Page Summary
-
Google Maps JavaScript API offers vector maps with sharper images, 3D buildings, and smoother transitions between zoom levels using fractional zoom.
-
Users can control the map's perspective with tilt and rotation using mouse or keyboard interactions, while developers can programmatically manipulate the camera for a dynamic user experience.
-
Zoom levels in Google Maps determine the level of detail visible, ranging from a world view to individual buildings, and can be fractional for smoother transitions.
-
Fractional zoom is enabled by default for vector maps and can be controlled using the
isFractionalZoomEnabledmap option, but it's important to optimizezoom_changedevent listeners for performance.
The Maps JavaScript API offers two different implementations of the map: raster and vector. The raster map loads the map as a grid of pixel-based raster image tiles, which are generated by Google Maps Platform server-side, then served to your web app. The vector map is a composed of vector-based tiles, which are drawn at load time on the client-side using WebGL, a web technology that allows the browser to access the GPU on the user's device to render 2D and 3D graphics.
The vector map is the same Google map your users are familiar with using, and offers a number of advantages over the default raster tile map, most notably the sharpness of vector-based images, and the addition of 3D buildings at close zoom levels. The vector map supports these features:
- Programmatic tilt and heading control
- Enhanced camera control
- Fractional zoom for smoother zooming
For maps loaded using a
divelement and JavaScript, the default rendering type isgoogle.maps.RenderingType.RASTER.For maps loaded using the
gmp-mapelement, the default rendering type isgoogle.maps.RenderingType.VECTOR, with tilt and heading control enabled.
Tilt and rotation
You can set tilt and rotation (heading) on the vector map
by including the heading and tilt properties when initializing the map, and
by calling the setTilt and setHeading methods on the map. The following
example adds some buttons to the map which show programmatically adjusting tilt
and heading in 20-degree increments.
TypeScript
function initMap(): void { const map = new google.maps.Map( document.getElementById("map") as HTMLElement, { center: { lat: 37.7893719, lng: -122.3942, }, zoom: 16, heading: 320, tilt: 47.5, mapId: "90f87356969d889c", } ); const buttons: [string, string, number, google.maps.ControlPosition][] = [ ["Rotate Left", "rotate", 20, google.maps.ControlPosition.LEFT_CENTER], ["Rotate Right", "rotate", -20, google.maps.ControlPosition.RIGHT_CENTER], ["Tilt Down", "tilt", 20, google.maps.ControlPosition.TOP_CENTER], ["Tilt Up", "tilt", -20, google.maps.ControlPosition.BOTTOM_CENTER], ]; buttons.forEach(([text, mode, amount, position]) => { const controlDiv = document.createElement("div"); const controlUI = document.createElement("button"); controlUI.classList.add("ui-button"); controlUI.innerText = `${text}`; controlUI.addEventListener("click", () => { adjustMap(mode, amount); }); controlDiv.appendChild(controlUI); map.controls[position].push(controlDiv); }); const adjustMap = function (mode: string, amount: number) { switch (mode) { case "tilt": map.setTilt(map.getTilt()! + amount); break; case "rotate": map.setHeading(map.getHeading()! + amount); break; default: break; } }; } declare global { interface Window { initMap: () => void; } } window.initMap = initMap;
JavaScript
function initMap() { const map = new google.maps.Map(document.getElementById("map"), { center: { lat: 37.7893719, lng: -122.3942, }, zoom: 16, heading: 320, tilt: 47.5, mapId: "90f87356969d889c", }); const buttons = [ ["Rotate Left", "rotate", 20, google.maps.ControlPosition.LEFT_CENTER], ["Rotate Right", "rotate", -20, google.maps.ControlPosition.RIGHT_CENTER], ["Tilt Down", "tilt", 20, google.maps.ControlPosition.TOP_CENTER], ["Tilt Up", "tilt", -20, google.maps.ControlPosition.BOTTOM_CENTER], ]; buttons.forEach(([text, mode, amount, position]) => { const controlDiv = document.createElement("div"); const controlUI = document.createElement("button"); controlUI.classList.add("ui-button"); controlUI.innerText = `${text}`; controlUI.addEventListener("click", () => { adjustMap(mode, amount); }); controlDiv.appendChild(controlUI); map.controls[position].push(controlDiv); }); const adjustMap = function (mode, amount) { switch (mode) { case "tilt": map.setTilt(map.getTilt() + amount); break; case "rotate": map.setHeading(map.getHeading() + amount); break; default: break; } }; } window.initMap = initMap;
CSS
/* * Always set the map height explicitly to define the size of the div element * that contains the map. */ #map { height: 100%; } /* * Optional: Makes the sample page fill the window. */ html, body { height: 100%; margin: 0; padding: 0; } .ui-button { background-color: #fff; border: 0; border-radius: 2px; box-shadow: 0 1px 4px -1px rgba(0, 0, 0, 0.3); margin: 10px; padding: 0 0.5em; font: 400 18px Roboto, Arial, sans-serif; overflow: hidden; height: 40px; cursor: pointer; } .ui-button:hover { background: rgb(235, 235, 235); }
HTML
<html>
<head>
<title>Tilt and Rotation</title>
<link rel="stylesheet" type="text/css" href="./style.css" />
<script type="module" src="./index.js"></script>
</head>
<body>
<div id="map"></div>
<!--
The `defer` attribute causes the script to execute after the full HTML
document has been parsed. For non-blocking uses, avoiding race conditions,
and consistent behavior across browsers, consider loading using Promises. See
https://developers.google.com/maps/documentation/javascript/load-maps-js-api
for more information.
-->
<script
src="https://maps.googleapis.com/maps/api/js?key=AIzaSyB41DRUbKWJHPxaFjMAwdrzWzbVKartNGg&callback=initMap&v=weekly"
defer
></script>
</body>
</html>Try Sample
Use mouse and keyboard gestures
If tilt and rotation (heading) user interactions have been enabled (either programmatically or in the Google Cloud Console), then users can adjust the tilt and rotation using the mouse and keyboard:
- Using the mouse, hold down the shift key, then drag the mouse up and down to adjust tilt, right and left to adjust heading.
- Using the keyboard, hold down the shift key, then use the up and down arrow keys to adjust tilt, and the right and left arrow keys to adjust heading.
Programmatically adjust tilt and heading
Use the setTilt() and setHeading() methods to programmatically adjust tilt
and heading on a vector map. Heading is the direction the camera is facing in
clockwise degrees starting north, so map.setHeading(90) will rotate the map
so that east is facing up. The tilt angle is measured from the zenith, so
map.setTilt(0) is looking straight down, while map.setTilt(45) will result
in an oblique view.
- Call
setTilt()to set the tilt angle of the map. UsegetTilt()to get the current tilt value. - Call
setHeading()to set the heading of the map. UsegetHeading()to get the current heading value.
To change the map center while preserving tilt and heading, use
map.setCenter() or map.panBy().
Note that the range of angles that can be used varies with the current zoom level. Values outside this range are clamped to the allowed range.
You can also use the moveCamera method to programmatically change heading,
tilt, center, and zoom.
Learn more.
Impact on other methods
When tilt or rotation is applied to the map, the behavior of other Maps JavaScript API methods is affected:
map.getBounds()always returns the smallest bounding box that includes the visible region; when tilt is applied, the returned bounds may represent a larger region than the visible region of the map's viewport.map.fitBounds()will reset tilt and heading to zero prior to fitting the bounds.map.panToBounds()will reset tilt and heading to zero prior to panning the bounds.map.setTilt()accepts any value, but restricts the maximum tilt based on the current map zoom level.map.setHeading()accepts any value, and will modify it to fit into the range[0, 360].
Control the camera
Use the map.moveCamera() function to update any combination of camera
properties at once. map.moveCamera() accepts a single parameter containing
all of the camera properties to update. The following example shows calling
map.moveCamera() to set center, zoom, heading, and tilt at once:
map.moveCamera({
  center: new google.maps.LatLng(37.7893719, -122.3942),
  zoom: 16,
  heading: 320,
  tilt: 47.5
});
You can animate camera properties by calling map.moveCamera() with an
animation loop, as shown here:
const degreesPerSecond = 3;

function animateCamera(time) {
  // Update the heading, leave everything else as-is.
  map.moveCamera({
    heading: (time / 1000) * degreesPerSecond
  });

  requestAnimationFrame(animateCamera);
}

// Start the animation.
requestAnimationFrame(animateCamera);
The camera position
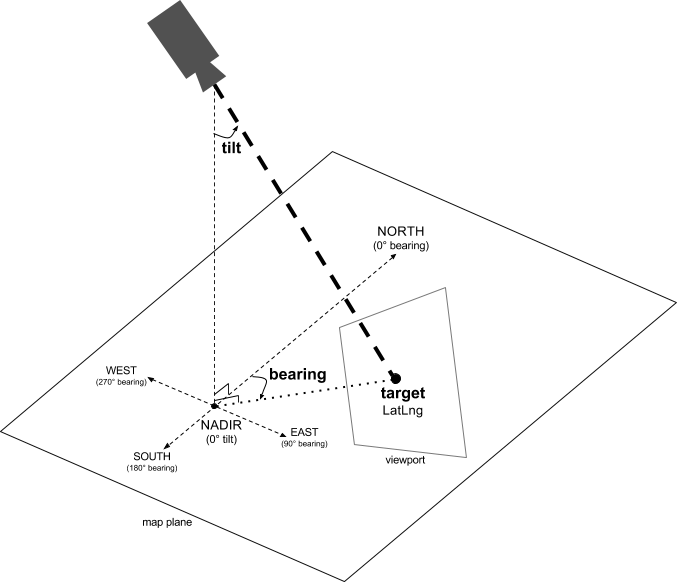
The map view is modeled as a camera looking down on a flat plane. The position of the camera (and hence the rendering of the map) is specified by the following properties: target (latitude/longitude location), bearing, tilt, and zoom.
Target (location)
The camera target is the location of the center of the map, specified as latitude and longitude coordinates.
The latitude can be between -85 and 85 degrees, inclusive. Values above or below this range will be clamped to the nearest value within this range. For example, specifying a latitude of 100 will set the value to 85. Longitude ranges between -180 and 180 degrees, inclusive. Values above or below this range will be wrapped such that they fall within the range (-180, 180). For example, 480, 840 and 1200 will all be wrapped to 120 degrees.Bearing (orientation)
The camera bearing specifies the compass direction, measured in degrees from true north, corresponding to the top edge of the map. If you draw a vertical line from the center of the map to the top edge of the map, the bearing corresponds to the heading of the camera (measured in degrees) relative to true north.
A bearing of 0 means that the top of the map points to true north. A bearing value 90 means the top of the map points due east (90 degrees on a compass). A value 180 means the top of the map points due south.
The Maps API lets you change a map's bearing. For example, someone driving a car often turns a road map to align it with their direction of travel, while hikers using a map and compass usually orient the map so that a vertical line is pointing north.
Tilt (viewing angle)
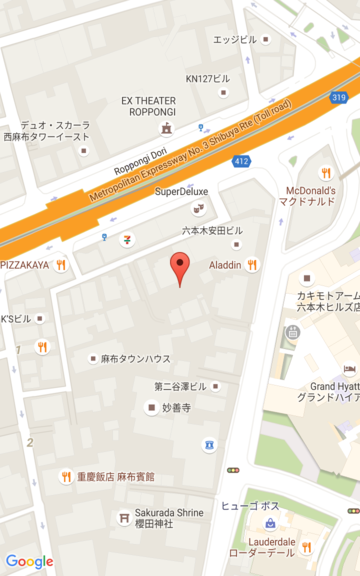
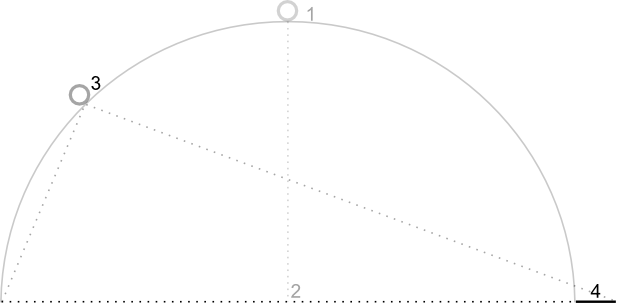
The tilt defines the camera's position on an arc directly over the map's center position, measured in degrees from the nadir (the direction pointing directly below the camera). A value of 0 corresponds to a camera pointed straight down. Values greater than 0 correspond to a camera that is pitched toward the horizon by the specified number of degrees. When you change the viewing angle, the map appears in perspective, with far-away features appearing smaller, and nearby features appearing larger. The following illustrations demonstrate this.
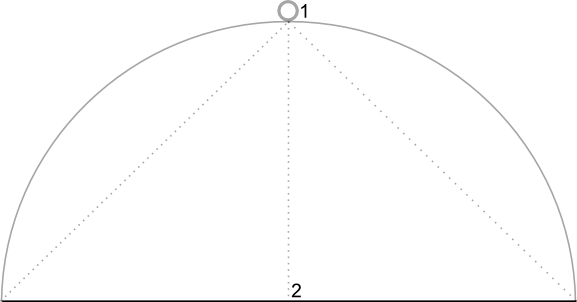
In the images below, the viewing angle is 0 degrees. The first image shows a schematic of this; position 1 is the camera position, and position 2 is the current map position. The resulting map is shown below it.
|
|
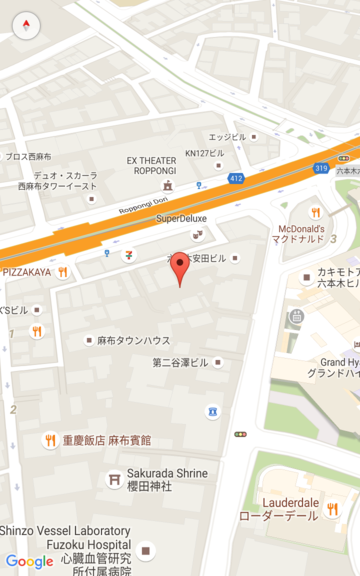
In the images below, the viewing angle is 45 degrees. Notice that the camera moves halfway along an arc between straight overhead (0 degrees) and the ground (90 degrees), to position 3. The camera is still pointing at the map's center point, but the area represented by the line at position 4 is now visible.
|
|
The map in this screenshot is still centered on the same point as in the original map, but more features have appeared at the top of the map. As you increase the angle beyond 45 degrees, features between the camera and the map position appear proportionally larger, while features beyond the map position appear proportionally smaller, yielding a three-dimensional effect.
Zoom
The zoom level of the camera determines the scale of the map. At larger zoom levels more detail can be seen on the screen, while at smaller zoom levels more of the world can be seen on the screen.
The zoom level need not be an integer. The range of zoom levels permitted by the map depends on a number of factors including target, map type and screen size. Any number out of the range will be converted to the next closest valid value, which can be either the minimum zoom level or the maximum zoom level. The following list shows the approximate level of detail you can expect to see at each zoom level:
- 1: World
- 5: Landmass/continent
- 10: City
- 15: Streets
- 20: Buildings

|

|

|
Fractional Zoom
Vector maps support fractional zoom, which lets you zoom using fractional
values instead of integers. While both raster and vector maps support fractional
zoom, fractional zoom is on by default for vector maps, and off by default for
raster maps. Use the isFractionalZoomEnabled map option to turn fractional
zoom on and off.
The following example shows enabling fractional zoom when initializing the map:
map = new google.maps.Map(document.getElementById('map'), {
  center: {lat: -34.397, lng: 150.644},
  zoom: 8,
  isFractionalZoomEnabled: true
});
You can also turn fractional zoom on and off by setting the
isFractionalZoomEnabled map option as shown here:
// Using map.set
map.set('isFractionalZoomEnabled', true);

// Using map.setOptions
map.setOptions({isFractionalZoomEnabled: true});
You can set a listener to detect whether fractional zoom is turned on; this is
most useful if you have not explicitly set isFractionalZoomEnabled to true
or false. The following example code checks to see whether fractional zoom
is enabled:
map.addListener('isfractionalzoomenabled_changed', () => {
  const isFractionalZoomEnabled = map.get('isFractionalZoomEnabled');
  if (isFractionalZoomEnabled === false) {
    console.log('not using fractional zoom');
  } else if (isFractionalZoomEnabled === true) {
    console.log('using fractional zoom');
  } else {
    console.log('map not done initializing yet');
  }
});
