
This document describes the conceptual relationship between custom styles and light and dark modes and defines the different map types and how to apply your styles to them.
To get started with custom styles, see Create a new style.
Understand light and dark modes
You can create two distinct styles for a single map ID: one optimized for light backgrounds and one for dark backgrounds. Maps for light backgrounds use a different base map than maps for dark backgrounds. Therefore, you cannot use one style for both modes.
The light and dark mode styles provide the best-suited styled map for different environments. When you use the map ID in your applications, your app can load the appropriate style based on programmed behavior or the user's device settings.
Choose light or dark mode when creating a style
You choose either light or dark mode when you create or copy a style. You can't change the mode of a style after creation.
You can check the style type in the style details page.
For step-by-step instructions on creating custom styles, see Create and use map styles.
Associate one light mode style and one dark mode style to a map ID
A map ID supports only one light mode style and one dark mode style. When you click the Edit icon to change a light mode style or dark mode style, the panel only displays your styles for that mode. To learn more, see Associate your style to a map ID.
Understand how custom styles apply to multiple map types
Google Maps Platform offers different map types to serve various use cases,
including roadmap, navigation, hybrid, terrain, 3D roadmap, and
3D hybrid. The level of customization depends on whether the map is based only
on vector data (such as roadmap, navigation, and 3D roadmap), uses a mix
of vector data and raster imagery (such as terrain and hybrid), or uses a
mix of raster imagery, 3D polygons, and vector imagery (such as 3D hybrid).
- Vector data maps
- The
roadmap,navigation, and3D roadmapmap types use only vector data, which lets you comprehensively style most map features, including polygons for land and water, roads, landmarks, and points of interest.
- Raster imagery maps
- The
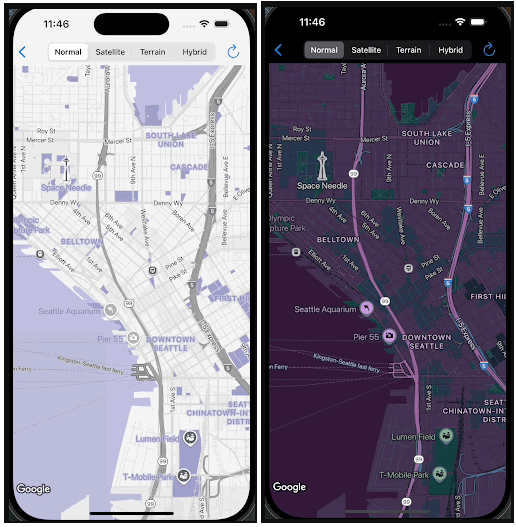
terrain,hybrid, and3D hybridmap types use raster imagery with vector data on top. As a result, their styling capabilities are limited. You can usually only style vector data that is overlaid on the imagery, such as labels, pins, and some polylines (such as roads, borders). You can't customize features that are part of the base imagery. - For example, the image below shows a style with a blue theme. Water is styled darker than the default, and a blue palette is applied to roads, outdoor areas, and POIs. When you preview the style on hybrid and 3D hybrid, the water and outdoor areas are not blue but roads and POIs are still styled.

Map type definitions and mode support
The following table defines the map types and shows which map types support light and dark modes.
| Map type | Description | Base map imagery | Mode support |
|---|---|---|---|
roadmap |
A standard map view that shows roads and major features. | Vector | Light and dark mode |
navigation |
A specialized map type optimized for turn-by-turn guidance using the Navigation SDK. For more information about navigation, see the customize map styles overview for the Navigation SDK for Android and the Navigation SDK for iOS. | Vector | Light and dark mode |
terrain |
A map that emphasizes physical terrain features like mountains, rivers, and elevation. | Vector and raster | Light and dark mode |
hybrid |
A combination of satellite imagery and roadmap data, displaying street names and other key features overlaid on the imagery. | Vector and raster | Light mode only |
3D roadmap |
A 3D standard map that shows roads and major features. This map type is only available in 3D Maps in Maps JavaScript API. | Vector | Light mode only |
3D hybrid |
A photorealistic 3D map where you can style the visibility of points of interest labels, roads, and road signs. This map type is only available in 3D Maps in Maps JavaScript API. | Vector and raster | Light mode only |
Style considerations for raster imagery maps
When styling terrain, 2D hybrid, 3D hybrid and 3D roadmap map types, you
might see the following behaviors:
When using custom styles on Android and iOS with the
terrainmap type, you might notice the water temporarily flashing. This expected behavior occurs when styling water because the roadmap tiles load after the terrain tiles. This delayed loading causes a brief visual conflict in custom colors.Polygon styles might occlude underlying map elements on
terrain,2D hybrid, and3D hybridmap types. For example, a stylized park polygon on a terrain map might hide subtle terrain features. On hybrid maps, it might hide the underlying satellite imagery.For
3D hybrid, road polylines might render underneath bridges or appear incorrectly around overpasses and underpasses.For
3D roadmapand3D hybridmap types, you can't modify the map settings for controlling the density of points of interest, the style of buildings, the style of landmarks, and the app background color.
Preview your styles on each map type
After you create your custom styles, test them on the different map types to see how they apply. This is especially important because not all styles apply across all map types.
In the Google Cloud console, you can preview your custom styles in the style editor or the map details page, as follows:
- Style editor: In the context panel, select the
Map typedrop-down list and change the map type. The map refreshes and displays the map type with your style applied. - Map details page: In the Map preview section, you can switch between light and dark mode styles and change the variant in the drop-down list to different map types. You must associate your style to the map ID first before you can preview it.
Apply your custom styles to multiple map types
In the map details page, after you associate your light and dark mode styles to your map ID, click Show more to choose whether to apply your custom styles to multiple map types. You can check once more how the style applies to the map types in the Map preview section.