
Для использования стилей, управляемых данными, для границ необходимо создать идентификатор карты, использующий векторную карту JavaScript. Затем необходимо создать новый стиль карты, выбрать слои пространственных объектов границ и связать стиль с вашим идентификатором карты.
Создать идентификатор карты
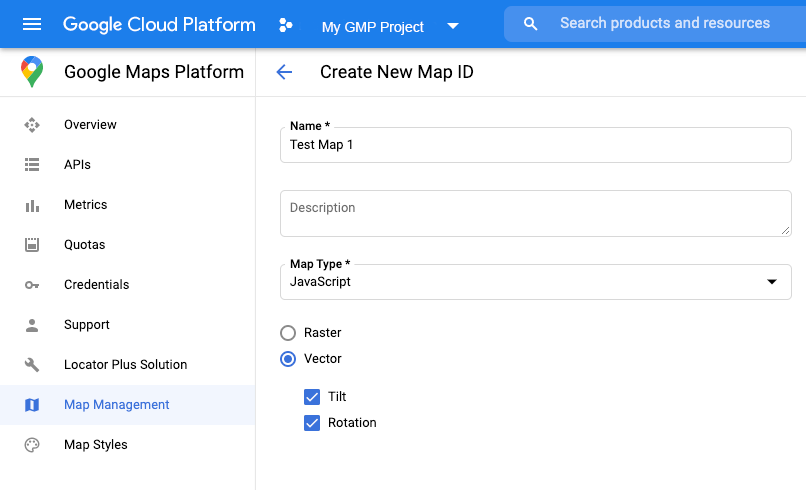
Чтобы создать новый идентификатор карты , выполните действия, описанные в разделе «Настройка облака» . Установите тип карты на JavaScript и выберите параметр «Вектор» . Установите флажки «Наклон» и «Вращение» , чтобы включить наклон и вращение карты. Если использование наклона или направления негативно влияет на ваше приложение, оставьте флажки «Наклон» и «Вращение» снятыми, чтобы пользователи не могли их регулировать.
Создать новый стиль карты
Чтобы создать новый стиль карты, следуйте инструкциям в разделе «Управление стилями карт» , чтобы создать стиль и связать его с идентификатором карты, которую вы только что создали .
Выберите слои объектов
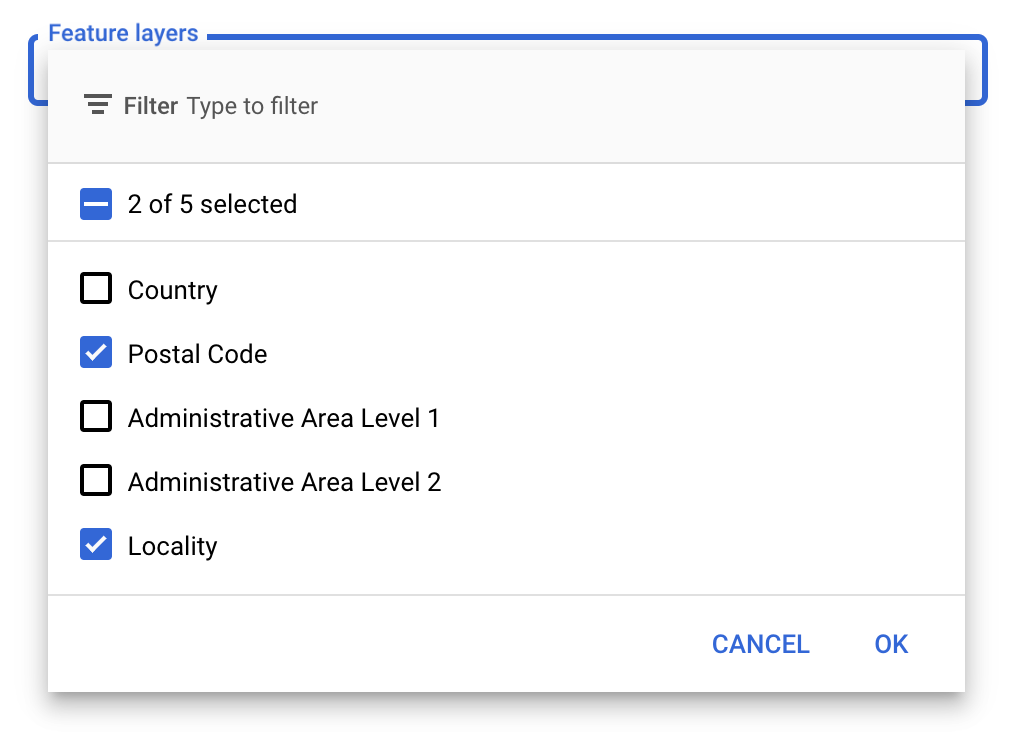
В консоли Google API можно выбрать, какие слои объектов отображать. Это определяет, какие типы границ будут отображаться на карте (например, населенные пункты, штаты и т. д.).
Для управления слоями объектов
- В консоли Google API перейдите на страницу «Стили карт» .
- При появлении запроса выберите проект.
- Выберите стиль карты.
- Чтобы добавить или удалить слои, щелкните раскрывающийся список « Слои объектов» .
- Нажмите «Сохранить» , чтобы сохранить изменения и сделать их доступными для ваших карт.
Обновите код инициализации карты.
Для этого потребуется идентификатор созданной вами карты. Его можно найти на странице управления картами .
- Загрузите JavaScript API для работы с картами, добавив встроенный загрузчик Bootstrap в код вашего приложения, как показано в следующем фрагменте кода:
<script>
  (g=>{var h,a,k,p="The Google Maps JavaScript API",c="google",l="importLibrary",q="__ib__",m=document,b=window;b=b[c]||(b[c]={});var d=b.maps||(b.maps={}),r=new Set,e=new URLSearchParams,u=()=>h||(h=new Promise(async(f,n)=>{await (a=m.createElement("script"));e.set("libraries",[...r]+"");for(k in g)e.set(k.replace(/[A-Z]/g,t=>"_"+t[0].toLowerCase()),g[k]);e.set("callback",c+".maps."+q);a.src=`https://maps.${c}apis.com/maps/api/js?`+e;d[q]=f;a.onerror=()=>h=n(Error(p+" could not load."));a.nonce=m.querySelector("script[nonce]")?.nonce||"";m.head.append(a)}));d[l]?console.warn(p+" only loads once. Ignoring:",g):d[l]=(f,...n)=>r.add(f)&&u().then(()=>d[l](f,...n))})({
    key: "YOUR_API_KEY",
    v: "weekly",
    // Use the 'v' parameter to indicate the version to use (weekly, beta, alpha, etc.).
    // Add other bootstrap parameters as needed, using camel case.
  });
</script>
При создании экземпляра карты используйте свойство
mapIdдля указания идентификатора карты. Это должен быть идентификатор карты, который вы настроили с помощью стиля карты с включенными слоями объектов.map = new google.maps.Map(document.getElementById('map'), { center: {lat: -34.397, lng: 150.644}, zoom: 8, mapId: 'MAP_ID' // A map ID using a style with one or more feature layers enabled. });
Узнайте больше о загрузке JavaScript API карт .
Добавление слоев объектов на карту
Чтобы получить ссылку на слой объектов на вашей карте, вызовите метод map.getFeatureLayer() при инициализации карты:
function initMap() {
  map = new google.maps.Map(document.getElementById("map"), {
    center: { lat: 20.773, lng: -156.01 },
    zoom: 12,
    mapId: 'MAP_ID',
  });

  // Add a feature layer for localities.
  localityLayer = map.getFeatureLayer('LOCALITY');
  ...
}
Проверьте возможности карты
Для создания стилизации границ на основе данных необходимы возможности, включенные в консоли Google API и связанные с идентификатором карты. Поскольку идентификаторы карт являются временными и могут изменяться, перед вызовом функции можно использовать метод map.getMapCapabilities() , чтобы проверить, доступна ли определенная возможность (например, стилизация на основе данных). Эта проверка необязательна.
В следующем примере показано добавление слушателя для подписки на изменения возможностей карты:
// subscribe to changes
map.addListener('mapcapabilities_changed', () => {
  const mapCapabilities = map.getMapCapabilities();

  if (!mapCapabilities.isDataDrivenStylingAvailable) {
    // Data-driven styling is *not* available, add a fallback.
    // Existing feature layers are also unavailable.
  }
});
Следующие шаги
- Стиль граничного многоугольника
- Создайте хорплетную карту
- Обработка событий мыши
- Получите идентификатор места для региона.
- Используйте API геокодирования и мест с возможностью стилизации границ на основе данных.