Un style de carte est un ensemble de personnalisations visuelles d'éléments cartographiques que vous associez à un ID de carte. Vous référencez ensuite l'ID de carte dans le code de votre application pour afficher la carte personnalisée.
Vous pouvez créer un style de carte avant d'avoir un ID de carte. Toutefois, pour utiliser ce style, vous devez l'associer à un ID de carte. Pour utiliser un style de carte, vous devez suivre l'ensemble des étapes ci-dessous :
Dans la console Google Cloud, accédez à Styles de carte et sélectionnez un projet si nécessaire.
Dans Styles de carte, cliquez sur Créer un style.
Dans la boîte de dialogue, sous l'onglet Styles Google, sélectionnez l'une des options suivantes :
Clair pour créer un style de carte clair, où le type de carte est "roadmap" (plan de route).
scienceSombre pour créer un style de carte sombre, où le type de carte est "Feuille de route sombre".
(Facultatif) Pour appliquer la variante monochrome à votre style de carte, sélectionnez Monochrome.
Sélectionnez Personnaliser pour créer un style sans titre.
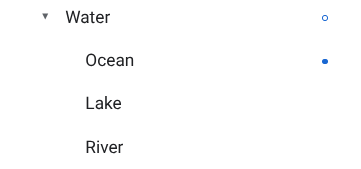
Sélectionnez des éléments cartographiques et modifiez leur style pour créer le style de carte souhaité.
Les éléments cartographiques dont le style est personnalisé sont indiqués par un point bleu. Si vous personnalisez un style enfant, un cercle bleu s'affiche sur le style parent. Pour en savoir plus sur la hiérarchie des styles de carte, consultez Comprendre l'héritage et la hiérarchie des styles de carte.
Cliquez sur Enregistrer.
Dans la boîte de dialogue Enregistrer et publier le style de carte, saisissez le nom de votre style et une description (facultative), puis cliquez sur Enregistrer.
Le style est publié automatiquement et la page principale de votre nouveau style s'affiche.
Dupliquer un style
Accédez à Styles de carte et sélectionnez un projet si nécessaire.
Sélectionnez l'un de vos styles existants.
Sur la page du style, cliquez sur Dupliquer.
Dans la boîte de dialogue Dupliquer le style de carte, saisissez un nouveau nom de carte et une description (facultative).
Cliquez sur Enregistrer.
Le style est publié automatiquement et la page principale de votre nouveau style s'affiche. Associez-le à un ID de carte pour l'utiliser avec vos cartes. Pour en savoir plus, consultez Associer un ID de carte à un style de carte.
Pour modifier le style, cliquez sur Personnaliser, apportez les modifications souhaitées, puis cliquez sur Enregistrer.
Publier un style
Lorsque vous créez un style de carte, la première instance du nouveau style de carte est publiée automatiquement. Vous pouvez ensuite enregistrer les modifications en tant que brouillon, puis publier le style une fois que vous êtes satisfait des modifications.
Modifiez le style de carte ou le style de carte dupliqué. Pour en savoir plus, consultez Modifier un style.
Cliquez sur Enregistrer pour enregistrer les modifications en tant que brouillon.
Lorsque vous êtes prêt à publier le style et à appliquer vos modifications à tous les ID de carte qui utilisent ce style de carte, cliquez sur Publier.
Styles de carte publiés et brouillons
Publié : un style de carte s'applique lorsqu'il est publié. Toutes les cartes qui utilisent le style de carte affichent sa version publiée.
Brouillon : les versions brouillon d'un style de carte sont des ébauches et ne s'affichent pas dans les cartes tant que vous ne les avez pas publiées.
Modifier un style
Si vous voulez modifier votre style de carte, vous pouvez le faire directement dans l'éditeur de style. Lorsque vous mettez à jour un style, deux possibilités s'offrent à vous :
Si vous voulez appliquer vos modifications dès que vous êtes prêt : cliquez sur Personnaliser et apportez les modifications souhaitées. Cliquez sur Enregistrer pour enregistrer vos modifications en tant que brouillon, puis sur Publier lorsque vous êtes prêt.
Si vous souhaitez d'abord tester vos modifications dans un environnement de test : au lieu d'apporter les modifications directement dans le style de carte, commencez par dupliquer le style. Pour en savoir plus, consultez Dupliquer un style et Tester les mises à jour du style de carte.
Une fois que vous avez créé un style de carte, vous pouvez le modifier sur sa page principale de l'une des façons suivantes :
Lorsque vous associez un style de carte clair pour lequel le style basé sur les données ou les ensembles de données sont activés à un ID de carte, les calques activés sont également disponibles pour le style de carte sombre science.
Pour utiliser le style basé sur les données ou les ensembles de données avec un style de carte sombre science, vous devez effectuer les opérations suivantes dans la console Google Cloud :
Accédez à Styles de carte, puis sélectionnez un style de carte clair ou créez-en un.
Sur la page principale du style, activez les calques de votre choix sur un style de carte clair.
Associez votre style à un ID de carte pour l'afficher sur votre site Web et dans votre application. Un ID de carte ne peut être associé qu'à un seul style clair (type "roadmap") et à un seul style sombre science (type "roadmap_dark").
Pour modifier le style associé à un ID de carte, procédez comme suit dans la console Google Cloud :
Accédez à Gestion des cartes, puis sélectionnez un ID de carte.
Dans la section "Styles de carte", cliquez sur Modifier le style pour un style de carte clair ou sombre.
Le panneau n'affiche que les styles avec un type de carte "Roadmap" pour les styles clairs, et uniquement les styles avec un type de carte sombre science pour les styles sombres.
Dans le panneau, sélectionnez l'un des styles à associer à cet ID de carte.
Cliquez sur OK.
Cliquez sur Enregistrer pour appliquer toutes les modifications.
L'aperçu de la carte se parcourt comme n'importe quelle carte Google :
Saisissez une adresse ou un lieu dans la zone Rechercher une adresse.
Cliquez sur la boussole pour centrer la carte sur votre position. Vous devrez peut-être aussi autoriser la carte à accéder à votre position.
Faites glisser la carte pour la déplacer.
Effectuez un zoom avant/arrière à l'aide des symboles plus (+) et moins (-).
Rechercher des éléments cartographiques
Pour rechercher un élément cartographique auquel vous souhaitez appliquer un style, vous pouvez utiliser le filtre ou l'inspecteur de carte.
Vous pouvez également développer et réduire les catégories d'éléments cartographiques pour trouver l'élément qui vous intéresse. Consultez la liste des éléments cartographiques sur la page Éléments auxquels vous pouvez appliquer un style sur la carte.
Filtrer les éléments cartographiques
Pour rechercher des éléments cartographiques à l'aide du filtre, sous Éléments cartographiques, saisissez un terme dans la zone Filtre.
Si vous ne parvenez pas à trouver un élément cartographique :
N'utilisez pas de pluriel (toutes les catégories sont au singulier).
Essayez d'utiliser un terme plus générique pour rechercher l'élément. Par exemple, recherchez "restaurant" plutôt que "pizzeria" ou "fast-food".
Essayez d'utiliser une catégorie plus large, puis d'explorer cette catégorie afin de trouver l'élément cartographique le plus proche. Par exemple, recherchez "divertissement" plutôt que "théâtre".
Inspecter les éléments cartographiques
Pour trouver des éléments cartographiques à l'aide de l'inspecteur de carte, procédez comme suit :
Cliquez n'importe où sur la carte avec le bouton gauche de la souris pour ouvrir l'inspecteur de carte au point où vous avez cliqué.
Sélectionnez un élément cartographique dans l'inspecteur de carte pour l'ouvrir dans le volet Éléments cartographiques.
Sauf indication contraire, le contenu de cette page est régi par une licence Creative Commons Attribution 4.0, et les échantillons de code sont régis par une licence Apache 2.0. Pour en savoir plus, consultez les Règles du site Google Developers. Java est une marque déposée d'Oracle et/ou de ses sociétés affiliées.
Dernière mise à jour le 2025/09/05 (UTC).
[[["Facile à comprendre","easyToUnderstand","thumb-up"],["J'ai pu résoudre mon problème","solvedMyProblem","thumb-up"],["Autre","otherUp","thumb-up"]],[["Il n'y a pas l'information dont j'ai besoin","missingTheInformationINeed","thumb-down"],["Trop compliqué/Trop d'étapes","tooComplicatedTooManySteps","thumb-down"],["Obsolète","outOfDate","thumb-down"],["Problème de traduction","translationIssue","thumb-down"],["Mauvais exemple/Erreur de code","samplesCodeIssue","thumb-down"],["Autre","otherDown","thumb-down"]],["Dernière mise à jour le 2025/09/05 (UTC)."],[[["\u003cp\u003eA map style is a customizable set of visual elements applied to a map using a map ID, which is referenced in your application code.\u003c/p\u003e\n"],["\u003cp\u003eYou can create a map style by starting fresh, duplicating an existing style/version, or importing JSON styling code.\u003c/p\u003e\n"],["\u003cp\u003eMap styles exist as either draft or published versions, with published versions actively displayed on maps using the associated map ID.\u003c/p\u003e\n"],["\u003cp\u003eOnce a map style is created, you can further customize its appearance, manage version history, associate it with map IDs, and perform other actions like renaming, duplicating, or deleting it.\u003c/p\u003e\n"],["\u003cp\u003eStyles can be associated with multiple map IDs for use across various Google Maps applications, but each map ID can only be linked to one style at a time.\u003c/p\u003e\n"]]],["Map styles are customized sets for map IDs, with published styles being live and draft styles being in progress. Creating a new style can be done by starting from scratch, duplicating an existing style or version, or importing JSON. Styles can be managed by editing, renaming, duplicating, or deleting. Version history allows for restoring previous styles. Map IDs must be associated with a style to display it in apps, with one map ID linked to one style. Association and removal of map IDs can be managed.\n"],null,["Select platform: [Android](/maps/documentation/android-sdk/cloud-customization/map-styles \"View this page for the Android platform docs.\") [iOS](/maps/documentation/ios-sdk/cloud-customization/map-styles \"View this page for the iOS platform docs.\") [JavaScript](/maps/documentation/javascript/cloud-customization/map-styles \"View this page for the JavaScript platform docs.\") [Web Service](/maps/documentation/maps-static/cloud-customization/map-styles \"View this page for the Web Service platform docs.\")\n\n\u003cbr /\u003e\n\nA map style is a set of visual customizations to map features\nthat you associate with a map ID. You then reference the\nmap ID in your application code to display the customized map.\n\nYou can create a map style before you have a map ID; however, to use\nthe style, you must associate the style with a map ID. To use a map style,\nyou must take all of these steps:\n\n1. **Create and publish a map Style** . For details, see\n [Create a style](#create-style) and [Publish a style](#publish-style).\n\n2. **Create a map ID** . For details, see\n [Create a map ID](../map-ids/get-map-id).\n\n3. **Associate the map style with a map ID** . For details, see\n [Associate a map ID to a map style](#associate-style-with-map-id).\n\n4. **Add the map ID to your app** to display your style. For details, see\n [Add the map ID to your map](../map-ids/get-map-id#add-a-map-id-to-your-app).\n\n| **Tip**: Once the map ID is in your application code, you can change the map style without any changes in your application code, and your end users don't have to upgrade to see updated map styles. Instead, you edit the map style associated with the map ID, and changes show up in your application maps.\n\nThis document describes how to create, edit, and publish map styles and how to\nassociate them to a map ID.\n\nCreate a map style\n\nCreate a map style using one of these methods:\n\n- [Create](#create-new-style) a new style using the default Google map style.\n\n- [Duplicate](#duplicate-style) and modify an existing standard or customized style.\n\n- [Import a JSON map style](/maps/documentation/javascript/cloud-customization/json#json-import) to use as a customized style.\n\nCreate a new style [Experimental](/maps/launch-stages#experimental) feature.\n\n1. In the Google Cloud console,\n go to [**Map Styles**](https://console.cloud.google.com/google/maps-apis/studio/styles), and select a project, if needed.\n\n2. In **Map styles** , click **Create style**.\n\n3. In the dialog, under the **Google styles** tab, select one of the following:\n\n - **Light** to create a light map style, where the map type is roadmap.\n - science **Dark** to create a dark map style, where the map type is roadmap dark.\n4. (Optional) To apply the monochrome variation to your map style, select **Monochrome**.\n\n5. Select **Customize** to create a new untitled style.\n\n6. Select map features and change their style to create the map style you want.\n\n Map features with custom styles have a solid blue dot next to them. If you\n customize a child style, the parent style displays a blue circle. For more\n information on map style hierarchy, see\n [Understand map style inheritance and hierarchy](/maps/documentation/javascript/cloud-customization/map-hier).\n | **Note:** Not all styles appear at all zoom levels. For more information, see [Style zoom levels](/maps/documentation/javascript/cloud-customization/zoom-levels).\n7. Click **Save**.\n\n8. In the **Save and publish map style** box, enter a name for your style and\n optionally a description, and click **Save**.\n\nThe style is automatically published, and you see your new style's\nmain page.\n| **Caution:** Making style changes but not explicitly saving them creates **Unsaved Changes** in your map style's version history. These versions are lost when you close the browser tab or when your Cloud console session ends.\n\nDuplicate a style\n\n1. Go to [**Map Styles**](https://console.cloud.google.com/google/maps-apis/studio/styles), and select a project, if needed.\n\n2. Select one of your existing styles.\n\n3. On the style page, click **Duplicate**.\n\n4. In the **Duplicate Map Style** box, enter a new map name and optionally\n a description.\n\n5. Click **Save**.\n\n The style is automatically published, and you can see your new style's\n main page. Associate it with a map ID to use it for your maps. For details,\n see [Associate a map ID to a map style](#associate-style-with-map-id).\n6. If you want to modify the style, click **Customize** , make changes,\n and click **Save**.\n\nPublish a style\n\nWhen you first create a new map style, that first instance of\nthe new map style is automatically published. After that, you save changes\nas a draft and when you're happy with the changes, you must publish.\n\n1. Make the changes to the map style or duplicated map style. For details, see\n [Change a style](#update-style).\n\n2. Click **Save** to save changes as a draft.\n\n3. When you're ready to publish and have your changes go live for any map IDs\n using that map style, click **Publish**.\n\nPublished versus Draft map styles\n\n**Published**: A published map style is live. Any maps that use the map style\ndisplay the published version of it.\n| **Note:** Style changes can take a few hours to propagate to your apps websites, and apps can take longer if the devices aren't connected to the internet. If you're still not seeing your style changes after a few hours, see [My style changes aren't updating](/maps/documentation/javascript/cloud-customization/troubleshoot#style-delay).\n\n**Draft**: Draft versions of a map style are works in progress\nand aren't displayed in maps until you publish them.\n\nChange a style\n\nIf you want to make changes to your map style, you can make the changes right\nin the style editor. You have a couple of choices when you update a style:\n\n- **If you want changes to go live as soon as you're ready** : Click\n **Customize** and make your changes. Click **Save** to save your\n changes as a draft, and then click **Publish** when you are ready.\n\n- **If you want to test your changes in a test environment first** : Instead of\n making changes directly in the map style, duplicate the style first. For\n details, see [Duplicate a style](#duplicate-style) and\n [Test map style updates](/maps/documentation/javascript/cloud-customization/test-style-updates).\n\nOnce you've created a map style, you can make changes to it on the style's\nmain page in any of the following ways:\n\n- **Edit** : Click **Customize**.\n\n- **Duplicate** : For details, see\n [Duplicate a style](/maps/documentation/javascript/cloud-customization/map-styles#duplicate-style).\n\n- **Rename**: Rename the map style.\n\n- **Delete**: Delete the map style.\n\nUse data-driven styling and datasets [Experimental](/maps/launch-stages#experimental) feature.\n\nIn the style's main page, you can enable and view layers for\n[data-driven styling for boundaries](../dds-boundaries/overview) and\n[data-driven styling for datasets](../dds-datasets/overview) on light map styles.\n\nWhen you link a light map style that has data-driven styling or datasets enabled\nto a [map ID](../map-ids/mapid-over), the enabled layers are also available for\nthe science dark map style.\n\nTo use data-driven styling or datasets with a science dark map style,\nyou must do the following in the Google Cloud console:\n\n1. Go to **Map Styles** and either select a light map style or\n [create one](#create-style).\n\n2. In the style main page, enable the your choice of layers on a light map\n style.\n\n3. [Associate the light map style to the same map\n ID](#associate-style-with-map-id) as the dark map style.\n\nAssociate your style to a map ID [Experimental](/maps/launch-stages#experimental) feature.\n\nAssociate your style to a map ID to display your custom style on your website\nand in your app. A map ID can have only one light style (roadmap type) and one\nscience dark style (roadmap dark type) associated with it.\n\nTo change the associated style for a map ID, do the following in the\nGoogle Cloud console:\n\n1. Go to **Map Management** and select a map ID.\n\n2. In the Map styles section, click **Change style** for a light or dark map style.\n\n The panel displays only styles with a roadmap map type for light styles, and\n only styles with a science roadmap dark map type for dark styles.\n3. In the panel, select one of the styles to associate to this map ID.\n\n4. Click **Done**.\n\n5. Click **Save** to apply all changes.\n\nTo use your cloud-based map style,\n[add the map ID to your app](../map-ids/get-map-id#add-a-map-id-to-your-app).\n\nNavigate on the preview map\n\nYou navigate on the preview map in the same way you navigate on any Google map:\n\n- Enter an address or location in the **Search Address** box.\n\n- Click the compass to center on your location. You may also have to grant\n location permissions.\n\n- Drag to move the map.\n\n- Zoom in or out using the plus (+) and minus (-).\n\nFind map features\n\nTo find a map feature that you want to style, you can use the filter or the map\ninspector.\n\nYou can also expand and collapse map feature categories to find the map\nfeature you want. Browse the list of map features at [What you can style on a map](/maps/documentation/javascript/cloud-customization/taxonomy).\n\nFilter map features\n\nTo find map features using the filter, under **Map Features** , enter a\nterm in the **Filter** box.\n\nIf you can't find a map feature:\n\n- Don't use plurals. All of the categories are singular.\n\n- Try using a more generic term for the feature. For example, instead of\n \"pizza parlor\" or \"fast food,\" search for \"restaurant.\"\n\n- Try using a broader category, and then explore that category for the closest\n map feature. For example, instead of \"theater,\" search for \"entertainment.\"\n\nInspect map features\n\nTo find map features using the map inspector, perform the following steps:\n\n1. Left-click anywhere on the map to open the map inspector at your click point.\n\n2. Select a map feature in the map inspector to open it in the **Map Features** pane."]]