
קוד מקור מלא לדוגמה
בדוגמה הזו מוצגות דרכים להתאמה אישית של סמנים: הוספת טקסט של כותרת, שינוי קנה המידה של הסמן, שינוי צבע הרקע, שינוי צבע הגבול, שינוי צבע הגליף והסתרת הגליף.
TypeScript
const mapElement = document.querySelector('gmp-map')!; async function init() { // Request needed libraries. const [{ AdvancedMarkerElement, PinElement }] = await Promise.all([ google.maps.importLibrary('marker'), google.maps.importLibrary('maps'), ]); // Each PinElement is paired with a marker to demonstrate setting each parameter. // Default marker with title text (no PinElement). const markerWithText = new AdvancedMarkerElement({ position: { lat: 37.419, lng: -122.03 }, title: 'Title text for the marker at lat: 37.419, lng: -122.03', }); mapElement.append(markerWithText); // Adjust the scale. const pinScaled = new PinElement({ scale: 1.5, }); const markerScaled = new AdvancedMarkerElement({ position: { lat: 37.419, lng: -122.02 }, }); markerScaled.append(pinScaled); mapElement.append(markerScaled); // Change the background color. const pinBackground = new PinElement({ background: '#FBBC04', }); const markerBackground = new AdvancedMarkerElement({ position: { lat: 37.419, lng: -122.01 }, }); markerBackground.append(pinBackground); mapElement.append(markerBackground); // Change the border color. const pinBorder = new PinElement({ borderColor: '#137333', }); const markerBorder = new AdvancedMarkerElement({ position: { lat: 37.415, lng: -122.035 }, }); markerBorder.append(pinBorder); mapElement.append(markerBorder); // Change the glyph color. const pinGlyph = new PinElement({ glyphColor: 'white', }); const markerGlyph = new AdvancedMarkerElement({ position: { lat: 37.415, lng: -122.025 }, }); markerGlyph.append(pinGlyph); mapElement.append(markerGlyph); const pinTextGlyph = new PinElement({ glyphText: 'T', glyphColor: 'white', }); const markerGlyphText = new AdvancedMarkerElement({ position: { lat: 37.415, lng: -122.015 }, }); markerGlyphText.append(pinTextGlyph); mapElement.append(markerGlyphText); // Hide the glyph. const pinNoGlyph = new PinElement({ glyphText: '', }); const markerNoGlyph = new AdvancedMarkerElement({ position: { lat: 37.415, lng: -122.005 }, }); markerNoGlyph.append(pinNoGlyph); mapElement.append(markerNoGlyph); } void init();
JavaScript
const mapElement = document.querySelector('gmp-map'); async function init() { // Request needed libraries. const [{ AdvancedMarkerElement, PinElement }] = await Promise.all([ google.maps.importLibrary('marker'), google.maps.importLibrary('maps'), ]); // Each PinElement is paired with a marker to demonstrate setting each parameter. // Default marker with title text (no PinElement). const markerWithText = new AdvancedMarkerElement({ position: { lat: 37.419, lng: -122.03 }, title: 'Title text for the marker at lat: 37.419, lng: -122.03', }); mapElement.append(markerWithText); // Adjust the scale. const pinScaled = new PinElement({ scale: 1.5, }); const markerScaled = new AdvancedMarkerElement({ position: { lat: 37.419, lng: -122.02 }, }); markerScaled.append(pinScaled); mapElement.append(markerScaled); // Change the background color. const pinBackground = new PinElement({ background: '#FBBC04', }); const markerBackground = new AdvancedMarkerElement({ position: { lat: 37.419, lng: -122.01 }, }); markerBackground.append(pinBackground); mapElement.append(markerBackground); // Change the border color. const pinBorder = new PinElement({ borderColor: '#137333', }); const markerBorder = new AdvancedMarkerElement({ position: { lat: 37.415, lng: -122.035 }, }); markerBorder.append(pinBorder); mapElement.append(markerBorder); // Change the glyph color. const pinGlyph = new PinElement({ glyphColor: 'white', }); const markerGlyph = new AdvancedMarkerElement({ position: { lat: 37.415, lng: -122.025 }, }); markerGlyph.append(pinGlyph); mapElement.append(markerGlyph); const pinTextGlyph = new PinElement({ glyphText: 'T', glyphColor: 'white', }); const markerGlyphText = new AdvancedMarkerElement({ position: { lat: 37.415, lng: -122.015 }, }); markerGlyphText.append(pinTextGlyph); mapElement.append(markerGlyphText); // Hide the glyph. const pinNoGlyph = new PinElement({ glyphText: '', }); const markerNoGlyph = new AdvancedMarkerElement({ position: { lat: 37.415, lng: -122.005 }, }); markerNoGlyph.append(pinNoGlyph); mapElement.append(markerNoGlyph); } void init();
CSS
/* * Always set the map height explicitly to define the size of the div element * that contains the map. */ gmp-map { height: 100%; } /* * Optional: Makes the sample page fill the window. */ html, body { height: 100%; margin: 0; padding: 0; }
HTML
<html>
<head>
<title>Advanced Marker Basic Customization</title>
<link rel="stylesheet" type="text/css" href="./style.css" />
<script type="module" src="./index.js"></script>
<script>
// prettier-ignore
(g=>{var h,a,k,p="The Google Maps JavaScript API",c="google",l="importLibrary",q="__ib__",m=document,b=window;b=b[c]||(b[c]={});var d=b.maps||(b.maps={}),r=new Set,e=new URLSearchParams,u=()=>h||(h=new Promise(async(f,n)=>{await (a=m.createElement("script"));e.set("libraries",[...r]+"");for(k in g)e.set(k.replace(/[A-Z]/g,t=>"_"+t[0].toLowerCase()),g[k]);e.set("callback",c+".maps."+q);a.src=`https://maps.${c}apis.com/maps/api/js?`+e;d[q]=f;a.onerror=()=>h=n(Error(p+" could not load."));a.nonce=m.querySelector("script[nonce]")?.nonce||"";m.head.append(a)}));d[l]?console.warn(p+" only loads once. Ignoring:",g):d[l]=(f,...n)=>r.add(f)&&u().then(()=>d[l](f,...n))})({
key: "AIzaSyA6myHzS10YXdcazAFalmXvDkrYCp5cLc8"
});
</script>
</head>
<body>
<gmp-map
center="37.419,-122.02"
zoom="14"
map-id="4504f8b37365c3d0"></gmp-map>
</body>
</html>דוגמה לניסיון
בדף הזה מוסבר איך להתאים אישית את הסמנים בדרכים הבאות:
- הוספת טקסט לכותרת
- שינוי הגודל של הסמן
- שינוי צבע הרקע
- שינוי של צבע הגבולות
- שינוי צבע הגליף
- שימוש בטקסט בגליף
- הסתרת הגליף
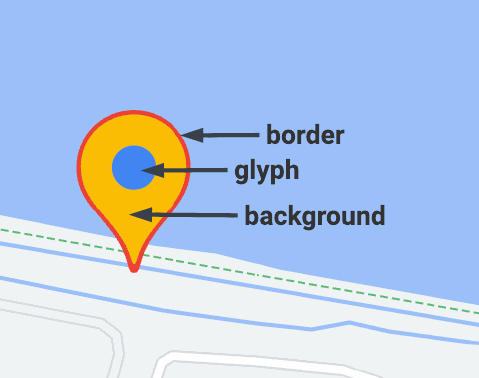
בסמנים מתקדמים נעשה שימוש בשתי מחלקות להגדרת סמנים: המחלקה AdvancedMarkerElement מספקת את הפרמטרים הבסיסיים (position, title ו-map), והמחלקה PinElement מכילה אפשרויות להתאמה אישית נוספת.
כדי להוסיף סמנים למפה, קודם צריך לטעון את הספרייה marker שמספקת את המחלקות AdvancedMarkerElement ו-PinElement.
בקטע הקוד הבא מוצג קוד ליצירת PinElement חדש, ואז להחלת אותו על סמן.
// Create a pin element.
const myPin = new PinElement({
    scale: 1.5,
});
// Create a marker.
const myMarker = new AdvancedMarkerElement({
    position: { lat: 37.4239163, lng: -122.0947209 },
});
// Append the pin to the marker.
myMarker.append(myPin);
// Append the marker to the map.
mapElement.append(myMarker);
במפות שנוצרו באמצעות רכיבי HTML מותאמים אישית, הפרמטרים הבסיסיים של סמן מוצהרים באמצעות רכיב ה-HTML gmp-advanced-marker. כל התאמה אישית שנעשית באמצעות המחלקה PinElement חייבת להתבצע באופן פרוגרמטי. כדי לעשות זאת, הקוד צריך לאחזר את רכיבי gmp-advanced-marker
מדף ה-HTML. בקטע הקוד הבא מוצגת שאילתה לאוסף של רכיבי gmp-advanced-marker, ואז איטרציה על התוצאות כדי להחיל התאמה אישית שהוגדרה ב-PinElement.
// Return an array of markers.
const advancedMarkers = [...document.querySelectorAll('gmp-advanced-marker')];

// Loop through the markers
for (let i = 0; i < advancedMarkers.length; i++) {
  const pin = new PinElement({
      scale: 2.0,
  });

  marker.append(pin);
}
הוספת טקסט לכותרת
טקסט הכותרת מופיע כשמעבירים את סמן העכבר מעל סמן. קוראי מסך יכולים לקרוא את הטקסט של הכותרת.
כדי להוסיף טקסט של כותרת באופן פרוגרמטי, משתמשים באפשרות AdvancedMarkerElement.title:
// Default marker with title text (no PinElement). const markerWithText = new AdvancedMarkerElement({ position: { lat: 37.419, lng: -122.03 }, title: 'Title text for the marker at lat: 37.419, lng: -122.03', }); mapElement.append(markerWithText);
כדי להוסיף טקסט של כותרת לסמן שנוצר באמצעות רכיבי HTML מותאמים אישית, משתמשים במאפיין title:
<gmp-map
center="43.4142989,-124.2301242"
zoom="4"
map-id="DEMO_MAP_ID"
style="height: 400px"
>
<gmp-advanced-marker
position="37.4220656,-122.0840897"
title="Mountain View, CA"
></gmp-advanced-marker>
<gmp-advanced-marker
position="47.648994,-122.3503845"
title="Seattle, WA"
></gmp-advanced-marker>
</gmp-map>שינוי גודל הסמן
כדי לשנות את גודל הסמן, משתמשים באפשרות scale.
TypeScript
// Adjust the scale. const pinScaled = new PinElement({ scale: 1.5, }); const markerScaled = new AdvancedMarkerElement({ position: { lat: 37.419, lng: -122.02 }, }); markerScaled.append(pinScaled); mapElement.append(markerScaled);
JavaScript
// Adjust the scale. const pinScaled = new PinElement({ scale: 1.5, }); const markerScaled = new AdvancedMarkerElement({ position: { lat: 37.419, lng: -122.02 }, }); markerScaled.append(pinScaled); mapElement.append(markerScaled);
שינוי צבע הרקע
כדי לשנות את צבע הרקע של סמן, משתמשים באפשרות PinElement.background:
TypeScript
// Change the background color. const pinBackground = new PinElement({ background: '#FBBC04', }); const markerBackground = new AdvancedMarkerElement({ position: { lat: 37.419, lng: -122.01 }, }); markerBackground.append(pinBackground); mapElement.append(markerBackground);
JavaScript
// Change the background color. const pinBackground = new PinElement({ background: '#FBBC04', }); const markerBackground = new AdvancedMarkerElement({ position: { lat: 37.419, lng: -122.01 }, }); markerBackground.append(pinBackground); mapElement.append(markerBackground);
שינוי צבע הגבול
כדי לשנות את צבע הגבול של סמן, משתמשים באפשרות PinElement.borderColor:
TypeScript
// Change the border color. const pinBorder = new PinElement({ borderColor: '#137333', }); const markerBorder = new AdvancedMarkerElement({ position: { lat: 37.415, lng: -122.035 }, }); markerBorder.append(pinBorder); mapElement.append(markerBorder);
JavaScript
// Change the border color. const pinBorder = new PinElement({ borderColor: '#137333', }); const markerBorder = new AdvancedMarkerElement({ position: { lat: 37.415, lng: -122.035 }, }); markerBorder.append(pinBorder); mapElement.append(markerBorder);
שינוי צבע הגליף
כדי לשנות את צבע הגליף של סמן, משתמשים באפשרות PinElement.glyphColor:
TypeScript
// Change the glyph color. const pinGlyph = new PinElement({ glyphColor: 'white', }); const markerGlyph = new AdvancedMarkerElement({ position: { lat: 37.415, lng: -122.025 }, }); markerGlyph.append(pinGlyph); mapElement.append(markerGlyph);
JavaScript
// Change the glyph color. const pinGlyph = new PinElement({ glyphColor: 'white', }); const markerGlyph = new AdvancedMarkerElement({ position: { lat: 37.415, lng: -122.025 }, }); markerGlyph.append(pinGlyph); mapElement.append(markerGlyph);
שימוש בטקסט בסימן גרפי
משתמשים באפשרות PinElement.glyphText כדי להחליף את הגליף שמוגדר כברירת מחדל בתו טקסט. הגליף של הטקסט PinElement משנה את הגודל שלו בהתאם ל-PinElement והצבע שלו כברירת מחדל תואם לצבע ברירת המחדל של glyphColor ב-PinElement.
TypeScript
const pinTextGlyph = new PinElement({ glyphText: 'T', glyphColor: 'white', }); const markerGlyphText = new AdvancedMarkerElement({ position: { lat: 37.415, lng: -122.015 }, }); markerGlyphText.append(pinTextGlyph); mapElement.append(markerGlyphText);
JavaScript
const pinTextGlyph = new PinElement({ glyphText: 'T', glyphColor: 'white', }); const markerGlyphText = new AdvancedMarkerElement({ position: { lat: 37.415, lng: -122.015 }, }); markerGlyphText.append(pinTextGlyph); mapElement.append(markerGlyphText);
הסתרת הגליף
כדי להסתיר את הגליף של סמן, מגדירים את האפשרות PinElement.glyphText כמחרוזת ריקה:
TypeScript
// Hide the glyph. const pinNoGlyph = new PinElement({ glyphText: '', }); const markerNoGlyph = new AdvancedMarkerElement({ position: { lat: 37.415, lng: -122.005 }, }); markerNoGlyph.append(pinNoGlyph); mapElement.append(markerNoGlyph);
JavaScript
// Hide the glyph. const pinNoGlyph = new PinElement({ glyphText: '', }); const markerNoGlyph = new AdvancedMarkerElement({ position: { lat: 37.415, lng: -122.005 }, }); markerNoGlyph.append(pinNoGlyph); mapElement.append(markerNoGlyph);
אפשרות אחרת היא להגדיר את PinElement.glyphColor לאותו ערך כמו PinElement.background. התוצאה היא שהגליף מוסתר חזותית.