Maps JavaScript API 提供兩種地圖導入方式:光柵與向量。光柵地圖會以像素為基礎的光柵圖片圖塊格線載入地圖,這些圖塊是由 Google 地圖平台伺服器端產生,然後提供給您的網頁應用程式。向量地圖則是由向量圖塊組成,這些圖塊會在載入時使用 WebGL (一種網頁技術,可讓瀏覽器存取使用者裝置上的 GPU,以算繪 2D 和 3D 圖像) 在用戶端繪製。
使用者熟悉的 Google 地圖就是向量地圖,與預設的光柵圖塊地圖相比,向量地圖具備許多優點。最明顯的是向量圖片的銳利度,以及在高縮放等級中增加的 3D 建築物功能。向量地圖支援下列功能:
- 透過程式輔助方式控制傾斜和方向角度
- 強化攝影機控制功能
- 小數縮放,縮放更流暢
使用
div元素和 JavaScript 載入的地圖,預設的算繪類型為google.maps.RenderingType.RASTER。使用
gmp-map元素載入的地圖預設會以google.maps.RenderingType.VECTOR類型算繪,並啟用傾斜和方向控制項。
傾斜和旋轉
如要設定向量地圖的傾斜和旋轉 (方向),請在地圖初始化時加入 heading 和 tilt 屬性,並在地圖上呼叫 setTilt 和 setHeading 方法。下例會在地圖中加入幾個按鈕,透過程式輔助方式,依 20 度的增量調整傾斜和方向角度。
TypeScript
function initMap(): void { const map = new google.maps.Map( document.getElementById("map") as HTMLElement, { center: { lat: 37.7893719, lng: -122.3942, }, zoom: 16, heading: 320, tilt: 47.5, mapId: "90f87356969d889c", } ); const buttons: [string, string, number, google.maps.ControlPosition][] = [ ["Rotate Left", "rotate", 20, google.maps.ControlPosition.LEFT_CENTER], ["Rotate Right", "rotate", -20, google.maps.ControlPosition.RIGHT_CENTER], ["Tilt Down", "tilt", 20, google.maps.ControlPosition.TOP_CENTER], ["Tilt Up", "tilt", -20, google.maps.ControlPosition.BOTTOM_CENTER], ]; buttons.forEach(([text, mode, amount, position]) => { const controlDiv = document.createElement("div"); const controlUI = document.createElement("button"); controlUI.classList.add("ui-button"); controlUI.innerText = `${text}`; controlUI.addEventListener("click", () => { adjustMap(mode, amount); }); controlDiv.appendChild(controlUI); map.controls[position].push(controlDiv); }); const adjustMap = function (mode: string, amount: number) { switch (mode) { case "tilt": map.setTilt(map.getTilt()! + amount); break; case "rotate": map.setHeading(map.getHeading()! + amount); break; default: break; } }; } declare global { interface Window { initMap: () => void; } } window.initMap = initMap;
JavaScript
function initMap() { const map = new google.maps.Map(document.getElementById("map"), { center: { lat: 37.7893719, lng: -122.3942, }, zoom: 16, heading: 320, tilt: 47.5, mapId: "90f87356969d889c", }); const buttons = [ ["Rotate Left", "rotate", 20, google.maps.ControlPosition.LEFT_CENTER], ["Rotate Right", "rotate", -20, google.maps.ControlPosition.RIGHT_CENTER], ["Tilt Down", "tilt", 20, google.maps.ControlPosition.TOP_CENTER], ["Tilt Up", "tilt", -20, google.maps.ControlPosition.BOTTOM_CENTER], ]; buttons.forEach(([text, mode, amount, position]) => { const controlDiv = document.createElement("div"); const controlUI = document.createElement("button"); controlUI.classList.add("ui-button"); controlUI.innerText = `${text}`; controlUI.addEventListener("click", () => { adjustMap(mode, amount); }); controlDiv.appendChild(controlUI); map.controls[position].push(controlDiv); }); const adjustMap = function (mode, amount) { switch (mode) { case "tilt": map.setTilt(map.getTilt() + amount); break; case "rotate": map.setHeading(map.getHeading() + amount); break; default: break; } }; } window.initMap = initMap;
CSS
/* * Always set the map height explicitly to define the size of the div element * that contains the map. */ #map { height: 100%; } /* * Optional: Makes the sample page fill the window. */ html, body { height: 100%; margin: 0; padding: 0; } .ui-button { background-color: #fff; border: 0; border-radius: 2px; box-shadow: 0 1px 4px -1px rgba(0, 0, 0, 0.3); margin: 10px; padding: 0 0.5em; font: 400 18px Roboto, Arial, sans-serif; overflow: hidden; height: 40px; cursor: pointer; } .ui-button:hover { background: rgb(235, 235, 235); }
HTML
<html>
<head>
<title>Tilt and Rotation</title>
<link rel="stylesheet" type="text/css" href="./style.css" />
<script type="module" src="./index.js"></script>
</head>
<body>
<div id="map"></div>
<!--
The `defer` attribute causes the script to execute after the full HTML
document has been parsed. For non-blocking uses, avoiding race conditions,
and consistent behavior across browsers, consider loading using Promises. See
https://developers.google.com/maps/documentation/javascript/load-maps-js-api
for more information.
-->
<script
src="https://maps.googleapis.com/maps/api/js?key=AIzaSyB41DRUbKWJHPxaFjMAwdrzWzbVKartNGg&callback=initMap&v=weekly"
defer
></script>
</body>
</html>測試範例
使用滑鼠和鍵盤手勢
如果已啟用傾斜和旋轉 (航向) 使用者互動 (透過程式輔助或在 Google Cloud 控制台中),使用者就能使用滑鼠和鍵盤調整傾斜和旋轉角度:
- 使用滑鼠:按住 Shift 鍵,接著按住滑鼠上下拖曳可調整傾斜角度,左右拖曳則能調整方向角度。
- 使用鍵盤:按住 Shift 鍵,然後使用向上鍵和向下鍵調整傾斜角度,向右鍵和向左鍵調整方向角度。
透過程式輔助方式調整傾斜和方向角度
使用 setTilt() 和 setHeading() 方法,即可透過程式輔助方式調整向量地圖上的傾斜和方向角度。方向是指相機面對的方向,以北方為起點,角度按順時針轉動,因此 map.setHeading(90) 會將地圖旋轉為面對東方。傾斜角度是以天頂為起點測量,因此 map.setTilt(0) 代表垂直俯視,map.setTilt(45) 代表斜角檢視。
- 呼叫
setTilt()可設定地圖的傾斜角度,使用getTilt()則可取得目前的傾斜值。 - 呼叫
setHeading()可設定地圖的方向,使用getHeading()則可取得目前的方向值。
如要變更地圖中心點,但維持現有的傾斜和方向角度,請使用 map.setCenter() 或 map.panBy()。
請注意,可使用的角度範圍會因目前的縮放等級而異。系統會將超出範圍的值調整到允許的範圍。
您也可以使用 moveCamera 方法,透過程式輔助方式變更方向、傾斜、中心和縮放設定。瞭解詳情。
對其他方法的影響
在地圖上套用傾斜或旋轉設定時,會影響其他 Maps JavaScript API 方法的行為:
map.getBounds()一律會傳回包含可見區域的最小定界框。套用傾斜設定時,傳回範圍所代表的區域,可能會大於地圖可視區域的可見區。map.fitBounds()會將傾斜和方向角度重設為零,再調整範圍。map.panToBounds()會將傾斜和方向角度重設為零,再平移範圍。map.setTilt()可接受任何值,但會根據目前的地圖縮放等級限制傾斜角度上限。map.setHeading()可接受任何值,但會進行修改,以符合範圍[0, 360]。
控制攝影機
使用 map.moveCamera() 函式即可一次更新攝影機屬性的任何組合。map.moveCamera() 接受單一參數,其中包含要更新的所有攝影機屬性。以下範例顯示如何呼叫 map.moveCamera(),一次設定 center、zoom、heading 和 tilt:
map.moveCamera({
  center: new google.maps.LatLng(37.7893719, -122.3942),
  zoom: 16,
  heading: 320,
  tilt: 47.5
});
您可以呼叫 map.moveCamera() 來為攝影機屬性加入動畫效果,並設定動畫迴圈,如下所示:
const degreesPerSecond = 3;

function animateCamera(time) {
  // Update the heading, leave everything else as-is.
  map.moveCamera({
    heading: (time / 1000) * degreesPerSecond
  });

  requestAnimationFrame(animateCamera);
}

// Start the animation.
requestAnimationFrame(animateCamera);
相機位置
地圖檢視是模擬向下俯瞰平面的攝影機。攝影機的位置 (以及連帶的地圖算繪方式) 是由下列屬性來指定:目標 (經緯度位置)、航向、傾斜角度和縮放。
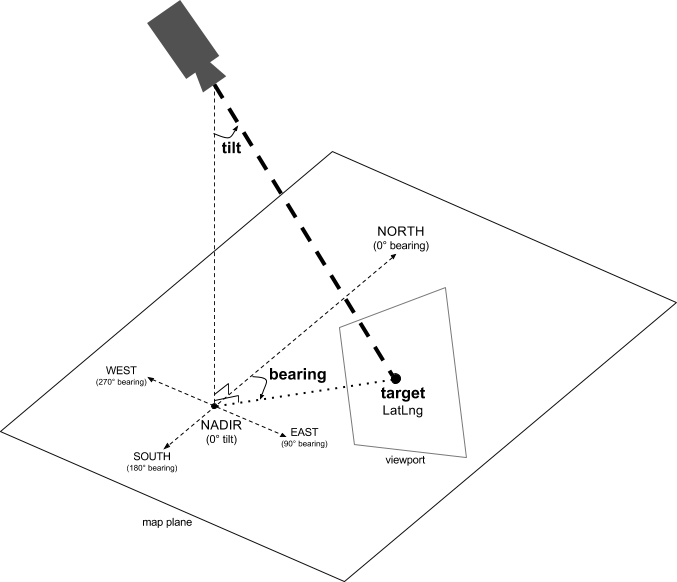
目標 (位置)
攝影機目標是地圖的中心位置,透過經緯度座標指定。
緯度可以介於正負 85 度 (含首尾)。只要超出這個範圍,都會調整為範圍內最接近的值。舉例來說,如果將緯度指定為 100,值就會設為 85。經度的範圍介於正負 180 度 (含首尾)。凡是超出這個範圍,都會換算為範圍 (正負 180) 內的值。舉例來說,480、840 和 1200 都會換算為 120 度。航向 (方向)
攝影機航向指的是指南針方向 (以度為單位,從正北算起,對應至地圖頂端邊緣)。如果您從地圖的中心點到頂端邊緣繪製一條垂直線,航向會對應到相對於正北的攝影機方向 (以度為單位)。
航向 0 表示地圖頂端指向正北。航向值 90 表示地圖頂端朝向正東 (在指南針上顯示為 90 度),航向值 180 表示地圖頂端朝向正南。
Maps API 能讓您改變地圖的航向。舉例來說,駕駛人為了讓道路地圖和行進方向一致,常會翻轉地圖;健行的人如果把地圖和指南針搭配使用,通常會將地圖上的垂直線對準北方。
傾斜角度 (視角)
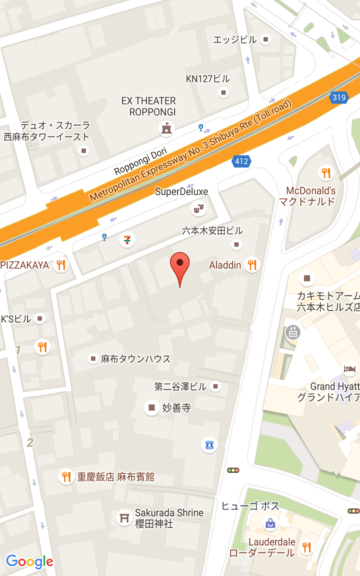
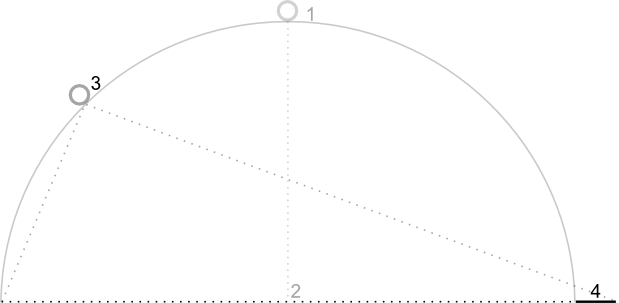
傾斜角度是指在地圖中心位置正上方的弧線上,從天底 (攝影機正下方) 測量至攝影機鏡頭位置所得的角度。值為 0 時,攝影機朝向正下方。值大於 0 時,攝影機依指定角度朝地平線傾斜。視角改變時,地圖的呈現會按照透視法調整,較遠的地圖項目看起來較小,鄰近的地圖項目看起來則較大。請參閱下方範例的說明。
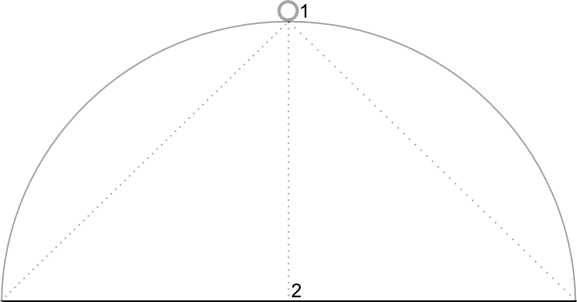
在下圖中,視角為 0 度。第一張是相關示意圖,1 是攝影機位置,2 則是目前地圖的位置。最終地圖則如下所示。
|
|
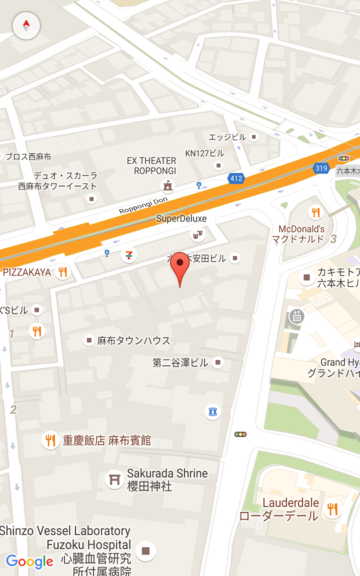
在下圖中,視角為 45 度。請注意,攝影機沿著弧線移動到地圖正上方 (0 度) 和地面 (90 度) 中間,也就是 3 的位置。攝影機仍然指向地圖的中心點,但現在可以看到位置 4 的線條所代表的區域。
|
|
在此螢幕截圖中,地圖的中心點仍與原始地圖相同,但地圖頂端顯示了更多地圖項目。若您將視角調整至 45 度以上,攝影機和地圖位置之間的地圖項目看起來會較大,而地圖位置以外的地圖項目則看起來較小,因而產生 3D 效果。
縮放
地圖比例取決於相機的縮放等級。縮放等級較大時,螢幕上會顯示較多細節;縮放等級較小時,則能在螢幕上顯示較大的範圍。
縮放等級不需要是整數。地圖允許的縮放等級範圍取決於許多因素,包括目標、地圖類型和螢幕大小。範圍外的任何數字都會轉換為下一個最接近的有效值,可能是最小或最大縮放等級。以下清單列出各縮放等級大致可顯示的精細程度:
- 1:全世界
- 5:自然景觀/大陸
- 10:城市
- 15:街道
- 20:建築

|

|

|
小數縮放
向量地圖支援小數縮放功能,意即縮放時不必使用整數,運用小數值就可以。雖然光柵地圖和向量地圖都支援小數縮放功能,但向量地圖預設啟用,而光柵地圖卻預設停用。您可以利用 isFractionalZoomEnabled 地圖選項,決定要啟用或停用小數縮放功能。
以下範例顯示在初始化地圖時啟用小數縮放功能:
map = new google.maps.Map(document.getElementById('map'), {
  center: {lat: -34.397, lng: 150.644},
  zoom: 8,
  isFractionalZoomEnabled: true
});
您也可以透過設定 isFractionalZoomEnabled 地圖選項來啟用或停用小數縮放功能,如下所示:
// Using map.set
map.set('isFractionalZoomEnabled', true);

// Using map.setOptions
map.setOptions({isFractionalZoomEnabled: true});
您可以設定事件監聽器,偵測小數縮放功能是否啟用。如果當初未明確將 isFractionalZoomEnabled 設為 true 或 false,建議用這個方法幫助您分辨。以下程式碼範例會檢查小數縮放功能是否啟用:
map.addListener('isfractionalzoomenabled_changed', () => {
  const isFractionalZoomEnabled = map.get('isFractionalZoomEnabled');
  if (isFractionalZoomEnabled === false) {
    console.log('not using fractional zoom');
  } else if (isFractionalZoomEnabled === true) {
    console.log('using fractional zoom');
  } else {
    console.log('map not done initializing yet');
  }
});

