
簡介
本教學課程說明如何使用 HTML、CSS 和 JavaScript,在網頁中新增含有標記的 Google 地圖。此外,本文也會說明如何設定地圖選項,以及如何使用控制項插槽將標籤新增至地圖。
以下是您將在本教學課程中建立的地圖。標記位於烏魯魯卡塔丘塔國家公園的烏魯魯 (又稱艾爾斯岩)。
開始使用
在網頁上建立含有標記的 Google 地圖時,步驟共有三個:
您需要使用網路瀏覽器。請從支援的瀏覽器清單中,根據您使用的平台選擇 Google Chrome (建議使用)、Firefox、Safari 或 Edge 等常見瀏覽器。
步驟 1:取得 API 金鑰
本節說明如何使用您自己的 API 金鑰,向 Maps JavaScript API 驗證應用程式。
取得 API 金鑰的步驟如下:
前往 Google Cloud 控制台。
建立或選取所需專案。
按一下「繼續」以啟用 API 和所有相關服務。
在「憑證」頁面上,取得 API 金鑰 (並設定 API 金鑰限制)。注意:如果您目前有不受限制的 API 金鑰,或是設有瀏覽器限制的金鑰,可以使用該金鑰。
如要避免配額竊用行為及保護 API 金鑰,請參閱「使用 API 金鑰」。
啟用計費功能。詳情請參閱「用量與計費」一文。
取得 API 金鑰後,請按一下「YOUR_API_KEY」,將金鑰加入下列程式碼片段。接著,請複製啟動載入器指令碼標記,並貼到自己的網頁。
<script>
  (g=>{var h,a,k,p="The Google Maps JavaScript API",c="google",l="importLibrary",q="__ib__",m=document,b=window;b=b[c]||(b[c]={});var d=b.maps||(b.maps={}),r=new Set,e=new URLSearchParams,u=()=>h||(h=new Promise(async(f,n)=>{await (a=m.createElement("script"));e.set("libraries",[...r]+"");for(k in g)e.set(k.replace(/[A-Z]/g,t=>"_"+t[0].toLowerCase()),g[k]);e.set("callback",c+".maps."+q);a.src=`https://maps.${c}apis.com/maps/api/js?`+e;d[q]=f;a.onerror=()=>h=n(Error(p+" could not load."));a.nonce=m.querySelector("script[nonce]")?.nonce||"";m.head.append(a)}));d[l]?console.warn(p+" only loads once. Ignoring:",g):d[l]=(f,...n)=>r.add(f)&&u().then(()=>d[l](f,...n))})({
    key: "YOUR_API_KEY",
    v: "weekly",
    // Use the 'v' parameter to indicate the version to use (weekly, beta, alpha, etc.).
    // Add other bootstrap parameters as needed, using camel case.
  });
</script>
步驟 2:建立 HTML 網頁
以下是基本 HTML 網頁程式碼:
<!DOCTYPE html>
<!--
 @license
 Copyright 2025 Google LLC. All Rights Reserved.
 SPDX-License-Identifier: Apache-2.0
-->

<html>
  <head>
    <title>Add a Map</title>

    <link rel="stylesheet" type="text/css" href="./style.css" />
    <script type="module" src="./index.js"></script>
    <!-- prettier-ignore -->
    <script>(g=>{var h,a,k,p="The Google Maps JavaScript API",c="google",l="importLibrary",q="__ib__",m=document,b=window;b=b[c]||(b[c]={});var d=b.maps||(b.maps={}),r=new Set,e=new URLSearchParams,u=()=>h||(h=new Promise(async(f,n)=>{await (a=m.createElement("script"));e.set("libraries",[...r]+"");for(k in g)e.set(k.replace(/[A-Z]/g,t=>"_"+t[0].toLowerCase()),g[k]);e.set("callback",c+".maps."+q);a.src=`https://maps.${c}apis.com/maps/api/js?`+e;d[q]=f;a.onerror=()=>h=n(Error(p+" could not load."));a.nonce=m.querySelector("script[nonce]")?.nonce||"";m.head.append(a)}));d[l]?console.warn(p+" only loads once. Ignoring:",g):d[l]=(f,...n)=>r.add(f)&&u().then(()=>d[l](f,...n))})
        ({key: "YOUR_API_KEY", v: "weekly"});</script>
  </head>
  <body>

    <!-- The map, centered at Uluru, Australia. -->
    <gmp-map center="-25.344,131.031" zoom="4" map-id="DEMO_MAP_ID">
    </gmp-map>

  </body>
</html>
這是非常基本的 HTML 網頁,使用 gmp-map 元素在網頁上顯示地圖。由於我們尚未新增任何 JavaScript 程式碼,因此地圖會是空白的。
瞭解程式碼
在本範例的現階段,我們有:
- 使用
!DOCTYPE html宣告,將應用程式宣告為 HTML5。 - 使用 Bootstrap 載入器載入 Maps JavaScript API。
- 建立
gmp-map元素來存放地圖。
將應用程式宣告為 HTML5
建議您在網頁應用程式內宣告真實的 DOCTYPE。在此處的範例中,我們已使用 HTML5 DOCTYPE,將應用程式宣告為 HTML5,如下所示:
<!DOCTYPE html>
目前多數瀏覽器會在「標準模式」中呈現使用此 DOCTYPE 宣告的內容,也就是說,您的應用程式應具有更高的跨瀏覽器相容性。此外,DOCTYPE 也設計成會優雅降級,但無法理解該宣告的瀏覽器會忽略宣告,而改為採用「相容模式」顯示內容。
請注意,有些在相容模式中可以運作的 CSS,在標準模式中卻無效。具體來說,所有百分比形式的尺寸都必須繼承上層區塊元素,但如果其中任一祖系無法指定尺寸,就會假設尺寸為 0 x 0 像素。基於這個理由,我們加入下列 style 聲明:
<style>
  gmp-map {
    height: 100%;
  }
  html, body {
    height: 100%;
    margin: 0;
    padding: 0;
  }
</style>
載入 Maps JavaScript API
Bootstrap 載入器會準備 Maps JavaScript API 進行載入 (在呼叫 importLibrary() 前不會載入任何程式庫)。
<script>
  (g=>{var h,a,k,p="The Google Maps JavaScript API",c="google",l="importLibrary",q="__ib__",m=document,b=window;b=b[c]||(b[c]={});var d=b.maps||(b.maps={}),r=new Set,e=new URLSearchParams,u=()=>h||(h=new Promise(async(f,n)=>{await (a=m.createElement("script"));e.set("libraries",[...r]+"");for(k in g)e.set(k.replace(/[A-Z]/g,t=>"_"+t[0].toLowerCase()),g[k]);e.set("callback",c+".maps."+q);a.src=`https://maps.${c}apis.com/maps/api/js?`+e;d[q]=f;a.onerror=()=>h=n(Error(p+" could not load."));a.nonce=m.querySelector("script[nonce]")?.nonce||"";m.head.append(a)}));d[l]?console.warn(p+" only loads once. Ignoring:",g):d[l]=(f,...n)=>r.add(f)&&u().then(()=>d[l](f,...n))})({
    key: "YOUR_API_KEY",
    v: "weekly",
    // Use the 'v' parameter to indicate the version to use (weekly, beta, alpha, etc.).
    // Add other bootstrap parameters as needed, using camel case.
  });
</script>
如要瞭解如何自行取得 API 金鑰,請參閱「步驟 3:取得 API 金鑰」一節。
在本教學課程的現階段,系統會顯示空白視窗,只會顯示未格式化的標籤文字。這是因為我們尚未新增任何 JavaScript 程式碼。
建立 gmp-map 元素
我們必須在網頁上預留顯示地圖的位置。一般來說,我們會建立 gmp-map 元素,然後在瀏覽器文件物件模型 (DOM) 中取得此元素的參照。您也可以使用 div 元素執行這項操作 (瞭解詳情),但建議使用 gmp-map 元素。
下方程式碼會定義 gmp-map 元素,並設定 center、zoom 和 map-id 參數。
<gmp-map center="-25.344,131.031" zoom="4" map-id="DEMO_MAP_ID">
</gmp-map>
center 和 zoom 選項一律為必填欄位。在上述程式碼中,center 屬性會向 API 指出地圖的中心點,而 zoom 屬性則會指定地圖的縮放等級。「縮放:0」是最低的縮放等級,會顯示整個地球。調高縮放等級值,就能以較高的解析度放大地球。
縮放等級
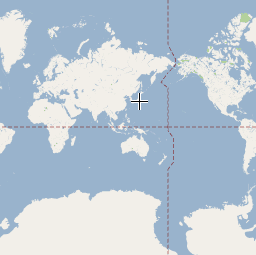
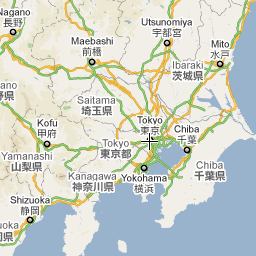
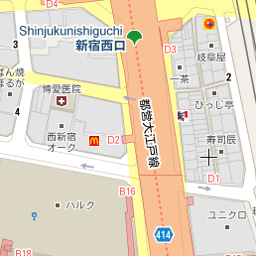
如果使用單一圖片提供整個地球的地圖,有可能會產生非常龐大的地圖,或是解析度非常差的小型地圖。因此,Google 地圖和 Maps JavaScript API 中的地圖圖片,會細分為地圖「圖塊」和「縮放等級」。縮放等級較低時,一小組的地圖圖塊即可涵蓋相當寬廣的區域。而縮放等級較高時,地圖圖塊的解析度就會較高且涵蓋的區域較小。以下清單列出各縮放等級大致可顯示的精細程度:
- 1:全世界
- 5:自然景觀或大陸
- 10:城市
- 15:街道
- 20:建築
下方三張圖片顯示東京相同位置的三個縮放等級 (0、7 和 18)。
下方程式碼說明用以設定 gmp-map 元素大小的 CSS。
/* Set the size of the gmp-map element that contains the map */
gmp-map {
    height: 400px; /* The height is 400 pixels */
    width: 100%; /* The width is the width of the web page */
}
在上述程式碼中,style 元素會設定 gmp-map 的大小。請將寬度和高度設為大於 0 像素以顯示地圖。在本例中,gmp-map 的高度設為 400 像素,寬度設為 100%,依照網頁的完整寬度顯示地圖。建議一律明確設定高度和寬度樣式。
控管插播
您可以使用控制項插槽,在地圖中新增 HTML 表單控制項。「位置」是地圖上預先定義的位置;請使用 slot 屬性為元素設定所需位置,並將元素巢狀內嵌在 gmp-map 元素中。下列程式碼片段顯示如何在左上角的地圖中新增 HTML 標籤。
<!-- The map, centered at Uluru, Australia. -->
<gmp-map center="-25.344,131.031" zoom="4" map-id="DEMO_MAP_ID">
  <div id="controls" slot="control-inline-start-block-start">
    <h3>My Google Maps Demo</h3>
  </div>
</gmp-map>
步驟 3:新增 JavaScript 程式碼
本節說明如何在網頁中載入 Maps JavaScript API,以及如何自行編寫 JavaScript,以使用 API 加入含有標記的地圖。
TypeScript
async function init(): Promise<void> { // Request the needed libraries. const [{ AdvancedMarkerElement }] = await Promise.all([ google.maps.importLibrary('marker'), google.maps.importLibrary('maps'), ]); // Get the gmp-map element. const mapElement = document.querySelector('gmp-map')!; // Get the inner map. const innerMap = mapElement.innerMap; // Set map options. innerMap.setOptions({ mapTypeControl: false, }); // Add a marker positioned at the map center (Uluru). new AdvancedMarkerElement({ map: innerMap, position: mapElement.center, title: 'Uluru/Ayers Rock', }); } void init();
JavaScript
async function init() { // Request the needed libraries. const [{ AdvancedMarkerElement }] = await Promise.all([ google.maps.importLibrary('marker'), google.maps.importLibrary('maps'), ]); // Get the gmp-map element. const mapElement = document.querySelector('gmp-map'); // Get the inner map. const innerMap = mapElement.innerMap; // Set map options. innerMap.setOptions({ mapTypeControl: false, }); // Add a marker positioned at the map center (Uluru). new AdvancedMarkerElement({ map: innerMap, position: mapElement.center, title: 'Uluru/Ayers Rock', }); } void init();
呼叫 initMap() 時,上述程式碼會執行下列動作:
- 載入
maps和marker程式庫。 - 從 DOM 取得地圖元素。
- 在內部地圖上設定其他地圖選項。
- 在地圖中加入標記。
取得地圖物件並設定選項
innerMap 代表 Map 類別的執行個體。如要設定地圖選項,請從地圖元素取得 innerMap 執行個體,然後呼叫 setOptions。下列程式碼片段顯示如何從 DOM 取得 innerMap 執行個體,然後呼叫 setOptions:
// Get the gmp-map element.
const mapElement = document.querySelector(
  "gmp-map"
) as google.maps.MapElement;

// Get the inner map.
const innerMap = mapElement.innerMap;

// Set map options.
innerMap.setOptions({
  mapTypeControl: false,
});
等待地圖載入
使用 gmp-map 元素時,地圖會以非同步方式載入。如果在初始化時發出其他要求 (例如地理位置或地點詳細資料要求),可能會導致競爭狀況。如要確保程式碼只會在完整載入地圖後執行,請在初始化函式中使用 addListenerOnce 閒置事件處理常式,如下所示:
// Do things once the map has loaded.
google.maps.event.addListenerOnce(innerMap, 'idle', () => {
    // Run this code only after the map has loaded.
    console.log("The map is now ready!");
});
這樣做可確保程式碼只會在載入地圖後執行,且處理常式只會在應用程式生命週期內觸發一次。
完整程式碼範例
如需完整程式碼範例,請參閱這裡:
TypeScript
async function init(): Promise<void> { // Request the needed libraries. const [{ AdvancedMarkerElement }] = await Promise.all([ google.maps.importLibrary('marker'), google.maps.importLibrary('maps'), ]); // Get the gmp-map element. const mapElement = document.querySelector('gmp-map')!; // Get the inner map. const innerMap = mapElement.innerMap; // Set map options. innerMap.setOptions({ mapTypeControl: false, }); // Add a marker positioned at the map center (Uluru). new AdvancedMarkerElement({ map: innerMap, position: mapElement.center, title: 'Uluru/Ayers Rock', }); } void init();
JavaScript
async function init() { // Request the needed libraries. const [{ AdvancedMarkerElement }] = await Promise.all([ google.maps.importLibrary('marker'), google.maps.importLibrary('maps'), ]); // Get the gmp-map element. const mapElement = document.querySelector('gmp-map'); // Get the inner map. const innerMap = mapElement.innerMap; // Set map options. innerMap.setOptions({ mapTypeControl: false, }); // Add a marker positioned at the map center (Uluru). new AdvancedMarkerElement({ map: innerMap, position: mapElement.center, title: 'Uluru/Ayers Rock', }); } void init();
CSS
/* * Always set the map height explicitly to define the size of the div element * that contains the map. */ gmp-map { height: 100%; } /* * Optional: Makes the sample page fill the window. */ html, body { height: 100%; margin: 0; padding: 0; }
HTML
<html>
<head>
<title>Add a Map</title>
<link rel="stylesheet" type="text/css" href="./style.css" />
<script type="module" src="./index.js"></script>
<script>
// prettier-ignore
(g=>{var h,a,k,p="The Google Maps JavaScript API",c="google",l="importLibrary",q="__ib__",m=document,b=window;b=b[c]||(b[c]={});var d=b.maps||(b.maps={}),r=new Set,e=new URLSearchParams,u=()=>h||(h=new Promise(async(f,n)=>{await (a=m.createElement("script"));e.set("libraries",[...r]+"");for(k in g)e.set(k.replace(/[A-Z]/g,t=>"_"+t[0].toLowerCase()),g[k]);e.set("callback",c+".maps."+q);a.src=`https://maps.${c}apis.com/maps/api/js?`+e;d[q]=f;a.onerror=()=>h=n(Error(p+" could not load."));a.nonce=m.querySelector("script[nonce]")?.nonce||"";m.head.append(a)}));d[l]?console.warn(p+" only loads once. Ignoring:",g):d[l]=(f,...n)=>r.add(f)&&u().then(()=>d[l](f,...n))})({
key: "AIzaSyA6myHzS10YXdcazAFalmXvDkrYCp5cLc8"
});
</script>
</head>
<body>
<!-- The map, centered at Uluru, Australia. -->
<gmp-map center="-25.344,131.031" zoom="4" map-id="DEMO_MAP_ID">
<div id="controls" slot="control-inline-start-block-start">
<h3>My Google Maps Demo</h3>
</div>
</gmp-map>
</body>
</html>試用範例
進一步瞭解標記:
提示和疑難排解
- 如要進一步瞭解如何取得經緯度座標,或將地址轉換成地理座標,請參閱本文。
- 您可以調整樣式和屬性等選項來自訂地圖。如要進一步瞭解如何自訂地圖,請參閱「樣式」和「在地圖上繪圖」的指南。
- 您可以在網路瀏覽器中,使用開發人員工具控制台測試及執行程式碼、閱讀錯誤報告,以及解決程式碼問題。
- 在 Chrome 中使用下列鍵盤快速鍵開啟控制台:
Command+Option+J 鍵 (Mac) 或 Control+Shift+J 鍵 (Windows)。 請按照下方步驟操作,取得 Google 地圖上某個地點的經緯度座標。
- 在瀏覽器中開啟 Google 地圖。
- 在地圖上,對需要座標的精確位置按一下滑鼠右鍵。
- 從選單中選取經緯度座標。
使用地理編碼服務即可將地址轉換成經緯度座標,開發人員指南也提供地理編碼服務的詳細使用方法。