소개
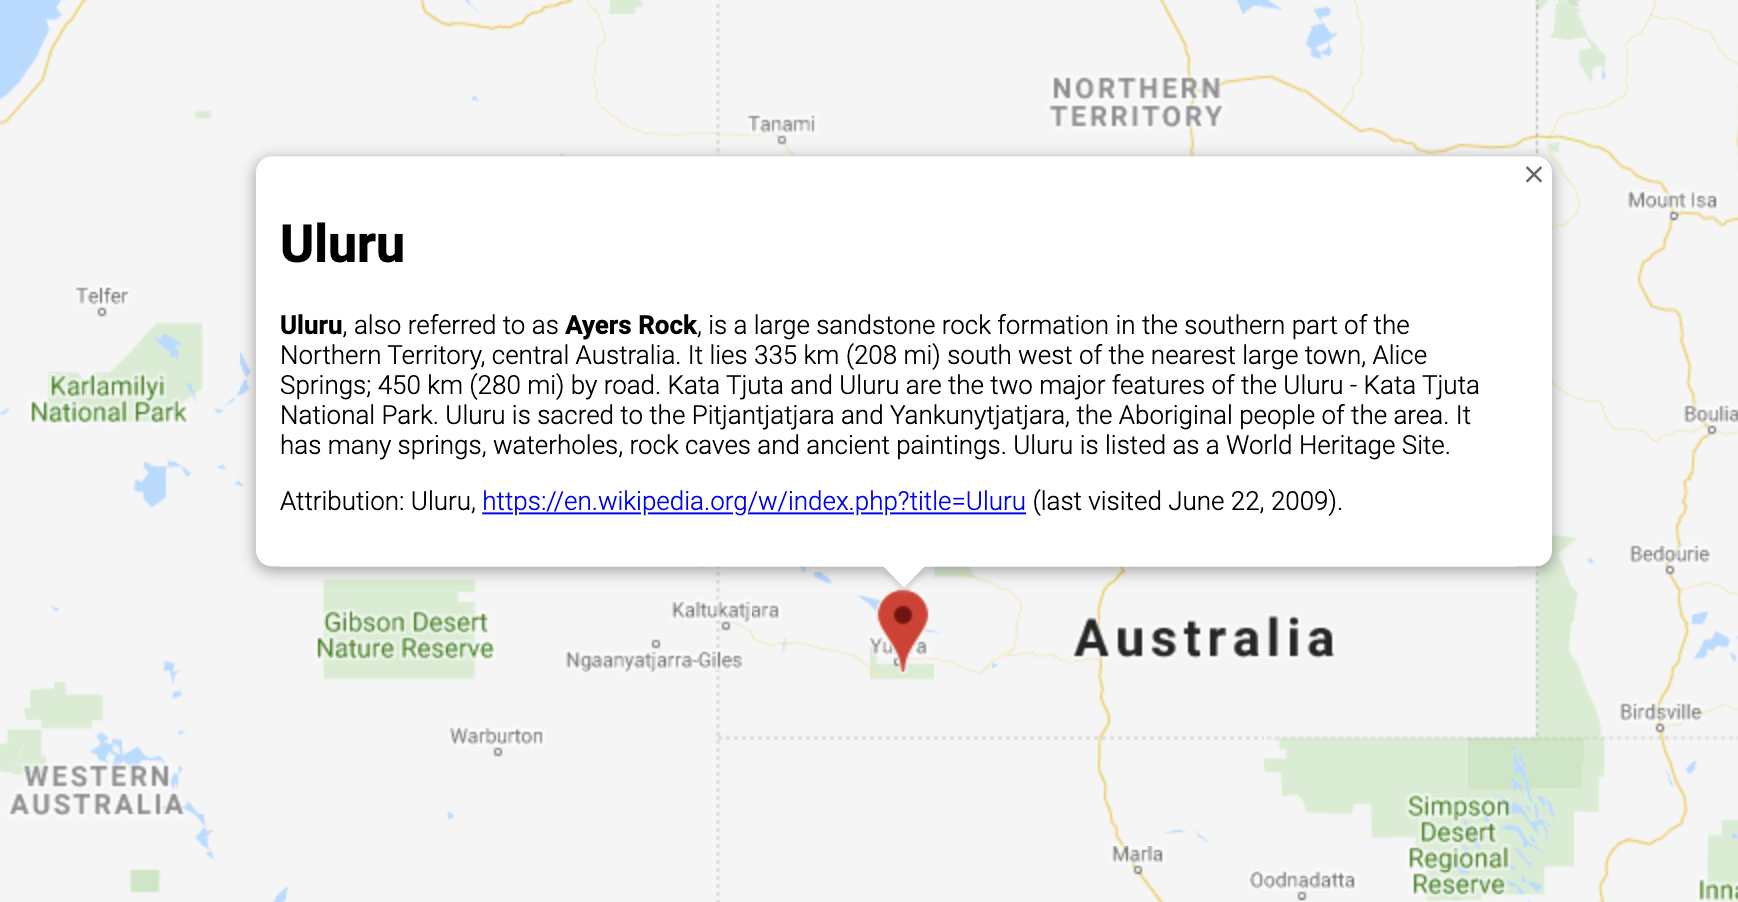
InfoWindow는 지도 위의 지정된 위치에 팝업 창으로 콘텐츠(보통 텍스트나 이미지)를 표시합니다. 정보 창은 콘텐츠 영역과 꼬리표로 이루어집니다. 꼬리표의 끝은 지정된 위치에 연결됩니다. 정보 창은 스크린 리더의 대화상자로 표시됩니다.

일반적으로 정보 창은 마커에 연결하지만 아래의 정보 창 추가에 관한 섹션에 설명된 것처럼 특정 위도/경도에 연결할 수도 있습니다.
넓은 의미에서 정보 창은 오버레이의 한 유형입니다. 다른 오버레이 유형에 대한 자세한 내용은 지도에서 그리기를 참고하세요.
정보 창 추가
InfoWindow 생성자는 정보 창을 표시하기 위한 초기 매개변수를 지정하는
InfoWindowOptions 객체 리터럴을 사용합니다.
InfoWindowOptions 객체 리터럴에는 다음 필드가 포함되어 있습니다.
content에는 정보 창에 표시할 텍스트 문자열이나 DOM 노드가 포함됩니다.pixelOffset에는 정보 창의 끝에서 정보 창이 고정된 위치까지의 오프셋이 포함됩니다. 실제로 이 필드는 지정할 필요가 없습니다. 기본값으로 두어도 됩니다.position에는 이 정보 창이 고정된LatLng가 포함됩니다. 참고:InfoWindow는Marker객체(위치가 마커 위치를 기반으로 하는 경우) 또는 지도 자체의 지정된LatLng에 연결될 수 있습니다.LatLng를 가져오는 한 가지 방법은 지오코딩 서비스를 사용하는 것입니다. 마커의 정보 창을 열면position이 자동으로 업데이트됩니다.maxWidth는 정보 창의 최대 너비를 픽셀 단위로 지정합니다. 기본적으로 정보 창은 콘텐츠에 맞게 확장되고 정보 창이 지도를 채우는 경우 자동으로 텍스트를 줄바꿈합니다.maxWidth를 추가하면 정보 창이 자동으로 줄바꿈되어 지정된 너비를 강제로 적용합니다. 정보 창이 최대 너비에 도달하고 화면에서 세로 방향으로 여유가 있으면 정보 창이 세로로 확장될 수도 있습니다.
InfoWindow의 콘텐츠에는 텍스트 문자열, HTML 스니펫 또는 DOM 요소가 포함될 수 있습니다. 콘텐츠를 설정하려면 InfoWindowOptions 내에서 콘텐츠를 지정하거나 InfoWindow에서 setContent()를 명시적으로 호출하세요.
콘텐츠 크기를 명시적으로 지정하려면 <div> 요소에 배치하고 CSS로 <div>의 스타일을 지정하세요. CSS를 사용하여 스크롤을 사용 설정할 수도 있습니다. 스크롤을 사용 설정하지 않고 콘텐츠가 정보 창에서 사용 가능한 공간을 초과하는 경우 콘텐츠가 정보 창 밖으로 넘칠 수도 있습니다.
정보 창 열기
정보 창을 만든다고 지도에 자동으로 표시되지 않습니다.
정보 창을 표시하려면 InfoWindow에서 open() 메서드를 호출하고 다음 옵션을 지정하는 InfoWindowOpenOptions 객체 리터럴을 전달해야 합니다.
map은 열 지도 또는 스트리트 뷰 파노라마를 지정합니다.anchor에는 앵커 포인트(예:Marker)가 포함됩니다.anchor옵션이null이거나 정의되지 않은 경우 정보 창이position속성에서 열립니다.
TypeScript
// This example displays a marker at the center of Australia. // When the user clicks the marker, an info window opens. function initMap(): void { const uluru = { lat: -25.363, lng: 131.044 }; const map = new google.maps.Map( document.getElementById("map") as HTMLElement, { zoom: 4, center: uluru, } ); const contentString = '<div id="content">' + '<div id="siteNotice">' + "</div>" + '<h1 id="firstHeading" class="firstHeading">Uluru</h1>' + '<div id="bodyContent">' + "<p><b>Uluru</b>, also referred to as <b>Ayers Rock</b>, is a large " + "sandstone rock formation in the southern part of the " + "Northern Territory, central Australia. It lies 335 km (208 mi) " + "south west of the nearest large town, Alice Springs; 450 km " + "(280 mi) by road. Kata Tjuta and Uluru are the two major " + "features of the Uluru - Kata Tjuta National Park. Uluru is " + "sacred to the Pitjantjatjara and Yankunytjatjara, the " + "Aboriginal people of the area. It has many springs, waterholes, " + "rock caves and ancient paintings. Uluru is listed as a World " + "Heritage Site.</p>" + '<p>Attribution: Uluru, <a href="https://en.wikipedia.org/w/index.php?title=Uluru&oldid=297882194">' + "https://en.wikipedia.org/w/index.php?title=Uluru</a> " + "(last visited June 22, 2009).</p>" + "</div>" + "</div>"; const infowindow = new google.maps.InfoWindow({ content: contentString, ariaLabel: "Uluru", }); const marker = new google.maps.Marker({ position: uluru, map, title: "Uluru (Ayers Rock)", }); marker.addListener("click", () => { infowindow.open({ anchor: marker, map, }); }); } declare global { interface Window { initMap: () => void; } } window.initMap = initMap;
JavaScript
// This example displays a marker at the center of Australia. // When the user clicks the marker, an info window opens. function initMap() { const uluru = { lat: -25.363, lng: 131.044 }; const map = new google.maps.Map(document.getElementById("map"), { zoom: 4, center: uluru, }); const contentString = '<div id="content">' + '<div id="siteNotice">' + "</div>" + '<h1 id="firstHeading" class="firstHeading">Uluru</h1>' + '<div id="bodyContent">' + "<p><b>Uluru</b>, also referred to as <b>Ayers Rock</b>, is a large " + "sandstone rock formation in the southern part of the " + "Northern Territory, central Australia. It lies 335 km (208 mi) " + "south west of the nearest large town, Alice Springs; 450 km " + "(280 mi) by road. Kata Tjuta and Uluru are the two major " + "features of the Uluru - Kata Tjuta National Park. Uluru is " + "sacred to the Pitjantjatjara and Yankunytjatjara, the " + "Aboriginal people of the area. It has many springs, waterholes, " + "rock caves and ancient paintings. Uluru is listed as a World " + "Heritage Site.</p>" + '<p>Attribution: Uluru, <a href="https://en.wikipedia.org/w/index.php?title=Uluru&oldid=297882194">' + "https://en.wikipedia.org/w/index.php?title=Uluru</a> " + "(last visited June 22, 2009).</p>" + "</div>" + "</div>"; const infowindow = new google.maps.InfoWindow({ content: contentString, ariaLabel: "Uluru", }); const marker = new google.maps.Marker({ position: uluru, map, title: "Uluru (Ayers Rock)", }); marker.addListener("click", () => { infowindow.open({ anchor: marker, map, }); }); } window.initMap = initMap;
샘플 사용해 보기
다음 예에서는 정보 창의 maxWidth를 설정합니다.
예시 보기
정보 창에 포커스 설정
정보 창에 포커스를 설정하려면 focus() 메서드를 호출하세요. 포커스를 설정하기 전에 이 메서드를 visible 이벤트와 함께 사용해 보세요. 표시되지 않은 정보 창에서 이 메서드를 호출하면 아무 효과가 없습니다. 정보 창을 표시하려면 open()을 호출하세요.
정보 창 닫기
기본적으로 정보 창은 사용자가 닫기 컨트롤(정보 창 오른쪽 상단의 X 표시)을 클릭하거나 ESC 키를 누를 때까지 열려 있습니다.
close() 메서드를 호출하여 정보 창을 명시적으로 닫을 수도 있습니다.
정보 창이 닫히면 정보 창이 열리기 전에 포커스가 있었던 요소로 포커스가 다시 이동합니다. 이 요소를 사용할 수 없는 경우 포커스가 지도로 다시 이동합니다. 이 동작을 재정의하려면 closeclick 이벤트를 수신 대기하고 다음 예와 같이 포커스를 수동으로 관리하세요.
infoWindow.addListener('closeclick', ()=>{
  // Handle focus manually.
});
정보 창 이동
정보 창의 위치를 바꾸는 데는 여러 방법이 있습니다.
- 정보 창에서
setPosition()호출 InfoWindow.open()메서드를 사용하여 정보 창을 새 마커에 연결. 참고: 마커를 전달하지 않고open()을 호출하면InfoWindow는InfoWindowOptions객체 리터럴을 통해 생성 시 지정된 위치를 사용합니다.
맞춤설정
InfoWindow 클래스는 맞춤설정 기능을 제공하지 않습니다. 대신 맞춤설정된 팝업 예에서 완전히 맞춤설정된 팝업을 만드는 방법을 확인하세요.

