
เลือกสถานที่ปัจจุบันและแสดงรายละเอียดบนแผนที่
บทแนะนำนี้แสดงการสร้างแอป iOS ที่ดึงตำแหน่งปัจจุบันของอุปกรณ์ ระบุตำแหน่งที่เป็นไปได้ แจ้งให้ผู้ใช้เลือกตำแหน่งที่ตรงกันมากที่สุด และแสดงเครื่องหมายแผนที่ สำหรับตำแหน่งที่เลือก
เหมาะสำหรับผู้ที่มีความรู้เบื้องต้นหรือระดับกลางเกี่ยวกับ Swift หรือ Objective-C และมีความรู้ทั่วไปเกี่ยวกับ Xcode ดูคำแนะนำขั้นสูงในการ สร้างแผนที่ได้ใน คู่มือสำหรับนักพัฒนาซอฟต์แวร์
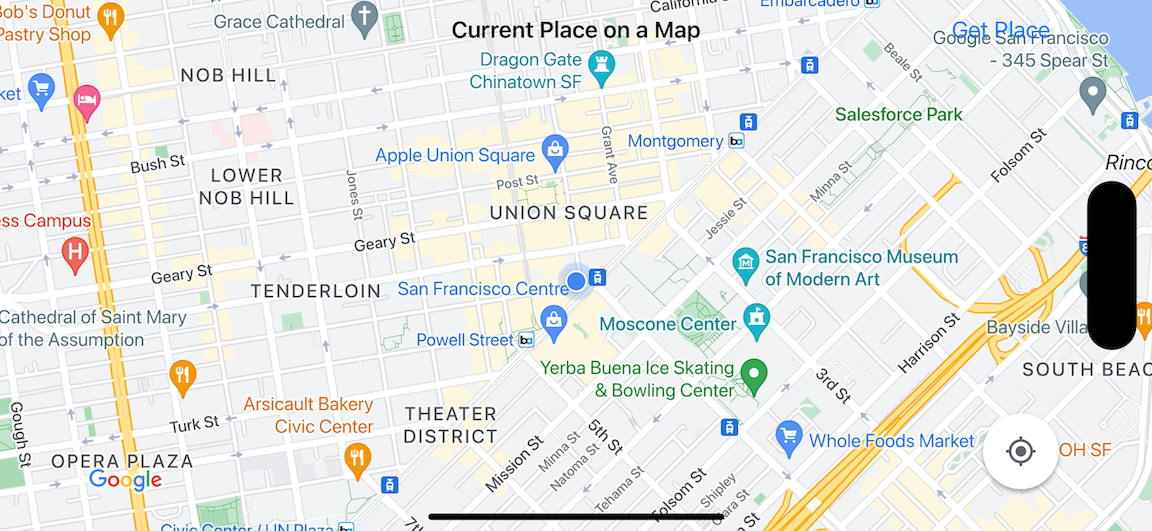
คุณจะสร้างแผนที่ต่อไปนี้โดยใช้บทแนะนำนี้ เครื่องหมายบนแผนที่จะอยู่ในซานฟรานซิสโก รัฐแคลิฟอร์เนีย แต่จะย้ายไปยังตำแหน่งที่อุปกรณ์หรือเครื่องจำลองอยู่
บทแนะนำนี้ใช้ Places SDK สำหรับ iOS, Maps SDK สำหรับ iOS และ Apple Core Location Framework
รับโค้ด
โคลนหรือดาวน์โหลดที่เก็บตัวอย่าง Google Maps สำหรับ iOS จาก GitHubหรือคลิกปุ่มต่อไปนี้เพื่อดาวน์โหลดซอร์สโค้ด
MapViewController
Swift
import UIKit
import GoogleMaps
import GooglePlaces

class MapViewController: UIViewController {

  var locationManager: CLLocationManager!
  var currentLocation: CLLocation?
  var mapView: GMSMapView!
  var placesClient: GMSPlacesClient!
  var preciseLocationZoomLevel: Float = 15.0
  var approximateLocationZoomLevel: Float = 10.0

  // An array to hold the list of likely places.
  var likelyPlaces: [GMSPlace] = []

  // The currently selected place.
  var selectedPlace: GMSPlace?

  // Update the map once the user has made their selection.
  @IBAction func unwindToMain(segue: UIStoryboardSegue) {
    // Clear the map.
    mapView.clear()

    // Add a marker to the map.
    if let place = selectedPlace {
      let marker = GMSMarker(position: place.coordinate)
      marker.title = selectedPlace?.name
      marker.snippet = selectedPlace?.formattedAddress
      marker.map = mapView
    }

    listLikelyPlaces()
  }

  override func viewDidLoad() {
    super.viewDidLoad()

    // Initialize the location manager.
    locationManager = CLLocationManager()
    locationManager.desiredAccuracy = kCLLocationAccuracyBest
    locationManager.requestWhenInUseAuthorization()
    locationManager.distanceFilter = 50
    locationManager.startUpdatingLocation()
    locationManager.delegate = self

    placesClient = GMSPlacesClient.shared()

    // A default location to use when location permission is not granted.
    let defaultLocation = CLLocation(latitude: -33.869405, longitude: 151.199)

    // Create a map.
    let zoomLevel = locationManager.accuracyAuthorization == .fullAccuracy ? preciseLocationZoomLevel : approximateLocationZoomLevel
    let camera = GMSCameraPosition.camera(withLatitude: defaultLocation.coordinate.latitude,
                                          longitude: defaultLocation.coordinate.longitude,
                                          zoom: zoomLevel)
    mapView = GMSMapView.map(withFrame: view.bounds, camera: camera)
    mapView.settings.myLocationButton = true
    mapView.autoresizingMask = [.flexibleWidth, .flexibleHeight]
    mapView.isMyLocationEnabled = true

    // Add the map to the view, hide it until we've got a location update.
    view.addSubview(mapView)
    mapView.isHidden = true

    listLikelyPlaces()
  }

  // Populate the array with the list of likely places.
  func listLikelyPlaces() {
    // Clean up from previous sessions.
    likelyPlaces.removeAll()

    let placeFields: GMSPlaceField = [.name, .coordinate]
    placesClient.findPlaceLikelihoodsFromCurrentLocation(withPlaceFields: placeFields) { (placeLikelihoods, error) in
      guard error == nil else {
        // TODO: Handle the error.
        print("Current Place error: \(error!.localizedDescription)")
        return
      }

      guard let placeLikelihoods = placeLikelihoods else {
        print("No places found.")
        return
      }

      // Get likely places and add to the list.
      for likelihood in placeLikelihoods {
        let place = likelihood.place
        self.likelyPlaces.append(place)
      }
    }
  }

  // Prepare the segue.
  override func prepare(for segue: UIStoryboardSegue, sender: Any?) {
    if segue.identifier == "segueToSelect" {
      if let nextViewController = segue.destination as? PlacesViewController {
        nextViewController.likelyPlaces = likelyPlaces
      }
    }
  }
}

// Delegates to handle events for the location manager.
extension MapViewController: CLLocationManagerDelegate {

  // Handle incoming location events.
  func locationManager(_ manager: CLLocationManager, didUpdateLocations locations: [CLLocation]) {
    let location: CLLocation = locations.last!
    print("Location: \(location)")

    let zoomLevel = locationManager.accuracyAuthorization == .fullAccuracy ? preciseLocationZoomLevel : approximateLocationZoomLevel
    let camera = GMSCameraPosition.camera(withLatitude: location.coordinate.latitude,
                                          longitude: location.coordinate.longitude,
                                          zoom: zoomLevel)

    if mapView.isHidden {
      mapView.isHidden = false
      mapView.camera = camera
    } else {
      mapView.animate(to: camera)
    }

    listLikelyPlaces()
  }

  // Handle authorization for the location manager.
  func locationManager(_ manager: CLLocationManager, didChangeAuthorization status: CLAuthorizationStatus) {
    // Check accuracy authorization
    let accuracy = manager.accuracyAuthorization
    switch accuracy {
    case .fullAccuracy:
        print("Location accuracy is precise.")
    case .reducedAccuracy:
        print("Location accuracy is not precise.")
    @unknown default:
      fatalError()
    }

    // Handle authorization status
    switch status {
    case .restricted:
      print("Location access was restricted.")
    case .denied:
      print("User denied access to location.")
      // Display the map using the default location.
      mapView.isHidden = false
    case .notDetermined:
      print("Location status not determined.")
    case .authorizedAlways: fallthrough
    case .authorizedWhenInUse:
      print("Location status is OK.")
    @unknown default:
      fatalError()
    }
  }

  // Handle location manager errors.
  func locationManager(_ manager: CLLocationManager, didFailWithError error: Error) {
    locationManager.stopUpdatingLocation()
    print("Error: \(error)")
  }
}
Objective-C
#import "MapViewController.h"
#import "PlacesViewController.h"
@import CoreLocation;
@import GooglePlaces;
@import GoogleMaps;

@interface MapViewController () <CLLocationManagerDelegate>

@end

@implementation MapViewController {
  CLLocationManager *locationManager;
  CLLocation * _Nullable currentLocation;
  GMSMapView *mapView;
  GMSPlacesClient *placesClient;
  float preciseLocationZoomLevel;
  float approximateLocationZoomLevel;

  // An array to hold the list of likely places.
  NSMutableArray<GMSPlace *> *likelyPlaces;

  // The currently selected place.
  GMSPlace * _Nullable selectedPlace;
}

- (void)viewDidLoad {
  [super viewDidLoad];
  preciseLocationZoomLevel = 15.0;
  approximateLocationZoomLevel = 15.0;

  // Initialize the location manager.
  locationManager = [[CLLocationManager alloc] init];
  locationManager.desiredAccuracy = kCLLocationAccuracyBest;
  [locationManager requestWhenInUseAuthorization];
  locationManager.distanceFilter = 50;
  [locationManager startUpdatingLocation];
  locationManager.delegate = self;

  placesClient = [GMSPlacesClient sharedClient];

  // A default location to use when location permission is not granted.
  CLLocationCoordinate2D defaultLocation = CLLocationCoordinate2DMake(-33.869405, 151.199);

  // Create a map.
  float zoomLevel = locationManager.accuracyAuthorization == CLAccuracyAuthorizationFullAccuracy ? preciseLocationZoomLevel : approximateLocationZoomLevel;
  GMSCameraPosition *camera = [GMSCameraPosition cameraWithLatitude:defaultLocation.latitude
                                                          longitude:defaultLocation.longitude
                                                               zoom:zoomLevel];
  mapView = [GMSMapView mapWithFrame:self.view.bounds camera:camera];
  mapView.settings.myLocationButton = YES;
  mapView.autoresizingMask = UIViewAutoresizingFlexibleWidth | UIViewAutoresizingFlexibleHeight;
  mapView.myLocationEnabled = YES;

  // Add the map to the view, hide it until we've got a location update.
  [self.view addSubview:mapView];
  mapView.hidden = YES;

  [self listLikelyPlaces];
}

// Populate the array with the list of likely places.
- (void) listLikelyPlaces
{
  // Clean up from previous sessions.
  likelyPlaces = [NSMutableArray array];

  GMSPlaceField placeFields = GMSPlaceFieldName | GMSPlaceFieldCoordinate;
  [placesClient findPlaceLikelihoodsFromCurrentLocationWithPlaceFields:placeFields callback:^(NSArray<GMSPlaceLikelihood *> * _Nullable likelihoods, NSError * _Nullable error) {
    if (error != nil) {
      // TODO: Handle the error.
      NSLog(@"Current Place error: %@", error.localizedDescription);
      return;
    }

    if (likelihoods == nil) {
      NSLog(@"No places found.");
      return;
    }

    for (GMSPlaceLikelihood *likelihood in likelihoods) {
      GMSPlace *place = likelihood.place;
      [likelyPlaces addObject:place];
    }
  }];
}

// Update the map once the user has made their selection.
- (void) unwindToMain:(UIStoryboardSegue *)segue
{
  // Clear the map.
  [mapView clear];

  // Add a marker to the map.
  if (selectedPlace != nil) {
    GMSMarker *marker = [GMSMarker markerWithPosition:selectedPlace.coordinate];
    marker.title = selectedPlace.name;
    marker.snippet = selectedPlace.formattedAddress;
    marker.map = mapView;
  }

  [self listLikelyPlaces];
}

// Prepare the segue.
- (void)prepareForSegue:(UIStoryboardSegue *)segue sender:(id)sender
{
  if ([segue.identifier isEqualToString:@"segueToSelect"]) {
    if ([segue.destinationViewController isKindOfClass:[PlacesViewController class]]) {
      PlacesViewController *placesViewController = (PlacesViewController *)segue.destinationViewController;
      placesViewController.likelyPlaces = likelyPlaces;
    }
  }
}

// Delegates to handle events for the location manager.
#pragma mark - CLLocationManagerDelegate

// Handle incoming location events.
- (void)locationManager:(CLLocationManager *)manager didUpdateLocations:(NSArray<CLLocation *> *)locations
{
  CLLocation *location = locations.lastObject;
  NSLog(@"Location: %@", location);

  float zoomLevel = locationManager.accuracyAuthorization == CLAccuracyAuthorizationFullAccuracy ? preciseLocationZoomLevel : approximateLocationZoomLevel;
  GMSCameraPosition * camera = [GMSCameraPosition cameraWithLatitude:location.coordinate.latitude
                                                           longitude:location.coordinate.longitude
                                                                zoom:zoomLevel];

  if (mapView.isHidden) {
    mapView.hidden = NO;
    mapView.camera = camera;
  } else {
    [mapView animateToCameraPosition:camera];
  }

  [self listLikelyPlaces];
}

// Handle authorization for the location manager.
- (void)locationManager:(CLLocationManager *)manager didChangeAuthorizationStatus:(CLAuthorizationStatus)status
{
  // Check accuracy authorization
  CLAccuracyAuthorization accuracy = manager.accuracyAuthorization;
  switch (accuracy) {
    case CLAccuracyAuthorizationFullAccuracy:
      NSLog(@"Location accuracy is precise.");
      break;
    case CLAccuracyAuthorizationReducedAccuracy:
      NSLog(@"Location accuracy is not precise.");
      break;
  }

  // Handle authorization status
  switch (status) {
    case kCLAuthorizationStatusRestricted:
      NSLog(@"Location access was restricted.");
      break;
    case kCLAuthorizationStatusDenied:
      NSLog(@"User denied access to location.");
      // Display the map using the default location.
      mapView.hidden = NO;
    case kCLAuthorizationStatusNotDetermined:
      NSLog(@"Location status not determined.");
    case kCLAuthorizationStatusAuthorizedAlways:
    case kCLAuthorizationStatusAuthorizedWhenInUse:
      NSLog(@"Location status is OK.");
  }
}

// Handle location manager errors.
- (void)locationManager:(CLLocationManager *)manager didFailWithError:(NSError *)error
{
  [manager stopUpdatingLocation];
  NSLog(@"Error: %@", error.localizedDescription);
}

@end
PlacesViewController
Swift
import UIKit
import GooglePlaces

class PlacesViewController: UIViewController {

  // ...

  // Pass the selected place to the new view controller.
  override func prepare(for segue: UIStoryboardSegue, sender: Any?) {
    if segue.identifier == "unwindToMain" {
      if let nextViewController = segue.destination as? MapViewController {
        nextViewController.selectedPlace = selectedPlace
      }
    }
  }
}

// Respond when a user selects a place.
extension PlacesViewController: UITableViewDelegate {
  func tableView(_ tableView: UITableView, didSelectRowAt indexPath: IndexPath) {
    selectedPlace = likelyPlaces[indexPath.row]
    performSegue(withIdentifier: "unwindToMain", sender: self)
  }

  // Adjust cell height to only show the first five items in the table
  // (scrolling is disabled in IB).
  func tableView(_ tableView: UITableView, heightForRowAt indexPath: IndexPath) -> CGFloat {
    return self.tableView.frame.size.height/5
  }

  // Make table rows display at proper height if there are less than 5 items.
  func tableView(_ tableView: UITableView, heightForFooterInSection section: Int) -> CGFloat {
    if (section == tableView.numberOfSections - 1) {
      return 1
    }
    return 0
  }
}

// Populate the table with the list of most likely places.
extension PlacesViewController: UITableViewDataSource {
  func tableView(_ tableView: UITableView, numberOfRowsInSection section: Int) -> Int {
    return likelyPlaces.count
  }

  func tableView(_ tableView: UITableView, cellForRowAt indexPath: IndexPath) -> UITableViewCell {
    let cell = tableView.dequeueReusableCell(withIdentifier: cellReuseIdentifier, for: indexPath)
    let collectionItem = likelyPlaces[indexPath.row]

    cell.textLabel?.text = collectionItem.name

    return cell
  }
}
Objective-C
#import "PlacesViewController.h"

@interface PlacesViewController () <UITableViewDataSource, UITableViewDelegate>
// ...

-(void)prepareForSegue:(UIStoryboardSegue *)segue sender:(id)sender
{

}

#pragma mark - UITableViewDelegate

// Respond when a user selects a place.
-(void)tableView:(UITableView *)tableView didSelectRowAtIndexPath:(NSIndexPath *)indexPath
{
  self.selectedPlace = [self.likelyPlaces objectAtIndex:indexPath.row];
  [self performSegueWithIdentifier:@"unwindToMain" sender:self];
}

// Adjust cell height to only show the first five items in the table
// (scrolling is disabled in IB).
-(CGFloat)tableView:(UITableView *)tableView heightForRowAtIndexPath:(NSIndexPath *)indexPath
{
  return self.tableView.frame.size.height/5;
}

// Make table rows display at proper height if there are less than 5 items.
-(CGFloat)tableView:(UITableView *)tableView heightForFooterInSection:(NSInteger)section
{
  if (section == tableView.numberOfSections - 1) {
    return 1;
  }
  return 0;
}

#pragma mark - UITableViewDataSource

- (NSInteger)tableView:(UITableView *)tableView numberOfRowsInSection:(NSInteger)section
{
  return self.likelyPlaces.count;
}

- (UITableViewCell *)tableView:(UITableView *)tableView cellForRowAtIndexPath:(NSIndexPath *)indexPath
{
  return [tableView dequeueReusableCellWithIdentifier:cellReuseIdentifier forIndexPath:indexPath];
}
@end
เริ่มต้นใช้งาน
Swift Package Manager
คุณติดตั้ง Maps SDK สำหรับ iOS ได้โดยใช้ Swift Package Manager
- นำทรัพยากร Dependency ของ Maps SDK สำหรับ iOS ที่มีอยู่ออก
- เปิดหน้าต่างเทอร์มินัลแล้วไปที่ไดเรกทอรี
tutorials/current-place-on-map -
ปิดพื้นที่ทำงาน Xcode แล้วเรียกใช้คำสั่งต่อไปนี้
        sudo gem install cocoapods-deintegrate cocoapods-clean
        pod deintegrate
        pod cache clean --all
        rm Podfile
        rm current-place-on-map.xcworkspace
- เปิดโปรเจ็กต์ Xcode แล้วลบ Podfile
- เพิ่ม Places และ Maps SDK โดยทำดังนี้
- ไปที่ไฟล์ > เพิ่มการขึ้นต่อกันของแพ็กเกจ
- ป้อน https://github.com/googlemaps/ios-places-sdk เป็น URL กด Enter เพื่อดึงแพ็กเกจ แล้วคลิกเพิ่มแพ็กเกจ
- ป้อน https://github.com/googlemaps/ios-maps-sdk เป็น URL กด Enter เพื่อดึงแพ็กเกจ แล้วคลิกเพิ่มแพ็กเกจ
- คุณอาจต้องรีเซ็ตแคชแพ็กเกจโดยใช้ไฟล์ > แพ็กเกจ > รีเซ็ตแคชแพ็กเกจ
ใช้ CocoaPods
- ดาวน์โหลดและติดตั้ง Xcode เวอร์ชัน 26.0 ขึ้นไป
- หากยังไม่มี CocoaPods
ให้ติดตั้งใน macOS โดยเรียกใช้คำสั่งต่อไปนี้จากเทอร์มินัล
sudo gem install cocoapods
- ไปที่ไดเรกทอรี
tutorials/current-place-on-map - เรียกใช้คำสั่ง
pod installซึ่งจะติดตั้ง SDK ของ Maps และ Places ที่ระบุไว้ในPodfileพร้อมกับการอ้างอิงทั้งหมด - เรียกใช้
pod outdatedเพื่อเปรียบเทียบเวอร์ชันพ็อดที่ติดตั้งกับการอัปเดตใหม่ หากตรวจพบเวอร์ชันใหม่ ให้เรียกใช้pod updateเพื่ออัปเดตPodfileและติดตั้ง SDK ล่าสุด ดูรายละเอียดเพิ่มเติมได้ที่คู่มือ CocoaPods - เปิด (ดับเบิลคลิก) ไฟล์ current-place-on-map.xcworkspace
ของโปรเจ็กต์เพื่อเปิดใน Xcode คุณต้องใช้ไฟล์
.xcworkspaceเพื่อเปิดโปรเจ็กต์
รับคีย์ API และเปิดใช้ API ที่จำเป็น
หากต้องการทำบทแนะนำนี้ให้เสร็จสมบูรณ์ คุณต้องมีคีย์ Google API ที่ได้รับอนุญาตให้ใช้ Maps SDK สำหรับ iOS และ Places API
- ทำตามวิธีการในเริ่มต้นใช้งาน Google Maps Platform เพื่อตั้งค่าบัญชีสำหรับการเรียกเก็บเงินและโปรเจ็กต์ที่เปิดใช้ผลิตภัณฑ์ทั้ง 2 รายการนี้
- ทำตามวิธีการในรับคีย์ API เพื่อสร้างคีย์ API สำหรับโปรเจ็กต์การพัฒนาที่คุณตั้งค่าไว้ก่อนหน้านี้
เพิ่มคีย์ API ลงในแอปพลิเคชัน
เพิ่มคีย์ API ลงใน AppDelegate.swift ดังนี้
- โปรดทราบว่ามีการเพิ่มคำสั่งนำเข้าต่อไปนี้ลงในไฟล์
import GooglePlaces
import GoogleMaps
- แก้ไขบรรทัดต่อไปนี้ในเมธอด
application(_:didFinishLaunchingWithOptions:)โดยแทนที่ YOUR_API_KEY ด้วยคีย์ API ของคุณGMSPlacesClient.provideAPIKey("YOUR_API_KEY") GMSServices.provideAPIKey("YOUR_API_KEY")
สร้างและเรียกใช้แอป
- เชื่อมต่ออุปกรณ์ iOS กับคอมพิวเตอร์ หรือเลือกโปรแกรมจำลองจากเมนูสคีม Xcode
- หากคุณใช้อุปกรณ์ โปรดตรวจสอบว่าได้เปิดใช้บริการตำแหน่งแล้ว หากใช้โปรแกรมจำลอง ให้เลือกตำแหน่งจากเมนูฟีเจอร์
- ใน Xcode ให้คลิกตัวเลือกเมนู Product/Run (หรือไอคอนปุ่มเล่น)
- Xcode จะสร้างแอป แล้วเรียกใช้แอปในอุปกรณ์หรือใน โปรแกรมจำลอง
- คุณควรเห็นแผนที่ที่มีเครื่องหมายหลายรายการซึ่งอยู่ตรงกลางตำแหน่งปัจจุบัน ของคุณ
การแก้ปัญหา:
- หากไม่เห็นแผนที่ ให้ตรวจสอบว่าคุณได้รับคีย์ API และเพิ่มคีย์ดังกล่าวลงในแอปแล้วตามที่อธิบายไว้ข้างต้น ตรวจสอบคอนโซลการแก้ไขข้อบกพร่องของ Xcode เพื่อดูข้อความแสดงข้อผิดพลาดเกี่ยวกับคีย์ API
- หากคุณจำกัดคีย์ API ตามตัวระบุชุด iOS ให้แก้ไขคีย์เพื่อเพิ่มตัวระบุชุดสำหรับแอป
com.google.examples.current-place-on-map - แผนที่จะแสดงอย่างไม่ถูกต้องหากคำขอสิทธิ์สำหรับ
บริการตำแหน่งถูกปฏิเสธ
- หากคุณใช้อุปกรณ์ ให้ไปที่การตั้งค่า/ทั่วไป/ความเป็นส่วนตัว/บริการ ตำแหน่ง แล้วเปิดใช้บริการตำแหน่งอีกครั้ง
- หากใช้โปรแกรมจำลอง ให้ไปที่โปรแกรมจำลอง/รีเซ็ตเนื้อหาและการตั้งค่า...
- ตรวจสอบว่าคุณมีการเชื่อมต่อ Wi-Fi หรือ GPS ที่สัญญาณดี
- หากแอปเปิดขึ้นแต่ไม่มีการแสดงแผนที่ ให้ตรวจสอบว่าคุณได้ อัปเดต Info.plist สำหรับโปรเจ็กต์ด้วยสิทธิ์เข้าถึงตำแหน่งที่เหมาะสมแล้ว ดูข้อมูลเพิ่มเติมเกี่ยวกับการจัดการสิทธิ์ได้ในคำแนะนำ เกี่ยวกับการขอสิทธิ์เข้าถึงตำแหน่งในแอป ด้านล่าง
- ใช้เครื่องมือแก้ไขข้อบกพร่องของ Xcode เพื่อดูบันทึกและแก้ไขข้อบกพร่องของแอป
ทำความเข้าใจโค้ด
ส่วนนี้ของบทแนะนำจะอธิบายส่วนที่สำคัญที่สุดของแอป current-place-on-map เพื่อช่วยให้คุณเข้าใจวิธีสร้างแอปที่คล้ายกัน
แอป current-place-on-map มีตัวควบคุมมุมมอง 2 รายการ
รายการหนึ่งแสดงแผนที่ที่แสดงสถานที่ที่ผู้ใช้เลือก และอีกรายการ
แสดงรายการสถานที่ที่น่าจะเป็นไปได้ให้ผู้ใช้เลือก โปรดทราบว่า
ตัวควบคุมมุมมองแต่ละรายการมีตัวแปรเดียวกันสำหรับการติดตามรายการ
สถานที่ที่น่าจะใช่ (likelyPlaces) และสำหรับการระบุตัวเลือกของผู้ใช้ (selectedPlace) การไปยังส่วนต่างๆ ระหว่างมุมมองทำได้โดยใช้ segue
การขอสิทธิ์เข้าถึงตำแหน่ง
แอปของคุณต้องแจ้งให้ผู้ใช้ให้ความยินยอมในการใช้บริการระบุตำแหน่ง โดยให้ใส่คีย์ NSLocationAlwaysUsageDescription ในไฟล์ Info.plist ของแอป และตั้งค่าของแต่ละคีย์เป็นสตริงที่อธิบายวิธีที่แอปตั้งใจจะใช้ข้อมูลตำแหน่ง
ตั้งค่าเครื่องมือจัดการตำแหน่ง
ใช้ CLLocationManager เพื่อค้นหาตำแหน่งปัจจุบันของอุปกรณ์และขอรับการอัปเดตเป็นประจำเมื่อ อุปกรณ์ย้ายไปยังตำแหน่งใหม่ บทแนะนำนี้มีโค้ดที่คุณต้องใช้เพื่อรับ ตำแหน่งของอุปกรณ์ ดูรายละเอียดเพิ่มเติมได้ในคู่มือ การรับตำแหน่งของผู้ใช้ ในเอกสารประกอบสำหรับนักพัฒนาซอฟต์แวร์ของ Apple
- ประกาศตัวจัดการตำแหน่ง ตำแหน่งปัจจุบัน มุมมองแผนที่ ไคลเอ็นต์ Places และระดับการซูมเริ่มต้นที่ระดับคลาส
- เริ่มต้นตัวจัดการตำแหน่งและ
GMSPlacesClientในviewDidLoad() - ประกาศตัวแปรเพื่อเก็บรายการสถานที่ที่น่าจะเป็นไปได้และสถานที่ที่ผู้ใช้เลือก
- เพิ่มผู้รับมอบสิทธิ์เพื่อจัดการเหตุการณ์สำหรับผู้จัดการสถานที่โดยใช้ ข้อกำหนดส่วนขยาย
Swift
var locationManager: CLLocationManager!
var currentLocation: CLLocation?
var mapView: GMSMapView!
var placesClient: GMSPlacesClient!
var preciseLocationZoomLevel: Float = 15.0
var approximateLocationZoomLevel: Float = 10.0
Objective-C
CLLocationManager *locationManager;
CLLocation * _Nullable currentLocation;
GMSMapView *mapView;
GMSPlacesClient *placesClient;
float preciseLocationZoomLevel;
float approximateLocationZoomLevel;
Swift
// Initialize the location manager.
locationManager = CLLocationManager()
locationManager.desiredAccuracy = kCLLocationAccuracyBest
locationManager.requestWhenInUseAuthorization()
locationManager.distanceFilter = 50
locationManager.startUpdatingLocation()
locationManager.delegate = self

placesClient = GMSPlacesClient.shared()
Objective-C
// Initialize the location manager.
locationManager = [[CLLocationManager alloc] init];
locationManager.desiredAccuracy = kCLLocationAccuracyBest;
[locationManager requestWhenInUseAuthorization];
locationManager.distanceFilter = 50;
[locationManager startUpdatingLocation];
locationManager.delegate = self;

placesClient = [GMSPlacesClient sharedClient];
Swift
// An array to hold the list of likely places.
var likelyPlaces: [GMSPlace] = []

// The currently selected place.
var selectedPlace: GMSPlace?
Objective-C
// An array to hold the list of likely places.
NSMutableArray<GMSPlace *> *likelyPlaces;

// The currently selected place.
GMSPlace * _Nullable selectedPlace;
Swift
// Delegates to handle events for the location manager.
extension MapViewController: CLLocationManagerDelegate {

  // Handle incoming location events.
  func locationManager(_ manager: CLLocationManager, didUpdateLocations locations: [CLLocation]) {
    let location: CLLocation = locations.last!
    print("Location: \(location)")

    let zoomLevel = locationManager.accuracyAuthorization == .fullAccuracy ? preciseLocationZoomLevel : approximateLocationZoomLevel
    let camera = GMSCameraPosition.camera(withLatitude: location.coordinate.latitude,
                                          longitude: location.coordinate.longitude,
                                          zoom: zoomLevel)

    if mapView.isHidden {
      mapView.isHidden = false
      mapView.camera = camera
    } else {
      mapView.animate(to: camera)
    }

    listLikelyPlaces()
  }

  // Handle authorization for the location manager.
  func locationManager(_ manager: CLLocationManager, didChangeAuthorization status: CLAuthorizationStatus) {
    // Check accuracy authorization
    let accuracy = manager.accuracyAuthorization
    switch accuracy {
    case .fullAccuracy:
        print("Location accuracy is precise.")
    case .reducedAccuracy:
        print("Location accuracy is not precise.")
    @unknown default:
      fatalError()
    }

    // Handle authorization status
    switch status {
    case .restricted:
      print("Location access was restricted.")
    case .denied:
      print("User denied access to location.")
      // Display the map using the default location.
      mapView.isHidden = false
    case .notDetermined:
      print("Location status not determined.")
    case .authorizedAlways: fallthrough
    case .authorizedWhenInUse:
      print("Location status is OK.")
    @unknown default:
      fatalError()
    }
  }

  // Handle location manager errors.
  func locationManager(_ manager: CLLocationManager, didFailWithError error: Error) {
    locationManager.stopUpdatingLocation()
    print("Error: \(error)")
  }
}
Objective-C
// Delegates to handle events for the location manager.
#pragma mark - CLLocationManagerDelegate

// Handle incoming location events.
- (void)locationManager:(CLLocationManager *)manager didUpdateLocations:(NSArray<CLLocation *> *)locations
{
  CLLocation *location = locations.lastObject;
  NSLog(@"Location: %@", location);

  float zoomLevel = locationManager.accuracyAuthorization == CLAccuracyAuthorizationFullAccuracy ? preciseLocationZoomLevel : approximateLocationZoomLevel;
  GMSCameraPosition * camera = [GMSCameraPosition cameraWithLatitude:location.coordinate.latitude
                                                           longitude:location.coordinate.longitude
                                                                zoom:zoomLevel];

  if (mapView.isHidden) {
    mapView.hidden = NO;
    mapView.camera = camera;
  } else {
    [mapView animateToCameraPosition:camera];
  }

  [self listLikelyPlaces];
}

// Handle authorization for the location manager.
- (void)locationManager:(CLLocationManager *)manager didChangeAuthorizationStatus:(CLAuthorizationStatus)status
{
  // Check accuracy authorization
  CLAccuracyAuthorization accuracy = manager.accuracyAuthorization;
  switch (accuracy) {
    case CLAccuracyAuthorizationFullAccuracy:
      NSLog(@"Location accuracy is precise.");
      break;
    case CLAccuracyAuthorizationReducedAccuracy:
      NSLog(@"Location accuracy is not precise.");
      break;
  }

  // Handle authorization status
  switch (status) {
    case kCLAuthorizationStatusRestricted:
      NSLog(@"Location access was restricted.");
      break;
    case kCLAuthorizationStatusDenied:
      NSLog(@"User denied access to location.");
      // Display the map using the default location.
      mapView.hidden = NO;
    case kCLAuthorizationStatusNotDetermined:
      NSLog(@"Location status not determined.");
    case kCLAuthorizationStatusAuthorizedAlways:
    case kCLAuthorizationStatusAuthorizedWhenInUse:
      NSLog(@"Location status is OK.");
  }
}

// Handle location manager errors.
- (void)locationManager:(CLLocationManager *)manager didFailWithError:(NSError *)error
{
  [manager stopUpdatingLocation];
  NSLog(@"Error: %@", error.localizedDescription);
}
การเพิ่มแผนที่
สร้างแผนที่และเพิ่มลงในมุมมองใน viewDidLoad() ใน
ตัวควบคุมมุมมองหลัก แผนที่จะซ่อนอยู่จนกว่าจะได้รับการอัปเดตตำแหน่ง
(การอัปเดตตำแหน่งจะได้รับการจัดการในส่วนขยาย CLLocationManagerDelegate
)
Swift
// A default location to use when location permission is not granted.
let defaultLocation = CLLocation(latitude: -33.869405, longitude: 151.199)

// Create a map.
let zoomLevel = locationManager.accuracyAuthorization == .fullAccuracy ? preciseLocationZoomLevel : approximateLocationZoomLevel
let camera = GMSCameraPosition.camera(withLatitude: defaultLocation.coordinate.latitude,
                                      longitude: defaultLocation.coordinate.longitude,
                                      zoom: zoomLevel)
mapView = GMSMapView.map(withFrame: view.bounds, camera: camera)
mapView.settings.myLocationButton = true
mapView.autoresizingMask = [.flexibleWidth, .flexibleHeight]
mapView.isMyLocationEnabled = true

// Add the map to the view, hide it until we've got a location update.
view.addSubview(mapView)
mapView.isHidden = true
Objective-C
// A default location to use when location permission is not granted.
CLLocationCoordinate2D defaultLocation = CLLocationCoordinate2DMake(-33.869405, 151.199);

// Create a map.
float zoomLevel = locationManager.accuracyAuthorization == CLAccuracyAuthorizationFullAccuracy ? preciseLocationZoomLevel : approximateLocationZoomLevel;
GMSCameraPosition *camera = [GMSCameraPosition cameraWithLatitude:defaultLocation.latitude
                                                        longitude:defaultLocation.longitude
                                                             zoom:zoomLevel];
mapView = [GMSMapView mapWithFrame:self.view.bounds camera:camera];
mapView.settings.myLocationButton = YES;
mapView.autoresizingMask = UIViewAutoresizingFlexibleWidth | UIViewAutoresizingFlexibleHeight;
mapView.myLocationEnabled = YES;

// Add the map to the view, hide it until we've got a location update.
[self.view addSubview:mapView];
mapView.hidden = YES;
แจ้งให้ผู้ใช้เลือกสถานที่ปัจจุบัน
ใช้ Places SDK สำหรับ iOS เพื่อรับความน่าจะเป็นของสถานที่ 5 อันดับแรกตามตำแหน่งปัจจุบันของผู้ใช้ และแสดงรายการใน UITableView เมื่อผู้ใช้เลือกสถานที่ ให้เพิ่มเครื่องหมายลงใน
แผนที่
- รับรายการสถานที่ที่น่าจะเป็นไปได้เพื่อป้อนข้อมูลใน
UITableViewซึ่งผู้ใช้สามารถเลือกสถานที่ที่ตนอยู่ได้ - เปิดมุมมองใหม่เพื่อแสดงสถานที่ที่ผู้ใช้น่าจะสนใจ เมื่อผู้ใช้
แตะ "รับสถานที่" เราจะเปลี่ยนไปมุมมองใหม่และแสดงรายการสถานที่ที่อาจเป็นไปได้
ให้ผู้ใช้เลือก ฟังก์ชัน
prepareupdatesPlacesViewControllerพร้อมรายการสถานที่ที่น่าจะใช่ในปัจจุบัน และจะเรียกใช้โดยอัตโนมัติเมื่อมีการเปลี่ยนฉาก - ใน
PlacesViewControllerให้กรอกตารางโดยใช้รายการสถานที่ที่มีแนวโน้มมากที่สุด โดยใช้ส่วนขยายUITableViewDataSource - จัดการการเลือกของผู้ใช้โดยใช้ส่วนขยาย
UITableViewDelegatedelegate
Swift
// Populate the array with the list of likely places.
func listLikelyPlaces() {
  // Clean up from previous sessions.
  likelyPlaces.removeAll()

  let placeFields: GMSPlaceField = [.name, .coordinate]
  placesClient.findPlaceLikelihoodsFromCurrentLocation(withPlaceFields: placeFields) { (placeLikelihoods, error) in
    guard error == nil else {
      // TODO: Handle the error.
      print("Current Place error: \(error!.localizedDescription)")
      return
    }

    guard let placeLikelihoods = placeLikelihoods else {
      print("No places found.")
      return
    }

    // Get likely places and add to the list.
    for likelihood in placeLikelihoods {
      let place = likelihood.place
      self.likelyPlaces.append(place)
    }
  }
}
Objective-C
// Populate the array with the list of likely places.
- (void) listLikelyPlaces
{
  // Clean up from previous sessions.
  likelyPlaces = [NSMutableArray array];

  GMSPlaceField placeFields = GMSPlaceFieldName | GMSPlaceFieldCoordinate;
  [placesClient findPlaceLikelihoodsFromCurrentLocationWithPlaceFields:placeFields callback:^(NSArray<GMSPlaceLikelihood *> * _Nullable likelihoods, NSError * _Nullable error) {
    if (error != nil) {
      // TODO: Handle the error.
      NSLog(@"Current Place error: %@", error.localizedDescription);
      return;
    }

    if (likelihoods == nil) {
      NSLog(@"No places found.");
      return;
    }

    for (GMSPlaceLikelihood *likelihood in likelihoods) {
      GMSPlace *place = likelihood.place;
      [likelyPlaces addObject:place];
    }
  }];
}
Swift
// Prepare the segue.
override func prepare(for segue: UIStoryboardSegue, sender: Any?) {
  if segue.identifier == "segueToSelect" {
    if let nextViewController = segue.destination as? PlacesViewController {
      nextViewController.likelyPlaces = likelyPlaces
    }
  }
}
Objective-C
// Prepare the segue.
- (void)prepareForSegue:(UIStoryboardSegue *)segue sender:(id)sender
{
  if ([segue.identifier isEqualToString:@"segueToSelect"]) {
    if ([segue.destinationViewController isKindOfClass:[PlacesViewController class]]) {
      PlacesViewController *placesViewController = (PlacesViewController *)segue.destinationViewController;
      placesViewController.likelyPlaces = likelyPlaces;
    }
  }
}
Swift
// Populate the table with the list of most likely places.
extension PlacesViewController: UITableViewDataSource {
  func tableView(_ tableView: UITableView, numberOfRowsInSection section: Int) -> Int {
    return likelyPlaces.count
  }

  func tableView(_ tableView: UITableView, cellForRowAt indexPath: IndexPath) -> UITableViewCell {
    let cell = tableView.dequeueReusableCell(withIdentifier: cellReuseIdentifier, for: indexPath)
    let collectionItem = likelyPlaces[indexPath.row]

    cell.textLabel?.text = collectionItem.name

    return cell
  }
}
Objective-C
#pragma mark - UITableViewDataSource

- (NSInteger)tableView:(UITableView *)tableView numberOfRowsInSection:(NSInteger)section
{
  return self.likelyPlaces.count;
}

- (UITableViewCell *)tableView:(UITableView *)tableView cellForRowAtIndexPath:(NSIndexPath *)indexPath
{
  return [tableView dequeueReusableCellWithIdentifier:cellReuseIdentifier forIndexPath:indexPath];
}
@end
Swift
class PlacesViewController: UIViewController {

  // ...

  // Pass the selected place to the new view controller.
  override func prepare(for segue: UIStoryboardSegue, sender: Any?) {
    if segue.identifier == "unwindToMain" {
      if let nextViewController = segue.destination as? MapViewController {
        nextViewController.selectedPlace = selectedPlace
      }
    }
  }
}

// Respond when a user selects a place.
extension PlacesViewController: UITableViewDelegate {
  func tableView(_ tableView: UITableView, didSelectRowAt indexPath: IndexPath) {
    selectedPlace = likelyPlaces[indexPath.row]
    performSegue(withIdentifier: "unwindToMain", sender: self)
  }

  // Adjust cell height to only show the first five items in the table
  // (scrolling is disabled in IB).
  func tableView(_ tableView: UITableView, heightForRowAt indexPath: IndexPath) -> CGFloat {
    return self.tableView.frame.size.height/5
  }

  // Make table rows display at proper height if there are less than 5 items.
  func tableView(_ tableView: UITableView, heightForFooterInSection section: Int) -> CGFloat {
    if (section == tableView.numberOfSections - 1) {
      return 1
    }
    return 0
  }
}
Objective-C
@interface PlacesViewController () <UITableViewDataSource, UITableViewDelegate>
// ...

-(void)prepareForSegue:(UIStoryboardSegue *)segue sender:(id)sender
{

}

#pragma mark - UITableViewDelegate

// Respond when a user selects a place.
-(void)tableView:(UITableView *)tableView didSelectRowAtIndexPath:(NSIndexPath *)indexPath
{
  self.selectedPlace = [self.likelyPlaces objectAtIndex:indexPath.row];
  [self performSegueWithIdentifier:@"unwindToMain" sender:self];
}

// Adjust cell height to only show the first five items in the table
// (scrolling is disabled in IB).
-(CGFloat)tableView:(UITableView *)tableView heightForRowAtIndexPath:(NSIndexPath *)indexPath
{
  return self.tableView.frame.size.height/5;
}

// Make table rows display at proper height if there are less than 5 items.
-(CGFloat)tableView:(UITableView *)tableView heightForFooterInSection:(NSInteger)section
{
  if (section == tableView.numberOfSections - 1) {
    return 1;
  }
  return 0;
}
เพิ่มเครื่องหมายลงในแผนที่
เมื่อผู้ใช้เลือก ให้ใช้การเปลี่ยนฉากแบบย้อนกลับเพื่อกลับไปยัง
มุมมองก่อนหน้า แล้วเพิ่มเครื่องหมายลงในแผนที่ ระบบจะเรียกใช้ unwindToMain
IBAction โดยอัตโนมัติเมื่อกลับไปที่ตัวควบคุมมุมมองหลัก
Swift
// Update the map once the user has made their selection.
@IBAction func unwindToMain(segue: UIStoryboardSegue) {
  // Clear the map.
  mapView.clear()

  // Add a marker to the map.
  if let place = selectedPlace {
    let marker = GMSMarker(position: place.coordinate)
    marker.title = selectedPlace?.name
    marker.snippet = selectedPlace?.formattedAddress
    marker.map = mapView
  }

  listLikelyPlaces()
}
Objective-C
// Update the map once the user has made their selection.
- (void) unwindToMain:(UIStoryboardSegue *)segue
{
  // Clear the map.
  [mapView clear];

  // Add a marker to the map.
  if (selectedPlace != nil) {
    GMSMarker *marker = [GMSMarker markerWithPosition:selectedPlace.coordinate];
    marker.title = selectedPlace.name;
    marker.snippet = selectedPlace.formattedAddress;
    marker.map = mapView;
  }

  [self listLikelyPlaces];
}
ยินดีด้วย คุณได้สร้างแอป iOS ที่ให้ผู้ใช้เลือก สถานที่ปัจจุบันและแสดงผลลัพธ์บนแผนที่ Google ในระหว่างการทำเช่นนี้ คุณได้เรียนรู้วิธีใช้ Places SDK สำหรับ iOS, Maps SDK สำหรับ iOS และเฟรมเวิร์ก Apple Core Location