지도 상단에 이미지를 타일 계층으로 추가할 수 있습니다. 타일 레이어는 특정 확대/축소 수준에서 지도 타일 위에 배치됩니다. 타일이 충분하면 여러 확대/축소 수준에서 전체 지도의 Google 지도 데이터를 보완할 수 있습니다.
소개
타일 레이어(타일 오버레이라고도 함)를 사용하면 Google의 기본 지도 타일 위에 이미지를 겹칠 수 있습니다. 이 기능을 사용하여 관심분야, 교통 정보, 로컬 이미지와 같은 데이터를 앱에 추가합니다. kGMSTypeNone 지도 유형과 결합하면 타일 레이어를 사용하여 Google의 기본 지도 데이터를 자체 데이터로 효과적으로 대체할 수 있습니다.
타일 레이어는 대체로 큰 지리적 영역이 포함된 광범위한 이미지를 지도에 추가하고자 할 때 유용합니다. 반면 지면 오버레이는 단일 이미지를 지도의 한 지점에 고정하려는 경우에 유용합니다.
타일 좌표
지도 API는 각 확대/축소 수준의 이미지를 순서가 지정된 그리드에 정렬된 정사각형 지도 타일 집합으로 분할합니다. 지도가 새 위치나 새 확대/축소 수준으로 스크롤되면 지도 API는 어느 타일이 필요한지 알아내고 이를 검색할 타일 집합으로 변환합니다.
Google의 메르카토르 투영법 구현에서 좌표가 (0,0)인 타일은 항상 지도의 북서쪽 모서리에 있으며 x 값은 서쪽에서 동쪽으로 갈수록 증가하고 y 값은 북쪽에서 남쪽으로 갈수록 증가합니다.
타일의 색인은 해당 원점에서부터 x,y 좌표를 사용하여 생성됩니다. 예를 들어 확대/축소 수준 2에서 지구가 16개의 타일로 나뉘면 각 타일은 다음과 같이 고유한 x,y 쌍으로 참조될 수 있습니다.
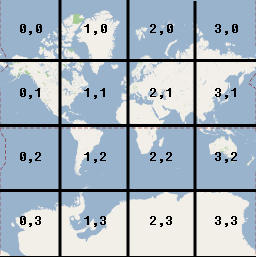
각 지도 타일은 256x256 포인트의 정사각형입니다. 확대/축소 수준 0에서는 세계 전체가 하나의 타일에 렌더링됩니다. 각 확대/축소 수준에서 2의 배수로 배율이 올라갑니다. 예를 들어 확대/축소 수준 1에서 지도는 2x2 그리드의 타일로 렌더링되고, 확대/축소 수준 2에서는 4x4 그리드로, 확대/축소 수준 3에서는 8x8 그리드로 렌더링됩니다. 타일 레이어의 이미지를 만들려면 지원하려는 각 확대/축소 수준에서 각 타일에 대해 256x256 포인트 이미지를 만듭니다.
GMSTileLayer를 서브클래스화하여 나중에 타일 이미지로 다시 호출되는 비동기 메서드 requestTileForX:y:zoom의 구현을 제공합니다.
기존 클래스 GMSURLTileLayer를 사용하여 URL에서 타일을 자동으로 가져와 GMSTileURLConstructor 블록을 제공합니다. GMSURLTileLayer는 서브클래스로 만들 수 없는 구체적인 클래스입니다.
GMSSyncTileLayer 또는 GMSTileLayer를 서브클래스화하는 경우 nil 타일 결과를 제공하면 iOS용 Maps SDK에 데이터가 제공되지 않지만 향후 제공될 수 있다고 알립니다. 또는 이 위치에 타일이 없음을 나타내기 위해 kGMSTileLayerNoTile를 반환합니다.
GMSURLTileLayer의 경우 GMSTileURLConstructor에서 nil를 반환하면 이 위치에 타일이 없음을 나타냅니다.
GMSURLTileLayer를 사용하여 URL에서 타일 가져오기
GMSURLTileLayer에는 서브클래스가 필요하지 않지만 GMSTileURLConstructor 블록을 구현해야 합니다. 아래 코드는 GMSURLTileLayer를 사용하여 다층 건물의 평면도를 표시하는 방법을 보여줍니다.
Swift
letfloor=1// Implement GMSTileURLConstructor// Returns a Tile based on the x,y,zoom coordinates, and the requested floorleturls:GMSTileURLConstructor={(x,y,zoom)inleturl="https://www.example.com/floorplans/L\(floor)_\(zoom)_\(x)_\(y).png"returnURL(string:url)}// Create the GMSTileLayerletlayer=GMSURLTileLayer(urlConstructor:urls)// Display on the map at a specific zIndexlayer.zIndex=100layer.map=mapView
Objective-C
NSIntegerfloor=1;// Create the GMSTileLayerGMSURLTileLayer*layer=[GMSURLTileLayertileLayerWithURLConstructor:^NSURL*_Nullable(NSUIntegerx,NSUIntegery,NSUIntegerzoom){NSString*url=[NSStringstringWithFormat:@"https://www.example.com/floorplans/L%ld_%lu_%lu_%lu.png",(long)floor,(unsignedlong)zoom,(unsignedlong)x,(unsignedlong)y];return[NSURLURLWithString:url];}];// Display on the map at a specific zIndexlayer.zIndex=100;layer.map=mapView;
GMSSyncTileLayer를 하위 클래스로 지정하여 UIImage로 타일 게재
GMSSyncTileLayer 및 GMSTileLayer은 서브클래스로 처리되도록 설계된 추상 클래스입니다. 이러한 클래스를 사용하여 타일을 UIImage로 제공할 수 있습니다. 아래 예에서는 GMSSyncTileLayer를 서브클래싱하여 지도에 있는 일부 타일 위에 맞춤 이미지를 렌더링하는 방법을 보여줍니다.
Swift
classTestTileLayer:GMSSyncTileLayer{overridefunctileFor(x:UInt,y:UInt,zoom:UInt)->UIImage?{// On every odd tile, render an image.if(x%2==1){returnUIImage(named:"australia")}else{returnkGMSTileLayerNoTile}}}
Objective-C
@interfaceTestTileLayer : GMSSyncTileLayer@end@implementationTestTileLayer-(UIImage*)tileForX:(NSUInteger)xy:(NSUInteger)yzoom:(NSUInteger)zoom{// On every odd tile, render an image.if(x%2==1){return[UIImageimageNamed:@"australia"];}else{returnkGMSTileLayerNoTile;}}@end
tileSize을 512로 설정하여 GMSSyncTileLayer 또는 GMSURLTileLayer와 함께 고해상도 이미지를 사용할 수 있습니다.
tileSize 속성은 반환된 타일 이미지가 표시되기를 원하는 픽셀 수를 나타냅니다. 기본값은 256입니다. 이는 Retina가 아닌 기기에서 Google 지도 타일의 크기입니다.
고DPI 기기에 일반 DPI 타일을 표시하는 경우 tileSize을 512로 설정하여 이미지를 확대할 수 있습니다. 이미지를 업스케일링하면 특히 가는 선이나 텍스트의 경우 이미지 품질이 저하될 수 있습니다. 최상의 결과를 얻으려면 tileSize 및 이미지 DPI를 디스플레이와 일치시키세요. 레티나 기기에 표시되는 지도는 tileSize가 512인 고DPI 이미지를 표시할 때 가장 보기 좋으며, 비레티나 기기에 표시되는 지도는 일반 이미지와 기본 tileSize인 256으로도 보기 좋습니다.
오래된 타일 삭제
레이어에서 제공하는 타일이 '오래된' 경우 레이어에서 clearTileCache 메서드를 호출하여 강제로 새로고침해야 합니다. 그러면 이 레이어에 있는 모든 타일이 다시 로드됩니다.
[[["이해하기 쉬움","easyToUnderstand","thumb-up"],["문제가 해결됨","solvedMyProblem","thumb-up"],["기타","otherUp","thumb-up"]],[["필요한 정보가 없음","missingTheInformationINeed","thumb-down"],["너무 복잡함/단계 수가 너무 많음","tooComplicatedTooManySteps","thumb-down"],["오래됨","outOfDate","thumb-down"],["번역 문제","translationIssue","thumb-down"],["샘플/코드 문제","samplesCodeIssue","thumb-down"],["기타","otherDown","thumb-down"]],["최종 업데이트: 2025-08-31(UTC)"],[[["\u003cp\u003eTile layers allow you to overlay images on top of Google Maps base map tiles to add custom data or imagery.\u003c/p\u003e\n"],["\u003cp\u003eTile layers are organized in a grid system, with each tile representing a square portion of the map at a specific zoom level.\u003c/p\u003e\n"],["\u003cp\u003eYou can create tile layers using \u003ccode\u003eGMSURLTileLayer\u003c/code\u003e to fetch tiles from URLs or by subclassing \u003ccode\u003eGMSSyncTileLayer\u003c/code\u003e or \u003ccode\u003eGMSTileLayer\u003c/code\u003e to provide tile images directly.\u003c/p\u003e\n"],["\u003cp\u003eUse a \u003ccode\u003etileSize\u003c/code\u003e of 512 for high DPI tiles on Retina devices for optimal visual quality.\u003c/p\u003e\n"],["\u003cp\u003eCall \u003ccode\u003eclearTileCache\u003c/code\u003e to refresh stale or outdated tile data.\u003c/p\u003e\n"]]],[],null,["Select platform: [Android](/maps/documentation/android-sdk/tileoverlay \"View this page for the Android platform docs.\") [iOS](/maps/documentation/ios-sdk/tiles \"View this page for the iOS platform docs.\") [JavaScript](/maps/documentation/javascript/customoverlays \"View this page for the JavaScript platform docs.\")\n\n\u003cbr /\u003e\n\nYou can add images on top of your map as a Tile Layer. Tile Layers are\nplaced overtop of a map tile at a specific zoom level. With enough tiles, you\ncan supplement Google's map data for the entire map, at multiple zoom levels.\n\nIntroduction\n\nTile layers, sometimes referred to as Tile Overlays, let you superimpose\nimages on top of Google's base map tiles. Use this feature to add data,\nsuch as points of interest or traffic information, and local imagery to\nyour app. When combined with the `kGMSTypeNone` map type,\ntile layers effectively let you replace Google's base map data with your own.\n\nTile layers are useful when you want to add extensive imagery, typically\ncovering large geographical areas, to the map. By contrast, [ground\noverlays](/maps/documentation/ios-sdk/overlays) are useful when you want to fix a single image at one\npoint on the map.\n\nTile coordinates\n\nThe Maps API breaks up imagery at each zoom level into a set of square map\ntiles, which are arranged in an ordered grid. When a map scrolls to\na new location, or to a new zoom level, the Maps API determines which tiles\nare needed, and translates that into a set of tiles to retrieve.\n\nIn the Google implementation of the Mercator projection, the tile with\ncoordinate (0,0) is always at the northwest corner of the map, with `x` values\nincreasing from west to east and `y` values increasing from north to south.\nTiles are indexed using `x,y` coordinates from that origin. For example, at\nzoom level 2, when the earth is divided up into 16 tiles, each tile can be\nreferenced by a unique `x,y` pair:\n\nEach map tile is a 256x256 point square. At zoom level 0, the entire world is\nrendered in a single tile. Each zoom level increases the magnification by a\nfactor of two. So, for example, at zoom level 1 the map is rendered as a 2x2\ngrid of tiles, at zoom level 2 as a 4x4 grid , and at zoom level 3 as an 8x8\ngrid. To create images for a tile layer, create a\n256x256 point image for each tile at each zoom level that you want to support.\n\nAdd a Tile Layer\n\n1. Instantiate a [`GMSURLTileLayer`](/maps/documentation/ios-sdk/reference/objc/Classes/GMSURLTileLayer) object, or a custom subclass of [`GMSTileLayer`](/maps/documentation/ios-sdk/reference/objc/Classes/GMSTileLayer) or [`GMSSyncTileLayer`](/maps/documentation/ios-sdk/reference/objc/Classes/GMSSyncTileLayer).\n2. Optionally modify the `zIndex` property to adjust its position in relation to other tile layers.\n3. Assign the `GMSTileLayer` object to the map by setting its `map` property.\n\nThe Maps SDK for iOS provides three classes that can be used to\nimplement a tile layer. With each class, you will need to define how to fetch\nthe correct map tile for a given set of `{x,y,zoom}` coordinates. The\navailable options are:\n\n- Subclass `GMSSyncTileLayer`, providing the implementation of `tileForX:y:zoom` that returns `UIImage` instances.\n- Subclass `GMSTileLayer`, providing the implementation of the asynchronous method `requestTileForX:y:zoom` that later calls back with a tile image.\n- Use the existing class, `GMSURLTileLayer`, to fetch tiles automatically from URLs, providing the `GMSTileURLConstructor` block. `GMSURLTileLayer` is a concrete class that cannot be subclassed.\n\nIn the case of subclassing `GMSSyncTileLayer` or `GMSTileLayer`, providing a\n`nil` tile result will tell the Maps SDK for iOS that data is\nunavailable but that it may be available in the future. Alternatively,\nreturn `kGMSTileLayerNoTile` to indicate that there is no tile at this\nlocation.\n\nFor `GMSURLTileLayer`, returning `nil` from the `GMSTileURLConstructor` will\nindicate that there is no tile at this location.\n\nUse GMSURLTileLayer to fetch tiles from URLs\n\nThe `GMSURLTileLayer` does not require subclassing, but you will have to\nimplement the `GMSTileURLConstructor` block. The below code shows how to\nuse `GMSURLTileLayer` to display the floor plan of a multistory building.\n\n\nSwift \n\n```swift\nlet floor = 1\n\n// Implement GMSTileURLConstructor\n// Returns a Tile based on the x,y,zoom coordinates, and the requested floor\nlet urls: GMSTileURLConstructor = { (x, y, zoom) in\n let url = \"https://www.example.com/floorplans/L\\(floor)_\\(zoom)_\\(x)_\\(y).png\"\n return URL(string: url)\n}\n\n// Create the GMSTileLayer\nlet layer = GMSURLTileLayer(urlConstructor: urls)\n\n// Display on the map at a specific zIndex\nlayer.zIndex = 100\nlayer.map = mapView\n \n```\n\nObjective-C \n\n```objective-c\nNSInteger floor = 1;\n\n// Create the GMSTileLayer\nGMSURLTileLayer *layer = [GMSURLTileLayer tileLayerWithURLConstructor:^NSURL * _Nullable(NSUInteger x, NSUInteger y, NSUInteger zoom) {\n NSString *url = [NSString stringWithFormat:@\"https://www.example.com/floorplans/L%ld_%lu_%lu_%lu.png\",\n (long)floor, (unsigned long)zoom, (unsigned long)x, (unsigned long)y];\n return [NSURL URLWithString:url];\n}];\n\n// Display on the map at a specific zIndex\nlayer.zIndex = 100;\nlayer.map = mapView;\n \n```\n\n\u003cbr /\u003e\n\nSubclass GMSSyncTileLayer to serve tiles as a UIImage\n\nThe `GMSSyncTileLayer` and `GMSTileLayer` are abstract classes designed to be\nsubclassed. You can use these classes to serve tiles as `UIImage`'s. The below\nexample shows how to render a custom image over some of the tiles on the map\nby subclassing `GMSSyncTileLayer`.\n\n\nSwift \n\n```swift\nclass TestTileLayer: GMSSyncTileLayer {\n override func tileFor(x: UInt, y: UInt, zoom: UInt) -\u003e UIImage? {\n // On every odd tile, render an image.\n if (x % 2 == 1) {\n return UIImage(named: \"australia\")\n } else {\n return kGMSTileLayerNoTile\n }\n }\n}\n\n \n```\n\nObjective-C \n\n```objective-c\n@interface TestTileLayer : GMSSyncTileLayer\n@end\n\n@implementation TestTileLayer\n\n- (UIImage *)tileForX:(NSUInteger)x y:(NSUInteger)y zoom:(NSUInteger)zoom {\n // On every odd tile, render an image.\n if (x % 2 == 1) {\n return [UIImage imageNamed:@\"australia\"];\n } else {\n return kGMSTileLayerNoTile;\n }\n}\n\n@end\n \n```\n\n\u003cbr /\u003e\n\nTo add the layer to your map, instantiate the object and set its map property.\n\n\nSwift \n\n```swift\nlet layer = TestTileLayer()\nlayer.map = mapView\n \n```\n\nObjective-C \n\n```objective-c\nGMSTileLayer *layer = [[TestTileLayer alloc] init];\nlayer.map = mapView;\n \n```\n\n\u003cbr /\u003e\n\nHigh DPI Tiles for Retina devices\n\nYou can use high DPI images with either [`GMSSyncTileLayer`](/maps/documentation/ios-sdk/reference/objc/Classes/GMSSyncTileLayer)\nor [`GMSURLTileLayer`](/maps/documentation/ios-sdk/reference/objc/Classes/GMSURLTileLayer) by setting the `tileSize` to 512.\nThe `tileSize` property indicates the number of pixels that the returned tile\nimages will prefer to display as; this defaults to 256 --- the dimension\nof a Google Maps tile on a non-Retina device.\n\nIf you are displaying normal DPI tiles on a high DPI device you can scale the\nimages up by setting `tileSize` to 512. Note that upscaling images may reduce\nimage quality, especially for fine lines or text. For best results, match the\n`tileSize` and image DPI to the display. Maps shown on a Retina device will\nlook their best when displaying high DPI images with a `tileSize` of 512;\nwhile maps shown on a non-Retina device will look great with normal images\nand the default `tileSize` of 256.\n| **Note:** Values less than 256 are not recommended for Retina devices.\n\nClear stale tiles\n\nIf the tiles provided by the layer become 'stale', then the method\n`clearTileCache` should be called on the layer to force a refresh. This will\ncause all of the tiles on this layer to be reloaded.\n\n\nSwift \n\n```swift\nlayer.clearTileCache()\n \n```\n\nObjective-C \n\n```objective-c\n[layer clearTileCache];\n \n```\n\n\u003cbr /\u003e"]]