
بعد تفعيل الفوترة وإنشاء مفتاح لواجهة برمجة التطبيقات، يمكنك إعداد مشروع Xcode الذي تستخدمه لتطوير تطبيقك.
تتوفّر ملاحظات الإصدار لكل إصدار.
الخطوة 1: تثبيت البرامج المطلوبة
لإنشاء مشروع باستخدام حزمة تطوير البرامج بالاستناد إلى بيانات "خرائط Google" للتطبيقات المتوافقة مع iOS، يجب تنزيل وتثبيت ما يلي:
- Xcode الإصدار 26.0 أو إصدار أحدث
الخطوة 2: إنشاء مشروع Xcode وتثبيت حزمة تطوير البرامج بالاستناد إلى بيانات "خرائط Google" للتطبيقات المتوافقة مع iOS
يمكن أن يختلف حجم تثبيت حزمة SDK. على سبيل المثال، يبلغ حجم التثبيت للإصدار 9.0 من حزمة تطوير البرامج بالاستناد إلى بيانات "خرائط Google" للتطبيقات المتوافقة مع iOS حوالي 18 ميغابايت.
Swift Package Manager
يمكن تثبيت حزمة تطوير البرامج بالاستناد إلى بيانات "خرائط Google" للتطبيقات المتوافقة مع iOS من خلال Swift Package Manager. لإضافة حزمة SDK، تأكَّد من إزالة أي تبعيات حالية لحزمة تطوير البرامج بالاستناد إلى بيانات "خرائط Google" للتطبيقات المتوافقة مع iOS.
لإضافة حزمة SDK إلى مشروع جديد أو حالي، اتّبِع الخطوات التالية:
-
افتح Xcode
project أوworkspace، ثم انتقِل إلى ملف > إضافة موارد الاعتمادية للحزمة (File > Add Package Dependencies). - أدخِل https://github.com/googlemaps/ios-maps-sdk كعنوان URL، واضغط على Enter لإحضار الحزمة، ثم انقر على "إضافة حزمة".
-
لتثبيت
versionمعيّن، اضبط الحقل قاعدة الاعتمادية على أحد الخيارات المستندة إلى الإصدار. بالنسبة إلى المشاريع الجديدة، ننصحك بتحديد أحدث إصدار واستخدام الخيار "الإصدار الدقيق". بعد إتمام الخطوة السابقة، انقر على "إضافة حزمة".
لتعديل package لمشروع حالي، اتّبِع الخطوات التالية:
إذا كنت بصدد الترقية من إصدار أقدم من 9.0.0، عليك إزالة موارد الاعتمادية التالية:
GoogleMapsBaseوGoogleMapsCoreوGoogleMapsM4Bبعد الترقية. لا تُزِل الاعتمادية الخاصة بـGoogleMaps. لمزيد من المعلومات، يُرجى الاطّلاع على ملاحظات الإصدار 9.0.0.من إعدادات ضبط مشروع Xcode، ابحث عن الأطر والمكتبات والمحتوى المضمّن. استخدِم علامة الطرح(-) لإزالة إطار العمل التالي:
GoogleMapsBase(فقط للترقية من إصدارات أقدم من 9.0.0)GoogleMapsCore(فقط للترقية من إصدارات أقدم من 9.0.0)GoogleMapsM4B(فقط للترقية من إصدارات أقدم من 9.0.0)
- من Xcode، انتقِل إلى "ملف > الحِزم > التحديث إلى أحدث إصدارات الحِزم" (File > Packages > Update To Latest Package Versions).
- للتأكّد من عملية التثبيت، انتقِل إلى قسم متطلبات الحزمة في مستكشف المشاريع للتأكّد من الحزمة وإصدارها.
لإزالة موارد الاعتمادية الحالية لحزمة تطوير البرامج بالاستناد إلى بيانات "خرائط Google" للتطبيقات المتوافقة مع iOS التي تمت إضافتها باستخدام
CocoaPods، اتّبِع الخطوات التالية:
- أغلِق مساحة عمل Xcode. افتح الوحدة الطرفية ونفِّذ الأمر التالي:
sudo gem install cocoapods-deintegrate cocoapods-clean
pod deintegrate
pod cache clean --all
-
أزِل
PodfileوPodfile.resolvedوworkspaceمن Xcode إذا كنت لا تستخدمها لأي غرض آخر غير CocoaPods.
-
من إعدادات ضبط مشروع Xcode، ابحث عن الأطر والمكتبات
والمحتوى المضمن. استخدِم علامة الطرح(-) لإزالة الإطار التالي:
GoogleMapsGoogleMapsBase(لعمليات التثبيت الأقدم من الإصدار 9.2.0 فقط)GoogleMapsCore(لعمليات التثبيت الأقدم من الإصدار 9.2.0 فقط)GoogleMapsM4B(لعمليات التثبيت التي تمت قبل الإصدار 9.0.0 فقط)
-
من دليل المستوى الأعلى لمشروع Xcode، أزِل الحزمة
GoogleMaps.
التثبيت اليدوي
يوضّح هذا الدليل كيفية إضافة XCFrameworks التي تحتوي على حزمة تطوير البرامج بالاستناد إلى بيانات "خرائط Google" للتطبيقات المتوافقة مع iOS إلى مشروعك يدويًا، وكيفية ضبط إعدادات الإصدار في Xcode. XCFramework هي حزمة ثنائية يمكنك استخدامها على منصات متعددة، بما في ذلك الأجهزة التي تستخدم معالج Apple.
- نزِّل ملفات SDK الثنائية وملفات الموارد التالية:
- استخرِج الملفات للوصول إلى XCFrameworks والموارد.
- إذا لم يكن لديك مشروع Xcode بعد، أنشئ مشروعًا الآن واحفظه على جهازك. إذا كنت مبتدئًا في تطوير تطبيقات iOS:
- أنشِئ مشروعًا جديدًا.
- اختَر نموذج iOS > التطبيق.
- في شاشة خيارات المشروع:
- أدخِل اسم المشروع.
- سجِّل قيمة حقل معرّف الحزمة. يمكنك استخدام هذه القيمة لتقييد مفتاح واجهة برمجة التطبيقات أدناه.
- اضبط واجهة المشروع على Storyboard.
- اضبط اللغة على Swift أو Objective-C.
-
افتح علامة التبويب عام. اسحب XCFrameworks التالية إلى مشروعك
ضمن الأطر والمكتبات والمحتوى المضمّن. احرص على اختيار عدم التضمين:
GoogleMaps.xcframework
-
انسخ
GoogleMaps.bundleمن GoogleMapsResources الذي نزّلته إلى الدليل الأعلى مستوى في مشروع Xcode. احرص على اختيار نسخ العناصر إلى مجلد المجموعة الوجهة عند مطالبتك بذلك. - اختَر مشروعك من "مستكشف المشروع" (Project Navigator)، ثم اختَر هدف تطبيقك.
-
افتح علامة التبويب مراحل الإنشاء (Build Phases) الخاصة بهدف تطبيقك.
في ربط الملفات الثنائية بالمكتبات (Link Binary with Libraries)، أضِف أُطر العمل والمكتبات التالية:
Accelerate.frameworkContacts.frameworkCoreData.frameworkCoreGraphics.frameworkCoreImage.frameworkCoreLocation.frameworkCoreTelephony.frameworkCoreText.frameworkGLKit.frameworkImageIO.frameworklibc++.tbdlibz.tbdMetal.frameworkMetricKit.frameworkOpenGLES.framework(في حال استخدام OpenGL فقط)QuartzCore.frameworkSecurity.frameworkSystemConfiguration.frameworkUIKit.framework
-
اختَر مشروعك بدلاً من هدف محدّد، وافتح علامة التبويب إعدادات الإنشاء. في قسم الربط - عام -> علامات أداة الربط الأخرى، أضِف
-ObjCإلى "تصحيح الأخطاء" و "الإصدار". إذا لم تظهر هذه الإعدادات، غيِّر الفلتر في شريط إعدادات الإنشاء من أساسي إلى الكل. -
لتثبيت حزمة Places SDK for iOS XCFramework، يُرجى الاطّلاع على مقالة البدء باستخدام حزمة Places SDK for iOS.
CocoaPods
تتوفّر حزمة تطوير البرامج بالاستناد إلى بيانات "خرائط Google"" للتطبيقات المتوافقة مع iOS كحزمة CocoaPods. CocoaPods هو نظام مفتوح المصدر لإدارة التبعيات في مشاريع Cocoa التي تستخدم لغتَي Swift وObjective-C.
إذا لم تكن أداة CocoaPods متوفّرة لديك، يمكنك تثبيتها على جهاز macOS من خلال تنفيذ الأمر التالي من الوحدة الطرفية. للحصول على التفاصيل، يُرجى الاطّلاع على دليل بدء استخدام CocoaPods.
sudo gem install cocoapods
أنشئ Podfile لحزمة تطوير البرامج بالاستناد إلى بيانات "خرائط Google" للتطبيقات المتوافقة مع iOS واستخدِمها لتثبيت واجهة برمجة التطبيقات والملفات التابعة لها:
- إذا لم يكن لديك مشروع Xcode بعد، أنشئ مشروعًا الآن واحفظه على جهازك. إذا كنت مبتدئًا في تطوير تطبيقات iOS:
- أنشِئ مشروعًا جديدًا.
- اختَر نموذج iOS > التطبيق.
- في شاشة خيارات المشروع:
- أدخِل اسم المشروع.
- سجِّل قيمة حقل معرّف الحزمة. يمكنك استخدام هذه القيمة لتقييد مفتاح واجهة برمجة التطبيقات أدناه.
- اضبط واجهة المشروع على Storyboard.
- اضبط اللغة على Swift أو Objective-C.
- أنشئ ملفًا باسم
Podfileفي دليل مشروعك. يحدّد هذا الملف التبعيات في مشروعك. - عدِّل
Podfileوأضِف التبعيات مع إصداراتها. إليك مثال يتضمّن الملحق الذي تحتاج إليه لحزمة تطوير البرامج بالاستناد إلى بيانات "خرائط Google" للتطبيقات المتوافقة مع iOS:source 'https://github.com/CocoaPods/Specs.git' platform :ios, '16.0' target 'YOUR_APPLICATION_TARGET_NAME_HERE' do pod 'GoogleMaps', '10.14.0' end
pod outdatedبانتظام لرصد توفّر إصدار أحدث والتأكّد من استخدام أحدث إصدار دائمًا. إذا لزم الأمر، ثبِّت أحدث إصدار. - احفظ
Podfile. افتح نافذة طرفية وانتقِل إلى الدليل الذي يحتوي على
Podfile:cd <path-to-project>
نفِّذ الأمر
pod install. سيؤدي ذلك إلى تثبيت واجهات برمجة التطبيقات المحدّدة فيPodfile، بالإضافة إلى أي موارد اعتمادية قد تكون مرتبطة بها.pod install
أغلِق Xcode، ثم افتح (انقر مرّتين) ملف
.xcworkspaceالخاص بمشروعك لتشغيل Xcode. بعد ذلك، عليك استخدام ملف.xcworkspaceلفتح المشروع.
لتعديل واجهة برمجة التطبيقات لمشروع حالي، اتّبِع الخطوات التالية:
- افتح نافذة أوامر طرفية وانتقِل إلى دليل المشروع الذي يحتوي على
Podfile. - نفِّذ الأمر
pod update. سيؤدي ذلك إلى تحديث جميع واجهات برمجة التطبيقات المحدّدة فيPodfileإلى أحدث إصدار.
الخطوة 3: إضافة مفتاح واجهة برمجة التطبيقات إلى المشروع
في الحصول على مفتاح واجهة برمجة تطبيقات، أنشأت مفتاح واجهة برمجة تطبيقات لتطبيقك. والآن، أضِف هذا المفتاح إلى مشروع Xcode.
في الأمثلة التالية، استبدِل YOUR_API_KEY بمفتاح واجهة برمجة التطبيقات.
Swift
أضِف مفتاح واجهة برمجة التطبيقات إلى AppDelegate.swift على النحو التالي:
- أضِف عبارة الاستيراد التالية:
import GoogleMaps
- أضِف ما يلي إلى طريقتك
application(_:didFinishLaunchingWithOptions:)باستخدام مفتاح واجهة برمجة التطبيقات:GMSServices.provideAPIKey("YOUR_API_KEY")
- إذا كنت تستخدم أيضًا Places API، أضِف مفتاحك مرة أخرى كما هو موضّح هنا:
GMSPlacesClient.provideAPIKey("YOUR_API_KEY")
Objective-C
أضِف مفتاح واجهة برمجة التطبيقات إلى AppDelegate.m على النحو التالي:
- أضِف عبارة الاستيراد التالية:
@import GoogleMaps;
- أضِف ما يلي إلى طريقتك
application:didFinishLaunchingWithOptions:باستخدام مفتاح واجهة برمجة التطبيقات:[GMSServices provideAPIKey:@"YOUR_API_KEY"];
- إذا كنت تستخدم أيضًا Places API، أضِف مفتاحك مرة أخرى كما هو موضّح هنا:
[GMSPlacesClient provideAPIKey:@"YOUR_API_KEY"];
الخطوة 4 (اختيارية): فحص ملف بيان خصوصية Apple
تتطلّب Apple توفير تفاصيل خصوصية التطبيق للتطبيقات على App Store. يمكنك الانتقال إلى صفحة "تفاصيل الخصوصية" في Apple App Store للاطّلاع على آخر الأخبار والمزيد من المعلومات.
يتم تضمين ملف "بيان الخصوصية" من Apple في حزمة الموارد لحزمة SDK. للتأكّد من تضمين ملف بيان الخصوصية وفحص محتواه، أنشئ أرشيفًا لتطبيقك وأنشئ تقرير خصوصية من الأرشيف.
الخطوة 5 (اختيارية): الإفصاح عن مخططات عناوين URL التي تستخدمها واجهة برمجة التطبيقات
بدءًا من نظام التشغيل iOS 9 وXcode 7، يمكن للتطبيقات الإعلان عن مخططات عناوين URL التي تنوي فتحها، وذلك من خلال تحديد المخططات في ملف Info.plist الخاص بالتطبيق. تفتح حزمة تطوير البرامج بالاستناد إلى بيانات "خرائط Google" للتطبيقات المتوافقة مع iOS تطبيق "خرائط Google" للأجهزة الجوّالة عندما ينقر المستخدم على شعار Google على الخريطة، وبالتالي يمكن لتطبيقك الإعلان عن مخططات عناوين URL ذات الصلة.
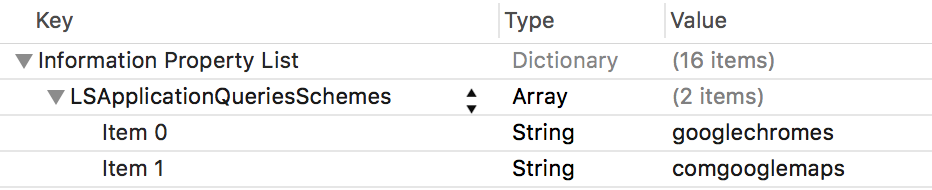
للإعلان عن مخططات عناوين URL التي تستخدمها حزمة تطوير البرامج بالاستناد إلى بيانات "خرائط Google" للتطبيقات المتوافقة مع iOS، أضِف الأسطر التالية إلى Info.plist:
 <key>LSApplicationQueriesSchemes</key>
 <array>
        <string>googlechromes</string>
        <string>comgooglemaps</string>
    </array>
تعرض لقطة الشاشة التالية الإعدادات في واجهة مستخدم Xcode:
في حال عدم توفّر البيان أعلاه، يمكن أن تحدث الأخطاء التالية عندما ينقر المستخدم على شعار Google على الخريطة:
-canOpenURL: failed for URL: "comgooglemaps://" - error: "This app is not
allowed to query for scheme comgooglemaps"
-canOpenURL: failed for URL: "googlechromes://" - error: "This app is not allowed to query for scheme googlechromes"
لإزالة هذه الأخطاء، أضِف البيان إلى Info.plist.
الخطوات التالية
بعد الحصول على مفتاح واجهة برمجة تطبيقات ومشروع Xcode، يمكنك إنشاء التطبيقات وتشغيلها. تقدّم حزمة تطوير البرامج للتنقّل على أجهزة iOS العديد من البرامج التعليمية والتطبيقات النموذجية التي يمكن أن تساعدك في البدء. لمزيد من التفاصيل، راجِع:
- ننصحك بالبدء بالبرامج التعليمية التالية:
- يمكنك الاطّلاع على عيّنات التعليمات البرمجية والدروس التطبيقية حول الترميز المتاحة.
- للحصول على حلول شاملة، راجِع حلول "خرائط Google" المتاحة.