
Page Summary
-
This guide explains how to configure a Google Map within your iOS app using the Maps SDK for iOS, covering initial settings and runtime adjustments.
-
You can customize map options like camera position, background color, map type, UI components, and gestures.
-
The Maps SDK for iOS supports various map types including normal, hybrid, satellite, terrain, and none, allowing you to select the best visual representation for your app.
-
You can enable features such as indoor maps, the traffic layer, accessibility elements, user location display, and 3D buildings to enhance the user experience.
-
Map padding allows you to adjust the visible map area for UI elements and controls, while the map color scheme can be customized to match your app's theme.
This overview describes how to configure a map that was added to an iOS app using the Maps SDK for iOS.
Overview
After you add a map to your app, you can configure initial options and runtime settings of the map. For details about adding a map container, see the Add a map.
The initial map settings include the following:
- The camera position, including: location, zoom, bearing and tilt. See Camera and View for details on camera positioning.
- The map background color.
- The map type.
- The UI components to display, such as the zoom buttons and compass.
- The gestures to enable.
At runtime you can configure these settings and some addition settings by
updating the
GMSMapView
object.
Map options
When initializing your map view, configuration options are set with
GMSMapViewOptions.
Option properties include the frame, camera, mapID or backgroundColor.
| Map Options | |
|---|---|
| frame | Value:
CGRectThe map frame. Defaults to CGRectZero.
|
| camera | Value:
GMSCameraPositionThe default map camera position.
|
| mapID | Value:
GMSMapIDGoogle mapID. Optional parameter.
|
| backgroundColor | Value:
UIColorDefaults to UIColor.lightGray
|
Configure map options
You can either set your own option properties, or pass an instantiated
GMSMapViewOptions
with default values directly to GMSMapView.
Swift
let options = GMSMapViewOptions()
options.camera = GMSCameraPosition.camera(withLatitude: -33.8683, longitude: 151.2086, zoom: 6)
let mapView = GMSMapView(options:options)
Objective-C
GMSMapViewOptions *options = [[GMSMapViewOptions alloc] init];
options.camera = [GMSCameraPosition cameraWithLatitude:-33.8683
                                                        longitude:151.2086
                                                             zoom:6];
GMSMapView *mapView = [[GMSMapView alloc] initWithOptions:options];
Here's an example of passing a GMSMapViewOptions object
with default values directly to GMSMapView.
Swift
let options = GMSMapViewOptions()
let mapView = GMSMapView(options:options) //initialized with default values
Objective-C
GMSMapViewOptions *options = [[GMSMapViewOptions alloc] init];
GMSMapView *mapView = [[GMSMapView alloc] initWithOptions:options]; //initialized with default values
Configure background color
When working in dark mode or switching between map views, it may be useful to
override the default map background color. This can be achieved by setting the
map options backgroundColor property.
Swift
let options = GMSMapViewOptions()
options.backgroundColor = UIColor.yellowColor
let mapView = GMSMapView(options:options)
Objective-C
GMSMapViewOptions *options = [[GMSMapViewOptions alloc] init];
options.backgroundColor = UIColor.yellowColor;
GMSMapView *mapView = [[GMSMapView alloc] initWithOptions:options];
Map types
You can customize your map with one of several map types. A map's type governs the overall representation of the map. For example, an atlas usually contains political maps that focus on showing boundaries, and road maps that show all of the roads for a city or region. The Maps SDK for iOS offers the following types of maps:
| Map Type | |
|---|---|
| Normal | Value:
kGMSTypeNormalTypical road map. Shows roads, some features built by
humans, and important natural features like rivers. Road and feature labels
are also visible. Supports setting the map color scheme to dark, light,
or to follow system settings.
|
| Hybrid | Value:
kGMSTypeHybridSatellite photograph data with road maps added. Road and feature
labels are also visible. |
| Satellite | Value:
kGMSTypeSatelliteSatellite photograph data. Road and feature labels are not
visible.
|
| Terrain | Value:
kGMSTypeTerrainTopographic data. The map includes colors, contour lines and labels,
and perspective shading. Some roads and labels are also visible. Supports
setting the map color scheme to dark, light, or to follow system settings.
|
| None | Value:
kGMSTypeNoneNo map tiles. The base map tiles won't be rendered. This mode is
useful in conjunction with tile
layers. The display of traffic data is disabled when the map type is
set to none. |
Change the map type
To set the type of a map, assign a new value to the GMSMapView.mapType
property. For example, to display a satellite map type:
Swift
let options = GMSMapViewOptions()
options.camera = GMSCameraPosition.camera(withLatitude: -33.8683, longitude: 151.2086, zoom: 6)
let mapView = GMSMapView(options:options)
mapView.mapType = .satellite
Objective-C
GMSMapViewOptions *options = [[GMSMapViewOptions alloc] init];
options.camera = [GMSCameraPosition cameraWithLatitude:-33.8683
                                                  longitude:151.2086
                                                        zoom:6];
GMSMapView *mapView = [[GMSMapView alloc] initWithOptions:options];
mapView.mapType = kGMSTypeSatellite;
The chooser below shows a comparison of terrain, normal and hybrid maps for the same location:
Indoor maps
At high zoom levels, the Maps SDK for iOS will show floor plans for
indoor spaces such as airports, shopping malls, large retail stores, and transit
stations. Indoor floor plans are integrated into the default map tiles for the
'normal' map type (kGMSTypeNormal), and are automatically enabled when the
user zooms in, and fade away when the map is zoomed out.
You can disable indoor maps by setting the indoorEnabled property of
GMSMapView to NO.
Swift
mapView.isIndoorEnabled = false
Objective-C
mapView.indoorEnabled = NO;
Alternatively, you can disable just the Floor Picker control.
Add floor plans
Floor plans are available in select locations. If floor plan data is not available for a building that you would like to highlight in your application, you can:
- Add floor plans to Google Maps directly. This makes your plans are available to all users of Google Maps.
- Display a floor plan as a Ground Overlay. This enables only users of your application to view your floor plans.
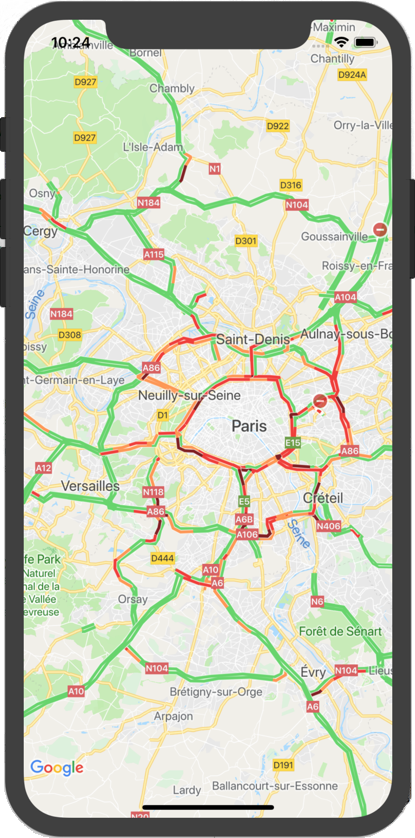
The traffic layer
You can give your users the ability to view the map with traffic density
information superimposed on top of it. This provides a visual summary of their
local traffic situation. You can turn the traffic layer on and off by calling
the
trafficEnabled
method. The following example shows how the traffic layer might appear on a map.
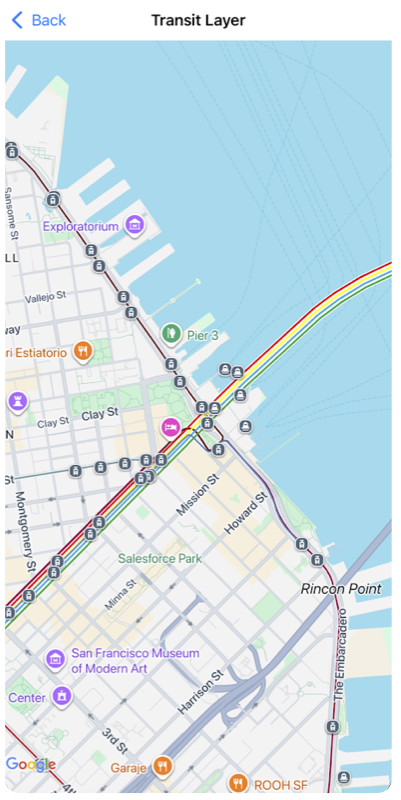
The transit layer
The Maps SDK for iOS lets you display the public transit network of a
city on your map using the
transitEnabled
method. When the traffic layer is enabled, and the map is centered on a city
that supports transit information, the map will display major transit lines as
thick, colored lines. The color of the line is set based upon information from
the transit line operator. Enabling the transit layer will alter the style of
the base map to better emphasize transit routes.
If you're a public agency that oversees public transportation for your city and would like your data to be included, visit the Google Transit Partner Program site to learn more.
The following example shows how the transit layer might appear on a map.
Accessibility
By default, accessibility elements on the map are hidden. You may enable
accessibility by setting the accessibilityElementsHidden property of
GMSMapView to NO. This causes accessibility elements to be generated for
overlay objects (such as GMSMarker and info windows, GMSPolyline etc).
Swift
mapView.accessibilityElementsHidden = false
Objective-C
mapView.accessibilityElementsHidden = NO;
This property is as per the informal UIAccessibility protocol, except that the
default value in the Maps SDK for iOS is YES.
My location
By default, no location data is shown on the map. You may enable the blue "My
Location" dot and compass direction by setting myLocationEnabled on
GMSMapView.
Swift
mapView.isMyLocationEnabled = true
Objective-C
mapView.myLocationEnabled = YES;
Enabling this feature provides the user's current location through the
myLocation property. This property may not be immediately available - for
example, if the user is prompted by iOS to allow access to this data. It is
nil in this case.
Swift
print("User's location: \(String(describing: mapView.myLocation))")
Objective-C
NSLog(@"User's location: %@", mapView.myLocation);
3D buildings
Many cities, when viewed close up, will have 3D buildings visible, as viewable in the image of Seattle, Washington below.
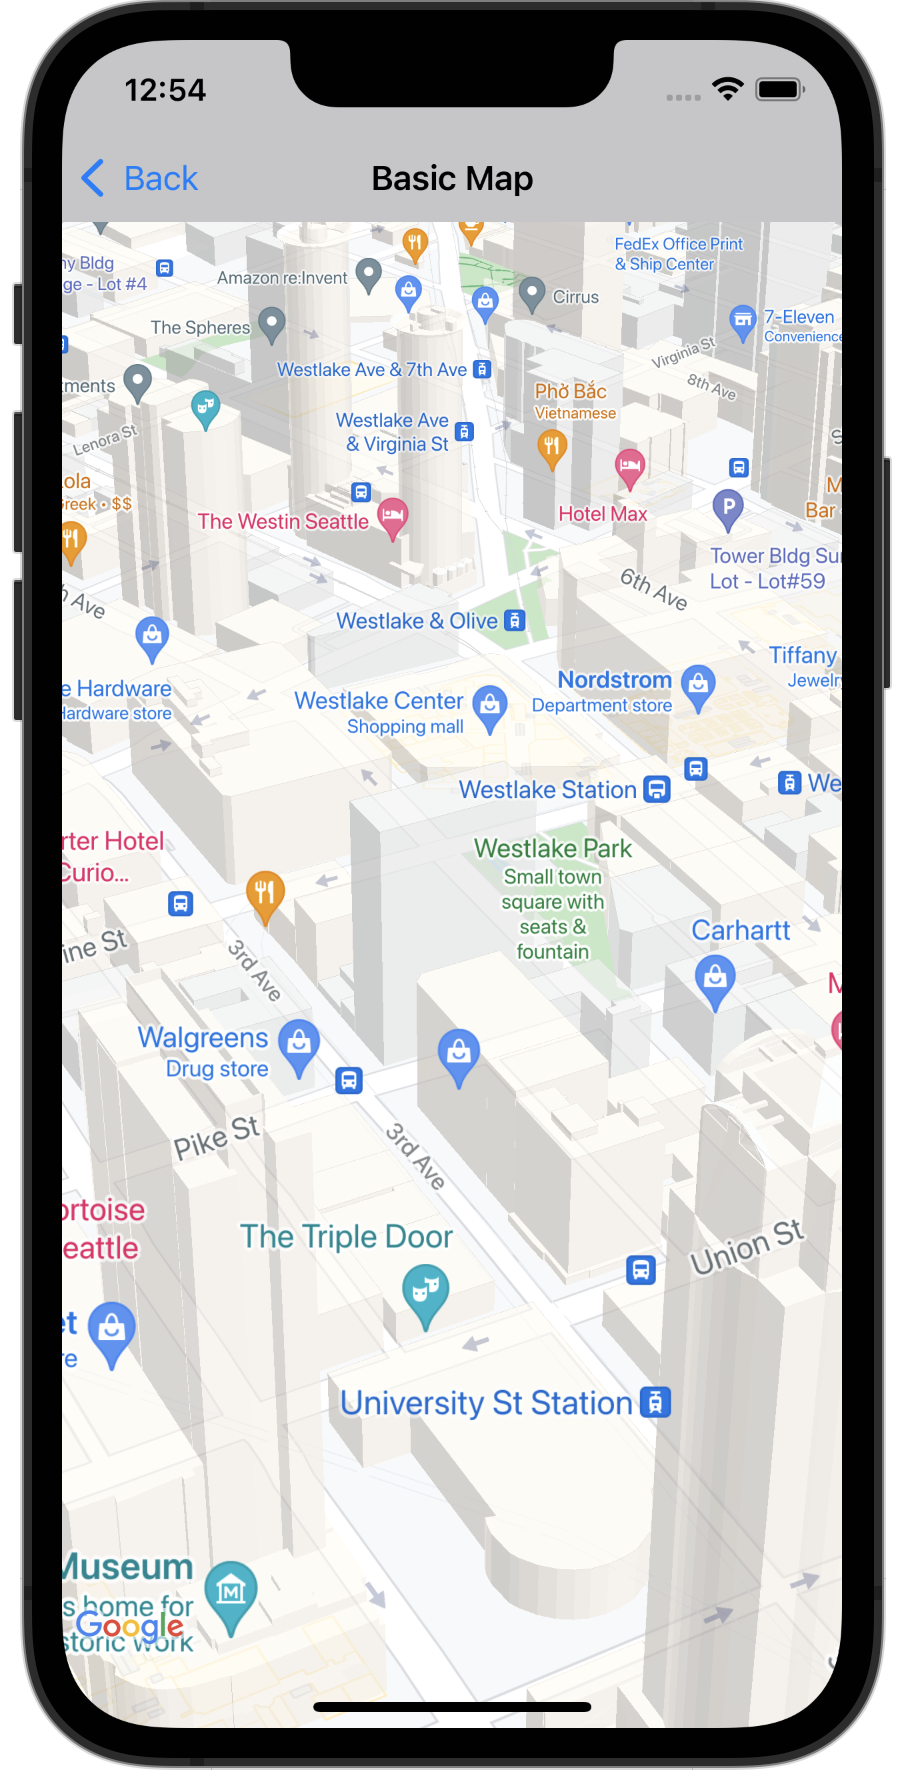
You can disable the 3D buildings by setting the corresponding
GMSMapView
property in Swift or Objective-C, as shown below:
Swift
mapView.isBuildingsEnabled = false
Objective-C
[mapView setBuildingsEnabled:NO];
Map padding
A Google Map is designed to fill the entire region defined by the GMSMapView.
Several aspects of how the map appears and behaves are defined by the dimensions
of the view:
- The camera's target reflects the center of the padded region.
- Map controls are positioned relative to the edges of the map.
- Legal information, such as copyright statements or the Google logo appear along the bottom edge of the map.
You can add padding around the edges of the map using the
GMSMapView.padding property. The map continues to fill
the entire container, but text and control positioning, map gestures, and camera
movements behave as if it has been placed in a smaller space. This results in
the following changes:
- Camera movements using API calls or button presses (e.g., compass, my location) are relative to the padded region.
GMSMapView.projectionreturns a projection that includes only the padded region.- UI controls are offset from the edge of the container by the specified number of points.
Padding can be helpful when designing UIs that overlap some portion of the map. For example, in the image, the map is padded along the top and right edges. Visible map controls and legal text is displayed along the edges of the padded region, shown in green, while the map continues to fill the entire container, shown in blue. In this example, you could float a menu over the right side of the map without obscuring map controls.

To add padding to your map, create a UIEdgeInsets object and pass it to the
GMSMapView.padding property.
Swift
// Insets are specified in this order: top, left, bottom, right
let mapInsets = UIEdgeInsets(top: 100.0, left: 0.0, bottom: 0.0, right: 300.0)
mapView.padding = mapInsets
Objective-C
// Insets are specified in this order: top, left, bottom, right
UIEdgeInsets mapInsets = UIEdgeInsetsMake(100.0, 0.0, 0.0, 300.0);
mapView.padding = mapInsets;
Map color scheme
For maps of type normal and terrain, you can set the map color scheme to dark, light, or to use the current system settings. For example, you can darken or lighten the map color scheme based on the time of day or indoor or outdoor use of the device.
Use GMSMapView
overrideUserInterfaceStyle:
to set and update the map color scheme.
Swift
let options = GMSMapViewOptions()
// Map is init to use light mode by default.
let mapView = GMSMapView(options: options)
// Set map to use dark mode.
mapView.overrideUserInterfaceStyle = .dark
// Set map to use light mode.
mapView.overrideUserInterfaceStyle = .light
// Set map to use dark/light mode based on the value of traitCollection.userInterfaceStyle
mapView.overrideUserInterfaceStyle = .unspecified
Objective-C
GMSMapViewOptions *options = [[GMSMapViewOptions alloc] init];
// Map is init to always use light mode.
GMSMapView *mapView = [[GMSMapView alloc] initWithOptions:options];
// Set map to use dark mode.
mapView.overrideUserInterfaceStyle = UIUserInterfaceStyleDark;
// Set map to use light mode.
mapView.overrideUserInterfaceStyle = UIUserInterfaceStyleLight;
// Set map to use dark/light mode based on the value of traitCollection.userInterfaceStyle
mapView.overrideUserInterfaceStyle = UIUserInterfaceStyleUnspecified;
To create custom light styles and dark styles for your maps, use cloud-based maps styling.