Page Summary
-
The Depth API allows a device's camera to understand the size and shape of real objects in a scene by creating depth images for AR realism.
-
You can use depth information to make virtual objects appear accurately in front of or behind real-world objects.
-
A device does not require a Time-of-Flight (ToF) sensor to support the Depth API.
-
Your app can be restricted to devices that support the Depth API by adding a specific uses-feature tag in the AndroidManifest.xml.
-
The Depth API is disabled by default and must be enabled in an ARCore session after checking for device support.
The Depth API helps a device’s camera to understand the size and shape of the real objects in a scene. It uses the camera to create depth images, or depth maps, thereby adding a layer of AR realism into your apps. You can use the information provided by a depth image to make virtual objects accurately appear in front of or behind real world objects, enabling immersive and realistic user experiences.
Depth information is calculated from motion and may be combined with information from a hardware depth sensor, such as a time-of-flight (ToF) sensor, if available. A device does not need a ToF sensor to support the Depth API.
Prerequisites
Make sure that you understand fundamental AR concepts and how to configure an ARCore session before proceeding.
Restrict access to Depth-supported devices
If your app requires Depth API support, either because a core part of the
AR experience relies on depth, or because there's no graceful fallback for the
parts of the app that use depth, you may choose to restrict distribution of your
app in the Google Play Store to
devices that support the Depth API by adding
the following line to your AndroidManifest.xml, in addition to the
AndroidManifest.xml changes described in the
Enable ARCore guide:
<uses-feature android:name="com.google.ar.core.depth" />
Enable Depth
In a new ARCore session, check whether a user's device supports Depth. Not all ARCore-compatible devices support the Depth API due to processing power constraints. To save resources, depth is disabled by default on ARCore. Enable depth mode to have your app use the Depth API.
Java
Config config = session.getConfig();

// Check whether the user's device supports the Depth API.
boolean isDepthSupported = session.isDepthModeSupported(Config.DepthMode.AUTOMATIC);
if (isDepthSupported) {
  config.setDepthMode(Config.DepthMode.AUTOMATIC);
}
session.configure(config);
Kotlin
val config = session.config

// Check whether the user's device supports the Depth API.
val isDepthSupported = session.isDepthModeSupported(Config.DepthMode.AUTOMATIC)
if (isDepthSupported) {
  config.depthMode = Config.DepthMode.AUTOMATIC
}
session.configure(config)
Acquire depth images
Call Frame.acquireDepthImage16Bits() to get the depth image for the current frame.
Java
// Retrieve the depth image for the current frame, if available.
Image depthImage = null;
try {
  depthImage = frame.acquireDepthImage16Bits();
  // Use the depth image here.
} catch (NotYetAvailableException e) {
  // This means that depth data is not available yet.
  // Depth data will not be available if there are no tracked
  // feature points. This can happen when there is no motion, or when the
  // camera loses its ability to track objects in the surrounding
  // environment.
} finally {
  if (depthImage != null) {
    depthImage.close();
  }
}
Kotlin
// Retrieve the depth image for the current frame, if available.
try {
  frame.acquireDepthImage16Bits().use { depthImage ->
    // Use the depth image here.
  }
} catch (e: NotYetAvailableException) {
  // This means that depth data is not available yet.
  // Depth data will not be available if there are no tracked
  // feature points. This can happen when there is no motion, or when the
  // camera loses its ability to track objects in the surrounding
  // environment.
}
The returned image provides the raw image buffer, which can be passed to a fragment shader for usage on the GPU for each rendered object to be occluded. It is oriented in OPENGL_NORMALIZED_DEVICE_COORDINATES and can be changed to TEXTURE_NORMALIZED by calling Frame.transformCoordinates2d(). Once the depth image is accessible within an object shader, these depth measurements can be accessed directly for occlusion handling.
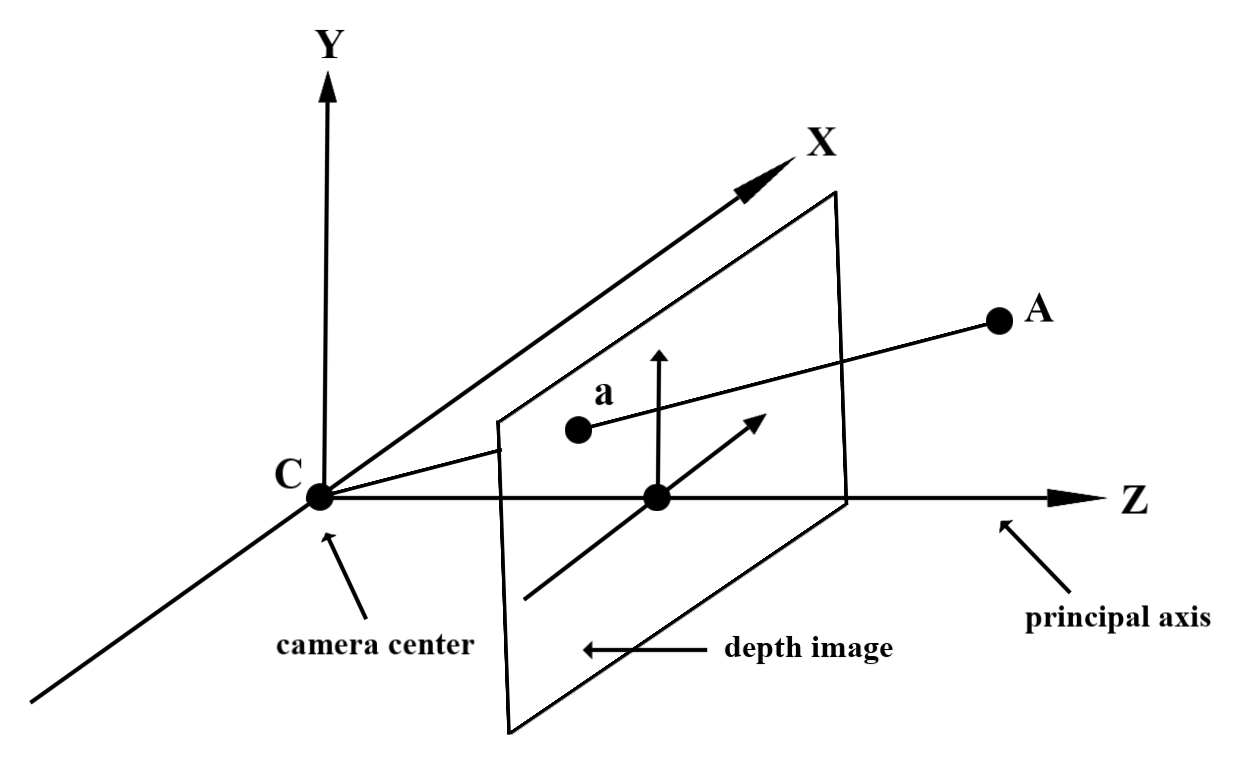
Understand depth values
Given point A on the observed real-world geometry and a 2D point a
representing the same point in the depth image, the value given by the Depth
API at a is equal to the length of CA projected onto the principal axis.
This can also be referred as the z-coordinate of A relative to the camera
origin C. When working with the Depth API, it is important to understand that
the depth values are not the length of the ray CA itself, but the projection
of it.
Use depth in shaders
Parse depth information for the current frame
Use the helper functions DepthGetMillimeters() and DepthGetVisibility() in a fragment shader to access the depth information for the current screen position. Then use this information to selectively occlude parts of the rendered object.
// Use DepthGetMillimeters() and DepthGetVisibility() to parse the depth image
// for a given pixel, and compare against the depth of the object to render.
float DepthGetMillimeters(in sampler2D depth_texture, in vec2 depth_uv) {
  // Depth is packed into the red and green components of its texture.
  // The texture is a normalized format, storing millimeters.
  vec3 packedDepthAndVisibility = texture2D(depth_texture, depth_uv).xyz;
  return dot(packedDepthAndVisibility.xy, vec2(255.0, 256.0 * 255.0));
}

// Return a value representing how visible or occluded a pixel is relative
// to the depth image. The range is 0.0 (not visible) to 1.0 (completely
// visible).
float DepthGetVisibility(in sampler2D depth_texture, in vec2 depth_uv,
                         in float asset_depth_mm) {
  float depth_mm = DepthGetMillimeters(depth_texture, depth_uv);

  // Instead of a hard Z-buffer test, allow the asset to fade into the
  // background along a 2 * kDepthTolerancePerMm * asset_depth_mm
  // range centered on the background depth.
  const float kDepthTolerancePerMm = 0.015f;
  float visibility_occlusion = clamp(0.5 * (depth_mm - asset_depth_mm) /
    (kDepthTolerancePerMm * asset_depth_mm) + 0.5, 0.0, 1.0);

 // Use visibility_depth_near to set the minimum depth value. If using
 // this value for occlusion, avoid setting it too close to zero. A depth value
 // of zero signifies that there is no depth data to be found.
  float visibility_depth_near = 1.0 - InverseLerp(
      depth_mm, /*min_depth_mm=*/150.0, /*max_depth_mm=*/200.0);

  // Use visibility_depth_far to set the maximum depth value. If the depth
  // value is too high (outside the range specified by visibility_depth_far),
  // the virtual object may get inaccurately occluded at further distances
  // due to too much noise.
  float visibility_depth_far = InverseLerp(
      depth_mm, /*min_depth_mm=*/7500.0, /*max_depth_mm=*/8000.0);

  const float kOcclusionAlpha = 0.0f;
  float visibility =
      max(max(visibility_occlusion, kOcclusionAlpha),
          max(visibility_depth_near, visibility_depth_far));

  return visibility;
}
Occlude virtual objects
Occlude virtual objects in the body of the fragment shader. Update the object's alpha channel based on its depth. This will render an occluded object.
// Occlude virtual objects by updating the object’s alpha channel based on its depth.
const float kMetersToMillimeters = 1000.0;

float asset_depth_mm = v_ViewPosition.z * kMetersToMillimeters * -1.;

// Compute the texture coordinates to sample from the depth image.
vec2 depth_uvs = (u_DepthUvTransform * vec3(v_ScreenSpacePosition.xy, 1)).xy;

gl_FragColor.a *= DepthGetVisibility(u_DepthTexture, depth_uvs, asset_depth_mm);
You can render occlusion using two-pass rendering or per-object, forward-pass rendering. The efficiency of each approach depends on the complexity of the scene and other app-specific considerations.
Per-object, forward-pass rendering
Per-object, forward-pass rendering determines the occlusion of each pixel of the object in its material shader. If the pixels are not visible, they are clipped, typically via alpha blending, thus simulating occlusion on the user’s device.
Two-pass rendering
With two-pass rendering, the first pass renders all of the virtual content into an intermediary buffer. The second pass blends the virtual scene onto the background based on the difference between the real-world depth with the virtual scene depth. This approach requires no additional object-specific shader work and generally produces more uniform-looking results than the forward-pass method.
Extract distance from a depth image
To use the Depth API for purposes other than occluding virtual objects or visualizing depth data, extract information from the depth image.
Java
/** Obtain the depth in millimeters for depthImage at coordinates (x, y). */
public int getMillimetersDepth(Image depthImage, int x, int y) {
  // The depth image has a single plane, which stores depth for each
  // pixel as 16-bit unsigned integers.
  Image.Plane plane = depthImage.getPlanes()[0];
  int byteIndex = x * plane.getPixelStride() + y * plane.getRowStride();
  ByteBuffer buffer = plane.getBuffer().order(ByteOrder.nativeOrder());
  return Short.toUnsignedInt(buffer.getShort(byteIndex));
}
Kotlin
/** Obtain the depth in millimeters for [depthImage] at coordinates ([x], [y]). */
fun getMillimetersDepth(depthImage: Image, x: Int, y: Int): UInt {
  // The depth image has a single plane, which stores depth for each
  // pixel as 16-bit unsigned integers.
  val plane = depthImage.planes[0]
  val byteIndex = x * plane.pixelStride + y * plane.rowStride
  val buffer = plane.buffer.order(ByteOrder.nativeOrder())
  val depthSample = buffer.getShort(byteIndex)
  return depthSample.toUInt()
}
Converting coordinates between camera images and depth images
Images obtained using getCameraImage() may have a different aspect ratio compared to depth images.
In this case, the depth image is a crop of the camera image, and not all pixels in the camera image have a corresponding valid depth estimate.
To obtain depth image coordinates for coordinates on the CPU image:
Java
float[] cpuCoordinates = new float[] {cpuCoordinateX, cpuCoordinateY};
float[] textureCoordinates = new float[2];
frame.transformCoordinates2d(
    Coordinates2d.IMAGE_PIXELS,
    cpuCoordinates,
    Coordinates2d.TEXTURE_NORMALIZED,
    textureCoordinates);
if (textureCoordinates[0] < 0 || textureCoordinates[1] < 0) {
  // There are no valid depth coordinates, because the coordinates in the CPU image are in the
  // cropped area of the depth image.
  return null;
}
return new Pair<>(
    (int) (textureCoordinates[0] * depthImage.getWidth()),
    (int) (textureCoordinates[1] * depthImage.getHeight()));
Kotlin
val cpuCoordinates = floatArrayOf(cpuCoordinateX.toFloat(), cpuCoordinateY.toFloat())
val textureCoordinates = FloatArray(2)
frame.transformCoordinates2d(
  Coordinates2d.IMAGE_PIXELS,
  cpuCoordinates,
  Coordinates2d.TEXTURE_NORMALIZED,
  textureCoordinates,
)
if (textureCoordinates[0] < 0 || textureCoordinates[1] < 0) {
  // There are no valid depth coordinates, because the coordinates in the CPU image are in the
  // cropped area of the depth image.
  return null
}
return (textureCoordinates[0] * depthImage.width).toInt() to
  (textureCoordinates[1] * depthImage.height).toInt()
To obtain CPU image coordinates for depth image coordinates:
Java
float[] textureCoordinates =
    new float[] {
      (float) depthCoordinateX / (float) depthImage.getWidth(),
      (float) depthCoordinateY / (float) depthImage.getHeight()
    };
float[] cpuCoordinates = new float[2];
frame.transformCoordinates2d(
    Coordinates2d.TEXTURE_NORMALIZED,
    textureCoordinates,
    Coordinates2d.IMAGE_PIXELS,
    cpuCoordinates);
return new Pair<>((int) cpuCoordinates[0], (int) cpuCoordinates[1]);
Kotlin
val textureCoordinates =
  floatArrayOf(
    depthCoordinatesX.toFloat() / depthImage.width.toFloat(),
    depthCoordinatesY.toFloat() / depthImage.height.toFloat(),
  )
val cpuCoordinates = FloatArray(2)
frame.transformCoordinates2d(
  Coordinates2d.TEXTURE_NORMALIZED,
  textureCoordinates,
  Coordinates2d.IMAGE_PIXELS,
  cpuCoordinates,
)
return cpuCoordinates[0].toInt() to cpuCoordinates[1].toInt()
Depth hit-test
Hit-tests allow users to place objects at a real-world location in the scene. Previously, hit-tests could only be conducted on detected planes, limiting locations to large, flat surfaces, such as the results shown by the green Androids. Depth hit-tests take advantage of both smooth and raw depth information to provide more accurate hit results, even on non-planar and low-texture surfaces. This is shown with the red Androids.
To use depth-enabled hit-tests, call hitTest() and check for DepthPoints in the return list.
Java
// Create a hit test using the Depth API.
List<HitResult> hitResultList = frame.hitTest(tap);
for (HitResult hit : hitResultList) {
  Trackable trackable = hit.getTrackable();
  if (trackable instanceof Plane
      || trackable instanceof Point
      || trackable instanceof DepthPoint) {
    useHitResult(hit);
    break;
  }
}
Kotlin
// Create a hit test using the Depth API.
val hitResult =
  frame
    .hitTest(tap)
    .filter {
      val trackable = it.trackable
      trackable is Plane || trackable is Point || trackable is DepthPoint
    }
    .firstOrNull()
useHitResult(hitResult)
What’s next
- Enable more accurate sensing with the Raw Depth API.
- Check out the ARCore Depth Lab, which demonstrates different ways to access depth data.