Depth API は、デバイスのカメラがシーン内の実際のオブジェクトのサイズと形状を認識できるようにします。カメラを使用して深度画像(深度マップ)を作成し、アプリに AR のリアリティを追加します。深度画像で提供される情報を使用して、仮想オブジェクトを現実世界のオブジェクトの前または後ろに正確に表示し、臨場感のあるリアルなユーザー エクスペリエンスを実現します。
深度情報は動きから計算され、Time of Flight(ToF)センサーなどのハードウェア深度センサーの情報と組み合わせることができます(利用可能な場合)。Depth API をサポートするために ToF センサーを搭載する必要はありません。
前提条件
続行する前に、基本的な AR コンセプトと ARCore セッションを構成する方法を理解してください。
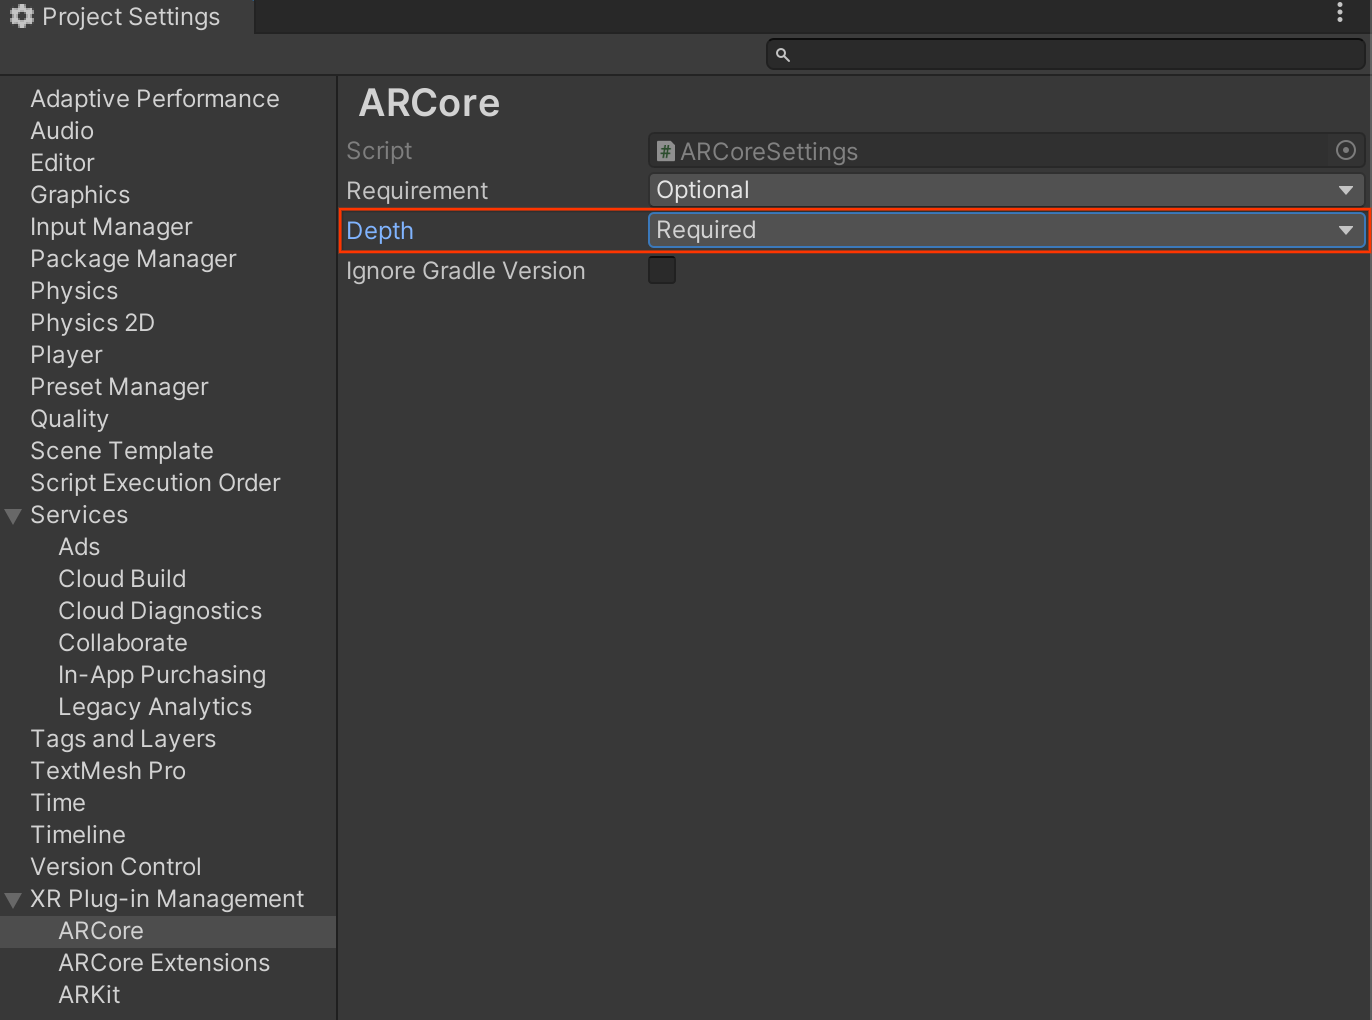
アプリを Depth Required または Depth Optional に構成する(Android のみ)
アプリが Depth API のサポートを必要としている場合(拡張現実の中心的な部分が深度に依存している場合や、深度を使用するアプリの部分に正常なフォールバックがない場合など)、Google Play ストアでのアプリの配信を Depth API をサポートするデバイスに制限できます。
アプリの Depth Required
Edit > Project Settings > XR Plug-in Management > ARCore に移動します。
Depth はデフォルトで Required に設定されています。

アプリの Depth Optional
Edit > Project Settings > XR Plug-in Management > ARCore に移動します。
[Depth] プルダウン メニューから [Optional] を選択して、アプリを Depth オプションに設定します。

深度を有効にする
リソースを節約するため、ARCore ではデフォルトで Depth API が有効になっていません。サポートされているデバイスで深度を利用するには、Camera コンポーネントと ARCameraBackground コンポーネントを使用して、AR カメラゲーム オブジェクトに AROcclusionManager コンポーネントを手動で追加する必要があります。詳細については、Unity ドキュメントの自動オクルージョンをご覧ください。
新しい ARCore セッションで、ユーザーのデバイスが深度と Depth API をサポートしているかどうかを確認します。
// Reference to AROcclusionManager that should be added to the AR Camera
// game object that contains the Camera and ARCameraBackground components.
var occlusionManager = …

// Check whether the user's device supports the Depth API.
if (occlusionManager.descriptor?.supportsEnvironmentDepthImage)
{
    // If depth mode is available on the user's device, perform
    // the steps you want here.
}
深度画像を取得する
AROcclusionManager から最新の環境深度画像を取得します。
// Reference to AROcclusionManager that should be added to the AR Camera
// game object that contains the Camera and ARCameraBackground components.
var occlusionManager = …

if (occlusionManager.TryAcquireEnvironmentDepthCpuImage(out XRCpuImage image))
{
    using (image)
    {
        // Use the texture.
    }
}
未加工の CPU イメージを RawImage に変換すると、柔軟性が向上します。方法の例については、Unity の ARFoundation サンプルをご覧ください。
深度値について
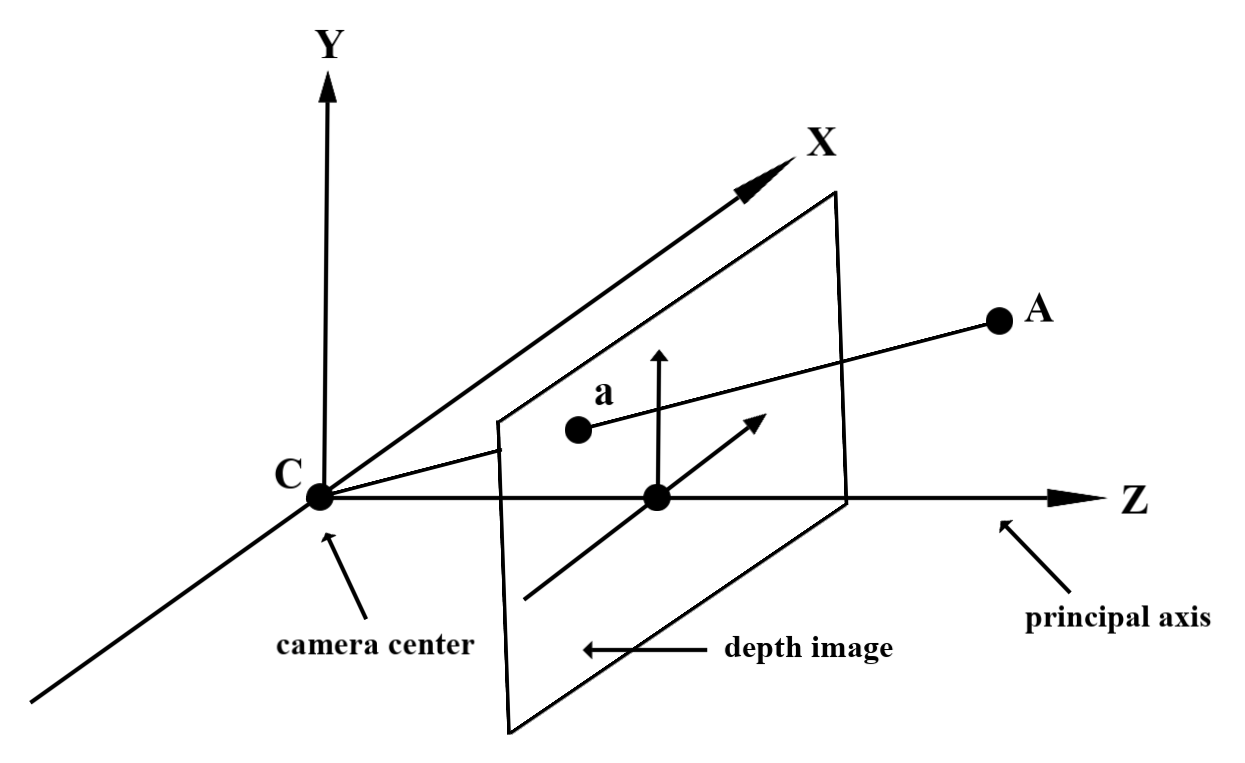
観測された現実世界のジオメトリ上の点 A と、深度画像内の同じ点を表す 2D 点 a が与えられた場合、Depth API が a で返す値は、主軸に投影された CA の長さに等しくなります。これは、カメラ原点 C を基準とした A の z 座標とも呼ばれます。Depth API を使用する場合は、深度値がレイ CA 自体の長さではなく、その投影であることを理解することが重要です。

仮想オブジェクトを遮蔽して深度データを可視化する
深度データの概要と、深度データを使用して仮想画像を遮蔽する方法については、Unity のブログ投稿をご覧ください。また、Unity の ARFoundation サンプルでは、仮想画像のオクルージョンと深度データの可視化を示しています。
オクルージョンは、2 パス レンダリングまたはオブジェクトごとのフォワード パス レンダリングを使用してレンダリングできます。各アプローチの効率は、シーンの複雑さやその他のアプリ固有の考慮事項によって異なります。
オブジェクトごとのフォワード パス レンダリング
オブジェクトごとのフォワード パス レンダリングでは、マテリアル シェーダーでオブジェクトの各ピクセルのオクルージョンが決定されます。ピクセルが見えない場合、通常はアルファ ブレンドによってクリップされ、ユーザーのデバイスで遮蔽がシミュレートされます。
2 パス レンダリング
2 パス レンダリングでは、最初のパスですべての仮想コンテンツが中間バッファにレンダリングされます。2 つ目のパスでは、実世界の深度とバーチャル シーンの深度の差に基づいて、バーチャル シーンを背景にブレンドします。このアプローチでは、オブジェクト固有のシェーダーの追加作業は必要ありません。また、通常、フォワード パス メソッドよりも均一な外観の結果が得られます。
深度画像から距離を抽出する
仮想オブジェクトのオクルージョンや深度データの可視化以外の目的で Depth API を使用する場合は、深度画像から情報を抽出します。
Texture2D _depthTexture;
short[] _depthArray;

void UpdateEnvironmentDepthImage()
{
  if (_occlusionManager &&
        _occlusionManager.TryAcquireEnvironmentDepthCpuImage(out XRCpuImage image))
    {
        using (image)
        {
            UpdateRawImage(ref _depthTexture, image, TextureFormat.R16);
            _depthWidth = image.width;
            _depthHeight = image.height;
        }
    }
  var byteBuffer = _depthTexture.GetRawTextureData();
  Buffer.BlockCopy(byteBuffer, 0, _depthArray, 0, byteBuffer.Length);
}

// Obtain the depth value in meters at a normalized screen point.
public static float GetDepthFromUV(Vector2 uv, short[] depthArray)
{
    int depthX = (int)(uv.x * (DepthWidth - 1));
    int depthY = (int)(uv.y * (DepthHeight - 1));

    return GetDepthFromXY(depthX, depthY, depthArray);
}

// Obtain the depth value in meters at the specified x, y location.
public static float GetDepthFromXY(int x, int y, short[] depthArray)
{
    if (!Initialized)
    {
        return InvalidDepthValue;
    }

    if (x >= DepthWidth || x < 0 || y >= DepthHeight || y < 0)
    {
        return InvalidDepthValue;
    }

    var depthIndex = (y * DepthWidth) + x;
    var depthInShort = depthArray[depthIndex];
    var depthInMeters = depthInShort * MillimeterToMeter;
    return depthInMeters;
}
次のステップ
- Raw Depth API を使用して、より正確なセンシングを実現します。
- ARCore Depth Lab で、深度データにアクセスするさまざまな方法を確認する。
