Android 12 (SDK 수준 31)를 타겟팅하는 Android 프로젝트를 빌드할 때 다음과 같은 오류가 발생할 수 있습니다.
Could not determine the dependencies of task ':launcher:compileDebugJavaWithJavac'.
> Installed Build Tools revision 31.0.0 is corrupted. Remove and install again using the SDK Manager.
> Configure project :launcher
WARNING: The option 'android.enableR8' is deprecated and should not be used anymore.
It will be removed in a future version of the Android Gradle plugin, and will no longer allow you to disable R8.
Build-tool 31.0.0 is missing DX at <android-sdk-path>/sdk/build-tools/31.0.0/dx
File ~/.android/repositories.cfg could not be loaded.
Build-tool 31.0.0 is missing DX at <android-sdk-path>/sdk/build-tools/31.0.0/dx
이는 Android 빌드 도구 버전 31.0.0과 Unity 빌드 시스템 간의 비호환성으로 인해 발생합니다. Android Build Tools 버전 31.0.0부터 DX가 D8으로 대체되어 삭제되었으며, 이로 인해 Android용 Unity 빌드가 중단되었습니다.
이 오류는 다음 시나리오에서 트리거될 수 있습니다.
- Unity의 AR Foundation 버전 1.26용 ARCore 확장 프로그램으로 업그레이드
- ARCore 확장 프로그램 버전에 관계없이 모든 Unity 프로젝트에서 Android SDK 수준 31 타겟팅
- ARCore 확장 프로그램 버전에 관계없이 빌드 도구 버전 31.0.0이 설치된 동안 Unity 프로젝트에서 Android SDK 수준 30을 타겟팅합니다.
해결 방법
Google은 Unity와 협력하여 이 비호환성을 해결하기 위해 노력하고 있습니다. 그동안 안내에 따라 Android 12를 타겟팅하는 프로젝트를 빌드하세요.
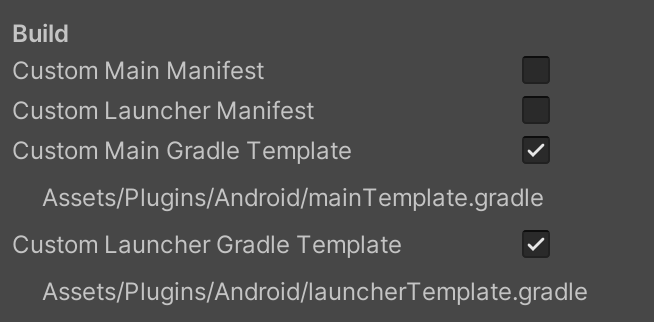
Project Settings > Player > Android > Publishing Settings > Build에서 다음을 모두 선택합니다.
- Custom Main Gradle Template
- Custom Launcher Gradle Template.

생성된 두 파일에 다음 변경사항을 적용합니다.
Assets/Plugins/Android/mainTemplate.gradleAssets/Plugins/Android/launcherTemplate.gradle
파일 상단에 다음 주석이 있는 경우 삭제합니다.
// GENERATED BY UNITY. REMOVE THIS COMMENT TO PREVENT OVERWRITING WHEN EXPORTING AGAIN그런 다음 다음과 같이
compileSdkVersion및buildToolsVersion를 수정합니다.buildToolsVersion '30.0.3'
빌드 시 Unity는 Build-Tools 버전 30.0.3을 다운로드하여 선택한 targetSdkVersion를 유지하면서 프로젝트를 빌드하는 데 사용합니다.
맞춤 Gradle 빌드 만들기
이전 버전으로 빌드된 Unity 버전 2019.4, 2020.1, 2020.2에서는 맞춤 Gradle 빌드를 Gradle 버전 6.1.1 이상으로 설정해야 합니다. Android Gradle 플러그인 4.0.1 이상도 필요합니다.
SDK 31을 타겟팅하는 앱에는 Gradle 버전 6.1.1 이상이 필요합니다.
- Preferences > External Tools > Android > Gradle로 이동하여 맞춤 Gradle 빌드를 Gradle 6.1.1 이상으로 설정합니다. 다운로드는 Gradle 빌드 도구를 참고하세요.
생성된 두 파일에 다음 변경사항을 적용합니다.
Assets/Plugins/Android/mainTemplate.gradleAssets/Plugins/Android/launcherTemplate.gradle
buildscript {
    repositories {
        google()
        jcenter()
    }
    dependencies {
        // Must be Android Gradle Plugin 4.0.1 or later. For a list of
        // compatible Gradle versions refer to:
        // https://developer.android.com/studio/releases/gradle-plugin
        classpath 'com.android.tools.build:gradle:4.0.1'
    }
}

allprojects {
   repositories {
      google()
      jcenter()
      flatDir {
        dirs 'libs'
      }
   }
}
Android 12를 타겟팅하는 앱에 변경사항 적용
앱이 Android 12를 타겟팅하는 경우 android:exported 속성을 명시적으로 선언해야 합니다. Android 12의 모든 변경사항은 Android 12의 동작 변경사항을 참고하세요.
Project Settings > Player > Android > Publishing Settings > Build에서 Custom Main Manifest을 선택합니다.
Assets/Plugins/Android/AndroidManifest.xml에 다음 변경사항을 적용합니다.파일 상단에 다음 주석이 있는 경우 삭제합니다.
<!-- GENERATED BY UNITY. REMOVE THIS COMMENT TO PREVENT OVERWRITING WHEN EXPORTING AGAIN--><activity>태그에android:exported속성을 추가합니다.<application> <activity android:name="com.unity3d.player.UnityPlayerActivity" android:theme="@style/UnityThemeSelector" android:exported="true"> <intent-filter> <action android:name="android.intent.action.MAIN" /> <category android:name="android.intent.category.LAUNCHER" /> </intent-filter> <meta-data android:name="unityplayer.UnityActivity" android:value="true" /> </activity> </application>

