دسترسی : این ویژگی در اندروید، iOS، جاوا اسکریپت و Maps Static قابل مشاهده است.
با برجسته کردن ویژگیها در سطح بزرگنمایی که نقشه در آن مشاهده میشود، نقشه خود را بهتر با نیازهای کاربرانتان تطبیق دهید. برای مثال، میتوانید نقاط مورد علاقه یا جادهها را پس از بزرگنمایی بینندگان روی یک مکان خاص مورد علاقهشان، برجسته کنید.
شما میتوانید عناصر عوارض نقشه را طوری سبکبندی کنید که در تمام سطوح بزرگنمایی روی نقشه یکسان به نظر برسند، یا برای برخی از عناصر، میتوانید سبکهای متفاوتی برای سطوح بزرگنمایی مختلف ایجاد کنید.
همه ویژگیها به شما اجازه نمیدهند سطوح بزرگنمایی را سفارشی کنید. عناصر ویژگی نقشه که میتوانید استایل سطح بزرگنمایی را روی آنها تنظیم کنید، یک آیکون الماس در سمت راست دارند.
![]()
درک استایلدهی در سطح بزرگنمایی
سطوح بزرگنمایی از ۰، که بیشترین بزرگنمایی را نشان میدهد و جهان را نشان میدهد، تا ۲۲، که بیشترین بزرگنمایی را نشان میدهد و بخش کوچکی از نقشه را با جزئیات نشان میدهد، متغیر است. بزرگنمایی کلیدی ، سطحی از بزرگنمایی است که میخواهید با آن یک سبک جدید را شروع کنید.
وقتی به عوارض نقشه در سطوح بزرگنمایی مختلف استایل میدهید، آن استایل برای تمام سطوح بزرگنمایی بالاتر (بزرگنمایی بیشتر) اعمال میشود تا زمانی که به استایل سطح بزرگنمایی دیگری برسید. سطح بزرگنمایی ۰ همیشه با استایل فعلی اضافه میشود.
برای مثال، اگر استایلها را در سطوح بزرگنمایی ۵ و ۱۰ تنظیم کنید:
- سبک بزرگنمایی سطح ۵ برای بزرگنمایی سطوح ۵ تا ۹ اعمال میشود.
- سبک بزرگنمایی سطح ۱۰ برای سطوح بزرگنمایی ۱۰ تا ۲۲ اعمال میشود.
- سطوح بزرگنمایی ۰-۴ سبک فعلی را حفظ میکنند.
وقتی یک سبک سطح بزرگنمایی را برای یک عارضه نقشه سفارشی میکنید، این سبک، هرگونه سبک سفارشی روی کل عارضه نقشه را لغو میکند.
درک انتقال سطح زوم برای نقشههای سهبعدی
وقتی یک نقشه سهبعدی را کج میکنید و بین سطوح بزرگنمایی جابهجا میشوید، ممکن است رنگهای جابهجایی را خارج از سبکهای سطح بزرگنمایی تنظیمشده خود ببینید.
برای مثال، اگر استایلهای سطح بزرگنمایی را به صورت زیر تنظیم کنید:
- برای بزرگنمایی سطح ۱۰، رنگ آب = سیاه.
- برای سطح بزرگنمایی ۱۱، رنگ آب = سفید.
همانطور که در شکل زیر نشان داده شده است، هنگام تغییر بین دو سطح بزرگنمایی، ممکن است رنگ پر شدن آب به صورت خاکستری ظاهر شود:

سفارشیسازی سطوح مختلف بزرگنمایی
در کنسول Cloud، به Map Styles بروید و در صورت نیاز، یک پروژه را انتخاب کنید.
یک سبک نقشه ایجاد یا باز کنید و سفارشیسازی را انتخاب کنید. برای جزئیات بیشتر، به ایجاد یک سبک نقشه مراجعه کنید.
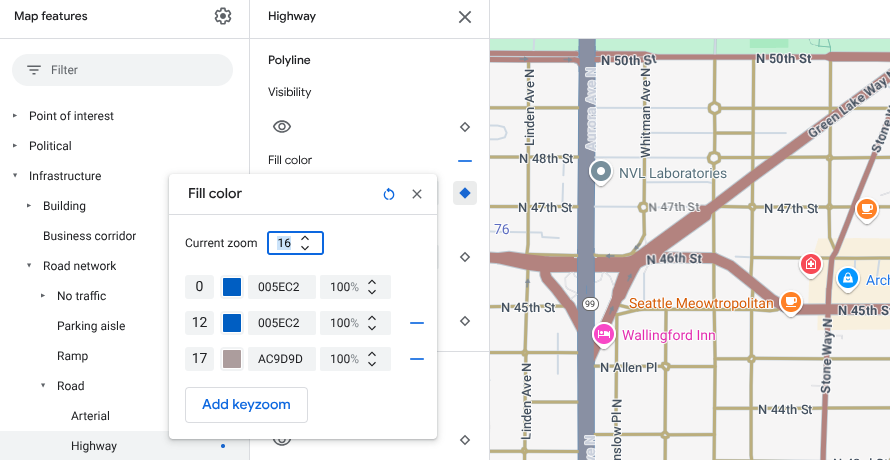
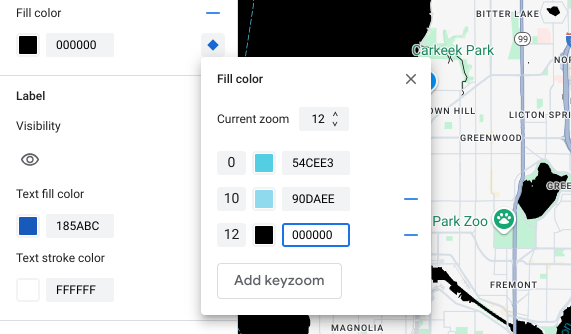
از پنل ویژگیهای نقشه ، یک ویژگی نقشه را برای سفارشیسازی انتخاب کنید. پنل سبک باز میشود و عناصری را که میتوانید سفارشیسازی کنید، نشان میدهد.
در کنار عنصری که میخواهید استایل سطح بزرگنمایی را به آن اضافه کنید، الماس بزرگنمایی را در سمت راست انتخاب کنید تا پنل keyzoom باز شود.
در کنار «بزرگنمایی فعلی» ، سطح بزرگنمایی مورد نظر برای سفارشیسازی را انتخاب کنید. نقشه پیشنمایش با آن سطح بزرگنمایی تنظیم میشود.
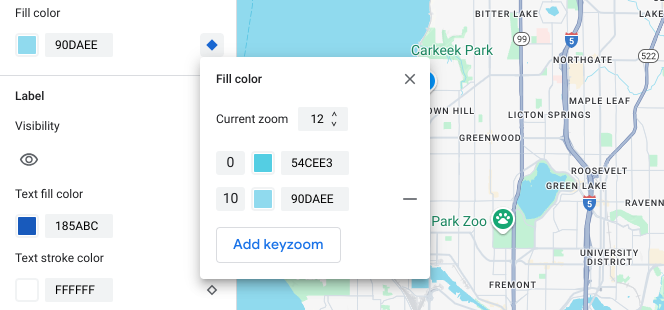
برای افزودن یک بزرگنمایی کلید جدید در سطح بزرگنمایی انتخاب شده، گزینه «افزودن بزرگنمایی کلید» (Add Keyzoom) را انتخاب کنید تا مقدار پیشفرض نقشه پایه مربوطه نمایش داده شود.
در صورت نیاز، این سطح بزرگنمایی و هر سطح بزرگنمایی دیگر را استایلدهی کنید.
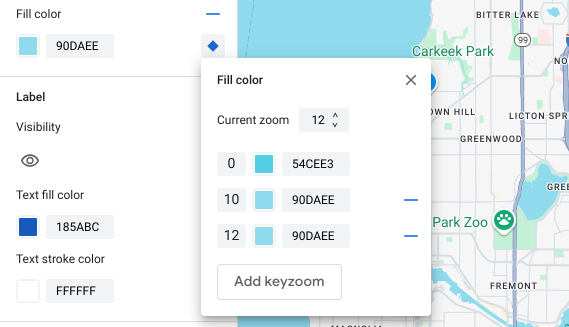
برای تنظیم سطح بزرگنمایی دیگر، Current Zoom را تغییر دهید و دوباره Add Keyzoom را انتخاب کنید تا سطح بزرگنمایی دیگری به لیست اضافه شود. اضافه کردن و تنظیم سبکهای سطح بزرگنمایی را تا زمانی که کارتان تمام شود ادامه دهید.
وقتی کارتان تمام شد، پنل keyzoom را ببندید.
مقادیر رنگ پیشفرض نقشه پایه را برای یک عنصر بازنویسی میکند.
برای بازنویسی تمام مقادیر رنگ پیشفرض نقشه پایه برای یک عنصر در سطوح بزرگنمایی، ابتدا عنصر را استایلبندی کنید. وقتی keyzooms اضافه میکنید، keyzoom به جای رنگ پیشفرض نقشه پایه، از رنگی که برای عنصر تنظیم کردهاید استفاده میکند.
ذخیره و انتشار استایل سطح بزرگنمایی
برای ذخیره تغییرات سبک نقشه، گزینه ذخیره را انتخاب کنید.
برای اعمال تغییرات روی شناسههای نقشه مرتبط با سبک نقشه خود، گزینه انتشار را انتخاب کنید.
حذف استایل سطح بزرگنمایی
از پنل ویژگیهای نقشه ، یک ویژگی نقشه سفارشیشده را انتخاب کنید.
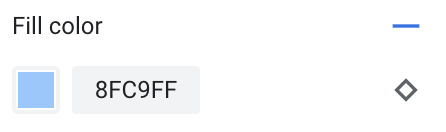
در کنار یک عنصر سبک، الماس سمت راست را انتخاب کنید. عناصری که دارای سبک سفارشی در سطح بزرگنمایی هستند، یک الماس آبی یکدست نشان میدهند.

در پنل keyzoom، برای حذف سطح بزرگنمایی، نماد منها را انتخاب کنید.

حذف تمام استایلهای سطح بزرگنمایی
اگر میخواهید تمام استایلهای سفارشی را از یک عنصر ویژگی نقشه حذف کنید، میتوانید یکی از موارد زیر را انجام دهید:
- در پنل استایل ، آیکون منها را که در کنار نام عنصر قرار دارد، انتخاب کنید.
- در پنل keyzoom ، آیکون reset کنار نام عنصر را انتخاب کنید.
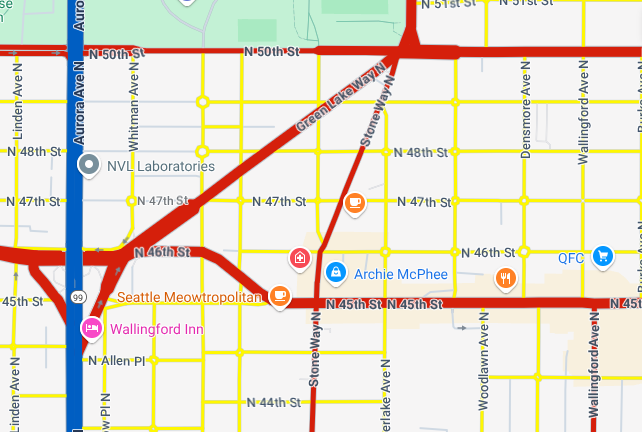
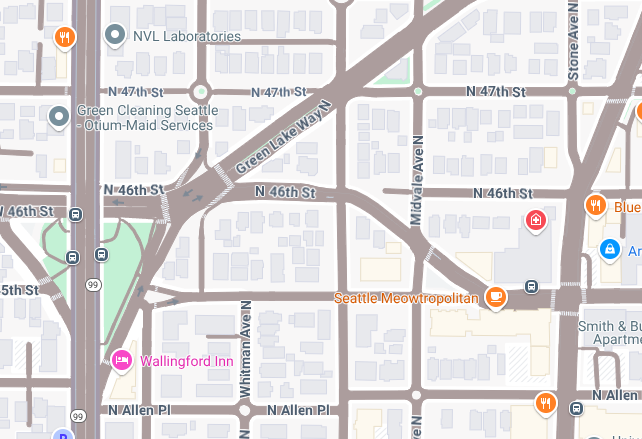
پیشنمایش جزئیات سطح جاده
شما میتوانید جزئیات سطح جاده بهبود یافته را در سطوح بزرگنمایی ۱۷+ روی سبکهای موجود خود مانند عرض واقعی جاده، پیادهروها، علائم خط و سایر ویژگیها در شهرهای منتخب، پیشنمایش کنید. شما باید پیشنمایش را برای هر جلسه ویرایشگر سبک فعال کنید. این ویژگیهای نقشه جزئیات جاده فقط در SDKها یا APIهایی که از جزئیات سطح جاده پشتیبانی میکنند، قابل مشاهده هستند. برای اعمال آنها در برنامه خود، باید SDK یا API مربوطه را به نسخهای که از جزئیات سطح جاده پشتیبانی میکند، بهروزرسانی کنید. برای اطلاعات بیشتر در مورد نسخههای API و SDK، به جزئیات سطح جاده برای پلتفرم نقشههای گوگل مراجعه کنید.
برای فعال کردن پیشنمایش جزئیات جاده، مراحل زیر را انجام دهید:
در کنسول گوگل کلود، به بخش «سبکهای نقشه» (Map Styles) بروید.
یک سبک موجود را انتخاب کنید یا یک سبک ایجاد کنید .
روی سفارشیسازی کلیک کنید.
در ویرایشگر سبک، روی پیشنمایش جزئیات جاده کلیک کنید.
در پنجره پیشنمایش، گزینه Road detail را فعال کنید.
برای جزئیات بیشتر در مورد اینکه کدام جزئیات سطح جاده را میتوانید استایل دهید، به آنچه میتوانید روی نقشه استایل دهید مراجعه کنید.
سبکهای سطح بزرگنمایی را برای ملایم کردن انتقال سبک برای سطوح بزرگنمایی ۱۷+ اضافه کنید
در سطوح بزرگنمایی ۱۷+ با فعال بودن جزئیات سطح جاده، ویژگیهای نقشه جاده ناپدید میشوند و به جای آن به ویژگی نقشه سطح تبدیل میشوند. با بزرگنمایی، هر عنصر استایلبندی شدهای که به ویژگی نقشه سطح اعمال میشود، ظاهر میشود و جایگزین ویژگیها و سبکهای نقشه جاده میشود.
برای روانتر کردن انتقال بین سبکهای ویژگیهای نقشه، میتوانید سبکهای سطح بزرگنمایی را اضافه کنید تا رنگهای سبک خود را بین سطوح بزرگنمایی خاص قفل کنید. همچنین میتوانید از سبکهای سطح بزرگنمایی برای کنترل زمان انتقال روان به یک رنگ سبک جدید استفاده کنید.
برای مثال، در سطح بزرگنمایی ۱۶، ویژگیهای نقشه فهرستشده به صورت زیر استایلبندی میشوند:
- شریانی قرمز است.
- بزرگراه آبی است.
- محلی زرد است.
- سطح بژ است.
وقتی تا سطح بزرگنمایی ۱۷ بزرگنمایی میکنید، شریانها، بزرگراهها و جادههای محلی به ویژگی نقشه سطحی تغییر میکنند که به رنگ بژ است.
برای ایجاد یک انتقال روانتر بین ویژگیهای نقشه جاده و ویژگی نقشه سطح، کلیدهای بزرگنمایی و استایلبندی سطح بزرگنمایی زیر را اضافه کنید:
| ویژگی نقشه | سطح بزرگنمایی 0 | سطح بزرگنمایی ۱۲ | سطح بزرگنمایی ۱۷ |
|---|---|---|---|
| شریانی | قرمز | قرمز | بژ |
| بزرگراه | آبی | آبی | بژ |
| محلی | زرد | زرد | بژ |
بعد از اضافه کردن استایل سطح بزرگنمایی، وقتی بزرگنمایی میکنید، موارد زیر اتفاق میافتد:
- شریانها، بزرگراهها و جادههای محلی، رنگ سفارشیشده را از سطوح بزرگنمایی ۰ تا ۱۲ نمایش میدهند.
- بعد از زوم سطح ۱۲، رنگ استایلدهی شده شروع به محو شدن به رنگ بژ میکند تا زمانی که در زوم سطح ۱۷، به طور کامل به رنگ بژ از استایل عوارض نقشه سطح منتقل شود.