You should review all automatically migrated styles in the style editor to make
sure the style updates didn't result in any unwanted effects in your custom
style.
Review an automatically migrated map style
To check if your automatically migrated map styles work, do the following:
In the style editor, open the updated map style.
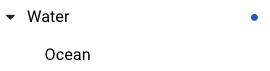
Map features that have custom styles are marked with a solid blue dot.
Expand all map features to find all of the changes.
Check all map features with custom styles in the following areas:
Map features: Check that the earlier map features have been moved to
the appropriate new map features.
Map styling: Check that colors, visibility, and other styling
features are rendering as expected on the preview map.
Take advantage of the new map features: Look to see if there is a
new map feature that is more accurate or detailed that works for your
needs.
For more information on what has changed between legacy styles and the
latest styling, see Map feature changes.
Make any needed adjustments to the updated map style, and test
the adjustments.
When you are satisfied with the updated map style, you can publish it in
the style editor.
[[["Easy to understand","easyToUnderstand","thumb-up"],["Solved my problem","solvedMyProblem","thumb-up"],["Other","otherUp","thumb-up"]],[["Missing the information I need","missingTheInformationINeed","thumb-down"],["Too complicated / too many steps","tooComplicatedTooManySteps","thumb-down"],["Out of date","outOfDate","thumb-down"],["Samples / code issue","samplesCodeIssue","thumb-down"],["Other","otherDown","thumb-down"]],["Last updated 2026-07-20 UTC."],[],[]]