Page Summary
-
The ARCore Geospatial Creator for Unity visualizes real-world placement of AR content in the Unity Editor using 3D Google Maps data.
-
This tool is part of the ARCore Extensions for AR Foundation and requires Unity 2021.3 or newer.
-
Setting up API access for both the Google Map Tiles API and the ARCore Geospatial API is necessary.
-
The process involves configuring the Geospatial Sample app, adding the Cesium for Unity package, enabling the Geospatial Creator, and adding/placing Geospatial Creator Origins and Anchors.
-
Geospatial Creator Anchors in the editor act as placeholders that resolve into runtime
ARGeospatialAnchorobjects when the AR session is ready, allowing attached geometry to appear at the specified real-world location.
The ARCore Geospatial Creator for Unity allows you to preview Geospatial content in the Unity Editor by showing Google Maps data in a new 3D tiles format. This helps you visualize where content will be placed in the real world, while you are building your app.
The Geospatial Creator is available as part of the ARCore Extensions for AR Foundation. This Quickstart will show you how to use the Geospatial Creator in Unity to add geospatial AR content to the ARCore Geospatial Sample app.
If you have an existing app that you'd like to use instead of the Geospatial Sample, you'll first need to follow our Geospatial Developer guide for Unity. After your app is configured for Geospatial API use, skip to the Add Required Dependencies step below and continue from there.
Prerequisites
Follow "Getting started with ARCore Extensions for AR Foundation" to configure your Unity environment to create AR experiences.
While the ARCore Extensions supports earlier versions of Unity, the Geospatial Creator requires Unity 2021.3 or newer.
API Authorization
You'll need to set up API access to use the ARCore Geospatial API and the Google Map Tiles API.
Google Map Tiles API
The Map Tiles API provides a 3D, photorealistic representation of supported locations. We'll use these tiles in the Unity Editor to preview the area around your AR scene.
See the Map Tiles API page to enable the API and learn more about Map Tiles.
ARCore Geospatial API
The ARCore Geospatial API is used by your app at runtime to to create and interact with Geospatial Anchors.
To enable the Geospatial APIs, set up the ARCore API in your application. You can use either the Keyless (recommended) or API Key authorization methods.
Extend the Geospatial Sample app
For this guide, we'll show you how to use the Geospatial Creator to add geospatial content to the ARCore Geospatial Sample app.
Configure the Geospatial Sample
First, familiarize yourself with the ARCore Geospatial Sample app. In a new Unity project, open the Unity Package Manager and select the ARCore Extensions package. In the Package Manager detail panel, expand Samples and import the Geospatial Sample into your Unity project.
Before running the app, you must enable ARCore and Geospatial functionality in your project. Use Edit > Project Settings... > XR Plug-in Management. Check the appropriate boxes to enable the ARCore plug-in provider for Android and/or the ARKit plug-in provider for iOS.
Then, from Edit > Project Settings... > XR Plug-in Management, open the ARCore Extensions panel. Ensure "Geospatial" is checked (you don't need to enable the Geospatial Creator just yet), and enter your API credentials. See the "Enable the Geospatial Unity API" documentation for Android and iOS for more details.
There's a few other platform-specific Player settings that are required for any Unity app that uses ARCore. See the Configure Player Settings section of our docs for required changes.
At this point, there are no game objects in your scene other than what is required for running the Geospatial Sample. This is a good time to build and run the app. If configured properly, at runtime the app will display your device's camera view. As you move, the geospatial accuracy displayed at the top of the screen will begin to improve. By tapping on the screen, you'll create Geospatial Anchors that will persist at their original location while you move around.
Next, we'll show how to use the Geospatial Creator to create and visualize sophisticated AR content from within the Unity Editor. This content will appear in your app at specific latitude / longitude locations in the world.
Add required dependencies
The Geospatial Creator makes use of a third party Unity package called Cesium to render Google Map Tiles in the Unity Editor's Scene window. Before enabling the Geospatial Creator features, let's add the Cesium package to your project.
We recommend installing the latest version of the Cesium for Unity package from Cesium's GitHub page:
- Download the most recent version of the precompiled
.tgzof Cesium for Unity from their GitHub Releases page. The current recommended version of the Cesium for Unity package is 1.1.0. - Open the Unity Package Manager by clicking on Unity's "Window" menu, then selecting "Package Manager".
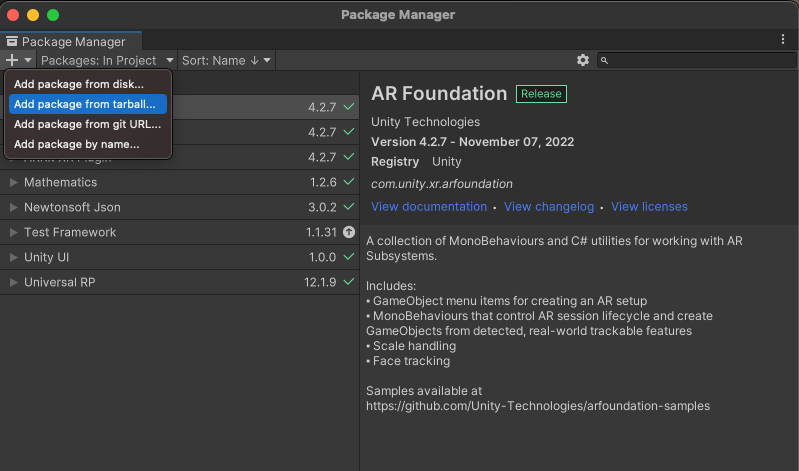
- Click the "+" icon and choose "Add package from tarball".
- Select the Cesium for Unity .tgz file downloaded in Step 1.
- You may be prompted to install additional dependencies, such as Text Mesh Pro.
Enable Geospatial Creator
You are now ready to enable the Geospatial Creator:
- From the Build Settings dialog, make sure your selected platform is either "Android" or "iOS". Geospatial Creator features are not available for other platforms at this time.
- Navigate to Project Settings > XR Plug-in Management > ARCore Extensions.
- If you did not set your ARCore Android and/or iOS API key(s) in an earlier step, make sure to do that now.
- Enable both "Geospatial" and "Geospatial Creator" toggles. After clicking to enable the Geospatial Creator toggle, a non-modal wizard will be displayed to confirm that your project is compatible with the Geospatial Creator.
- Click "Finish" on the wizard.
After finishing the wizard, Unity will trigger a compilation of your scripts. Wait for the recompilation to complete before continuing. (If your selected platform is not "Android" or "iOS", switch to one of those now.)
Add a Geospatial Creator Origin with Map Tiles
Your scene needs exactly one "Geospatial Creator Origin" object. This object is used as the reference point for converting real-world latitude, longitude, and altitude values to Unity game coordinates.
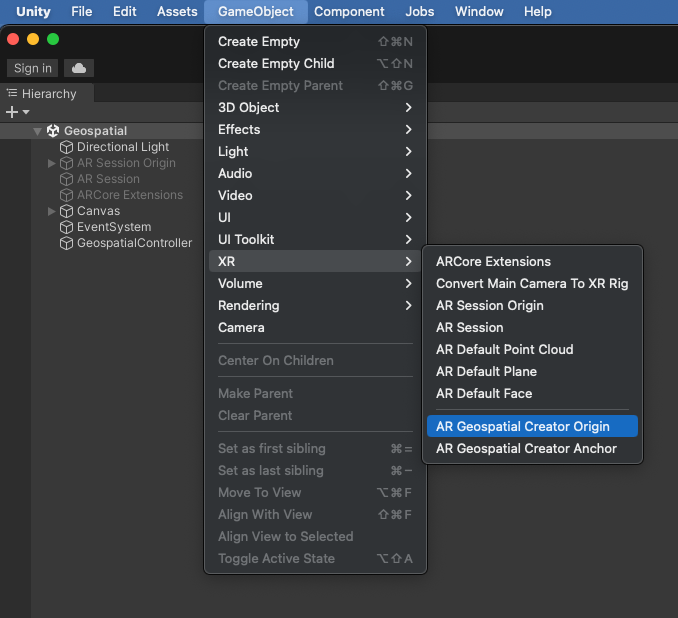
To add a Geospatial Creator Origin to your scene, select Game Object > XR > Geospatial Creator Origin. The newly-created object requires a georeference, which links a specific latitude, longitude, and altitude to the origin's position in game coordinates. From your Geospatial Creator Origin's Inspector pane, add a georeference by clicking the Add Cesium Georeference Component button.
In addition to being the reference point for your AR objects, the Cesium Georeference adds a Cesium 3D Tileset object to the scene. This object will render Google Map Tiles in the Editor's Scene View, allowing you to visualize exactly where in the world your AR content will appear. There is a field on the Geospatial Creator Origin's inspector to add the Map Tiles API key that you set up earlier. After you set this key, you should see the map tiles load in the Scene view.
Now change the latitude, longitude, and height fields to be located near where you'd like AR content to appear in your app.
The Scene View in the Editor should now show the map tiles at your origin's specified latitude and longitude. At runtime, we assume your app will be using the AR Camera, so Geospatial Creator has already configured the Cesium 3D Map Tileset object with the "EditorOnly" tag. Because of this, the tiles will not be downloaded or rendered at runtime in your game. This can be changed from the Cesium3DTileset object's inspector. To learn more about Cesium's Georeference and 3D Tileset GameObjects, refer to the Cesium for Unity documentation.
Add and place a Geospatial Creator Anchor
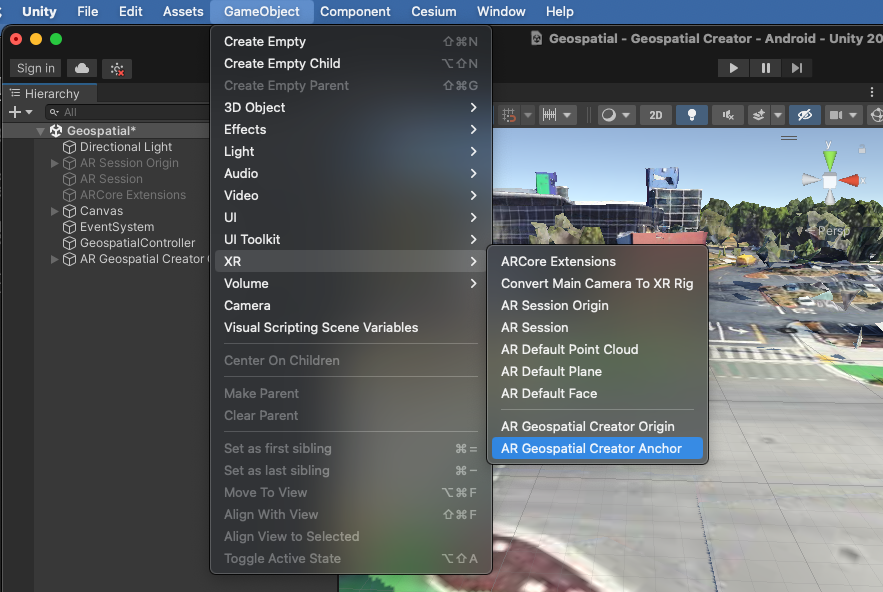
You are now ready to place AR content in your scene! Click GameObject > XR > Geospatial Creator Anchor to add an anchor to your scene hierarchy. From the Anchor's inspector, you can specify an exact latitude, longitude, and height. The object's transform will immediately update to the correct position in your scene, and you can see exactly where in the world the object will appear.
As you fine-tune the anchor's latitude and longitude, pick a place that is close by so you'll be able to validate it is in the correct place at runtime. When setting the altitude of a Geospatial Creator Anchor, you have three options:
- Terrain places the anchor at ground level at the latitude and longitude specified. The ground level is determined at runtime by the Visual Positioning System. If you are new to ARCore's Geospatial APIs, "Terrain" is a good choice, because the anchor will be resolved directly on the ground with a high degree of vertical accuracy. The "Altitude Offset" field lets you position the anchor above or below ground level by a fixed amount, in meters. For example, specifying an offset of "1.0" causes the anchor to "float" one meter above the terrain.
- Rooftop places the anchor relative to the top of any structure at the given latitude and longitude. Like the terrain anchor, the "Altitude Offset" field lets you move the anchor up or down relative to roof position, in meters.
- WGS84 places the anchor at a specific absolute altitude, in meters, based on the WGS84 coordinate system. Placing the object this way may require some trial and error, as a a height of "0" in WSG84 does not necessarily indicate mean sea level and may not match a GPS's altitude. Also, while the latitude and longitude of the rendered 3D tiles is highly accurate, attempting to place the object at ground level using the 3D tiles as a reference could result in a height error of up to several meters.
To learn more about the different types of ARCore Geospatial Anchors, refer to the Geospatial Developer Guide.
Both terrain and rooftop anchors have a WGS84 Altitude field. This value is only used in Editor mode, to set the height of the object in the Scene View. The terrain and rooftop heights are determined at runtime only, so the WGS84 Altitude field lets you visualize the anchor at a specific height while developing the app. The WGS84 Altitude field is ignored at runtime for terrain and rooftop anchors.
Add Geometry to the anchor
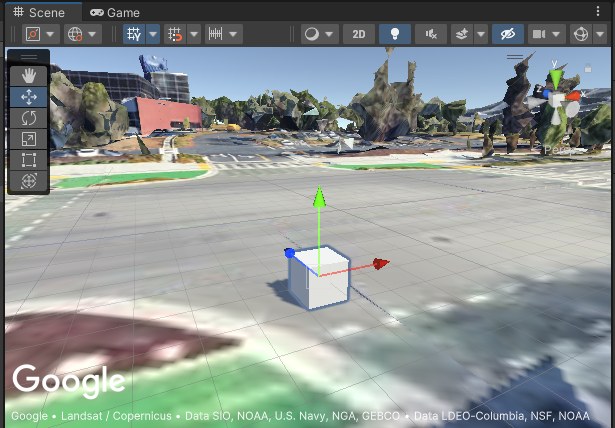
If you build and run the app now, you won't see the anchor in your AR enabled app. That's because there's no geometry attached to it. Let's add a simple 3D primitive to the anchor: In the scene hierarchy, right click on your AR Geospatial Creator Anchor object. From the context menu, choose 3D Object > Cube. You should see a gray cube in your scene view as a child of your anchor. If you decide to move the object's position or rotation in the Editor, we recommend moving the root Anchor object instead of the child Cube primitive. This will help reduce error in the translation from latitude / longitude to game coordinates.
Of course, you can add more complicated geometry and arbitrary components and children to the anchor as well.
Build and run your app
It is time to see your anchor in the real world! Try building and running your app, then move to the location where you expect to see the cube. Is it there? Congratulations, you're ready to build more complex AR experiences with the Geospatial Creator!
If you have any issues, see the Troubleshooting Guide.
Now is a great time to add additional AR Geospatial Creator Anchors with different geometries. Try experimenting with multiple rooftop and terrain anchors and their offsets. Add scripts to animate or enable interactions with the objects.
Understanding Geospatial Creator Anchors and the ARGeospatialAnchor class
When constructing complex and interactive AR experiences, it is helpful to
understand the relationship between Geospatial Creator Anchors and ARCore's
ARGeospatialAnchor C# class:
An
ARGeospatialAnchor
can only be created at runtime by invoking one of the functions on
ARAnchorManager,
and they can only be created once the AR session has stabilized. A Geospatial
Creator Anchor can be thought of as a placeholder that exists in your scene,
waiting for the AR session to be ready to resolve ARGeospatialAnchor objects.
Once the session is ready, the placeholder will automatically call the
ARAnchorManager to create and resolve the ARGeospatialAnchor.
Immediately after the runtime anchor is resolved, the Geospatial Creator Anchor
in your scene hierarchy will attach itself as a child to the new GameObject.
This means that any components or children of the Geospatial Creator Anchor will
become subcomponents or grandchildren of the new ARGeospatialAnchor
GameObject. For example, the transform of a geometry primitive attached to the
Geospatial Creator Anchor will inherit from the transform of the
ARGeospatialAnchor, and will therefore be placed at the expected location in
the runtime AR session.
If you need to identify specific ARGeospatialAnchor GameObjects at runtime,
you can search the scene for objects whose name property matches the anchor
created using the Geospatial Creator. If the AR session is initialized, the
parent of that object will be the corresponding ARGeospatialAnchor object.
Troubleshooting
Why is my anchor moving?
You may notice, especially when the app first launches, that the anchor may
appear to slowly "drift", or even jump several meters abruptly. This occurs when
the VPS session is still determining and refining the precise location of the
camera. As the horizontal and vertical accuracy improves over multiple frames,
the anchor is redrawn at a more accurate location, giving the illusion of
movement. You may wish to render the object differently (or not at all) until
the location accuracy reaches a certain threshold. To do so, you can query the
ARCoreEarthManager.CameraGeospatialPose
property to determine the accuracy for the current frame update.
Why does my anchor appear at the wrong altitude?
When using the "Manual" altitude type for Geospatial Creator Anchors, the anchor's altitude will be set (in meters) according to WGS84. At a given location, there may be a discrepancy of up to several meters between the apparent ground level shown in the map tiles and the actual ground level as reported by Google's Visual Positioning System (VPS). If a Geospatial Anchor appears to be located incorrectly at runtime, we recommend validating the VPS height in person using the debugging overlay in the sample app. You can then change the altitude in the Unity Editor to match the known VPS height at that location.
Map tiles are not rendering properly in the Editor's Scene View
If the Cesium3DTileset appears to be loading tiles, but they are rendered in
solid magenta in your scene view, add Unity's Shader Graph package to your
project. This package is required by Cesium, though projects using Unity's
built-in renderer do not include it by default.
To add Shader Graph, open the Unity Package Manager (Window > Package
Manager). Make sure you are browsing packages available on the Unity Package
Registry by selecting "Packages: Unity Registry" from the dropdown menu at the
top of the Package Manager window. Search for the com.unity.shadergraph
package and install the latest version. Once the package loads, the 3D tiles
should reload and render properly in the Scene View.
The app displays a black screen at runtime instead of the camera view
Unity's Universal Rendering Pipeline (URP) is not configured for the AR Camera
by default. If you are seeing a black screen at runtime instead of the camera
output, you'll need to add the AR Background Renderer Feature to each URP
Renderer in your scene.
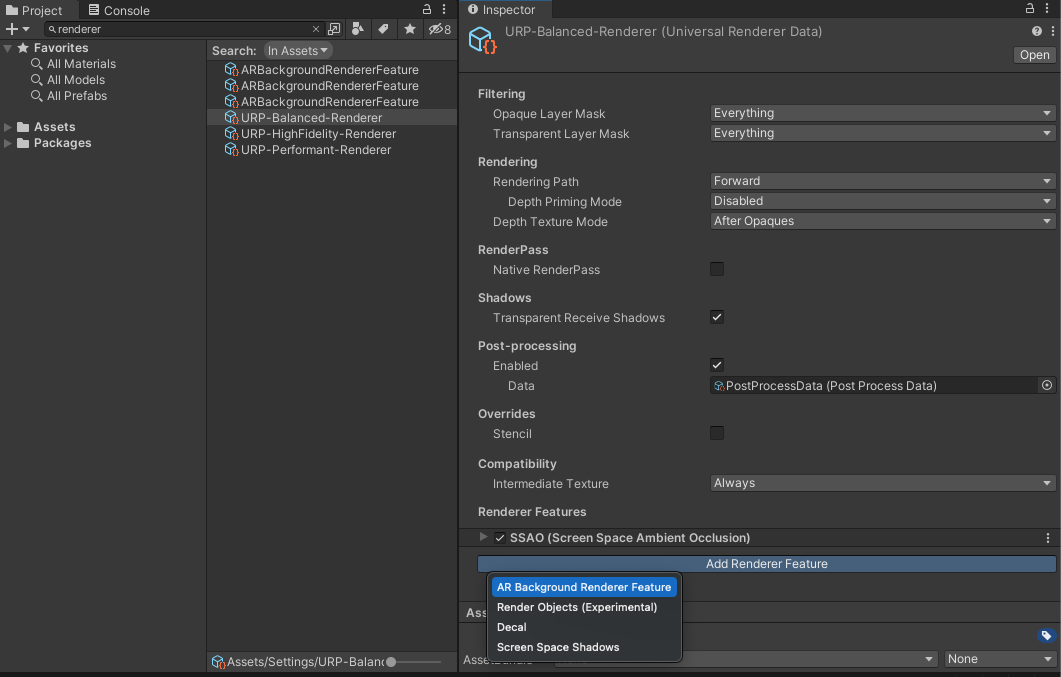
To add the feature, search for "renderer" in your project. For each URP Renderer object, click the "Add Renderer Feature" button in the Inspector and add the AR Background Renderer.
Why do Anchors placed far from the origin seem to be placed incorrectly?
The conversion from WGS84 coordinates to Unity game coordinates is subject to error due to floating point arithmetic precision, which can be minimized by ensuring your origin is nearby to your AR anchors. Distances over 20km may lead to inaccuracies. We recommend using multiple scenes, with a unique anchor in each scene, if your AR experience spans long distances.
