Depth API を使用すると、デバイスのカメラでシーン内の実際の物体のサイズと形状を認識できます。カメラを使用して奥行き画像(奥行きマップ)を作成することで、アプリに AR のリアリティのレイヤを追加します。奥行きのある画像から得られる情報を使用して、仮想オブジェクトを現実世界のオブジェクトの前または後ろに正確に表示し、臨場感のあるリアルなユーザー エクスペリエンスを実現できます。
奥行き情報は動きから計算され、可能であれば飛行時間(ToF)センサーなどのハードウェア奥行きセンサーからの情報と組み合わせることができます。デバイスで Depth API をサポートするため ToF センサーは不要。
前提条件
AR の基礎的なコンセプトを理解しておいてください。 と ARCore セッションを構成する方法を確認してください。
Depth 対応デバイスへのアクセスを制限する
Depth API のサポートがアプリのコア部分や
AR エクスペリエンスは深度に依存します。または、
深度を使用する部分については、アプリのコンテンツの
アプリを Google Play ストアから
Depth API をサポートするデバイスを追加する場合、
AndroidManifest.xml に次の行を追加します。
AndroidManifest.xml 件の変更については、
ARCore の有効化に関するガイド:
<uses-feature android:name="com.google.ar.core.depth" />
奥行きを有効にする
新しい ARCore セッションで、ユーザーのデバイスが Depth をサポートしているかどうかを確認します。処理能力の制約により、ARCore 対応デバイスはすべて Depth API をサポートしているわけではありません。リソースを節約するため、ARCore では深度がデフォルトで無効になっています。アプリで Depth API を使用するには、深度モードを有効にします。
Java
Config config = session.getConfig();

// Check whether the user's device supports the Depth API.
boolean isDepthSupported = session.isDepthModeSupported(Config.DepthMode.AUTOMATIC);
if (isDepthSupported) {
  config.setDepthMode(Config.DepthMode.AUTOMATIC);
}
session.configure(config);
Kotlin
val config = session.config

// Check whether the user's device supports the Depth API.
val isDepthSupported = session.isDepthModeSupported(Config.DepthMode.AUTOMATIC)
if (isDepthSupported) {
  config.depthMode = Config.DepthMode.AUTOMATIC
}
session.configure(config)
奥行きのある画像を取得する
Frame.acquireDepthImage16Bits() を呼び出して、現在のフレームの奥行きのある画像を取得します。
Java
// Retrieve the depth image for the current frame, if available.
Image depthImage = null;
try {
  depthImage = frame.acquireDepthImage16Bits();
  // Use the depth image here.
} catch (NotYetAvailableException e) {
  // This means that depth data is not available yet.
  // Depth data will not be available if there are no tracked
  // feature points. This can happen when there is no motion, or when the
  // camera loses its ability to track objects in the surrounding
  // environment.
} finally {
  if (depthImage != null) {
    depthImage.close();
  }
}
Kotlin
// Retrieve the depth image for the current frame, if available.
try {
  frame.acquireDepthImage16Bits().use { depthImage ->
    // Use the depth image here.
  }
} catch (e: NotYetAvailableException) {
  // This means that depth data is not available yet.
  // Depth data will not be available if there are no tracked
  // feature points. This can happen when there is no motion, or when the
  // camera loses its ability to track objects in the surrounding
  // environment.
}
返される画像は、未加工の画像バッファを提供します。このバッファをフラグメント シェーダーに渡して、レンダリングされた各オブジェクトを遮断するために GPU で使用できます。OPENGL_NORMALIZED_DEVICE_COORDINATES の向きで指定されており、Frame.transformCoordinates2d() を呼び出すことで TEXTURE_NORMALIZED に変更できます。オブジェクト シェーダー内で深度画像にアクセスできるようになると、それらの深度測定値に直接アクセスしてオクルージョンを処理できるようになります。
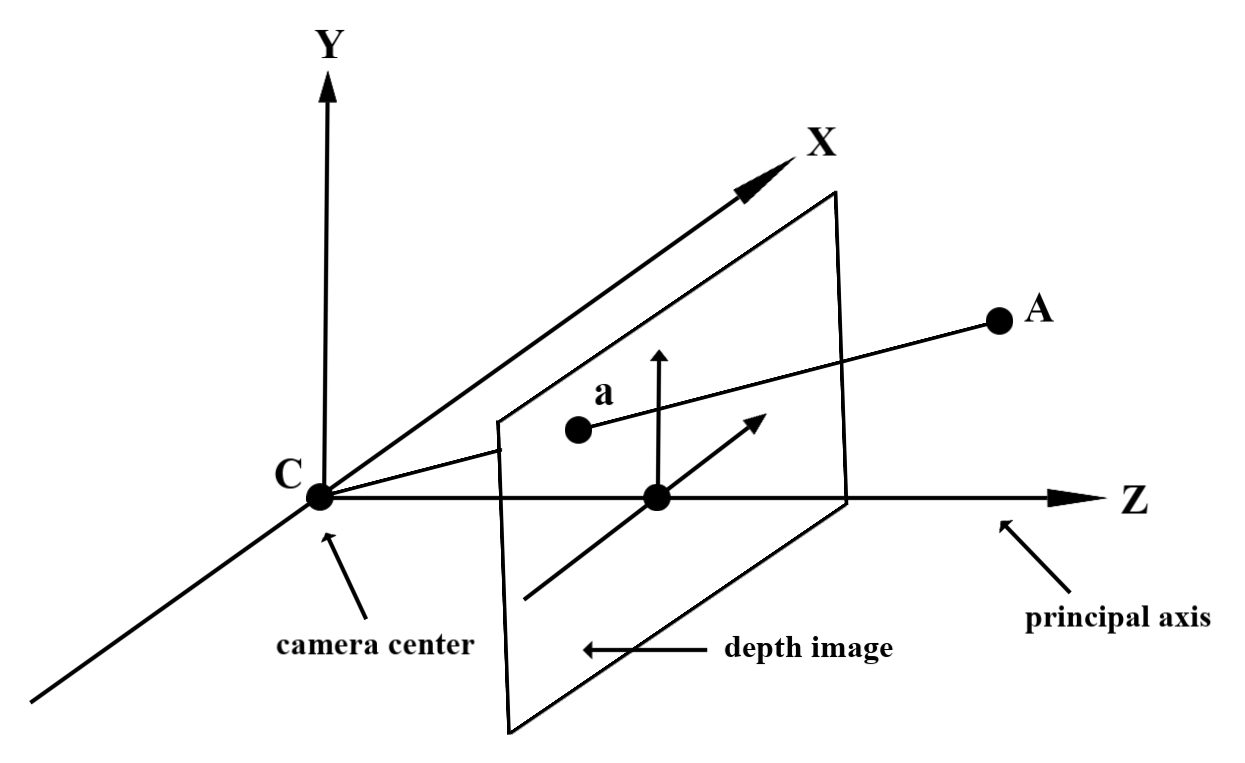
深度値について
観測された実世界のジオメトリ上の点 A と 2D の点 a
深度画像内の同じポイントを表します。Depth
a の API の座標は、CA を主軸に投影した長さと等しくなります。
これは、カメラを基準とする A の Z 座標とも呼ばれます。
オリジン: C。Depth API を使用する際は、次の点を理解することが重要です。
深度値は光線 CA 自体の長さではなく、投影です
できます。
シェーダーで深度を使用する
現在のフレームの深度情報を解析する
フラグメント シェーダーでヘルパー関数 DepthGetMillimeters() と DepthGetVisibility() を使用して、現在の画面位置の深度情報にアクセスします。次に、この情報を使用して、レンダリングされたオブジェクトの一部を選択的に覆います。
// Use DepthGetMillimeters() and DepthGetVisibility() to parse the depth image
// for a given pixel, and compare against the depth of the object to render.
float DepthGetMillimeters(in sampler2D depth_texture, in vec2 depth_uv) {
  // Depth is packed into the red and green components of its texture.
  // The texture is a normalized format, storing millimeters.
  vec3 packedDepthAndVisibility = texture2D(depth_texture, depth_uv).xyz;
  return dot(packedDepthAndVisibility.xy, vec2(255.0, 256.0 * 255.0));
}

// Return a value representing how visible or occluded a pixel is relative
// to the depth image. The range is 0.0 (not visible) to 1.0 (completely
// visible).
float DepthGetVisibility(in sampler2D depth_texture, in vec2 depth_uv,
                         in float asset_depth_mm) {
  float depth_mm = DepthGetMillimeters(depth_texture, depth_uv);

  // Instead of a hard Z-buffer test, allow the asset to fade into the
  // background along a 2 * kDepthTolerancePerMm * asset_depth_mm
  // range centered on the background depth.
  const float kDepthTolerancePerMm = 0.015f;
  float visibility_occlusion = clamp(0.5 * (depth_mm - asset_depth_mm) /
    (kDepthTolerancePerMm * asset_depth_mm) + 0.5, 0.0, 1.0);

 // Use visibility_depth_near to set the minimum depth value. If using
 // this value for occlusion, avoid setting it too close to zero. A depth value
 // of zero signifies that there is no depth data to be found.
  float visibility_depth_near = 1.0 - InverseLerp(
      depth_mm, /*min_depth_mm=*/150.0, /*max_depth_mm=*/200.0);

  // Use visibility_depth_far to set the maximum depth value. If the depth
  // value is too high (outside the range specified by visibility_depth_far),
  // the virtual object may get inaccurately occluded at further distances
  // due to too much noise.
  float visibility_depth_far = InverseLerp(
      depth_mm, /*min_depth_mm=*/7500.0, /*max_depth_mm=*/8000.0);

  const float kOcclusionAlpha = 0.0f;
  float visibility =
      max(max(visibility_occlusion, kOcclusionAlpha),
          max(visibility_depth_near, visibility_depth_far));

  return visibility;
}
仮想オブジェクトを遮断する
フラグメント シェーダーの本体で仮想オブジェクトをオクルードします。オブジェクトの深度に基づいてオブジェクトのアルファ チャンネルを更新します。これにより、遮蔽されたオブジェクトがレンダリングされます。
// Occlude virtual objects by updating the object’s alpha channel based on its depth.
const float kMetersToMillimeters = 1000.0;

float asset_depth_mm = v_ViewPosition.z * kMetersToMillimeters * -1.;

// Compute the texture coordinates to sample from the depth image.
vec2 depth_uvs = (u_DepthUvTransform * vec3(v_ScreenSpacePosition.xy, 1)).xy;

gl_FragColor.a *= DepthGetVisibility(u_DepthTexture, depth_uvs, asset_depth_mm);
オクルージョンは、2 パス レンダリングまたはオブジェクトごとのフォワードパス レンダリングを使用してレンダリングできます。それぞれの方法の効率は、シーンの複雑さやその他のアプリ固有の考慮事項によって異なります。
オブジェクトごとのフォワードパス レンダリング
オブジェクトごとのフォワードパス レンダリングでは、マテリアル シェーダーでのオブジェクトの各ピクセルのオクルージョンを決定します。ピクセルが見えない場合は、通常はアルファ ブレンディングによってクリップされ、ユーザーのデバイスでオクルージョンをシミュレートします。
2 パス レンダリング
2 パス レンダリングでは、最初のパスですべての仮想コンテンツが中間バッファにレンダリングされます。2 回目のパスでは、現実世界の奥行きと仮想シーンの奥行きの差に基づいて、仮想シーンを背景にブレンドします。この方法では、オブジェクト固有のシェーダーを追加で作業する必要はなく、通常はフォワードパス メソッドよりも均一な結果が得られます。
深度画像から距離を抽出する
仮想オブジェクトの隠蔽や奥行きデータの可視化以外の目的で Depth API を使用するには、奥行き画像から情報を抽出します。
Java
/** Obtain the depth in millimeters for depthImage at coordinates (x, y). */
public int getMillimetersDepth(Image depthImage, int x, int y) {
  // The depth image has a single plane, which stores depth for each
  // pixel as 16-bit unsigned integers.
  Image.Plane plane = depthImage.getPlanes()[0];
  int byteIndex = x * plane.getPixelStride() + y * plane.getRowStride();
  ByteBuffer buffer = plane.getBuffer().order(ByteOrder.nativeOrder());
  return Short.toUnsignedInt(buffer.getShort(byteIndex));
}
Kotlin
/** Obtain the depth in millimeters for [depthImage] at coordinates ([x], [y]). */
fun getMillimetersDepth(depthImage: Image, x: Int, y: Int): UInt {
  // The depth image has a single plane, which stores depth for each
  // pixel as 16-bit unsigned integers.
  val plane = depthImage.planes[0]
  val byteIndex = x * plane.pixelStride + y * plane.rowStride
  val buffer = plane.buffer.order(ByteOrder.nativeOrder())
  val depthSample = buffer.getShort(byteIndex)
  return depthSample.toUInt()
}
カメラ画像と奥行き画像の座標変換
getCameraImage() を使用して取得した画像は、奥行きのある画像とは異なるアスペクト比になることがあります。
この場合、奥行き画像はカメラ画像から切り抜かれたものであり、カメラ画像内のすべてのピクセルに対応する有効な奥行き推定値があるわけではありません。
CPU 画像上の座標の深度画像座標を取得するには:
Java
float[] cpuCoordinates = new float[] {cpuCoordinateX, cpuCoordinateY};
float[] textureCoordinates = new float[2];
frame.transformCoordinates2d(
    Coordinates2d.IMAGE_PIXELS,
    cpuCoordinates,
    Coordinates2d.TEXTURE_NORMALIZED,
    textureCoordinates);
if (textureCoordinates[0] < 0 || textureCoordinates[1] < 0) {
  // There are no valid depth coordinates, because the coordinates in the CPU image are in the
  // cropped area of the depth image.
  return null;
}
return new Pair<>(
    (int) (textureCoordinates[0] * depthImage.getWidth()),
    (int) (textureCoordinates[1] * depthImage.getHeight()));
Kotlin
val cpuCoordinates = floatArrayOf(cpuCoordinateX.toFloat(), cpuCoordinateY.toFloat())
val textureCoordinates = FloatArray(2)
frame.transformCoordinates2d(
  Coordinates2d.IMAGE_PIXELS,
  cpuCoordinates,
  Coordinates2d.TEXTURE_NORMALIZED,
  textureCoordinates,
)
if (textureCoordinates[0] < 0 || textureCoordinates[1] < 0) {
  // There are no valid depth coordinates, because the coordinates in the CPU image are in the
  // cropped area of the depth image.
  return null
}
return (textureCoordinates[0] * depthImage.width).toInt() to
  (textureCoordinates[1] * depthImage.height).toInt()
奥行き画像座標の CPU 画像座標を取得するには:
Java
float[] textureCoordinates =
    new float[] {
      (float) depthCoordinateX / (float) depthImage.getWidth(),
      (float) depthCoordinateY / (float) depthImage.getHeight()
    };
float[] cpuCoordinates = new float[2];
frame.transformCoordinates2d(
    Coordinates2d.TEXTURE_NORMALIZED,
    textureCoordinates,
    Coordinates2d.IMAGE_PIXELS,
    cpuCoordinates);
return new Pair<>((int) cpuCoordinates[0], (int) cpuCoordinates[1]);
Kotlin
val textureCoordinates =
  floatArrayOf(
    depthCoordinatesX.toFloat() / depthImage.width.toFloat(),
    depthCoordinatesY.toFloat() / depthImage.height.toFloat(),
  )
val cpuCoordinates = FloatArray(2)
frame.transformCoordinates2d(
  Coordinates2d.TEXTURE_NORMALIZED,
  textureCoordinates,
  Coordinates2d.IMAGE_PIXELS,
  cpuCoordinates,
)
return cpuCoordinates[0].toInt() to cpuCoordinates[1].toInt()
深度ヒットテスト
ヒットテストを使用すると、ユーザーはシーン内の現実世界の場所にオブジェクトを配置できます。以前は、ヒットテストは検出された平面に対してのみ実行でき、場所は緑色の Android で表示される結果のように、広くて平らな面に限定されていました。深度ヒットテストでは、平面ではないサーフェスやテクスチャの低いサーフェスでも、スムーズな深度情報と未加工の深度情報の両方を利用して、より正確なヒット結果を提供します。これは、赤色の Android で示されています。
<ph type="x-smartling-placeholder">
深度に対応したヒットテストを使用するには、hitTest() を呼び出し、リターンリストで DepthPoints を確認します。
Java
// Create a hit test using the Depth API.
List<HitResult> hitResultList = frame.hitTest(tap);
for (HitResult hit : hitResultList) {
  Trackable trackable = hit.getTrackable();
  if (trackable instanceof Plane
      || trackable instanceof Point
      || trackable instanceof DepthPoint) {
    useHitResult(hit);
    break;
  }
}
Kotlin
// Create a hit test using the Depth API.
val hitResult =
  frame
    .hitTest(tap)
    .filter {
      val trackable = it.trackable
      trackable is Plane || trackable is Point || trackable is DepthPoint
    }
    .firstOrNull()
useHitResult(hitResult)
次のステップ
- Raw Depth API を使用すると、より正確な検出が可能になります。
- ARCore Depth Lab で、深度データにアクセスするさまざまな方法を確認しましょう。