El SDK de Maps para iOS ofrece varias formas de agregar formas a tus mapas. Se admiten las siguientes formas:
- Una polilínea es una serie de segmentos de líneas conectados que pueden formar cualquier forma que desees y se pueden usar para marcar recorridos y rutas en el mapa.
- Un polígono es una forma delimitada que se puede usar para marcar áreas en el mapa.
- Un círculo es una proyección geográficamente precisa de un círculo en la superficie terrestre.
Puedes modificar el aspecto de cada forma de varias maneras.
Polilíneas
Las polilíneas te permiten dibujar líneas en el mapa. Un objeto GMSPolyline representa una secuencia ordenada de ubicaciones, que se muestra como una serie de segmentos de líneas. Puedes establecer el color de una polilínea con GMSStrokeStyle.
Para crear una polilínea, deberás especificar su ruta creando un objeto GMSMutablePath correspondiente con dos o más puntos.
Cada CLLocationCoordinate2D representa un punto en la superficie de la Tierra. Los segmentos de línea se dibujan entre puntos según el orden en el que los agregues a la ruta. Puedes agregar puntos a la ruta con los métodos addCoordinate: o addLatitude:longitude:.
Swift
let path = GMSMutablePath()
path.add(CLLocationCoordinate2D(latitude: -33.85, longitude: 151.20))
path.add(CLLocationCoordinate2D(latitude: -33.70, longitude: 151.40))
path.add(CLLocationCoordinate2D(latitude: -33.73, longitude: 151.41))
let polyline = GMSPolyline(path: path)
Objective-C
GMSMutablePath *path = [GMSMutablePath path];
[path addCoordinate:CLLocationCoordinate2DMake(-33.85, 151.20)];
[path addCoordinate:CLLocationCoordinate2DMake(-33.70, 151.40)];
[path addCoordinate:CLLocationCoordinate2DMake(-33.73, 151.41)];
GMSPolyline *polyline = [GMSPolyline polylineWithPath:path];
Cómo agregar una polilínea
- Crea un objeto
GMSMutablePath. - Establece los puntos en la ruta con los métodos
addCoordinate:oaddLatitude:longitude:. - Crea una instancia de un objeto
GMSPolylinenuevo con la ruta de acceso como argumento. - Establece otras propiedades, como
strokeWidthystrokeColor, según sea necesario. - Establece la propiedad
mapdelGMSPolyline. - La polilínea aparecerá en el mapa.
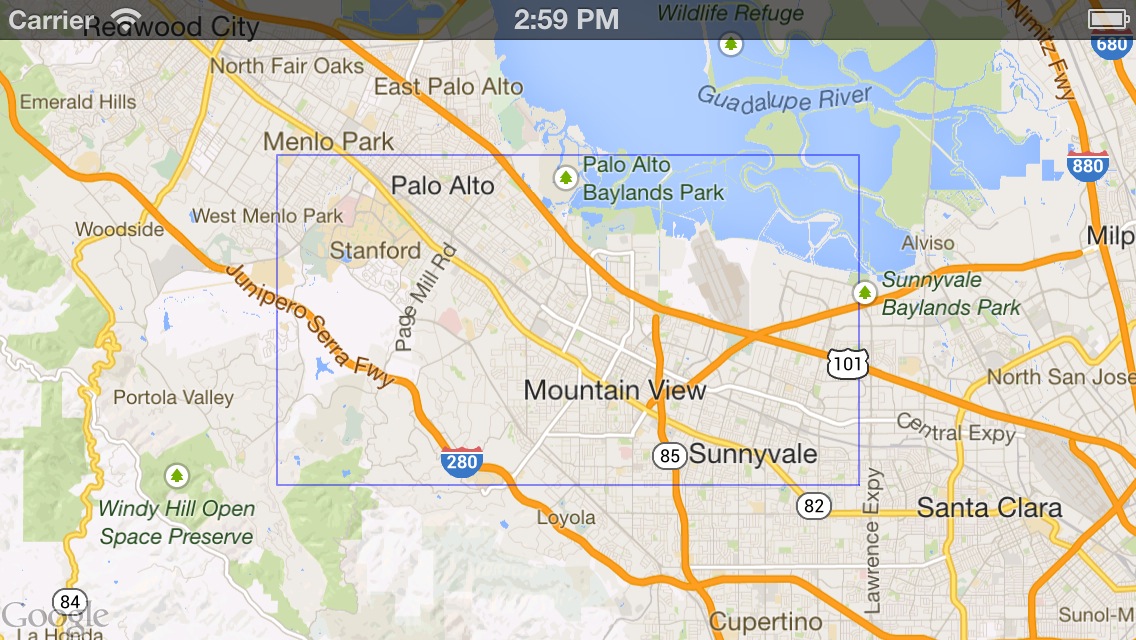
Con el fragmento de código siguiente se agrega un rectángulo a un mapa:
Swift
let rectanglePath = GMSMutablePath()
rectanglePath.add(CLLocationCoordinate2D(latitude: 37.36, longitude: -122.0))
rectanglePath.add(CLLocationCoordinate2D(latitude: 37.45, longitude: -122.0))
rectanglePath.add(CLLocationCoordinate2D(latitude: 37.45, longitude: -122.2))
rectanglePath.add(CLLocationCoordinate2D(latitude: 37.36, longitude: -122.2))
rectanglePath.add(CLLocationCoordinate2D(latitude: 37.36, longitude: -122.0))

let rectangle = GMSPolyline(path: path)
rectangle.map = mapView
Objective-C
GMSMutablePath *rectanglePath = [GMSMutablePath path];
[rectanglePath addCoordinate:CLLocationCoordinate2DMake(37.36, -122.0)];
[rectanglePath addCoordinate:CLLocationCoordinate2DMake(37.45, -122.0)];
[rectanglePath addCoordinate:CLLocationCoordinate2DMake(37.45, -122.2)];
[rectanglePath addCoordinate:CLLocationCoordinate2DMake(37.36, -122.2)];
[rectanglePath addCoordinate:CLLocationCoordinate2DMake(37.36, -122.0)];

GMSPolyline *rectangle = [GMSPolyline polylineWithPath:path];
rectangle.map = mapView;
Cómo quitar una polilínea
Para quitar una polilínea del mapa, establece la propiedad map de tu GMSPolyline en nil. Como alternativa, puedes quitar todas las superposiciones (incluidas las polilíneas y otras formas) del mapa llamando al método clear de GMSMapView.
Swift
mapView.clear()
Objective-C
[mapView clear];
Cómo personalizar una polilínea
El objeto GMSPolyline proporciona varias propiedades para controlar la apariencia de la línea. Se admiten las siguientes opciones:
strokeWidth- Ancho de toda la línea, en puntos de pantalla. El valor predeterminado es 1. El ancho no se ajusta cuando se aplica zoom al mapa.
geodesic-
Cuando es
YES, renderiza este borde de polilínea como geodésico. Los segmentos geodésicos siguen la ruta más corta en la superficie terrestre y pueden aparecer como líneas curvas en un mapa con una proyección de Mercator. Los tramos no geodésicos se dibujan como líneas rectas en el mapa. La configuración predeterminada esNO. spans- Se usa para especificar el color de uno o más segmentos de una polilínea. La propiedad spans es un array de objetos
GMSStyleSpan. Establecer la propiedadspanses la forma preferida de cambiar el color de una polilínea. strokeColor- : Un objeto
UIColorque especifica el color de la polilínea. La configuración predeterminada esblueColor. La propiedadstrokeColorse ignora si se establecespans.
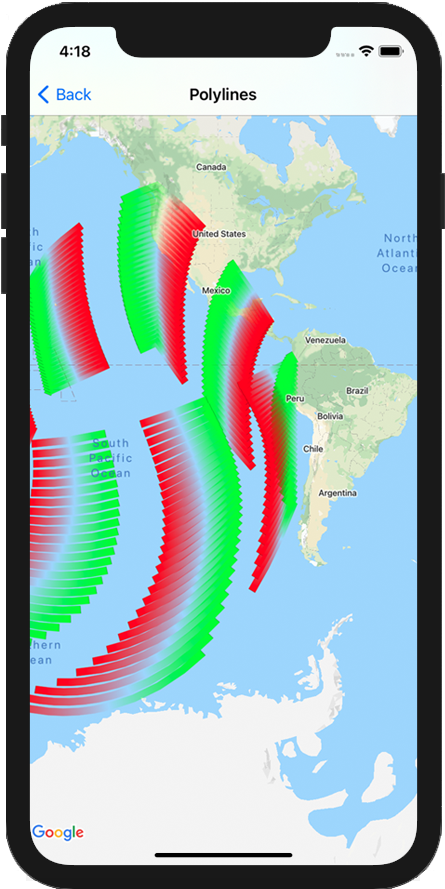
El siguiente fragmento agrega una polilínea gruesa desde Melbourne hasta Perth, con interpolación geodésica.
Swift
let path = GMSMutablePath()
path.addLatitude(-37.81319, longitude: 144.96298)
path.addLatitude(-31.95285, longitude: 115.85734)
let polyline = GMSPolyline(path: path)
polyline.strokeWidth = 10.0
polyline.geodesic = true
polyline.map = mapView
Objective-C
GMSMutablePath *path = [GMSMutablePath path];
[path addLatitude:-37.81319 longitude:144.96298];
[path addLatitude:-31.95285 longitude:115.85734];
GMSPolyline *polyline = [GMSPolyline polylineWithPath:path];
polyline.strokeWidth = 10.f;
polyline.geodesic = YES;
polyline.map = mapView;
Para modificar una polilínea después de agregarla al mapa, asegúrate de conservar el objeto GMSPolyline.
Swift
polyline.strokeColor = .blue
Objective-C
polyline.strokeColor = [UIColor blueColor];
Cómo cambiar el color de una polilínea
Las polilíneas se dibujan como una serie de segmentos en el mapa. Puedes cambiar el color de segmentos individuales o de toda la línea con la propiedad spans. Si bien esta propiedad te brinda un control detallado sobre el color de una polilínea, existen varias opciones convenientes que te permiten aplicar un solo estilo a toda la línea.
El siguiente fragmento usa el método spanWithColor: para cambiar el color de toda la línea a rojo.
Swift
polyline.spans = [GMSStyleSpan(color: .red)]
Objective-C
polyline.spans = @[[GMSStyleSpan spanWithColor:[UIColor redColor]]];
Como alternativa, si ya tienes acceso a un objeto GMSStrokeStyle, puedes usar el método spanWithStyle:.
Swift
let solidRed = GMSStrokeStyle.solidColor(.red)
polyline.spans = [GMSStyleSpan(style: solidRed)]
Objective-C
GMSStrokeStyle *solidRed = [GMSStrokeStyle solidColor:[UIColor redColor]];
polyline.spans = @[[GMSStyleSpan spanWithStyle:solidRed]];
Antes de la versión 1.7 del SDK de Maps para iOS, la única propiedad strokeColor estaba disponible para establecer el color completo de un GMSPolyline. La propiedad spans tiene prioridad sobre strokeColor.
Swift
polyline.strokeColor = .red
Objective-C
polyline.strokeColor = [UIColor redColor];
Estilos
Si tu app aplica el mismo color de trazo varias veces, te resultará útil definir un estilo reutilizable. Los diseños de polilíneas se especifican con el objeto GMSStrokeStyle. Un estilo de trazo puede ser un color sólido o un gradiente de un color a otro. Una vez que creaste un diseño, puedes aplicarlo a un GMSStyleSpan con el método spanWithStyle:.
Swift
// Create two styles: one that is solid blue, and one that is a gradient from red to yellow
let solidBlue = GMSStrokeStyle.solidColor(.blue)
let solidBlueSpan = GMSStyleSpan(style: solidBlue)
let redYellow = GMSStrokeStyle.gradient(from: .red, to: .yellow)
let redYellowSpan = GMSStyleSpan(style: redYellow)
Objective-C
// Create two styles: one that is solid blue, and one that is a gradient from red to yellow
GMSStrokeStyle *solidBlue = [GMSStrokeStyle solidColor:[UIColor blueColor]];
GMSStyleSpan *solidBlueSpan = [GMSStyleSpan spanWithStyle:solidBlue];
GMSStrokeStyle *redYellow =
    [GMSStrokeStyle gradientFromColor:[UIColor redColor] toColor:[UIColor yellowColor]];
GMSStyleSpan *redYellowSpan = [GMSStyleSpan spanWithStyle:redYellow];
El estilo de un span continuará hasta el final de la polilínea o hasta que se establezca un nuevo estilo. Puedes cambiar el color de toda la línea estableciendo la propiedad spans de una polilínea en un solo GMSStyleSpan. En el ejemplo, se muestra cómo aplicar un gradiente en toda la longitud de la polilínea.
Swift
polyline.spans = [GMSStyleSpan(style: redYellow)]
Objective-C
polyline.spans = @[[GMSStyleSpan spanWithStyle:redYellow]];
Cómo cambiar el color de segmentos de líneas individuales
Si deseas aplicar un diseño a cada segmento de tu polilínea de forma individual, puedes crear un array de objetos GMSStyleSpan y pasarlo a la propiedad spans. De forma predeterminada, cada elemento del array establece el color del segmento de línea correspondiente. Si hay más elementos en el array que segmentos en la línea, se ignorarán los elementos adicionales. Si hay menos elementos en el array, el GMSStyleSpan final describe el color del resto de la línea.
Puedes usar bloques de color o polilíneas de gradiente para indicar cambios a lo largo de tu polilínea, como la elevación o la velocidad. El siguiente fragmento de código establece el color de los dos primeros segmentos de una polilínea en rojo, y el resto de la línea es un gradiente de rojo a amarillo.
Swift
polyline.spans = [
  GMSStyleSpan(style: solidRed),
  GMSStyleSpan(style: solidRed),
  GMSStyleSpan(style: redYellow)
]
Objective-C
polyline.spans = @[[GMSStyleSpan spanWithStyle:solidRed],
                   [GMSStyleSpan spanWithStyle:solidRed],
                   [GMSStyleSpan spanWithStyle:redYellow]];
Puedes usar el método spanWithStyle:segments: para establecer el estilo de varios segmentos a la vez. Por ejemplo, el siguiente código es equivalente al anterior.
La longitud del segmento del GMSStyleSpan final siempre se ignora, ya que el estilo se usa para describir el resto de la línea.
Swift
polyline.spans = [
  GMSStyleSpan(style: solidRed, segments:2),
  GMSStyleSpan(style: redYellow, segments:10)
]
Objective-C
polyline.spans = @[[GMSStyleSpan spanWithStyle:solidRed segments:2],
                   [GMSStyleSpan spanWithStyle:redYellow segments:10]];
Segmentos fraccionarios
Los segmentos también pueden especificarse como un valor fraccionario. Esto aplicará el estilo a la cantidad fraccionaria de segmentos, lo que podría provocar una división en un solo segmento. Cada GMSStyleSpan comienza inmediatamente después del anterior: en el siguiente ejemplo, el color gris comienza desde la mitad del segundo segmento y continúa hasta la mitad del tercer segmento.
Swift
polyline.spans = [
  GMSStyleSpan(style: solidRed, segments: 2.5),
  GMSStyleSpan(color: .gray),
  GMSStyleSpan(color: .purple, segments: 0.75),
  GMSStyleSpan(style: redYellow)
]
Objective-C
polyline.spans = @[[GMSStyleSpan spanWithStyle:solidRed segments:2.5],
                   [GMSStyleSpan spanWithColor:[UIColor grayColor]],
                   [GMSStyleSpan spanWithColor:[UIColor purpleColor] segments:0.75],
                   [GMSStyleSpan spanWithStyle:redYellow]];
Cómo agregar un patrón de color repetitivo a una polilínea
Si quieres agregar un patrón a una polilínea, puedes usar el método de utilidad GMSStyleSpans en GMSGeometryUtils. El método GMSStyleSpans acepta dos arrays que definen un patrón repetitivo. Un array establece los estilos que se deben repetir y el otro define el intervalo de repetición. Si se usan en conjunto, puedes crear un patrón que se puede aplicar a cualquier polilínea, sin importar su longitud o la cantidad de segmentos disponibles.
Por ejemplo, el siguiente fragmento de código define una polilínea con un patrón alternado en blanco y negro. Sus longitudes se tratan como metros a lo largo de una línea loxodrómica (en Mercator, es una línea recta), ya que el tipo se especifica como kGMSLengthRhumb.
Swift
let styles = [
  GMSStrokeStyle.solidColor(.white),
  GMSStrokeStyle.solidColor(.black)
]
let lengths: [NSNumber] = [100000, 50000]
polyline.spans = GMSStyleSpans(
  polyline.path!,
  styles,
  lengths,
  GMSLengthKind.rhumb
)
Objective-C
NSArray *styles = @[[GMSStrokeStyle solidColor:[UIColor whiteColor]],
                    [GMSStrokeStyle solidColor:[UIColor blackColor]]];
NSArray *lengths = @[@100000, @50000];
polyline.spans = GMSStyleSpans(polyline.path, styles, lengths, kGMSLengthRhumb);
Polilíneas selladas con Sprite
Las polilíneas selladas con sprites te permiten crear una polilínea con una imagen de mapa de bits recurrente de tu elección. Las formas se muestran con un trazo de fondo claro, pero el sello no se trunca alrededor de las esquinas de las líneas, lo que las hace útiles para situaciones como los puntos para ilustrar las indicaciones sobre cómo llegar a pie.
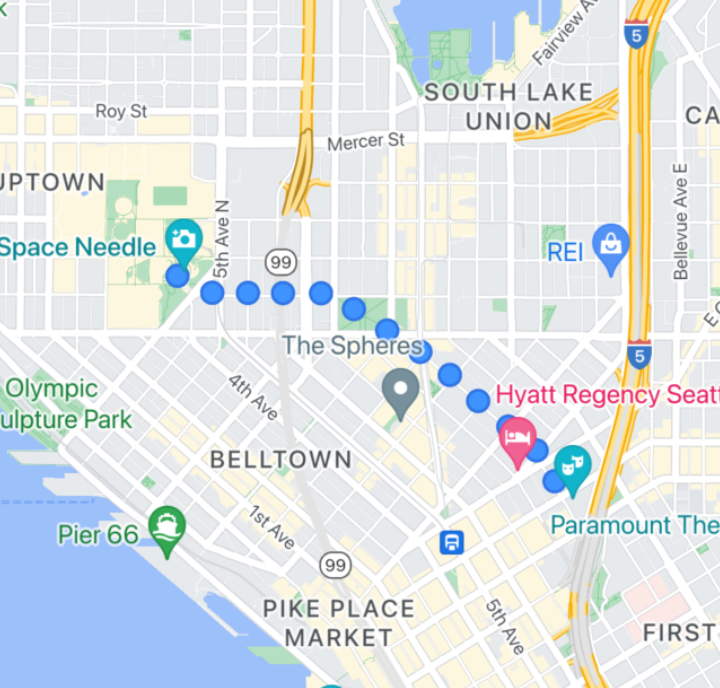
Puedes usar esta función con GMSSpriteStyle y configurarla como el sello con la propiedad stampStyle de GMSStrokeStyle.
Swift
let path = GMSMutablePath()
path.addLatitude(-37.81319, longitude: 144.96298)
path.addLatitude(-31.95285, longitude: 115.85734)
let polyline = GMSPolyline(path: path)
polyline.strokeWidth = 20
let image = UIImage(named: "imageFromBundleOrAsset")! // Image could be from anywhere
let stampStyle = GMSSpriteStyle(image: image)
let transparentStampStroke = GMSStrokeStyle.transparentStroke(withStamp: stampStyle)
let span = GMSStyleSpan(style: transparentStampStroke)
polyline.spans = [span]
polyline.map = mapView
Objective-C
GMSMutablePath *path = [GMSMutablePath path];
[path addLatitude:-37.81319 longitude:144.96298];
[path addLatitude:-31.95285 longitude:115.85734];
polyline.strokeWidth = 20;
GMSPolyline *polyline = [GMSPolyline polylineWithPath:path];

UIImage *image = [UIImage imageNamed:@"imageFromBundleOrAsset"];
GMSStrokeStyle *transparentStampStroke = [GMSStrokeStyle transparentStrokeWithStampStyle:[GMSSpriteStyle spriteStyleWithImage:image]];

GMSStyleSpan *span = [GMSStyleSpan spanWithStyle:transparentStampStroke];
polyline.spans = @[span];
polyline.map = _mapView;
Polilíneas selladas con texturas
Las polilíneas selladas con textura te permiten crear una polilínea con una textura repetida de tu elección. Las formas se pueden mostrar con un trazo de fondo claro, de color sólido o de gradiente. La textura cambia de tamaño a medida que cambian los niveles de zoom. Las imágenes al final o al principio de las rutas o los puntos de ruta se truncan en ciertos niveles de zoom.
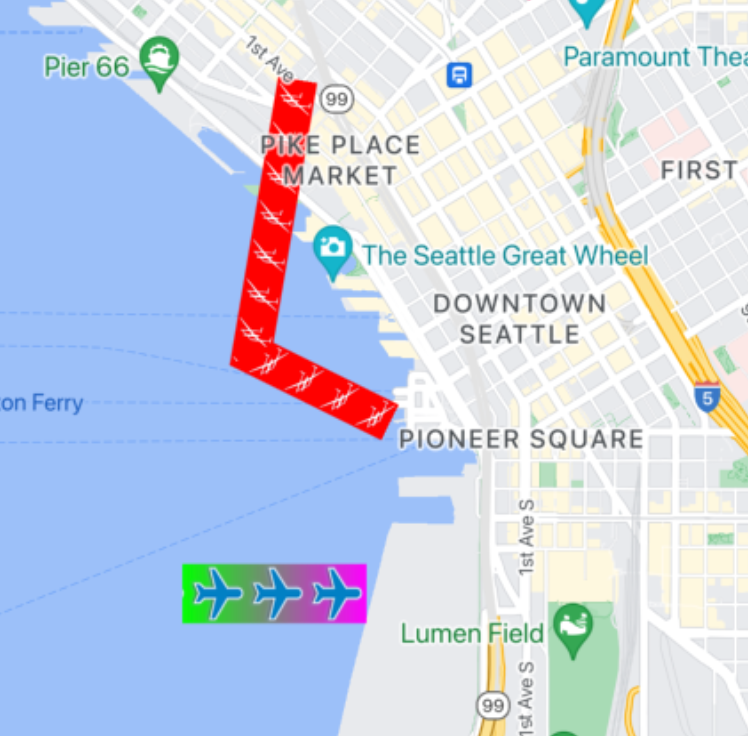
Puedes usar esta función con GMSTextureStyle y configurarla como el sello con la propiedad stampStyle de GMSStrokeStyle.
Swift
let path = GMSMutablePath()
path.addLatitude(-37.81319, longitude: 144.96298)
path.addLatitude(-31.95285, longitude: 115.85734)
let polyline = GMSPolyline(path: path)
polyline.strokeWidth = 20
let redWithStamp = GMSStrokeStyle.solidColor(.red)
let image = UIImage(named: "imageFromBundleOrAsset")! // Image could be from anywhere
redWithStamp.stampStyle = GMSTextureStyle(image: image)
let span = GMSStyleSpan(style: redWithStamp)
polyline.spans = [span]
polyline.map = mapView
Objective-C
GMSMutablePath *path = [GMSMutablePath path];
[path addLatitude:-37.81319 longitude:144.96298];
[path addLatitude:-31.95285 longitude:115.85734];
GMSPolyline *polyline = [GMSPolyline polylineWithPath:path];
polyline.strokeWidth = 20;
GMSStrokeStyle *redWithStamp = [GMSStrokeStyle solidColor:[UIColor redColor]];

UIImage *image = [UIImage imageNamed:@"imageFromBundleOrAsset"]; // Image could be from anywhere
redWithStamp.stampStyle = [GMSTextureStyle textureStyleWithImage:image];

GMSStyleSpan *span = [GMSStyleSpan spanWithStyle:redWithStamp];
polyline.spans = @[span];
polyline.map = _mapView;
Funciones de mapas
La propiedad mapCapabilities en GMSMapView agrega una verificación programática para las funciones específicas del mapa. Esto es útil cuando se desea saber si hay ciertos capabilities de mapa disponibles antes de llamar a APIs específicas. Esta consulta determina si la vista del mapa admite polilíneas con marcas de sprite.
Swift
let path = GMSMutablePath()
path.addLatitude(-37.81319, longitude: 144.96298)
path.addLatitude(-31.95285, longitude: 115.85734)
let polyline = GMSPolyline(path: path)
polyline.strokeWidth = 20
let image = UIImage(named: "imageFromBundleOrAsset")! // Image could be from anywhere
let spans: [GMSStyleSpan]
if (mapView.mapCapabilities.contains(.spritePolylines)) {
  let spriteStyle = GMSSpriteStyle(image: image)
  let stroke = GMSStrokeStyle.transparentStroke(withStamp: spriteStyle)
  spans = [ GMSStyleSpan(style: stroke) ]
} else {
  let stroke = GMSStrokeStyle.solidColor(.clear)
  stroke.stampStyle = GMSTextureStyle(image: image)
  spans = [ GMSStyleSpan(style: stroke) ]
}
polyline.spans = spans
polyline.map = mapView
Objective-C
GMSMutablePath *path = [GMSMutablePath path];
[path addLatitude:-37.81319 longitude:144.96298];
[path addLatitude:-31.95285 longitude:115.85734];

UIImage *_Nonnull image = [UIImage imageNamed:@"imageFromBundleOrAsset"]; // Image could be from anywhere

NSArray<GMSStyleSpan *> * spans;
if (_mapView.mapCapabilities & GMSMapCapabilityFlagsSpritePolylines) {
  GMSSpriteStyle *spriteStyle = [GMSSpriteStyle spriteStyleWithImage:image];
  GMSStrokeStyle *stroke = [GMSStrokeStyle transparentStrokeWithStampStyle:spriteStyle];
  spans = @[ [GMSStyleSpan spanWithStyle:stroke] ];
} else {
  GMSStrokeStyle *stroke = [GMSStrokeStyle solidColor:UIColor.clearColor];
  stroke.stampStyle = [GMSTextureStyle textureStyleWithImage:image];
  spans = @[ [GMSStyleSpan spanWithStyle:stroke] ];
}

GMSPolyline *polyline = [GMSPolyline polylineWithPath:path];
polyline.strokeWidth = 20;
polyline.spans = spans;
polyline.map = _mapView;
Este patrón te permite suscribirte a los cambios y reaccionar a las actualizaciones con el estado de la vista del mapa. También puedes implementar didChangeMapCapabilities en GMSMapViewDelegate para recibir actualizaciones sobre la disponibilidad de las funciones.
Polígonos
Los polígonos son similares a las polilíneas, ya que constan de una serie de coordenadas en una secuencia ordenada. Sin embargo, en lugar de ser abiertos, los polígonos están diseñados para definir regiones sólidas dentro de un bucle cerrado. Los polígonos se definen en el SDK de Maps para iOS con la clase GMSPolygon.
Puedes agregar un objeto GMSPolygon al mapa de la misma manera en la que agregas un objeto GMSPolyline. Primero, especifica su ruta de acceso creando un objeto GMSMutablePath correspondiente y agregándole puntos.
Estos puntos forman el contorno del polígono. Cada CLLocationCoordinate2D representa un punto en la superficie de la Tierra. Los segmentos de línea se dibujan entre puntos según el orden en el que los agregues a la ruta.
Cómo agregar un polígono
- Crea un objeto
GMSMutablePath. - Establece los puntos en la ruta con los métodos
addCoordinate:oaddLatitude:longitude:. Estos puntos conforman el contorno del polígono. - Crea una instancia de un objeto
GMSPolygonnuevo con la ruta de acceso como argumento. - Establece otras propiedades, como
strokeWidth,strokeColoryfillColor, según lo desees. - Asigna el polígono a un objeto
GMSMapViewconfigurando la propiedadGMSPolygon.map. - El polígono aparecerá en el mapa.
Con el fragmento de código siguiente se agrega un rectángulo a un mapa.
Swift
// Create a rectangular path
let rect = GMSMutablePath()
rect.add(CLLocationCoordinate2D(latitude: 37.36, longitude: -122.0))
rect.add(CLLocationCoordinate2D(latitude: 37.45, longitude: -122.0))
rect.add(CLLocationCoordinate2D(latitude: 37.45, longitude: -122.2))
rect.add(CLLocationCoordinate2D(latitude: 37.36, longitude: -122.2))

// Create the polygon, and assign it to the map.
let polygon = GMSPolygon(path: rect)
polygon.fillColor = UIColor(red: 0.25, green: 0, blue: 0, alpha: 0.05);
polygon.strokeColor = .black
polygon.strokeWidth = 2
polygon.map = mapView
Objective-C
// Create a rectangular path
GMSMutablePath *rect = [GMSMutablePath path];
[rect addCoordinate:CLLocationCoordinate2DMake(37.36, -122.0)];
[rect addCoordinate:CLLocationCoordinate2DMake(37.45, -122.0)];
[rect addCoordinate:CLLocationCoordinate2DMake(37.45, -122.2)];
[rect addCoordinate:CLLocationCoordinate2DMake(37.36, -122.2)];

// Create the polygon, and assign it to the map.
GMSPolygon *polygon = [GMSPolygon polygonWithPath:rect];
polygon.fillColor = [UIColor colorWithRed:0.25 green:0 blue:0 alpha:0.05];
polygon.strokeColor = [UIColor blackColor];
polygon.strokeWidth = 2;
polygon.map = mapView;
Puedes personalizar el aspecto del polígono antes y después de agregarlo al mapa.
Cómo quitar un polígono
Quita un polígono configurando su propiedad GMSPolygon.map como nil y separando el layer de su elemento superior.
Swift
 polygon.map = nil
 polygon.layer.removeFromSuperLayer()
Objective-C
 polygon.map = nil;
 [polygon.layer removeFromSuperlayer];
Círculos
Además de la clase genérica GMSPolygon, el SDK de Maps para iOS también incluye GMSCircle, lo que te permite dibujar círculos en la superficie de la Tierra.
Para construir un círculo, debes especificar las dos propiedades siguientes:
positioncomoCLLocationCoordinate2Dradiusen metros
Por lo tanto, un círculo se define como el conjunto de todos los puntos de la superficie terrestre, que se encuentran a radius metros del objeto center especificado. Debido a la manera en que la proyección de Mercator que usa la API de Maps renderiza una esfera en una superficie plana, esta aparece casi como un círculo perfecto cuando se encuentra cerca del ecuador en el mapa y pierde cada vez más la forma circular (en la pantalla) a medida que el círculo se aleja del ecuador.
Cómo agregar un círculo
En el fragmento de código siguiente se agrega un círculo al mapa:
Swift
let circleCenter = CLLocationCoordinate2D(latitude: 37.35, longitude: -122.0)
let circle = GMSCircle(position: circleCenter, radius: 1000)
circle.map = mapView
Objective-C
CLLocationCoordinate2D circleCenter = CLLocationCoordinate2DMake(37.35, -122.0);
GMSCircle *circle = [GMSCircle circleWithPosition:circleCenter
                                         radius:1000];
circle.map = mapView;
Puedes personalizar el aspecto del círculo antes y después de agregarlo al mapa.
Cómo personalizar un círculo
Puedes especificar colores y anchos de trazo personalizados modificando las propiedades de GMSCircle. Se admiten las siguientes opciones:
fillColor- : Un objeto
UIColorque especifica el color interior del círculo. La configuración predeterminada es transparente. strokeColor- : Es un objeto
UIColorque especifica el color del contorno del círculo. La configuración predeterminada esblackColor. strokeWidth- Grosor del contorno del círculo, en puntos de pantalla. El valor predeterminado es 1. El grosor no se ajusta cuando se aplica zoom al mapa.
El siguiente fragmento agrega un círculo rojo grueso con un interior rojo semitransparente.
Swift
circle.fillColor = UIColor(red: 0.35, green: 0, blue: 0, alpha: 0.05)
circle.strokeColor = .red
circle.strokeWidth = 5
Objective-C
circle.fillColor = [UIColor colorWithRed:0.25 green:0 blue:0 alpha:0.05];
circle.strokeColor = [UIColor redColor];
circle.strokeWidth = 5;
Cómo crear un polígono hueco
Puedes combinar varias rutas en un solo objeto GMSPolygon para crear formas complejas, como anillos rellenos o rosquillas (donde las áreas poligonales aparecen dentro del polígono como formas separadas). Las formas complejas son la composición de varias rutas.
Crea un polígono con una ruta que especifica el área más grande cubierta por el polígono. Luego, especifica la propiedad holes del polígono como un array de uno o más objetos GMSPath, que definen los agujeros dentro del polígono.
Si una ruta más pequeña está completamente delimitada por la ruta más grande, parecerá que se quitó parte del polígono.
En el siguiente ejemplo de código se crea un polígono con dos orificios:
Swift
let hydeParkLocation = CLLocationCoordinate2D(latitude: -33.87344, longitude: 151.21135)
let camera = GMSCameraPosition.camera(withTarget: hydeParkLocation, zoom: 16)
let mapView = GMSMapView.map(withFrame: .zero, camera: camera)
mapView.animate(to: camera)

let hydePark = "tpwmEkd|y[QVe@Pk@BsHe@mGc@iNaAKMaBIYIq@qAMo@Eo@@[Fe@DoALu@HUb@c@XUZS^ELGxOhAd@@ZB`@J^BhFRlBN\\BZ@`AFrATAJAR?rAE\\C~BIpD"
let archibaldFountain = "tlvmEqq|y[NNCXSJQOB[TI"
let reflectionPool = "bewmEwk|y[Dm@zAPEj@{AO"

let hollowPolygon = GMSPolygon()
hollowPolygon.path = GMSPath(fromEncodedPath: hydePark)
hollowPolygon.holes = [GMSPath(fromEncodedPath: archibaldFountain)!, GMSPath(fromEncodedPath: reflectionPool)!]
hollowPolygon.fillColor = UIColor(red: 1.0, green: 0.0, blue: 0.0, alpha: 0.2)
hollowPolygon.strokeColor = UIColor(red: 1.0, green: 0.0, blue: 0.0, alpha: 1.0)
hollowPolygon.strokeWidth = 2
hollowPolygon.map = mapView
Objective-C
CLLocationCoordinate2D hydeParkLocation = CLLocationCoordinate2DMake(-33.87344, 151.21135);
GMSCameraPosition *camera = [GMSCameraPosition cameraWithTarget:hydeParkLocation
                                                           zoom:16];
mapView = [GMSMapView mapWithFrame:CGRectZero camera:camera];

NSString *hydePark = @"tpwmEkd|y[QVe@Pk@BsHe@mGc@iNaAKMaBIYIq@qAMo@Eo@@[Fe@DoALu@HUb@c@XUZS^ELGxOhAd@@ZB`@J^BhFRlBN\\BZ@`AFrATAJAR?rAE\\C~BIpD";
NSString *archibaldFountain = @"tlvmEqq|y[NNCXSJQOB[TI";
NSString *reflectionPool = @"bewmEwk|y[Dm@zAPEj@{AO";

GMSPolygon *hollowPolygon = [[GMSPolygon alloc] init];
hollowPolygon.path = [GMSPath pathFromEncodedPath:hydePark];
hollowPolygon.holes = @[[GMSPath pathFromEncodedPath:archibaldFountain],
                  [GMSPath pathFromEncodedPath:reflectionPool]];
hollowPolygon.fillColor = [UIColor colorWithRed:1.0 green:0.0 blue:0.0 alpha:0.2];
hollowPolygon.strokeColor = [UIColor colorWithRed:1.0 green:0.0 blue:0.0 alpha:1.0];
hollowPolygon.strokeWidth = 2;
hollowPolygon.map = mapView;