
After you enable billing and create an API key, you're ready to set up the Xcode project that you use to develop your app.
Release notes are available for each release.
Step 1: Install the required software
To build a project using the Maps SDK for iOS, you must download and install:
- Xcode version 26.0 or later
Step 2: Create the Xcode project and install the Maps SDK for iOS
The SDK install size can vary. For example, the install size for Maps SDK for iOS version 9.0 is about 18 MB.
مدیر بسته سوئیفت
The Maps SDK for iOS can be installed via Swift Package Manager . To add the SDK, ensure you have removed any existing Maps SDK for iOS dependencies.
To add the SDK to a new or existing project, follow these steps:
- Open your Xcode
projectorworkspace, then go to File > Add Package Dependencies . - Enter https://github.com/googlemaps/ios-maps-sdk as the URL, press Enter to pull in the package, and click "Add Package".
- To install a specific
version, set the Dependency Rule field to one of the version-based options. For new projects, we recommend specifying the latest version and using the "Exact Version" option. Once complete, click "Add Package".
To update the package for an existing project, follow these steps:
If you are upgrading from a version earlier than 9.0.0, you must remove the following dependencies:
GoogleMapsBase,GoogleMapsCore, andGoogleMapsM4Bafter upgrading. Do not remove the dependency forGoogleMaps. For more information, see the Version 9.0.0 Release Notes .From your Xcode project configuration settings, find Frameworks, Libraries, and Embedded Content . Use the minus sign(-) to remove the following framework:
-
GoogleMapsBase(Only for upgrades from versions earlier than 9.0.0) -
GoogleMapsCore(Only for upgrades from versions earlier than 9.0.0) -
GoogleMapsM4B(Only for upgrades from versions earlier than 9.0.0)
-
- From Xcode, go to "File > Packages > Update To Latest Package Versions".
- To verify your installation, go to the Package Dependencies section of Project Navigator to verify the package and its version.
To remove existing Maps SDK for iOS dependencies added using CocoaPods , follow these steps:
- Close your Xcode workspace. Open terminal and execute the following command:
sudo gem install cocoapods-deintegrate cocoapods-clean
pod deintegrate
pod cache clean --all
- Remove the
Podfile,Podfile.resolvedand the Xcodeworkspaceif you are not using them for anything other than CocoaPods.
- From your Xcode project configuration settings, find Frameworks, Libraries, and Embedded Content . Use the minus sign(-) to remove the following framework:
-
GoogleMaps -
GoogleMapsBase(Only for installations earlier than version 9.2.0) -
GoogleMapsCore(Only for installations earlier than version 9.2.0) -
GoogleMapsM4B(Only for installations earlier than version 9.0.0)
-
- From the top level directory of your Xcode project, remove the
GoogleMapsbundle.
نصب دستی
This guide shows how to manually add the XCFrameworks containing the Maps SDK for iOS to your project and configure your build settings in Xcode. An XCFramework is a binary package that you can use on multiple platforms, including machines using Apple silicon .
- فایلهای باینری و منابع SDK زیر را دانلود کنید:
- Extract the files to access the XCFrameworks and resources.
- If you don't have an Xcode project yet, create one now and save it to your local machine. If you're new to iOS development:
- یک پروژه جدید ایجاد کنید.
- قالب iOS > App را انتخاب کنید.
- در صفحه گزینههای پروژه:
- نام پروژه را وارد کنید.
- Record the value of the Bundle identifier field. You can use that value to restrict your API key below.
- رابط پروژه را روی Storyboard تنظیم کنید.
- زبان را روی Swift یا Objective-C تنظیم کنید.
- Open the General tab. Drag the following XCFrameworks into your project under Frameworks, Libraries, and Embedded Content . Make sure to select Do Not Embed :
-
GoogleMaps.xcframework
-
- Copy the
GoogleMaps.bundlefrom the GoogleMapsResources you downloaded into your Xcode project's top level directory. Make sure to select Copy items into destination group's folder when prompted. - Select your project from the Project Navigator, and choose your application's target.
- تب Build Phases را برای برنامهی هدف خود باز کنید. در داخل Link Binary with Libraries ، فریمورکها و کتابخانههای زیر را اضافه کنید:
-
Accelerate.framework -
Contacts.framework -
CoreData.framework -
CoreGraphics.framework -
CoreImage.framework -
CoreLocation.framework -
CoreTelephony.framework -
CoreText.framework -
GLKit.framework -
ImageIO.framework -
libc++.tbd -
libz.tbd -
Metal.framework -
MetricKit.framework -
OpenGLES.framework(Only if you are using OpenGL) -
QuartzCore.framework -
Security.framework -
SystemConfiguration.framework -
UIKit.framework
-
Choose your project, rather than a specific target, and open the Build Settings tab. In the Linking - General -> Other Linker Flags section, add
-ObjCto "Debug" and "Release". If these settings aren't visible, change the filter in the Build Settings bar from Basic to All .To install the Places SDK for iOS XCFramework, see Get Started with the Places SDK for iOS .
کوکوپادز
The Maps SDK for iOS is available as a CocoaPods pod. CocoaPods is an open source dependency manager for Swift and Objective-C Cocoa projects.
If you don't already have the CocoaPods tool, install it on macOS by running the following command from the terminal. For details, see the CocoaPods Getting Started guide .
sudo gem install cocoapods
Create a Podfile for the Maps SDK for iOS and use it to install the API and its dependencies:
- If you don't have an Xcode project yet, create one now and save it to your local machine. If you're new to iOS development:
- یک پروژه جدید ایجاد کنید.
- قالب iOS > App را انتخاب کنید.
- در صفحه گزینههای پروژه:
- نام پروژه را وارد کنید.
- مقدار فیلد شناسه بسته (Bundle identifier) را ثبت کنید. میتوانید از آن مقدار برای محدود کردن کلید API خود در زیر استفاده کنید.
- رابط پروژه را روی Storyboard تنظیم کنید.
- زبان را روی Swift یا Objective-C تنظیم کنید.
- Create a file named
Podfilein your project directory. This file defines your project's dependencies. -
Podfileویرایش کنید و وابستگیهای خود را به همراه نسخههای آنها اضافه کنید. در اینجا مثالی آورده شده است که شامل وابستگی مورد نیاز برای Maps SDK برای iOS است:source 'https://github.com/CocoaPods/Specs.git' platform :ios, '16.0' target 'YOUR_APPLICATION_TARGET_NAME_HERE' do pod 'GoogleMaps', '10.13.0' end
pod outdatedto detect when there is a newer version to make sure you're always on the latest version. If necessary, upgrade to the latest version . -
Podfileرا ذخیره کنید. Open a terminal and go to the directory containing the
Podfile:cd <path-to-project>
Run the
pod installcommand. This will install the APIs specified in thePodfile, along with any dependencies they may have.pod install
Xcode را ببندید و سپس فایل
.xcworkspaceپروژه خود را باز کنید (روی آن دوبار کلیک کنید). از این به بعد، برای باز کردن پروژه باید از فایل.xcworkspaceاستفاده کنید.
To update the API for an existing project, follow these steps:
- Open a terminal and go to the project directory containing the
Podfile. - Run the
pod updatecommand. This will update all of the APIs specified in thePodfileto the latest version.
مرحله ۳: کلید API خود را به پروژه اضافه کنید
In Get an API key , you generated an API key for your app. Now add that key to your Xcode project.
در مثالهای زیر، YOUR_API_KEY را با کلید API خود جایگزین کنید.
سویفت
کلید API خود را به صورت زیر به AppDelegate.swift خود اضافه کنید:
- عبارت import زیر را اضافه کنید:
import GoogleMaps
- Add the following to your
application(_:didFinishLaunchingWithOptions:)method, using your API key:GMSServices.provideAPIKey("YOUR_API_KEY")
- اگر از Places API نیز استفاده میکنید، کلید خود را دوباره همانطور که در اینجا نشان داده شده است اضافه کنید:
GMSPlacesClient.provideAPIKey("YOUR_API_KEY")
هدف-سی
کلید API خود را به صورت زیر به AppDelegate.m خود اضافه کنید:
- عبارت import زیر را اضافه کنید:
@import GoogleMaps;
- با استفاده از کلید API خود، کد زیر را به
application:didFinishLaunchingWithOptions:اضافه کنید:[GMSServices provideAPIKey:@"YOUR_API_KEY"];
- اگر از Places API نیز استفاده میکنید، کلید خود را دوباره همانطور که در اینجا نشان داده شده است اضافه کنید:
[GMSPlacesClient provideAPIKey:@"YOUR_API_KEY"];
مرحله ۴ (اختیاری): بررسی فایل مانیفست حریم خصوصی اپل
اپل برای برنامههای موجود در اپ استور، جزئیات حریم خصوصی برنامه را الزامی میداند. برای بهروزرسانیها و اطلاعات بیشتر ، از صفحه جزئیات حریم خصوصی اپ استور اپل دیدن کنید.
The Apple Privacy Manifest file is included in the resources bundle for the SDK. To verify that the Privacy Manifest File has been included, and to inspect its contents, create an archive of your app and generate a privacy report from the archive.
مرحله ۵ (اختیاری): طرحهای URL مورد استفاده توسط API را اعلام کنید
Beginning with iOS 9 and Xcode 7, apps can declare the URL schemes that they intend to open, by specifying the schemes in the app's Info.plist file. The Maps SDK for iOS opens the Google Maps mobile app when the user clicks the Google logo on the map, and your app can therefore declare the relevant URL schemes.
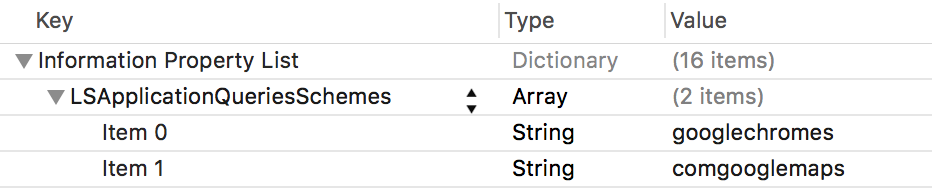
برای اعلام طرحهای URL مورد استفاده توسط Maps SDK برای iOS، خطوط زیر را به Info.plist خود اضافه کنید:
 <key>LSApplicationQueriesSchemes</key>
 <array>
        <string>googlechromes</string>
        <string>comgooglemaps</string>
    </array>
تصویر زیر پیکربندی رابط کاربری Xcode را نشان میدهد:
بدون تعریف فوق، وقتی کاربر روی لوگوی گوگل روی نقشه ضربه میزند، خطاهای زیر ممکن است رخ دهد:
-
-canOpenURL: failed for URL: "comgooglemaps://" - error: "This app is not allowed to query for scheme comgooglemaps" -
-canOpenURL: failed for URL: "googlechromes://" - error: "This app is not allowed to query for scheme googlechromes"
برای حذف این خطاها، این اعلان را به Info.plist خود اضافه کنید.
قدم بعدی چیست؟
Now that you have an API key and an Xcode project, you can create and run apps. The Navigation SDK for iOS provides many tutorials and sample apps that can help you get started. For more details, see:
- آموزشهای زیر به عنوان نقطه شروع توصیه میشوند:
- نمونه کدها و آزمایشگاههای کد موجود را بررسی کنید.
- برای راهحلهای جامع، راهحلهای نقشههای موجود را بررسی کنید.