
Page Summary
-
This tutorial demonstrates integrating Google Maps into an Android app to display routes and areas using polylines and polygons.
-
It utilizes the Maps SDK for Android and provides code samples in both Java and Kotlin.
-
Functionality covered includes adding, styling, and handling click events for polylines and polygons.
-
The code showcases how to customize map elements like stroke patterns, colors, and camera positioning.
-
The tutorial provides a starting point for building interactive map features within your Android application.
This tutorial shows you how to add a Google map to your Android app, and use polylines and polygons to represent routes and areas on a map.
Follow the tutorial to build an Android app using the Maps SDK for Android. The recommended development environment is Android Studio.
Get the code
Clone or download the Google Maps Android API v2 Samples repository from GitHub.
View the Java version of the activity:
    // Copyright 2020 Google LLC
//
// Licensed under the Apache License, Version 2.0 (the "License");
// you may not use this file except in compliance with the License.
// You may obtain a copy of the License at
//
//      http://www.apache.org/licenses/LICENSE-2.0
//
// Unless required by applicable law or agreed to in writing, software
// distributed under the License is distributed on an "AS IS" BASIS,
// WITHOUT WARRANTIES OR CONDITIONS OF ANY KIND, either express or implied.
// See the License for the specific language governing permissions and
// limitations under the License.

package com.example.polygons;

import android.os.Bundle;
import android.widget.Toast;
import androidx.appcompat.app.AppCompatActivity;
import com.google.android.gms.maps.CameraUpdateFactory;
import com.google.android.gms.maps.GoogleMap;
import com.google.android.gms.maps.OnMapReadyCallback;
import com.google.android.gms.maps.SupportMapFragment;
import com.google.android.gms.maps.model.BitmapDescriptorFactory;
import com.google.android.gms.maps.model.CustomCap;
import com.google.android.gms.maps.model.Dash;
import com.google.android.gms.maps.model.Dot;
import com.google.android.gms.maps.model.Gap;
import com.google.android.gms.maps.model.JointType;
import com.google.android.gms.maps.model.LatLng;
import com.google.android.gms.maps.model.PatternItem;
import com.google.android.gms.maps.model.Polygon;
import com.google.android.gms.maps.model.PolygonOptions;
import com.google.android.gms.maps.model.Polyline;
import com.google.android.gms.maps.model.PolylineOptions;
import com.google.android.gms.maps.model.RoundCap;
import java.util.Arrays;
import java.util.List;


/**
 * An activity that displays a Google map with polylines to represent paths or routes,
 * and polygons to represent areas.
 */
public class PolyActivity extends AppCompatActivity
        implements
                OnMapReadyCallback,
                GoogleMap.OnPolylineClickListener,
                GoogleMap.OnPolygonClickListener {

    @Override
    protected void onCreate(Bundle savedInstanceState) {
        super.onCreate(savedInstanceState);

        // Retrieve the content view that renders the map.
        setContentView(R.layout.activity_maps);

        // Get the SupportMapFragment and request notification when the map is ready to be used.
        SupportMapFragment mapFragment = (SupportMapFragment) getSupportFragmentManager()
                .findFragmentById(R.id.map);
        mapFragment.getMapAsync(this);
    }

    /**
     * Manipulates the map when it's available.
     * The API invokes this callback when the map is ready to be used.
     * This is where we can add markers or lines, add listeners or move the camera.
     * In this tutorial, we add polylines and polygons to represent routes and areas on the map.
     */
    @Override
    public void onMapReady(GoogleMap googleMap) {

        // Add polylines to the map.
        // Polylines are useful to show a route or some other connection between points.
        Polyline polyline1 = googleMap.addPolyline(new PolylineOptions()
                .clickable(true)
                .add(
                        new LatLng(-35.016, 143.321),
                        new LatLng(-34.747, 145.592),
                        new LatLng(-34.364, 147.891),
                        new LatLng(-33.501, 150.217),
                        new LatLng(-32.306, 149.248),
                        new LatLng(-32.491, 147.309)));
        // Store a data object with the polyline, used here to indicate an arbitrary type.
        polyline1.setTag("A");
        // Style the polyline.
        stylePolyline(polyline1);

        Polyline polyline2 = googleMap.addPolyline(new PolylineOptions()
                .clickable(true)
                .add(
                        new LatLng(-29.501, 119.700),
                        new LatLng(-27.456, 119.672),
                        new LatLng(-25.971, 124.187),
                        new LatLng(-28.081, 126.555),
                        new LatLng(-28.848, 124.229),
                        new LatLng(-28.215, 123.938)));
        polyline2.setTag("B");
        stylePolyline(polyline2);

        // Add polygons to indicate areas on the map.
        Polygon polygon1 = googleMap.addPolygon(new PolygonOptions()
                .clickable(true)
                .add(
                        new LatLng(-27.457, 153.040),
                        new LatLng(-33.852, 151.211),
                        new LatLng(-37.813, 144.962),
                        new LatLng(-34.928, 138.599)));
        // Store a data object with the polygon, used here to indicate an arbitrary type.
        polygon1.setTag("alpha");
        // Style the polygon.
        stylePolygon(polygon1);

        Polygon polygon2 = googleMap.addPolygon(new PolygonOptions()
                .clickable(true)
                .add(
                        new LatLng(-31.673, 128.892),
                        new LatLng(-31.952, 115.857),
                        new LatLng(-17.785, 122.258),
                        new LatLng(-12.4258, 130.7932)));
        polygon2.setTag("beta");
        stylePolygon(polygon2);

        // Position the map's camera near Alice Springs in the center of Australia,
        // and set the zoom factor so most of Australia shows on the screen.
        googleMap.moveCamera(CameraUpdateFactory.newLatLngZoom(new LatLng(-23.684, 133.903), 4));

        // Set listeners for click events.
        googleMap.setOnPolylineClickListener(this);
        googleMap.setOnPolygonClickListener(this);
    }

    private static final int COLOR_BLACK_ARGB = 0xff000000;
    private static final int POLYLINE_STROKE_WIDTH_PX = 12;

    /**
     * Styles the polyline, based on type.
     * @param polyline The polyline object that needs styling.
     */
    private void stylePolyline(Polyline polyline) {
        String type = "";
        // Get the data object stored with the polyline.
        if (polyline.getTag() != null) {
            type = polyline.getTag().toString();
        }

        switch (type) {
            // If no type is given, allow the API to use the default.
            case "A":
                // Use a custom bitmap as the cap at the start of the line.
                polyline.setStartCap(
                        new CustomCap(
                                BitmapDescriptorFactory.fromResource(R.drawable.ic_arrow), 10));
                break;
            case "B":
                // Use a round cap at the start of the line.
                polyline.setStartCap(new RoundCap());
                break;
        }

        polyline.setEndCap(new RoundCap());
        polyline.setWidth(POLYLINE_STROKE_WIDTH_PX);
        polyline.setColor(COLOR_BLACK_ARGB);
        polyline.setJointType(JointType.ROUND);
    }

    private static final int PATTERN_GAP_LENGTH_PX = 20;
    private static final PatternItem DOT = new Dot();
    private static final PatternItem GAP = new Gap(PATTERN_GAP_LENGTH_PX);

    // Create a stroke pattern of a gap followed by a dot.
    private static final List<PatternItem> PATTERN_POLYLINE_DOTTED = Arrays.asList(GAP, DOT);

    /**
     * Listens for clicks on a polyline.
     * @param polyline The polyline object that the user has clicked.
     */
    @Override
    public void onPolylineClick(Polyline polyline) {
        // Flip from solid stroke to dotted stroke pattern.
        if ((polyline.getPattern() == null) || (!polyline.getPattern().contains(DOT))) {
            polyline.setPattern(PATTERN_POLYLINE_DOTTED);
        } else {
            // The default pattern is a solid stroke.
            polyline.setPattern(null);
        }

        Toast.makeText(this, "Route type " + polyline.getTag().toString(),
                Toast.LENGTH_SHORT).show();
    }

    /**
     * Listens for clicks on a polygon.
     * @param polygon The polygon object that the user has clicked.
     */
    @Override
    public void onPolygonClick(Polygon polygon) {
        // Flip the values of the red, green, and blue components of the polygon's color.
        int color = polygon.getStrokeColor() ^ 0x00ffffff;
        polygon.setStrokeColor(color);
        color = polygon.getFillColor() ^ 0x00ffffff;
        polygon.setFillColor(color);

        Toast.makeText(this, "Area type " + polygon.getTag().toString(), Toast.LENGTH_SHORT).show();
    }

    private static final int COLOR_WHITE_ARGB = 0xffffffff;
    private static final int COLOR_DARK_GREEN_ARGB = 0xff388E3C;
    private static final int COLOR_LIGHT_GREEN_ARGB = 0xff81C784;
    private static final int COLOR_DARK_ORANGE_ARGB = 0xffF57F17;
    private static final int COLOR_LIGHT_ORANGE_ARGB = 0xffF9A825;

    private static final int POLYGON_STROKE_WIDTH_PX = 8;
    private static final int PATTERN_DASH_LENGTH_PX = 20;
    private static final PatternItem DASH = new Dash(PATTERN_DASH_LENGTH_PX);

    // Create a stroke pattern of a gap followed by a dash.
    private static final List<PatternItem> PATTERN_POLYGON_ALPHA = Arrays.asList(GAP, DASH);

    // Create a stroke pattern of a dot followed by a gap, a dash, and another gap.
    private static final List<PatternItem> PATTERN_POLYGON_BETA =
        Arrays.asList(DOT, GAP, DASH, GAP);

    /**
     * Styles the polygon, based on type.
     * @param polygon The polygon object that needs styling.
     */
    private void stylePolygon(Polygon polygon) {
        String type = "";
        // Get the data object stored with the polygon.
        if (polygon.getTag() != null) {
            type = polygon.getTag().toString();
        }

        List<PatternItem> pattern = null;
        int strokeColor = COLOR_BLACK_ARGB;
        int fillColor = COLOR_WHITE_ARGB;

        switch (type) {
            // If no type is given, allow the API to use the default.
            case "alpha":
                // Apply a stroke pattern to render a dashed line, and define colors.
                pattern = PATTERN_POLYGON_ALPHA;
                strokeColor = COLOR_DARK_GREEN_ARGB;
                fillColor = COLOR_LIGHT_GREEN_ARGB;
                break;
            case "beta":
                // Apply a stroke pattern to render a line of dots and dashes, and define colors.
                pattern = PATTERN_POLYGON_BETA;
                strokeColor = COLOR_DARK_ORANGE_ARGB;
                fillColor = COLOR_LIGHT_ORANGE_ARGB;
                break;
        }

        polygon.setStrokePattern(pattern);
        polygon.setStrokeWidth(POLYGON_STROKE_WIDTH_PX);
        polygon.setStrokeColor(strokeColor);
        polygon.setFillColor(fillColor);
    }
}
View the Kotlin version of the activity:
    // Copyright 2020 Google LLC
//
// Licensed under the Apache License, Version 2.0 (the "License");
// you may not use this file except in compliance with the License.
// You may obtain a copy of the License at
//
//      http://www.apache.org/licenses/LICENSE-2.0
//
// Unless required by applicable law or agreed to in writing, software
// distributed under the License is distributed on an "AS IS" BASIS,
// WITHOUT WARRANTIES OR CONDITIONS OF ANY KIND, either express or implied.
// See the License for the specific language governing permissions and
// limitations under the License.
package com.example.polygons

import android.os.Bundle
import android.widget.Toast
import androidx.appcompat.app.AppCompatActivity
import com.google.android.gms.maps.CameraUpdateFactory
import com.google.android.gms.maps.GoogleMap
import com.google.android.gms.maps.GoogleMap.OnPolygonClickListener
import com.google.android.gms.maps.GoogleMap.OnPolylineClickListener
import com.google.android.gms.maps.OnMapReadyCallback
import com.google.android.gms.maps.SupportMapFragment
import com.google.android.gms.maps.model.BitmapDescriptorFactory
import com.google.android.gms.maps.model.CustomCap
import com.google.android.gms.maps.model.Dash
import com.google.android.gms.maps.model.Dot
import com.google.android.gms.maps.model.Gap
import com.google.android.gms.maps.model.JointType
import com.google.android.gms.maps.model.LatLng
import com.google.android.gms.maps.model.PatternItem
import com.google.android.gms.maps.model.Polygon
import com.google.android.gms.maps.model.PolygonOptions
import com.google.android.gms.maps.model.Polyline
import com.google.android.gms.maps.model.PolylineOptions
import com.google.android.gms.maps.model.RoundCap

/**
 * An activity that displays a Google map with polylines to represent paths or routes,
 * and polygons to represent areas.
 */
class PolyActivity : AppCompatActivity(), OnMapReadyCallback, OnPolylineClickListener, OnPolygonClickListener {

    override fun onCreate(savedInstanceState: Bundle?) {
        super.onCreate(savedInstanceState)

        // Retrieve the content view that renders the map.
        setContentView(R.layout.activity_maps)

        // Get the SupportMapFragment and request notification when the map is ready to be used.
        val mapFragment = supportFragmentManager
            .findFragmentById(R.id.map) as SupportMapFragment?
        mapFragment?.getMapAsync(this)
    }

    /**
     * Manipulates the map when it's available.
     * The API invokes this callback when the map is ready to be used.
     * This is where we can add markers or lines, add listeners or move the camera.
     * In this tutorial, we add polylines and polygons to represent routes and areas on the map.
     */
    override fun onMapReady(googleMap: GoogleMap) {

        // Add polylines to the map.
        // Polylines are useful to show a route or some other connection between points.
        val polyline1 = googleMap.addPolyline(PolylineOptions()
            .clickable(true)
            .add(
                LatLng(-35.016, 143.321),
                LatLng(-34.747, 145.592),
                LatLng(-34.364, 147.891),
                LatLng(-33.501, 150.217),
                LatLng(-32.306, 149.248),
                LatLng(-32.491, 147.309)))
        // Store a data object with the polyline, used here to indicate an arbitrary type.
        polyline1.tag = "A"
        // Style the polyline.
        stylePolyline(polyline1)

        val polyline2 = googleMap.addPolyline(PolylineOptions()
            .clickable(true)
            .add(
                LatLng(-29.501, 119.700),
                LatLng(-27.456, 119.672),
                LatLng(-25.971, 124.187),
                LatLng(-28.081, 126.555),
                LatLng(-28.848, 124.229),
                LatLng(-28.215, 123.938)))
        polyline2.tag = "B"
        stylePolyline(polyline2)

        // Add polygons to indicate areas on the map.
        val polygon1 = googleMap.addPolygon(PolygonOptions()
            .clickable(true)
            .add(
                LatLng(-27.457, 153.040),
                LatLng(-33.852, 151.211),
                LatLng(-37.813, 144.962),
                LatLng(-34.928, 138.599)))
        // Store a data object with the polygon, used here to indicate an arbitrary type.
        polygon1.tag = "alpha"
        // Style the polygon.
        stylePolygon(polygon1)

        val polygon2 = googleMap.addPolygon(PolygonOptions()
            .clickable(true)
            .add(
                LatLng(-31.673, 128.892),
                LatLng(-31.952, 115.857),
                LatLng(-17.785, 122.258),
                LatLng(-12.4258, 130.7932)))
        polygon2.tag = "beta"
        stylePolygon(polygon2)

        // Position the map's camera near Alice Springs in the center of Australia,
        // and set the zoom factor so most of Australia shows on the screen.
        googleMap.moveCamera(CameraUpdateFactory.newLatLngZoom(LatLng(-23.684, 133.903), 4f))

        // Set listeners for click events.
        googleMap.setOnPolylineClickListener(this)
        googleMap.setOnPolygonClickListener(this)
    }

    private val COLOR_BLACK_ARGB = -0x1000000
    private val POLYLINE_STROKE_WIDTH_PX = 12

    /**
     * Styles the polyline, based on type.
     * @param polyline The polyline object that needs styling.
     */
    private fun stylePolyline(polyline: Polyline) {
        // Get the data object stored with the polyline.
        val type = polyline.tag?.toString() ?: ""
        when (type) {
            "A" -> {
                // Use a custom bitmap as the cap at the start of the line.
                polyline.startCap = CustomCap(
                    BitmapDescriptorFactory.fromResource(R.drawable.ic_arrow), 10f)
            }
            "B" -> {
               // Use a round cap at the start of the line.
                polyline.startCap = RoundCap()
            }
        }
        polyline.endCap = RoundCap()
        polyline.width = POLYLINE_STROKE_WIDTH_PX.toFloat()
        polyline.color = COLOR_BLACK_ARGB
        polyline.jointType = JointType.ROUND
    }

    private val PATTERN_GAP_LENGTH_PX = 20
    private val DOT: PatternItem = Dot()
    private val GAP: PatternItem = Gap(PATTERN_GAP_LENGTH_PX.toFloat())

    // Create a stroke pattern of a gap followed by a dot.
    private val PATTERN_POLYLINE_DOTTED = listOf(GAP, DOT)

    /**
     * Listens for clicks on a polyline.
     * @param polyline The polyline object that the user has clicked.
     */
    override fun onPolylineClick(polyline: Polyline) {
        // Flip from solid stroke to dotted stroke pattern.
        if (polyline.pattern == null || !polyline.pattern!!.contains(DOT)) {
            polyline.pattern = PATTERN_POLYLINE_DOTTED
        } else {
            // The default pattern is a solid stroke.
            polyline.pattern = null
        }
        Toast.makeText(this, "Route type " + polyline.tag.toString(),
            Toast.LENGTH_SHORT).show()
    }

    /**
     * Listens for clicks on a polygon.
     * @param polygon The polygon object that the user has clicked.
     */
    override fun onPolygonClick(polygon: Polygon) {
        // Flip the values of the red, green, and blue components of the polygon's color.
        var color = polygon.strokeColor xor 0x00ffffff
        polygon.strokeColor = color
        color = polygon.fillColor xor 0x00ffffff
        polygon.fillColor = color
        Toast.makeText(this, "Area type ${polygon.tag?.toString()}", Toast.LENGTH_SHORT).show()
    }

    private val COLOR_WHITE_ARGB = -0x1
    private val COLOR_DARK_GREEN_ARGB = -0xc771c4
    private val COLOR_LIGHT_GREEN_ARGB = -0x7e387c
    private val COLOR_DARK_ORANGE_ARGB = -0xa80e9
    private val COLOR_LIGHT_ORANGE_ARGB = -0x657db
    private val POLYGON_STROKE_WIDTH_PX = 8
    private val PATTERN_DASH_LENGTH_PX = 20

    private val DASH: PatternItem = Dash(PATTERN_DASH_LENGTH_PX.toFloat())

    // Create a stroke pattern of a gap followed by a dash.
    private val PATTERN_POLYGON_ALPHA = listOf(GAP, DASH)

    // Create a stroke pattern of a dot followed by a gap, a dash, and another gap.
    private val PATTERN_POLYGON_BETA = listOf(DOT, GAP, DASH, GAP)

    /**
     * Styles the polygon, based on type.
     * @param polygon The polygon object that needs styling.
     */
    private fun stylePolygon(polygon: Polygon) {
        // Get the data object stored with the polygon.
        val type = polygon.tag?.toString() ?: ""
        var pattern: List<PatternItem>? = null
        var strokeColor = COLOR_BLACK_ARGB
        var fillColor = COLOR_WHITE_ARGB
        when (type) {
            "alpha" -> {
                // Apply a stroke pattern to render a dashed line, and define colors.
                pattern = PATTERN_POLYGON_ALPHA
                strokeColor = COLOR_DARK_GREEN_ARGB
                fillColor = COLOR_LIGHT_GREEN_ARGB
            }
            "beta" -> {
                // Apply a stroke pattern to render a line of dots and dashes, and define colors.
                pattern = PATTERN_POLYGON_BETA
                strokeColor = COLOR_DARK_ORANGE_ARGB
                fillColor = COLOR_LIGHT_ORANGE_ARGB
            }
        }
        polygon.strokePattern = pattern
        polygon.strokeWidth = POLYGON_STROKE_WIDTH_PX.toFloat()
        polygon.strokeColor = strokeColor
        polygon.fillColor = fillColor
    }
}
Set up your development project
Follow these steps to create the tutorial project in Android Studio.
- Download and install Android Studio.
- Add the Google Play services package to Android Studio.
- Clone or download the Google Maps Android API v2 Samples repository if you didn't do that when you started reading this tutorial.
Import the tutorial project:
- In Android Studio, select File > New > Import Project.
- Go to the location where you saved the Google Maps Android API v2 Samples repository after downloading it.
- Find the Polygons project at this location:
PATH-TO-SAVED-REPO/android-samples/tutorials/java/Polygons(Java) or
PATH-TO-SAVED-REPO/android-samples/tutorials/kotlin/Polygons(Kotlin) - Select the project directory, then click Open. Android Studio now builds your project, using the Gradle build tool.
Enable the necessary APIs and get an API key
To complete this tutorial, you need a Google Cloud project with the necessary APIs enabled and an API key that's authorized to use the Maps SDK for Android. For more details, see:
Add the API key to your app
- Open your project's
local.propertiesfile. Add the following string and then replace
YOUR_API_KEYwith the value of your API key:MAPS_API_KEY=YOUR_API_KEYWhen you build your app, the Secrets Gradle Plugin for Android will copy the API key and make it available as a build variable in the Android manifest, as explained below.
Build and run your app
To build and run the app:
Connect an Android device to your computer. Follow the instructions to enable developer options on your Android device and configure your system to detect the device.
Alternatively, you can use the Android Virtual Device (AVD) Manager to configure a virtual device. When choosing an emulator, make sure you pick an image that includes the Google APIs. For more details, see Set Up an Android Studio Project .
In Android Studio, click the Run menu option (or the play button icon). Choose a device as prompted.
Android Studio invokes Gradle to build the app, and then runs the app on the device or on the emulator.
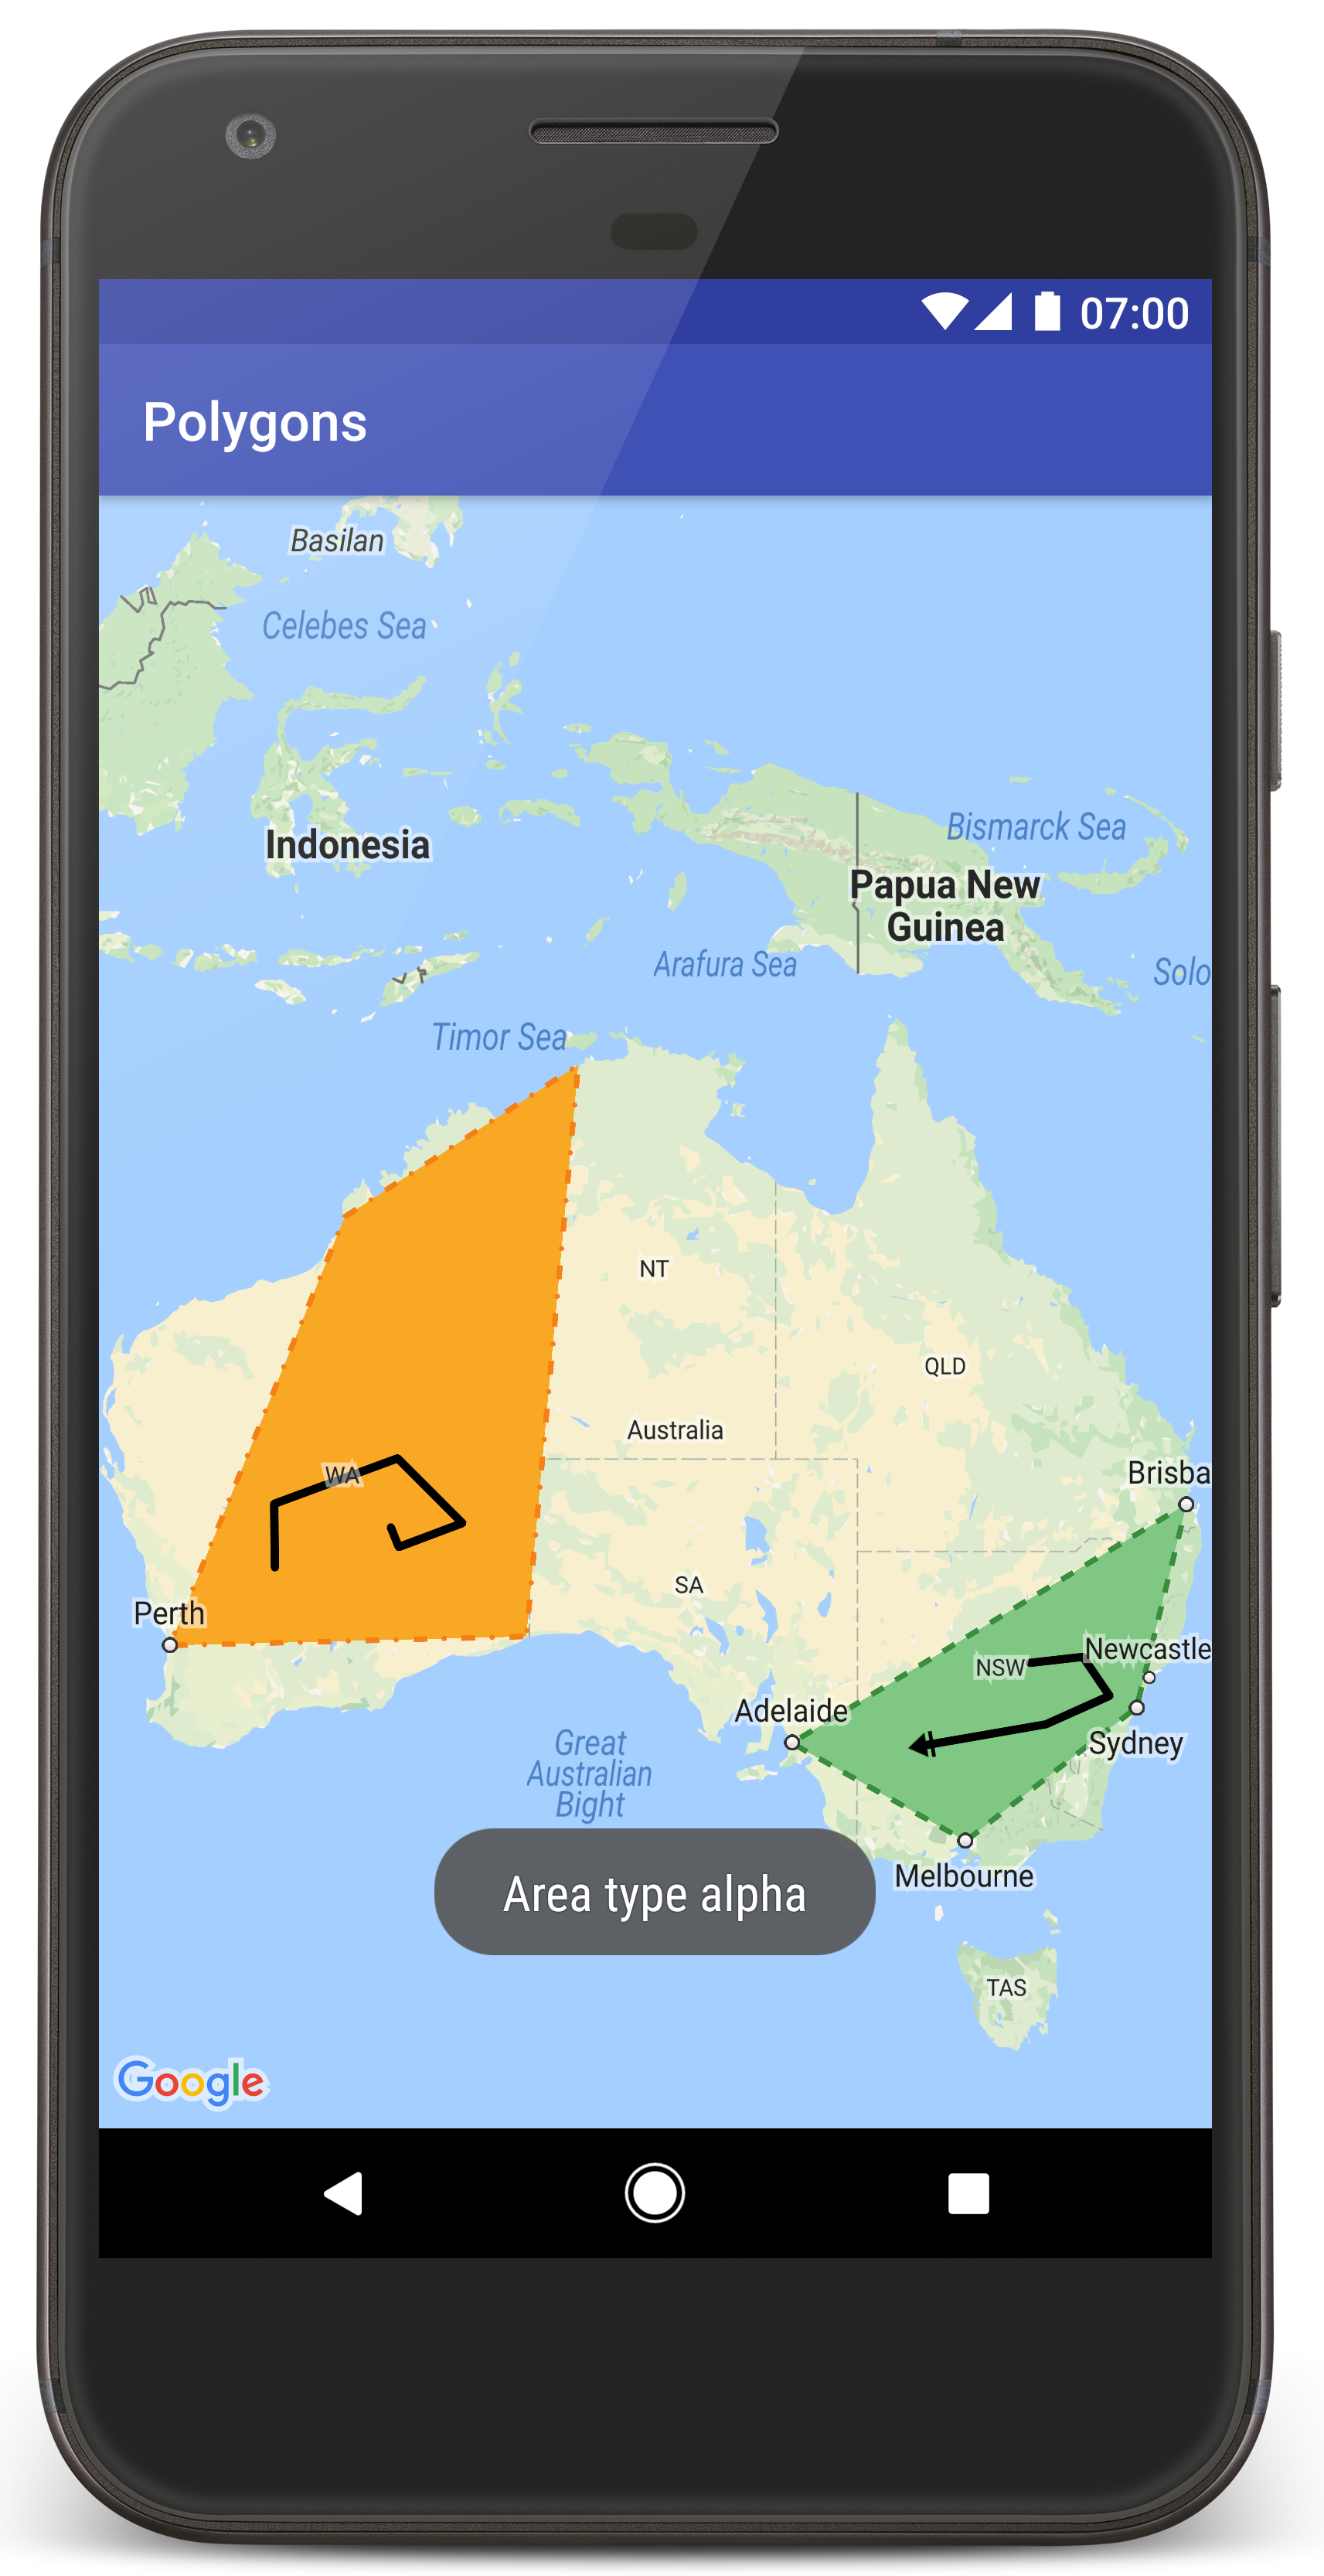
You should see a map with two polygons overlaid on top of Australia, similar to the image on this page.
Troubleshooting:
- If you don't see a map, check that you've obtained an API key and added it to the app, as described above. Check the log in Android Studio's Android Monitor for error messages about the API key.
- Use the Android Studio debugging tools to view logs and debug the app.
Understand the code
This part of the tutorial explains the most significant parts of the Polygons app, to help you understand how to build a similar app.
Check your Android manifest
Note the following elements in your app's AndroidManifest.xml file:
Add a
meta-dataelement to embed the version of Google Play services that the app was compiled with.<meta-data android:name="com.google.android.gms.version" android:value="@integer/google_play_services_version" />Add a
meta-dataelement specifying your API key. The sample accompanying this tutorial maps the value for the API key to a build variable matching the name of the key you defined earlier,MAPS_API_KEY. When you build your app, the Secrets Gradle Plugin for Android will make the keys in yourlocal.propertiesfile available as manifest build variables.<meta-data android:name="com.google.android.geo.API_KEY" android:value="${MAPS_API_KEY}" />In your
build.gradlefile, the following line passes your API key to your Android manifest.id 'com.google.android.libraries.mapsplatform.secrets-gradle-plugin'
Below is a complete example of a manifest:
  <?xml version="1.0" encoding="utf-8"?>
<!--
 Copyright 2020 Google LLC

 Licensed under the Apache License, Version 2.0 (the "License");
 you may not use this file except in compliance with the License.
 You may obtain a copy of the License at

      http://www.apache.org/licenses/LICENSE-2.0

 Unless required by applicable law or agreed to in writing, software
 distributed under the License is distributed on an "AS IS" BASIS,
 WITHOUT WARRANTIES OR CONDITIONS OF ANY KIND, either express or implied.
 See the License for the specific language governing permissions and
 limitations under the License.
-->

<manifest xmlns:android="http://schemas.android.com/apk/res/android">

    <application
        android:allowBackup="true"
        android:icon="@mipmap/ic_launcher"
        android:label="@string/app_name"
        android:supportsRtl="true"
        android:theme="@style/AppTheme">

        <meta-data
            android:name="com.google.android.gms.version"
            android:value="@integer/google_play_services_version" />

        <!--
             The API key for Google Maps-based APIs.
        -->
        <meta-data
            android:name="com.google.android.geo.API_KEY"
            android:value="${MAPS_API_KEY}" />

        <activity
            android:name="com.example.polygons.PolyActivity"
            android:exported="true"
            android:label="@string/title_activity_maps">
            <intent-filter>
                <action android:name="android.intent.action.MAIN" />
                <category android:name="android.intent.category.LAUNCHER" />
            </intent-filter>
        </activity>
    </application>
</manifest>
Add a map
Display a map, using the Maps SDK for Android.
Add a
<fragment>element to your activity's layout file,activity_maps.xml. This element defines aSupportMapFragmentto act as a container for the map and to provide access to theGoogleMapobject. The tutorial uses the Android support library version of the map fragment, to ensure backward compatibility with earlier versions of the Android framework.<!-- Copyright 2020 Google LLC Licensed under the Apache License, Version 2.0 (the "License"); you may not use this file except in compliance with the License. You may obtain a copy of the License at http://www.apache.org/licenses/LICENSE-2.0 Unless required by applicable law or agreed to in writing, software distributed under the License is distributed on an "AS IS" BASIS, WITHOUT WARRANTIES OR CONDITIONS OF ANY KIND, either express or implied. See the License for the specific language governing permissions and limitations under the License. --> <fragment xmlns:android="http://schemas.android.com/apk/res/android" xmlns:tools="http://schemas.android.com/tools" android:id="@+id/map" android:name="com.google.android.gms.maps.SupportMapFragment" android:layout_width="match_parent" android:layout_height="match_parent" tools:context="com.example.polygons.PolyActivity" />
In your activity's
onCreate()method, set the layout file as the content view. Get a handle to the map fragment by callingFragmentManager.findFragmentById(). Then usegetMapAsync()to register for the map callback:Java
@Override protected void onCreate(Bundle savedInstanceState) { super.onCreate(savedInstanceState); // Retrieve the content view that renders the map. setContentView(R.layout.activity_maps); // Get the SupportMapFragment and request notification when the map is ready to be used. SupportMapFragment mapFragment = (SupportMapFragment) getSupportFragmentManager() .findFragmentById(R.id.map); mapFragment.getMapAsync(this); }
Kotlin
override fun onCreate(savedInstanceState: Bundle?) { super.onCreate(savedInstanceState) // Retrieve the content view that renders the map. setContentView(R.layout.activity_maps) // Get the SupportMapFragment and request notification when the map is ready to be used. val mapFragment = supportFragmentManager .findFragmentById(R.id.map) as SupportMapFragment? mapFragment?.getMapAsync(this) }
Implement the
OnMapReadyCallbackinterface and override theonMapReady()method. The API invokes this callback when theGoogleMapobject is available, so you can add objects to the map and further customize it for your app:Java
public class PolyActivity extends AppCompatActivity implements OnMapReadyCallback, GoogleMap.OnPolylineClickListener, GoogleMap.OnPolygonClickListener { @Override protected void onCreate(Bundle savedInstanceState) { super.onCreate(savedInstanceState); // Retrieve the content view that renders the map. setContentView(R.layout.activity_maps); // Get the SupportMapFragment and request notification when the map is ready to be used. SupportMapFragment mapFragment = (SupportMapFragment) getSupportFragmentManager() .findFragmentById(R.id.map); mapFragment.getMapAsync(this); } /** * Manipulates the map when it's available. * The API invokes this callback when the map is ready to be used. * This is where we can add markers or lines, add listeners or move the camera. * In this tutorial, we add polylines and polygons to represent routes and areas on the map. */ @Override public void onMapReady(GoogleMap googleMap) { // Add polylines to the map. // Polylines are useful to show a route or some other connection between points. Polyline polyline1 = googleMap.addPolyline(new PolylineOptions() .clickable(true) .add( new LatLng(-35.016, 143.321), new LatLng(-34.747, 145.592), new LatLng(-34.364, 147.891), new LatLng(-33.501, 150.217), new LatLng(-32.306, 149.248), new LatLng(-32.491, 147.309))); // Position the map's camera near Alice Springs in the center of Australia, // and set the zoom factor so most of Australia shows on the screen. googleMap.moveCamera(CameraUpdateFactory.newLatLngZoom(new LatLng(-23.684, 133.903), 4)); // Set listeners for click events. googleMap.setOnPolylineClickListener(this); googleMap.setOnPolygonClickListener(this); }
Kotlin
class PolyActivity : AppCompatActivity(), OnMapReadyCallback, OnPolylineClickListener, OnPolygonClickListener { override fun onCreate(savedInstanceState: Bundle?) { super.onCreate(savedInstanceState) // Retrieve the content view that renders the map. setContentView(R.layout.activity_maps) // Get the SupportMapFragment and request notification when the map is ready to be used. val mapFragment = supportFragmentManager .findFragmentById(R.id.map) as SupportMapFragment? mapFragment?.getMapAsync(this) } /** * Manipulates the map when it's available. * The API invokes this callback when the map is ready to be used. * This is where we can add markers or lines, add listeners or move the camera. * In this tutorial, we add polylines and polygons to represent routes and areas on the map. */ override fun onMapReady(googleMap: GoogleMap) { // Add polylines to the map. // Polylines are useful to show a route or some other connection between points. val polyline1 = googleMap.addPolyline(PolylineOptions() .clickable(true) .add( LatLng(-35.016, 143.321), LatLng(-34.747, 145.592), LatLng(-34.364, 147.891), LatLng(-33.501, 150.217), LatLng(-32.306, 149.248), LatLng(-32.491, 147.309))) // Position the map's camera near Alice Springs in the center of Australia, // and set the zoom factor so most of Australia shows on the screen. googleMap.moveCamera(CameraUpdateFactory.newLatLngZoom(LatLng(-23.684, 133.903), 4f)) // Set listeners for click events. googleMap.setOnPolylineClickListener(this) googleMap.setOnPolygonClickListener(this) }
Add a polyline to draw a line on the map
A Polyline is a series of connected line segments. Polylines are
useful to represent routes, paths, or other connections between locations on the
map.
Create a
PolylineOptionsobject and add points to it. Each point represents a location on the map, which you define with aLatLngobject containing latitude and longitude values. The code sample below creates a polyline with 6 points.Call
GoogleMap.addPolyline()to add the polyline to the map.Java
Polyline polyline1 = googleMap.addPolyline(new PolylineOptions() .clickable(true) .add( new LatLng(-35.016, 143.321), new LatLng(-34.747, 145.592), new LatLng(-34.364, 147.891), new LatLng(-33.501, 150.217), new LatLng(-32.306, 149.248), new LatLng(-32.491, 147.309)));
Kotlin
val polyline1 = googleMap.addPolyline(PolylineOptions() .clickable(true) .add( LatLng(-35.016, 143.321), LatLng(-34.747, 145.592), LatLng(-34.364, 147.891), LatLng(-33.501, 150.217), LatLng(-32.306, 149.248), LatLng(-32.491, 147.309)))
Set the polyline's clickable option to true if you want to handle click
events on the polyline. There's more about event handling later in this
tutorial.
Store arbitrary data with a polyline
You can store arbitrary data objects with polylines and other geometry objects.
Call
Polyline.setTag()to store a data object with the polyline. The code below defines an arbitrary tag (A) indicating a type of polyline.Java
Polyline polyline1 = googleMap.addPolyline(new PolylineOptions()
    .clickable(true)
    .add(
            new LatLng(-35.016, 143.321),
            new LatLng(-34.747, 145.592),
            new LatLng(-34.364, 147.891),
            new LatLng(-33.501, 150.217),
            new LatLng(-32.306, 149.248),
            new LatLng(-32.491, 147.309)));
// Store a data object with the polyline, used here to indicate an arbitrary type.
polyline1.setTag("A");
Kotlin
val polyline1 = googleMap.addPolyline(PolylineOptions()
.clickable(true)
.add(
    LatLng(-35.016, 143.321),
    LatLng(-34.747, 145.592),
    LatLng(-34.364, 147.891),
    LatLng(-33.501, 150.217),
    LatLng(-32.306, 149.248),
    LatLng(-32.491, 147.309)))
// Store a data object with the polyline, used here to indicate an arbitrary type.
polyline1.tag = "A
Retrieve the data using
Polyline.getTag(), as the next section shows.
Add custom styling to your polyline
You can specify various styling properties in the
PolylineOptions object. Styling options include the stroke
color, stroke width, stroke pattern, joint types, and start and end caps. If you
don't specify a particular property, the API uses a default for that
property.
The following code applies a round cap to the end of the line, and a different start cap depending on the polyline's type, where the type is an arbitrary property stored in the data object for the polyline. The sample also specifies a stroke width, stroke color, and joint type:
Java
private static final int COLOR_BLACK_ARGB = 0xff000000; private static final int POLYLINE_STROKE_WIDTH_PX = 12; /** * Styles the polyline, based on type. * @param polyline The polyline object that needs styling. */ private void stylePolyline(Polyline polyline) { String type = ""; // Get the data object stored with the polyline. if (polyline.getTag() != null) { type = polyline.getTag().toString(); } switch (type) { // If no type is given, allow the API to use the default. case "A": // Use a custom bitmap as the cap at the start of the line. polyline.setStartCap( new CustomCap( BitmapDescriptorFactory.fromResource(R.drawable.ic_arrow), 10)); break; case "B": // Use a round cap at the start of the line. polyline.setStartCap(new RoundCap()); break; } polyline.setEndCap(new RoundCap()); polyline.setWidth(POLYLINE_STROKE_WIDTH_PX); polyline.setColor(COLOR_BLACK_ARGB); polyline.setJointType(JointType.ROUND); }
Kotlin
private val COLOR_BLACK_ARGB = -0x1000000 private val POLYLINE_STROKE_WIDTH_PX = 12 /** * Styles the polyline, based on type. * @param polyline The polyline object that needs styling. */ private fun stylePolyline(polyline: Polyline) { // Get the data object stored with the polyline. val type = polyline.tag?.toString() ?: "" when (type) { "A" -> { // Use a custom bitmap as the cap at the start of the line. polyline.startCap = CustomCap( BitmapDescriptorFactory.fromResource(R.drawable.ic_arrow), 10f) } "B" -> { // Use a round cap at the start of the line. polyline.startCap = RoundCap() } } polyline.endCap = RoundCap() polyline.width = POLYLINE_STROKE_WIDTH_PX.toFloat() polyline.color = COLOR_BLACK_ARGB polyline.jointType = JointType.ROUND }
The above code specifies a custom bitmap for the start cap of the type A polyline, and specifies a reference stroke width of 10 pixels. The API scales the bitmap based on the reference stroke width. When specifying the reference stroke width, supply the width that you used when designing the bitmap image, at the original dimension of the image. Hint: Open your bitmap image at 100% zoom in an image editor, and plot the desired width of the line stroke relative to the image.
Read more about line caps and other options for customizing shapes.
Handle click events on the polyline
Make the polyline clickable by calling
Polyline.setClickable(). (By default, polylines are not clickable and your app will not receive a notification when the user taps a polyline.)Implement the
OnPolylineClickListenerinterface and callGoogleMap.setOnPolylineClickListener()to set the listener on the map:Java
public class PolyActivity extends AppCompatActivity implements OnMapReadyCallback, GoogleMap.OnPolylineClickListener, GoogleMap.OnPolygonClickListener { @Override protected void onCreate(Bundle savedInstanceState) { super.onCreate(savedInstanceState); // Retrieve the content view that renders the map. setContentView(R.layout.activity_maps); // Get the SupportMapFragment and request notification when the map is ready to be used. SupportMapFragment mapFragment = (SupportMapFragment) getSupportFragmentManager() .findFragmentById(R.id.map); mapFragment.getMapAsync(this); } /** * Manipulates the map when it's available. * The API invokes this callback when the map is ready to be used. * This is where we can add markers or lines, add listeners or move the camera. * In this tutorial, we add polylines and polygons to represent routes and areas on the map. */ @Override public void onMapReady(GoogleMap googleMap) { // Add polylines to the map. // Polylines are useful to show a route or some other connection between points. Polyline polyline1 = googleMap.addPolyline(new PolylineOptions() .clickable(true) .add( new LatLng(-35.016, 143.321), new LatLng(-34.747, 145.592), new LatLng(-34.364, 147.891), new LatLng(-33.501, 150.217), new LatLng(-32.306, 149.248), new LatLng(-32.491, 147.309))); // Position the map's camera near Alice Springs in the center of Australia, // and set the zoom factor so most of Australia shows on the screen. googleMap.moveCamera(CameraUpdateFactory.newLatLngZoom(new LatLng(-23.684, 133.903), 4)); // Set listeners for click events. googleMap.setOnPolylineClickListener(this); googleMap.setOnPolygonClickListener(this); }
Kotlin
class PolyActivity : AppCompatActivity(), OnMapReadyCallback, OnPolylineClickListener, OnPolygonClickListener { override fun onCreate(savedInstanceState: Bundle?) { super.onCreate(savedInstanceState) // Retrieve the content view that renders the map. setContentView(R.layout.activity_maps) // Get the SupportMapFragment and request notification when the map is ready to be used. val mapFragment = supportFragmentManager .findFragmentById(R.id.map) as SupportMapFragment? mapFragment?.getMapAsync(this) } /** * Manipulates the map when it's available. * The API invokes this callback when the map is ready to be used. * This is where we can add markers or lines, add listeners or move the camera. * In this tutorial, we add polylines and polygons to represent routes and areas on the map. */ override fun onMapReady(googleMap: GoogleMap) { // Add polylines to the map. // Polylines are useful to show a route or some other connection between points. val polyline1 = googleMap.addPolyline(PolylineOptions() .clickable(true) .add( LatLng(-35.016, 143.321), LatLng(-34.747, 145.592), LatLng(-34.364, 147.891), LatLng(-33.501, 150.217), LatLng(-32.306, 149.248), LatLng(-32.491, 147.309))) // Position the map's camera near Alice Springs in the center of Australia, // and set the zoom factor so most of Australia shows on the screen. googleMap.moveCamera(CameraUpdateFactory.newLatLngZoom(LatLng(-23.684, 133.903), 4f)) // Set listeners for click events. googleMap.setOnPolylineClickListener(this) googleMap.setOnPolygonClickListener(this) }
Override the
onPolylineClick()callback method. The following example alternates the stroke pattern of the line between solid and dotted, each time the user clicks the polyline:Java
private static final int PATTERN_GAP_LENGTH_PX = 20; private static final PatternItem DOT = new Dot(); private static final PatternItem GAP = new Gap(PATTERN_GAP_LENGTH_PX); // Create a stroke pattern of a gap followed by a dot. private static final List<PatternItem> PATTERN_POLYLINE_DOTTED = Arrays.asList(GAP, DOT); /** * Listens for clicks on a polyline. * @param polyline The polyline object that the user has clicked. */ @Override public void onPolylineClick(Polyline polyline) { // Flip from solid stroke to dotted stroke pattern. if ((polyline.getPattern() == null) || (!polyline.getPattern().contains(DOT))) { polyline.setPattern(PATTERN_POLYLINE_DOTTED); } else { // The default pattern is a solid stroke. polyline.setPattern(null); } Toast.makeText(this, "Route type " + polyline.getTag().toString(), Toast.LENGTH_SHORT).show(); }
Kotlin
private val PATTERN_GAP_LENGTH_PX = 20 private val DOT: PatternItem = Dot() private val GAP: PatternItem = Gap(PATTERN_GAP_LENGTH_PX.toFloat()) // Create a stroke pattern of a gap followed by a dot. private val PATTERN_POLYLINE_DOTTED = listOf(GAP, DOT) /** * Listens for clicks on a polyline. * @param polyline The polyline object that the user has clicked. */ override fun onPolylineClick(polyline: Polyline) { // Flip from solid stroke to dotted stroke pattern. if (polyline.pattern == null || !polyline.pattern!!.contains(DOT)) { polyline.pattern = PATTERN_POLYLINE_DOTTED } else { // The default pattern is a solid stroke. polyline.pattern = null } Toast.makeText(this, "Route type " + polyline.tag.toString(), Toast.LENGTH_SHORT).show() }
Add polygons to represent areas on the map
A Polygon is a shape consisting of a series of coordinates in an
ordered sequence, similar to a Polyline. The difference is that
polygon defines a closed area with a fillable interior, while a polyline
is open ended.
Create a
PolygonOptionsobject and add points to it. Each point represents a location on the map, which you define with aLatLngobject containing latitude and longitude values. The code sample below creates a polygon with 4 points.Make the polygon clickable by calling
Polygon.setClickable(). (By default, polygons are not clickable and your app will not receive a notification when the user taps a polygon.) Handling polygon click events is similar to handling the events on polylines, described earlier in this tutorial.Call
GoogleMap.addPolygon()to add the polygon to the map.Call
Polygon.setTag()to store a data object with the polygon. The code below defines an arbitrary type (alpha) for the polygon.Java
// Add polygons to indicate areas on the map. Polygon polygon1 = googleMap.addPolygon(new PolygonOptions() .clickable(true) .add( new LatLng(-27.457, 153.040), new LatLng(-33.852, 151.211), new LatLng(-37.813, 144.962), new LatLng(-34.928, 138.599))); // Store a data object with the polygon, used here to indicate an arbitrary type. polygon1.setTag("alpha");
Kotlin
// Add polygons to indicate areas on the map. val polygon1 = googleMap.addPolygon(PolygonOptions() .clickable(true) .add( LatLng(-27.457, 153.040), LatLng(-33.852, 151.211), LatLng(-37.813, 144.962), LatLng(-34.928, 138.599))) // Store a data object with the polygon, used here to indicate an arbitrary type. polygon1.tag = "alpha" // Style the polygon.
Add custom styling to your polygon
You can specify a number of styling properties in the
PolygonOptions object. Styling options include the stroke
color, stroke width, stroke pattern, stroke joint types, and fill color. If you
don't specify a particular property, the API uses a default for that
property.
The following code applies specific colors and stroke patterns depending on the polygon's type, where the type is an arbitrary property stored in the data object for the polygon:
Java
private static final int COLOR_WHITE_ARGB = 0xffffffff; private static final int COLOR_DARK_GREEN_ARGB = 0xff388E3C; private static final int COLOR_LIGHT_GREEN_ARGB = 0xff81C784; private static final int COLOR_DARK_ORANGE_ARGB = 0xffF57F17; private static final int COLOR_LIGHT_ORANGE_ARGB = 0xffF9A825; private static final int POLYGON_STROKE_WIDTH_PX = 8; private static final int PATTERN_DASH_LENGTH_PX = 20; private static final PatternItem DASH = new Dash(PATTERN_DASH_LENGTH_PX); // Create a stroke pattern of a gap followed by a dash. private static final List<PatternItem> PATTERN_POLYGON_ALPHA = Arrays.asList(GAP, DASH); // Create a stroke pattern of a dot followed by a gap, a dash, and another gap. private static final List<PatternItem> PATTERN_POLYGON_BETA = Arrays.asList(DOT, GAP, DASH, GAP); /** * Styles the polygon, based on type. * @param polygon The polygon object that needs styling. */ private void stylePolygon(Polygon polygon) { String type = ""; // Get the data object stored with the polygon. if (polygon.getTag() != null) { type = polygon.getTag().toString(); } List<PatternItem> pattern = null; int strokeColor = COLOR_BLACK_ARGB; int fillColor = COLOR_WHITE_ARGB; switch (type) { // If no type is given, allow the API to use the default. case "alpha": // Apply a stroke pattern to render a dashed line, and define colors. pattern = PATTERN_POLYGON_ALPHA; strokeColor = COLOR_DARK_GREEN_ARGB; fillColor = COLOR_LIGHT_GREEN_ARGB; break; case "beta": // Apply a stroke pattern to render a line of dots and dashes, and define colors. pattern = PATTERN_POLYGON_BETA; strokeColor = COLOR_DARK_ORANGE_ARGB; fillColor = COLOR_LIGHT_ORANGE_ARGB; break; } polygon.setStrokePattern(pattern); polygon.setStrokeWidth(POLYGON_STROKE_WIDTH_PX); polygon.setStrokeColor(strokeColor); polygon.setFillColor(fillColor); }
Kotlin
private val COLOR_WHITE_ARGB = -0x1 private val COLOR_DARK_GREEN_ARGB = -0xc771c4 private val COLOR_LIGHT_GREEN_ARGB = -0x7e387c private val COLOR_DARK_ORANGE_ARGB = -0xa80e9 private val COLOR_LIGHT_ORANGE_ARGB = -0x657db private val POLYGON_STROKE_WIDTH_PX = 8 private val PATTERN_DASH_LENGTH_PX = 20 private val DASH: PatternItem = Dash(PATTERN_DASH_LENGTH_PX.toFloat()) // Create a stroke pattern of a gap followed by a dash. private val PATTERN_POLYGON_ALPHA = listOf(GAP, DASH) // Create a stroke pattern of a dot followed by a gap, a dash, and another gap. private val PATTERN_POLYGON_BETA = listOf(DOT, GAP, DASH, GAP) /** * Styles the polygon, based on type. * @param polygon The polygon object that needs styling. */ private fun stylePolygon(polygon: Polygon) { // Get the data object stored with the polygon. val type = polygon.tag?.toString() ?: "" var pattern: List<PatternItem>? = null var strokeColor = COLOR_BLACK_ARGB var fillColor = COLOR_WHITE_ARGB when (type) { "alpha" -> { // Apply a stroke pattern to render a dashed line, and define colors. pattern = PATTERN_POLYGON_ALPHA strokeColor = COLOR_DARK_GREEN_ARGB fillColor = COLOR_LIGHT_GREEN_ARGB } "beta" -> { // Apply a stroke pattern to render a line of dots and dashes, and define colors. pattern = PATTERN_POLYGON_BETA strokeColor = COLOR_DARK_ORANGE_ARGB fillColor = COLOR_LIGHT_ORANGE_ARGB } } polygon.strokePattern = pattern polygon.strokeWidth = POLYGON_STROKE_WIDTH_PX.toFloat() polygon.strokeColor = strokeColor polygon.fillColor = fillColor }
Read more about stroke patterns and other options for customizing shapes.
Next steps
Learn about the Circle object. Circles are similar to polygons but have properties that reflect the shape of a circle.