
כדי להוסיף סמנים מתקדמים למפה, יוצרים מופע חדש של AdvancedMarkerOptions ואז משתמשים ב-GoogleMap.addMarker() כדי להוסיף את הסמן:
Kotlin
private val SYDNEY = LatLng(-33.87365, 151.20689)

val marker: Marker? = map.addMarker(
    AdvancedMarkerOptions()
        .position(SYDNEY)
        .iconView(textView)
        .zIndex(zIndex)
)
Java
private final LatLng SYDNEY = new LatLng(-33.87365, 151.20689);

Marker marker = map.addMarker(
    new AdvancedMarkerOptions()
        .position(SYDNEY)
        .iconView(textView)
        .zIndex(zIndex));
הפונקציה GoogleMap.addMarker() מחזירה מופע של
Marker.
במקרה הצורך, אפשר להמיר את הערך שמוחזר ל-AdvancedMarker.
אפשר להשתמש ב-AdvancedMarkerOptions כדי להגדיר סמנים מתקדמים.
AdvancedMarkerOptions הוא מחלקת משנה של MarkerOptions, ולכן הוא תומך בכל ההגדרות של MarkerOptions.
ב-AdvancedMarkerOptions אפשר גם:
יוצרים מופע של המחלקה
PinConfig, ואז משתמשים במופעPinConfigכדי להגדיר את המופעAdvancedMarkerOptions.משתמשים ב-
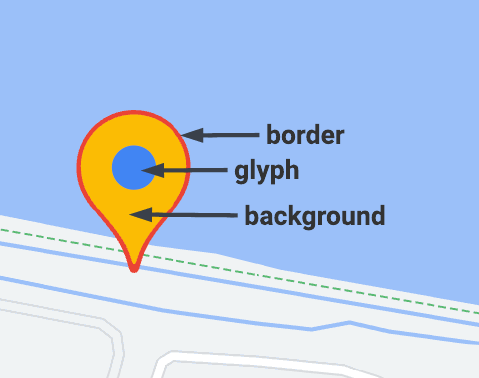
PinConfigכדי להתאים אישית מאפיינים של סמן מתקדם, כמו צבע הרקע, צבע הגבול והגליף.יוצרים מופע של המחלקה
Viewשל Android ומשתמשים במופע הזה כדי להגדיר את המופעAdvancedMarkerOptions.התצוגה של המופע מאפשרת להתאים אישית את הסמן.
שימוש ב-PinConfig
המחלקות PinConfig מכילות אפשרויות להתאמה אישית של סמנים מתקדמים. אפשר להשתמש ב-PinConfig כדי:
- שינוי צבע הרקע
- שינוי צבע הגבול
- שינוי צבע הגליף או הוספת טקסט
- הסתרת הגליף
משתמשים ב-PinConfig.Builder
כדי ליצור מופע של PinConfig:
Kotlin
// Use PinConfig.Builder to create an instance of PinConfig. val pinConfigBuilder: PinConfig.Builder = PinConfig.builder() pinConfigBuilder.setBackgroundColor(Color.MAGENTA) val pinConfig: PinConfig = pinConfigBuilder.build()// Use the PinConfig instance to set the icon for AdvancedMarkerOptions. val advancedMarkerOptions: AdvancedMarkerOptions = AdvancedMarkerOptions() .icon(BitmapDescriptorFactory.fromPinConfig(pinConfig)) .position(MARKER_POSITION)
// Pass the AdvancedMarkerOptions instance to addMarker(). val marker: Marker? = map.addMarker(advancedMarkerOptions)
Java
// Use PinConfig.Builder to create an instance of PinConfig.
PinConfig.Builder pinConfigBuilder = PinConfig.builder();
pinConfigBuilder.setBackgroundColor(Color.MAGENTA);
PinConfig pinConfig = pinConfigBuilder.build();

// Use the  PinConfig instance to set the icon for AdvancedMarkerOptions.
AdvancedMarkerOptions advancedMarkerOptions =
    new AdvancedMarkerOptions()
        .icon(BitmapDescriptorFactory.fromPinConfig(pinConfig))
        .position(MARKER_POSITION);

// Pass the AdvancedMarkerOptions instance to addMarker().
Marker marker = map.addMarker(advancedMarkerOptions);
שינוי צבע הרקע
משתמשים בשיטה PinConfig.background() כדי לשנות את צבע הרקע של סמן:
Kotlin
// Use PinConfig.Builder to create an instance of PinConfig.
val pinConfigBuilder: PinConfig.Builder = PinConfig.builder()
pinConfigBuilder.setBackgroundColor(Color.MAGENTA)
val pinConfig: PinConfig = pinConfigBuilder.build()
Java
// Use PinConfig.Builder to create an instance of PinConfig.
PinConfig.Builder pinConfigBuilder = PinConfig.builder();
pinConfigBuilder.setBackgroundColor(Color.MAGENTA);
PinConfig pinConfig = pinConfigBuilder.build();
שינוי צבע הגבול
כדי לשנות את צבע הגבול של סמן, משתמשים בשיטה PinConfig.borderColor():
Kotlin
// Set the border color.
val pinConfigBuilder: PinConfig.Builder = PinConfig.builder()
pinConfigBuilder.setBorderColor(Color.BLUE)
val pinConfig: PinConfig = pinConfigBuilder.build()
Java
// Set the border color.
PinConfig.Builder pinConfigBuilder = PinConfig.builder();
pinConfigBuilder.setBorderColor(Color.BLUE);
PinConfig pinConfig = pinConfigBuilder.build();
שינוי הגליף
יוצרים מכונת Glyph ואז משתמשים בה כדי להגדיר את PinConfig.
משתמשים בסימן הגרפי כדי להגדיר את הטקסט של הסימן הגרפי ואת צבע הטקסט, את צבע הסימן הגרפי או כדי לציין תמונה בהתאמה אישית לשימוש כסימן הגרפי.
בדוגמה הבאה מוגדר הטקסט של הגליף:
Kotlin
// Set the glyph text.
val pinConfigBuilder: PinConfig.Builder = PinConfig.builder()
val glyphText = Glyph("A")

// Alteratively, you can set the text color:
// Glyph glyphText = new Glyph("A", Color.GREEN);

pinConfigBuilder.setGlyph(glyphText)
val pinConfig: PinConfig = pinConfigBuilder.build()
Java
// Set the glyph text.
PinConfig.Builder pinConfigBuilder = PinConfig.builder();
PinConfig.Glyph glyphText = new PinConfig.Glyph("A");

// Alternatively, you can set the text color:
// PinConfig.Glyph glyphText = new PinConfig.Glyph("A", Color.GREEN);

pinConfigBuilder.setGlyph(glyphText);
PinConfig pinConfig = pinConfigBuilder.build();
הגדרת צבע הגליף:
Kotlin
val glyphColor = PinConfig.Glyph(Color.BLUE)
pinConfigBuilder.setGlyph(glyphColor)
val pinConfig: PinConfig = pinConfigBuilder.build()
Java
PinConfig.Glyph glyphColor = new PinConfig.Glyph(Color.BLUE);
pinConfigBuilder.setGlyph(glyphColor);
PinConfig pinConfig = pinConfigBuilder.build();
מגדירים תמונה מותאמת אישית לסימן הגרפי. הטכניקה הזו שימושית אם רוצים להשתמש בלוגו מותאם אישית או בסמן ויזואלי אחר בסמן.
Kotlin
// Set the glyph image.
val glyphImage: Int = R.drawable.example_image
val descriptor = PinConfig.BitmapDescriptorFactory.fromResource(glyphImage)
pinConfigBuilder.setGlyph(Glyph(descriptor))
val pinConfig: PinConfig = pinConfigBuilder.build()
Java
// Set the glyph image.
int glyphImage = R.drawable.example_image;
BitmapDescriptor descriptor = BitmapDescriptorFactory.fromResource(glyphImage);
pinConfigBuilder.setGlyph(new PinConfig.Glyph(descriptor));
PinConfig pinConfig = pinConfigBuilder.build();
הסתרת הגליף
אפשר להסתיר את הגליף כך שצבע הרקע ימלא את כל הסמן:
Kotlin
// Create a transparent glyph.
val pinConfigBuilder: PinConfig.Builder = PinConfig.builder()
pinConfigBuilder.setBackgroundColor(Color.MAGENTA)
pinConfigBuilder.setGlyph(PinConfig.Glyph(Color.TRANSPARENT))
val pinConfig: PinConfig = pinConfigBuilder.build()
Java
// Create a transparent glyph.
PinConfig.Builder pinConfigBuilder = PinConfig.builder();
pinConfigBuilder.setBackgroundColor(Color.MAGENTA);
pinConfigBuilder.setGlyph(new PinConfig.Glyph(Color.TRANSPARENT));
PinConfig pinConfig = pinConfigBuilder.build();
שימוש ב-iconView
השיטה AdvancedMarkerOptions.iconView() מאפשרת להשתמש בכל View של Android כסמן. כשמשתמשים בתצוגה כסמן, יש שליטה מלאה בסמן.
באפליקציה, קודם יוצרים את התצוגה ואז משתמשים בשיטה AdvancedMarkerOptions.iconView() כדי להוסיף את התצוגה לסמנים המתקדמים.
Kotlin
// Create a TextView to use as the marker.
val textView = TextView(this)
textView.text = "Hello!!"
textView.setBackgroundColor(Color.BLACK)
textView.setTextColor(Color.YELLOW)

val marker: Marker? = map.addMarker(
    AdvancedMarkerOptions()
        .position(SYDNEY)
        .iconView(textView)
)
Java
// Create a TextView to use as the marker.
TextView textView = new TextView(this);
textView.setText("Hello!!");
textView.setBackgroundColor(Color.BLACK);
textView.setTextColor(Color.YELLOW);

Marker marker = map.addMarker(
    new AdvancedMarkerOptions()
        .position(SYDNEY)
        .iconView(textView));