
يمكنك إضافة صور أعلى الخريطة كطبقة مربّعات. يتم وضع طبقات المربّعات فوق مربّع خريطة بمستوى تكبير/تصغير معيّن. باستخدام عدد كافٍ من المربّعات، يمكنك استكمال بيانات خرائط Google للخريطة بأكملها، وذلك على مستويات تكبير/تصغير متعدّدة.
مقدمة
تتيح لك طبقات المربّعات، التي يُشار إليها أحيانًا باسم تراكبات المربّعات، وضع صور فوق مربّعات الخريطة الأساسية من Google. استخدِم هذه الميزة لإضافة بيانات، مثل النقاط المثيرة للاهتمام أو معلومات حركة المرور، وصور محلية إلى تطبيقك. عند دمج طبقات المربّعات مع نوع الخريطة kGMSTypeNone، تتيح لك هذه الطبقات فعليًا استبدال بيانات الخريطة الأساسية من Google ببياناتك الخاصة.
تكون طبقات المربّعات مفيدة عندما تريد إضافة صور واسعة النطاق إلى الخريطة، وعادةً ما تغطي هذه الصور مناطق جغرافية كبيرة. في المقابل، تكون التراكبات الأرضية مفيدة عندما تريد تثبيت صورة واحدة في نقطة واحدة على الخريطة.
إحداثيات المربّعات
تقسّم Maps API الصور على كل مستوى تكبير/تصغير إلى مجموعة من مربّعات الخريطة المربّعة، والتي يتم ترتيبها في شبكة منظَّمة. عندما يتم تمرير الخريطة إلى موقع جغرافي جديد أو إلى مستوى تكبير/تصغير جديد، تحدّد Maps API المربّعات المطلوبة، وتحوّل ذلك إلى مجموعة من المربّعات التي يجب استردادها.
في تطبيق Google لإسقاط مركاتور، يكون المربّع الذي يحمل الإحداثيات (0,0) دائمًا في الركن الشمالي الغربي من الخريطة، مع زيادة قيم x من الغرب إلى الشرق وزيادة قيم y من الشمال إلى الجنوب.
يتم فهرسة المربّعات باستخدام إحداثيات x,y من هذا المصدر. على سبيل المثال، عند مستوى التكبير/التصغير 2، عندما يتم تقسيم الكرة الأرضية إلى 16 مربّعًا، يمكن الإشارة إلى كل مربّع باستخدام زوج فريد من x,y:
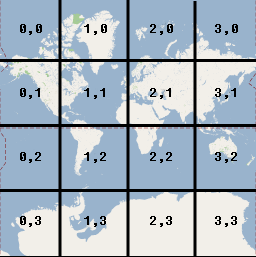
كل مربّع خريطة هو مربّع بحجم 256×256 نقطة. عند مستوى التكبير/التصغير 0، يتم عرض العالم بأكمله في مربّع واحد. يزيد كل مستوى تكبير/تصغير التكبير بمقدار الضعف. على سبيل المثال، عند مستوى التكبير/التصغير 1، يتم عرض الخريطة كشبكة مربّعات بحجم 2×2، وعند مستوى التكبير/التصغير 2 كشبكة مربّعات بحجم 4×4، وعند مستوى التكبير/التصغير 3 كشبكة مربّعات بحجم 8×8. لإنشاء صور لطبقة مربّعات، أنشئ صورة بحجم 256×256 نقطة لكل مربّع على كل مستوى تكبير/تصغير تريد دعمه.
إضافة طبقة مربّعات
- أنشئ كائنًا
GMSURLTileLayerأو فئة فرعية مخصّصة منGMSTileLayerأوGMSSyncTileLayer. - يمكنك تعديل السمة
zIndexاختياريًا لضبط موضعها بالنسبة إلى طبقات المربّعات الأخرى. - عيِّن الكائن
GMSTileLayerللخريطة من خلال ضبط السمةmap.
توفّر حزمة تطوير البرامج بالاستناد إلى بيانات "خرائط Google" للتطبيقات المتوافقة مع iOS ثلاث فئات يمكن استخدامها لتنفيذ طبقة مربّعات. باستخدام كل فئة، ستحتاج إلى تحديد كيفية جلب مربّع الخريطة الصحيح لمجموعة معيّنة من إحداثيات {x,y,zoom}. وفي ما يلي الخيارات المتاحة:
- أنشئ فئة فرعية من
GMSSyncTileLayer، مع توفير تنفيذtileForX:y:zoomالذي يعرض مثيلاتUIImage. - أنشئ فئة فرعية من
GMSTileLayer، مع توفير تنفيذ الطريقة غير المتزامنةrequestTileForX:y:zoomالتي يتم استدعاؤها لاحقًا باستخدام صورة مربّع. - استخدِم الفئة الحالية
GMSURLTileLayerلجلب المربّعات تلقائيًا من عناوين URL، مع توفير كتلةGMSTileURLConstructor.GMSURLTileLayerهي فئة ملموسة لا يمكن إنشاء فئة فرعية منها.
في حال إنشاء فئة فرعية من GMSSyncTileLayer أو GMSTileLayer، سيشير توفير نتيجة مربّع nil إلى حزمة تطوير البرامج بالاستناد إلى بيانات "خرائط Google" للتطبيقات المتوافقة مع iOS إلى أنّ البيانات غير متاحة ولكن قد تكون متاحة في المستقبل. بدلاً من ذلك، يمكنك عرض kGMSTileLayerNoTile للإشارة إلى أنّه ما مِن مربّع في هذا الموقع الجغرافي.
بالنسبة إلى GMSURLTileLayer، سيشير عرض nil من GMSTileURLConstructor إلى أنّه ما مِن مربّع في هذا الموقع الجغرافي.
استخدام GMSURLTileLayer لجلب المربّعات من عناوين URL
لا يتطلّب GMSURLTileLayer إنشاء فئة فرعية، ولكن عليك تنفيذ كتلة GMSTileURLConstructor. يوضّح الرمز أدناه كيفية استخدام GMSURLTileLayer لعرض مخطط مبنى لمبنى متعدّد الطوابق.
Swift
let floor = 1

// Implement GMSTileURLConstructor
// Returns a Tile based on the x,y,zoom coordinates, and the requested floor
let urls: GMSTileURLConstructor = { (x, y, zoom) in
  let url = "https://www.example.com/floorplans/L\(floor)_\(zoom)_\(x)_\(y).png"
  return URL(string: url)
}

// Create the GMSTileLayer
let layer = GMSURLTileLayer(urlConstructor: urls)

// Display on the map at a specific zIndex
layer.zIndex = 100
layer.map = mapView
Objective-C
NSInteger floor = 1;

// Create the GMSTileLayer
GMSURLTileLayer *layer = [GMSURLTileLayer tileLayerWithURLConstructor:^NSURL * _Nullable(NSUInteger x, NSUInteger y, NSUInteger zoom) {
  NSString *url = [NSString stringWithFormat:@"https://www.example.com/floorplans/L%ld_%lu_%lu_%lu.png",
                   (long)floor, (unsigned long)zoom, (unsigned long)x, (unsigned long)y];
  return [NSURL URLWithString:url];
}];

// Display on the map at a specific zIndex
layer.zIndex = 100;
layer.map = mapView;
إنشاء فئة فرعية من GMSSyncTileLayer لعرض المربّعات كـ UIImage
GMSSyncTileLayer وGMSTileLayer هما فئتان مجرّدتان تم تصميمهما لإنشاء فئات فرعية منهما. يمكنك استخدام هاتَين الفئتَين لعرض المربّعات كـ UIImage. يوضّح المثال أدناه كيفية عرض صورة مخصّصة فوق بعض المربّعات على الخريطة من خلال إنشاء فئة فرعية من GMSSyncTileLayer.
Swift
class TestTileLayer: GMSSyncTileLayer {
  override func tileFor(x: UInt, y: UInt, zoom: UInt) -> UIImage? {
    // On every odd tile, render an image.
    if (x % 2 == 1) {
      return UIImage(named: "australia")
    } else {
      return kGMSTileLayerNoTile
    }
  }
}
Objective-C
@interface TestTileLayer : GMSSyncTileLayer
@end

@implementation TestTileLayer

- (UIImage *)tileForX:(NSUInteger)x y:(NSUInteger)y zoom:(NSUInteger)zoom {
  // On every odd tile, render an image.
  if (x % 2 == 1) {
    return [UIImage imageNamed:@"australia"];
  } else {
    return kGMSTileLayerNoTile;
  }
}

@end
لإضافة الطبقة إلى خريطتك، أنشئ الكائن واضبط سمة الخريطة.
Swift
let layer = TestTileLayer()
layer.map = mapView
Objective-C
GMSTileLayer *layer = [[TestTileLayer alloc] init];
layer.map = mapView;
مربّعات عالية الكثافة النقطية لأجهزة Retina
يمكنك استخدام صور عالية الكثافة النقطية مع GMSSyncTileLayer
أو GMSURLTileLayer من خلال ضبط tileSize على 512.
تشير السمة tileSize إلى عدد وحدات البكسل التي تفضّل صور المربّعات المعروضة عرضها، ويتم ضبطها تلقائيًا على 256، وهو بُعد مربّع "خرائط Google" على جهاز غير Retina.
إذا كنت تعرض مربّعات ذات كثافة نقطية عادية على جهاز عالي الكثافة النقطية، يمكنك تكبير الصور من خلال ضبط tileSize على 512. يُرجى العِلم أنّ تكبير الصور قد يقلّل من جودة الصورة، خاصةً بالنسبة إلى الخطوط الدقيقة أو النص. للحصول على أفضل النتائج، يجب أن تتطابق tileSize والكثافة النقطية للصورة مع الشاشة. ستبدو الخرائط المعروضة على جهاز Retina في أفضل حالاتها عند عرض صور عالية الكثافة النقطية مع tileSize بقيمة 512، بينما ستبدو الخرائط المعروضة على جهاز غير Retina رائعة باستخدام الصور العادية وtileSize التلقائية بقيمة 256.
محو المربّعات القديمة
إذا أصبحت المربّعات التي توفّرها الطبقة "قديمة"، يجب استدعاء الطريقة clearTileCache على الطبقة لفرض عملية إعادة تحميل. سيؤدي ذلك إلى إعادة تحميل جميع المربّعات على هذه الطبقة.
Swift
layer.clearTileCache()
Objective-C
[layer clearTileCache];