กลับมาให้บริการเติมข้อความอัตโนมัติใน Places SDK สำหรับ iOS การคาดคะเนตอบกลับคำค้นหาของผู้ใช้ ตามที่ผู้ใช้พิมพ์ พารามิเตอร์ บริการเติมข้อความอัตโนมัติจะแสดงคำแนะนำสถานที่ต่างๆ เช่น ธุรกิจต่างๆ ที่อยู่ โค้ด Plus และ จุดที่น่าสนใจ
คุณสามารถเพิ่มการเติมข้อความอัตโนมัติในแอปได้ด้วยวิธีต่อไปนี้
- เพิ่มตัวควบคุม UI การเติมข้อความอัตโนมัติเพื่อบันทึก เวลาในการพัฒนา และทำให้ผู้ใช้ได้รับประสบการณ์ที่สอดคล้องกัน
- รับการคาดคะเนสถานที่แบบเป็นโปรแกรมเพื่อสร้างผู้ใช้ที่กำหนดเอง ประสบการณ์การใช้งาน
การเพิ่มการควบคุม UI การเติมข้อความอัตโนมัติ
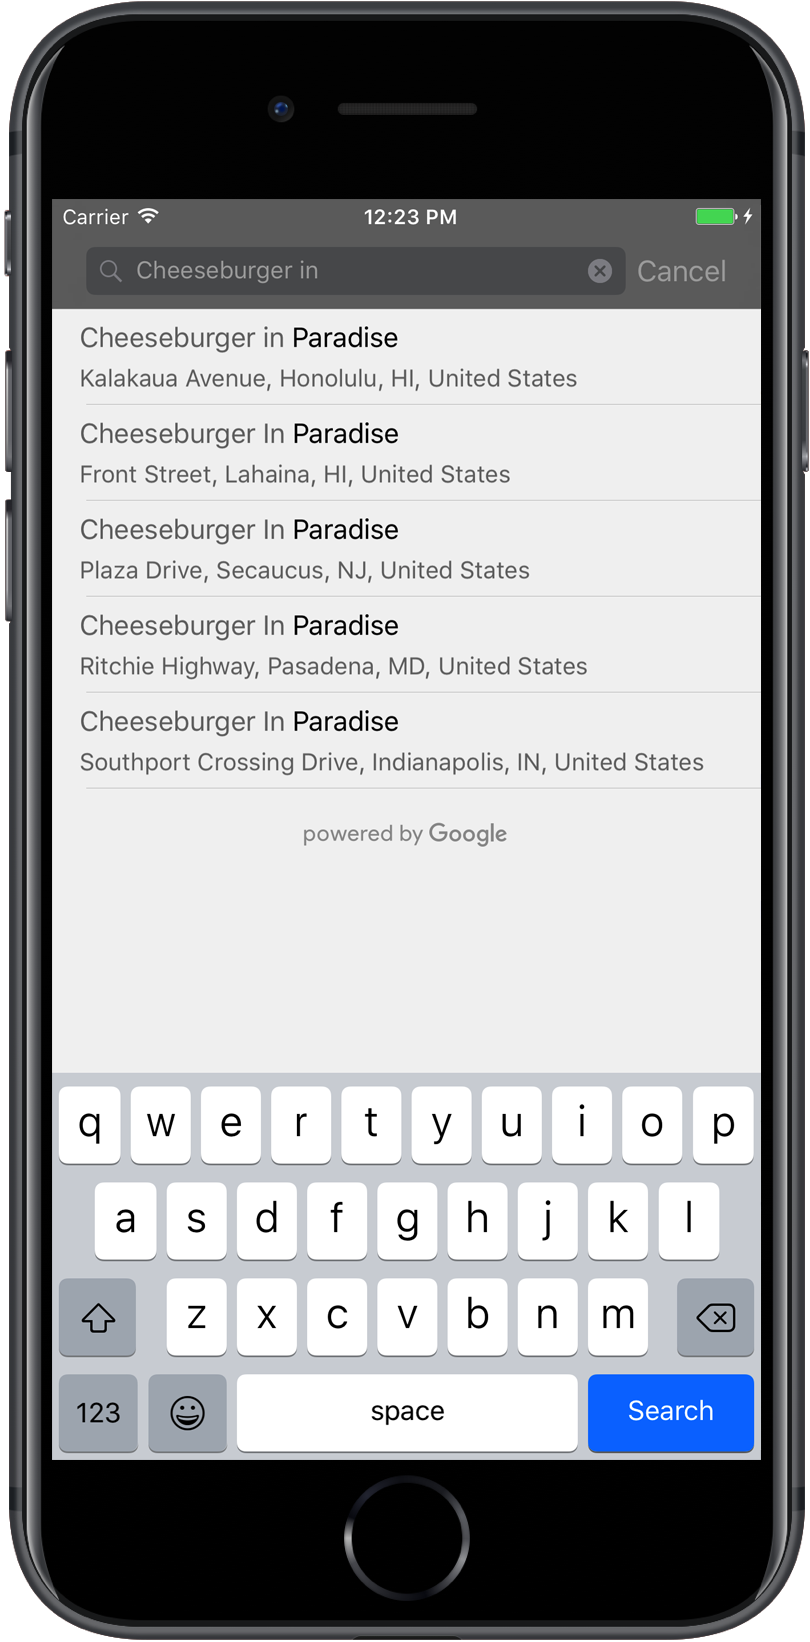
ตัวควบคุม UI การเติมข้อความอัตโนมัติเป็นกล่องโต้ตอบการค้นหาที่มีการเติมข้อความอัตโนมัติในตัว
ขณะที่ผู้ใช้ป้อนข้อความค้นหา ตัวควบคุมจะแสดง
รายการสถานที่ที่คาดคะเนไว้ให้เลือก เมื่อผู้ใช้เลือก
GMSPlace
ซึ่งแอปสามารถใช้เพื่อรับรายละเอียดเกี่ยวกับ
สถานที่ที่เลือก
คุณสามารถเพิ่มการควบคุม UI การเติมข้อความอัตโนมัติในแอปได้ด้วยวิธีต่อไปนี้
การเพิ่มการควบคุมแบบเต็มหน้าจอ
ใช้การควบคุมแบบเต็มหน้าจอเมื่อคุณต้องการให้บริบทแบบโมดัล โดยที่
UI การเติมข้อความอัตโนมัติจะแทนที่ UI ของแอปชั่วคราวจนกว่า
ผู้ใช้ ได้เลือกตัวเลือกของตน ฟังก์ชันนี้ให้บริการโดย
GMSAutocompleteViewController
เมื่อผู้ใช้เลือกสถานที่ แอปของคุณจะได้รับการติดต่อกลับ
วิธีเพิ่มการควบคุมแบบเต็มหน้าจอลงในแอป
- สร้างองค์ประกอบ UI ในแอปหลักเพื่อเปิดตัวควบคุม UI การเติมข้อความอัตโนมัติ
เช่น ตัวแฮนเดิลแบบสัมผัสใน
UIButton - ใช้
GMSAutocompleteViewControllerDelegateในตัวควบคุมมุมมองระดับบนสุด - สร้างอินสแตนซ์ของ
GMSAutocompleteViewControllerและกำหนดให้ตัวควบคุมมุมมองหลักเป็นพร็อพเพอร์ตี้ที่ได้รับมอบสิทธิ์ - สร้าง
GMSPlaceFieldเพื่อกำหนดประเภทข้อมูลสถานที่ที่จะแสดงผล - เพิ่ม
GMSAutocompleteFilterเพื่อจำกัดการค้นหาเป็นประเภทของสถานที่ที่ต้องการ - นำเสนอ
GMSAutocompleteViewControllerโดยใช้[self presentViewController...] - จัดการตัวเลือกของผู้ใช้ใน
didAutocompleteWithPlaceการมอบสิทธิ์ - ปิดตัวควบคุมใน
didAutocompleteWithPlacedidFailAutocompleteWithErrorและwasCancelledวิธีผู้รับมอบสิทธิ์
ตัวอย่างต่อไปนี้แสดงวิธีหนึ่งที่เป็นไปได้ในการเปิดตัว
GMSAutocompleteViewController
เพื่อตอบกลับเมื่อผู้ใช้แตะปุ่ม
Swift
import UIKit
import GooglePlaces

class ViewController: UIViewController {

  override func viewDidLoad() {
    makeButton()
  }

  // Present the Autocomplete view controller when the button is pressed.
  @objc func autocompleteClicked(_ sender: UIButton) {
    let autocompleteController = GMSAutocompleteViewController()
    autocompleteController.delegate = self

    // Specify the place data types to return.
    let fields: GMSPlaceField = GMSPlaceField(rawValue: UInt(GMSPlaceField.name.rawValue) |
      UInt(GMSPlaceField.placeID.rawValue))!
    autocompleteController.placeFields = fields

    // Specify a filter.
    let filter = GMSAutocompleteFilter()
    filter.types = [.address]
    autocompleteController.autocompleteFilter = filter

    // Display the autocomplete view controller.
    present(autocompleteController, animated: true, completion: nil)
  }

  // Add a button to the view.
  func makeButton() {
    let btnLaunchAc = UIButton(frame: CGRect(x: 5, y: 150, width: 300, height: 35))
    btnLaunchAc.backgroundColor = .blue
    btnLaunchAc.setTitle("Launch autocomplete", for: .normal)
    btnLaunchAc.addTarget(self, action: #selector(autocompleteClicked), for: .touchUpInside)
    self.view.addSubview(btnLaunchAc)
  }

}

extension ViewController: GMSAutocompleteViewControllerDelegate {

  // Handle the user's selection.
  func viewController(_ viewController: GMSAutocompleteViewController, didAutocompleteWith place: GMSPlace) {
    print("Place name: \(place.name)")
    print("Place ID: \(place.placeID)")
    print("Place attributions: \(place.attributions)")
    dismiss(animated: true, completion: nil)
  }

  func viewController(_ viewController: GMSAutocompleteViewController, didFailAutocompleteWithError error: Error) {
    // TODO: handle the error.
    print("Error: ", error.localizedDescription)
  }

  // User canceled the operation.
  func wasCancelled(_ viewController: GMSAutocompleteViewController) {
    dismiss(animated: true, completion: nil)
  }

  // Turn the network activity indicator on and off again.
  func didRequestAutocompletePredictions(_ viewController: GMSAutocompleteViewController) {
    UIApplication.shared.isNetworkActivityIndicatorVisible = true
  }

  func didUpdateAutocompletePredictions(_ viewController: GMSAutocompleteViewController) {
    UIApplication.shared.isNetworkActivityIndicatorVisible = false
  }

}
Objective-C
#import "ViewController.h"
@import GooglePlaces;

@interface ViewController () <GMSAutocompleteViewControllerDelegate>

@end

@implementation ViewController {
  GMSAutocompleteFilter *_filter;
}

- (void)viewDidLoad {
  [super viewDidLoad];
  [self makeButton];
}

  // Present the autocomplete view controller when the button is pressed.
- (void)autocompleteClicked {
  GMSAutocompleteViewController *acController = [[GMSAutocompleteViewController alloc] init];
  acController.delegate = self;

  // Specify the place data types to return.
  GMSPlaceField fields = (GMSPlaceFieldName | GMSPlaceFieldPlaceID);
  acController.placeFields = fields;

  // Specify a filter.
  _filter = [[GMSAutocompleteFilter alloc] init];
  _filter.types = @[ kGMSPlaceTypeBank ];
  acController.autocompleteFilter = _filter;

  // Display the autocomplete view controller.
  [self presentViewController:acController animated:YES completion:nil];
}

  // Add a button to the view.
- (void)makeButton{
  UIButton *btnLaunchAc = [UIButton buttonWithType:UIButtonTypeCustom];
  [btnLaunchAc addTarget:self
             action:@selector(autocompleteClicked) forControlEvents:UIControlEventTouchUpInside];
  [btnLaunchAc setTitle:@"Launch autocomplete" forState:UIControlStateNormal];
  btnLaunchAc.frame = CGRectMake(5.0, 150.0, 300.0, 35.0);
  btnLaunchAc.backgroundColor = [UIColor blueColor];
  [self.view addSubview:btnLaunchAc];
}

  // Handle the user's selection.
- (void)viewController:(GMSAutocompleteViewController *)viewController
didAutocompleteWithPlace:(GMSPlace *)place {
  [self dismissViewControllerAnimated:YES completion:nil];
  // Do something with the selected place.
  NSLog(@"Place name %@", place.name);
  NSLog(@"Place ID %@", place.placeID);
  NSLog(@"Place attributions %@", place.attributions.string);
}

- (void)viewController:(GMSAutocompleteViewController *)viewController
didFailAutocompleteWithError:(NSError *)error {
  [self dismissViewControllerAnimated:YES completion:nil];
  // TODO: handle the error.
  NSLog(@"Error: %@", [error description]);
}

  // User canceled the operation.
- (void)wasCancelled:(GMSAutocompleteViewController *)viewController {
  [self dismissViewControllerAnimated:YES completion:nil];
}

  // Turn the network activity indicator on and off again.
- (void)didRequestAutocompletePredictions:(GMSAutocompleteViewController *)viewController {
  [UIApplication sharedApplication].networkActivityIndicatorVisible = YES;
}

- (void)didUpdateAutocompletePredictions:(GMSAutocompleteViewController *)viewController {
  [UIApplication sharedApplication].networkActivityIndicatorVisible = NO;
}

@end
การเพิ่มตัวควบคุมผลลัพธ์
ใช้ตัวควบคุมผลลัพธ์เมื่อต้องการควบคุม UI การป้อนข้อความมากขึ้น ตัวควบคุมผลลัพธ์จะเปิด/ปิดการแสดงรายการผลลัพธ์แบบไดนามิก ตามการโฟกัสของ UI ที่ป้อน
วิธีเพิ่มตัวควบคุมผลลัพธ์ลงในแอป
- สร้าง
GMSAutocompleteResultsViewController - ใช้
GMSAutocompleteResultsViewControllerDelegateในตัวควบคุมมุมมองระดับบนสุดและมอบหมายตัวควบคุมมุมมองระดับบนสุดเป็น ทรัพย์สินที่มอบสิทธิ์ - สร้างออบเจ็กต์
UISearchControllerโดยการส่งในGMSAutocompleteResultsViewControllerเป็นอาร์กิวเมนต์ตัวควบคุมผลลัพธ์ - ตั้งค่า
GMSAutocompleteResultsViewControllerเป็นพร็อพเพอร์ตี้searchResultsUpdaterของUISearchController - เพิ่ม
searchBarสำหรับUISearchControllerลงใน UI ของแอป - จัดการตัวเลือกของผู้ใช้ใน
didAutocompleteWithPlaceการมอบสิทธิ์
คุณสามารถวางแถบค้นหาของ UISearchController ใน
UI ของแอป
การเพิ่มแถบค้นหาในแถบนำทาง
ตัวอย่างโค้ดต่อไปนี้สาธิตการเพิ่มตัวควบคุมผลลัพธ์ การเพิ่มฟิลด์
searchBar ไปยังแถบนำทางแล้วจัดการตัวเลือกของผู้ใช้
Swift
class ViewController: UIViewController {

  var resultsViewController: GMSAutocompleteResultsViewController?
  var searchController: UISearchController?
  var resultView: UITextView?

  override func viewDidLoad() {
    super.viewDidLoad()

    resultsViewController = GMSAutocompleteResultsViewController()
    resultsViewController?.delegate = self

    searchController = UISearchController(searchResultsController: resultsViewController)
    searchController?.searchResultsUpdater = resultsViewController

    // Put the search bar in the navigation bar.
    searchController?.searchBar.sizeToFit()
    navigationItem.titleView = searchController?.searchBar

    // When UISearchController presents the results view, present it in
    // this view controller, not one further up the chain.
    definesPresentationContext = true

    // Prevent the navigation bar from being hidden when searching.
    searchController?.hidesNavigationBarDuringPresentation = false
  }
}

// Handle the user's selection.
extension ViewController: GMSAutocompleteResultsViewControllerDelegate {
  func resultsController(_ resultsController: GMSAutocompleteResultsViewController,
                         didAutocompleteWith place: GMSPlace) {
    searchController?.isActive = false
    // Do something with the selected place.
    print("Place name: \(place.name)")
    print("Place address: \(place.formattedAddress)")
    print("Place attributions: \(place.attributions)")
  }

  func resultsController(_ resultsController: GMSAutocompleteResultsViewController,
                         didFailAutocompleteWithError error: Error){
    // TODO: handle the error.
    print("Error: ", error.localizedDescription)
  }

  // Turn the network activity indicator on and off again.
  func didRequestAutocompletePredictions(_ viewController: GMSAutocompleteViewController) {
    UIApplication.shared.isNetworkActivityIndicatorVisible = true
  }

  func didUpdateAutocompletePredictions(_ viewController: GMSAutocompleteViewController) {
    UIApplication.shared.isNetworkActivityIndicatorVisible = false
  }
}
Objective-C
- (void)viewDidLoad {
  _resultsViewController = [[GMSAutocompleteResultsViewController alloc] init];
  _resultsViewController.delegate = self;

  _searchController = [[UISearchController alloc]
                       initWithSearchResultsController:_resultsViewController];
  _searchController.searchResultsUpdater = _resultsViewController;

  // Put the search bar in the navigation bar.
  [_searchController.searchBar sizeToFit];
  self.navigationItem.titleView = _searchController.searchBar;

  // When UISearchController presents the results view, present it in
  // this view controller, not one further up the chain.
  self.definesPresentationContext = YES;

  // Prevent the navigation bar from being hidden when searching.
  _searchController.hidesNavigationBarDuringPresentation = NO;
}

// Handle the user's selection.
- (void)resultsController:(GMSAutocompleteResultsViewController *)resultsController
  didAutocompleteWithPlace:(GMSPlace *)place {
    _searchController.active = NO;
    // Do something with the selected place.
    NSLog(@"Place name %@", place.name);
    NSLog(@"Place address %@", place.formattedAddress);
    NSLog(@"Place attributions %@", place.attributions.string);
}

- (void)resultsController:(GMSAutocompleteResultsViewController *)resultsController
didFailAutocompleteWithError:(NSError *)error {
  [self dismissViewControllerAnimated:YES completion:nil];
  // TODO: handle the error.
  NSLog(@"Error: %@", [error description]);
}

// Turn the network activity indicator on and off again.
- (void)didRequestAutocompletePredictionsForResultsController:
    (GMSAutocompleteResultsViewController *)resultsController {
  [UIApplication sharedApplication].networkActivityIndicatorVisible = YES;
}

- (void)didUpdateAutocompletePredictionsForResultsController:
    (GMSAutocompleteResultsViewController *)resultsController {
  [UIApplication sharedApplication].networkActivityIndicatorVisible = NO;
}
การเพิ่มแถบค้นหาที่ด้านบนของมุมมอง
ตัวอย่างโค้ดต่อไปนี้แสดงการเพิ่ม searchBar ที่ด้านบนสุดของข้อมูลพร็อพเพอร์ตี้
Swift
import UIKit
import GooglePlaces

class ViewController: UIViewController {

  var resultsViewController: GMSAutocompleteResultsViewController?
  var searchController: UISearchController?
  var resultView: UITextView?

  override func viewDidLoad() {
    super.viewDidLoad()

    resultsViewController = GMSAutocompleteResultsViewController()
    resultsViewController?.delegate = self

    searchController = UISearchController(searchResultsController: resultsViewController)
    searchController?.searchResultsUpdater = resultsViewController

    let subView = UIView(frame: CGRect(x: 0, y: 65.0, width: 350.0, height: 45.0))

    subView.addSubview((searchController?.searchBar)!)
    view.addSubview(subView)
    searchController?.searchBar.sizeToFit()
    searchController?.hidesNavigationBarDuringPresentation = false

    // When UISearchController presents the results view, present it in
    // this view controller, not one further up the chain.
    definesPresentationContext = true
  }
}

// Handle the user's selection.
extension ViewController: GMSAutocompleteResultsViewControllerDelegate {
  func resultsController(_ resultsController: GMSAutocompleteResultsViewController,
                         didAutocompleteWith place: GMSPlace) {
    searchController?.isActive = false
    // Do something with the selected place.
    print("Place name: \(place.name)")
    print("Place address: \(place.formattedAddress)")
    print("Place attributions: \(place.attributions)")
  }

  func resultsController(_ resultsController: GMSAutocompleteResultsViewController,
                         didFailAutocompleteWithError error: Error){
    // TODO: handle the error.
    print("Error: ", error.localizedDescription)
  }

  // Turn the network activity indicator on and off again.
  func didRequestAutocompletePredictions(forResultsController resultsController: GMSAutocompleteResultsViewController) {
    UIApplication.shared.isNetworkActivityIndicatorVisible = true
  }

  func didUpdateAutocompletePredictions(forResultsController resultsController: GMSAutocompleteResultsViewController) {
    UIApplication.shared.isNetworkActivityIndicatorVisible = false
  }
}
Objective-C
- (void)viewDidLoad {
    [super viewDidLoad];

    _resultsViewController = [[GMSAutocompleteResultsViewController alloc] init];
    _resultsViewController.delegate = self;

    _searchController = [[UISearchController alloc]
                             initWithSearchResultsController:_resultsViewController];
    _searchController.searchResultsUpdater = _resultsViewController;

    UIView *subView = [[UIView alloc] initWithFrame:CGRectMake(0, 65.0, 250, 50)];

    [subView addSubview:_searchController.searchBar];
    [_searchController.searchBar sizeToFit];
    [self.view addSubview:subView];

    // When UISearchController presents the results view, present it in
    // this view controller, not one further up the chain.
    self.definesPresentationContext = YES;
}

// Handle the user's selection.
- (void)resultsController:(GMSAutocompleteResultsViewController *)resultsController
didAutocompleteWithPlace:(GMSPlace *)place {
  [self dismissViewControllerAnimated:YES completion:nil];
  // Do something with the selected place.
  NSLog(@"Place name %@", place.name);
  NSLog(@"Place address %@", place.formattedAddress);
  NSLog(@"Place attributions %@", place.attributions.string);
}

- (void)resultsController:(GMSAutocompleteResultsViewController *)resultsController
didFailAutocompleteWithError:(NSError *)error {
  [self dismissViewControllerAnimated:YES completion:nil];
  // TODO: handle the error.
  NSLog(@"Error: %@", [error description]);
}

// Turn the network activity indicator on and off again.
- (void)didRequestAutocompletePredictionsForResultsController:
    (GMSAutocompleteResultsViewController *)resultsController {
  [UIApplication sharedApplication].networkActivityIndicatorVisible = YES;
}

- (void)didUpdateAutocompletePredictionsForResultsController:
    (GMSAutocompleteResultsViewController *)resultsController {
  [UIApplication sharedApplication].networkActivityIndicatorVisible = NO;
}
โดยค่าเริ่มต้น UISearchController
ซ่อนแถบนำทางเมื่อนำเสนอ (สามารถปิดใช้ได้) ในกรณีที่
แถบนำทางมองเห็นได้และไม่ชัดเจน UISearchController ไม่ได้ตั้งค่า
ตำแหน่งได้อย่างถูกต้อง
ให้ใช้โค้ดต่อไปนี้เพื่อแก้ปัญหาชั่วคราว
Swift
navigationController?.navigationBar.translucent = false
searchController?.hidesNavigationBarDuringPresentation = false

// This makes the view area include the nav bar even though it is opaque.
// Adjust the view placement down.
self.extendedLayoutIncludesOpaqueBars = true
self.edgesForExtendedLayout = .top
Objective-C
self.navigationController.navigationBar.translucent = NO;
_searchController.hidesNavigationBarDuringPresentation = NO;

// This makes the view area include the nav bar even though it is opaque.
// Adjust the view placement down.
self.extendedLayoutIncludesOpaqueBars = YES;
self.edgesForExtendedLayout = UIRectEdgeTop;
การเพิ่มแถบค้นหาโดยใช้ผลการค้นหาป๊อปอัป
ตัวอย่างโค้ดต่อไปนี้แสดงการวางแถบค้นหาที่ด้านขวาของแท็ก แถบนำทาง และแสดงผลการค้นหาในป๊อปอัป
Swift
import UIKit
import GooglePlaces

class ViewController: UIViewController {

  var resultsViewController: GMSAutocompleteResultsViewController?
  var searchController: UISearchController?
  var resultView: UITextView?

  override func viewDidLoad() {
    super.viewDidLoad()

    resultsViewController = GMSAutocompleteResultsViewController()
    resultsViewController?.delegate = self

    searchController = UISearchController(searchResultsController: resultsViewController)
    searchController?.searchResultsUpdater = resultsViewController

    // Add the search bar to the right of the nav bar,
    // use a popover to display the results.
    // Set an explicit size as we don't want to use the entire nav bar.
    searchController?.searchBar.frame = (CGRect(x: 0, y: 0, width: 250.0, height: 44.0))
    navigationItem.rightBarButtonItem = UIBarButtonItem(customView: (searchController?.searchBar)!)

    // When UISearchController presents the results view, present it in
    // this view controller, not one further up the chain.
    definesPresentationContext = true

    // Keep the navigation bar visible.
    searchController?.hidesNavigationBarDuringPresentation = false
    searchController?.modalPresentationStyle = .popover
  }
}
// Handle the user's selection.
extension ViewController: GMSAutocompleteResultsViewControllerDelegate {
  func resultsController(_ resultsController: GMSAutocompleteResultsViewController,
                         didAutocompleteWith place: GMSPlace) {
    searchController?.isActive = false
    // Do something with the selected place.
    print("Place name: \(place.name)")
    print("Place address: \(place.formattedAddress)")
    print("Place attributions: \(place.attributions)")
  }

  func resultsController(_ resultsController: GMSAutocompleteResultsViewController,
                         didFailAutocompleteWithError error: Error){
    // TODO: handle the error.
    print("Error: ", error.localizedDescription)
  }

  // Turn the network activity indicator on and off again.
  func didRequestAutocompletePredictions(forResultsController resultsController: GMSAutocompleteResultsViewController) {
    UIApplication.shared.isNetworkActivityIndicatorVisible = true
  }

  func didUpdateAutocompletePredictions(forResultsController resultsController: GMSAutocompleteResultsViewController) {
    UIApplication.shared.isNetworkActivityIndicatorVisible = false
  }
}
Objective-C
- (void)viewDidLoad {
  [super viewDidLoad];

  _resultsViewController = [[GMSAutocompleteResultsViewController alloc] init];
  _resultsViewController.delegate = self;

  _searchController = [[UISearchController alloc]
                           initWithSearchResultsController:_resultsViewController];
  _searchController.searchResultsUpdater = _resultsViewController;

  // Add the search bar to the right of the nav bar,
  // use a popover to display the results.
  // Set an explicit size as we don't want to use the entire nav bar.
  _searchController.searchBar.frame = CGRectMake(0, 0, 250.0f, 44.0f);
  self.navigationItem.rightBarButtonItem =
  [[UIBarButtonItem alloc] initWithCustomView:_searchController.searchBar];

  // When UISearchController presents the results view, present it in
  // this view controller, not one further up the chain.
  self.definesPresentationContext = YES;

  // Keep the navigation bar visible.
  _searchController.hidesNavigationBarDuringPresentation = NO;

  _searchController.modalPresentationStyle = UIModalPresentationPopover;
}

// Handle the user's selection.
- (void)resultsController:(GMSAutocompleteResultsViewController *)resultsController
didAutocompleteWithPlace:(GMSPlace *)place {
  [self dismissViewControllerAnimated:YES completion:nil];
  NSLog(@"Place name %@", place.name);
  NSLog(@"Place address %@", place.formattedAddress);
  NSLog(@"Place attributions %@", place.attributions.string);
}

- (void)resultsController:(GMSAutocompleteResultsViewController *)resultsController
didFailAutocompleteWithError:(NSError *)error {
  [self dismissViewControllerAnimated:YES completion:nil];
  // TODO: handle the error.
  NSLog(@"Error: %@", [error description]);
}

// Turn the network activity indicator on and off again.
- (void)didRequestAutocompletePredictionsForResultsController:
    (GMSAutocompleteResultsViewController *)resultsController {
  [UIApplication sharedApplication].networkActivityIndicatorVisible = YES;
}

- (void)didUpdateAutocompletePredictionsForResultsController:
    (GMSAutocompleteResultsViewController *)resultsController {
  [UIApplication sharedApplication].networkActivityIndicatorVisible = NO;
}
การใช้แหล่งข้อมูลตาราง
หากแอปของคุณมี UI ข้อความค้นหาที่กำหนดเอง คุณสามารถใช้
GMSAutocompleteTableDataSource
เพื่อขับเคลื่อนมุมมองตารางซึ่งแสดงผลลัพธ์บนตัวควบคุมมุมมอง
หากต้องการใช้งาน GMSAutocompleteTableDataSource
เป็นแหล่งข้อมูลและผู้รับมอบสิทธิ์ของ UITableView
ในตัวควบคุมมุมมอง
- ใช้
GMSAutocompleteTableDataSourceDelegateและUISearchBarDelegateในตัวควบคุมมุมมอง - สร้าง
GMSAutocompleteTableDataSourceและกำหนดตัวควบคุมการแสดงผลเป็นพร็อพเพอร์ตี้ที่มอบสิทธิ์ - ตั้งค่า
GMSAutocompleteTableDataSourceเป็นพร็อพเพอร์ตี้แหล่งข้อมูลและมอบสิทธิ์ของUITableViewบนตัวควบคุมมุมมอง - ในเครื่องจัดการสำหรับการป้อนข้อความ ให้เรียก
sourceTextHasChangedในGMSAutocompleteTableDataSource - จัดการตัวเลือกของผู้ใช้ในวิธีผู้รับมอบสิทธิ์
didAutocompleteWithPlace - ปิดตัวควบคุมใน
didAutocompleteWithPlacedidFailAutocompleteWithErrorวิธีการมอบสิทธิ์wasCancelledวิธี
ตัวอย่างโค้ดต่อไปนี้สาธิตการใช้
GMSAutocompleteTableDataSource
เพื่อขับเคลื่อนมุมมองตารางของ UIViewController เมื่อมีการเพิ่ม UISearchBar แยกต่างหาก
Swift
// Copyright 2020 Google LLC
//
// Licensed under the Apache License, Version 2.0 (the "License");
// you may not use this file except in compliance with the License.
// You may obtain a copy of the License at
//
//      http://www.apache.org/licenses/LICENSE-2.0
//
// Unless required by applicable law or agreed to in writing, software
// distributed under the License is distributed on an "AS IS" BASIS,
// WITHOUT WARRANTIES OR CONDITIONS OF ANY KIND, either express or implied.
// See the License for the specific language governing permissions and
// limitations under the License.

import GooglePlaces
import UIKit

class PlaceAutocompleteViewController: UIViewController {

  private var tableView: UITableView!
  private var tableDataSource: GMSAutocompleteTableDataSource!

  override func viewDidLoad() {
    super.viewDidLoad()

    let searchBar = UISearchBar(frame: CGRect(x: 0, y: 20, width: self.view.frame.size.width, height: 44.0))
    searchBar.delegate = self
    view.addSubview(searchBar)

    tableDataSource = GMSAutocompleteTableDataSource()
    tableDataSource.delegate = self

    tableView = UITableView(frame: CGRect(x: 0, y: 64, width: self.view.frame.size.width, height: self.view.frame.size.height - 44))
    tableView.delegate = tableDataSource
    tableView.dataSource = tableDataSource

    view.addSubview(tableView)
  }
}

extension PlaceAutocompleteViewController: UISearchBarDelegate {
  func searchBar(_ searchBar: UISearchBar, textDidChange searchText: String) {
    // Update the GMSAutocompleteTableDataSource with the search text.
    tableDataSource.sourceTextHasChanged(searchText)
  }
}

extension PlaceAutocompleteViewController: GMSAutocompleteTableDataSourceDelegate {
  func didUpdateAutocompletePredictions(for tableDataSource: GMSAutocompleteTableDataSource) {
    // Turn the network activity indicator off.
    UIApplication.shared.isNetworkActivityIndicatorVisible = false
    // Reload table data.
    tableView.reloadData()
  }

  func didRequestAutocompletePredictions(for tableDataSource: GMSAutocompleteTableDataSource) {
    // Turn the network activity indicator on.
    UIApplication.shared.isNetworkActivityIndicatorVisible = true
    // Reload table data.
    tableView.reloadData()
  }

  func tableDataSource(_ tableDataSource: GMSAutocompleteTableDataSource, didAutocompleteWith place: GMSPlace) {
    // Do something with the selected place.
    print("Place name: \(place.name)")
    print("Place address: \(place.formattedAddress)")
    print("Place attributions: \(place.attributions)")
  }

  func tableDataSource(_ tableDataSource: GMSAutocompleteTableDataSource, didFailAutocompleteWithError error: Error) {
    // Handle the error.
    print("Error: \(error.localizedDescription)")
  }

  func tableDataSource(_ tableDataSource: GMSAutocompleteTableDataSource, didSelect prediction: GMSAutocompletePrediction) -> Bool {
    return true
  }
}
Objective-C
// Copyright 2020 Google LLC
//
// Licensed under the Apache License, Version 2.0 (the "License");
// you may not use this file except in compliance with the License.
// You may obtain a copy of the License at
//
//      http://www.apache.org/licenses/LICENSE-2.0
//
// Unless required by applicable law or agreed to in writing, software
// distributed under the License is distributed on an "AS IS" BASIS,
// WITHOUT WARRANTIES OR CONDITIONS OF ANY KIND, either express or implied.
// See the License for the specific language governing permissions and
// limitations under the License.

#import "PlaceAutocompleteViewController.h"
@import GooglePlaces;
@import UIKit;

@interface PlaceAutocompleteViewController () <GMSAutocompleteTableDataSourceDelegate, UISearchBarDelegate>

@end

@implementation PlaceAutocompleteViewController {
  UITableView *tableView;
  GMSAutocompleteTableDataSource *tableDataSource;
}

- (void)viewDidLoad {
  [super viewDidLoad];

  UISearchBar *searchBar = [[UISearchBar alloc] initWithFrame:CGRectMake(0, 20, self.view.frame.size.width, 44)];
  searchBar.delegate = self;

  [self.view addSubview:searchBar];

  tableDataSource = [[GMSAutocompleteTableDataSource alloc] init];
  tableDataSource.delegate = self;

  tableView = [[UITableView alloc] initWithFrame:CGRectMake(0, 64, self.view.frame.size.width, self.view.frame.size.height - 44)];
  tableView.delegate = tableDataSource;
  tableView.dataSource = tableDataSource;

  [self.view addSubview:tableView];
}

#pragma mark - GMSAutocompleteTableDataSourceDelegate

- (void)didUpdateAutocompletePredictionsForTableDataSource:(GMSAutocompleteTableDataSource *)tableDataSource {
  // Turn the network activity indicator off.
  UIApplication.sharedApplication.networkActivityIndicatorVisible = NO;

  // Reload table data.
  [tableView reloadData];
}

- (void)didRequestAutocompletePredictionsForTableDataSource:(GMSAutocompleteTableDataSource *)tableDataSource {
  // Turn the network activity indicator on.
  UIApplication.sharedApplication.networkActivityIndicatorVisible = YES;

  // Reload table data.
  [tableView reloadData];
}

- (void)tableDataSource:(GMSAutocompleteTableDataSource *)tableDataSource didAutocompleteWithPlace:(GMSPlace *)place {
  // Do something with the selected place.
  NSLog(@"Place name: %@", place.name);
  NSLog(@"Place address: %@", place.formattedAddress);
  NSLog(@"Place attributions: %@", place.attributions);
}

- (void)tableDataSource:(GMSAutocompleteTableDataSource *)tableDataSource didFailAutocompleteWithError:(NSError *)error {
  // Handle the error
  NSLog(@"Error %@", error.description);
}

- (BOOL)tableDataSource:(GMSAutocompleteTableDataSource *)tableDataSource didSelectPrediction:(GMSAutocompletePrediction *)prediction {
  return YES;
}

#pragma mark - UISearchBarDelegate

- (void)searchBar:(UISearchBar *)searchBar textDidChange:(NSString *)searchText {
  // Update the GMSAutocompleteTableDataSource with the search text.
  [tableDataSource sourceTextHasChanged:searchText];
}

@end
การปรับแต่งข้อความและสีพื้นหลัง
คุณสามารถตั้งค่าสีของข้อความและพื้นหลังทั้งหมดได้ใน UI การเติมข้อความอัตโนมัติ เพื่อให้วิดเจ็ตเข้ากับรูปลักษณ์ของแอปได้มากขึ้น อย่างใกล้ชิด การตั้งค่าสีตัวควบคุม UI ทำได้ 2 วิธีดังนี้
- ใช้โปรโตคอล UIAppearance ดั้งเดิมของ iOS เพื่อกำหนดรูปแบบการควบคุม UI ทั่วโลกหากเป็นไปได้ การตั้งค่าเหล่านี้มีผลกับการควบคุม UI หลายรายการ แต่ไม่ใช่ทั้งหมด จากองค์ประกอบเหล่านี้
- ใช้เมธอด SDK ในคลาสวิดเจ็ตเพื่อตั้งค่าพร็อพเพอร์ตี้ที่ โปรโตคอล UIAppearance ไม่รองรับ
โดยปกติแล้ว แอปของคุณจะใช้โปรโตคอล UIAppearance บางอย่างผสมกัน และเมธอด SDK แผนภาพต่อไปนี้แสดงองค์ประกอบที่ใช้จัดรูปแบบได้
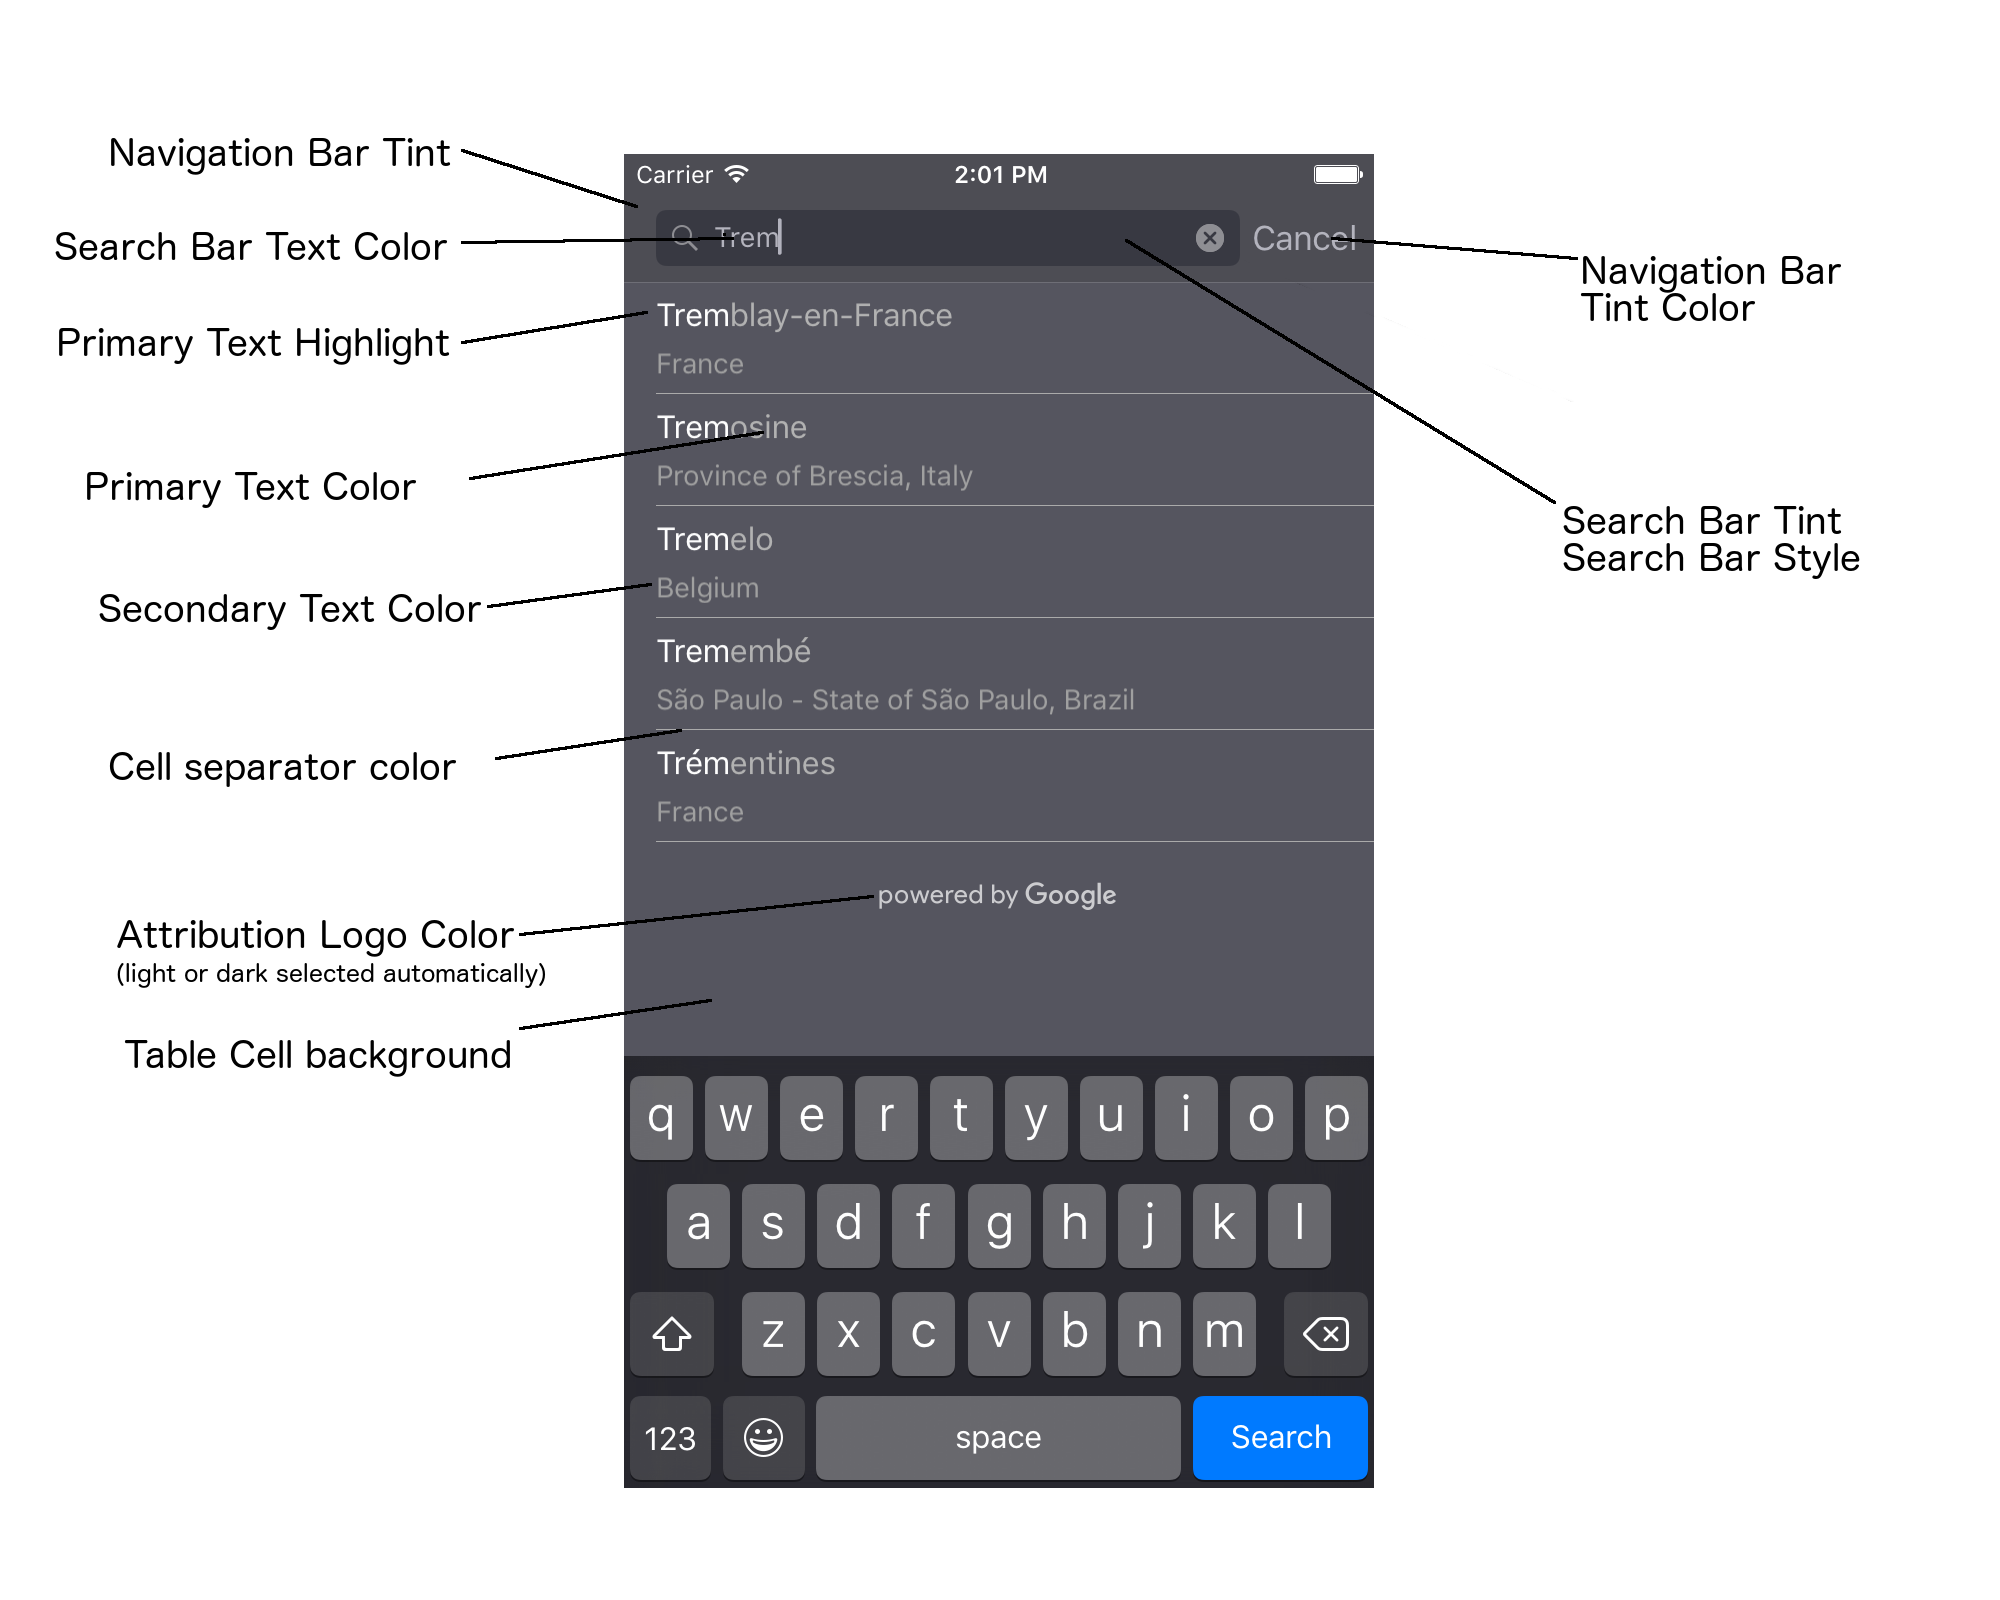
ตารางต่อไปนี้แสดงองค์ประกอบของ UI ทั้งหมด และระบุวิธีที่ ควรมีการจัดรูปแบบ (โปรโตคอล UIAppearance หรือเมธอด SDK)
| องค์ประกอบ UI | วิธีการ | วิธีการแต่งตัว |
|---|---|---|
| การแต้มสีแถบนำทาง (พื้นหลัง) | โปรโตคอล UIAppearance | เรียกใช้ setBarTintColor บนพร็อกซี UINavigationBar |
| สีแต้มของแถบนำทาง (เครื่องหมาย Caret ของข้อความในแถบค้นหาและปุ่มยกเลิก) | โปรโตคอล UIAppearance | เรียกใช้ setTintColor บนพร็อกซี UINavigationBar |
| สีข้อความของแถบค้นหา | โปรโตคอล UIAppearance | ตั้งค่าNSForegroundColorAttributeNameใน searchBarTextAttributes |
| สีแต้มของแถบค้นหา | ไม่มี | แถบค้นหาเป็นแบบโปร่งแสงและจะแสดงเป็นเฉดสี ของแถบนำทาง |
| สีข้อความตัวยึดตำแหน่งของแถบค้นหา (ข้อความค้นหาเริ่มต้น) | โปรโตคอล UIAppearance | ตั้งค่าNSForegroundColorAttributeNameใน placeholderAttributes |
| ข้อความหลัก (ใช้กับข้อความแสดงข้อผิดพลาดและข้อความด้วย) | เมธอดของ SDK | โทรมาที่ primaryTextColor |
| ไฮไลต์ข้อความหลัก | เมธอดของ SDK | โทรมาที่ primaryTextHighlightColor |
| ข้อความรอง | เมธอดของ SDK | โทรมาที่ secondaryTextColor |
| ข้อผิดพลาดและข้อความ | เมธอดของ SDK | โทรมาที่ primaryTextColor |
| พื้นหลังของเซลล์ในตาราง | เมธอดของ SDK | โทรมาที่ tableCellBackgroundColor |
| สีของตัวคั่นเซลล์ในตาราง | เมธอดของ SDK | โทรมาที่ tableCellSeparatorColor |
| "ลองอีกครั้ง" ปุ่ม | เมธอดของ SDK | โทรมาที่ tintColor |
| สัญญาณบอกสถานะกิจกรรม (ไอคอนหมุนแสดงความคืบหน้า) | โปรโตคอล UIAppearance | เรียกใช้ setColor บนพร็อกซี UIActivityIndicatorView |
| "ขับเคลื่อนโดย Google" โลโก้ รูปภาพเมฆเศร้า | ไม่มี | ระบบจะเลือกเวอร์ชันสีขาวหรือสีเทาโดยอัตโนมัติตามคอนทราสต์ของพื้นหลัง |
| ไอคอนแว่นขยายและไอคอนล้างข้อความในช่องข้อความของแถบค้นหา | ไม่มี | หากต้องการจัดรูปแบบ ให้แทนที่รูปภาพเริ่มต้นด้วยรูปภาพสีที่ต้องการ |
การใช้โปรโตคอล UIAppearance
คุณสามารถใช้โปรโตคอล UIAppearance
เพื่อรับพร็อกซีลักษณะที่ปรากฏสำหรับองค์ประกอบ UI ที่กำหนด ซึ่งคุณใช้เพื่อ
กำหนดสีขององค์ประกอบ UI เมื่อมีการแก้ไข ทุกอินสแตนซ์ของ
องค์ประกอบ UI หนึ่งๆ ได้รับผลกระทบ ดูตัวอย่างต่อไปนี้สำหรับทั่วโลก
เปลี่ยนสีข้อความของ UITextField คลาสเป็นสีเขียวเมื่อ
ที่อยู่ใน UISearchBar:
[[UITextField appearanceWhenContainedIn:[UISearchBar class], nil]
    setDefaultTextAttributes:@{NSForegroundColorAttributeName:[UIColor greenColor]}];
หากต้องการข้อมูลเพิ่มเติมเกี่ยวกับการกำหนดค่าสี โปรดดู การอ้างอิงคลาส UIColor
ข้อมูลโค้ดต่อไปนี้แสดงคำสั่งพร็อกซีทั้งหมดที่คุณต้องใช้เพื่อ
จัดรูปแบบทุกอย่างในการควบคุม UI การเติมข้อความอัตโนมัติแบบเต็มหน้าจอ เพิ่มโค้ดนี้
ไปยังเมธอด didFinishLaunchingWithOptions ใน Appdelegate.m:
// Define some colors.
UIColor *darkGray = [UIColor darkGrayColor];
UIColor *lightGray = [UIColor lightGrayColor];

// Navigation bar background.
[[UINavigationBar appearance] setBarTintColor:darkGray];
[[UINavigationBar appearance] setTintColor:lightGray];

// Color of typed text in the search bar.
NSDictionary *searchBarTextAttributes = @{
                                          NSForegroundColorAttributeName: lightGray,
                                          NSFontAttributeName : [UIFont systemFontOfSize:[UIFont systemFontSize]]
                                          };
[UITextField appearanceWhenContainedInInstancesOfClasses:@[[UISearchBar class]]]
    .defaultTextAttributes = searchBarTextAttributes;

// Color of the placeholder text in the search bar prior to text entry.
NSDictionary *placeholderAttributes = @{
                                        NSForegroundColorAttributeName: lightGray,
                                        NSFontAttributeName : [UIFont systemFontOfSize:[UIFont systemFontSize]]
                                        };

// Color of the default search text.
// NOTE: In a production scenario, "Search" would be a localized string.
NSAttributedString *attributedPlaceholder =
[[NSAttributedString alloc] initWithString:@"Search"
                                attributes:placeholderAttributes];
[UITextField appearanceWhenContainedInInstancesOfClasses:@[[UISearchBar class]]]
    .attributedPlaceholder = attributedPlaceholder;

// Color of the in-progress spinner.
[[UIActivityIndicatorView appearance] setColor:lightGray];

// To style the two image icons in the search bar (the magnifying glass
// icon and the 'clear text' icon), replace them with different images.
[[UISearchBar appearance] setImage:[UIImage imageNamed:@"custom_clear_x_high"]
                  forSearchBarIcon:UISearchBarIconClear
                            state:UIControlStateHighlighted];
[[UISearchBar appearance] setImage:[UIImage imageNamed:@"custom_clear_x"]
                  forSearchBarIcon:UISearchBarIconClear
                            state:UIControlStateNormal];
[[UISearchBar appearance] setImage:[UIImage imageNamed:@"custom_search"]
                    forSearchBarIcon:UISearchBarIconSearch
                            state:UIControlStateNormal];

// Color of selected table cells.
UIView *selectedBackgroundView = [[UIView alloc] init];
selectedBackgroundView.backgroundColor = [UIColor lightGrayColor];
[UITableViewCell appearanceWhenContainedIn:[GMSAutocompleteViewController class], nil]
    .selectedBackgroundView = selectedBackgroundView;
การตั้งค่าคุณสมบัติของรูปแบบการควบคุม UI
เซ็ตย่อยขององค์ประกอบการควบคุม UI จะมีพร็อพเพอร์ตี้ที่ไม่ได้รับผลกระทบจาก
โปรโตคอล UIAppearance และต้องตั้งค่าโดยตรง ตัวอย่างโค้ดต่อไปนี้
แสดงสีพื้นหน้าและพื้นหลังที่กำหนด และนำไปใช้กับ UI
อินสแตนซ์ควบคุมที่ชื่อ acController เพิ่มโค้ดนี้ลงใน onLaunchClicked
ใน ViewController.m
UIColor *darkGray = [UIColor darkGrayColor];
UIColor *lightGray = [UIColor lightGrayColor];

acController.secondaryTextColor = [UIColor colorWithWhite:1.0f alpha:0.5f];
acController.primaryTextColor = lightGray;
acController.primaryTextHighlightColor = [UIColor grayColor];
acController.tableCellBackgroundColor = darkGray;
acController.tableCellSeparatorColor = lightGray;
acController.tintColor = lightGray;
การรับการคาดคะเนสถานที่แบบเป็นโปรแกรม
คุณสามารถสร้าง UI การค้นหาที่กำหนดเองเป็นทางเลือกแทน UI ที่ วิดเจ็ตการเติมข้อความอัตโนมัติ โดยแอปต้องได้รับการคาดคะเนสถานที่จึงจะดำเนินการนี้ได้ แบบเป็นโปรแกรม แอปของคุณสามารถรับรายการชื่อสถานที่ที่คาดการณ์ไว้ และ/หรือ ด้วยวิธีใดวิธีหนึ่งต่อไปนี้
กำลังโทรหา GMSPlacesClient findAutocompletePredictionsFromQuery:
ถ้าต้องการดูรายการชื่อและ/หรือที่อยู่สถานที่ที่คาดคะเนไว้ ก่อนอื่น
GMSPlacesClient ที่ชัดเจน
จากนั้นเรียก
GMSPlacesClient findAutocompletePredictionsFromQuery:
ด้วยพารามิเตอร์ต่อไปนี้
- สตริง
autocompleteQueryที่มีข้อความที่ผู้ใช้พิมพ์ GMSAutocompleteSessionTokenซึ่งจะใช้ระบุแต่ละเซสชัน แอปของคุณควร ผ่านโทเค็นเดียวกันสำหรับการเรียกคำขอเติมข้อความอัตโนมัติแต่ละครั้ง จากนั้นส่งโทเค็นนั้น พร้อมด้วยรหัสสถานที่ ในการโทรครั้งต่อๆ ไปไปยังfetchPlacefromPlaceID:เพื่อดึงข้อมูลรายละเอียดสถานที่ของสถานที่ที่ผู้ใช้เลือกGMSAutocompleteFilterไปยัง- ให้น้ำหนักพิเศษหรือจำกัดผลลัพธ์เฉพาะบางภูมิภาค
- จำกัดผลการค้นหาให้แสดงเฉพาะประเภทสถานที่ที่เฉพาะเจาะจง
- ออบเจ็กต์
GMSPlaceLocationBias/ข้อจำกัดที่ให้น้ำหนักผลลัพธ์กับพื้นที่ที่เจาะจงที่ระบุด้วยขอบเขตละติจูดและลองจิจูด
- เมธอด Callback เพื่อจัดการการคาดการณ์ที่ส่งกลับ
ตัวอย่างโค้ดด้านล่างแสดงการเรียกไปยัง findAutocompletePredictionsFromQuery:
Swift
/**
 * Create a new session token. Be sure to use the same token for calling
 * findAutocompletePredictions, as well as the subsequent place details request.
 * This ensures that the user's query and selection are billed as a single session.
 */
let token = GMSAutocompleteSessionToken.init()

// Create a type filter.
let filter = GMSAutocompleteFilter()
filter.types = [.bank]
filter.locationBias = GMSPlaceRectangularLocationOption( northEastBounds,
                                   southWestBounds);

placesClient?.findAutocompletePredictions(fromQuery: "cheesebu",

                                          filter: filter,
                                          sessionToken: token,
                                          callback: { (results, error) in
    if let error = error {
      print("Autocomplete error: \(error)")
      return
    }
    if let results = results {
      for result in results {
        print("Result \(result.attributedFullText) with placeID \(result.placeID)")
      }
    }
})
Objective-C
/**
 * Create a new session token. Be sure to use the same token for calling
 * findAutocompletePredictionsFromQuery:, as well as the subsequent place details request.
 * This ensures that the user's query and selection are billed as a single session.
 */
GMSAutocompleteSessionToken *token = [[GMSAutocompleteSessionToken alloc] init];

// Create a type filter.
GMSAutocompleteFilter *_filter = [[GMSAutocompleteFilter alloc] init];
_filter.types = @[ kGMSPlaceTypeBank ];

[_placesClient findAutocompletePredictionsFromQuery:@"cheesebu"
filter:_filter sessionToken:token callback:^(NSArray<GMSAutocompletePrediction *> * _Nullable results, NSError * _Nullable error) {
  if (error != nil) {
    NSLog(@"An error occurred %@", [error localizedDescription]);
    return;
  }
  if (results != nil) {
    for (GMSAutocompletePrediction *result in results) {
      NSLog(@"Result %@ with PlaceID %@", result.attributedFullText, result.placeID);
    }
  }
}];
API เรียกใช้เมธอด Callback ที่ระบุ โดยส่งผ่านอาร์เรย์ของ
GMSAutocompletePrediction
ออบเจ็กต์
GMSAutocompletePrediction แต่ละรายการ
มีข้อมูลต่อไปนี้
attributedFullText– ข้อความทั้งหมดของการคาดคะเน ในรูปแบบของNSAttributedStringตัวอย่างเช่น "ซิดนีย์โอเปราเฮาส์, ซิดนีย์, นิวเซาท์ เวลส์ ออสเตรเลีย" ทุกช่วงข้อความที่ตรงกับอินพุตของผู้ใช้จะมีค่าkGMSAutocompleteMatchAttributeคุณใช้แอตทริบิวต์นี้เพื่อ ไฮไลต์ข้อความที่ตรงกันในคำค้นหาของผู้ใช้ ดังตัวอย่างต่อไปนี้placeID– รหัสสถานที่ของสถานที่ที่คาดการณ์ รหัสสถานที่คือ ตัวระบุข้อความที่ระบุสถานที่โดยไม่ซ้ำกัน สำหรับข้อมูลเพิ่มเติมเกี่ยวกับ รหัสสถานที่ โปรดดูภาพรวมของรหัสสถานที่distanceMeters– ระยะทางที่เป็นเส้นตรงจากที่ระบุoriginจะถึงจุดหมาย หากไม่ได้ตั้งค่าพร็อพเพอร์ตี้originไว้ ก็จะไม่มีระยะทาง
ตัวอย่างโค้ดต่อไปนี้แสดงวิธีไฮไลต์ส่วนต่างๆ ด้วยตัวหนา
ของผลลัพธ์ที่ตรงกับข้อความในคำค้นหาของผู้ใช้ โดยใช้ enumerateAttribute:
Swift
let regularFont = UIFont.systemFont(ofSize: UIFont.labelFontSize)
let boldFont = UIFont.boldSystemFont(ofSize: UIFont.labelFontSize)

let bolded = prediction.attributedFullText.mutableCopy() as! NSMutableAttributedString
bolded.enumerateAttribute(kGMSAutocompleteMatchAttribute, in: NSMakeRange(0, bolded.length), options: []) {
  (value, range: NSRange, stop: UnsafeMutablePointer<ObjCBool>) -> Void in
    let font = (value == nil) ? regularFont : boldFont
    bolded.addAttribute(NSFontAttributeName, value: font, range: range)
}

label.attributedText = bolded
Objective-C
UIFont *regularFont = [UIFont systemFontOfSize:[UIFont labelFontSize]];
UIFont *boldFont = [UIFont boldSystemFontOfSize:[UIFont labelFontSize]];

NSMutableAttributedString *bolded = [prediction.attributedFullText mutableCopy];
[bolded enumerateAttribute:kGMSAutocompleteMatchAttribute
                   inRange:NSMakeRange(0, bolded.length)
                   options:0
                usingBlock:^(id value, NSRange range, BOOL *stop) {
                  UIFont *font = (value == nil) ? regularFont : boldFont;
                  [bolded addAttribute:NSFontAttributeName value:font range:range];
                }];

label.attributedText = bolded;
การใช้ตัวดึงข้อมูล
หากคุณต้องการสร้างการควบคุมการเติมข้อความอัตโนมัติเองตั้งแต่ต้น คุณสามารถใช้
GMSAutocompleteFetcher
ซึ่งรวมเมธอด autocompleteQuery ใน GMSPlacesClient
ตัวดึงข้อมูลจะควบคุมคำขอ โดยแสดงผลเฉพาะผลลัพธ์สำหรับล่าสุด
ป้อนข้อความค้นหา และไม่มีองค์ประกอบ UI
หากต้องการติดตั้งใช้งาน GMSAutocompleteFetcher
ให้ทำตามขั้นตอนต่อไปนี้
- ใช้
GMSAutocompleteFetcherDelegate - สร้างออบเจ็กต์
GMSAutocompleteFetcher - เรียก
sourceTextHasChangedในตัวดึงข้อมูลเมื่อผู้ใช้พิมพ์ - จัดการการคาดคะเนและข้อผิดพลาดโดยใช้
didAutcompleteWithPredictionsและdidFailAutocompleteWithErrorเมธอดที่สุด
ตัวอย่างโค้ดต่อไปนี้สาธิตการใช้ตัวดึงข้อมูลเพื่อรับอินพุตของผู้ใช้
และแสดงสถานที่ที่ตรงกันในมุมมองข้อความ ฟังก์ชันสำหรับการเลือกสถานที่
ถูกละเว้น FetcherSampleViewController มาจาก UIViewController
ใน FetcherSampleViewController.h.
Swift
import UIKit
import GooglePlaces

class ViewController: UIViewController {

  var textField: UITextField?
  var resultText: UITextView?
  var fetcher: GMSAutocompleteFetcher?

  override func viewDidLoad() {
    super.viewDidLoad()

    view.backgroundColor = .white
    edgesForExtendedLayout = []

    // Set bounds to inner-west Sydney Australia.
    let neBoundsCorner = CLLocationCoordinate2D(latitude: -33.843366,
                                                longitude: 151.134002)
    let swBoundsCorner = CLLocationCoordinate2D(latitude: -33.875725,
                                                longitude: 151.200349)

    // Set up the autocomplete filter.
    let filter = GMSAutocompleteFilter()
    filter.locationRestriction = GMSPlaceRectangularLocationOption(neBoundsCorner, swBoundsCorner)

    // Create a new session token.
    let token: GMSAutocompleteSessionToken = GMSAutocompleteSessionToken.init()

    // Create the fetcher.
    fetcher = GMSAutocompleteFetcher(bounds: nil, filter: filter)
    fetcher?.delegate = self
    fetcher?.provide(token)

    textField = UITextField(frame: CGRect(x: 5.0, y: 10.0,
                                          width: view.bounds.size.width - 5.0,
                                          height: 64.0))
    textField?.autoresizingMask = .flexibleWidth
    textField?.addTarget(self, action: #selector(textFieldDidChange(textField:)),
                         for: .editingChanged)
    let placeholder = NSAttributedString(string: "Type a query...")

    textField?.attributedPlaceholder = placeholder

    resultText = UITextView(frame: CGRect(x: 0, y: 65.0,
                                          width: view.bounds.size.width,
                                          height: view.bounds.size.height - 65.0))
    resultText?.backgroundColor = UIColor(white: 0.95, alpha: 1.0)
    resultText?.text = "No Results"
    resultText?.isEditable = false

    self.view.addSubview(textField!)
    self.view.addSubview(resultText!)
  }

  @objc func textFieldDidChange(textField: UITextField) {
    fetcher?.sourceTextHasChanged(textField.text!)
  }

}

extension ViewController: GMSAutocompleteFetcherDelegate {
  func didAutocomplete(with predictions: [GMSAutocompletePrediction]) {
    let resultsStr = NSMutableString()
    for prediction in predictions {
      resultsStr.appendFormat("\n Primary text: %@\n", prediction.attributedPrimaryText)
      resultsStr.appendFormat("Place ID: %@\n", prediction.placeID)
    }

    resultText?.text = resultsStr as String
  }

  func didFailAutocompleteWithError(_ error: Error) {
    resultText?.text = error.localizedDescription
  }
}
Objective-C
#import "FetcherSampleViewController.h"
#import <GooglePlaces/GooglePlaces.h>
#import <GoogleMapsBase/GoogleMapsBase.h>

@interface FetcherSampleViewController () <GMSAutocompleteFetcherDelegate>

@end

@implementation FetcherSampleViewController {
  UITextField *_textField;
  UITextView *_resultText;
  GMSAutocompleteFetcher* _fetcher;
}

- (void)viewDidLoad {
  [super viewDidLoad];

  self.view.backgroundColor = [UIColor whiteColor];
  self.edgesForExtendedLayout = UIRectEdgeNone;

  // Set bounds to inner-west Sydney Australia.
  CLLocationCoordinate2D neBoundsCorner = CLLocationCoordinate2DMake(-33.843366, 151.134002);
  CLLocationCoordinate2D swBoundsCorner = CLLocationCoordinate2DMake(-33.875725, 151.200349);

  GMSAutocompleteFilter *autocompleteFilter = [[GMSAutocompleteFilter alloc] init];
  autocompleteFilter.locationRestriction =
        GMSPlaceRectangularLocationOption(neBoundsCorner, swBoundsCorner);

  // Create the fetcher.
  _fetcher = [[GMSAutocompleteFetcher alloc] initWithBounds:nil
                                                     filter:filter];
  _fetcher.delegate = self;

  // Set up the UITextField and UITextView.
  _textField = [[UITextField alloc] initWithFrame:CGRectMake(5.0f,
                                                             0,
                                                             self.view.bounds.size.width - 5.0f,
                                                             44.0f)];
  _textField.autoresizingMask = UIViewAutoresizingFlexibleWidth;
  [_textField addTarget:self
                 action:@selector(textFieldDidChange:)
       forControlEvents:UIControlEventEditingChanged];
  _resultText =[[UITextView alloc] initWithFrame:CGRectMake(0,
                                                            45.0f,
                                                            self.view.bounds.size.width,
                                                            self.view.bounds.size.height - 45.0f)];
  _resultText.backgroundColor = [UIColor colorWithWhite:0.95f alpha:1.0f];
  _resultText.text = @"No Results";
  _resultText.editable = NO;
  [self.view addSubview:_textField];
  [self.view addSubview:_resultText];
}

- (void)textFieldDidChange:(UITextField *)textField {
  NSLog(@"%@", textField.text);
  [_fetcher sourceTextHasChanged:textField.text];
}

#pragma mark - GMSAutocompleteFetcherDelegate
- (void)didAutocompleteWithPredictions:(NSArray *)predictions {
  NSMutableString *resultsStr = [NSMutableString string];
  for (GMSAutocompletePrediction *prediction in predictions) {
      [resultsStr appendFormat:@"%@\n", [prediction.attributedPrimaryText string]];
  }
  _resultText.text = resultsStr;
}

- (void)didFailAutocompleteWithError:(NSError *)error {
  _resultText.text = [NSString stringWithFormat:@"%@", error.localizedDescription];
}

@end
โทเค็นของเซสชัน
โทเค็นเซสชันจะจัดกลุ่มขั้นตอนการค้นหาและการเลือกของการเติมข้อความอัตโนมัติของผู้ใช้ ค้นหาในเซสชันที่แยกกันโดยสิ้นเชิงเพื่อจุดประสงค์ในการเรียกเก็บเงิน เซสชันจะเริ่มต้นเมื่อ ผู้ใช้เริ่มพิมพ์ข้อความค้นหา และสรุปผลเมื่อเลือกสถานที่ ชิ้น สามารถมีการค้นหาได้หลายรายการ ตามด้วยตัวเลือกสถานที่ 1 แห่ง เมื่อ สิ้นสุดเซสชันแล้ว โทเค็นจะใช้ไม่ได้อีกต่อไป แอปของคุณจะต้องสร้าง โทเค็นใหม่สำหรับแต่ละเซสชัน เราขอแนะนำให้ใช้โทเค็นเซสชัน เซสชันการเติมข้อความอัตโนมัติแบบเป็นโปรแกรม (เมื่อคุณใช้ตัวควบคุมแบบเต็มหน้าจอ หรือเครื่องมือควบคุมผลลัพธ์ API จะดูแลเรื่องนี้โดยอัตโนมัติ)
Places SDK สำหรับ iOS ใช้GMSAutocompleteSessionToken
เพื่อระบุแต่ละเซสชัน แอปของคุณควรส่งโทเค็นเซสชันใหม่ให้
เริ่มต้นแต่ละเซสชันใหม่ แล้วส่งโทเค็นเดียวกันนั้น พร้อมกับรหัสสถานที่
ในการโทรครั้งต่อๆ ไปของ fetchPlacefromPlaceID:
เพื่อดึงข้อมูลรายละเอียดสถานที่ของสถานที่ที่ผู้ใช้เลือก
ดูข้อมูลเพิ่มเติมเกี่ยวกับโทเค็นของเซสชัน
ใช้รหัสต่อไปนี้เพื่อสร้างโทเค็นเซสชันใหม่
let token: GMSAutocompleteSessionToken = GMSAutocompleteSessionToken.init()
ขีดจำกัดการใช้งาน
- การใช้
GMSPlacesClient findAutocompletePredictionsFromQueryจะขึ้นอยู่กับขีดจำกัดการค้นหาตามลำดับขั้น ดูเอกสารใน ขีดจำกัดการใช้งาน
กำลังแสดงการระบุแหล่งที่มาในแอปของคุณ
- หากแอปใช้บริการเติมข้อความอัตโนมัติแบบเป็นโปรแกรม UI จะต้อง แสดงหน้าจอ "ขับเคลื่อนโดย Google" หรือปรากฏใน แผนที่ที่เป็นแบรนด์ Google
- หากแอปใช้การควบคุม UI การเติมข้อความอัตโนมัติ คุณก็ไม่ต้องดำเนินการใดๆ เพิ่มเติม (การระบุแหล่งที่มาที่จำเป็นจะแสดงโดยค่าเริ่มต้น)
- หากคุณเรียกและแสดงข้อมูลสถานที่เพิ่มเติมหลังจาก การขอข้อมูลสถานที่ด้วยรหัส คุณจะต้องแสดงการระบุแหล่งที่มาของบุคคลที่สามด้วย
ดูรายละเอียดเพิ่มเติมได้ในเอกสาร การระบุแหล่งที่มา
การควบคุมสัญญาณบอกสถานะกิจกรรมเครือข่าย
หากต้องการควบคุมสัญญาณบอกสถานะกิจกรรมเครือข่ายในแถบสถานะของแอปพลิเคชัน ต้องใช้วิธีการผู้รับมอบสิทธิ์ที่เป็นตัวเลือกที่เหมาะสมสำหรับการเติมข้อความอัตโนมัติ ที่คุณกำลังใช้งานอยู่ จากนั้นเปิดและปิดสัญญาณบอกสถานะเครือข่ายด้วยตัวคุณเอง
- สำหรับ
GMSAutocompleteViewControllerคุณต้องใช้เมธอดผู้รับมอบสิทธิ์didRequestAutocompletePredictions:และdidUpdateAutocompletePredictions: - สำหรับ
GMSAutocompleteResultsViewControllerคุณต้องใช้เมธอดผู้รับมอบสิทธิ์didRequestAutocompletePredictionsForResultsController:และdidUpdateAutocompletePredictionsForResultsController: - สำหรับ
GMSAutocompleteTableDataSourceคุณต้องใช้เมธอดผู้รับมอบสิทธิ์didRequestAutocompletePredictionsForTableDataSource:และdidUpdateAutocompletePredictionsForTableDataSource:
การใช้วิธีการและการตั้งค่า [UIApplication sharedApplication].networkActivityIndicatorVisible เหล่านี้
ถึง YES และ NO ตามลำดับ แถบสถานะจะจับคู่กับ
UI ที่เติมข้อความอัตโนมัติ
จำกัดผลลัพธ์ของการเติมข้อความอัตโนมัติ
คุณสามารถตั้งค่าการควบคุม UI การเติมข้อความอัตโนมัติเพื่อจำกัดผลลัพธ์เป็น ตามพื้นที่ทางภูมิศาสตร์ และ/หรือกรองผลลัพธ์เป็น 1 ประเภทขึ้นไป หรือเพื่อ ประเทศที่ต้องการ หากต้องการจำกัดผลลัพธ์ คุณสามารถทำดังต่อไปนี้
- หากต้องการเลือกใช้ผลลัพธ์ (การให้น้ำหนักพิเศษ) ภายในภูมิภาคที่กำหนด ให้ตั้งค่า
locationBiasเป็นเปิดGMSAutocompleteFilter(ผลการค้นหาบางส่วนจากภายนอกภูมิภาคที่กำหนดไว้อาจ การส่งคืน) หากตั้งค่าlocationRestrictionไว้ด้วย ระบบจะไม่สนใจlocationBias หากต้องการแสดงเฉพาะ (จำกัด) ผลการค้นหาภายในภูมิภาคที่กำหนด ให้ตั้งค่า
locationRestrictionในGMSAutocompleteFilter(เฉพาะผลลัพธ์ภายใน ระบบจะแสดงผลภูมิภาคที่กำหนด)- หมายเหตุ: ข้อจำกัดนี้มีผลกับทั้งเส้นทาง ทั้งเส้นสังเคราะห์ อาจมีการแสดงผลลัพธ์ที่อยู่นอกขอบเขตสี่เหลี่ยมผืนผ้าตามเส้นทาง ที่ทับซ้อนกับการจำกัดสถานที่
หากต้องการให้แสดงเฉพาะผลลัพธ์ที่สอดคล้องกับประเภทสถานที่หนึ่งๆ ให้ตั้งค่า
typesในGMSAutocompleteFilter(เช่น การระบุ TypeFilter.ADDRESS จะทำให้วิดเจ็ตแสดงเฉพาะผลลัพธ์ที่มีที่อยู่ที่แน่นอน)หากต้องการให้แสดงเฉพาะผลลัพธ์ภายใน 5 ประเทศที่ระบุ ให้ตั้งค่า
countriesในวันที่GMSAutocompleteFilter
ผลลัพธ์การให้น้ำหนักพิเศษกับภูมิภาคที่เฉพาะเจาะจง
หากต้องการเลือกใช้ผลลัพธ์ (การให้น้ำหนักพิเศษ) ภายในภูมิภาคที่กำหนด ให้ตั้งค่า locationBias เป็นเปิด
GMSAutocompleteFilter ตามที่แสดงอยู่ด้านล่างนี้
  northEast = CLLocationCoordinate2DMake(39.0, -95.0);
  southWest = CLLocationCoordinate2DMake(37.5, -100.0);
  GMSAutocompleteFilter *filter = [[GMSAutocompleteFilter alloc] init];
  filter.locationBias = GMSPlaceRectangularLocationOption(northEast, southWest);
จำกัดผลการค้นหาไปยังภูมิภาคที่เฉพาะเจาะจง
หากต้องการแสดงเฉพาะ (จำกัด) ผลการค้นหาภายในภูมิภาคที่กำหนด ให้ตั้งค่า
locationRestriction บน GMSAutocompleteFilter ดังที่แสดงที่นี่:
  northEast = CLLocationCoordinate2DMake(39.0, -95.0);
  southWest = CLLocationCoordinate2DMake(37.5, -100.0);
  GMSAutocompleteFilter *filter = [[GMSAutocompleteFilter alloc] init];
  filter.locationRestriction = GMSPlaceRectangularLocationOption(northEast, southWest);
กรองผลการค้นหาตามประเทศ
หากต้องการกรองผลการค้นหาภายใน 5 ประเทศที่ระบุ ให้ตั้งค่า countries เป็น
GMSAutocompleteFilter ตามที่แสดงไว้ที่นี่
  GMSAutocompleteFilter *filter = [[GMSAutocompleteFilter alloc] init];
  filter.countries = @[ @"au", @"nz" ];
กรองผลการค้นหาตามประเภทสถานที่หรือคอลเล็กชันของประเภท
จำกัดผลการค้นหาเป็นประเภทหรือประเภทคอลเล็กชันที่กำหนดด้วยการตั้งค่า
พร็อพเพอร์ตี้ types ของ
GMSAutoCompleteFilter
ใช้พร็อพเพอร์ตี้นี้เพื่อระบุตัวกรองที่แสดงในตารางที่ 1, 2 และ 3
ประเภทสถานที่ หากไม่ได้ระบุอะไรไว้ ระบบจะแสดงผลทุกประเภท
ในการระบุประเภทหรือตัวกรองคอลเล็กชัน
ใช้พร็อพเพอร์ตี้
typesเพื่อระบุค่า type ได้สูงสุด 5 ค่าจากตาราง 1 และตาราง 2 ซึ่งแสดงในประเภทสถานที่ ค่าประเภทคือ ที่กำหนดโดยค่าคงที่ในGMSPlaceTypeใช้พร็อพเพอร์ตี้
typesเพื่อระบุคอลเล็กชันประเภทจากตารางที่ 3 ที่แสดง เกี่ยวกับประเภทสถานที่ ค่าการรวบรวมประเภทกำหนดโดย ค่าคงที่ในGMSPlaceTypeคำขอจะมีเพียงประเภทเดียวจากตาราง 3 หากคุณระบุ จากตาราง 3 คุณไม่สามารถระบุค่าจากตาราง 1 หรือตาราง 2 ได้ ถ้า แล้วเกิดข้อผิดพลาดขึ้น
ตัวอย่างเช่น หากต้องการให้แสดงเฉพาะผลลัพธ์ที่สอดคล้องกับประเภทสถานที่หนึ่งๆ ให้ตั้งค่า
types ในวันที่ GMSAutocompleteFilter ตัวอย่างต่อไปนี้จะแสดงการตั้งค่า
ตัวกรองเพื่อแสดงเฉพาะผลลัพธ์ที่มีที่อยู่ที่ถูกต้อง:
  GMSAutocompleteFilter *filter = [[GMSAutocompleteFilter alloc] init];
  filter.types = @[ kGMSPlaceTypeAirport, kGMSPlaceTypeAmusementPark ];
การเพิ่มประสิทธิภาพการเติมข้อความอัตโนมัติในสถานที่
ส่วนนี้จะอธิบายแนวทางปฏิบัติแนะนำเพื่อช่วยให้คุณใช้ประโยชน์สูงสุดจาก วางบริการเติมข้อความอัตโนมัติ
หลักเกณฑ์ทั่วไปมีดังนี้
- วิธีที่รวดเร็วที่สุดในการพัฒนาอินเทอร์เฟซผู้ใช้ที่ใช้งานได้คือการใช้ วิดเจ็ตเติมข้อความอัตโนมัติของ Maps JavaScript API วิดเจ็ตเติมข้อความอัตโนมัติของ Places SDK สำหรับ Android หรือ Places SDK สำหรับ iOS การควบคุม UI การเติมข้อความอัตโนมัติ
- พัฒนาความเข้าใจเกี่ยวกับการเติมข้อความอัตโนมัติที่จำเป็นเกี่ยวกับสถานที่ ฟิลด์ข้อมูลตั้งแต่ต้น
- ฟิลด์การให้น้ำหนักสถานที่และการจำกัดตำแหน่งเป็นฟิลด์ที่ไม่บังคับแต่สามารถใส่ได้ จะมีผลอย่างมากต่อประสิทธิภาพการเติมข้อความอัตโนมัติ
- ใช้การจัดการข้อผิดพลาดเพื่อดูแลให้แอปมีประสิทธิภาพลดลง หาก API แสดงผลข้อผิดพลาด
- ตรวจสอบว่าแอปของคุณแฮนเดิลเมื่อไม่ได้เลือกและเสนอทางเลือกให้กับผู้ใช้ เพื่อดำเนินการต่อ
แนวทางปฏิบัติแนะนำในการเพิ่มประสิทธิภาพต้นทุน
การเพิ่มประสิทธิภาพต้นทุนขั้นพื้นฐาน
เพิ่มความคุ้มค่าในการใช้การเติมข้อความอัตโนมัติในสถานที่ ให้ใช้มาสก์ฟิลด์ในรายละเอียดสถานที่ และวิดเจ็ตเติมข้อความอัตโนมัติเพื่อแสดงผลเฉพาะ วางฟิลด์ข้อมูลที่ต้องการ
การเพิ่มประสิทธิภาพต้นทุนขั้นสูง
พิจารณาการใช้การเติมข้อความอัตโนมัติแบบเป็นโปรแกรมเพื่อเข้าถึงการกำหนดราคาตามคำขอ และขอผลลัพธ์ Geocoding API เกี่ยวกับสถานที่ที่เลือกแทนรายละเอียดสถานที่ ราคาต่อคําขอที่จับคู่กับ Geocoding API จะคุ้มค่ากว่าราคาแบบต่อเซสชัน (ตามเซสชัน) หากเป็นไปตามเงื่อนไขทั้ง 2 ข้อต่อไปนี้
- หากคุณต้องการเพียงละติจูด/ลองจิจูดหรือที่อยู่ของสถานที่ที่ผู้ใช้เลือกเท่านั้น Geocoding API จะส่งข้อมูลนี้ให้น้อยกว่าการโทรรายละเอียดสถานที่
- หากผู้ใช้เลือกการคาดคะเนการเติมข้อความอัตโนมัติภายในคำขอการคาดการณ์การเติมข้อความอัตโนมัติโดยเฉลี่ย 4 คำขอหรือน้อยกว่า การกำหนดราคาต่อคำขออาจคุ้มค่ากว่าการกำหนดราคาต่อเซสชัน
แอปพลิเคชันของคุณต้องการข้อมูลอื่นๆ นอกเหนือจากที่อยู่และละติจูด/ลองจิจูดของการคาดการณ์ที่เลือกไหม
ใช่ ต้องขอรายละเอียดเพิ่มเติม
ใช้การเติมข้อความอัตโนมัติเกี่ยวกับสถานที่ตามเซสชันพร้อมรายละเอียดสถานที่
เนื่องจากแอปพลิเคชันของคุณจำเป็นต้องมีรายละเอียดสถานที่ เช่น ชื่อสถานที่ สถานะธุรกิจ หรือเวลาทำการ การเติมข้อมูลสถานที่อัตโนมัติจึงควรใช้โทเค็นเซสชัน (แบบเป็นโปรแกรมหรือมีอยู่ในวิดเจ็ต JavaScript, Android หรือ iOS) โดยมีค่าใช้จ่ายรวม $0.017 ต่อเซสชัน และ SKU ข้อมูลสถานที่ โดยขึ้นอยู่กับช่องข้อมูลสถานที่ที่คุณขอ
การใช้งานวิดเจ็ต
การจัดการเซสชันจะรวมอยู่ในวิดเจ็ต JavaScript, Android หรือ iOS โดยอัตโนมัติ ซึ่งรวมทั้งคำขอเติมข้อความอัตโนมัติและคำขอรายละเอียดสถานที่ในการคาดการณ์ที่เลือก อย่าลืมระบุพารามิเตอร์ fields เพื่อให้แน่ใจว่าคุณขอเฉพาะ
วางฟิลด์ข้อมูลที่ต้องการ
การใช้งานแบบเป็นโปรแกรม
ใช้โทเค็นเซสชันกับคำขอเติมข้อความอัตโนมัติเกี่ยวกับสถานที่ เมื่อขอรายละเอียดสถานที่เกี่ยวกับการคาดการณ์ที่เลือก ให้ใส่พารามิเตอร์ต่อไปนี้
- รหัสสถานที่จากการตอบกลับการเติมข้อความอัตโนมัติในสถานที่
- โทเค็นเซสชันที่ใช้ในคำขอเติมข้อความอัตโนมัติเกี่ยวกับสถานที่
- พารามิเตอร์
fieldsที่ระบุ วางฟิลด์ข้อมูลที่ต้องการ
ไม่ ต้องใช้เฉพาะที่อยู่และตำแหน่งเท่านั้น
Geocoding API จะเป็นตัวเลือกที่คุ้มค่ากว่า รายละเอียดสถานที่ สำหรับแอปพลิเคชันของคุณ ทั้งนี้ขึ้นอยู่กับประสิทธิภาพของการใช้งานการเติมข้อความอัตโนมัติใน Place ของคุณ ประสิทธิภาพการเติมข้อความอัตโนมัติของแอปพลิเคชันทุกตัวจะแตกต่างกันไปโดยขึ้นอยู่กับสิ่งที่ผู้ใช้ป้อน ตำแหน่งที่ใช้แอปพลิเคชัน และมีการใช้งานแนวทางปฏิบัติแนะนำสำหรับการเพิ่มประสิทธิภาพหรือไม่
ในการตอบคำถามต่อไปนี้ ให้วิเคราะห์ว่าผู้ใช้พิมพ์โดยเฉลี่ยกี่ตัว ก่อนที่จะเลือกการคาดคะเนการเติมข้อความอัตโนมัติในแอปพลิเคชันของคุณ
ผู้ใช้เลือกการคาดคะเนการเติมข้อความอัตโนมัติใน 4 คำขอโดยเฉลี่ยหรือไม่
ใช่
ใช้การเติมข้อความอัตโนมัติในสถานที่แบบเป็นโปรแกรมโดยไม่ต้องใช้โทเค็นเซสชันและเรียกใช้ Geocoding API ในการคาดการณ์สถานที่ที่เลือก
Geocoding API จะแสดงที่อยู่และพิกัดละติจูด/ลองจิจูดในราคา $0.005 ต่อคำขอ การส่งคำขอเติมข้อความอัตโนมัติเกี่ยวกับสถานที่ - ต่อคำขอ 4 รายการมีค่าใช้จ่าย $0.01132 ดังนั้นค่าใช้จ่ายทั้งหมดของคำขอ 4 รายการพร้อมการเรียก Geocoding API เกี่ยวกับการคาดการณ์สถานที่ที่เลือกจะเป็น $0.01632 ซึ่งต่ำกว่าราคาการเติมข้อความอัตโนมัติต่อเซสชันที่ $0.017 ต่อเซสชัน1
ลองใช้แนวทางปฏิบัติแนะนำด้านประสิทธิภาพเพื่อช่วยให้ผู้ใช้ได้รับการคาดการณ์ที่ต้องการโดยใช้อักขระน้อยลง
ไม่ได้
ใช้การเติมข้อความอัตโนมัติเกี่ยวกับสถานที่ตามเซสชันพร้อมรายละเอียดสถานที่
เนื่องจากจำนวนคำขอเฉลี่ยที่คุณคาดว่าจะสร้างก่อนที่ผู้ใช้จะเลือกการคาดการณ์การเติมข้อความอัตโนมัติเกินราคาต่อเซสชัน การใช้การเติมข้อความอัตโนมัติในสถานที่ควรใช้โทเค็นเซสชันสำหรับทั้งคำขอเติมข้อความอัตโนมัติและคำขอรายละเอียดสถานที่ที่เกี่ยวข้อง โดยมีค่าใช้จ่ายรวม $0.017 ต่อเซสชัน1
การใช้งานวิดเจ็ต
การจัดการเซสชันจะรวมอยู่ในวิดเจ็ต JavaScript, Android หรือ iOS โดยอัตโนมัติ ซึ่งรวมทั้งคำขอเติมข้อความอัตโนมัติและคำขอรายละเอียดสถานที่ในการคาดการณ์ที่เลือก ตรวจสอบว่าได้ระบุพารามิเตอร์ fields แล้ว เพื่อให้แน่ใจว่าคุณขอเฉพาะช่องข้อมูลพื้นฐาน
การใช้งานแบบเป็นโปรแกรม
ใช้โทเค็นเซสชันกับคำขอเติมข้อความอัตโนมัติเกี่ยวกับสถานที่ เมื่อขอรายละเอียดสถานที่เกี่ยวกับการคาดการณ์ที่เลือก ให้ใส่พารามิเตอร์ต่อไปนี้
- รหัสสถานที่จากการตอบกลับการเติมข้อความอัตโนมัติในสถานที่
- โทเค็นเซสชันที่ใช้ในคำขอเติมข้อความอัตโนมัติเกี่ยวกับสถานที่
- พารามิเตอร์
fieldsที่ระบุช่องข้อมูลพื้นฐาน เช่น ที่อยู่และเรขาคณิต
พิจารณาชะลอคำขอเติมสถานที่อัตโนมัติ
คุณสามารถใช้กลยุทธ์ต่างๆ เช่น ชะลอคำขอเติมสถานที่อัตโนมัติ จนกว่าผู้ใช้จะพิมพ์อักขระ 3 หรือ 4 ตัวแรกเพื่อให้แอปพลิเคชันส่งคำขอน้อยลง ตัวอย่างเช่น การสร้างคำขอการเติมข้อความอัตโนมัติสำหรับแต่ละอักขระหลังจากที่ผู้ใช้พิมพ์อักขระตัวที่ 3 หมายความว่าหากผู้ใช้พิมพ์อักขระตัวที่ 3 ตัว จากนั้นจะเลือกการคาดคะเนที่คุณขอ Geocoding API 1 รายการ ค่าใช้จ่ายรวมจะเท่ากับ $0.01632 (4 * $0.00283 การเติมข้อความอัตโนมัติต่อคำขอ + $0.005)1
หากความล่าช้าของคำขออาจทำให้คำขอแบบเป็นโปรแกรมโดยเฉลี่ยต่ำกว่า 4 ครั้ง คุณสามารถทำตามคำแนะนำในการใช้งานการเติมข้อความอัตโนมัติเกี่ยวกับสถานที่ด้วย Geocoding API ที่มีประสิทธิภาพ โปรดทราบว่าคำขอล่าช้าอาจถูกมองว่าเป็นเวลาในการตอบสนองโดยผู้ใช้ที่อาจคาดว่าจะเห็นการคาดการณ์ทุกครั้งที่กดแป้นพิมพ์ใหม่
ลองใช้แนวทางปฏิบัติแนะนำด้านประสิทธิภาพเพื่อช่วยให้ผู้ใช้ได้รับการคาดการณ์ที่ต้องการโดยใช้อักขระน้อยลง
-
ค่าใช้จ่ายที่แสดงที่นี่เป็นสกุลเงิน USD โปรดดูหน้าการเรียกเก็บเงินของ Google Maps Platform สำหรับข้อมูลราคาทั้งหมด
แนวทางปฏิบัติแนะนำด้านประสิทธิภาพ
หลักเกณฑ์ต่อไปนี้อธิบายวิธีเพิ่มประสิทธิภาพการเติมข้อความอัตโนมัติในสถานที่
- เพิ่มข้อจำกัดประเทศ การให้น้ำหนักตำแหน่ง และ (สำหรับการติดตั้งแบบเป็นโปรแกรม) ค่ากำหนดภาษาเป็นการเติมข้อความอัตโนมัติในสถานที่ของคุณ การใช้งานของคุณ ไม่จำเป็นต้องตั้งค่าภาษา กับวิดเจ็ตเพราะจะเลือกค่ากำหนดภาษาจากเบราว์เซอร์หรืออุปกรณ์เคลื่อนที่ของผู้ใช้
- หากมีการเติมข้อมูลสถานที่อัตโนมัติปรากฏพร้อมกับแผนที่ คุณสามารถให้น้ำหนักกับตำแหน่งตามวิวพอร์ตของแผนที่ได้
- ในกรณีที่ผู้ใช้ไม่ได้เลือกการคาดคะเนการเติมข้อความอัตโนมัติใดๆ โดยปกติ
เนื่องจากการคาดคะเนเหล่านั้นไม่ใช่ที่อยู่ผลลัพธ์ที่ต้องการ คุณจึงสามารถใช้ที่อยู่เดิม
ข้อมูลจากผู้ใช้เพื่อพยายามให้ได้ผลการค้นหาที่เกี่ยวข้องมากขึ้น:
- ถ้าคุณคาดว่าผู้ใช้จะป้อนข้อมูลที่อยู่อย่างเดียว โปรดใช้ข้อมูลเดิมของผู้ใช้ซ้ำ ในการเรียกใช้ Geocoding API
- หากคุณคาดหวังให้ผู้ใช้ป้อนคำค้นหาสถานที่ใดสถานที่หนึ่งตามชื่อหรือที่อยู่ ให้ใช้คำขอค้นหาสถานที่ หากต้องการผลลัพธ์เฉพาะในภูมิภาคที่กำหนด ให้ใช้ การให้น้ำหนักตำแหน่ง
- ผู้ใช้ป้อนที่อยู่ย่อยในประเทศที่รองรับการเติมข้อความอัตโนมัติ ที่อยู่สถานที่ย่อยไม่สมบูรณ์ เช่น เช็กเกีย เอสโตเนีย และลิทัวเนีย ตัวอย่างเช่น พารามิเตอร์ ที่อยู่ภาษาเช็ก "Stroupeการสมัครnického 3191/17, Praha" ให้การคาดการณ์บางส่วนใน Place เติมข้อความอัตโนมัติ
- ผู้ใช้ป้อนที่อยู่โดยขึ้นต้นด้วยถนนส่วน เช่น "23-30 29th St, Queens" ใน นิวยอร์กซิตี้ หรือ "47-380 Kamehameha Hwy, Kaneohe" บนเกาะคาไวในฮาวาย
การแก้ปัญหา
แม้ว่าจะเกิดข้อผิดพลาดได้มากมาย แต่ข้อผิดพลาดส่วนใหญ่ ที่มีโอกาสพบได้นั้น มักเกิดจากข้อผิดพลาดในการกำหนดค่า (สำหรับ ตัวอย่างเช่น มีการใช้คีย์ API ที่ไม่ถูกต้อง หรือมีการกำหนดค่าคีย์ API ไม่ถูกต้อง) หรือข้อผิดพลาดเกี่ยวกับโควต้า (แอปของคุณเกินโควต้าแล้ว) โปรดดู ขีดจำกัดการใช้งาน เพื่อดูข้อมูลเพิ่มเติมเกี่ยวกับโควต้า
ข้อผิดพลาดที่เกิดขึ้นในการใช้การควบคุมการเติมข้อความอัตโนมัติจะส่งคืนใน
didFailAutocompleteWithError() ของโปรโตคอลผู้รับมอบสิทธิ์ต่างๆ
พร็อพเพอร์ตี้ code ของออบเจ็กต์ NSError ที่ระบุมีการตั้งค่าเป็นค่าใดค่าหนึ่งของ
การแจกแจง GMSPlacesErrorCode