
在启用结算功能并创建 API 密钥后,设置用于开发应用的 Xcode 项目。
每个版本都有版本说明。
第 1 步:安装所需的软件
若要使用 Maps SDK for iOS 构建项目,请下载并安装:
- Xcode 版本 26.0 或更高版本
第 2 步:创建 Xcode 项目并安装 Maps SDK for iOS
SDK 安装大小各不相同。例如,Maps SDK for iOS 版本 9.0 的安装大小约为 18 MB。
Swift Package Manager
可以通过 Swift Package Manager 安装 Maps SDK for iOS。如需添加 SDK,请确保您已移除所有现有的 Maps SDK for iOS 依赖项。
如需将 SDK 添加到新的或现有项目,请按以下步骤操作:
-
打开 Xcode
project或workspace,然后前往 File > Add Package Dependencies。 - 输入 https://github.com/googlemaps/ios-maps-sdk 作为网址,按 Enter 键拉取软件包,然后点击“Add Package”(添加软件包)。
-
如需安装特定
version,请将依赖项规则字段设置为基于版本的选项之一。对于新项目,我们建议指定最新版本并使用“确切版本”选项。完成后,点击“添加套餐”。
如需更新现有项目的 package,请按以下步骤操作:
如果您要从 9.0.0 之前的版本升级,则必须在升级后移除以下依赖项:
GoogleMapsBase、GoogleMapsCore和GoogleMapsM4B。请勿移除GoogleMaps的依赖项。如需了解详情,请参阅版本 9.0.0 的版本说明。在 Xcode 项目配置设置中,找到 Frameworks, Libraries, and Embedded Content(框架、库和嵌入内容)。使用减号(-) 移除以下框架:
GoogleMapsBase(仅适用于从 9.0.0 之前的版本升级)GoogleMapsCore(仅适用于从 9.0.0 之前的版本升级)GoogleMapsM4B(仅适用于从 9.0.0 之前的版本升级)
- 在 Xcode 中,依次前往“File > Packages > Update To Latest Package Versions”。
- 如需验证安装,请前往项目导航器的软件包依赖项部分,验证软件包及其版本。
如需移除使用 CocoaPods 添加的现有 Maps SDK for iOS 依赖项,请按以下步骤操作:
- 关闭 Xcode 工作区。打开终端并执行以下命令:
sudo gem install cocoapods-deintegrate cocoapods-clean
pod deintegrate
pod cache clean --all
-
如果您使用
Podfile、Podfile.resolved和 Xcodeworkspace的目的并非 CocoaPods,请将其移除。
-
在 Xcode 项目配置设置中,找到 Frameworks, Libraries, and Embedded Content(框架、库和嵌入内容)。使用减号 (-) 移除以下框架:
GoogleMapsGoogleMapsBase(仅适用于 9.2.0 之前的安装)GoogleMapsCore(仅适用于 9.2.0 之前的安装)GoogleMapsM4B(仅适用于 9.0.0 之前的安装)
-
从 Xcode 项目的顶级目录中,移除
GoogleMaps软件包。
手动安装
本指南介绍了如何手动将包含 Maps SDK for iOS 的 XCFrameworks 添加到您的项目,以及如何在 Xcode 中配置您的 build 设置。XCFramework 是一种可在多个平台(包括使用 Apple 芯片的机器)上使用的二进制软件包。
- 下载以下 SDK 二进制文件和资源文件:
- 提取文件以访问 XCFramework 和资源。
- 如果您尚未创建 Xcode 项目,请立即创建一个并将其保存到您的本地计算机上。如果您刚开始接触 iOS 开发:
- 创建新项目。
- 选择 iOS > App 模板。
- 在项目选项界面上:
- 输入项目名称。
- 记录 软件包标识符 字段的值。您可以使用该值在下方限制 API 密钥。
- 将项目界面设置为故事板。
- 将语言设置为 Swift 或 Objective-C。
-
打开常规标签页。将以下 XCFramework 拖到项目中的 Frameworks, Libraries, and Embedded Content 下。请务必选择不嵌入:
GoogleMaps.xcframework
-
将您下载的 GoogleMapsResources 中的
GoogleMaps.bundle复制到 Xcode 项目的顶级目录中。系统显示提示时,请务必选择将项目复制到目标组的文件夹。 - 从项目导航器中选择项目,然后选择应用的目标。
-
打开应用目标的 Build Phases 标签页。
在 Link Binary with Libraries 中,添加以下框架和库:
Accelerate.frameworkContacts.frameworkCoreData.frameworkCoreGraphics.frameworkCoreImage.frameworkCoreLocation.frameworkCoreTelephony.frameworkCoreText.frameworkGLKit.frameworkImageIO.frameworklibc++.tbdlibz.tbdMetal.frameworkMetricKit.frameworkOpenGLES.framework(仅当您使用 OpenGL 时)QuartzCore.frameworkSecurity.frameworkSystemConfiguration.frameworkUIKit.framework
-
选择项目而不是具体的目标,并打开“Build Settings”(构建设置)标签页。在 Linking - General -> Other Linker Flags 部分中,向“Debug”和“Release”添加
-ObjC。如果看不到这些设置,请将“Build Settings”(构建设置)栏中的过滤条件从“Basic”(基本)更改为“All”(全部)。 -
如需安装 Places SDK for iOS XCFramework,请参阅 Places SDK for iOS 使用入门。
CocoaPods
Maps SDK for iOS 以 CocoaPods pod 的形式提供。CocoaPods 是一种用于 Swift 和 Objective-C Cocoa 项目的开源依赖项管理器。
如果您没有 CocoaPods 工具,请在 macOS 上从终端运行以下命令进行安装。如需了解详情,请参阅 CocoaPods 入门指南。
sudo gem install cocoapods
为 Maps SDK for iOS 创建一个 Podfile,并使用它来安装 API 及其依赖项:
- 如果您尚未创建 Xcode 项目,请立即创建一个并将其保存到您的本地计算机上。如果您刚开始接触 iOS 开发:
- 创建新项目。
- 选择 iOS > App 模板。
- 在项目选项界面上:
- 输入项目名称。
- 记录 软件包标识符 字段的值。您可以使用该值在下方限制 API 密钥。
- 将项目界面设置为故事板。
- 将语言设置为 Swift 或 Objective-C。
- 在您的项目目录中创建一个名为
Podfile的文件。此文件可定义您项目的依赖项。 - 修改
Podfile并添加您的依赖项及其版本。 下面的示例包含 Maps SDK for iOS 所需的依赖项:source 'https://github.com/CocoaPods/Specs.git' platform :ios, '16.0' target 'YOUR_APPLICATION_TARGET_NAME_HERE' do pod 'GoogleMaps', '10.15.0' end
pod outdated以检测是否存在新版本,确保您始终使用最新版本。如有必要,请升级到最新版本。 - 保存
Podfile。 打开终端,然后前往包含
Podfile的目录:cd <path-to-project>
运行
pod install命令。此操作会安装Podfile中指定的 API 及其具有的任何依赖项。pod install
关闭 Xcode,然后打开(双击)您项目的
.xcworkspace文件以启动 Xcode。从那时起,请使用.xcworkspace文件打开项目。
如需更新现有项目的 API,请按以下步骤操作:
- 打开终端,然后前往包含
Podfile的项目目录。 - 运行
pod update命令。此命令会将Podfile中指定的所有 API 更新为最新版本。
第 3 步:将您的 API 密钥添加到项目中
在获取 API 密钥中,您为应用生成了一个 API 密钥。现在,将该密钥添加到您的 Xcode 项目中。
在下例中,请将 YOUR_API_KEY 替换为您的 API 密钥。
Swift
按照以下方法向 AppDelegate.swift 添加 API 密钥:
- 添加以下 import 语句:
import GoogleMaps
- 将以下内容添加到您的
application(_:didFinishLaunchingWithOptions:)方法,并使用您的 API 密钥:GMSServices.provideAPIKey("YOUR_API_KEY")
- 如果您也使用 Places API,请按照下面的内容再次添加密钥:
GMSPlacesClient.provideAPIKey("YOUR_API_KEY")
Objective-C
按照以下方法向 AppDelegate.m 添加 API 密钥:
- 添加以下 import 语句:
@import GoogleMaps;
- 将以下内容添加到您的
application:didFinishLaunchingWithOptions:方法,并使用您的 API 密钥:[GMSServices provideAPIKey:@"YOUR_API_KEY"];
- 如果您也使用 Places API,请按照下面的内容再次添加密钥:
[GMSPlacesClient provideAPIKey:@"YOUR_API_KEY"];
第 4 步(可选):检查 Apple 隐私清单文件
Apple 要求 App Store 上的应用提供应用隐私详细信息。如需了解最新动态和更多信息,请访问 Apple App Store 隐私详情页面。
Apple 隐私清单文件包含在 SDK 的资源 bundle 中。如需验证是否已添加隐私权清单文件并检查其内容,请创建应用归档,然后从该归档生成隐私权报告。
第 5 步(可选):声明 API 使用的网址方案
从 iOS 9 和 Xcode 7 开始,应用通过在应用的 Info.plist 文件中指定方案来声明它们打算打开的网址方案。当用户点击地图上的 Google 徽标时,Maps SDK for iOS 会打开 Google 地图移动应用,因此您的应用可以声明相关的网址方案。
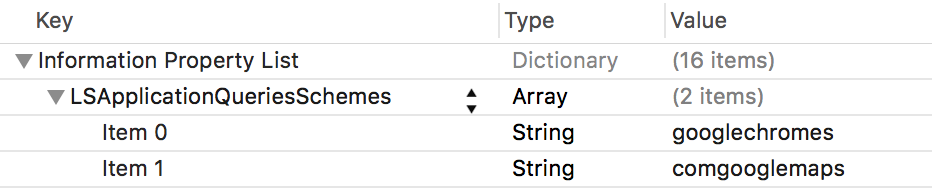
如需声明 Maps SDK for iOS 使用的网址方案,请将以下行添加到 Info.plist:
 <key>LSApplicationQueriesSchemes</key>
 <array>
        <string>googlechromes</string>
        <string>comgooglemaps</string>
    </array>
下图显示了 Xcode 界面中的配置:
如果没有上述声明,当用户点按地图上的 Google 徽标时,可能会出现以下错误:
-canOpenURL: failed for URL: "comgooglemaps://" - error: "This app is not
allowed to query for scheme comgooglemaps"
-canOpenURL: failed for URL: "googlechromes://" - error: "This app is not allowed to query for scheme googlechromes"
如需消除这些错误,请将声明添加到 Info.plist 中。
后续步骤
现在,您已经有了 API 密钥和 Xcode 项目,接下来便可以创建和运行应用了。Navigation SDK for iOS 提供了许多可帮助您顺利上手的教程和示例应用。如需了解详情,请参阅以下文档: