
결제를 사용 설정하고 API 키를 만든 후 앱 개발에 사용할 Xcode 프로젝트를 설정할 수 있습니다.
각 출시마다 출시 노트가 제공됩니다.
1단계: 필수 소프트웨어 설치하기
iOS용 Maps SDK를 사용하여 프로젝트를 빌드하려면 다음을 다운로드하여 설치해야 합니다.
- Xcode 버전 26.0 이상
2단계: Xcode 프로젝트 생성 및 iOS용 Maps SDK 설치
SDK 설치 크기는 다를 수 있습니다. 예를 들어 iOS용 Maps SDK 버전 9.0의 설치 크기는 약 18MB입니다.
Swift Package Manager
iOS용 Maps SDK는 Swift Package Manager를 통해 설치할 수 있습니다. SDK를 추가하려면 기존 iOS용 Maps SDK 종속 항목을 삭제해야 합니다.
SDK를 기존 또는 새 프로젝트에 추가하려면 다음 단계를 따르세요.
-
Xcode
project또는workspace를 열고 File > Add Package Dependencies로 이동합니다. - https://github.com/googlemaps/ios-maps-sdk를 URL로 입력하고 Enter 키를 눌러 패키지를 가져온 다음 '패키지 추가'를 클릭합니다.
-
특정
version를 설치하려면 종속 항목 규칙 필드를 버전 기반 옵션 중 하나로 설정합니다. 새 프로젝트의 경우 최신 버전을 지정하고 '정확한 버전' 옵션을 사용하는 것이 좋습니다. 완료되면 '패키지 추가'를 클릭합니다.
기존 프로젝트의 package를 업데이트하려면 다음 단계를 따르세요.
9.0.0 이전 버전에서 업그레이드하는 경우 업그레이드 후
GoogleMapsBase,GoogleMapsCore,GoogleMapsM4B종속 항목을 삭제해야 합니다.GoogleMaps의 종속 항목을 삭제하지 마세요. 자세한 내용은 버전 9.0.0 출시 노트를 참고하세요.Xcode 프로젝트 구성 설정에서 프레임워크, 라이브러리, 삽입된 콘텐츠를 찾습니다. 빼기 기호(-)를 사용하여 다음 프레임워크를 삭제합니다.
GoogleMapsBase(9.0.0 이전 버전에서 업그레이드하는 경우에만 해당)GoogleMapsCore(9.0.0 이전 버전에서 업그레이드하는 경우에만 해당)GoogleMapsM4B(9.0.0 이전 버전에서 업그레이드하는 경우에만 해당)
- Xcode에서 'File > Packages > Update To Latest Package Versions'로 이동합니다.
- 설치를 확인하려면 프로젝트 탐색기의 패키지 종속 항목 섹션으로 이동하여 패키지와 버전을 확인합니다.
CocoaPods를 사용하여 추가된 기존 iOS용 Maps SDK 종속 항목을 삭제하려면 다음 단계를 따르세요.
- Xcode 작업공간을 닫습니다. 터미널을 열고 다음 명령어를 실행합니다.
sudo gem install cocoapods-deintegrate cocoapods-clean
pod deintegrate
pod cache clean --all
-
CocoaPods 이외의 용도로 사용하지 않는 경우
Podfile,Podfile.resolved, Xcodeworkspace를 삭제합니다.
-
Xcode 프로젝트 구성 설정에서 프레임워크, 라이브러리, 삽입된 콘텐츠를 찾습니다. 빼기 기호(-)를 사용하여 다음 프레임워크를 삭제합니다.
GoogleMapsGoogleMapsBase(버전 9.2.0 이전 설치에만 해당)GoogleMapsCore(버전 9.2.0 이전 설치에만 해당)GoogleMapsM4B(버전 9.0.0 이전 설치에만 해당)
-
Xcode 프로젝트의 최상위 디렉터리에서
GoogleMaps번들을 삭제합니다.
수동 설치
이 가이드에서는 iOS용 Maps SDK가 포함된 XCFramework를 프로젝트에 수동으로 추가하고 Xcode에서 빌드 설정을 구성하는 방법을 보여줍니다. XCFramework는 Apple Silicon을 사용하는 머신을 비롯한 여러 플랫폼에서 사용할 수 있는 바이너리 패키지입니다.
- 다음 SDK 바이너리 및 리소스 파일을 다운로드합니다.
- 파일을 추출하여 XCFrameworks 및 리소스에 액세스합니다.
- 아직 Xcode 프로젝트가 없으면 지금 만들어 로컬 시스템에 저장합니다. iOS 개발을 처음 시작하는 경우 다음 단계를 따르세요.
- 새 프로젝트를 만듭니다.
- iOS > 앱 템플릿을 선택합니다.
- 프로젝트 옵션 화면에서 다음을 실행합니다.
- 프로젝트 이름을 입력합니다.
- 번들 식별자 필드의 값을 기록합니다. 이 값을 사용하여 아래에서 API 키를 제한할 수 있습니다.
- 프로젝트 인터페이스를 Storyboard로 설정합니다.
- 언어를 Swift 또는 Objective-C로 설정합니다.
-
일반 탭을 엽니다. 다음 XCFramework를 Frameworks, Libraries, and Embedded Content 아래의 프로젝트로 드래그합니다. 삽입 안 함을 선택해야 합니다.
GoogleMaps.xcframework
-
다운로드한 GoogleMapsResources에서
GoogleMaps.bundle를 Xcode 프로젝트의 최상위 디렉터리에 복사합니다. 메시지가 표시되면 Copy items into destination group's folder를 선택해야 합니다. - Project Navigator에서 프로젝트를 선택하고 애플리케이션의 대상을 선택합니다.
-
애플리케이션 타겟의 빌드 단계 탭을 엽니다.
Link Binary with Libraries 내에 다음 프레임워크와 라이브러리를 추가합니다.
Accelerate.frameworkContacts.frameworkCoreData.frameworkCoreGraphics.frameworkCoreImage.frameworkCoreLocation.frameworkCoreTelephony.frameworkCoreText.frameworkGLKit.frameworkImageIO.frameworklibc++.tbdlibz.tbdMetal.frameworkMetricKit.frameworkOpenGLES.framework(OpenGL을 사용하는 경우에만)QuartzCore.frameworkSecurity.frameworkSystemConfiguration.frameworkUIKit.framework
-
특정 대상 대신 자신의 프로젝트를 선택하고 Build Settings(빌드 설정) 탭을 엽니다. Linking - General -> Other Linker Flags(연결 - 일반 -> 기타 링커 플래그) 섹션에서 'Debug'(디버그) 및 'Release'(출시)에
-ObjC를 추가합니다. 이 설정이 표시되지 않으면 Build Settings(빌드 설정) 표시줄의 필터를 Basic(기본)에서 All(모두)로 변경합니다. -
iOS용 Places SDK XCFramework를 설치하려면 iOS용 Places SDK 시작하기를 참고하세요.
CocoaPods
iOS용 Maps SDK는 CocoaPods pod로 제공됩니다. CocoaPods는 Swift 및 Objective-C Cocoa 프로젝트용 오픈소스 종속 항목 관리자입니다.
아직 CocoaPods 도구가 없으면 터미널에서 다음 명령어를 실행하여 macOS에 CocoaPods 도구를 설치합니다. 자세한 내용은 CocoaPods 시작 가이드를 참고하세요.
sudo gem install cocoapods
iOS용 Maps SDK를 위한 Podfile을 만들고 이를 사용하여 API와 종속 항목을 설치합니다.
- 아직 Xcode 프로젝트가 없으면 지금 만들어 로컬 시스템에 저장합니다. iOS 개발을 처음 시작하는 경우 다음 단계를 따르세요.
- 새 프로젝트를 만듭니다.
- iOS > 앱 템플릿을 선택합니다.
- 프로젝트 옵션 화면에서 다음을 실행합니다.
- 프로젝트 이름을 입력합니다.
- 번들 식별자 필드의 값을 기록합니다. 이 값을 사용하여 아래에서 API 키를 제한할 수 있습니다.
- 프로젝트 인터페이스를 Storyboard로 설정합니다.
- 언어를 Swift 또는 Objective-C로 설정합니다.
- 프로젝트 디렉터리에
Podfile파일을 만듭니다. 이 파일은 프로젝트의 종속 항목을 정의합니다. Podfile을 수정하고 종속 항목과 버전을 추가합니다. 다음은 iOS용 Maps SDK에 필요한 종속 항목이 포함된 예입니다.source 'https://github.com/CocoaPods/Specs.git' platform :ios, '16.0' target 'YOUR_APPLICATION_TARGET_NAME_HERE' do pod 'GoogleMaps', '10.14.0' end
pod outdated를 정기적으로 실행하여 최신 버전이 있는지 감지하고 항상 최신 버전을 사용하고 있는지 확인합니다. 필요한 경우 최신 버전으로 업그레이드합니다.Podfile을 저장합니다.터미널을 열고
Podfile이 포함된 디렉터리로 이동합니다.cd <path-to-project>
pod install명령어를 실행합니다.Podfile에 지정된 API가 API에 포함된 종속 항목과 함께 설치됩니다.pod install
Xcode를 닫은 다음 프로젝트의
.xcworkspace파일을 (더블클릭하여) 열어 Xcode를 실행합니다. 이 때부터는.xcworkspace파일을 사용하여 프로젝트를 열어야 합니다.
기존 프로젝트의 API를 업데이트하려면 다음 단계를 따르세요.
- 터미널을 열고
Podfile이 포함된 프로젝트 디렉터리로 이동합니다. pod update명령어를 실행합니다. 이렇게 하면Podfile에 지정된 모든 API가 최신 버전으로 업데이트됩니다.
3단계: 프로젝트에 API 키 추가
API 키 가져오기에서 앱의 API 키를 생성했습니다. 이제 Xcode 프로젝트에 해당 키를 추가합니다.
다음 예에서 YOUR_API_KEY를 이 API 키로 바꾸세요.
Swift
다음과 같이 API 키를 AppDelegate.swift에 추가합니다.
- 다음 import 문을 추가합니다.
import GoogleMaps
- API 키를 사용하여 다음을
application(_:didFinishLaunchingWithOptions:)메서드에 추가합니다.GMSServices.provideAPIKey("YOUR_API_KEY")
- Places API도 사용 중이면 여기에 표시된 것처럼 키를 다시 추가합니다.
GMSPlacesClient.provideAPIKey("YOUR_API_KEY")
Objective-C
다음과 같이 API 키를 AppDelegate.m에 추가합니다.
- 다음 import 문을 추가합니다.
@import GoogleMaps;
- API 키를 사용하여 다음을
application:didFinishLaunchingWithOptions:메서드에 추가합니다.[GMSServices provideAPIKey:@"YOUR_API_KEY"];
- Places API도 사용 중이면 여기에 표시된 것처럼 키를 다시 추가합니다.
[GMSPlacesClient provideAPIKey:@"YOUR_API_KEY"];
4단계 (선택사항): Apple 개인 정보 보호 매니페스트 파일 검사
Apple은 App Store에 있는 앱의 앱 개인 정보 보호 세부정보를 요구합니다. 업데이트 및 자세한 내용은 Apple App Store 개인 정보 보호 세부정보 페이지를 참고하세요.
Apple 개인 정보 보호 매니페스트 파일은 SDK의 리소스 번들에 포함되어 있습니다. 개인 정보 매니페스트 파일이 포함되었는지 확인하고 그 내용을 검사하려면 앱의 보관 파일을 만들고 보관 파일에서 개인 정보 보고서를 생성하세요.
5단계 (선택사항): API에서 사용하는 URL 스키마 선언
iOS 9 및 Xcode 7부터 앱은 앱의 Info.plist 파일에 스키마를 지정하여 열려는 URL 스키마를 선언할 수 있습니다. 사용자가 지도에서 Google 로고를 클릭하면 iOS용 Maps SDK가 Google 지도 모바일 앱을 열므로 앱에서 관련 URL 스키마를 선언할 수 있습니다.
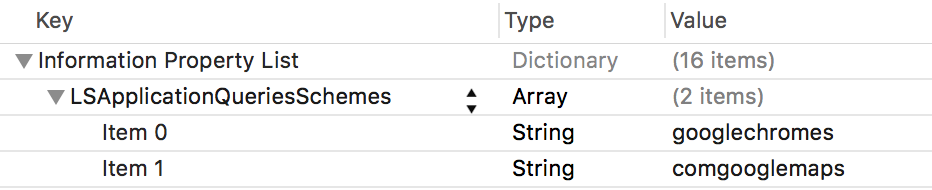
iOS용 Maps SDK에서 사용하는 URL 스키마를 선언하려면 Info.plist에 다음 줄을 추가하세요.
 <key>LSApplicationQueriesSchemes</key>
 <array>
        <string>googlechromes</string>
        <string>comgooglemaps</string>
    </array>
다음 스크린샷은 Xcode 사용자 인터페이스의 구성을 보여줍니다.
위의 선언이 없으면 사용자가 지도에서 Google 로고를 탭할 때 다음 오류가 발생할 수 있습니다.
-canOpenURL: failed for URL: "comgooglemaps://" - error: "This app is not
allowed to query for scheme comgooglemaps"
-canOpenURL: failed for URL: "googlechromes://" - error: "This app is not allowed to query for scheme googlechromes"
이러한 오류를 없애려면 Info.plist에 선언을 추가하세요.
다음 단계
이제 API 키와 Xcode 프로젝트가 있으므로 앱을 만들고 실행할 수 있습니다. iOS용 Navigation SDK는 시작하는 데 도움이 되는 다양한 튜토리얼과 샘플 앱을 제공합니다. 자세한 내용은 다음을 참고하세요.