
This quickstart teaches you how to create a custom step for Workspace Studio using Google Apps Script. The custom step takes two numbers and an arithmetic operation as input, performs the calculation, and outputs the result.
Objectives
- Create a custom step for Workspace Studio with Google Apps Script.
- Deploy the custom step to your own Google Workspace organization.
- Test the custom step in Workspace Studio.
Prerequisites
- A Google Account with access to Workspace Studio.
Set up the script
To set up the script, create a new Apps Script project and then connect it to your Cloud project.
Click the following button to open the Calculator quickstart Apps Script project.
Click Overview.
On the overview page, click
 Make a copy.
Name your copy of the Apps Script project:
Click Copy of Calculator quickstart.
In Project title, type
Calculator quickstart.Click Rename.
Optional: Review the quickstart code
In the prior section, you copied an entire Apps Script project that contains all the required application code for your flow's custom step, so there's no need to copy and paste each file.
Optionally, you can review each file you copied in the prior section here:
appsscript.jsonThe manifest file. A special JSON file that specifies a basic project information that Apps Script needs to run the script.
View
appsscript.jsoncode{ "timeZone": "America/Los_Angeles", "exceptionLogging": "STACKDRIVER", "runtimeVersion": "V8", "addOns": { "common": { "name": "Calculator", "logoUrl": "https://www.gstatic.com/images/branding/productlogos/calculator_search/v1/web-24dp/logo_calculator_search_color_1x_web_24dp.png", "useLocaleFromApp": true }, "flows": { "workflowElements": [ { "id": "actionElement", "state": "ACTIVE", "name": "Calculate", "description": "Asks the user for two values and a math operation, then performs the math operation on the values and outputs the result.", "workflowAction": { "inputs": [ { "id": "value1", "description": "value1", "cardinality": "SINGLE", "dataType": { "basicType": "INTEGER" } }, { "id": "value2", "description": "value2", "cardinality": "SINGLE", "dataType": { "basicType": "INTEGER" } }, { "id": "operation", "description": "operation", "cardinality": "SINGLE", "dataType": { "basicType": "STRING" } } ], "outputs": [ { "id": "result", "description": "Calculated result", "cardinality": "SINGLE", "dataType": { "basicType": "INTEGER" } } ], "onConfigFunction": "onConfigCalculateFunction", "onExecuteFunction": "onExecuteCalculateFunction" } } ] } } }
Calculator.gsDefines a custom step for Google Workspace Studio. The step, named "Calculate", takes two numbers and an operation as input and returns the result of the calculation.
View
Calculator.gscode/** * This script defines a custom step for Google Workspace Studio. * The step, named "Calculate", takes two numbers and an operation as input * and returns the result of the calculation. * * The script includes functions to: * * 1. Define the configuration UI for the step using Card objects: * * - `onConfigCalculateFunction()`: Generates the main configuration card. * - Helper functions like `pushCard()`, `saveButton()` to build card components. * * 2. Handle the execution of the step. * * - `onExecuteCalculateFunction()`: Retrieves inputs, performs the calculation, * and returns outputs. * * To learn more, see the following quickstart guide: * https://developers.google.com/workspace/add-ons/studio/quickstart */ /** * Creates an action response to push a new card onto the card stack. * * This function generates an action object that, when returned, causes the * provided card to be pushed onto the card stack, making it the currently * displayed card in the configuration UI. * @param {Object} card The Card object to push. * @return {Object} The action response object. */ function pushCard(card) { return { "action": { "navigations": [{ "push_card": card } ] } }; } /** * Creates an action response to update the currently displayed card. * * This function generates an action object that, when returned, causes the * currently displayed card to be replaced with the provided card in the * configuration UI. * @param {Object} card The Card object to update. * @return {Object} The render actions object. */ function updateCard(card) { return { "render_actions": { "action": { "navigations": [{ "update_card": card } ] } } }; } /** * Creates a button configuration object for saving the step. * * This function generates a button definition that, when clicked, triggers * a save action for the current step configuration. * @return {Object} The button widget object. */ function saveButton() { return { "text": "Save", "onClick": { "hostAppAction" : { "workflowAction" : { "saveWorkflowAction" : {} } } }, }; } /** * Creates a button configuration object for a refresh action. * * This function generates a button definition that, when clicked, triggers * a function to refresh the current card. * @param {string} functionName The name of the Apps Script function to call on click. * @return {Object} The button widget object. */ function refreshButton(functionName) { return { "text": "Refresh", "onClick": { "action" : { "function" : functionName } }, }; } /** * Generates and displays a configuration card for the sample calculation action. * * This function creates a card with input fields for two values and a dropdown * for selecting an arithmetic operation. The card also includes a "Save" * button to save the action configuration for the step. * * The input fields are configured to let the user select outputs from previous * steps as input values using the `hostAppDataSource` property. * This function is called when the user adds or edits the "Calculate" step in the UI. * @return {Object} The action response object containing the card to display. */ function onConfigCalculateFunction() { var card = { "sections": [ { "header": "Action sample: Calculate", "widgets": [ { "textInput": { "name": "value1", "label": "First value", "hostAppDataSource" : { "workflowDataSource" : { "includeVariables" : true } } } }, { "selectionInput": { "name": "operation", "label": "Operation", "type": "DROPDOWN", "items": [ { "text": "+", "value": "+", }, { "text": "-", "value": "-", }, { "text": "x", "value": "x", }, { "text": "/", "value": "/", } ] } }, { "textInput": { "name": "value2", "label": "Second value", "hostAppDataSource" : { "workflowDataSource" : { "includeVariables" : true } } } } ] } ] }; return pushCard(card); } /** * Gets an integer value from variable data, handling both string and integer formats. * * This function attempts to extract an integer value from the provided variable data. * It checks if the data contains string values and, if so, parses the first string * as an integer. If integer values are present, it returns the first integer. * @param {Object} variableData The variable data object from the event. * @return {number} The extracted integer value. */ function getIntValue(variableData) { if (variableData.stringValues) { return parseInt(variableData.stringValues[0]); } return variableData.integerValues[0]; } /** * Returns output variables from a step. * * This function constructs an object that, when returned, sends the * provided variable values as output from the current step. * The variable values are logged to the console for debugging purposes. */ function outputVariables(variableDataMap) { const workflowAction = AddOnsResponseService.newReturnOutputVariablesAction() .setVariableDataMap(variableDataMap); const hostAppAction = AddOnsResponseService.newHostAppAction() .setWorkflowAction(workflowAction); const renderAction = AddOnsResponseService.newRenderActionBuilder() .setHostAppAction(hostAppAction) .build(); return renderAction; } /** * Executes the calculation action based on the inputs from an event. * * This function retrieves input values ("value1", "value2") and the "operation" * from the event, performs the calculation, and returns the "result" and * "log" as output variables. * This function is called when the flow reaches this custom step. * @param {Object} event The event object passed by the runtime. * @return {Object} The output variables object. */ function onExecuteCalculateFunction(event) { console.log("output: " + JSON.stringify(event)); var calculatedValue = 0; var value1 = event.workflow.actionInvocation.inputs["value1"].integerValues[0]; var value2 = event.workflow.actionInvocation.inputs["value2"].integerValues[0]; var operation = event.workflow.actionInvocation.inputs["operation"].stringValues[0]; if (operation == "+") { calculatedValue = value1 + value2; } else if (operation == "-") { calculatedValue = value1 - value2; } else if (operation == "x") { calculatedValue = value1 * value2; } else if (operation == "/") { calculatedValue = value1 / value2; } const variableDataMap = { "result": AddOnsResponseService.newVariableData().addIntegerValue(calculatedValue) }; return outputVariables(variableDataMap); }
Deploy and test your step
To test your step, set up a test deployment for your add-on, add the step to a flow and then run the flow.
Set up a test deployment for your add-on:
- Open the script project in the Apps Script editor.
- Click Deploy > Test deployments.
- Click Install.
- At the bottom, click Done.
You can let other users test the add-on by sharing the Apps Script project with their account (edit access is required). Then prompt the users to follow the previous steps.
Once installed, the add-on is immediately available in Flows. You may need to refresh Flows before the add-on appears. You must also authorize the add-on before using it.
To learn more about test deployments, see Install an unpublished add-on.
Open Flows.
Create a flow that includes your step:
- Click New flow.
- Select how the flow starts. If your step requires an input variable, configure the input variable as part of the starter's output.
- Click Add step. Select the step you built or updated, called Calculate.
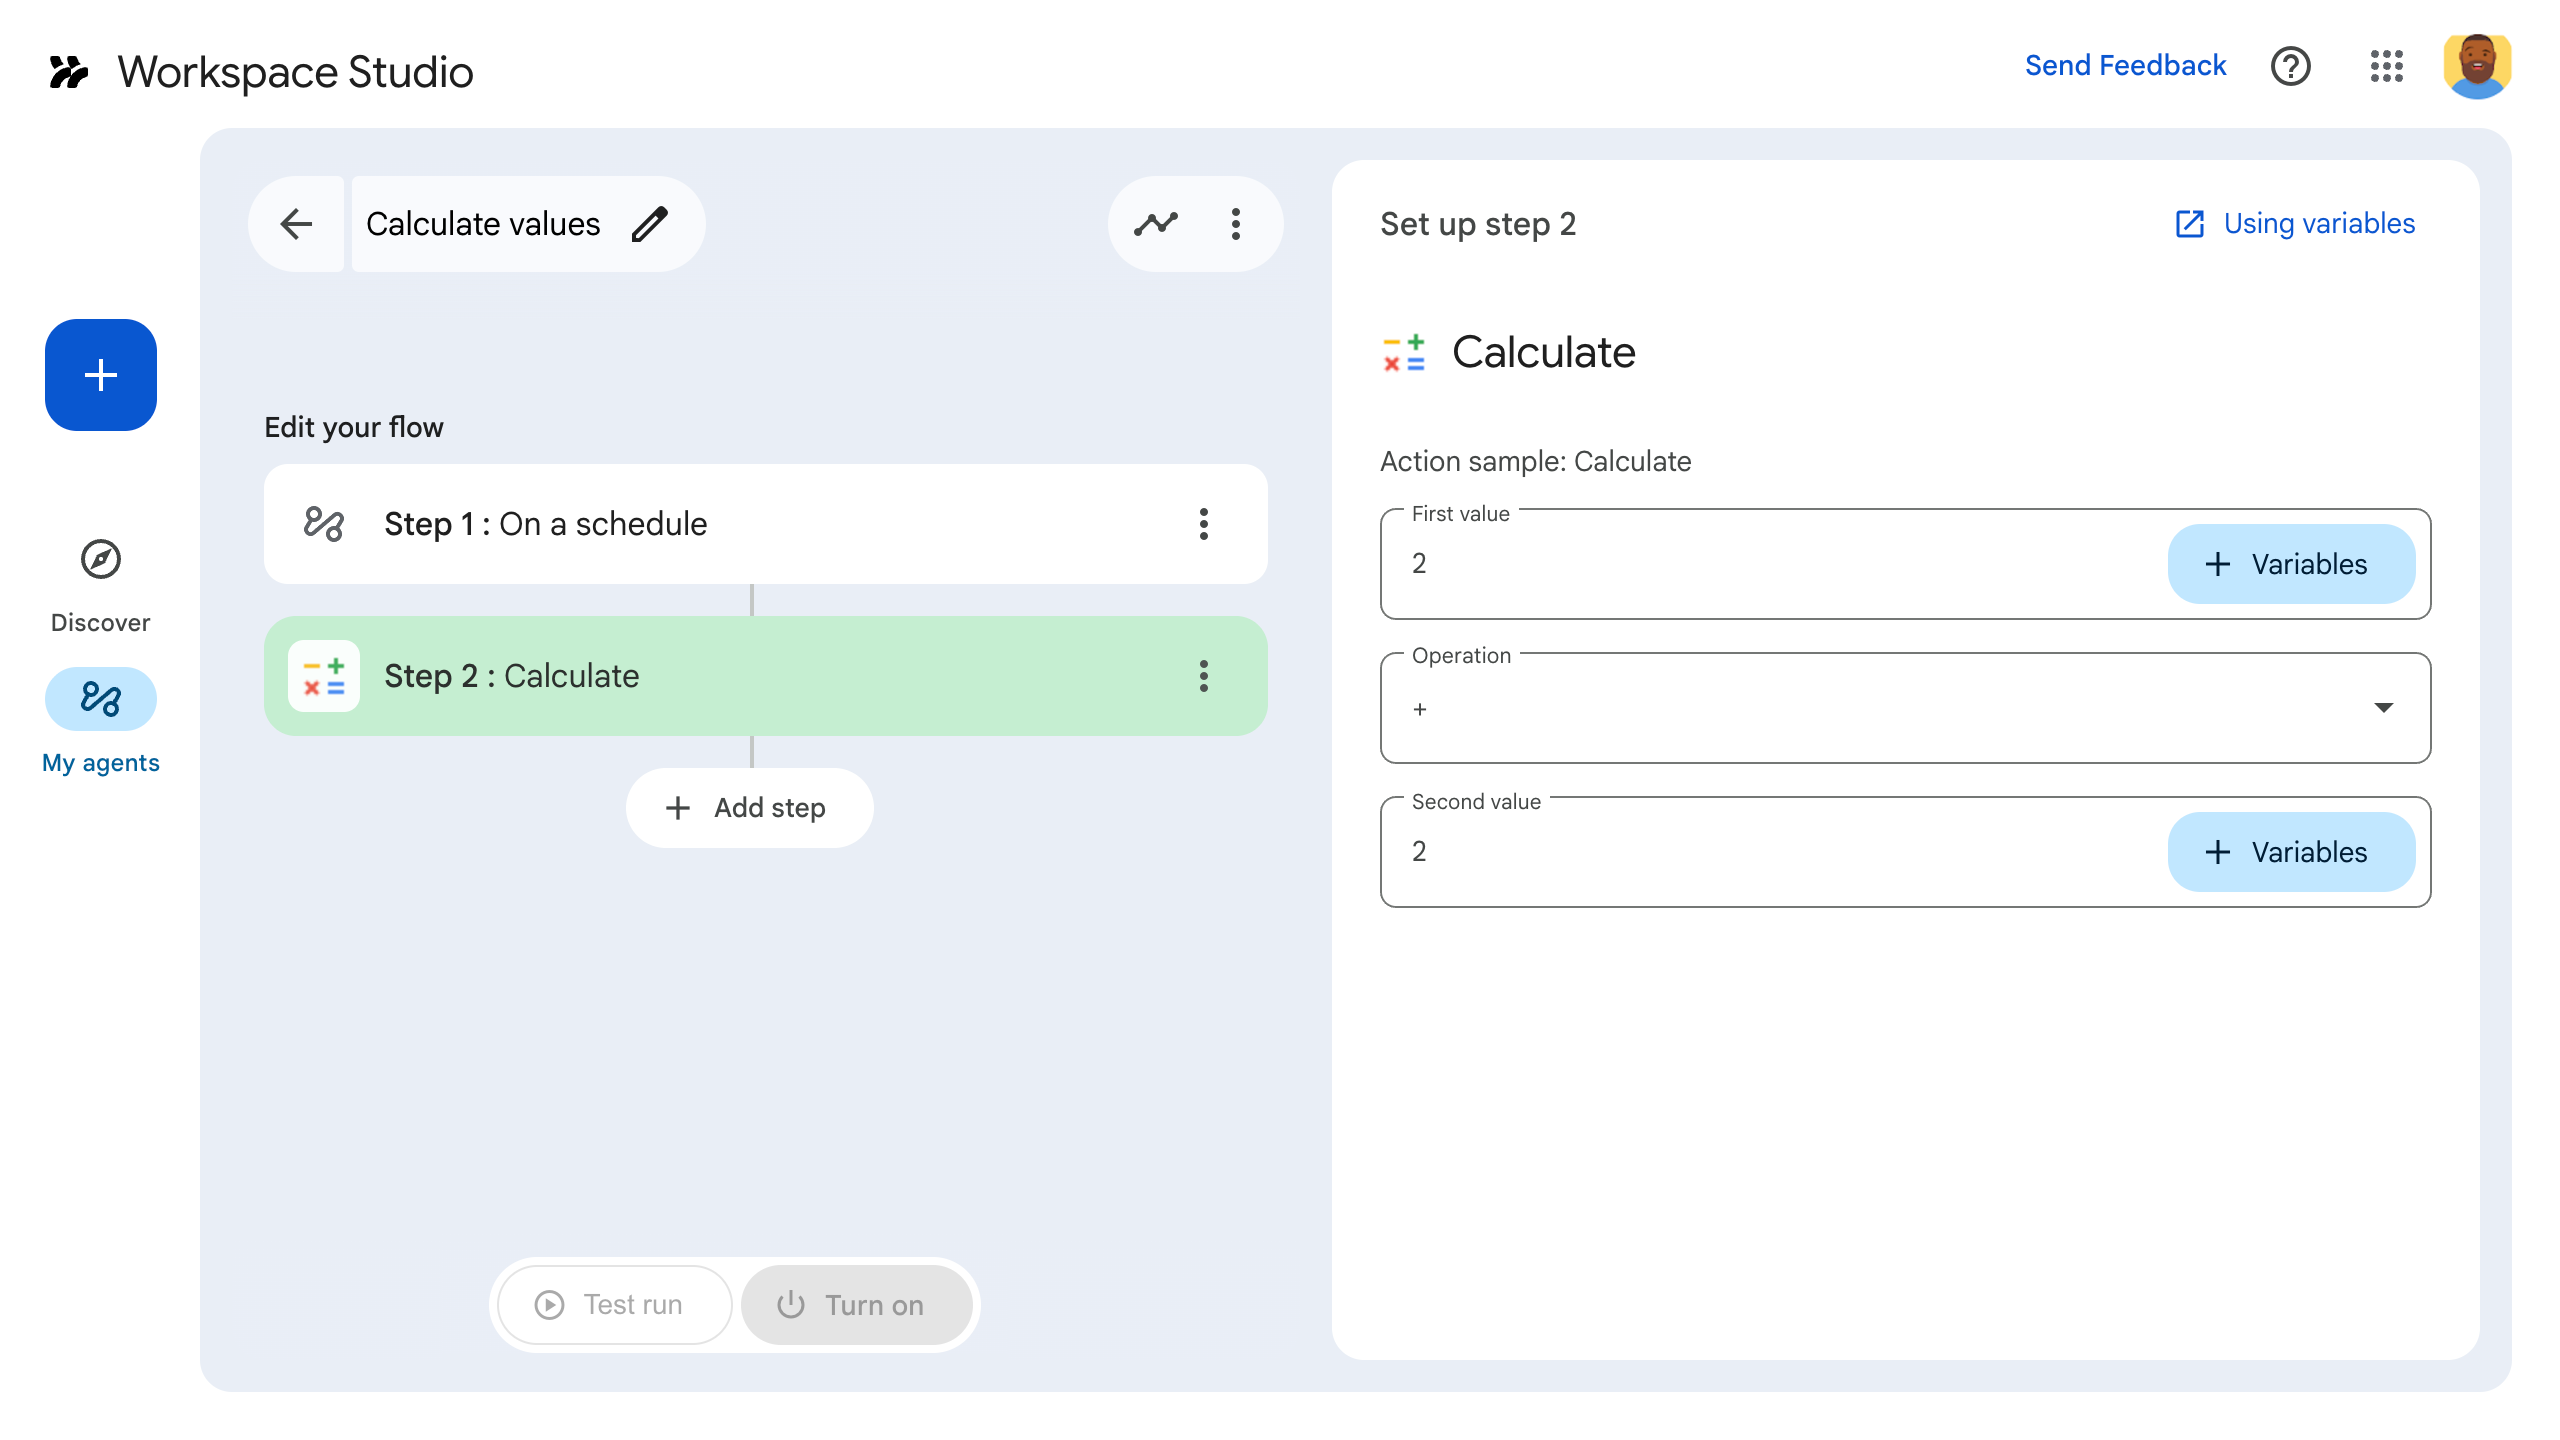
- Configure your step. For the calculate step, choose two values and a math operation. The step saves automatically.
- To test your step's output, add another step. For example, to add output to a Google Chat message, add Chat's Notify me in Chat step. In Message, click Variables and select your step's output. For the calculate step, select Variables > Step 2: Calculate > Calculated result. The variable appears as a chip in the Message field.
- Click Turn on. Your flow is ready to run.
Run the flow by setting off your flow's starter. For example, if your flow starts on a schedule, it will run at the specified date and time.
Verify the flow runs as expected. Check logs by visiting the flow builder's Activity tab. To learn how to create custom logs in the Activity tab, see Activity logs.
Next steps
You have successfully created and tested a custom step for Workspace Studio. You can now:
Continue customizing the step by prompting Gemini to help you implement more complex logic.
Build a configuration card to customize step configuration.
Log activity and errors to record and troubleshoot your step runs.
Review event objects to review the JSON payload that flows send and receive as steps run.