
はじめに
このチュートリアルでは、マーカーが配置された Google マップを、HTML、CSS、JavaScript を使ってウェブページに追加する方法を説明します。また、地図のオプションを設定する方法と、コントロール スロッティングを使用して地図にラベルを追加する方法についても説明します。
このチュートリアルで作成する地図は次のとおりです。マーカーは、ウルル・カタ・ジュタ国立公園のウルル(エアーズロックとも呼ばれます)にあります。
始める
マーカーが配置された Google マップをウェブページ上に作成する際のステップは、次の 3 つです。
この作業には、ウェブブラウザが必要です。使用するプラットフォームに応じて、対応しているブラウザのリストから、Google Chrome (推奨)、Firefox、Safari、Edge などのよく知られたブラウザを選択します。
ステップ 1: API キーを取得する
このセクションでは、独自の API キーを使用して、Maps JavaScript API に対してアプリを認証する方法について説明します。
次のステップに沿って、API キーを取得します。
Google Cloud コンソールに移動します。
プロジェクトを作成または選択します。
[続行] をクリックして、API と関連サービスを有効にします。
[認証情報] ページで API キーを取得します(API キーの制限も設定します)。制限のない既存の API キーまたはブラウザの制限が設定されたキーがある場合は、そのキーを使用することもできます。
割り当ての盗用を防ぎ、API キーを保護する方法については、API キーの使用をご覧ください。
課金を有効化します。詳細については、使用量と課金をご覧ください。
API キーを取得したら、[YOUR_API_KEY] をクリックして、次のスニペットに追加します。ご自身のウェブページで使用するブートローダー スクリプトタグをコピーして貼り付けます。
<script>
  (g=>{var h,a,k,p="The Google Maps JavaScript API",c="google",l="importLibrary",q="__ib__",m=document,b=window;b=b[c]||(b[c]={});var d=b.maps||(b.maps={}),r=new Set,e=new URLSearchParams,u=()=>h||(h=new Promise(async(f,n)=>{await (a=m.createElement("script"));e.set("libraries",[...r]+"");for(k in g)e.set(k.replace(/[A-Z]/g,t=>"_"+t[0].toLowerCase()),g[k]);e.set("callback",c+".maps."+q);a.src=`https://maps.${c}apis.com/maps/api/js?`+e;d[q]=f;a.onerror=()=>h=n(Error(p+" could not load."));a.nonce=m.querySelector("script[nonce]")?.nonce||"";m.head.append(a)}));d[l]?console.warn(p+" only loads once. Ignoring:",g):d[l]=(f,...n)=>r.add(f)&&u().then(()=>d[l](f,...n))})({
    key: "YOUR_API_KEY",
    v: "weekly",
    // Use the 'v' parameter to indicate the version to use (weekly, beta, alpha, etc.).
    // Add other bootstrap parameters as needed, using camel case.
  });
</script>
ステップ 2: HTML ページを作成する
基本的な HTML ウェブページのコードを次に示します。
<!DOCTYPE html>
<!--
 @license
 Copyright 2025 Google LLC. All Rights Reserved.
 SPDX-License-Identifier: Apache-2.0
-->

<html>
  <head>
    <title>Add a Map</title>

    <link rel="stylesheet" type="text/css" href="./style.css" />
    <script type="module" src="./index.js"></script>
    <!-- prettier-ignore -->
    <script>(g=>{var h,a,k,p="The Google Maps JavaScript API",c="google",l="importLibrary",q="__ib__",m=document,b=window;b=b[c]||(b[c]={});var d=b.maps||(b.maps={}),r=new Set,e=new URLSearchParams,u=()=>h||(h=new Promise(async(f,n)=>{await (a=m.createElement("script"));e.set("libraries",[...r]+"");for(k in g)e.set(k.replace(/[A-Z]/g,t=>"_"+t[0].toLowerCase()),g[k]);e.set("callback",c+".maps."+q);a.src=`https://maps.${c}apis.com/maps/api/js?`+e;d[q]=f;a.onerror=()=>h=n(Error(p+" could not load."));a.nonce=m.querySelector("script[nonce]")?.nonce||"";m.head.append(a)}));d[l]?console.warn(p+" only loads once. Ignoring:",g):d[l]=(f,...n)=>r.add(f)&&u().then(()=>d[l](f,...n))})
        ({key: "YOUR_API_KEY", v: "weekly"});</script>
  </head>
  <body>

    <!-- The map, centered at Uluru, Australia. -->
    <gmp-map center="-25.344,131.031" zoom="4" map-id="DEMO_MAP_ID">
    </gmp-map>

  </body>
</html>
これは非常に基本的な HTML ページで、
gmp-map 要素を使用して
ページに地図を表示します。JavaScript コードはまだ追加していないため、地図は空白になります。
コードを理解する
サンプルのこのステージの詳細は次のとおりです。
!DOCTYPE html宣言を使用して、アプリケーションを HTML5 として宣言しています。- ブートストラップ ローダを使用して Maps JavaScript API を読み込んでいます。
- 地図を保持する
gmp-map要素を作成しています。
アプリケーションを HTML5 として宣言する
ウェブ アプリケーション内で、実際の DOCTYPE を宣言することをおすすめします。
このサンプルでは、下に示すように HTML5 DOCTYPE を使用して、アプリケーションを HTML5 として宣言しています。
<!DOCTYPE html>
最新のブラウザの大半は、この DOCTYPE で宣言されたコンテンツを「標準モード」でレンダリングします。これは、アプリケーションがより多くのブラウザに対応していることを意味します。DOCTYPE は、スムーズなデグレードも可能にしています。つまり、これを認識しないブラウザはこれを無視し、「後方互換モード」を使用してそのコンテンツを表示します。
後方互換モードで動作する一部の CSS は、標準モードでは有効ではありません。特に、パーセント ベースのサイズは親ブロック要素から継承する必要があり、いずれかの祖先でサイズの指定に失敗すると、0×0 ピクセルのサイズとみなされます。この理由から、次の style 宣言を含めています。
<style>
  gmp-map {
    height: 100%;
  }
  html, body {
    height: 100%;
    margin: 0;
    padding: 0;
  }
</style>
Maps JavaScript API を読み込む
ブートストラップ ローダーにより、Maps JavaScript API の読み込みが準備されます(importLibrary() が呼び出されるまでライブラリは読み込まれません)。
<script>
  (g=>{var h,a,k,p="The Google Maps JavaScript API",c="google",l="importLibrary",q="__ib__",m=document,b=window;b=b[c]||(b[c]={});var d=b.maps||(b.maps={}),r=new Set,e=new URLSearchParams,u=()=>h||(h=new Promise(async(f,n)=>{await (a=m.createElement("script"));e.set("libraries",[...r]+"");for(k in g)e.set(k.replace(/[A-Z]/g,t=>"_"+t[0].toLowerCase()),g[k]);e.set("callback",c+".maps."+q);a.src=`https://maps.${c}apis.com/maps/api/js?`+e;d[q]=f;a.onerror=()=>h=n(Error(p+" could not load."));a.nonce=m.querySelector("script[nonce]")?.nonce||"";m.head.append(a)}));d[l]?console.warn(p+" only loads once. Ignoring:",g):d[l]=(f,...n)=>r.add(f)&&u().then(()=>d[l](f,...n))})({
    key: "YOUR_API_KEY",
    v: "weekly",
    // Use the 'v' parameter to indicate the version to use (weekly, beta, alpha, etc.).
    // Add other bootstrap parameters as needed, using camel case.
  });
</script>
独自の API キーを取得する方法については、ステップ 3: API キーを取得するをご覧ください。
チュートリアルのこの段階では、書式設定されていないラベルテキストのみが表示される空白のウィンドウが表示されます。これは、まだ JavaScript コードを追加していないためです。
gmp-map 要素を作成する
地図をウェブページ上に表示するには、地図用の場所を確保する必要があります。通常、これは gmp-map 要素を作成して、ブラウザのドキュメント オブジェクト モデル(DOM)内でこの要素への参照を取得することで行います。
div 要素を使用してこれを行うこともできますが(詳細)、
gmp-map 要素を使用することをおすすめします。
次のコードでは、gmp-map 要素を定義し、center、zoom、map-id パラメータを設定しています。
<gmp-map center="-25.344,131.031" zoom="4" map-id="DEMO_MAP_ID">
</gmp-map>
center オプションと zoom オプションは常に必須です。上記のコードでは、center プロパティは地図の中心位置を API に指示し、zoom プロパティでは地図のズームレベルを指定します。0 は最小ズームレベルで、Earth 全体を表示します。より高解像度で Earth にズームインするには、ズームレベルにより大きい値を設定します。
ズームレベル
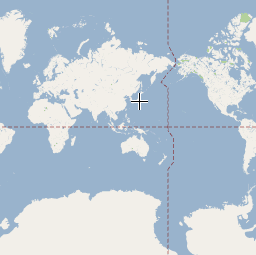
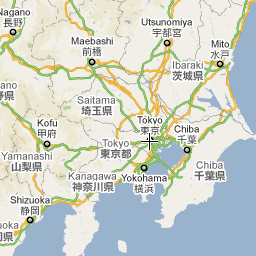
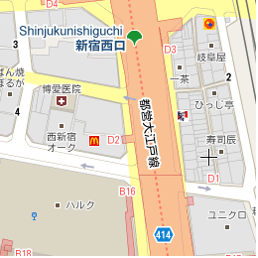
地球全体の地図を単一の画像として提供すると、巨大な地図か、非常に低い解像度の小さな地図となってしまいます。そのため、Google マップおよび Maps JavaScript API 内の地図画像は、複数の地図タイルに分割され、複数のズームレベルで提供されます。低ズームレベルでは、少数の地図タイルのセットで広範囲をカバーし、高ズームレベルでは、高解像度のタイルで狭い範囲をカバーします。次のリストは、各ズームレベルで表示されるおおよその詳細度を示しています。
- 1: 世界
- 5: 陸塊または大陸
- 10: 都市
- 15: 通り
- 20: 建物
次の 3 つの画像は、東京の同じ場所をそれぞれズームレベル 0、7、18 で表示したものです。
以下のコードは、gmp-map 要素のサイズを設定する CSS を記述しています。
/* Set the size of the gmp-map element that contains the map */
gmp-map {
    height: 400px; /* The height is 400 pixels */
    width: 100%; /* The width is the width of the web page */
}
上記のコードでは、style 要素で gmp-map のサイズを設定しています。地図を表示するには、 の幅と高さを 0 ピクセルより大きい値に設定してください。この例では、gmp-map の高さが 400 ピクセル、幅が 100% に設定されており、ウェブページの幅いっぱいに表示されます。高さと幅のスタイルは常に明示的に設定することをおすすめします。
コントロール スロッティング
コントロール スロッティングを使用すると、HTML フォーム コントロールを地図に追加できます。スロットは地図上の事前定義された位置です。slot 属性を使用して要素に必要な位置を設定し、gmp-map 要素内に要素をネストします。次のスニペットは、地図の左上隅に HTML ラベルを追加する方法を示しています。
<!-- The map, centered at Uluru, Australia. -->
<gmp-map center="-25.344,131.031" zoom="4" map-id="DEMO_MAP_ID">
  <div id="controls" slot="control-inline-start-block-start">
    <h3>My Google Maps Demo</h3>
  </div>
</gmp-map>
ステップ 3: JavaScript コードを追加する
このセクションでは、Maps JavaScript API をウェブページに読み込む方法と、この API を使用してマーカーが配置された地図を追加する独自の JavaScript を記述する方法について説明します。
TypeScript
async function init(): Promise<void> { // Request the needed libraries. const [{ AdvancedMarkerElement }] = await Promise.all([ google.maps.importLibrary('marker'), google.maps.importLibrary('maps'), ]); // Get the gmp-map element. const mapElement = document.querySelector('gmp-map')!; // Get the inner map. const innerMap = mapElement.innerMap; // Set map options. innerMap.setOptions({ mapTypeControl: false, }); // Add a marker positioned at the map center (Uluru). new AdvancedMarkerElement({ map: innerMap, position: mapElement.center, title: 'Uluru/Ayers Rock', }); } void init();
JavaScript
async function init() { // Request the needed libraries. const [{ AdvancedMarkerElement }] = await Promise.all([ google.maps.importLibrary('marker'), google.maps.importLibrary('maps'), ]); // Get the gmp-map element. const mapElement = document.querySelector('gmp-map'); // Get the inner map. const innerMap = mapElement.innerMap; // Set map options. innerMap.setOptions({ mapTypeControl: false, }); // Add a marker positioned at the map center (Uluru). new AdvancedMarkerElement({ map: innerMap, position: mapElement.center, title: 'Uluru/Ayers Rock', }); } void init();
上記のコードでは、initMap() が呼び出されると次の処理が行われます。
mapsライブラリとmarkerライブラリを読み込みます。- DOM から地図要素を取得します。
- 内部地図に追加の地図オプション を設定します。
- 地図にマーカーを追加します。
地図オブジェクトを取得してオプションを設定する
innerMap は Map クラスのインスタンスを表します。
地図のオプションを設定するには、地図要素から innerMap
インスタンスを取得して setOptionsを呼び出します。
次のスニペットは、DOM から innerMap インスタンスを取得し、setOptions を呼び出す方法を示しています。
// Get the gmp-map element.
const mapElement = document.querySelector(
  "gmp-map"
) as google.maps.MapElement;

// Get the inner map.
const innerMap = mapElement.innerMap;

// Set map options.
innerMap.setOptions({
  mapTypeControl: false,
});
地図が読み込まれるまで待つ
gmp-map 要素を使用すると、地図は非同期で読み込まれます。初期化時に他のリクエスト(位置情報やプレイスの詳細リクエストなど)が行われると、競合状態が発生する可能性があります。地図が完全に読み込まれた後にのみコードが実行されるようにするには、次の例に示すように、初期化関数で addListenerOnce アイドル イベント ハンドラを使用します。
// Do things once the map has loaded.
google.maps.event.addListenerOnce(innerMap, 'idle', () => {
    // Run this code only after the map has loaded.
    console.log("The map is now ready!");
});
これにより、地図が読み込まれた後にのみコードが実行されるようになります。ハンドラは、アプリのライフサイクル中に 1 回だけトリガーされます。
コードサンプルの全文
コードサンプルの全文は以下をご覧ください。
TypeScript
async function init(): Promise<void> { // Request the needed libraries. const [{ AdvancedMarkerElement }] = await Promise.all([ google.maps.importLibrary('marker'), google.maps.importLibrary('maps'), ]); // Get the gmp-map element. const mapElement = document.querySelector('gmp-map')!; // Get the inner map. const innerMap = mapElement.innerMap; // Set map options. innerMap.setOptions({ mapTypeControl: false, }); // Add a marker positioned at the map center (Uluru). new AdvancedMarkerElement({ map: innerMap, position: mapElement.center, title: 'Uluru/Ayers Rock', }); } void init();
JavaScript
async function init() { // Request the needed libraries. const [{ AdvancedMarkerElement }] = await Promise.all([ google.maps.importLibrary('marker'), google.maps.importLibrary('maps'), ]); // Get the gmp-map element. const mapElement = document.querySelector('gmp-map'); // Get the inner map. const innerMap = mapElement.innerMap; // Set map options. innerMap.setOptions({ mapTypeControl: false, }); // Add a marker positioned at the map center (Uluru). new AdvancedMarkerElement({ map: innerMap, position: mapElement.center, title: 'Uluru/Ayers Rock', }); } void init();
CSS
/* * Always set the map height explicitly to define the size of the div element * that contains the map. */ gmp-map { height: 100%; } /* * Optional: Makes the sample page fill the window. */ html, body { height: 100%; margin: 0; padding: 0; }
HTML
<html>
<head>
<title>Add a Map</title>
<link rel="stylesheet" type="text/css" href="./style.css" />
<script type="module" src="./index.js"></script>
<script>
// prettier-ignore
(g=>{var h,a,k,p="The Google Maps JavaScript API",c="google",l="importLibrary",q="__ib__",m=document,b=window;b=b[c]||(b[c]={});var d=b.maps||(b.maps={}),r=new Set,e=new URLSearchParams,u=()=>h||(h=new Promise(async(f,n)=>{await (a=m.createElement("script"));e.set("libraries",[...r]+"");for(k in g)e.set(k.replace(/[A-Z]/g,t=>"_"+t[0].toLowerCase()),g[k]);e.set("callback",c+".maps."+q);a.src=`https://maps.${c}apis.com/maps/api/js?`+e;d[q]=f;a.onerror=()=>h=n(Error(p+" could not load."));a.nonce=m.querySelector("script[nonce]")?.nonce||"";m.head.append(a)}));d[l]?console.warn(p+" only loads once. Ignoring:",g):d[l]=(f,...n)=>r.add(f)&&u().then(()=>d[l](f,...n))})({
key: "AIzaSyA6myHzS10YXdcazAFalmXvDkrYCp5cLc8"
});
</script>
</head>
<body>
<!-- The map, centered at Uluru, Australia. -->
<gmp-map center="-25.344,131.031" zoom="4" map-id="DEMO_MAP_ID">
<div id="controls" slot="control-inline-start-block-start">
<h3>My Google Maps Demo</h3>
</div>
</gmp-map>
</body>
</html>サンプルを試す
マーカーについて詳しくは、次の記事をご覧ください。
ヒントとトラブルシューティング
- 詳しくは、緯度と経度の座標を取得する方法、または住所を地理座標に変換する方法をご覧ください。
- スタイルやプロパティなどのオプションを微調整して、地図をカスタマイズできます。地図のカスタマイズについて詳しくは、スタイルと地図上への図形描画に関するガイドをご覧ください。
- ウェブブラウザでデベロッパー ツール コンソールを使用すると、コードをテストして実行したり、エラーレポートを確認したり、コードの問題を解決したりできます。
- Chrome でコンソールを開くには、キーボード ショートカットを使用します。
Mac の場合は Command+Option+J キー、Windows の場合は Ctrl+Shift+J キーです。 Google マップ上のビジネス拠点の緯度と経度の座標を取得する手順は次のとおりです。
- ブラウザで Google マップを開きます。
- 地図上で、座標が必要な場所の正確な位置を右クリックします。
- メニューから緯度と経度の座標を選択します。
ジオコーディング サービスを使用すると、住所を緯度と経度の座標に変換できます。デベロッパー ガイドで、ジオコーディング サービスの利用方法について詳しく説明しています。