iOS용 Maps SDK에서는 지도에 도형을 추가하는 다양한 방법을 제공합니다. 다음과 같은 셰이프가 지원됩니다.
- 다중선은 일련의 연결된 선분으로서 원하는 도형을 무엇이든 만들 수 있으며 지도에 경로를 표시하는 데 사용할 수 있습니다.
- 다각형(Polygon)은 닫혀 있는 도형으로서, 지도에서 영역을 표시하는 데 사용할 수 있습니다.
- 원은 지표면의 원을 지리적으로 정확하게 투영한 것입니다.
다양한 방식으로 각 셰이프의 모양을 수정할 수 있습니다.
다중선
폴리라인으로 지도에 선을 그릴 수 있습니다. GMSPolyline 객체는 일련의 선분으로 표시되는 위치의 순서가 지정된 시퀀스를 나타냅니다. GMSStrokeStyle을 사용하여 다중선의 색상을 설정할 수 있습니다.
다중선을 만들려면 두 개 이상의 점으로 구성된 해당 GMSMutablePath 객체를 만들어 경로를 지정해야 합니다.
각 CLLocationCoordinate2D는 지구 표면의 한 지점을 나타냅니다. 선분은 경로에 추가한 순서에 따라 위치 지점 간에 그려집니다. addCoordinate: 또는 addLatitude:longitude: 메서드를 사용하여 경로에 점을 추가할 수 있습니다.
Swift
let path = GMSMutablePath()
path.add(CLLocationCoordinate2D(latitude: -33.85, longitude: 151.20))
path.add(CLLocationCoordinate2D(latitude: -33.70, longitude: 151.40))
path.add(CLLocationCoordinate2D(latitude: -33.73, longitude: 151.41))
let polyline = GMSPolyline(path: path)
Objective-C
GMSMutablePath *path = [GMSMutablePath path];
[path addCoordinate:CLLocationCoordinate2DMake(-33.85, 151.20)];
[path addCoordinate:CLLocationCoordinate2DMake(-33.70, 151.40)];
[path addCoordinate:CLLocationCoordinate2DMake(-33.73, 151.41)];
GMSPolyline *polyline = [GMSPolyline polylineWithPath:path];
다중선 추가
GMSMutablePath객체를 만듭니다.addCoordinate:또는addLatitude:longitude:메서드를 사용하여 경로의 점을 설정합니다.- 경로를 인수로 사용하여 새
GMSPolyline객체를 인스턴스화합니다. - 필요에 따라
strokeWidth,strokeColor과 같은 다른 속성을 설정합니다. GMSPolyline의map속성을 설정합니다.- 다중선이 지도에 표시됩니다.
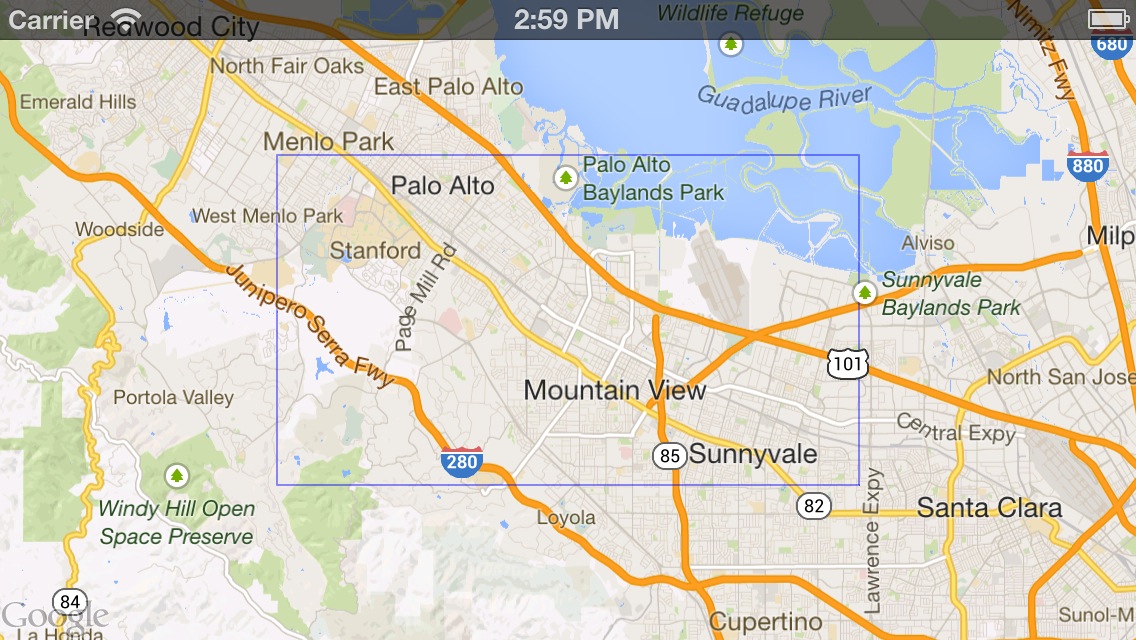
다음 코드 스니펫은 지도에 사각형을 추가합니다.
Swift
let rectanglePath = GMSMutablePath()
rectanglePath.add(CLLocationCoordinate2D(latitude: 37.36, longitude: -122.0))
rectanglePath.add(CLLocationCoordinate2D(latitude: 37.45, longitude: -122.0))
rectanglePath.add(CLLocationCoordinate2D(latitude: 37.45, longitude: -122.2))
rectanglePath.add(CLLocationCoordinate2D(latitude: 37.36, longitude: -122.2))
rectanglePath.add(CLLocationCoordinate2D(latitude: 37.36, longitude: -122.0))

let rectangle = GMSPolyline(path: path)
rectangle.map = mapView
Objective-C
GMSMutablePath *rectanglePath = [GMSMutablePath path];
[rectanglePath addCoordinate:CLLocationCoordinate2DMake(37.36, -122.0)];
[rectanglePath addCoordinate:CLLocationCoordinate2DMake(37.45, -122.0)];
[rectanglePath addCoordinate:CLLocationCoordinate2DMake(37.45, -122.2)];
[rectanglePath addCoordinate:CLLocationCoordinate2DMake(37.36, -122.2)];
[rectanglePath addCoordinate:CLLocationCoordinate2DMake(37.36, -122.0)];

GMSPolyline *rectangle = [GMSPolyline polylineWithPath:path];
rectangle.map = mapView;

다중선 제거
GMSPolyline의 map 속성을 nil로 설정하여 지도에서 다중선을 삭제할 수 있습니다. 또는 GMSMapView
clear 메서드를 호출하여 지도에서 다중선 및 기타 도형을 포함한 모든 오버레이를 삭제할 수 있습니다.
Swift
mapView.clear()
Objective-C
[mapView clear];
다중선 맞춤설정
GMSPolyline 객체는 선의 모양을 제어하는 여러 속성을 제공합니다. 지원되는 옵션은 다음과 같습니다.
strokeWidth- 전체 선의 너비(화면 포인트)입니다. 기본값은 1입니다. 지도를 확대/축소해도 너비는 조정되지 않습니다.
geodesic-
YES인 경우 이 다중선 가장자리를 최단 거리로 렌더링합니다. 최단 거리 선분은 지표면을 따라 가장 짧은 경로를 따르며 메르카토르 투영법을 사용한 지도에는 곡선으로 표시될 수 있습니다. 측지선이 아닌 선분은 지도에서 직선으로 그려집니다. 기본값은NO입니다. spans- 다중선의 하나 이상의 세그먼트 색상을 지정하는 데 사용됩니다. spans 속성은
GMSStyleSpan객체의 배열입니다.spans속성을 설정하는 것이 다중선의 색상을 변경하는 기본 방법입니다. strokeColor- 다중선의 색상을 지정하는
UIColor객체입니다. 기본값은blueColor입니다.spans이 설정된 경우strokeColor속성은 무시됩니다.
다음 스니펫은 멜버른에서 퍼스까지의 최단 거리 보간을 굵은 다중선으로 추가합니다.
Swift
let path = GMSMutablePath()
path.addLatitude(-37.81319, longitude: 144.96298)
path.addLatitude(-31.95285, longitude: 115.85734)
let polyline = GMSPolyline(path: path)
polyline.strokeWidth = 10.0
polyline.geodesic = true
polyline.map = mapView
Objective-C
GMSMutablePath *path = [GMSMutablePath path];
[path addLatitude:-37.81319 longitude:144.96298];
[path addLatitude:-31.95285 longitude:115.85734];
GMSPolyline *polyline = [GMSPolyline polylineWithPath:path];
polyline.strokeWidth = 10.f;
polyline.geodesic = YES;
polyline.map = mapView;
다중선을 지도에 추가한 후 수정하려면 GMSPolyline 객체를 보유하고 있어야 합니다.
Swift
polyline.strokeColor = .blue
Objective-C
polyline.strokeColor = [UIColor blueColor];
다중선의 색상 변경
폴리라인은 지도 위에 일련의 세그먼트로 그려집니다. spans 속성을 사용하여 개별 세그먼트 또는 전체 선의 색상을 변경할 수 있습니다. 이 속성을 사용하면 다중선의 색상을 세부적으로 제어할 수 있지만 전체 선에 단일 스타일을 적용할 수 있는 여러 편의 기능이 있습니다.
아래 스니펫은 spanWithColor: 메서드를 사용하여 전체 선의 색상을 빨간색으로 변경합니다.
Swift
polyline.spans = [GMSStyleSpan(color: .red)]
Objective-C
polyline.spans = @[[GMSStyleSpan spanWithColor:[UIColor redColor]]];
또는 GMSStrokeStyle 객체에 이미 액세스할 수 있는 경우 spanWithStyle: 메서드를 사용할 수 있습니다.
Swift
let solidRed = GMSStrokeStyle.solidColor(.red)
polyline.spans = [GMSStyleSpan(style: solidRed)]
Objective-C
GMSStrokeStyle *solidRed = [GMSStrokeStyle solidColor:[UIColor redColor]];
polyline.spans = @[[GMSStyleSpan spanWithStyle:solidRed]];
iOS용 Maps SDK 버전 1.7 이전에는 strokeColor 단일 속성을 사용하여 GMSPolyline의 전체 색상을 설정할 수 있었습니다. spans 속성은 strokeColor보다 우선합니다.
Swift
polyline.strokeColor = .red
Objective-C
polyline.strokeColor = [UIColor redColor];
스타일
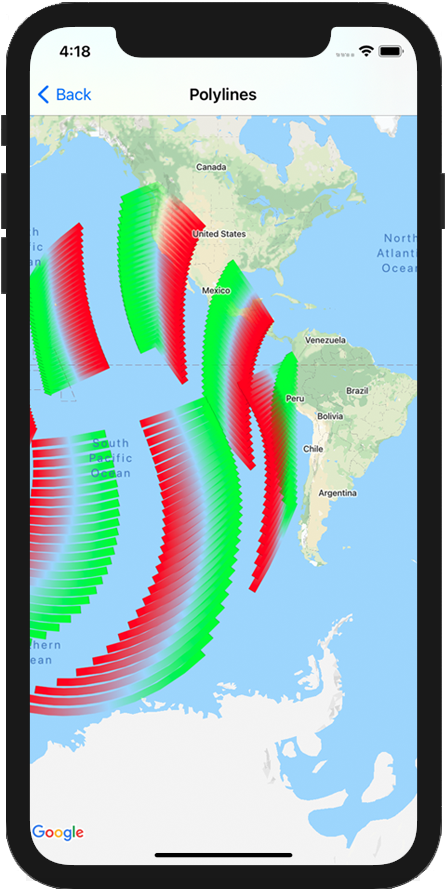
앱에서 동일한 획 색상을 여러 번 적용하는 경우 재사용 가능한 스타일을 정의하는 것이 유용할 수 있습니다. 다중선 스타일은 GMSStrokeStyle 객체를 사용하여 지정됩니다. 획 스타일은 단색이거나 한 색상에서 다른 색상으로의 그라데이션일 수 있습니다. 스타일을 만든 후에는 spanWithStyle: 메서드를 사용하여 GMSStyleSpan에 적용할 수 있습니다.
Swift
// Create two styles: one that is solid blue, and one that is a gradient from red to yellow
let solidBlue = GMSStrokeStyle.solidColor(.blue)
let solidBlueSpan = GMSStyleSpan(style: solidBlue)
let redYellow = GMSStrokeStyle.gradient(from: .red, to: .yellow)
let redYellowSpan = GMSStyleSpan(style: redYellow)
Objective-C
// Create two styles: one that is solid blue, and one that is a gradient from red to yellow
GMSStrokeStyle *solidBlue = [GMSStrokeStyle solidColor:[UIColor blueColor]];
GMSStyleSpan *solidBlueSpan = [GMSStyleSpan spanWithStyle:solidBlue];
GMSStrokeStyle *redYellow =
    [GMSStrokeStyle gradientFromColor:[UIColor redColor] toColor:[UIColor yellowColor]];
GMSStyleSpan *redYellowSpan = [GMSStyleSpan spanWithStyle:redYellow];
span의 스타일은 폴리라인이 끝날 때까지 또는 새 스타일이 설정될 때까지 계속됩니다. 다중선의 spans 속성을 단일 GMSStyleSpan로 설정하여 전체 선의 색상을 변경할 수 있습니다. 이 예에서는 다중선의 전체 길이에 그라데이션을 적용하는 방법을 보여줍니다.
Swift
polyline.spans = [GMSStyleSpan(style: redYellow)]
Objective-C
polyline.spans = @[[GMSStyleSpan spanWithStyle:redYellow]];
개별 선 세그먼트의 색상 변경
다중선의 각 선분을 개별적으로 스타일 지정하려면 GMSStyleSpan 객체 배열을 만들고 이를 spans 속성에 전달하면 됩니다. 기본적으로 배열의 각 항목에서는 해당 선분의 색상을 설정합니다. 배열의 요소가 선의 세그먼트보다 많으면 추가 요소는 무시됩니다. 배열의 요소가 더 적은 경우 마지막 GMSStyleSpan은 나머지 행의 색상을 설명합니다.
색상 블록 또는 그라데이션 폴리라인을 사용하여 고도나 속도와 같은 폴리라인을 따라 변경사항을 표시할 수 있습니다. 아래 스니펫은 다중선의 처음 두 선분의 색상을 빨간색으로 설정하고 나머지 선은 빨간색에서 노란색으로의 그라데이션입니다.
Swift
polyline.spans = [
  GMSStyleSpan(style: solidRed),
  GMSStyleSpan(style: solidRed),
  GMSStyleSpan(style: redYellow)
]
Objective-C
polyline.spans = @[[GMSStyleSpan spanWithStyle:solidRed],
                   [GMSStyleSpan spanWithStyle:solidRed],
                   [GMSStyleSpan spanWithStyle:redYellow]];
spanWithStyle:segments: 메서드를 사용하여 여러 세그먼트의 스타일을 한 번에 설정할 수 있습니다. 예를 들어, 다음 코드는 위의 코드와 동일합니다.
스타일은 선의 나머지 부분을 설명하는 데 사용되므로 최종 GMSStyleSpan의 세그먼트 길이는 항상 무시됩니다.
Swift
polyline.spans = [
  GMSStyleSpan(style: solidRed, segments:2),
  GMSStyleSpan(style: redYellow, segments:10)
]
Objective-C
polyline.spans = @[[GMSStyleSpan spanWithStyle:solidRed segments:2],
                   [GMSStyleSpan spanWithStyle:redYellow segments:10]];
부분 세그먼트
세그먼트는 분수 값으로 지정될 수도 있습니다. 이렇게 하면 세그먼트의 소수점 이하 부분에 스타일이 적용되어 단일 세그먼트가 분할될 수 있습니다. 각 GMSStyleSpan는 이전 GMSStyleSpan 바로 뒤에 시작됩니다. 아래 예에서 회색은 두 번째 세그먼트의 ½부터 시작하여 세 번째 세그먼트의 ½까지 계속됩니다.
Swift
polyline.spans = [
  GMSStyleSpan(style: solidRed, segments: 2.5),
  GMSStyleSpan(color: .gray),
  GMSStyleSpan(color: .purple, segments: 0.75),
  GMSStyleSpan(style: redYellow)
]
Objective-C
polyline.spans = @[[GMSStyleSpan spanWithStyle:solidRed segments:2.5],
                   [GMSStyleSpan spanWithColor:[UIColor grayColor]],
                   [GMSStyleSpan spanWithColor:[UIColor purpleColor] segments:0.75],
                   [GMSStyleSpan spanWithStyle:redYellow]];
다중선에 반복되는 색상 패턴 추가
폴리라인에 패턴을 추가하려면 GMSGeometryUtils의 GMSStyleSpans 유틸리티 메서드를 사용하면 됩니다. GMSStyleSpans 메서드는 반복 패턴을 정의하는 두 개의 배열을 허용합니다. 한 배열은 반복해야 하는 스타일을 설정하고 다른 배열은 반복 간격을 정의합니다. 함께 사용하면 길이 또는 사용 가능한 세그먼트 수와 관계없이 모든 폴리라인에 적용할 수 있는 패턴을 만들 수 있습니다.
예를 들어 아래 코드 스니펫은 검은색과 흰색이 번갈아 나오는 패턴이 있는 다중선을 정의합니다. 유형이 kGMSLengthRhumb로 지정되어 있으므로 길이는 럼블라인 (메르카토르에서는 직선)을 따라 미터로 처리됩니다.
Swift
let styles = [
  GMSStrokeStyle.solidColor(.white),
  GMSStrokeStyle.solidColor(.black)
]
let lengths: [NSNumber] = [100000, 50000]
polyline.spans = GMSStyleSpans(
  polyline.path!,
  styles,
  lengths,
  GMSLengthKind.rhumb
)
Objective-C
NSArray *styles = @[[GMSStrokeStyle solidColor:[UIColor whiteColor]],
                    [GMSStrokeStyle solidColor:[UIColor blackColor]]];
NSArray *lengths = @[@100000, @50000];
polyline.spans = GMSStyleSpans(polyline.path, styles, lengths, kGMSLengthRhumb);
스프라이트 스탬프 처리된 다중선
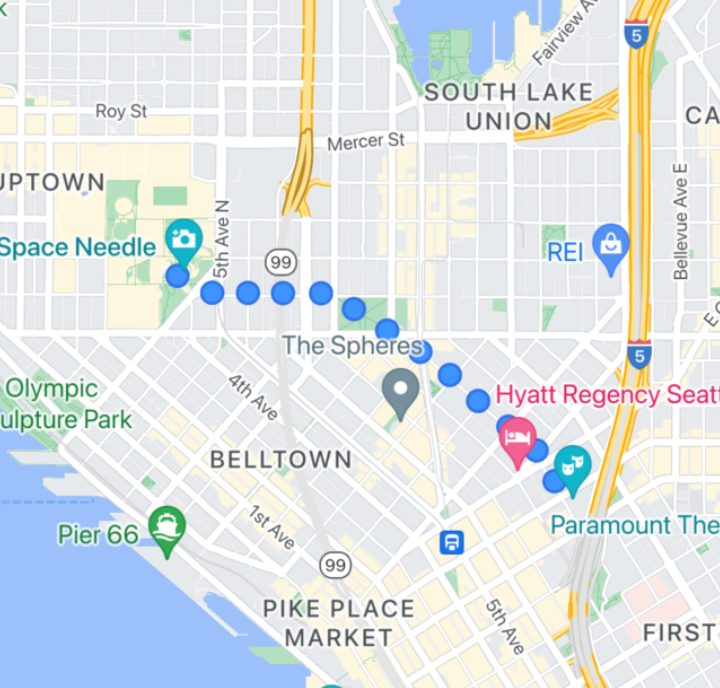
스프라이트 스탬프 처리된 다중선을 사용하면 원하는 반복 비트맵 이미지를 사용하여 다중선을 만들 수 있습니다. 모양은 배경 획이 명확하게 표시되지만 스탬프는 선 모서리에서 잘리지 않으므로 도보 경로를 설명하는 점과 같은 상황에 유용합니다.

GMSSpriteStyle를 사용하여 이 기능을 사용하고 GMSStrokeStyle의 stampStyle 속성을 사용하여 스탬프로 설정할 수 있습니다.
Swift
let path = GMSMutablePath()
path.addLatitude(-37.81319, longitude: 144.96298)
path.addLatitude(-31.95285, longitude: 115.85734)
let polyline = GMSPolyline(path: path)
polyline.strokeWidth = 20
let image = UIImage(named: "imageFromBundleOrAsset")! // Image could be from anywhere
let stampStyle = GMSSpriteStyle(image: image)
let transparentStampStroke = GMSStrokeStyle.transparentStroke(withStamp: stampStyle)
let span = GMSStyleSpan(style: transparentStampStroke)
polyline.spans = [span]
polyline.map = mapView
Objective-C
GMSMutablePath *path = [GMSMutablePath path];
[path addLatitude:-37.81319 longitude:144.96298];
[path addLatitude:-31.95285 longitude:115.85734];
polyline.strokeWidth = 20;
GMSPolyline *polyline = [GMSPolyline polylineWithPath:path];

UIImage *image = [UIImage imageNamed:@"imageFromBundleOrAsset"];
GMSStrokeStyle *transparentStampStroke = [GMSStrokeStyle transparentStrokeWithStampStyle:[GMSSpriteStyle spriteStyleWithImage:image]];

GMSStyleSpan *span = [GMSStyleSpan spanWithStyle:transparentStampStroke];
polyline.spans = @[span];
polyline.map = _mapView;
텍스처 스탬프 처리된 다중선
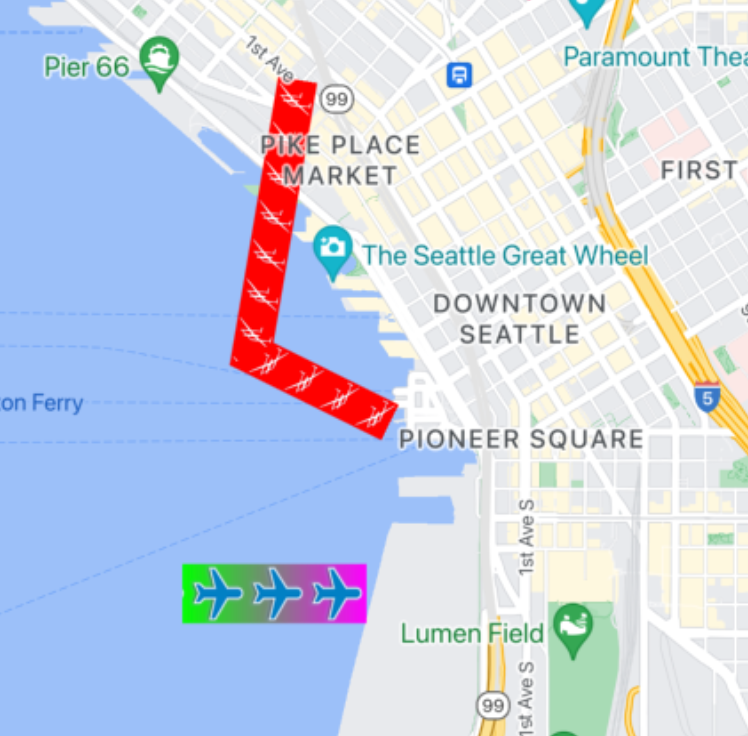
질감 스탬프 처리된 다중선을 사용하면 원하는 반복 질감을 사용하여 다중선을 만들 수 있습니다. 도형은 투명한 단색 또는 그라데이션 배경 획으로 표시할 수 있습니다. 확대/축소 수준이 변경되면 텍스처의 크기가 조정됩니다. 경로 또는 경로 지점의 끝이나 시작 부분에 있는 이미지가 특정 확대/축소 수준에서 잘립니다.

GMSTextureStyle를 사용하여 이 기능을 사용하고 GMSStrokeStyle의 stampStyle 속성을 사용하여 스탬프로 설정할 수 있습니다.
Swift
let path = GMSMutablePath()
path.addLatitude(-37.81319, longitude: 144.96298)
path.addLatitude(-31.95285, longitude: 115.85734)
let polyline = GMSPolyline(path: path)
polyline.strokeWidth = 20
let redWithStamp = GMSStrokeStyle.solidColor(.red)
let image = UIImage(named: "imageFromBundleOrAsset")! // Image could be from anywhere
redWithStamp.stampStyle = GMSTextureStyle(image: image)
let span = GMSStyleSpan(style: redWithStamp)
polyline.spans = [span]
polyline.map = mapView
Objective-C
GMSMutablePath *path = [GMSMutablePath path];
[path addLatitude:-37.81319 longitude:144.96298];
[path addLatitude:-31.95285 longitude:115.85734];
GMSPolyline *polyline = [GMSPolyline polylineWithPath:path];
polyline.strokeWidth = 20;
GMSStrokeStyle *redWithStamp = [GMSStrokeStyle solidColor:[UIColor redColor]];

UIImage *image = [UIImage imageNamed:@"imageFromBundleOrAsset"]; // Image could be from anywhere
redWithStamp.stampStyle = [GMSTextureStyle textureStyleWithImage:image];

GMSStyleSpan *span = [GMSStyleSpan spanWithStyle:redWithStamp];
polyline.spans = @[span];
polyline.map = _mapView;
지도 기능
GMSMapView의 mapCapabilities 속성은 지도별 기능에 대한 프로그래매틱 검사를 추가합니다. 이는 특정 API를 호출하기 전에 특정 지도 capabilities를 사용할 수 있는지 확인하려는 경우에 유용합니다. 이 쿼리는 지도 뷰가 스프라이트 스탬프 폴리라인을 지원하는지 확인합니다.
Swift
let path = GMSMutablePath()
path.addLatitude(-37.81319, longitude: 144.96298)
path.addLatitude(-31.95285, longitude: 115.85734)
let polyline = GMSPolyline(path: path)
polyline.strokeWidth = 20
let image = UIImage(named: "imageFromBundleOrAsset")! // Image could be from anywhere
let spans: [GMSStyleSpan]
if (mapView.mapCapabilities.contains(.spritePolylines)) {
  let spriteStyle = GMSSpriteStyle(image: image)
  let stroke = GMSStrokeStyle.transparentStroke(withStamp: spriteStyle)
  spans = [ GMSStyleSpan(style: stroke) ]
} else {
  let stroke = GMSStrokeStyle.solidColor(.clear)
  stroke.stampStyle = GMSTextureStyle(image: image)
  spans = [ GMSStyleSpan(style: stroke) ]
}
polyline.spans = spans
polyline.map = mapView
Objective-C
GMSMutablePath *path = [GMSMutablePath path];
[path addLatitude:-37.81319 longitude:144.96298];
[path addLatitude:-31.95285 longitude:115.85734];

UIImage *_Nonnull image = [UIImage imageNamed:@"imageFromBundleOrAsset"]; // Image could be from anywhere

NSArray<GMSStyleSpan *> * spans;
if (_mapView.mapCapabilities & GMSMapCapabilityFlagsSpritePolylines) {
  GMSSpriteStyle *spriteStyle = [GMSSpriteStyle spriteStyleWithImage:image];
  GMSStrokeStyle *stroke = [GMSStrokeStyle transparentStrokeWithStampStyle:spriteStyle];
  spans = @[ [GMSStyleSpan spanWithStyle:stroke] ];
} else {
  GMSStrokeStyle *stroke = [GMSStrokeStyle solidColor:UIColor.clearColor];
  stroke.stampStyle = [GMSTextureStyle textureStyleWithImage:image];
  spans = @[ [GMSStyleSpan spanWithStyle:stroke] ];
}

GMSPolyline *polyline = [GMSPolyline polylineWithPath:path];
polyline.strokeWidth = 20;
polyline.spans = spans;
polyline.map = _mapView;
이 패턴을 사용하면 변경사항을 구독하고 지도 뷰 상태로 업데이트에 반응할 수 있습니다. GMSMapViewDelegate에서 didChangeMapCapabilities를 구현하여 기능 사용 가능 여부에 관한 업데이트를 받을 수도 있습니다.
다각형
다각형은 순서가 지정된 일련의 좌표로 이루어졌다는 점에서 다중선과 유사합니다. 그러나 다각형은 끝이 열려 있지 않으며, 닫힌 루프 내에서 솔리드 영역을 정의하도록 설계되어 있습니다. 다각형은 iOS용 Maps SDK에서 GMSPolygon 클래스로 정의됩니다.
GMSPolyline을 추가하는 것과 동일한 방법으로 GMSPolygon을 지도에 추가할 수 있습니다. 먼저 해당 GMSMutablePath 객체를 만들고 여기에 점을 추가하여 경로를 지정합니다.
이러한 점들은 다각형의 윤곽선을 형성합니다. 각 CLLocationCoordinate2D는 지구 표면의 한 지점을 나타냅니다. 선분은 경로에 추가한 순서에 따라 점 사이에 그려집니다.
다각형 추가
GMSMutablePath객체를 만듭니다.addCoordinate:또는addLatitude:longitude:메서드를 사용하여 경로의 점을 설정합니다. 이러한 점들은 다각형의 윤곽선을 형성합니다.- 경로를 인수로 사용하여 새
GMSPolygon객체를 인스턴스화합니다. strokeWidth,strokeColor,fillColor와 같은 다른 속성을 원하는 대로 설정합니다.GMSPolygon.map속성을 설정하여 다각형을GMSMapView객체에 할당합니다.- 다각형이 지도에 표시됩니다.
다음 코드 스니펫은 지도에 직사각형을 추가합니다.
Swift
// Create a rectangular path
let rect = GMSMutablePath()
rect.add(CLLocationCoordinate2D(latitude: 37.36, longitude: -122.0))
rect.add(CLLocationCoordinate2D(latitude: 37.45, longitude: -122.0))
rect.add(CLLocationCoordinate2D(latitude: 37.45, longitude: -122.2))
rect.add(CLLocationCoordinate2D(latitude: 37.36, longitude: -122.2))

// Create the polygon, and assign it to the map.
let polygon = GMSPolygon(path: rect)
polygon.fillColor = UIColor(red: 0.25, green: 0, blue: 0, alpha: 0.05);
polygon.strokeColor = .black
polygon.strokeWidth = 2
polygon.map = mapView
Objective-C
// Create a rectangular path
GMSMutablePath *rect = [GMSMutablePath path];
[rect addCoordinate:CLLocationCoordinate2DMake(37.36, -122.0)];
[rect addCoordinate:CLLocationCoordinate2DMake(37.45, -122.0)];
[rect addCoordinate:CLLocationCoordinate2DMake(37.45, -122.2)];
[rect addCoordinate:CLLocationCoordinate2DMake(37.36, -122.2)];

// Create the polygon, and assign it to the map.
GMSPolygon *polygon = [GMSPolygon polygonWithPath:rect];
polygon.fillColor = [UIColor colorWithRed:0.25 green:0 blue:0 alpha:0.05];
polygon.strokeColor = [UIColor blackColor];
polygon.strokeWidth = 2;
polygon.map = mapView;
다각형을 지도에 추가하기 전이나 후에 그 모양을 맞춤설정할 수 있습니다.
다각형 제거
GMSPolygon.map 속성을 nil으로 설정하고 layer을 상위 요소에서 분리하여 다각형을 삭제합니다.
Swift
 polygon.map = nil
 polygon.layer.removeFromSuperLayer()
Objective-C
 polygon.map = nil;
 [polygon.layer removeFromSuperlayer];
원
일반 GMSPolygon 클래스 외에도 iOS용 Maps SDK에는 GMSCircle이 포함되어 있어 지구 표면에 원을 그릴 수 있습니다.
원을 구성하려면 다음 두 가지 속성을 지정해야 합니다.
CLLocationCoordinate2D로서의positionradius(단위: 미터)
그러면 특정 center에서 radius 미터만큼 떨어진 지표면의
모든 지점들을 연결한 집합으로서 원이 정의됩니다. 지도 API에서 메르카토르 투영법을 사용하는 방식 때문에 구체는 평면에 렌더링됩니다. 적도 근처에 위치할 때는 지도에서 거의 완벽한 원이 표시되지만, 적도로부터 원이 멀어지면 화면에서 원의 형태가 점점 사라지고 다른 모양으로 표시되게 됩니다.
서클 추가
다음 코드 스니펫은 지도에 원을 추가합니다.
Swift
let circleCenter = CLLocationCoordinate2D(latitude: 37.35, longitude: -122.0)
let circle = GMSCircle(position: circleCenter, radius: 1000)
circle.map = mapView
Objective-C
CLLocationCoordinate2D circleCenter = CLLocationCoordinate2DMake(37.35, -122.0);
GMSCircle *circle = [GMSCircle circleWithPosition:circleCenter
                                         radius:1000];
circle.map = mapView;
원을 지도에 추가하기 전후로 그 모양을 맞춤설정할 수 있습니다.
서클 맞춤설정
GMSCircle의 속성을 수정하여 맞춤 색상과 획 너비를 지정할 수 있습니다. 지원되는 옵션은 다음과 같습니다.
fillColor- 원의 내부 색상을 지정하는
UIColor객체입니다. 기본값은 '투명'입니다 strokeColor- 원 윤곽선의 색상을 지정하는
UIColor객체입니다. 기본값은blackColor입니다. strokeWidth- 원의 윤곽선 두께(화면 포인트)입니다. 기본값은 1입니다. 지도를 확대/축소해도 두께는 조정되지 않습니다.
다음 스니펫은 반투명 빨간색 내부가 있는 두꺼운 빨간색 원을 추가합니다.
Swift
circle.fillColor = UIColor(red: 0.35, green: 0, blue: 0, alpha: 0.05)
circle.strokeColor = .red
circle.strokeWidth = 5
Objective-C
circle.fillColor = [UIColor colorWithRed:0.25 green:0 blue:0 alpha:0.05];
circle.strokeColor = [UIColor redColor];
circle.strokeWidth = 5;
빈 다각형 만들기
단일 GMSPolygon 객체에서 여러 개의 경로를 조합하여 채워진 고리 또는 도넛과 같은 복잡한 도형을 만들 수 있습니다. 여기서 다각형 영역은 다각형 내의 별도 도형으로 표시됩니다. 복잡한 도형은 여러 경로로 구성됩니다.
다각형이 포함하는 가장 큰 영역을 지정하는 경로로 다각형을 만듭니다. 그런 다음 다각형의 holes 속성을 다각형 내의 구멍을 정의하는 하나 이상의 GMSPath 객체의 배열로 지정합니다.
작은 경로가 큰 경로에 의해 완전히 둘러싸이면 이 경로는 마치 다각형의 일부가 삭제된 것처럼 표시됩니다.
다음 코드 샘플에서는 구멍이 2개인 폴리곤을 생성합니다.
Swift
let hydeParkLocation = CLLocationCoordinate2D(latitude: -33.87344, longitude: 151.21135)
let camera = GMSCameraPosition.camera(withTarget: hydeParkLocation, zoom: 16)
let mapView = GMSMapView.map(withFrame: .zero, camera: camera)
mapView.animate(to: camera)

let hydePark = "tpwmEkd|y[QVe@Pk@BsHe@mGc@iNaAKMaBIYIq@qAMo@Eo@@[Fe@DoALu@HUb@c@XUZS^ELGxOhAd@@ZB`@J^BhFRlBN\\BZ@`AFrATAJAR?rAE\\C~BIpD"
let archibaldFountain = "tlvmEqq|y[NNCXSJQOB[TI"
let reflectionPool = "bewmEwk|y[Dm@zAPEj@{AO"

let hollowPolygon = GMSPolygon()
hollowPolygon.path = GMSPath(fromEncodedPath: hydePark)
hollowPolygon.holes = [GMSPath(fromEncodedPath: archibaldFountain)!, GMSPath(fromEncodedPath: reflectionPool)!]
hollowPolygon.fillColor = UIColor(red: 1.0, green: 0.0, blue: 0.0, alpha: 0.2)
hollowPolygon.strokeColor = UIColor(red: 1.0, green: 0.0, blue: 0.0, alpha: 1.0)
hollowPolygon.strokeWidth = 2
hollowPolygon.map = mapView
Objective-C
CLLocationCoordinate2D hydeParkLocation = CLLocationCoordinate2DMake(-33.87344, 151.21135);
GMSCameraPosition *camera = [GMSCameraPosition cameraWithTarget:hydeParkLocation
                                                           zoom:16];
mapView = [GMSMapView mapWithFrame:CGRectZero camera:camera];

NSString *hydePark = @"tpwmEkd|y[QVe@Pk@BsHe@mGc@iNaAKMaBIYIq@qAMo@Eo@@[Fe@DoALu@HUb@c@XUZS^ELGxOhAd@@ZB`@J^BhFRlBN\\BZ@`AFrATAJAR?rAE\\C~BIpD";
NSString *archibaldFountain = @"tlvmEqq|y[NNCXSJQOB[TI";
NSString *reflectionPool = @"bewmEwk|y[Dm@zAPEj@{AO";

GMSPolygon *hollowPolygon = [[GMSPolygon alloc] init];
hollowPolygon.path = [GMSPath pathFromEncodedPath:hydePark];
hollowPolygon.holes = @[[GMSPath pathFromEncodedPath:archibaldFountain],
                  [GMSPath pathFromEncodedPath:reflectionPool]];
hollowPolygon.fillColor = [UIColor colorWithRed:1.0 green:0.0 blue:0.0 alpha:0.2];
hollowPolygon.strokeColor = [UIColor colorWithRed:1.0 green:0.0 blue:0.0 alpha:1.0];
hollowPolygon.strokeWidth = 2;
hollowPolygon.map = mapView;

