סגנון מפה הוא קבוצה של התאמות אישיות חזותיות לתכונות של מפה
שמשויכות למזהה מפה. לאחר מכן, צריך להפנות למזהה המפה בקוד האפליקציה כדי להציג את המפה המותאמת אישית.
אפשר ליצור סגנון מפה לפני שיש מזהה מפה, אבל כדי להשתמש בסגנון צריך לשייך אותו למזהה מפה. כדי להשתמש בסגנון מפה, צריך לבצע את כל השלבים הבאים:
במסוף Google Cloud, עוברים אל Map Styles ובוחרים פרויקט, אם צריך.
בקטע סגנונות מפה, לוחצים על יצירת סגנון.
בתיבת הדו-שיח, בכרטיסייה סגנונות Google, בוחרים באחת מהאפשרויות הבאות:
Light (בהיר) כדי ליצור סגנון מפה בהיר, שבו סוג המפה הוא מפת דרכים.
scienceDark (כהה) כדי ליצור סגנון מפה כהה, שבו סוג המפה הוא roadmap dark (מפת דרכים כהה).
(אופציונלי) כדי להחיל את הווריאציה המונוכרומטית על סגנון המפה, בוחרים באפשרות מונוכרום.
כדי ליצור סגנון חדש ללא שם, בוחרים באפשרות התאמה אישית.
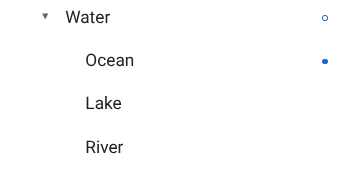
בוחרים מאפייני מפה ומשנים את הסגנון שלהם כדי ליצור את סגנון המפה הרצוי.
לצד תכונות במפה עם סגנונות מותאמים אישית מופיעה נקודה כחולה מלאה. אם משנים את הסגנון של פריט צאצא, הסגנון של פריט האב מוצג כעיגול כחול. מידע נוסף על ההיררכיה של סגנונות המפה זמין במאמר הסבר על ירושה והיררכיה של סגנונות מפה.
לוחצים על שמירה.
בתיבה Save and publish map style (שמירה ופרסום של סגנון המפה), מזינים שם לסגנון ואפשר גם להוסיף תיאור, ואז לוחצים על Save (שמירה).
הסגנון מתפרסם באופן אוטומטי, ומוצג הדף הראשי של הסגנון החדש.
שכפול סגנון
עוברים אל Map Styles (סגנונות מפה) ובוחרים פרויקט, אם צריך.
בוחרים אחד מהסגנונות הקיימים.
בדף הסגנון, לוחצים על שכפול.
בתיבה Duplicate Map Style (שכפול סגנון מפה), מזינים שם חדש למפה ואפשר גם להוסיף תיאור.
לוחצים על שמירה.
הסגנון מתפרסם באופן אוטומטי, ואפשר לראות את דף הבית של הסגנון החדש. משייכים אותו למזהה מפה כדי להשתמש בו במפות. פרטים נוספים מופיעים במאמר בנושא שיוך מזהה מפה לסגנון מפה.
כדי לשנות את הסגנון, לוחצים על התאמה אישית, מבצעים את השינויים ולוחצים על שמירה.
פרסום סגנון
כשיוצרים סגנון מפה חדש, המופע הראשון של סגנון המפה החדש מתפרסם באופן אוטומטי. אחרי זה, שומרים את השינויים כטיוטה, וכשמרוצים מהשינויים, צריך לפרסם אותם.
מבצעים את השינויים בסגנון המפה או בסגנון המפה המשוכפל. פרטים נוספים מופיעים במאמר בנושא שינוי סגנון.
לוחצים על שמירה כדי לשמור את השינויים כטיוטה.
כשמוכנים לפרסם את השינויים ולהפעיל אותם בכל מזהי המפות שמשתמשים בסגנון המפה הזה, לוחצים על פרסום.
סגנונות מפה שפורסמו לעומת סגנונות מפה בטיוטה
פורסם: סגנון מפה שפורסם פעיל. כל המפות שמשתמשות בסגנון המפה יציגו את הגרסה שפורסמה שלה.
טיוטה: גרסאות טיוטה של סגנון מפה הן עבודות בתהליך, ולא מוצגות במפות עד שמפרסמים אותן.
שינוי סגנון
אם רוצים לבצע שינויים בסגנון המפה, אפשר לערוך אותם ישירות בעורך הסגנונות. יש כמה אפשרויות לעדכון סגנון:
אם רוצים שהשינויים יתפרסמו ברגע שמוכנים: לוחצים על התאמה אישית ומבצעים את השינויים. לוחצים על שמירה כדי לשמור את השינויים כטיוטה, ואז לוחצים על פרסום כשמוכנים.
אם רוצים לבדוק את השינויים בסביבת בדיקה קודם: במקום לבצע שינויים ישירות בסגנון המפה, קודם משכפלים את הסגנון. לפרטים נוספים, אפשר לעיין במאמרים בנושא שכפול סגנון ובדיקת עדכונים של סגנון מפה.
אחרי שיוצרים סגנון מפה, אפשר לבצע בו שינויים בדף הראשי של הסגנון באחת מהדרכים הבאות:
עריכה: לוחצים על התאמה אישית.
שכפול: פרטים נוספים זמינים במאמר בנושא שכפול סגנון.
שינוי שם: שינוי השם של סגנון המפה.
מחיקה: מחיקת סגנון המפה.
שיוך הסגנון למזהה מפה
משייכים את הסגנון למזהה מפה כדי להציג את הסגנון המותאם אישית באתר ובאפליקציה. למזהה מפה יכול להיות משויך רק סגנון בהיר אחד (סוג מפת דרכים) וסגנון כהה אחד (סוג מפת דרכים כהה).science
כדי לשנות את הסגנון המשויך למזהה מפה, מבצעים את הפעולות הבאות במסוף Google Cloud:
עוברים אל ניהול מפות ובוחרים מזהה מפה.
בקטע 'סגנונות מפה', לוחצים על שינוי סגנון כדי לבחור סגנון מפה בהיר או כהה.
בחלונית מוצגים רק סגנונות עם סוג המפה 'מפת דרכים' לסגנונות בהירים, ורק סגנונות עם סוג המפה science 'מפת דרכים' כהה לסגנונות כהים.
בחלונית, בוחרים אחד מהסגנונות לקישור למזהה המפה הזה.
[[["התוכן קל להבנה","easyToUnderstand","thumb-up"],["התוכן עזר לי לפתור בעיה","solvedMyProblem","thumb-up"],["סיבה אחרת","otherUp","thumb-up"]],[["חסרים לי מידע או פרטים","missingTheInformationINeed","thumb-down"],["התוכן מורכב מדי או עם יותר מדי שלבים","tooComplicatedTooManySteps","thumb-down"],["התוכן לא עדכני","outOfDate","thumb-down"],["בעיה בתרגום","translationIssue","thumb-down"],["בעיה בדוגמאות/בקוד","samplesCodeIssue","thumb-down"],["סיבה אחרת","otherDown","thumb-down"]],["עדכון אחרון: 2025-09-05 (שעון UTC)."],[[["\u003cp\u003eA Map Style is a customizable set of visual elements applied to a map using a Map ID, which is referenced in your application code.\u003c/p\u003e\n"],["\u003cp\u003eMap Styles can be created by starting fresh, duplicating existing styles or versions, or importing JSON styling code.\u003c/p\u003e\n"],["\u003cp\u003eStyles exist as either published, live versions or drafts that can be edited and later published for use in your maps.\u003c/p\u003e\n"],["\u003cp\u003eYou can manage Map Styles by renaming, duplicating, deleting, associating with Map IDs, and restoring previous versions.\u003c/p\u003e\n"],["\u003cp\u003eTo utilize a Cloud-based Map Style in your application, associate the style with a Map ID and then add the Map ID to your app code.\u003c/p\u003e\n"]]],[],null,["Select platform: [Android](/maps/documentation/android-sdk/cloud-customization/map-styles \"View this page for the Android platform docs.\") [iOS](/maps/documentation/ios-sdk/cloud-customization/map-styles \"View this page for the iOS platform docs.\") [JavaScript](/maps/documentation/javascript/cloud-customization/map-styles \"View this page for the JavaScript platform docs.\") [Web Service](/maps/documentation/maps-static/cloud-customization/map-styles \"View this page for the Web Service platform docs.\")\n\n\u003cbr /\u003e\n\nA map style is a set of visual customizations to map features\nthat you associate with a map ID. You then reference the\nmap ID in your application code to display the customized map.\n\nYou can create a map style before you have a map ID; however, to use\nthe style, you must associate the style with a map ID. To use a map style,\nyou must take all of these steps:\n\n1. **Create and publish a map Style** . For details, see\n [Create a style](#create-style) and [Publish a style](#publish-style).\n\n2. **Create a map ID** . For details, see\n [Create a map ID](../map-ids/get-map-id).\n\n3. **Associate the map style with a map ID** . For details, see\n [Associate a map ID to a map style](#associate-style-with-map-id).\n\n4. **Add the map ID to your app** to display your style. For details, see\n [Add the map ID to your map](../map-ids/get-map-id#add-a-map-id-to-your-app).\n\n| **Tip**: Once the map ID is in your application code, you can change the map style without any changes in your application code, and your end users don't have to upgrade to see updated map styles. Instead, you edit the map style associated with the map ID, and changes show up in your application maps.\n\nThis document describes how to create, edit, and publish map styles and how to\nassociate them to a map ID.\n\nCreate a map style\n\nCreate a map style using one of these methods:\n\n- [Create](#create-new-style) a new style using the default Google map style.\n\n- [Duplicate](#duplicate-style) and modify an existing standard or customized style.\n\n- [Import a JSON map style](/maps/documentation/maps-static/cloud-customization/json#json-import) to use as a customized style.\n\nCreate a new style [Experimental](/maps/launch-stages#experimental) feature.\n\n1. In the Google Cloud console,\n go to [**Map Styles**](https://console.cloud.google.com/google/maps-apis/studio/styles), and select a project, if needed.\n\n2. In **Map styles** , click **Create style**.\n\n3. In the dialog, under the **Google styles** tab, select one of the following:\n\n - **Light** to create a light map style, where the map type is roadmap.\n - science **Dark** to create a dark map style, where the map type is roadmap dark.\n4. (Optional) To apply the monochrome variation to your map style, select **Monochrome**.\n\n5. Select **Customize** to create a new untitled style.\n\n6. Select map features and change their style to create the map style you want.\n\n Map features with custom styles have a solid blue dot next to them. If you\n customize a child style, the parent style displays a blue circle. For more\n information on map style hierarchy, see\n [Understand map style inheritance and hierarchy](/maps/documentation/maps-static/cloud-customization/map-hier).\n | **Note:** Not all styles appear at all zoom levels. For more information, see [Style zoom levels](/maps/documentation/maps-static/cloud-customization/zoom-levels).\n7. Click **Save**.\n\n8. In the **Save and publish map style** box, enter a name for your style and\n optionally a description, and click **Save**.\n\nThe style is automatically published, and you see your new style's\nmain page.\n| **Caution:** Making style changes but not explicitly saving them creates **Unsaved Changes** in your map style's version history. These versions are lost when you close the browser tab or when your Cloud console session ends.\n\nDuplicate a style\n\n1. Go to [**Map Styles**](https://console.cloud.google.com/google/maps-apis/studio/styles), and select a project, if needed.\n\n2. Select one of your existing styles.\n\n3. On the style page, click **Duplicate**.\n\n4. In the **Duplicate Map Style** box, enter a new map name and optionally\n a description.\n\n5. Click **Save**.\n\n The style is automatically published, and you can see your new style's\n main page. Associate it with a map ID to use it for your maps. For details,\n see [Associate a map ID to a map style](#associate-style-with-map-id).\n6. If you want to modify the style, click **Customize** , make changes,\n and click **Save**.\n\nPublish a style\n\nWhen you first create a new map style, that first instance of\nthe new map style is automatically published. After that, you save changes\nas a draft and when you're happy with the changes, you must publish.\n\n1. Make the changes to the map style or duplicated map style. For details, see\n [Change a style](#update-style).\n\n2. Click **Save** to save changes as a draft.\n\n3. When you're ready to publish and have your changes go live for any map IDs\n using that map style, click **Publish**.\n\nPublished versus Draft map styles\n\n**Published**: A published map style is live. Any maps that use the map style\ndisplay the published version of it.\n| **Note:** Style changes can take a few hours to propagate to your apps websites, and apps can take longer if the devices aren't connected to the internet. If you're still not seeing your style changes after a few hours, see [My style changes aren't updating](/maps/documentation/maps-static/cloud-customization/troubleshoot#style-delay).\n\n**Draft**: Draft versions of a map style are works in progress\nand aren't displayed in maps until you publish them.\n\nChange a style\n\nIf you want to make changes to your map style, you can make the changes right\nin the style editor. You have a couple of choices when you update a style:\n\n- **If you want changes to go live as soon as you're ready** : Click\n **Customize** and make your changes. Click **Save** to save your\n changes as a draft, and then click **Publish** when you are ready.\n\n- **If you want to test your changes in a test environment first** : Instead of\n making changes directly in the map style, duplicate the style first. For\n details, see [Duplicate a style](#duplicate-style) and\n [Test map style updates](/maps/documentation/maps-static/cloud-customization/test-style-updates).\n\nOnce you've created a map style, you can make changes to it on the style's\nmain page in any of the following ways:\n\n- **Edit** : Click **Customize**.\n\n- **Duplicate** : For details, see\n [Duplicate a style](/maps/documentation/maps-static/cloud-customization/map-styles#duplicate-style).\n\n- **Rename**: Rename the map style.\n\n- **Delete**: Delete the map style.\n\nAssociate your style to a map ID [Experimental](/maps/launch-stages#experimental) feature.\n\nAssociate your style to a map ID to display your custom style on your website\nand in your app. A map ID can have only one light style (roadmap type) and one\nscience dark style (roadmap dark type) associated with it.\n\nTo change the associated style for a map ID, do the following in the\nGoogle Cloud console:\n\n1. Go to **Map Management** and select a map ID.\n\n2. In the Map styles section, click **Change style** for a light or dark map style.\n\n The panel displays only styles with a roadmap map type for light styles, and\n only styles with a science roadmap dark map type for dark styles.\n3. In the panel, select one of the styles to associate to this map ID.\n\n4. Click **Done**.\n\n5. Click **Save** to apply all changes.\n\nTo use your cloud-based map style,\n[add the map ID to your app](../map-ids/get-map-id#add-a-map-id-to-your-app).\n\nNavigate on the preview map\n\nYou navigate on the preview map in the same way you navigate on any Google map:\n\n- Enter an address or location in the **Search Address** box.\n\n- Click the compass to center on your location. You may also have to grant\n location permissions.\n\n- Drag to move the map.\n\n- Zoom in or out using the plus (+) and minus (-).\n\nFind map features\n\nTo find a map feature that you want to style, you can use the filter or the map\ninspector.\n\nYou can also expand and collapse map feature categories to find the map\nfeature you want. Browse the list of map features at [What you can style on a map](/maps/documentation/maps-static/cloud-customization/taxonomy).\n\nFilter map features\n\nTo find map features using the filter, under **Map Features** , enter a\nterm in the **Filter** box.\n\nIf you can't find a map feature:\n\n- Don't use plurals. All of the categories are singular.\n\n- Try using a more generic term for the feature. For example, instead of\n \"pizza parlor\" or \"fast food,\" search for \"restaurant.\"\n\n- Try using a broader category, and then explore that category for the closest\n map feature. For example, instead of \"theater,\" search for \"entertainment.\"\n\nInspect map features\n\nTo find map features using the map inspector, perform the following steps:\n\n1. Left-click anywhere on the map to open the map inspector at your click point.\n\n2. Select a map feature in the map inspector to open it in the **Map Features** pane."]]