
This tutorial shows how to make a Google Chat app that a team can use to manage projects in real time. The Chat app uses Vertex AI to help teams write user stories (which represent features of a software system from the point of view of a user for the team to develop) and persists the stories in a Firestore database.
-
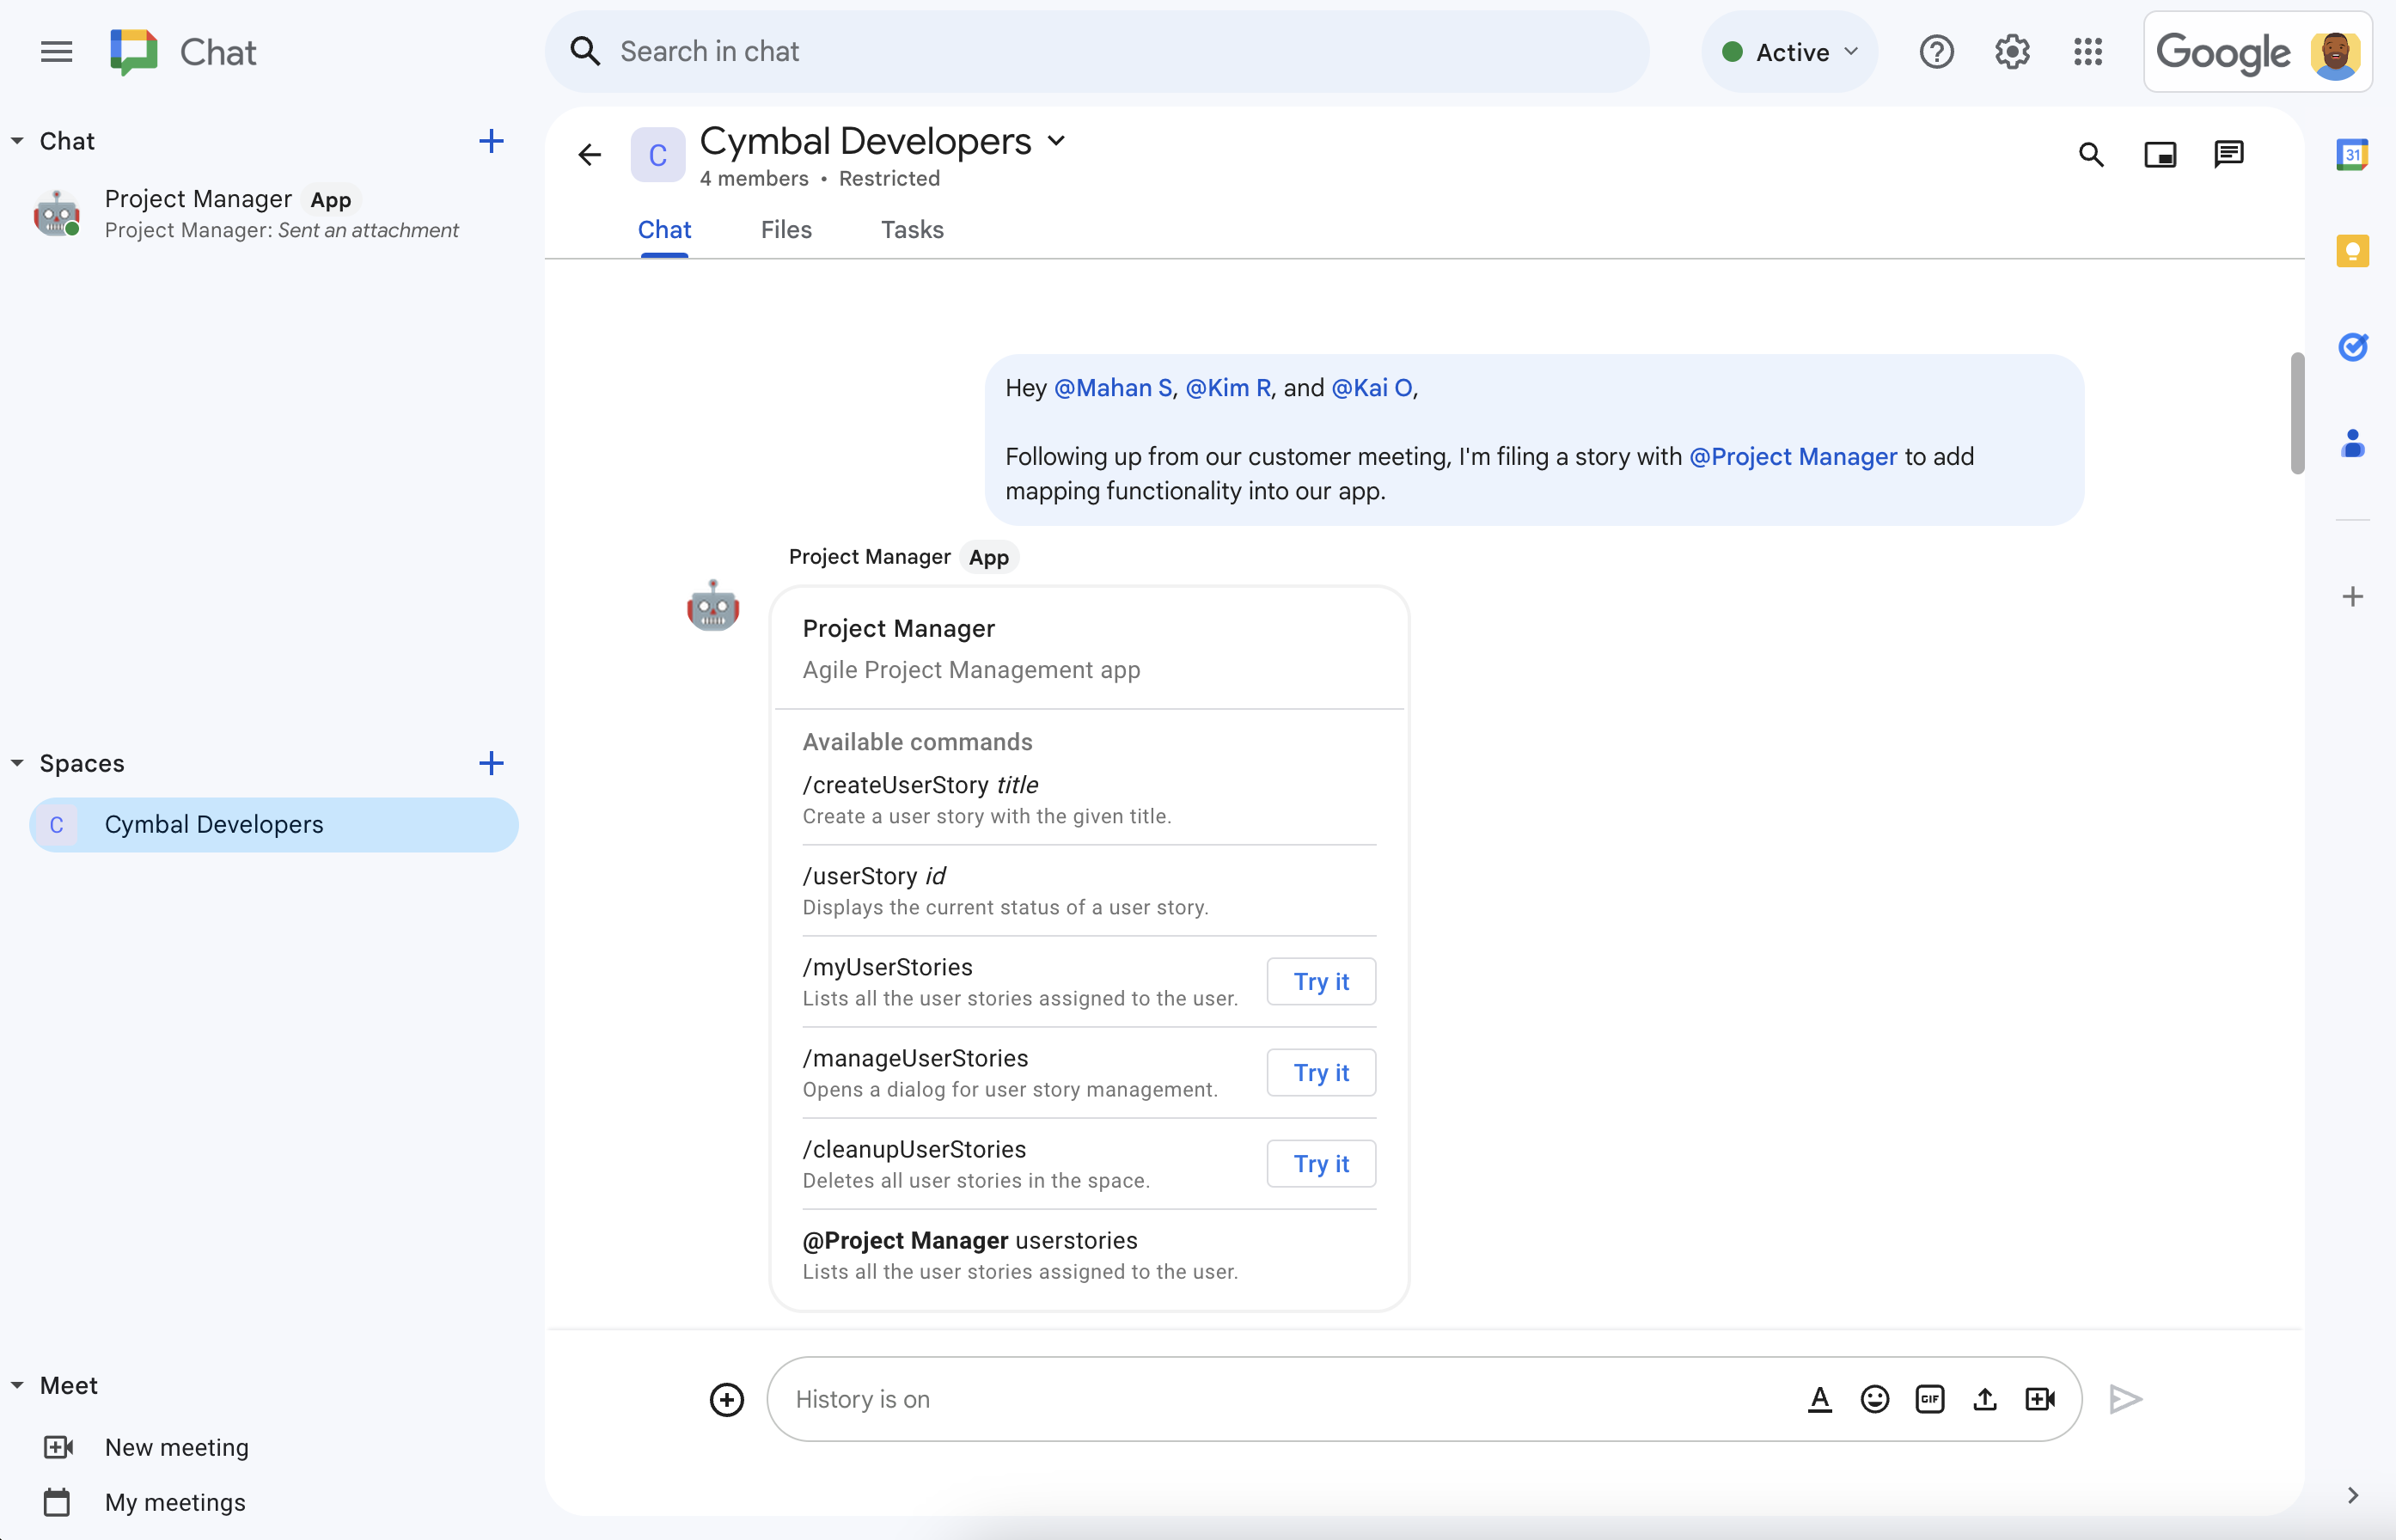
Figure 1. Charlie discusses feature development in a Chat space with their team. Mentioning the project management Chat app prompts the Chat app to offer help. -
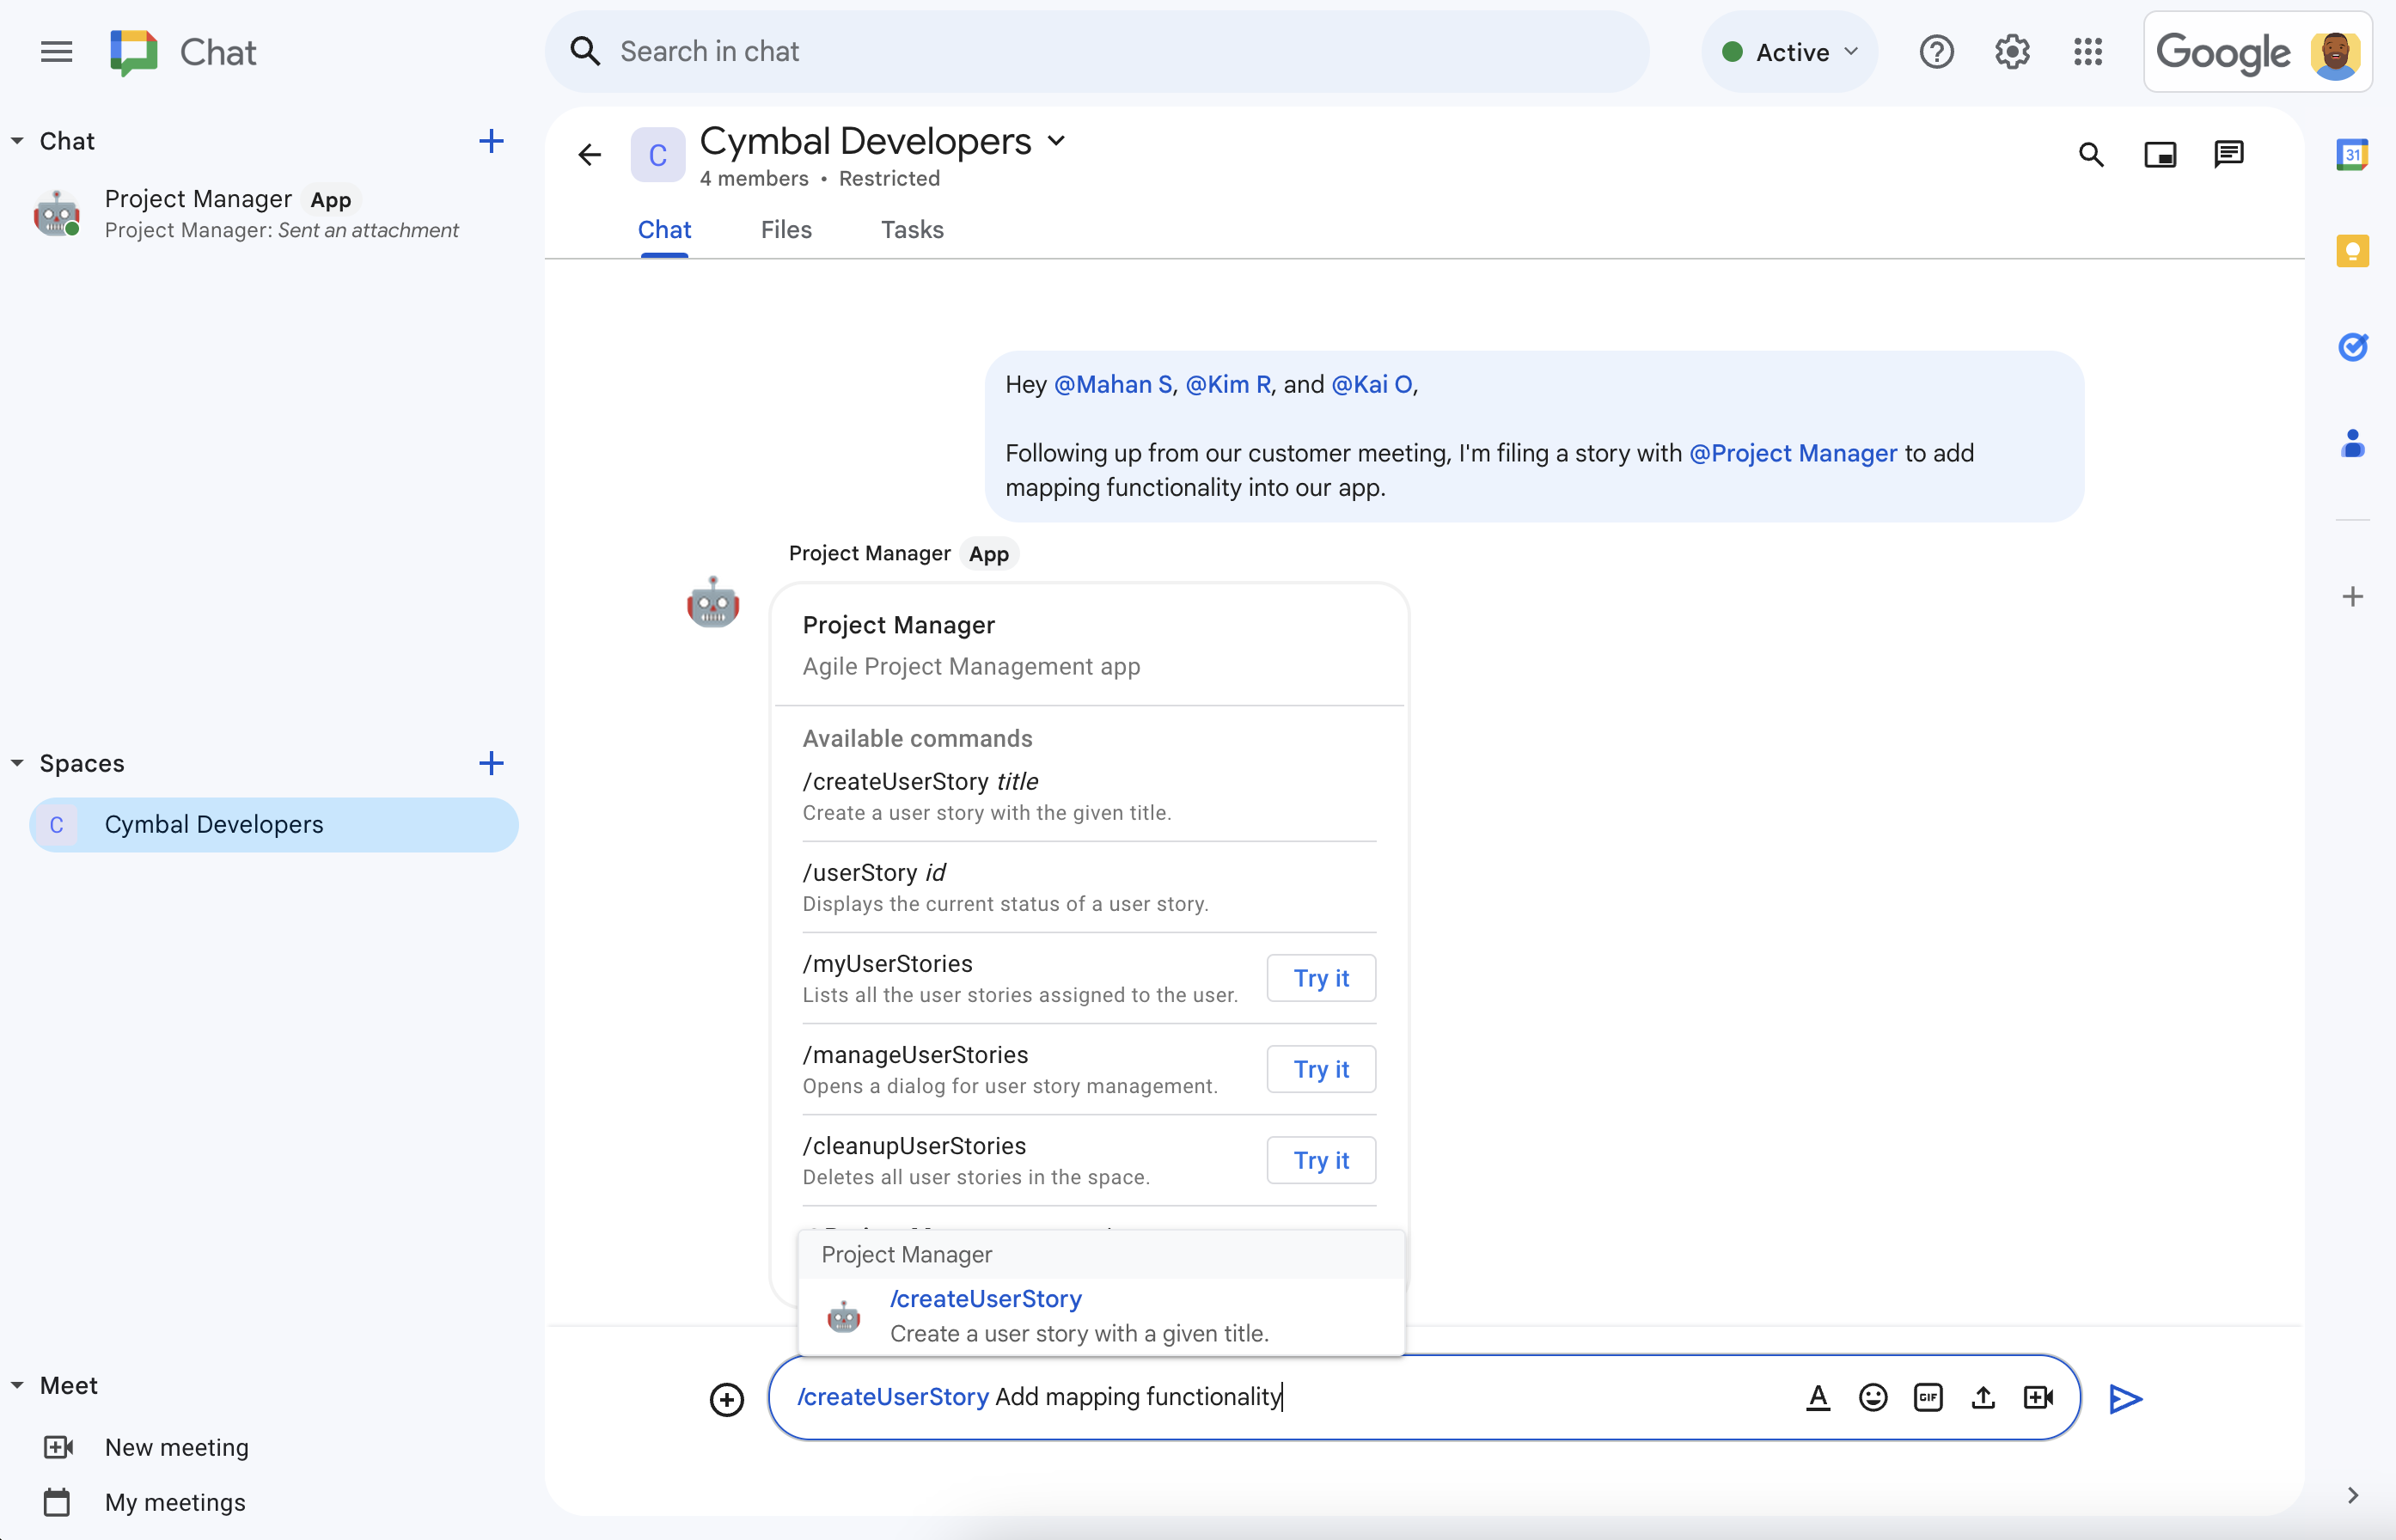
Figure 2. Using the /createUserStoryslash command, Charlie creates a story. -
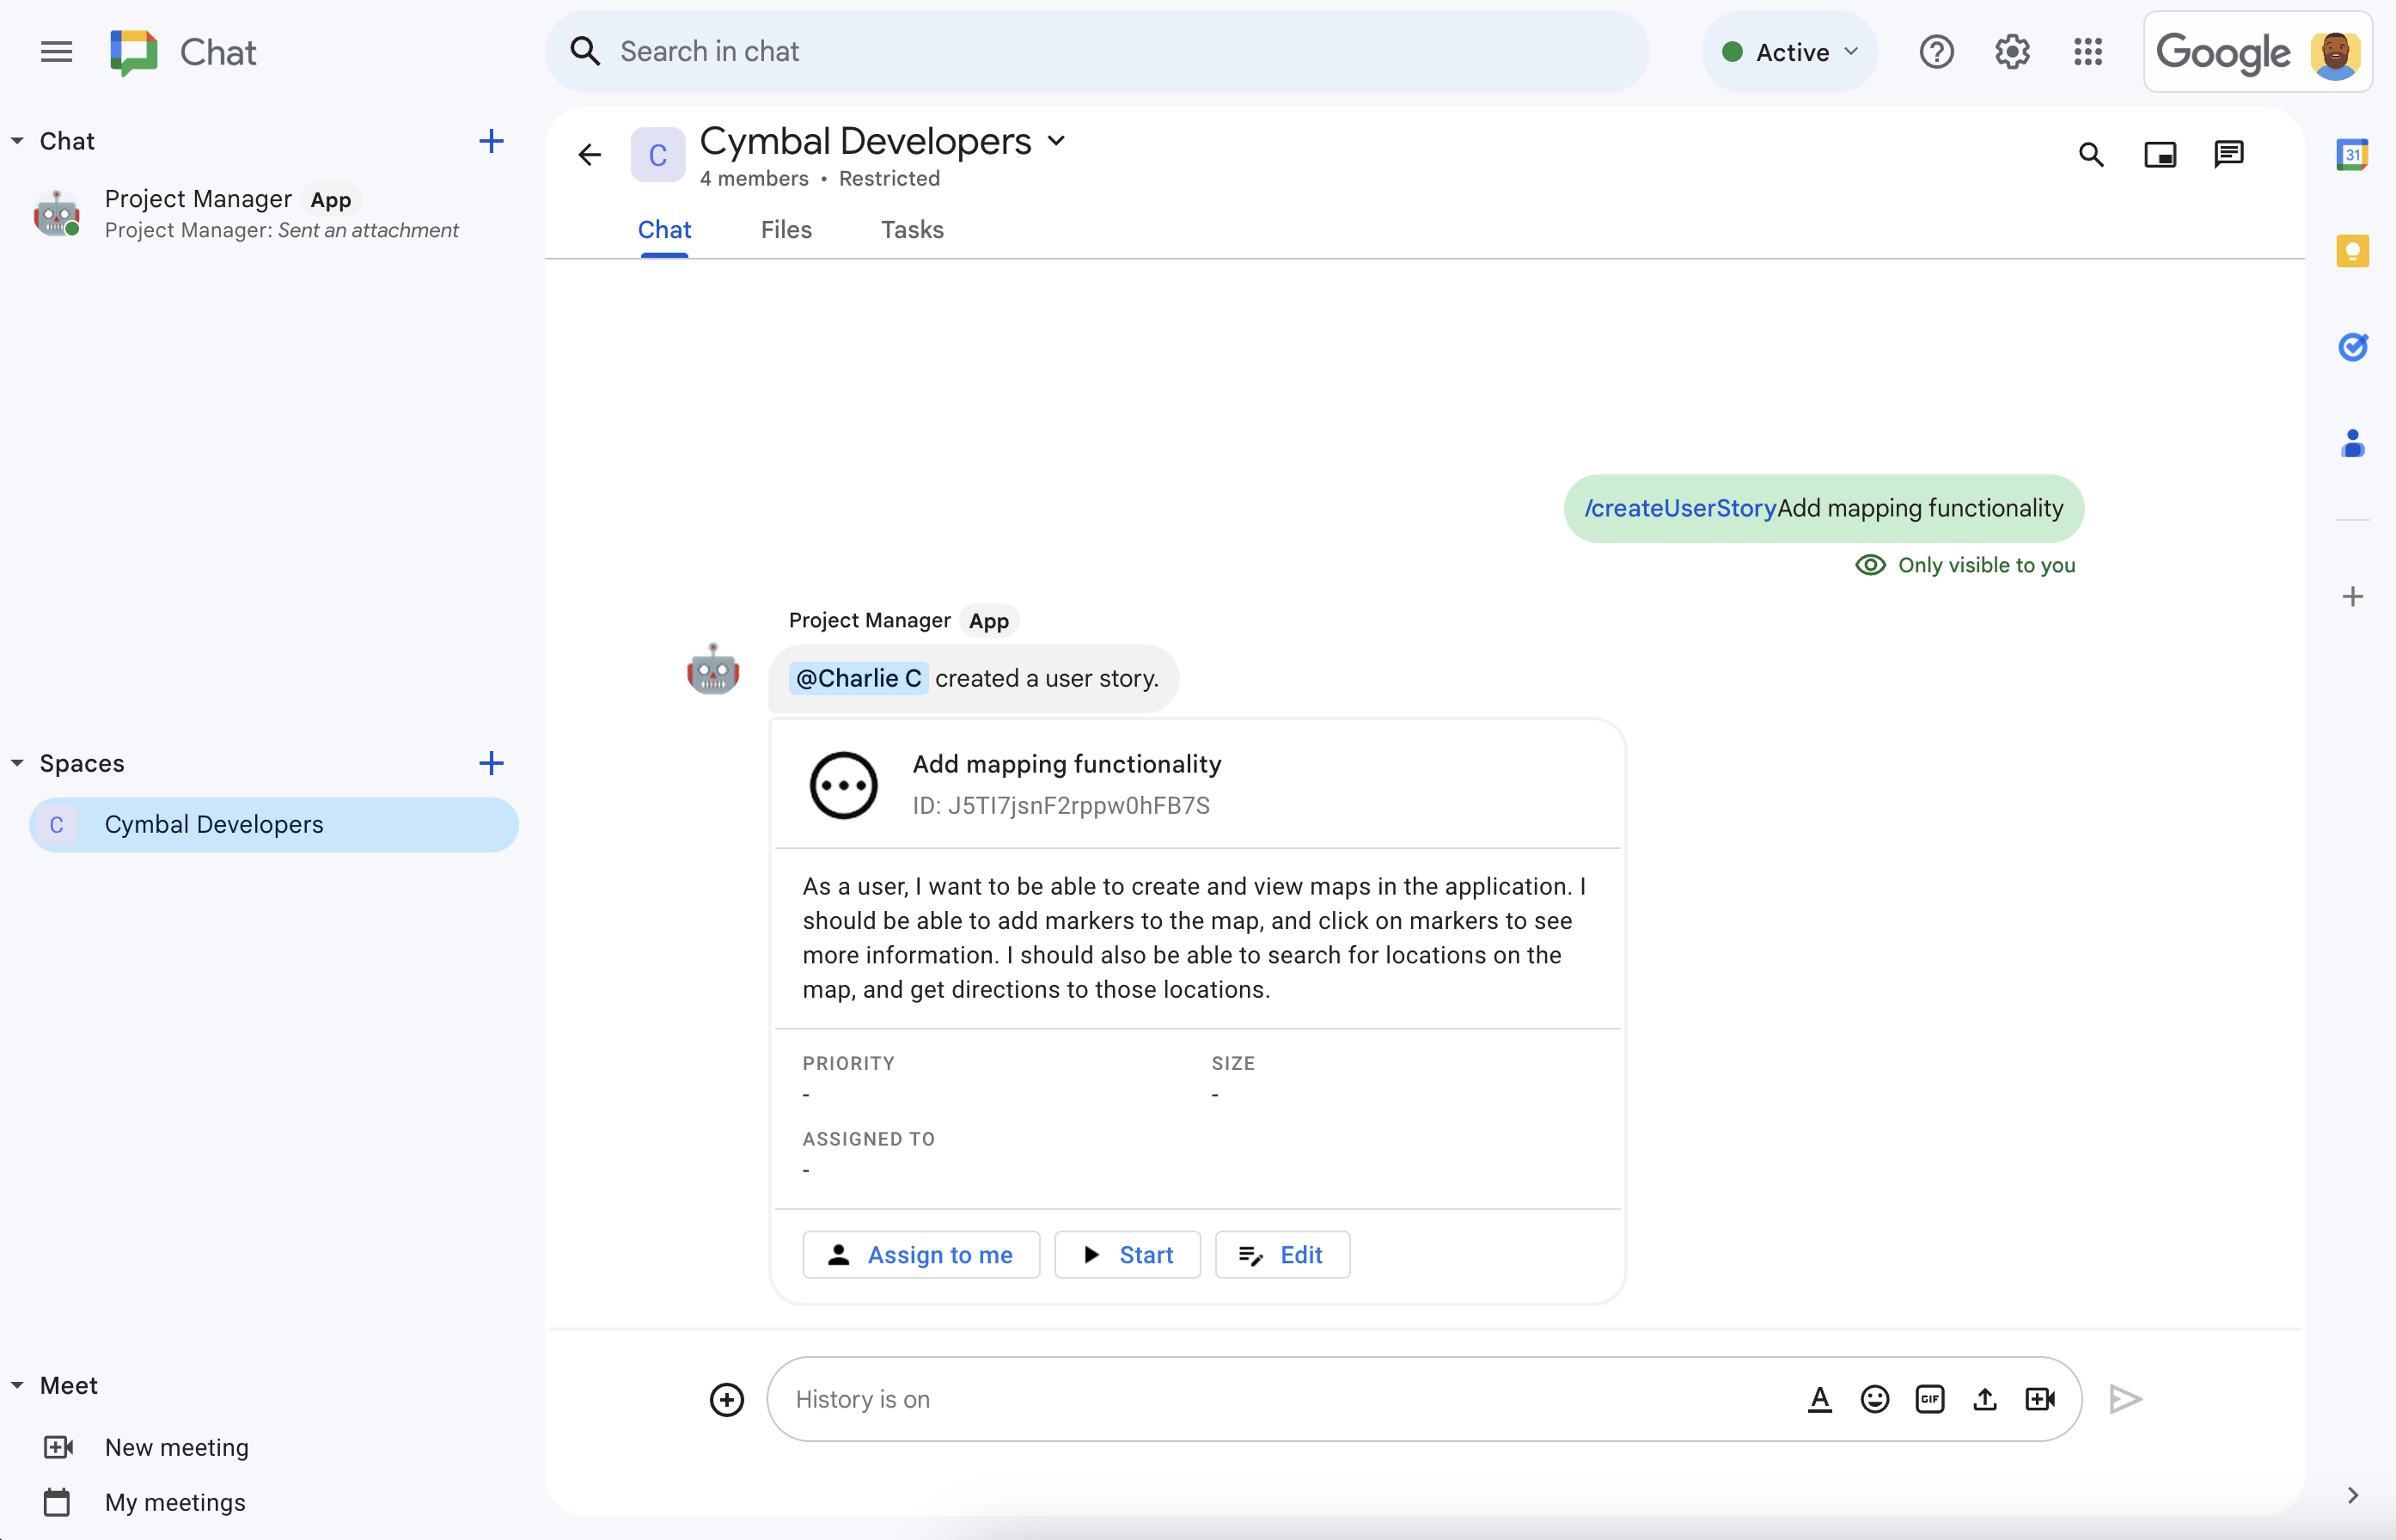
Figure 3. The project management Chat app uses Vertex AI to write the story description, then shares the story in the space. -
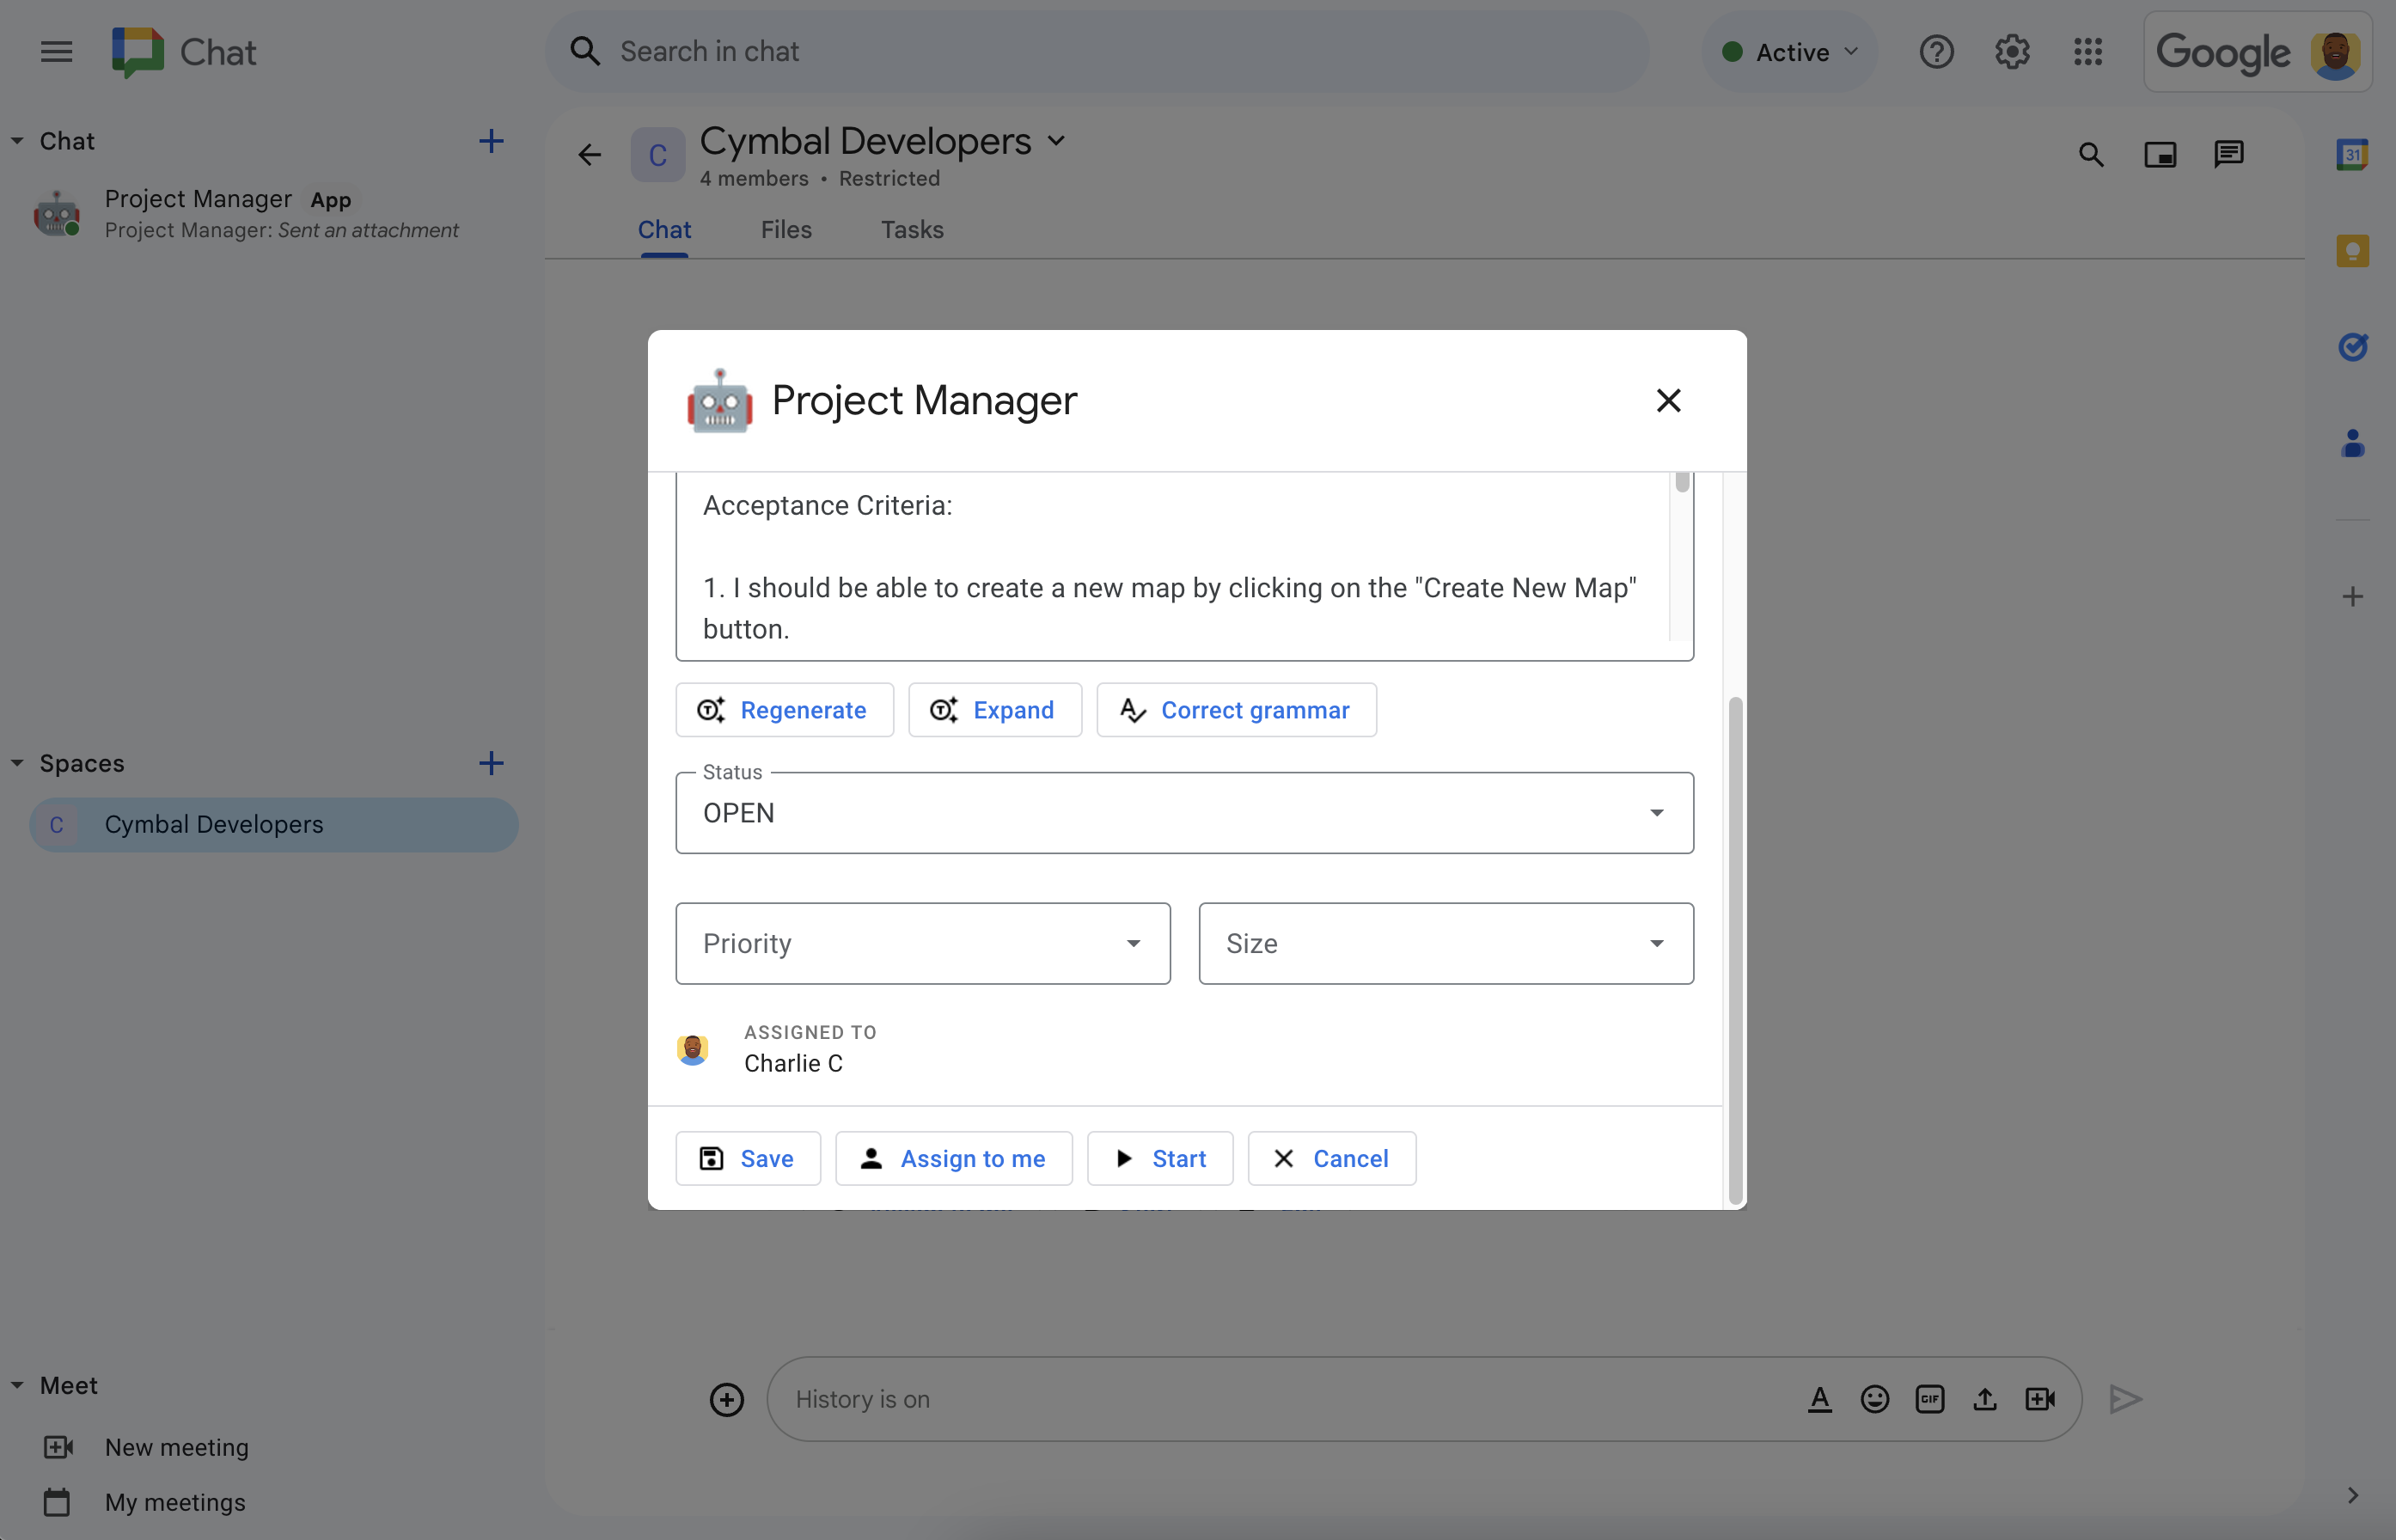
Figure 4. Charlie clicks Edit to finalize the story details. The AI description is accurate, but Charlie wants more details, so Charlie clicks Expand to have Vertex AI add requirements to the story description. Charlie assigns the story to themself, sets status to started, selects an appropriate priority and size, then clicks Save. -
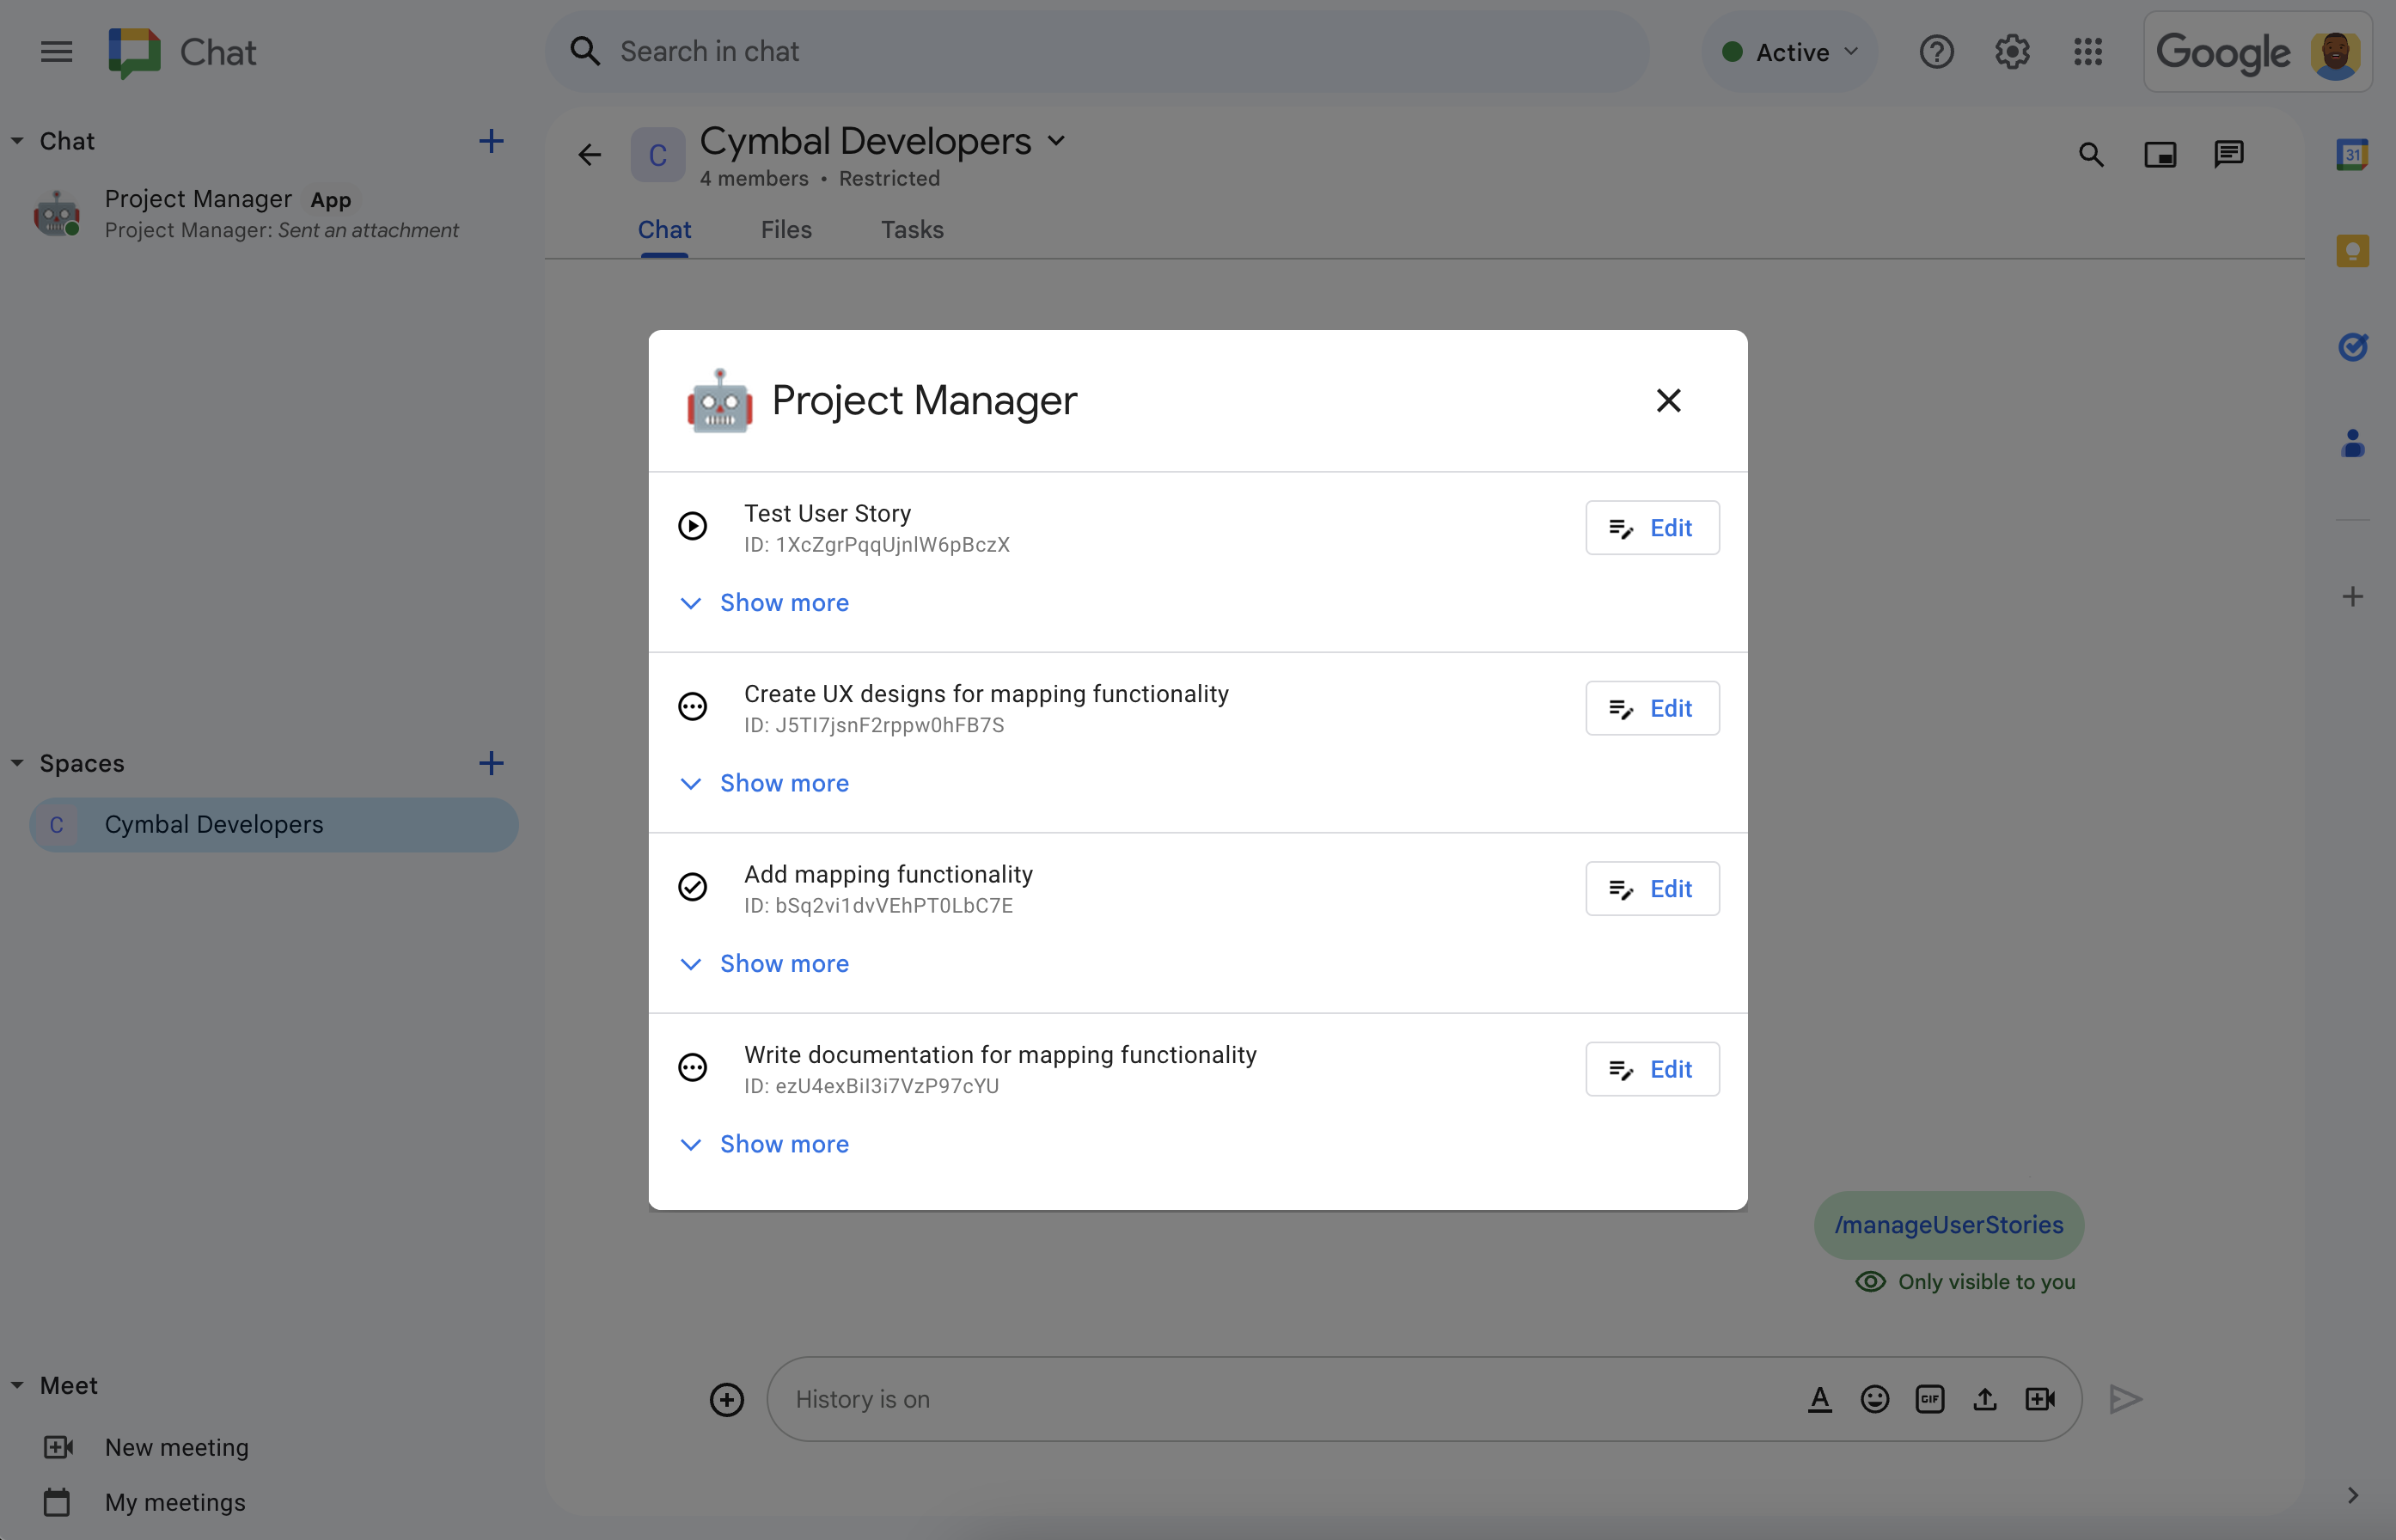
Figure 5. At any time, Charlie can see and manage all the team's user stories with the /manageUserStoriesslash command.
Prerequisites
- A Business or Enterprise Google Workspace account with access to Google Chat.
Access to Google Cloud services to do the following:
- Create a Google Cloud project.
- Link a Google Cloud billing account to the Cloud project. To learn if you have access, see Permissions required to enable billing.
Use unauthenticated Google Cloud Function invocations, which you can verify by determining whether your Google Cloud organization uses domain restricted sharing.
If necessary, ask your Google Cloud administrator for access or permission.
If using the Google Cloud CLI, a Node.js development environment configured to work with gcloud CLI. See Setting up a Node.js development environment.
Objectives
- Build a Chat app that manages agile software projects.
- Help users write user stories with generative
AI-assisted story writing tools powered by Vertex AI:
- Generate and regenerate story descriptions.
- Expand story descriptions from notes to complete requirements.
- Correct grammar to fix typos.
- Keep work up-to-date by writing to, and reading from, a Firestore database.
- Facilitate collaboration in a Chat space by letting users create, edit, assign, and start stories directly from the conversation.
Products used
The project management app uses the following Google Workspace and Google Cloud products:
- Chat API: An API for developing Google Chat apps that receive and respond to Chat interaction events, like messages. The project management Google Chat app uses Chat API to receive and respond to interaction events sent by Chat, and to configure attributes that determine how it appears in Chat, like name and avatar image.
- Vertex AI API: A generative AI platform. The project management Google Chat app uses the Vertex AI API to write user story titles and descriptions.
- Firestore: A serverless document database. The project management Google Chat app uses Firebase to store data about user stories.
Cloud Functions: A lightweight serverless compute service that lets you create single-purpose, standalone functions that can respond to Chat interaction events without the need to manage a server or runtime environment. The project management Google Chat app uses Cloud Functions to host the HTTP endpoint that Chat sends interaction events to and as a compute platform to run logic that processes and responds to these events.
Cloud Functions uses the following Google Cloud products to build, process interaction events, and host compute resources:
- Cloud Build: A fully managed continuous integration, delivery and deployment platform that runs automated builds.
- Pub/Sub: An asynchronous and scalable messaging service that decouples services that produce messages from services that process those messages.
- Cloud Run Admin API: A fully managed environment for running containerized apps.
Architecture
The project management Google Chat app architecture receives and processes Chat interaction events at an HTTP endpoint, uses Vertex AI to help write user stories, and stores user story details in a Firestore database. The following diagram shows the architecture of the Google Workspace and Google Cloud resources used.

The project management Google Chat app works like this:
A user sends a message in Chat and invokes the project management Google Chat app by either messaging it directly, mentioning it in a space, or entering a slash command.
Chat sends a synchronous HTTP request to the Cloud Function's HTTP endpoint.
The project management Google Chat app processes the HTTP request:
Vertex AI helps write or update a user story.
A Firestore database stores, retrieves, updates, or deletes user story data.
Cloud Functions returns an HTTP response to Chat which displays it to the user as either a message or dialog.
Prepare the environment
This section shows how to create and configure a Google Cloud project for the Chat app.
Create a Google Cloud project
Google Cloud console
- In the Google Cloud console, go to Menu > IAM & Admin > Create a Project.
-
In the Project Name field, enter a descriptive name for your project.
Optional: To edit the Project ID, click Edit. The project ID can't be changed after the project is created, so choose an ID that meets your needs for the lifetime of the project.
- In the Location field, click Browse to display potential locations for your project. Then, click Select.
- Click Create. The Google Cloud console navigates to the Dashboard page and your project is created within a few minutes.
gcloud CLI
In one of the following development environments, access the Google Cloud
CLI (gcloud):
-
Cloud Shell: To use an online terminal with the gcloud CLI
already set up, activate Cloud Shell.
Activate Cloud Shell -
Local Shell: To use a local development environment,
install and
initialize
the gcloud CLI.
To create a Cloud project, use thegcloud projects createcommand:gcloud projects create PROJECT_ID
Enable billing for the Cloud project
Google Cloud console
- In the Google Cloud console, go to Billing. Click Menu > Billing > My Projects.
- In Select an organization, choose the organization associated with your Google Cloud project.
- In the project row, open the Actions menu (), click Change billing, and choose the Cloud Billing account.
- Click Set account.
gcloud CLI
- To list available billing accounts, run:
gcloud billing accounts list - Link a billing account with a Google Cloud project:
gcloud billing projects link PROJECT_ID --billing-account=BILLING_ACCOUNT_IDReplace the following:
PROJECT_IDis the Project ID for the Cloud project for which you want to enable billing.BILLING_ACCOUNT_IDis the billing account ID to link with the Google Cloud project.
Enable the APIs
Google Cloud console
In the Google Cloud console, enable the Google Chat API, the Vertex AI API, the Cloud Functions API, the Firestore API, the Cloud Build API, the Pub/Sub API, and the Cloud Run Admin API.
Confirm that you're enabling the APIs in the correct Cloud project, then click Next.
Confirm that you're enabling the correct APIs, then click Enable.
gcloud CLI
If necessary, set the current Cloud project to the one you created with the
gcloud config set projectcommand:gcloud config set project PROJECT_IDReplace PROJECT_ID with the Project ID of the Cloud project you created.
Enable the Google Chat API, the Vertex AI API, the Cloud Functions API, the Firestore API, the Cloud Build API, the Pub/Sub API, and the Cloud Run Admin API with the
gcloud services enablecommand:gcloud services enable chat.googleapis.com \ aiplatform.googleapis.com \ cloudfunctions.googleapis.com \ firestore.googleapis.com \ cloudbuild.googleapis.com \ pubsub.googleapis.com \ run.googleapis.comThe Cloud Build, Pub/Sub, and Cloud Run Admin APIs are prerequisites of Cloud Functions.
Authentication and authorization
No authentication and authorization configuration is necessary to follow this tutorial.
To call the Firestore and Vertex AI APIs, this tutorial uses Application Default Credentials with the default service account attached to the Cloud Function, which you don't need to set up. In the context of a production environment, you would typically create and attach a service account to the Cloud Function instead.
Create and deploy the Google Chat app
Now that your Google Cloud project is created and configured, you're ready to build and deploy the Google Chat app. In this section, you do the following:
- Create a Firestore database in which to persist and retrieve user stories.
- Optionally, review the sample code.
- Create a Cloud Function to host and run the Chat app's code in response to events received from Chat as HTTP requests.
- Create and deploy a Google Chat app on the Google Chat API configuration page.
Create the Firestore database
In this section, you create a Firestore database to persist and retrieve
user stories, but you don't define the data model. The data model is set
implicitly in the sample code by the model/user-story.js and model/user.js
files.
The project management Chat app database uses a NoSQL data model based on documents organized into collections. To learn more, see Firestore data model.
The following diagram is an overview of the project management Google Chat app's data model:

The root collection is spaces, where each document represents a space that the
Chat app created stories in. Each user story is
represented by a document in the userStories subcollection, and each user is
represented by a document in the users subcollection.
View collection, document, and field definitions
spaces
Spaces the Chat app created stories in.
| Fields | |
|---|---|
Document ID | StringUnique ID of a specific space where stories are created. Corresponds with the space's resource name in Chat API. |
userStories | Subcollection of Documents (Stories created by the Chat app and its users. Corresponds with the Document ID of a userStories in Firebase. |
users | Subcollection of Documents (user)Users who created or who are assigned stories. |
displayName | StringThe display name of the space in the Chat API. Not set for direct messages with users. |
userStories
Stories created by the Chat app and its users.
| Fields | |
|---|---|
Document ID | StringUnique ID of a specific user story created by the Chat app and its users. |
assignee | Document (user)The resource name of the user assigned to complete the story. Corresponds with the Document ID of the users document and with a user's resource name in Chat API. |
description | StringA description of the software feature from the user's point of view. |
priority | EnumThe urgency with which to complete the work. Possible values are Low, Medium, or High. |
size | EnumThe amount of work. Possible values are Small, Medium, or Large. |
status | EnumThe phase of work. Possible values are OPEN, STARTED, or COMPLETED. |
title | StringThe title of the story; a brief summary. |
users
Users who created or who are assigned stories.
| Fields | |
|---|---|
Document ID | StringUnique ID of a specific user. Corresponds with the assignee of a userStories in Firebase, and with a user's resource name in Chat API. |
avatarUrl | StringURL hosting the user's Chat avatar image. |
displayName | StringThe user's Chat display name. |
Here's how to create the Firestore database:
Google Cloud console
In the Google Cloud console, go to Firestore. Click Menu > Firestore.
Click Create database.
From Select your Firestore mode, click Native mode.
Click Continue.
Configure the database:
In Name your database, leave the Database ID as
(default).In Location type, specify a region for your database, such as
us-central1. For best performance, select the same or nearby location as the Chat app's Cloud Function.
Click Create database.
gcloud CLI
Create a Firestore database in Native mode with the
gcloud firestore databases createcommand:gcloud firestore databases create \ --location=LOCATION \ --type=firestore-nativeReplace LOCATION with the name of a Firestore region, such as
us-central1.
Review the sample code
Optionally, before creating the Cloud Function, take a moment to review and familiarize yourself with the sample code hosted on GitHub.
Here's an overview of each file:
env.js- Environment configuration variables to deploy the Chat app to a specified Google Cloud project and region. You must update the configuration variables in this file.
package.jsonandpackage-lock.json- Node.js project settings and dependencies.
index.js- Entry point for the Chat app's Cloud Function. It reads the Chat event from the HTTP request, calls the app handler, and posts the HTTP response as a JSON object.
controllers/app.js- The main application logic. Processes the
interaction events by handling the
Chat app mentions and slash commands.
To respond to card clicks, it calls
app-action-handler.js. controllers/app-action-handler.js- Application logic to handle card click Chat interaction events.
services/space-service.js,services/user-service.js, andservices/user-story-service.js- These files contain the parts of the
application logic specific to working with Chat spaces,
users, and user stories. The functions in these files are called by
app.jsorapp-action-handler.js. To perform database operations, the functions in these files call functions infirestore-service.js. services/firestore-service.js- Handles database operations.
The functions in this file are called by
services/space-service.js,services/user-service.js, andservices/user-story-service.js. services/aip-service.js- Calls the Vertex AI API for generative AI text prediction.
model/*.js- These files contain the definition of classes and enums that the application services use to store and pass data between functions. They set the data model for the Firestore database.
views/*.js- Each file in this directory instantiates a card object that the Chat app then sends back to Chat as either a card message or a dialog action response.
views/widgets/*.js- Each file instantiates
a type of widget
object that the app uses to build the cards in the
views/directory. test/**/*.test.js- Each file in this directory and its subdirectories contains the unit tests
for the corresponding function, controller, service, view, or widget.
You can execute all the unit tests by running
npm run testwhile in the project's root directory.
Create and deploy the Cloud Function
In this section, you create and deploy a Cloud Function that comprises the project management Chat app's application logic.
The Cloud Function runs in response to an HTTP request from Chat containing a Chat interaction event. When run, the Cloud Function code processes the event and returns a response to Chat which Chat renders as a message, dialog, or other type of user interaction. If applicable, the Cloud Function also reads from, or writes to, the Firestore database.
Here's how to create the Cloud Function:
Google Cloud console
Download the code from GitHub as a zip file.
Extract the downloaded zip file.
The extracted folder contains the entire Google Workspace samples repository.
In the extracted folder, navigate to
add-ons-samples-main/node/chat/project-management-app/, then compress theproject-management-appfolder into a zip file.The root directory of the zip file must contain the following files and folders:
env.jsREADME.mdgcloudignore.textpackage-lock.jsonpackage.jsonindex.jsmodel/controllers/views/services/
In the Google Cloud console, go to the Cloud Functions page:
Make sure that the Google Cloud project for your Chat app is selected.
Click Create Function.
On the Create function page, set up your function:
- In Environment, select Cloud Run Function.
- In Function name, enter
project-management-tutorial. - In Region, select a region.
- Under Authentication, select Allow unauthenticated invocations.
- Click Next.
In Runtime, select Node.js 20.
In Entry point, delete the default text and enter
projectManagementChatApp.In Source code, select Zip upload.
In Destination bucket, create or select a bucket:
- Click Browse.
- Choose a bucket.
- Click Select.
Google Cloud uploads the zip file to and extracts the component files in this bucket. Cloud Functions then copies the component files into the Cloud Function.
In Zip file, upload the zip file you downloaded from GitHub, extracted, and recompressed:
- Click Browse.
- Navigate to and select the zip file.
- Click Open.
Click Deploy.
The Cloud Functions detail page opens, and your function appears with two progress indicators: one for the build and one for the service. When both progress indicators disappear and are replaced with a check mark, your function is deployed and ready.
Edit the sample code to set constants:
- On the Cloud Function detail page, click Edit.
- Click Next.
- In Source code, select Inline editor.
- In the inline editor, open the
env.jsfile. - Replace project-id with your Cloud project ID.
- Optional: Update us-central1 with a supported location for your Cloud Function.
Click Deploy.
When the function finishes deploying, copy the trigger URL:
- On the Function details page, click Trigger.
- Copy the URL. You need it to configure the Chat app in the following section.
gcloud CLI
Clone the code from GitHub:
git clone https://github.com/googleworkspace/add-ons-samples.gitSwitch to the directory that holds the code for this project management Chat app:
cd add-ons-samples/node/chat/project-management-appEdit the
env.jsfile to set environment variables:- Replace project-id with your Google Cloud project ID.
- Replace us-central1 with your Google Cloud project location.
Deploy the Cloud Function to Google Cloud:
gcloud functions deploy project-management-tutorial \
--gen2 \
--region=REGION \
--runtime=nodejs20 \
--source=. \
--entry-point=projectManagementChatApp \
--trigger-http \
--allow-unauthenticated
Replace REGION with a Cloud Function location where its infrastructure is hosted, such as
us-central1.
- When the function finishes deploying, copy the
urlproperty from the response. This is the Trigger URL that you use in the following section to configure the Google Chat app.
Configure the Google Chat app in the Google Cloud console
This section shows how to configure the Chat API in the Google Cloud console with information about your Chat app, including the Chat app's name, supported slash commands, and the trigger URL of the Chat app's Cloud Function to which it sends Chat interaction events.
In the Google Cloud console, click Menu > More products > Google Workspace > Product Library > Google Chat API > Manage > Configuration.
In App name, type
Project Manager.In Avatar URL, type
https://developers.google.com/add-ons/samples/images/quickstart-app-avatar.png.In Description, type
Manages projects with user stories.Click the Enable Interactive features toggle to the on position.
Under Functionality, select Join spaces and group conversations.
Under Connection settings, select HTTP endpoint URL.
Copy the Service account email. You need this email when you authorize your add-on to invoke your function.
Under Triggers, select Use a common HTTP endpoint URL for all triggers.
In HTTP endpoint URL, paste the trigger URL of the Cloud Function formatted as
https://REGION-PROJECT_ID.cloudfunctions.net/project-management-tutorial. If you deployed the Cloud Function with the gcloud CLI, this is theurlproperty.Register the Chat app's slash commands. To register a slash command:
- Under Commands, click Add a command.
For each command detailed in the following table, enter the Command ID, enter the Description, under Command type select Slash command, enter the Slash command name, select Dialog, and then click Done:
Command ID Description Slash command name Dialog 1 Create a story with the specified title. /createUserStoryUnselected 2 Lists all the stories assigned to the user. /myUserStoriesUnselected 3 Displays current status of the specified story. /userStoryUnselected 4 Opens a dialog where stories can be edited. /manageUserStoriesSelected 5 Deletes all stories in the space. /cleanupUserStoriesUnselected
Under Visibility, select Make this Google Chat app available to specific people and groups in your Workspace domain and enter your email address.
Optionally, under Logs, select Log errors to Logging.
Click Save. A configuration saved message appears.
The Chat app is ready to receive and respond to messages on Chat.
Test the Chat app
Test the project management Chat app by messaging it and using its slash commands to create, edit, and delete user stories.
Open Google Chat using the Google Workspace account that you provided when you added yourself as a trusted tester.
- Click New chat.
- In the Add 1 or more people field, type the name of your Chat app.
Select your Chat app from the results. A direct message opens.
- In the new direct message with the app, type
Helloand pressenter. The project management Chat app responds with a help menu detailing what it can do. - To create a story, type
/createUserStory Test storyin the message bar and send it. The project management Chat app responds with a card message detailing the user story it creates for you using generative AI from Vertex AI. In the console, check the Firestore database to review the records it created about the space you added the Chat app to, the users who have interacted with it, and the user story you created.
Return to Google Chat.
- Optionally, to edit the story, click Edit. When you're satisfied with the story, click Save.
- Test each slash command supported by the app. To see them, type
/or mention the Chat app. - Delete the test user story by issuing the
/cleanupUserStoriesslash command. Alternatively, remove or uninstall the app. When removed, the app deletes all user stories created in that space.
Troubleshoot
When a Google Chat app or card returns an error, the Chat interface surfaces a message saying "Something went wrong." or "Unable to process your request." Sometimes the Chat UI doesn't display any error message, but the Chat app or card produces an unexpected result; for example, a card message might not appear.
Although an error message might not display in the Chat UI, descriptive error messages and log data are available to help you fix errors when error logging for Chat apps is turned on. For help viewing, debugging, and fixing errors, see Troubleshoot and fix Google Chat errors.
Clean up
To avoid incurring charges to your Google Cloud account for the resources used in this tutorial, we recommend that you delete the Cloud project.
- In the Google Cloud console, go to the Manage resources page. Click Menu > IAM & Admin > Manage Resources.
- In the project list, select the project you want to delete and then click Delete .
- In the dialog, type the project ID and then click Shut down to delete the project.
Related topics
- Plan travels with an AI agent accessible across Google Workspace
- Answer questions based on Chat conversations with a Gemini AI Chat app
- Respond to incidents with Google Chat, Vertex AI, Apps Script, and user authentication
- Fact-check statements with an ADK AI agent and Gemini model
- Integrate fundamental AI concepts in Chat apps
- Build a Chat app as a Google Workspace add-on with Apps Script