
This tutorial shows how to make a Google Chat app that responds to incidents in real time. When responding to an incident, the app creates and populates a Chat space, facilitates incident resolution with messages, app commands, and dialogs, and uses AI to summarize the incident response in a Google Docs document.
An incident is an event that requires the immediate attention of a team of people to resolve. Examples of incidents include:
- A time-sensitive case is created in a Customer Relationship Management (CRM) platform, requiring a service team to collaborate on a resolution.
- A system goes offline, alerting a group of site reliability engineers (SREs) so that they can work together to bring it back online.
- A high magnitude earthquake occurs, and emergency workers need to coordinate their response.
For the purposes of this tutorial, the incident alert starts when someone reports the incident with a button click from a web page. The web page simulates an incident by asking users to enter basic incident information: title, description, and email addresses of the responders.
See the incident management Chat app in action:
-
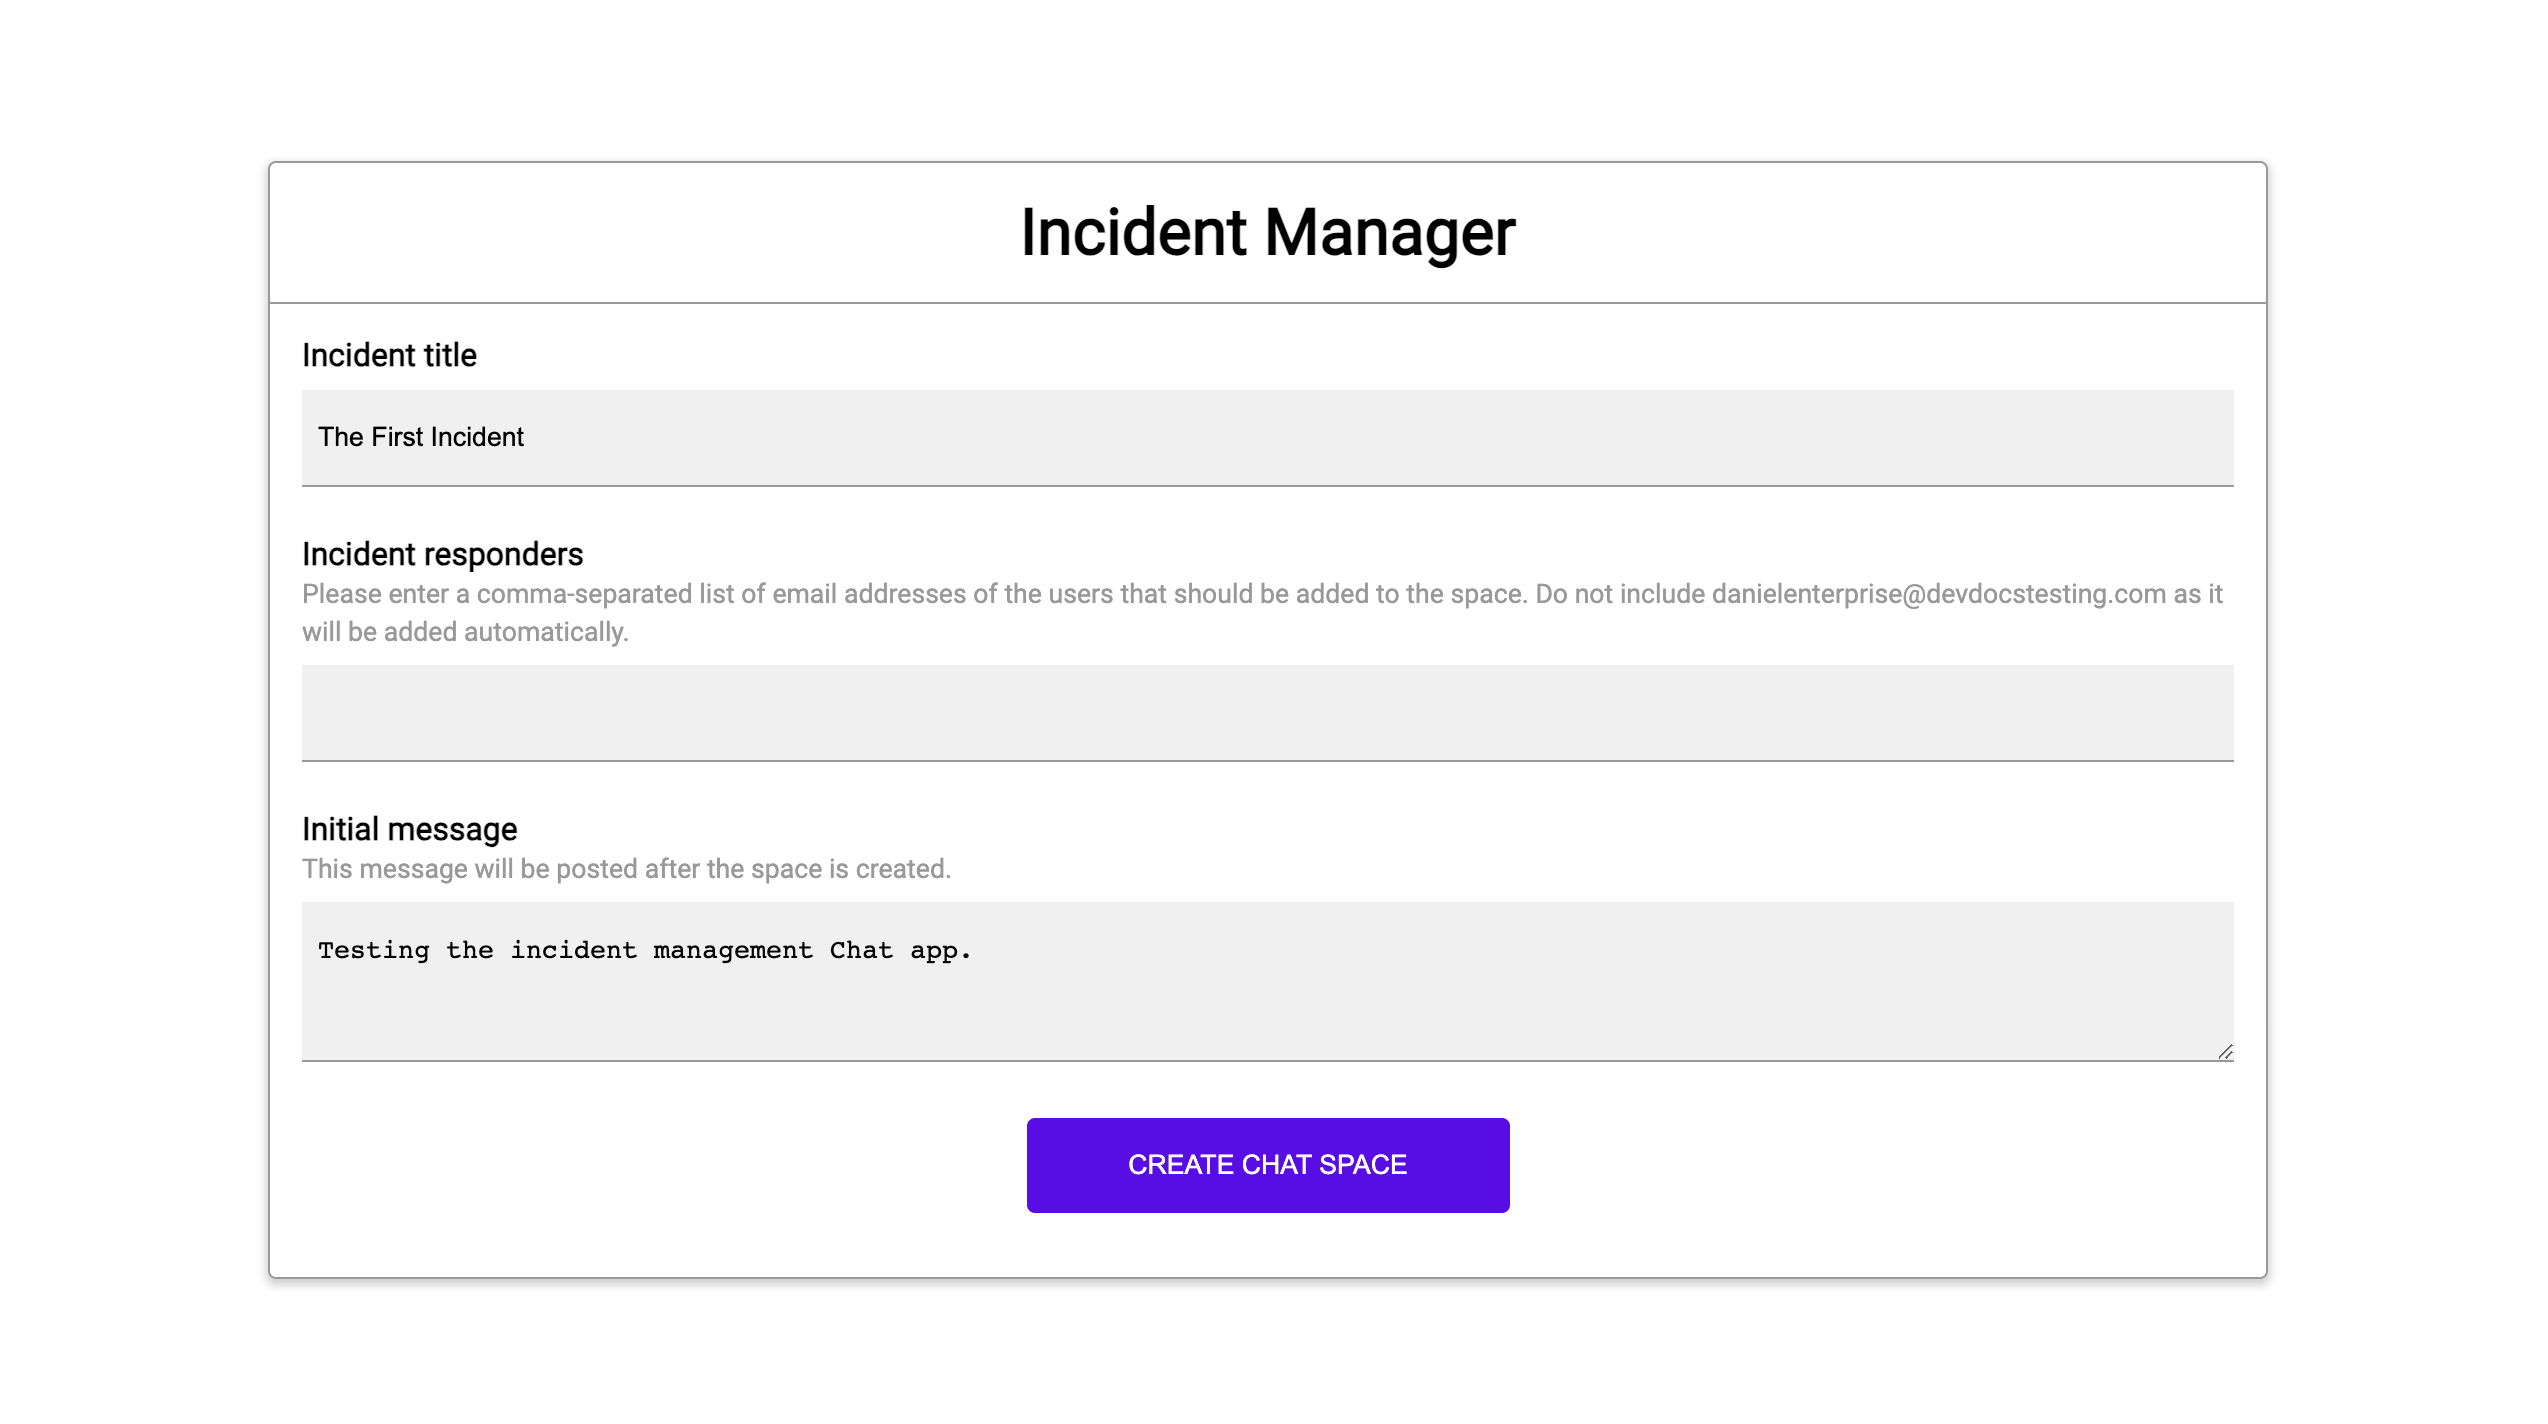
Figure 1. The website where someone can report an incident. -
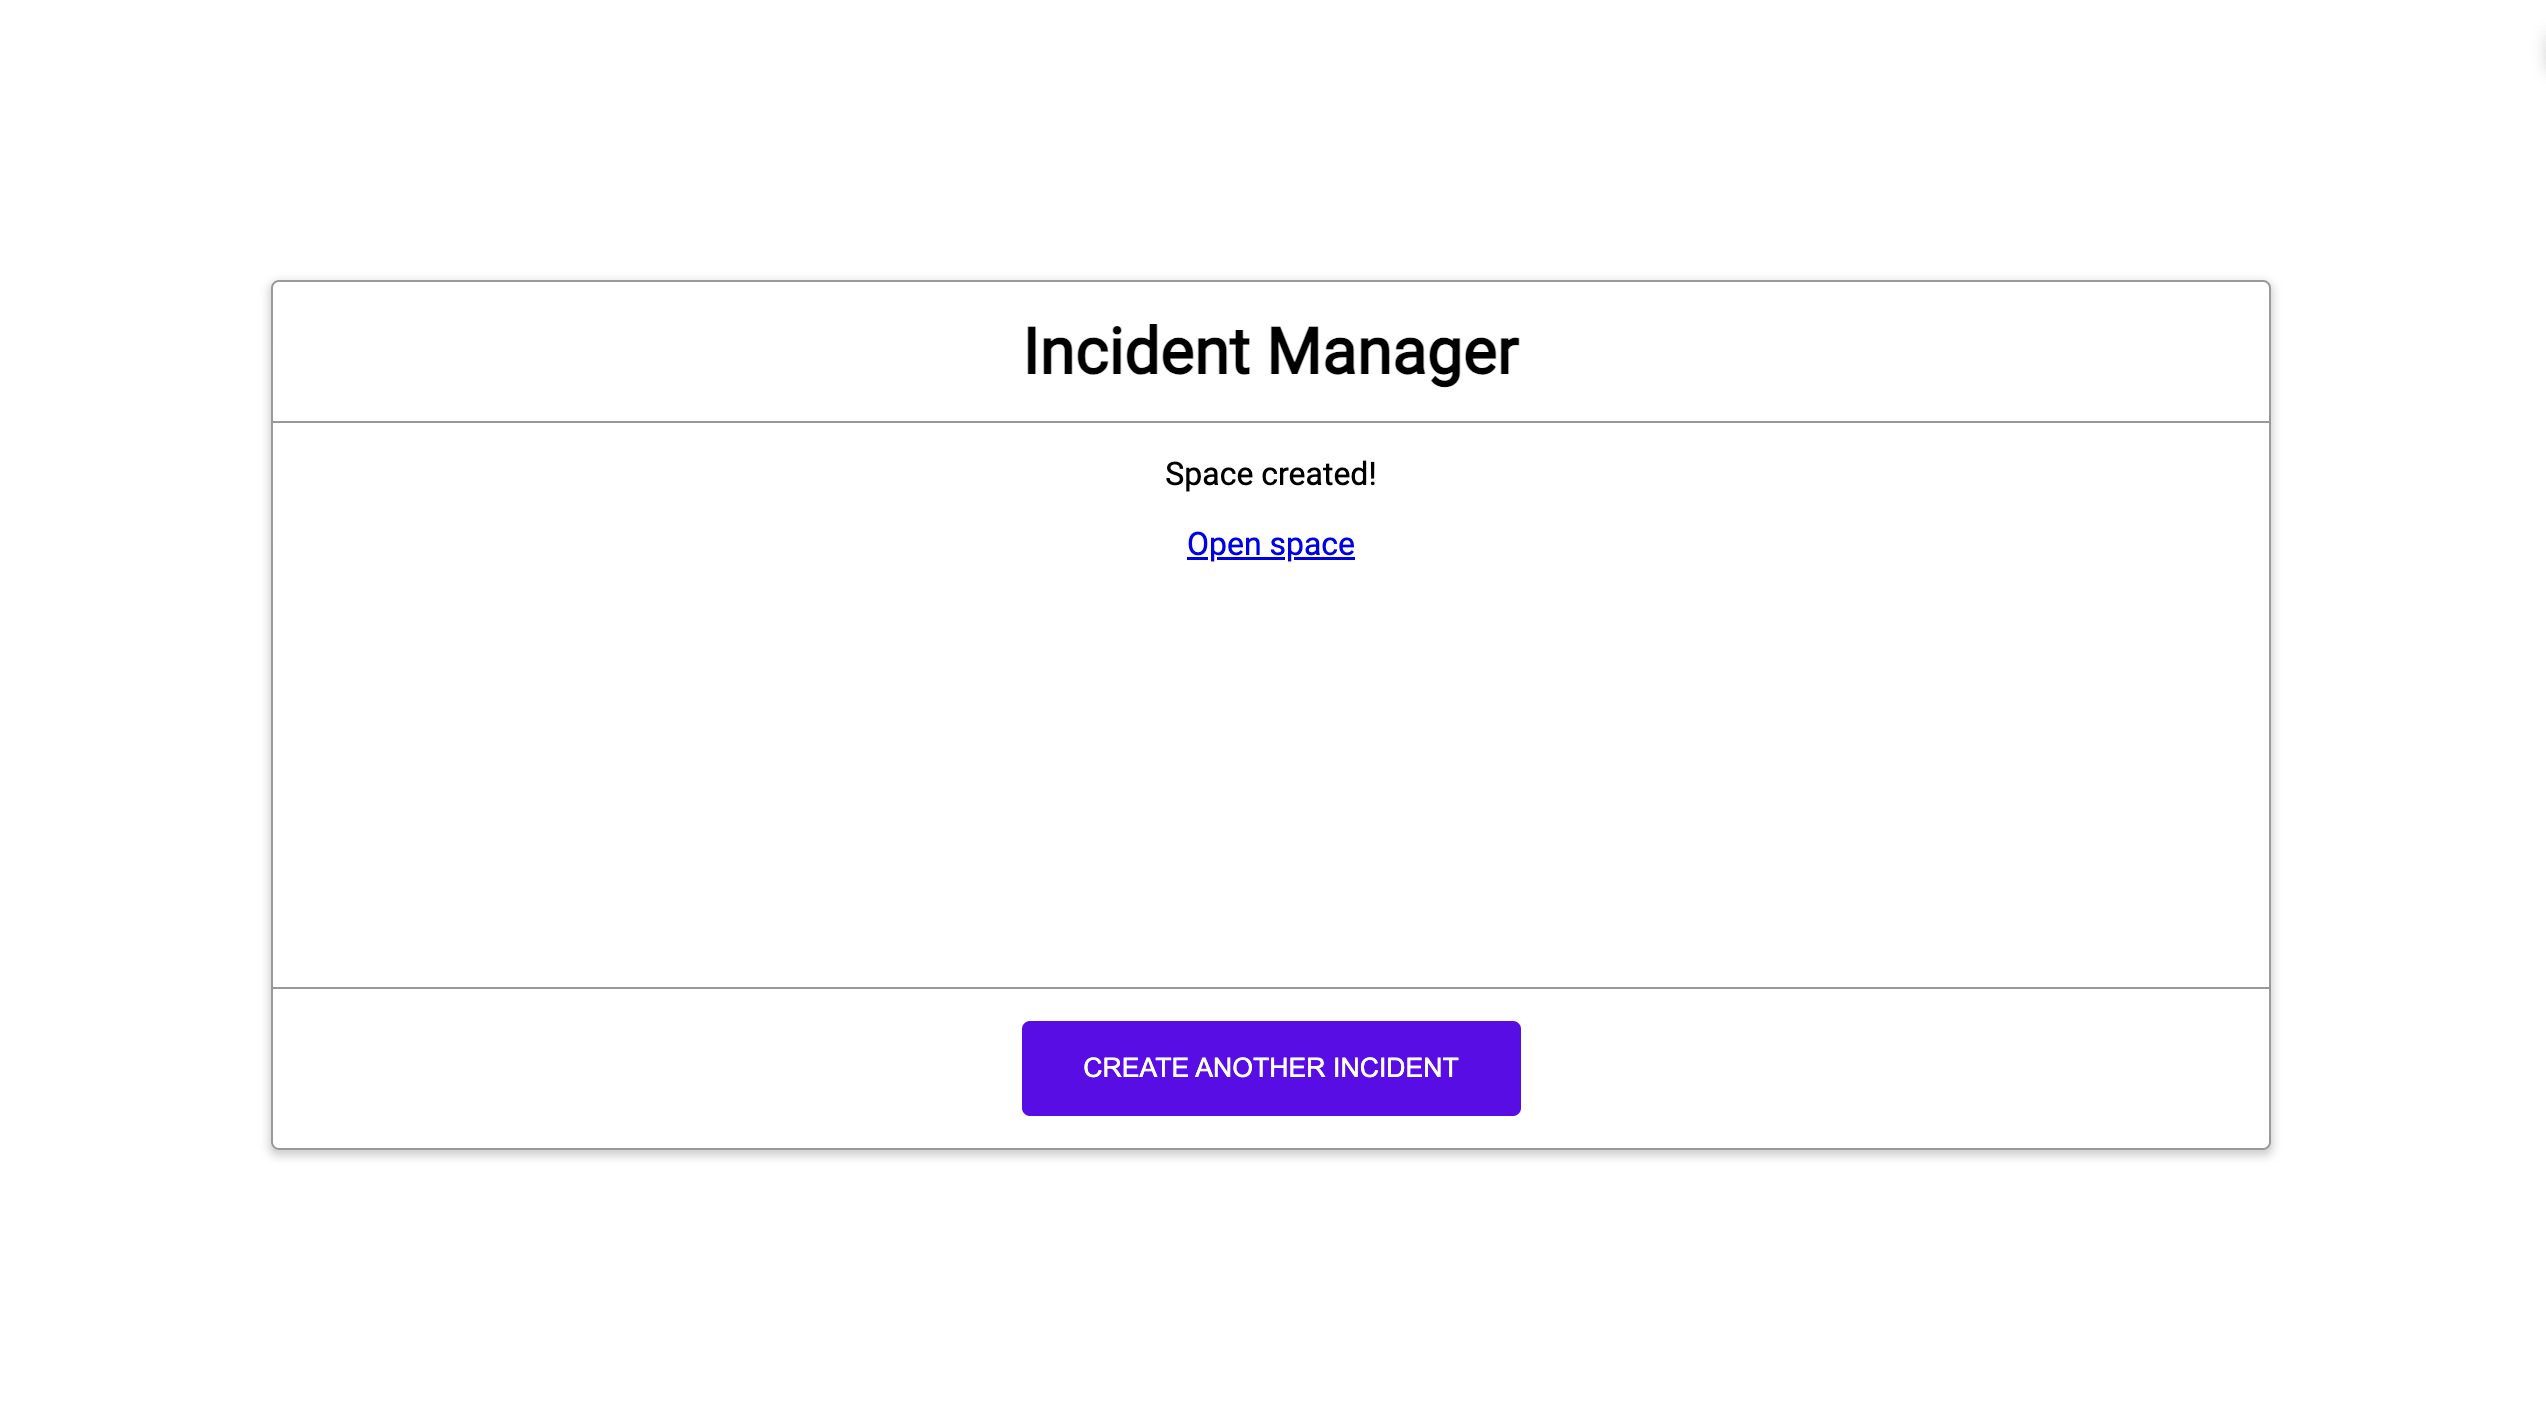
Figure 2. Notification that the incident Chat space is created. -
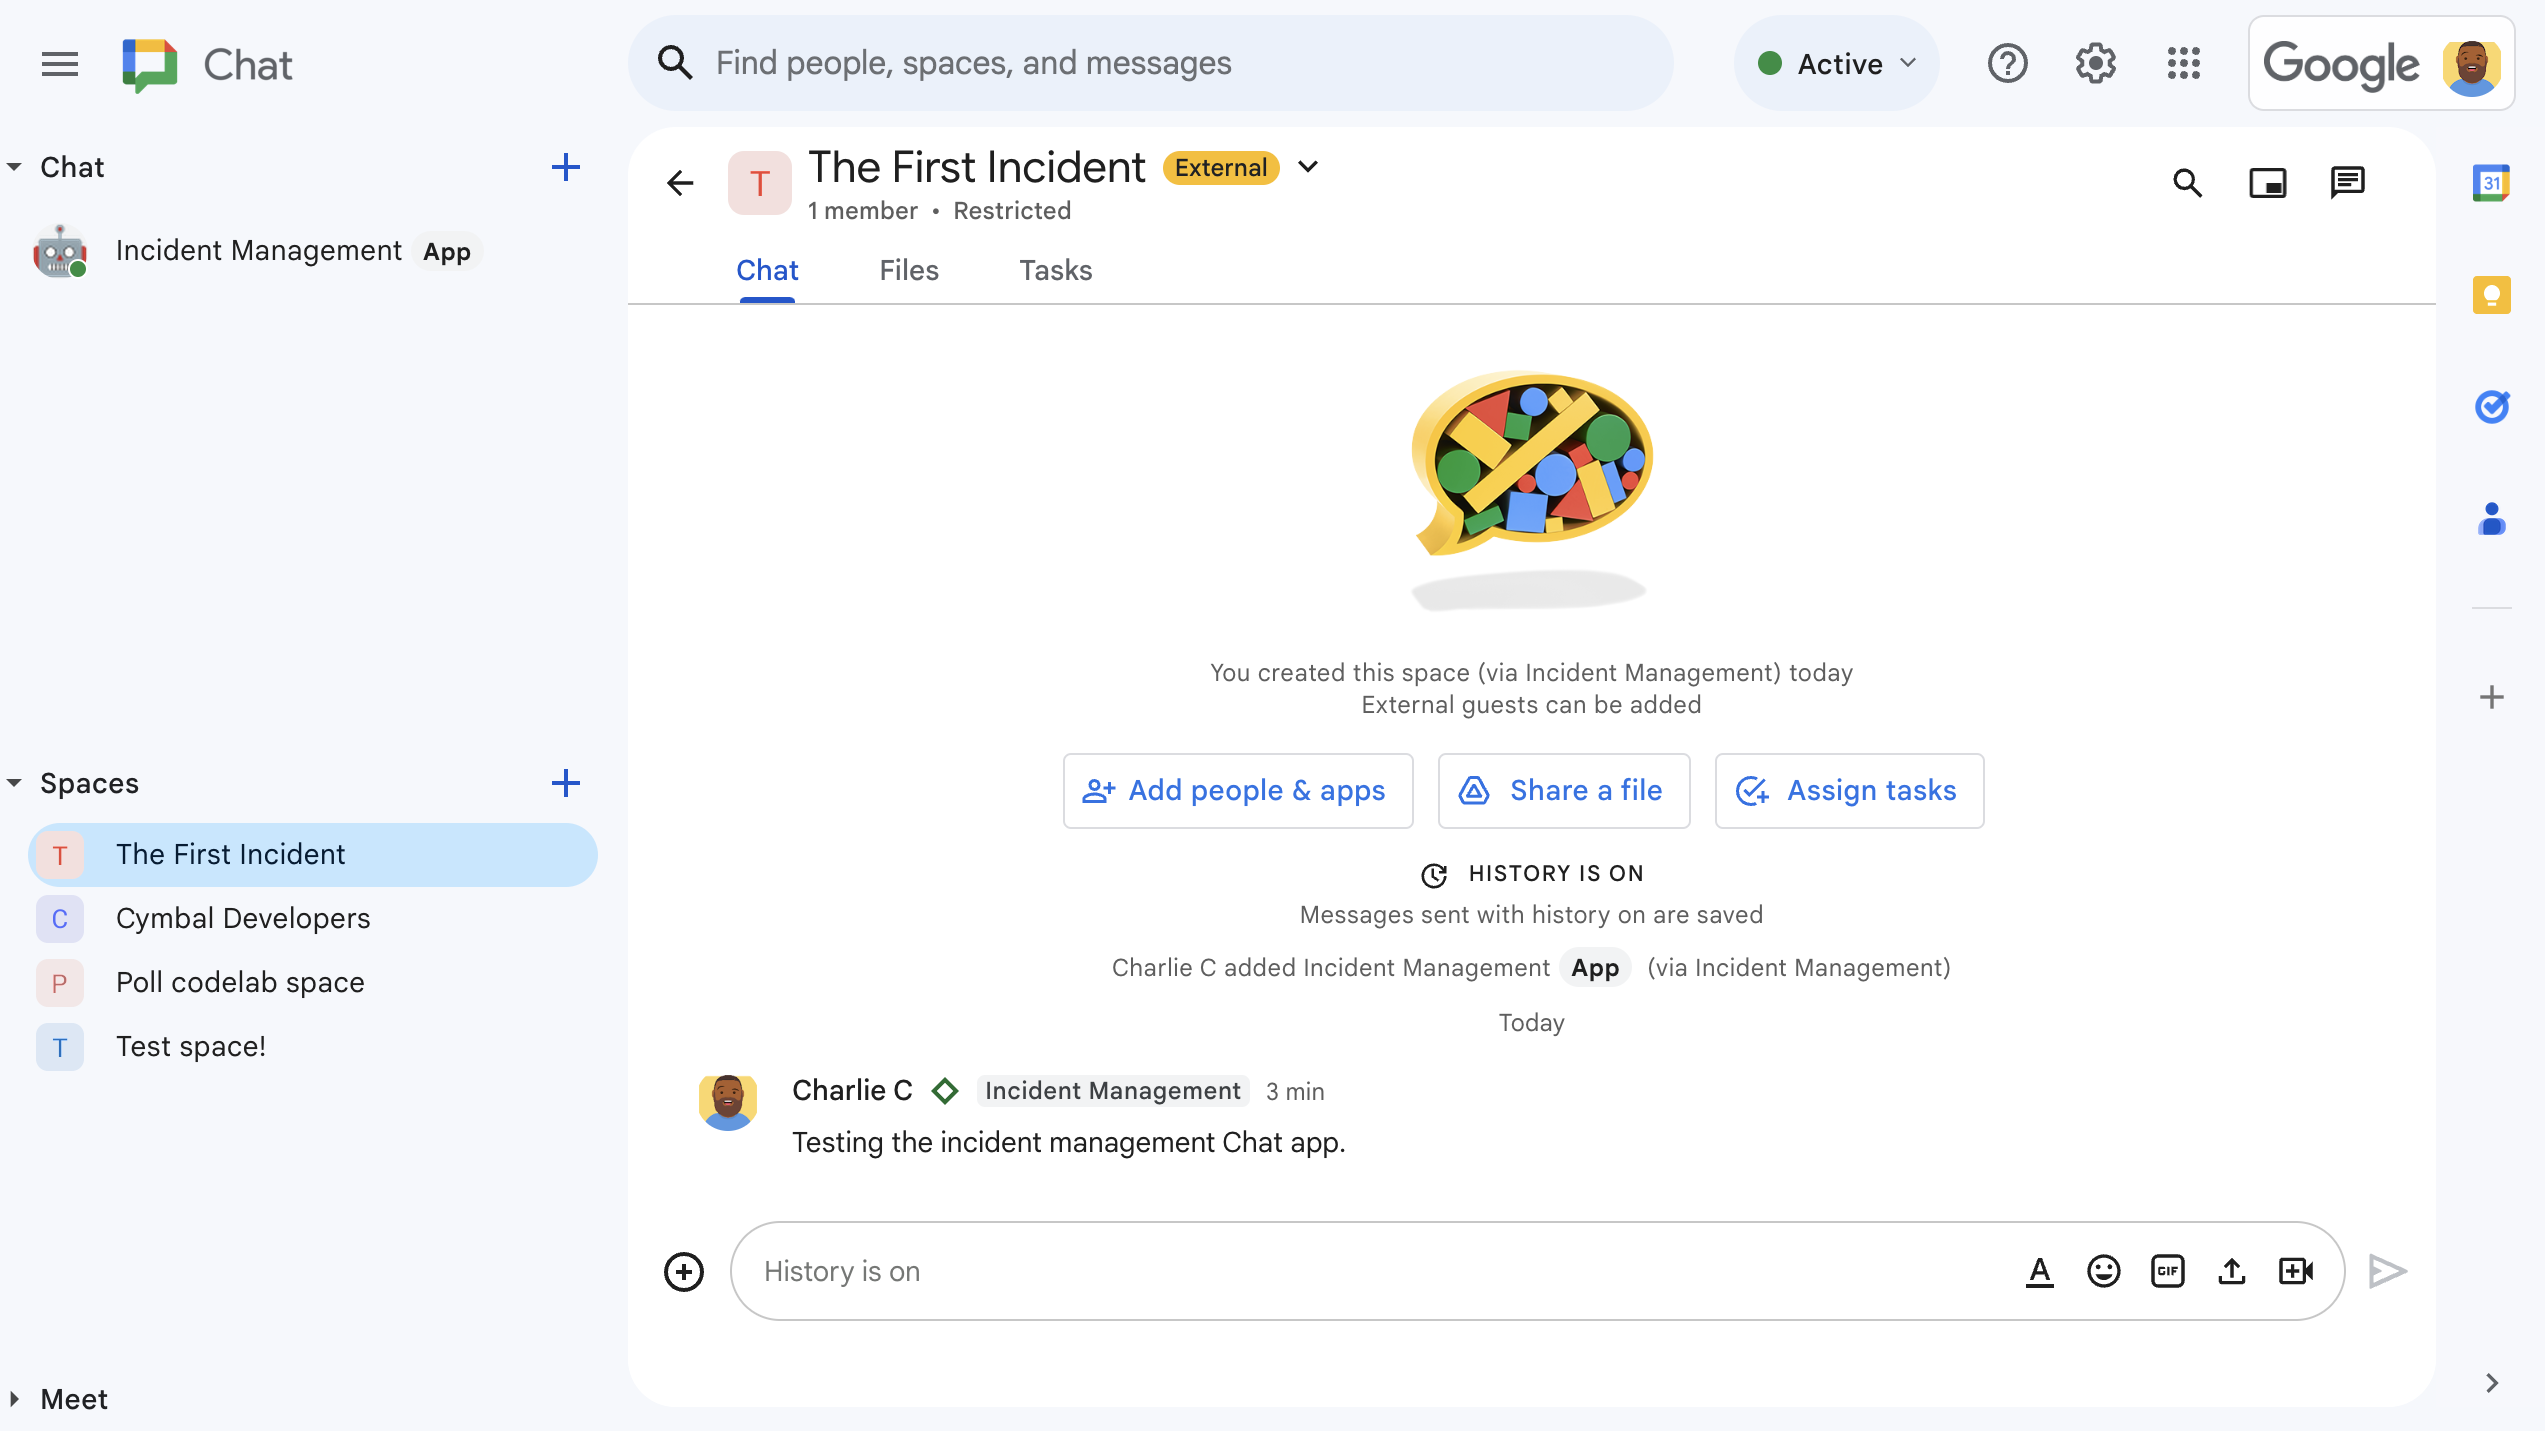
Figure 3. The incident response Chat space. -
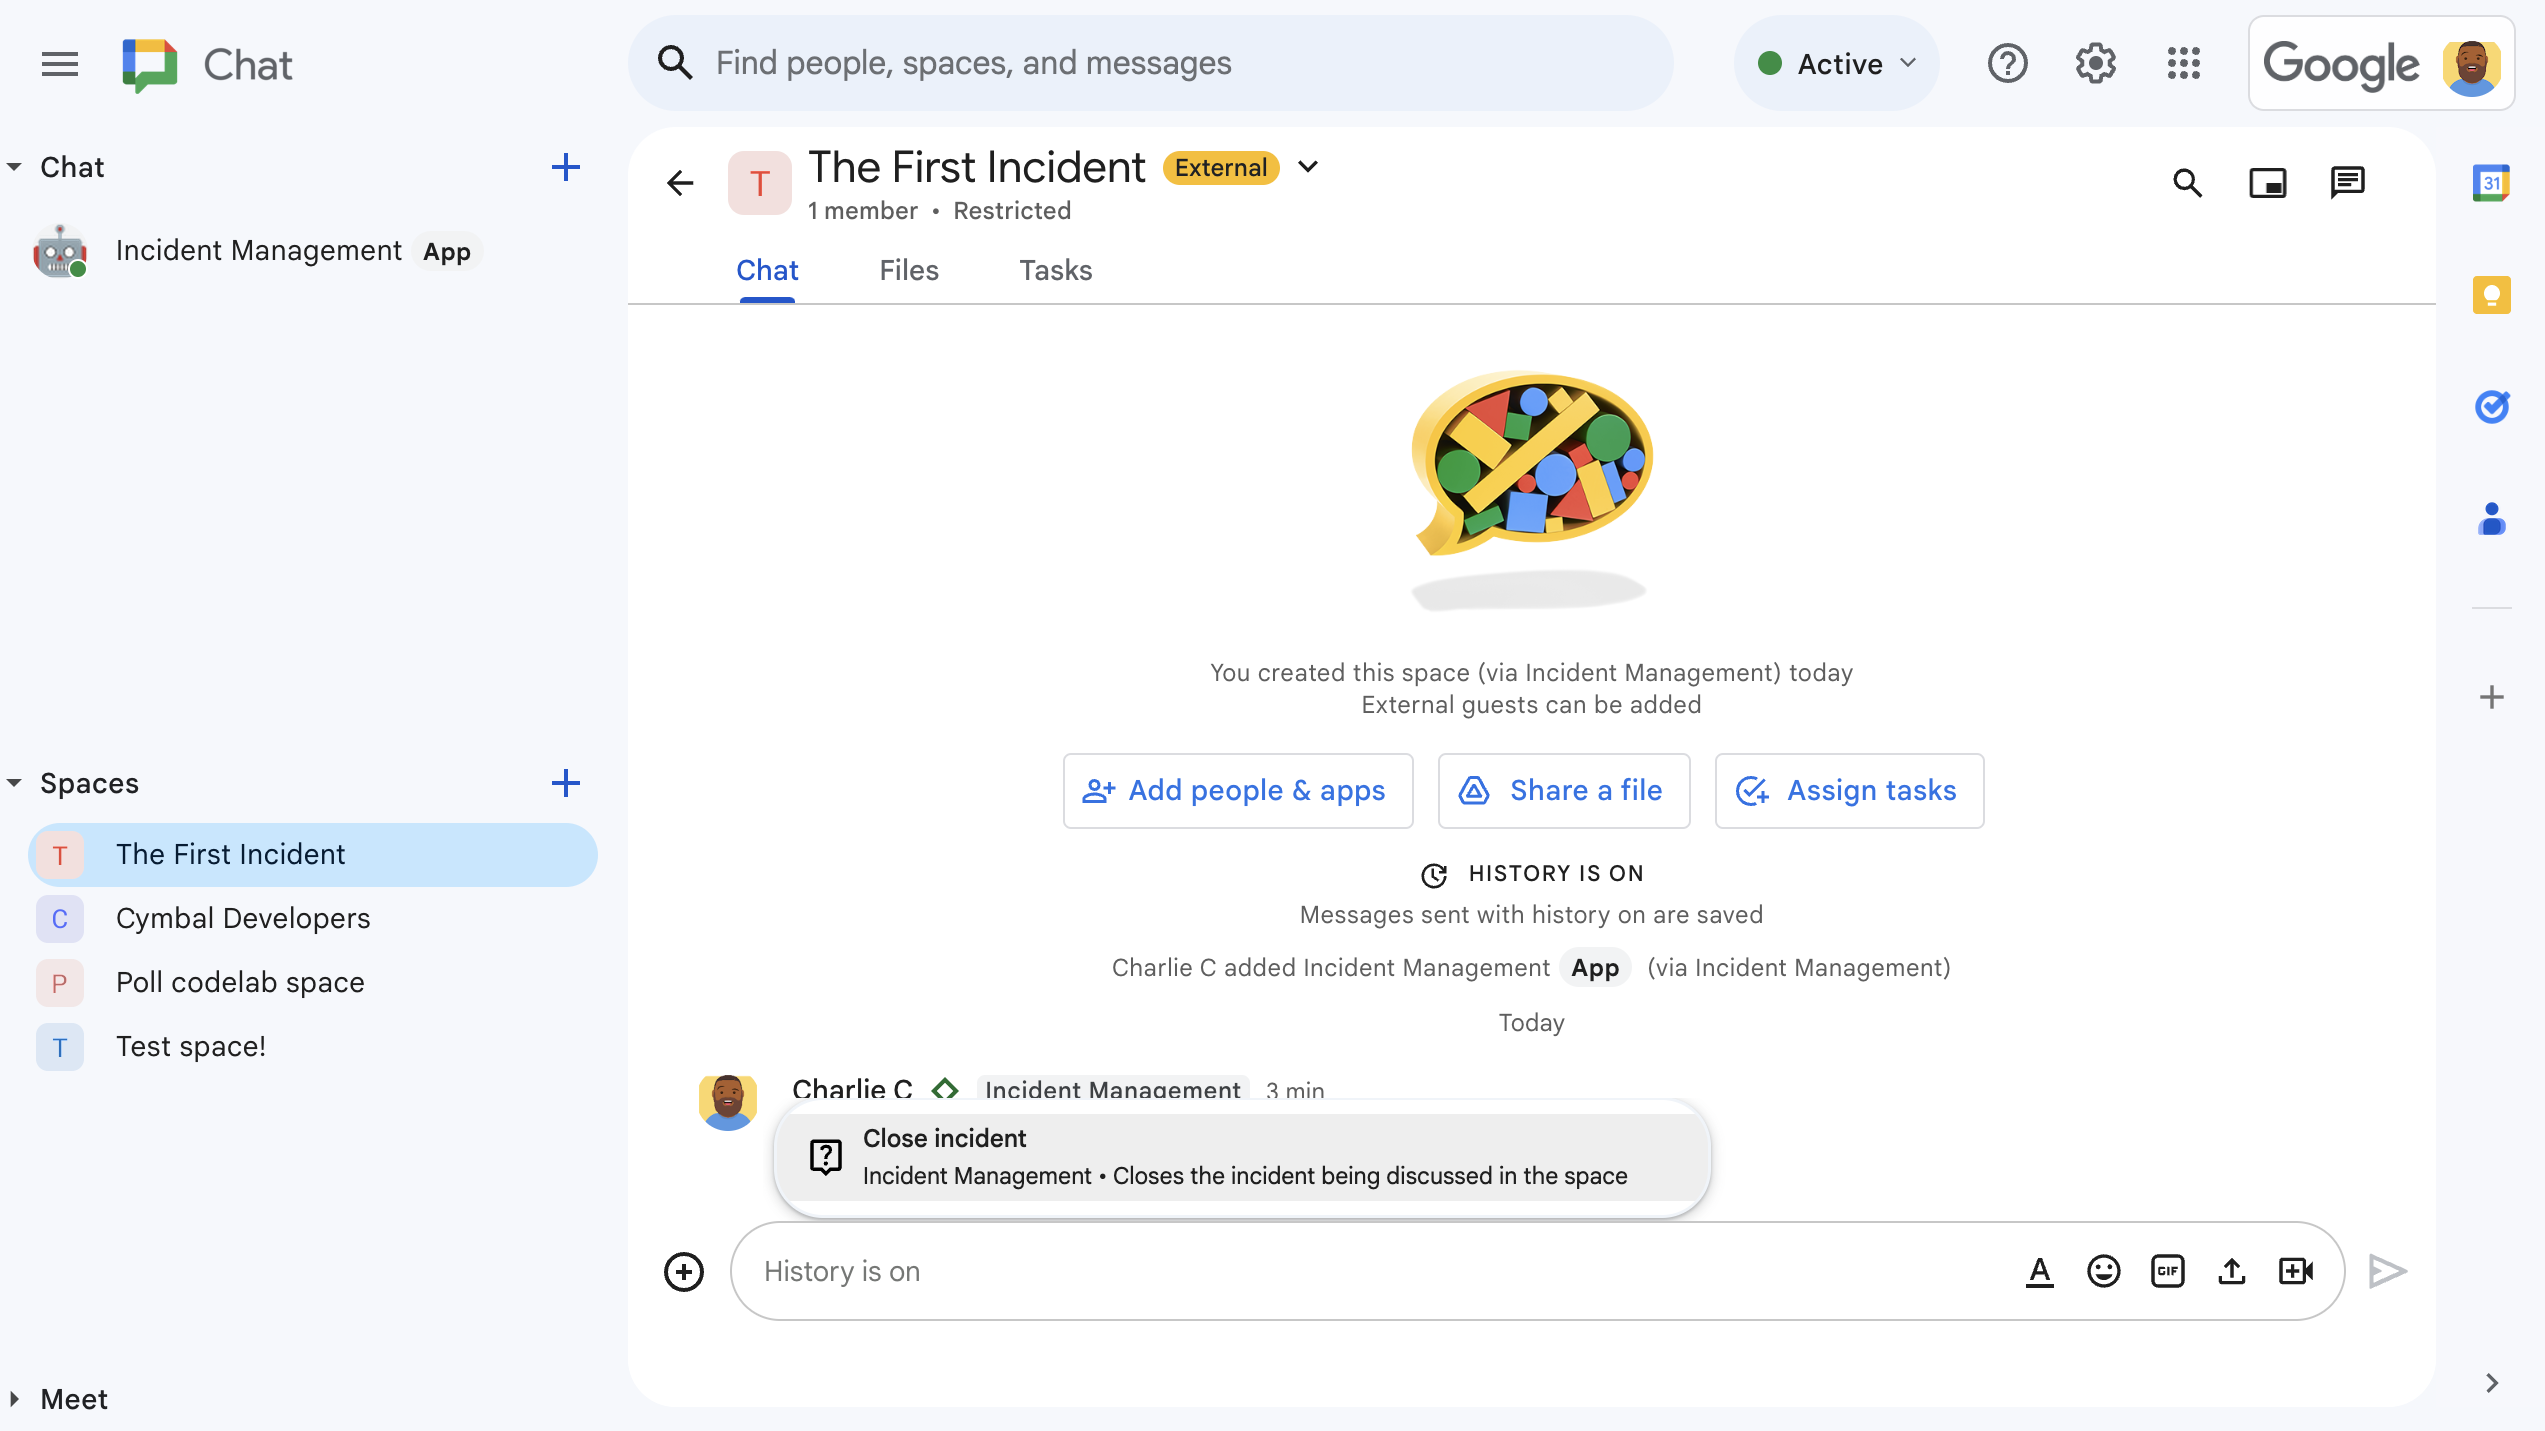
Figure 4. Resolving the incident with a quick command. -
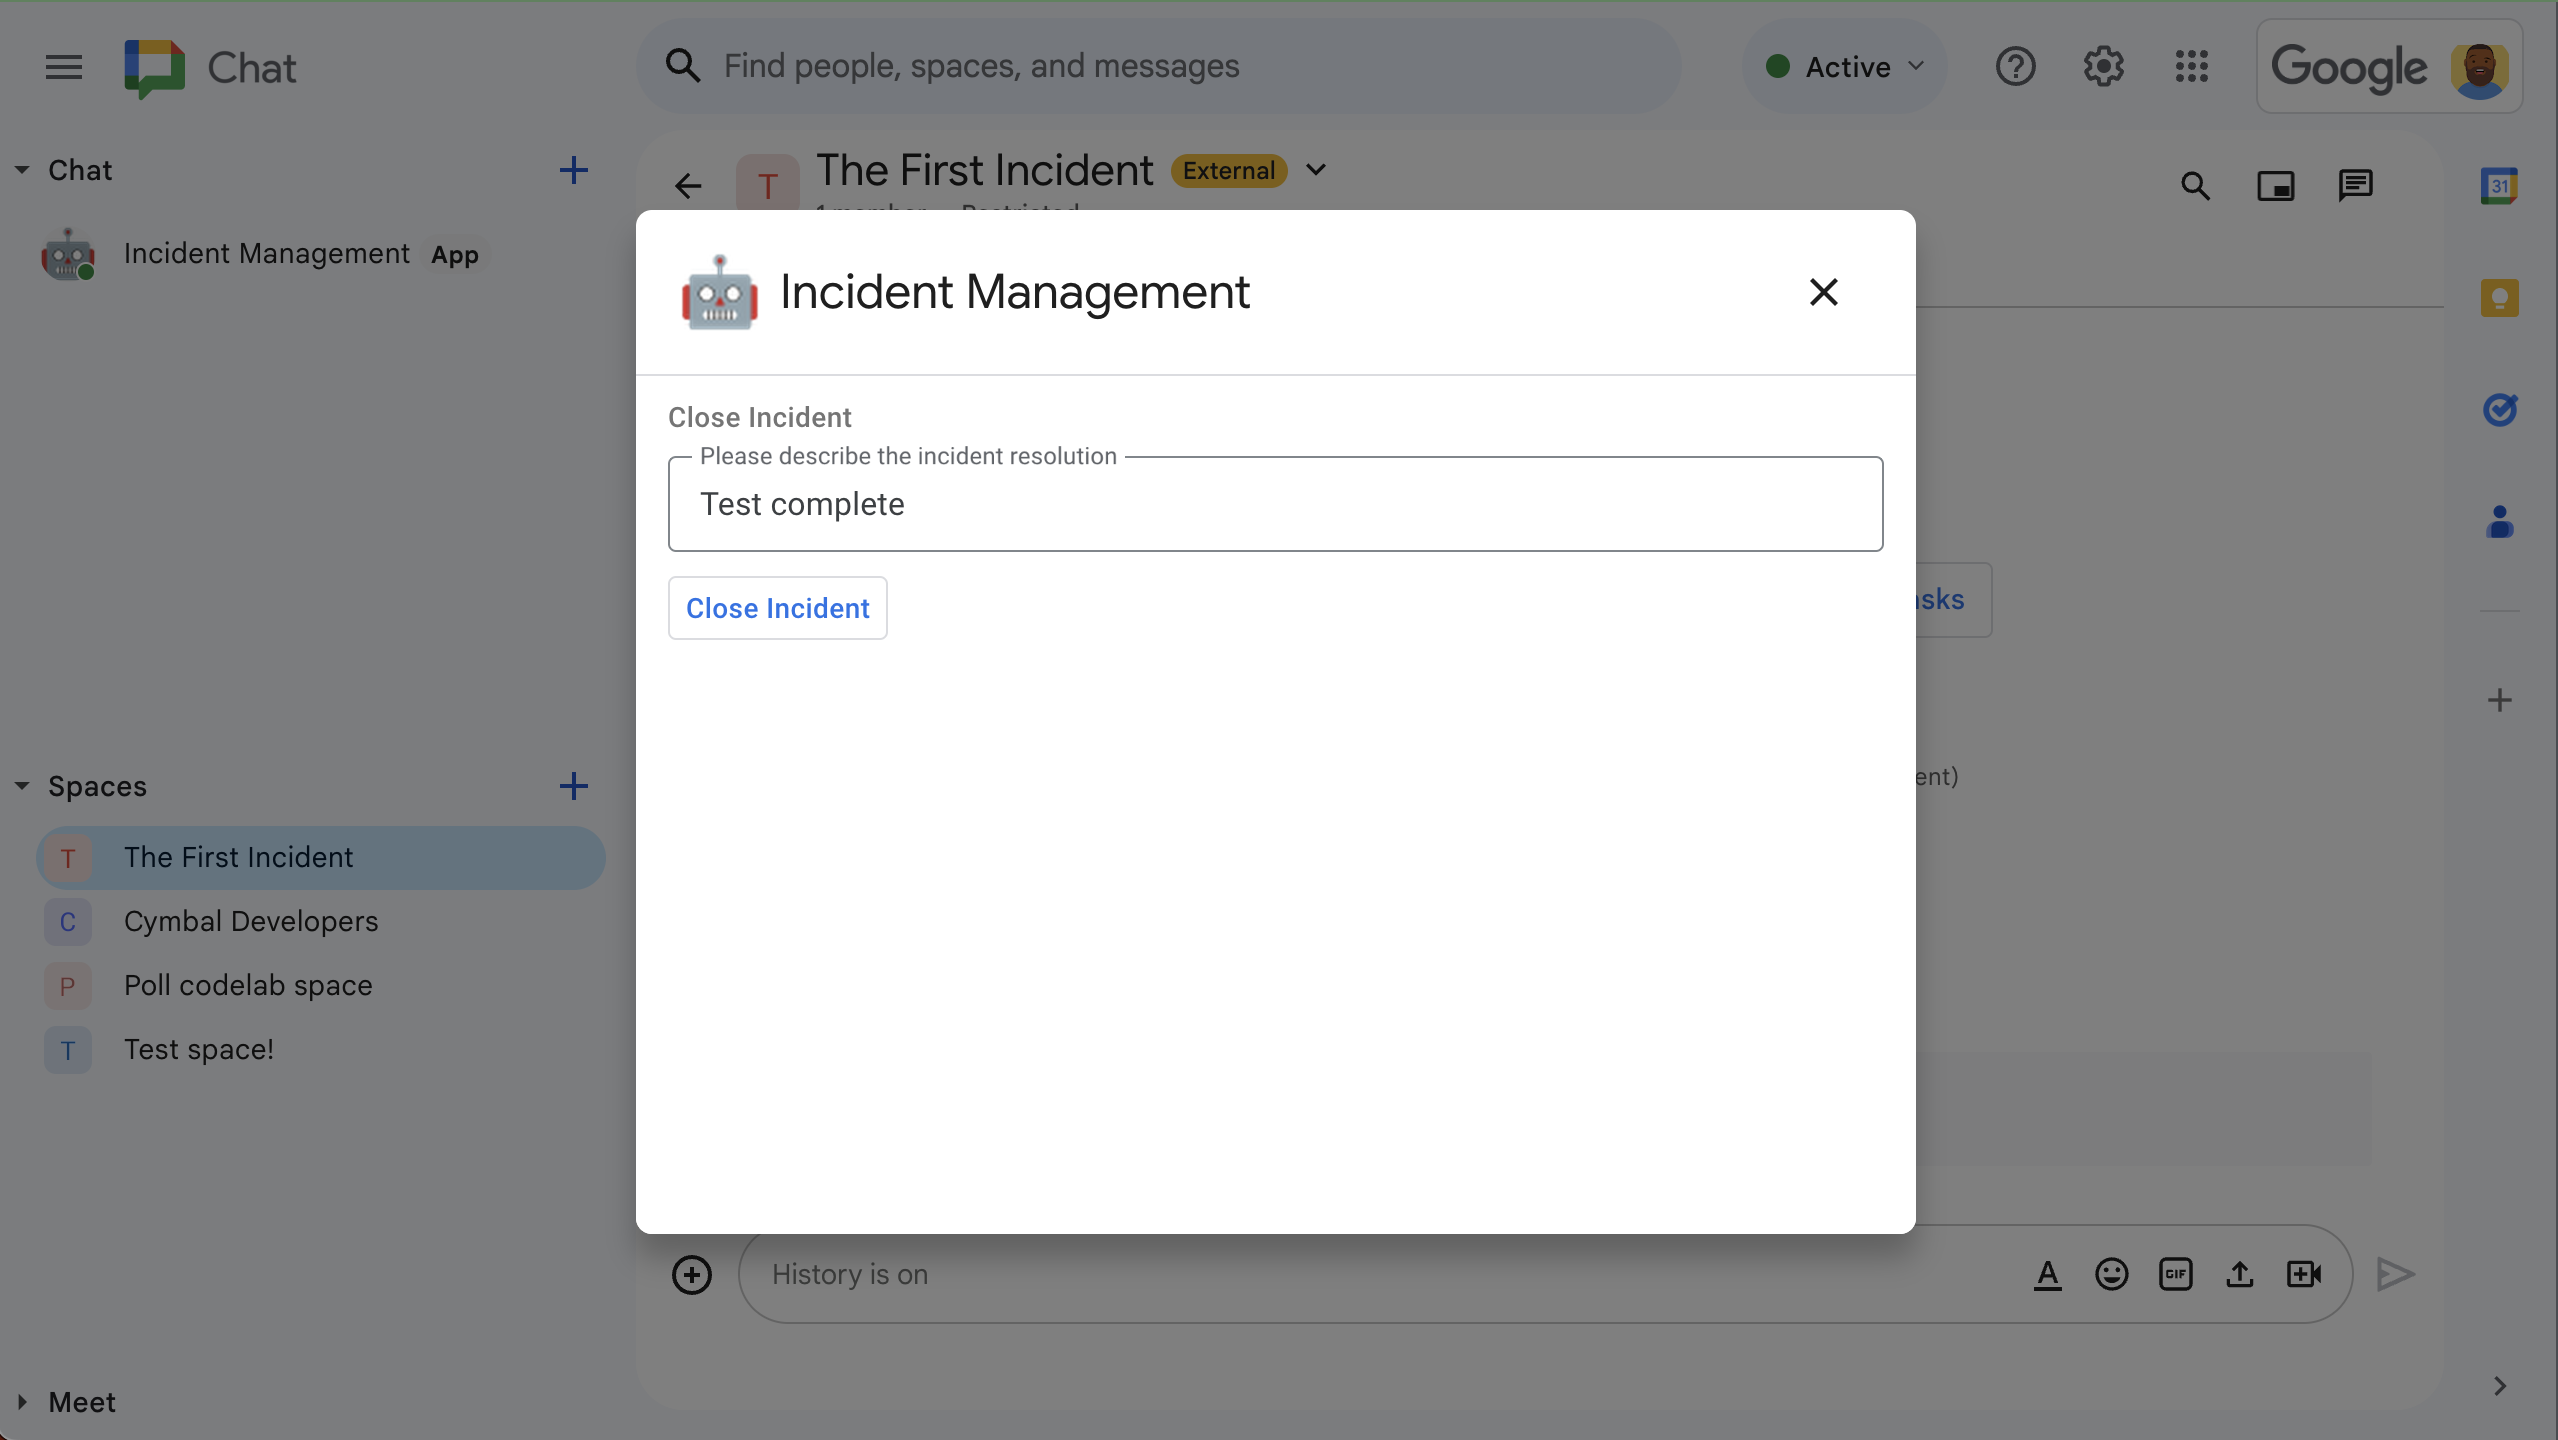
Figure 5. Incident resolution dialog. -
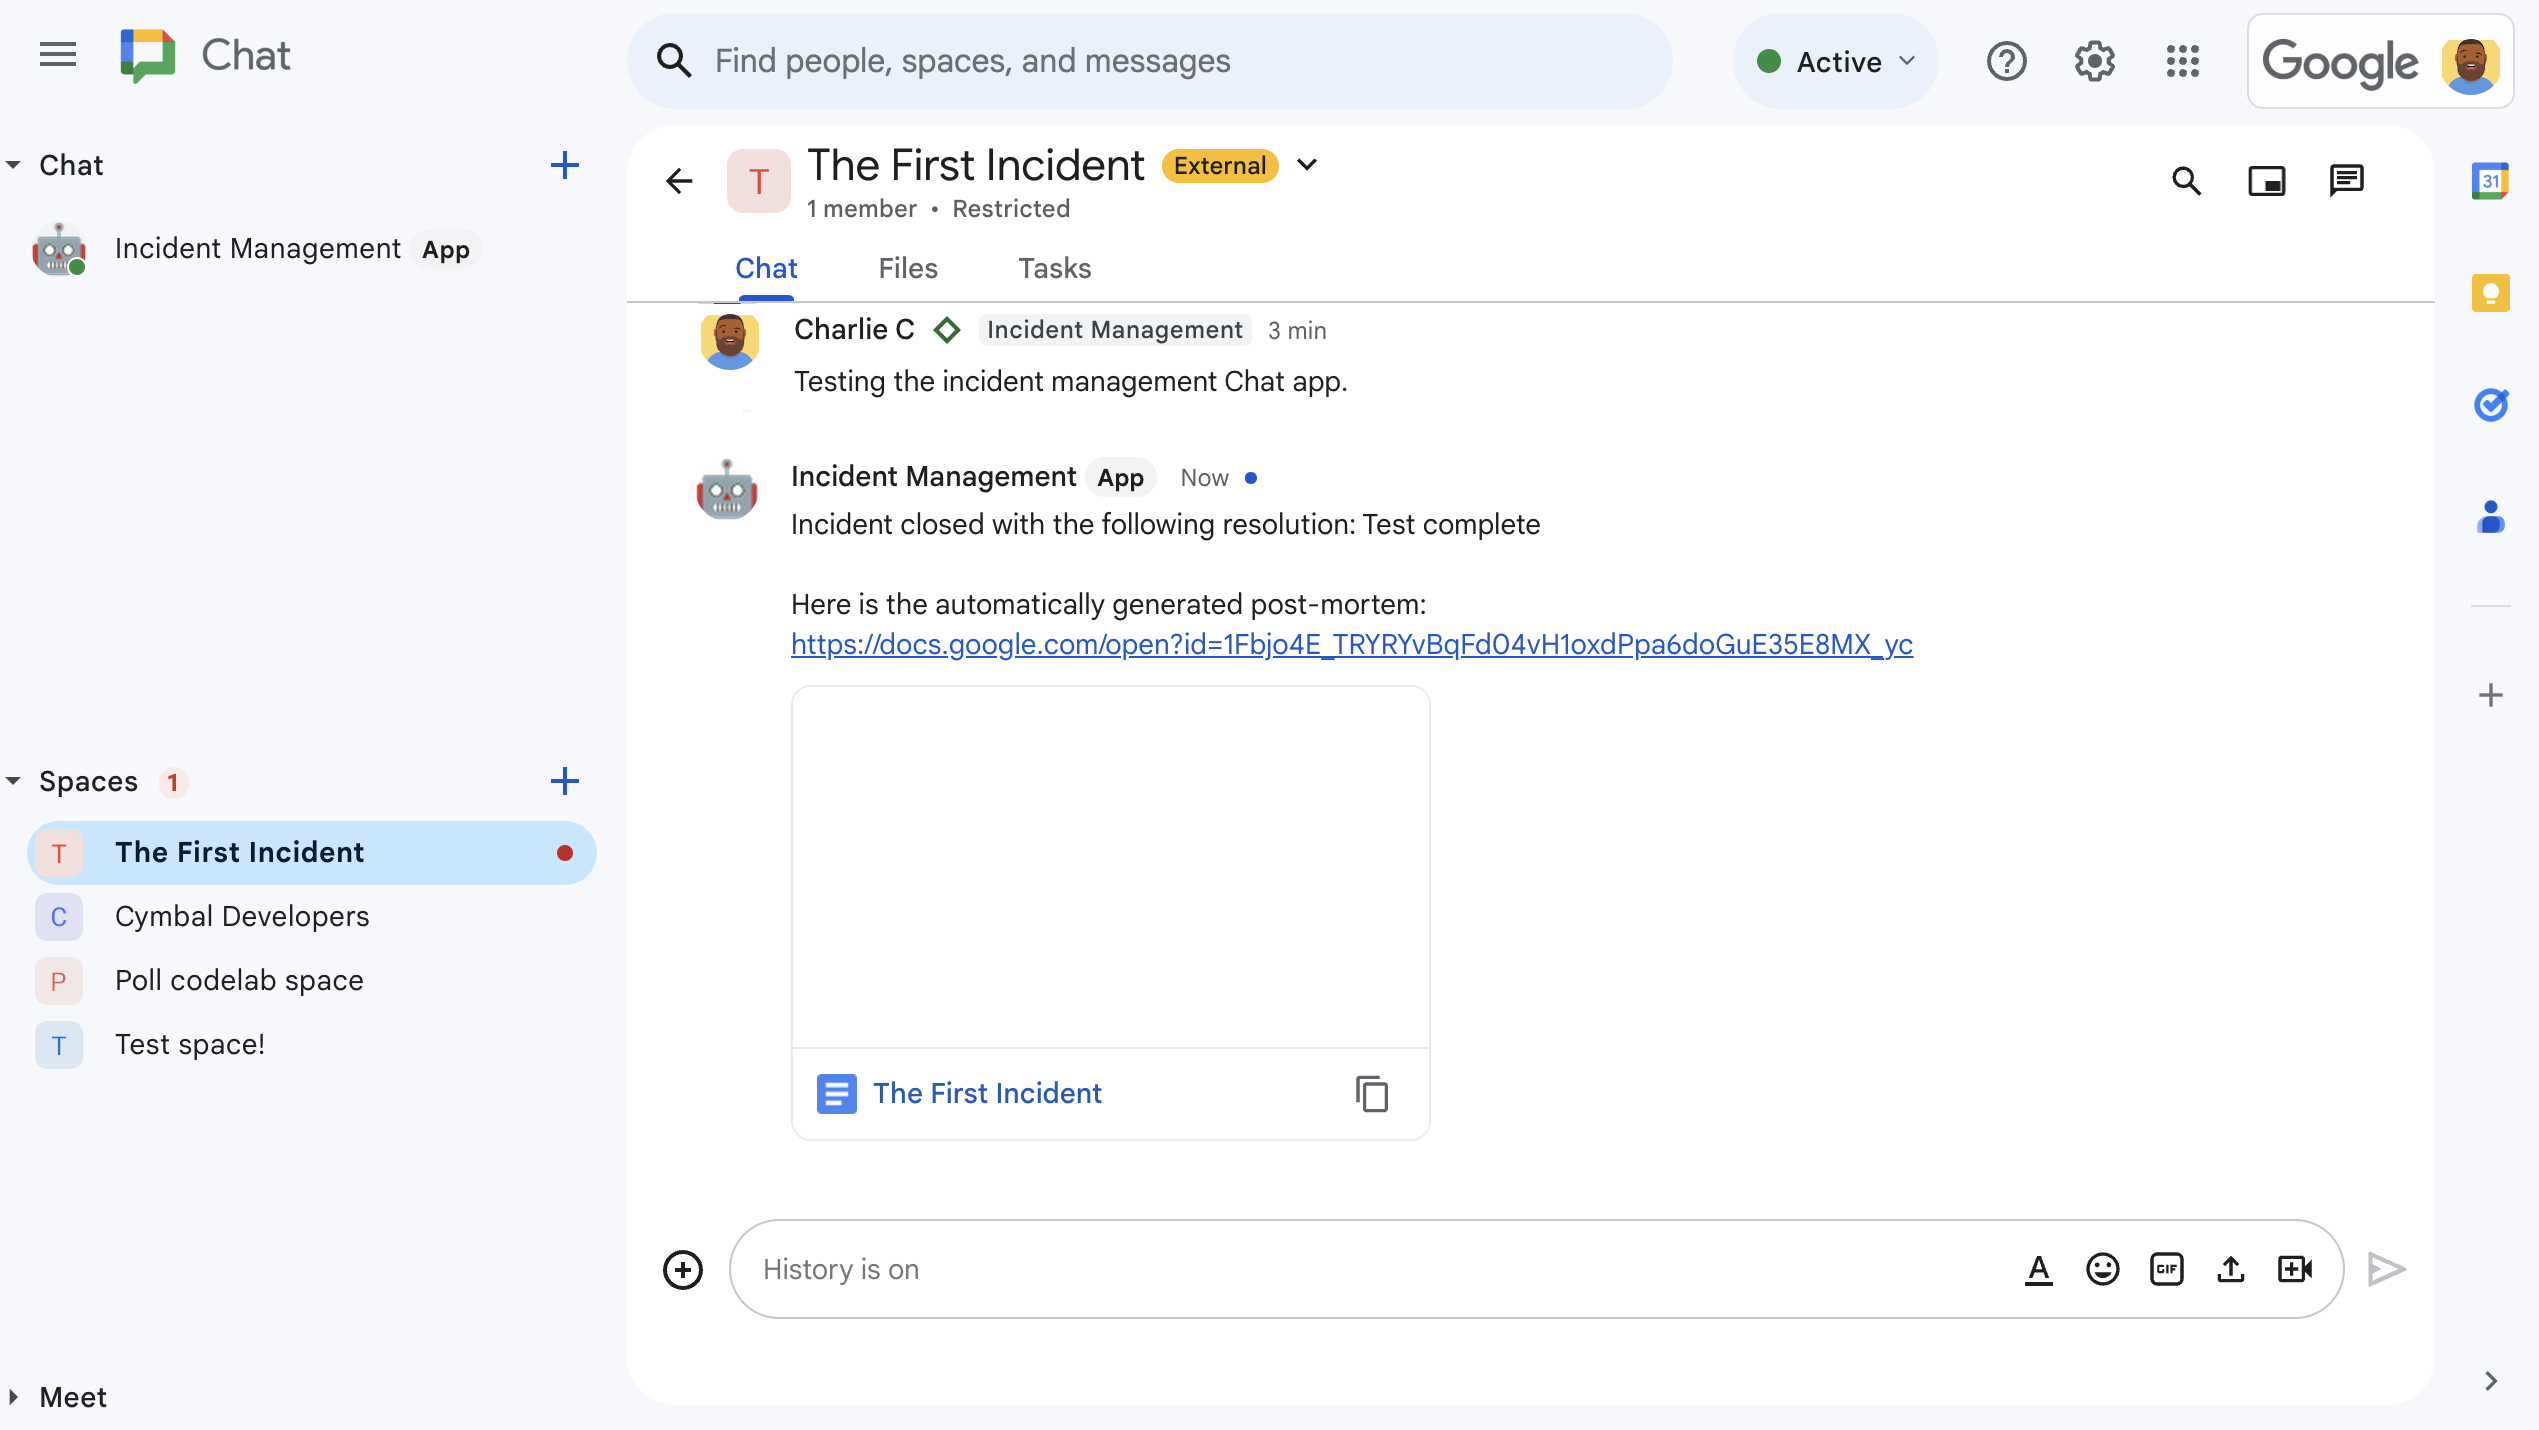
Figure 6. Incident resolution Google Docs document shared in space. -
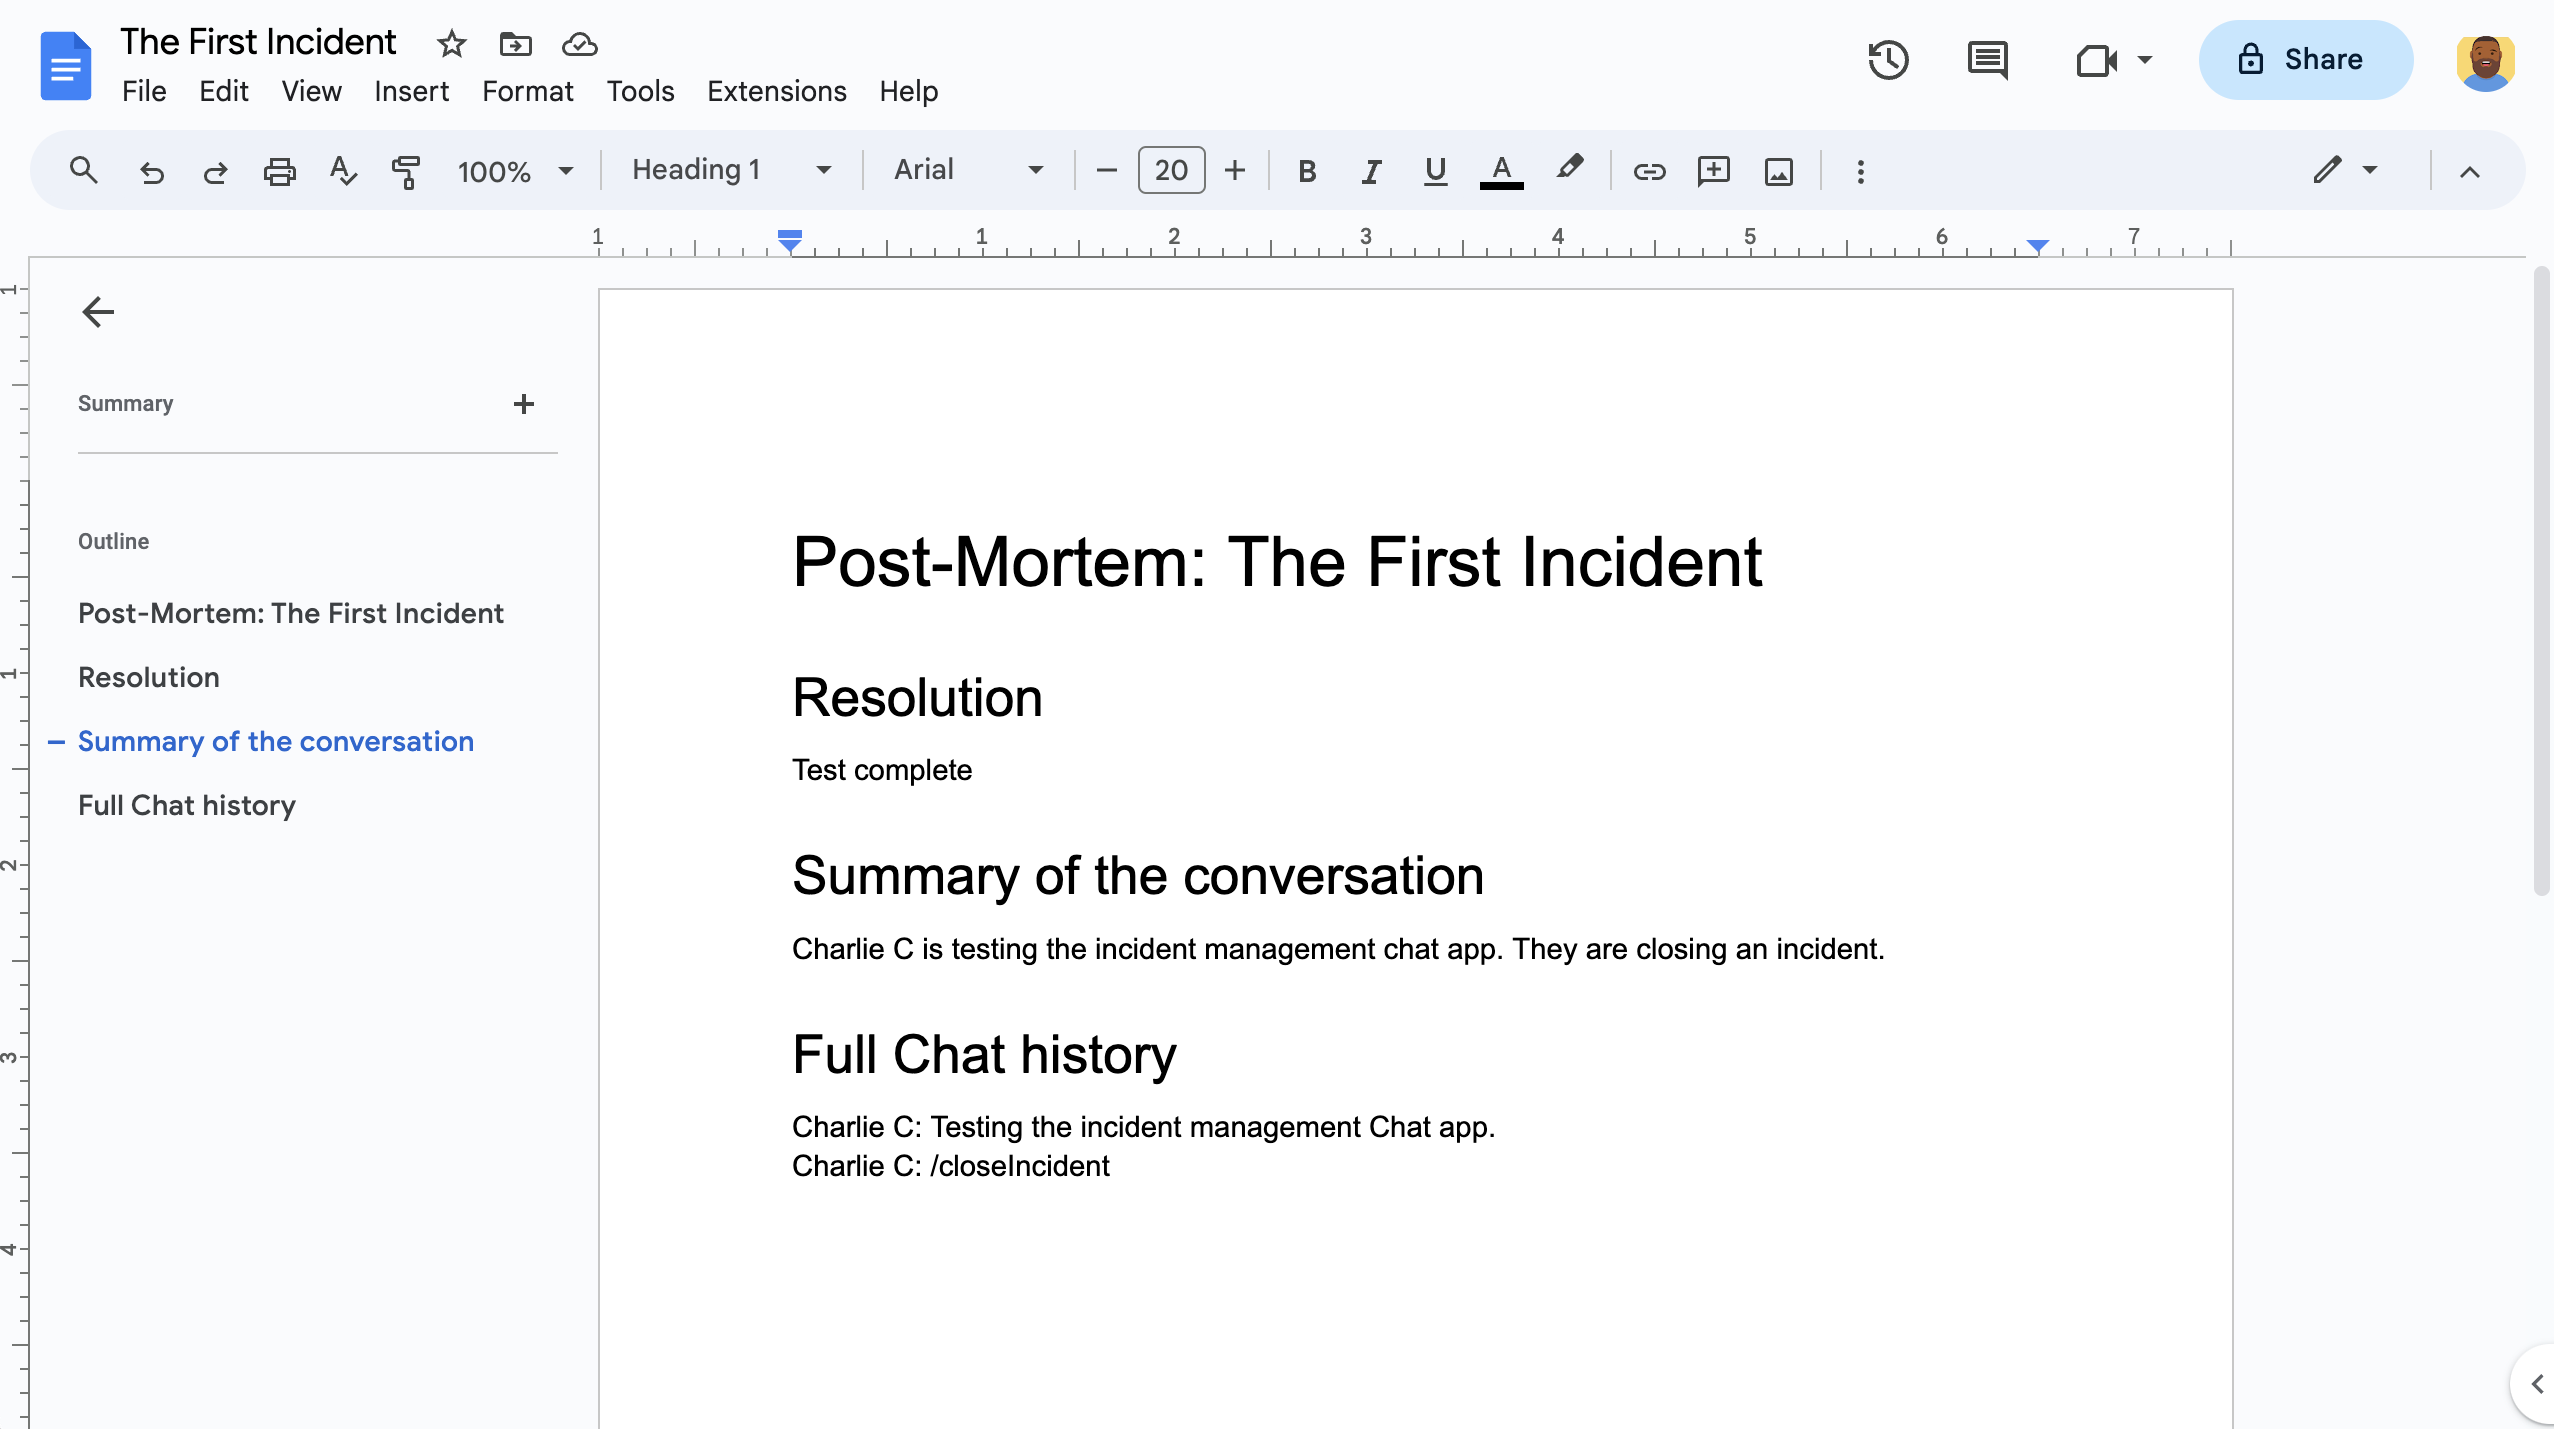
Figure 7. The AI summary incident resolution Google Docs document.
Prerequisites
If you need any of these prerequisites turned on for your organization, ask your Google Workspace administrator to turn them on:
- A Business or Enterprise Google Workspace account with access to Google Chat.
- To have Directory (contact sharing) turned on for Google Workspace. The incident app uses the directory to look up the incident responders' contact info, like name and email address. Incident responders must be users with a Google Chat account in your Google Workspace organization.
Objectives
- Build a Chat app that responds to incidents.
- Help users respond to incidents by doing the following:
- Creating incident response spaces.
- Posting messages summarizing incidents and responses.
- Supporting collaboration with interactive Chat app features.
- Summarize conversations and resolutions with Vertex AI.
Architecture
The following diagram shows the architecture of the Google Workspace and Google Cloud resources used by the incident response Google Chat app.
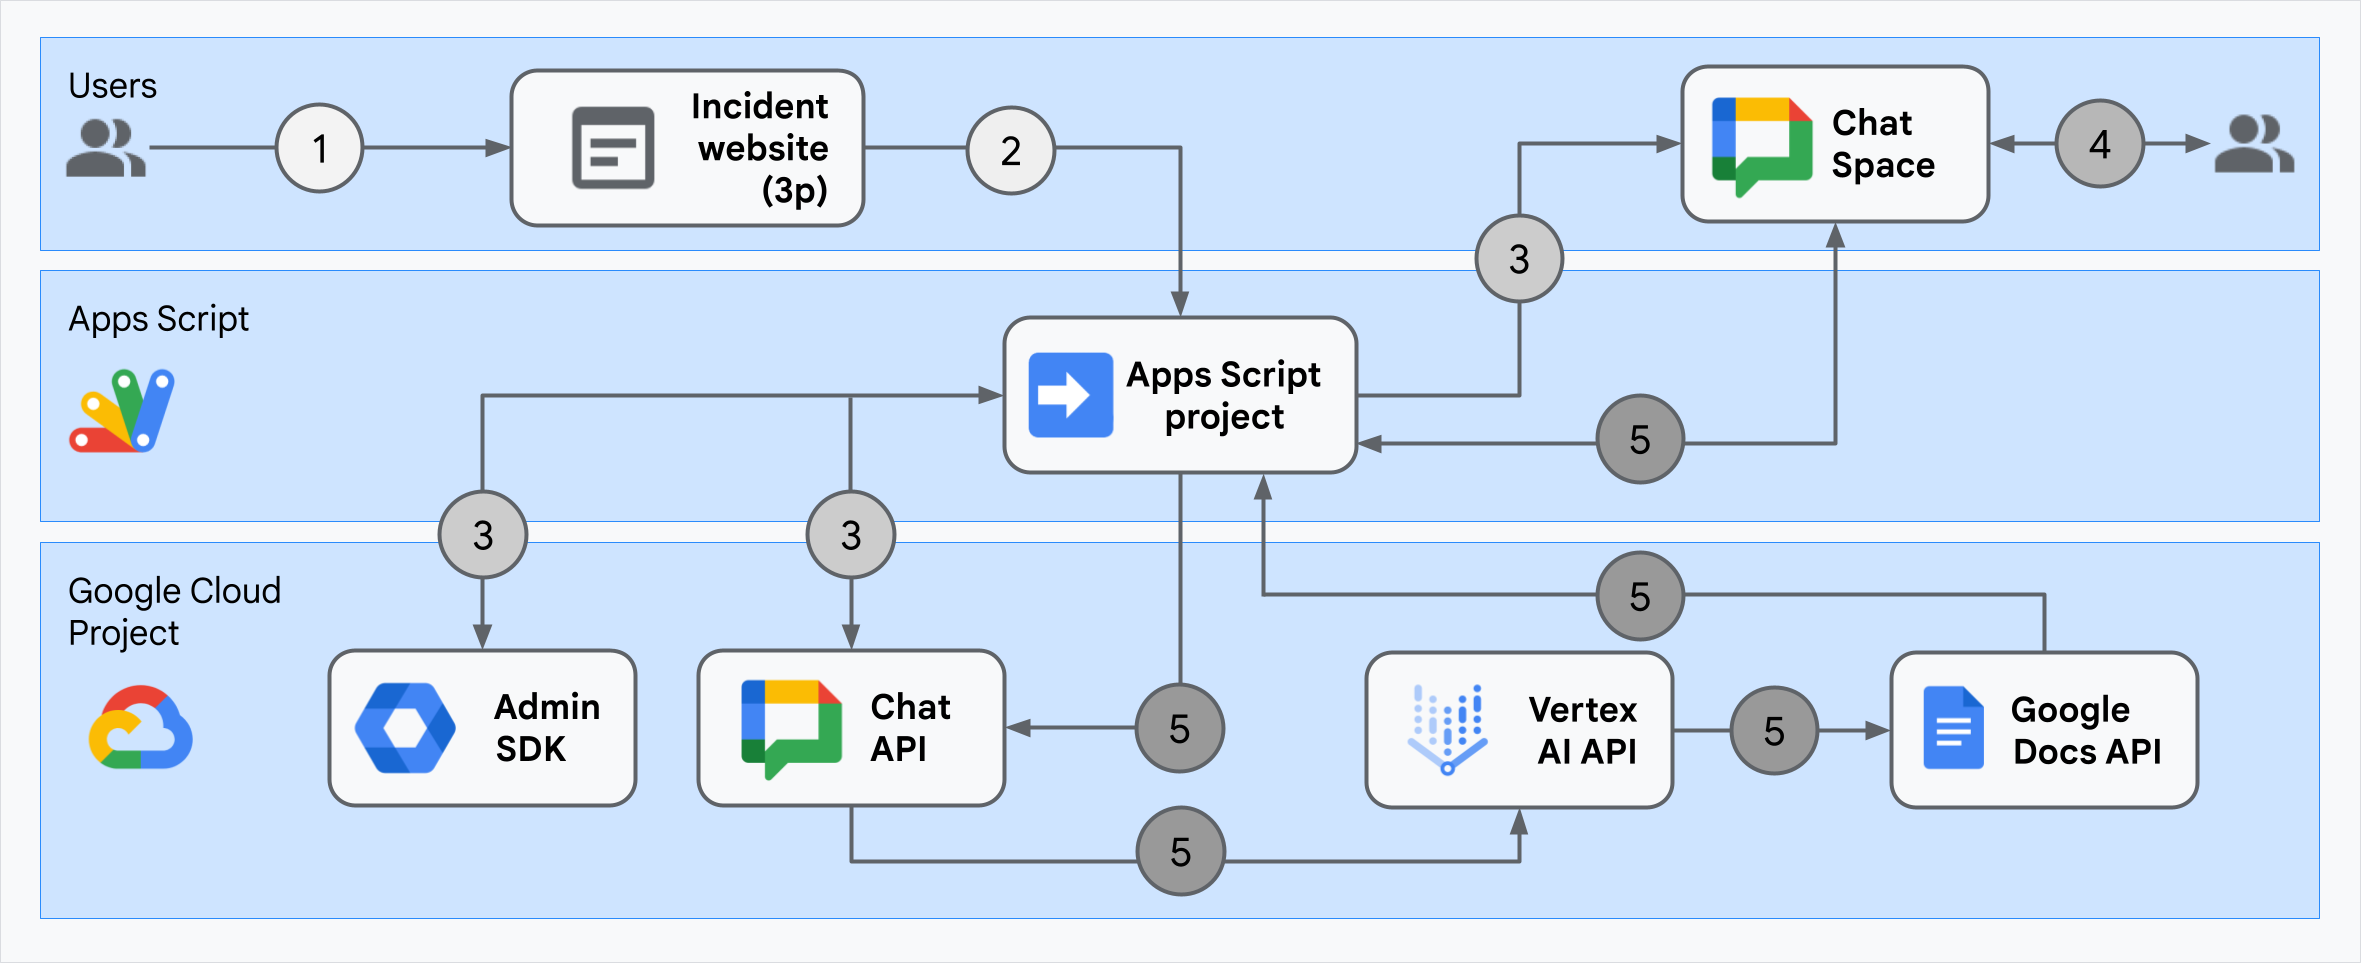
The architecture shows how the incident response Google Chat app processes an incident and resolution.
A user starts an incident from an external website hosted on Apps Script.
The website sends an asynchronous HTTP request to the Google Chat app, also hosted on Apps Script.
The incident response Google Chat app processes the request:
The Apps Script Admin SDK service gets team member information, like user ID and email address.
With a set of HTTP requests to Chat API using the Apps Script Advanced Chat service, the incident response Google Chat app creates an incident Chat space, populates it with team members, and sends a message to the space.
Team members discuss the incident in the Chat space.
A team member invokes a quick command to signal a resolution to the incident.
An HTTP call to Chat API using the Apps Script Advanced Chat service lists all the Chat space's messages.
Vertex AI receives the listed messages and generates a summary.
The Apps Script
DocumentAppservice creates a Docs document and adds Vertex AI's summary to the document.The incident response Google Chat app calls Chat API to send a message sharing a link to the summary Docs document.
Prepare the environment
This section shows how to create and configure a Google Cloud project for the Chat app.
Create a Google Cloud project
Google Cloud console
- In the Google Cloud console, go to Menu > IAM & Admin > Create a Project.
-
In the Project Name field, enter a descriptive name for your project.
Optional: To edit the Project ID, click Edit. The project ID can't be changed after the project is created, so choose an ID that meets your needs for the lifetime of the project.
- In the Location field, click Browse to display potential locations for your project. Then, click Select.
- Click Create. The Google Cloud console navigates to the Dashboard page and your project is created within a few minutes.
gcloud CLI
In one of the following development environments, access the Google Cloud
CLI (gcloud):
-
Cloud Shell: To use an online terminal with the gcloud CLI
already set up, activate Cloud Shell.
Activate Cloud Shell -
Local Shell: To use a local development environment,
install and
initialize
the gcloud CLI.
To create a Cloud project, use thegcloud projects createcommand:gcloud projects create PROJECT_ID
Enable billing for the Cloud project
Google Cloud console
- In the Google Cloud console, go to Billing. Click Menu > Billing > My Projects.
- In Select an organization, choose the organization associated with your Google Cloud project.
- In the project row, open the Actions menu (), click Change billing, and choose the Cloud Billing account.
- Click Set account.
gcloud CLI
- To list available billing accounts, run:
gcloud billing accounts list - Link a billing account with a Google Cloud project:
gcloud billing projects link PROJECT_ID --billing-account=BILLING_ACCOUNT_IDReplace the following:
PROJECT_IDis the Project ID for the Cloud project for which you want to enable billing.BILLING_ACCOUNT_IDis the billing account ID to link with the Google Cloud project.
Enable the APIs
Google Cloud console
In the Google Cloud console, enable the Google Chat API, the Google Docs API, the Admin SDK API, and the Vertex AI API.
Confirm that you're enabling the APIs in the correct Cloud project, then click Next.
Confirm that you're enabling the correct APIs, then click Enable.
gcloud CLI
If necessary, set the current Cloud project to the one you created with the
gcloud config set projectcommand:gcloud config set project PROJECT_IDReplace PROJECT_ID with the Project ID of the Cloud project you created.
Enable the Google Chat API, Google Docs API, Admin SDK API, and Vertex AI API with the
gcloud services enablecommand:gcloud services enable chat.googleapis.com docs.googleapis.com admin.googleapis.com aiplatform.googleapis.com
Set up authentication and authorization
Authentication and authorization lets the Chat app access resources in Google Workspace and Google Cloud to process an incident response.
In this tutorial, you publish the app internally so it's OK to use placeholder information. Before publishing the app externally, replace placeholder information with real information for the consent screen.
In the Google Cloud console, go to Menu > Google Auth platform > Branding.
If you have already configured the Google Auth platform, you can configure the following OAuth Consent Screen settings in Branding, Audience, and Data Access. If you see a message that says Google Auth platform not configured yet, click Get Started:
- Under App Information, in App name, type
Incident Management with User Auth. - In User support email, select your email address or an appropriate Google group.
- Click Next.
- Under Audience, select Internal. If you can't select Internal, select External.
- Click Next.
- Under Contact Information, enter an Email address where you can be notified about any changes to your project.
- Click Next.
- Under Finish, review the Google API Services User Data Policy and if you agree, select I agree to the Google API Services: User Data Policy.
- Click Continue.
- Click Create.
- If you selected External for user type, add test users:
- Click Audience.
- Under Test users, click Add users.
- Enter your email address and any other authorized test users, then click Save.
- Under App Information, in App name, type
Click Data Access > Add or Remove Scopes. A panel appears with a list of scopes for each API that you've enabled in your Google Cloud project.
Under Manually add scopes, paste the following scopes:
https://www.googleapis.com/auth/chat.spaces.createhttps://www.googleapis.com/auth/chat.membershipshttps://www.googleapis.com/auth/chat.memberships.apphttps://www.googleapis.com/auth/chat.messageshttps://www.googleapis.com/auth/documentshttps://www.googleapis.com/auth/admin.directory.user.readonlyhttps://www.googleapis.com/auth/script.external_requesthttps://www.googleapis.com/auth/userinfo.emailhttps://www.googleapis.com/auth/cloud-platform
Click Add to Table.
Click Update.
After selecting the scopes required by your app, on the Data Access page, click Save.
Create and deploy the Chat app
In the following section, you copy and update an entire Apps Script project that contains all the required application code for your Chat app, so there's no need to copy and paste each file.
Some functions include underscores at the end of their names, like
concatenateAllSpaceMessages_() from ChatApp.gs. The underscore hides the
function from the incident initialization web page when it's open in a browser.
For more information, see
Private functions.
Apps Script supports two file types, .gs scripts and .html
files. To abide by this support, the app's client-side JavaScript is included
inside <script /> tags and its CSS is included inside <style /> tags inside
an HTML file.
Optionally, you can view the entire project on GitHub.
Here's an overview of each file:
Consts.gsDefines constants referenced by other code files, including your Cloud project ID, Vertex AI location ID, the quick command ID for closing an incident, and the Gemini model.
View
Consts.gscodeChatApp.gsHandles Chat interaction events, including messages, button clicks, app commands, and dialogs. Responds to the
Close incidentquick command by opening a dialog to gather incident resolution details. Reads messages in the space by calling thespaces.messages.listmethod in the Chat API. Gets user IDs using the Admin SDK Directory service in Apps Script.View
ChatApp.gscodeChatSpaceCreator.gsReceives form data users enter on the incident initialization web page, and uses it to set up a Chat space by creating and populating it, and then posts a message about the incident.
View
ChatSpaceCreator.gscodeDocsApi.gsCalls the Google Docs API to create a Google Docs document in a user's Google Drive and writes a summary of the incident information, created in
VertexAiApi.gs, to the document.View
DocsApi.gscodeVertexAiApi.gsSummarizes the conversation in the Chat space using Vertex AI. This summary is posted in a specially-created document in
DocsAPI.gs.View
VertexAiApi.gscodeWebController.gsServes the incident initialization website.
View
WebController.gscodeIndex.htmlThe HTML comprising the incident initialization website.
View
Index.htmlcodeJavaScript.htmlHandles form behavior including submits, errors, and clears, for the incident initialization website. It's included into
Index.htmlby the customincludefunction inWebController.gs.View
JavaScript.htmlcodeStylesheet.htmlThe CSS for the incident initialization website. It's included into
Index.htmlby the customincludefunction inWebController.gs.View
Stylesheet.htmlcode
Find your Cloud project number and ID
In the Google Cloud console, go to your Cloud project.
Click Settings and Utilities > Project settings.
Note the values in the Project number and Project ID fields. You use them in the following sections.
Create the Apps Script project
To create an Apps Script project and connect it with your Cloud project:
- Click the following button to open the Incident Management Chat app with User Auth Apps Script project.
Open the project - Click Overview.
- On the overview page, click
 Make a copy.
 Name your copy of the Apps Script project:
Click Copy of Incident Management Chat app with User Auth.
In Project title, type
Incident Management Chat app with User Auth.Click Rename.
In your copy of the Apps Script project, go to the
Consts.gsfile and setPROJECT_IDwith the ID of your Cloud project.
Set the Apps Script project's Cloud project
- In your Apps Script project,
click
 Project Settings.
 - Under Google Cloud Platform (GCP) Project, click Change project.
- In GCP project number, paste the project number of your Cloud project.
- Click Set project. The Cloud project and Apps Script project are now connected.
Create an Apps Script test deployment
Now that all the code is in place, deploy the Apps Script project. You use the deployment ID when you configure the Chat app in the Google Cloud.
In Apps Script, open the incident response app's project.
Click Deploy > Test deployments.
If Google Workspace Add-on and Web app aren't already selected, next to Select type, click deployment types
and select
Google Workspace Add-on and Web app.Apps Script provides a deployment ID and a URL for the web app.
Make note of the Web app URL to visit later when you start an incident. Copy the Deployment ID. You use this ID while configuring the Chat app in Google Cloud console.
Click Done.
Configure the Chat app in the Google Cloud console
This section shows how to configure the Google Chat API in the Google Cloud console with information about your Chat app, including the ID of the deployment that you just created from your Apps Script project.
In the Google Cloud console, click Menu > More products > Google Workspace > Product Library > Google Chat API > Manage > Configuration.
In App name, type
Incident Management with User Auth.In Avatar URL, type
https://developers.google.com/chat/images/quickstart-app-avatar.png.In Description, type
Responds to incidents.Click the Enable Interactive features toggle to the on position.
Under Functionality, select Join spaces and group conversations.
Under Connection settings, select Apps Script.
In Deployment ID, paste the Apps Script Deployment ID that you copied earlier from the Apps Script project deployment.
Register a quick command that the fully implemented Chat app uses:
Under Commands, click Add a command.
In Command ID, type
1.In Description, type
Closes the incident being discussed in the space.Under Command type, select Quick command.
In Quick command name, type
Close incident.Select Dialog.
Click Done. The command is registered and listed.
Under Visibility, select Make this Chat app available to specific people and groups in Your Workspace Domain and enter your email address.
Under Logs, select Log errors to Logging.
Click Save. A configuration saved message appears, meaning the app is ready to test.
Test the Chat app
To test the incident management Chat app, initiate an incident from the web page and verify that the Chat app works as expected:
Go to the Apps Script deployment web app URL.
When Apps Script asks permission to access your data, click Review permissions, sign in with an appropriate Google Account in your Google Workspace domain, and click Allow.
The incident initialization web page opens. Enter test information:
- In Incident title, type
The First Incident. - Optionally, in Incident responders, enter the email addresses of your fellow incident responders. They must be users with a Google Chat account in your Google Workspace organization or space creation fails. Don't enter your own email address because it's included automatically.
- In Initial message, type
Testing the incident management Chat app.
- In Incident title, type
Click Create Chat Space. A
creating spacemessage appears.After the space is created, a
Space created!message appears. Click Open space, which opens the space in Chat in a new tab.Optionally, you and the other incident responders can send messages in the space. The app summarizes these messages using Vertex AI and shares a retrospective document.
To end the incident response and begin the resolution process, in the Chat space, launch the quick command
Close incident. An incident management dialog opens.In Close incident, enter a description for the incident resolution, like
Test complete.Click Close Incident.
The Incident Management app lists the messages in the space, summarizes them with Vertex AI, pastes the summary in a Google Docs document, and shares the document in the space.
Clean up
To avoid incurring charges to your Google Cloud account for the resources used in this tutorial, we recommend that you delete the Cloud project.
- In the Google Cloud console, go to the Manage resources page. Click Menu > IAM & Admin > Manage Resources.
- In the project list, select the project you want to delete and then click Delete .
- In the dialog, type the project ID and then click Shut down to delete the project.
Related topics
- Plan travels with an AI agent accessible across Google Workspace
- Answer questions based on Chat conversations with a Gemini AI Chat app
- Manage projects with Google Chat, Vertex AI, and Firestore
- Fact-check statements with an ADK AI agent and Gemini model
- Integrate fundamental AI concepts in Chat apps
- Build a Chat app as a Google Workspace add-on with Apps Script