
يوضّح هذا الدليل كيفية استخدام طريقة
create()
في مورد Message ضمن Google Chat API لتنفيذ أيّ مما يلي:
- إرسال رسائل تحتوي على نصوص وبطاقات وتطبيقات مصغّرة تفاعلية
- إرسال رسائل بشكل خاص إلى مستخدم محدّد في Chat
- بدء سلسلة محادثات أو الردّ عليها
- تسمية رسالة لتتمكّن من تحديدها في طلبات أخرى لواجهة برمجة تطبيقات Chat
يبلغ الحد الأقصى لحجم الرسالة (بما في ذلك أي نصوص أو بطاقات) 32,000 بايت. لإرسال رسالة تتجاوز هذا الحجم، يجب أن يرسل تطبيق Chat عدة رسائل بدلاً من ذلك.
بالإضافة إلى طلب Chat API لإنشاء الرسائل، يمكن لتطبيقات Chat إنشاء الرسائل وإرسالها للرد على تفاعلات المستخدمين، مثل نشر رسالة ترحيب بعد أن يضيف المستخدم تطبيق Chat إلى مساحة. عند الردّ على التفاعلات، يمكن لتطبيقات الدردشة استخدام أنواع أخرى من ميزات المراسلة، بما في ذلك مربّعات الحوار التفاعلية وواجهات معاينة الروابط. للرد على مستخدم، يعرض تطبيق Chat الرسالة بشكل متزامن، بدون استدعاء Chat API. لمعرفة المزيد حول إرسال الرسائل للردّ على التفاعلات، يمكنك الاطّلاع على المقالة تلقّي التفاعلات والردّ عليها باستخدام تطبيق Google Chat.
طريقة عرض الرسائل التي تم إنشاؤها باستخدام Chat API وتحديد مصدرها
يمكنك استدعاء طريقة create() باستخدام
مصادقة التطبيق
ومصادقة المستخدم.
تنسب "خدمة المحادثة" مرسل الرسالة بشكل مختلف
استنادًا إلى نوع المصادقة التي تستخدمها.
عند المصادقة كتطبيق Chat، يرسل تطبيق Chat الرسالة.

App بجانب اسمه.عند المصادقة كمستخدم، يرسل تطبيق Chat الرسالة نيابةً عن المستخدم. يُشير Chat أيضًا إلى تطبيق Chat في الرسالة من خلال عرض اسمه.

يحدّد نوع المصادقة أيضًا ميزات المراسلة وواجهاتها التي يمكنك تضمينها في الرسالة. باستخدام ميزة مصادقة التطبيق، يمكن لتطبيقات Chat إرسال رسائل تتضمّن نصًا منسّقًا وواجهات مستندة إلى البطاقات وتطبيقات مصغّرة تفاعلية. باستخدام مصادقة المستخدم، يمكنك إرسال رسائل نصية. في معاينة المطور، يمكنك أيضًا إرسال بطاقات، كما هو موضّح في إنشاء البطاقات وتعديلها.
لمزيد من المعلومات حول ميزات المراسلة المتاحة لواجهة برمجة تطبيقات Chat، يُرجى الاطّلاع على نظرة عامة على رسائل Google Chat.
يوضّح هذا الدليل كيفية استخدام أيّ من نوعَي المصادقة لإرسال رسالة باستخدام Chat API.
المتطلبات الأساسية
Node.js
- حساب Google Workspace تابع للعمل أو لمؤسسة مع إمكانية الوصول إلى Google Chat
- إعداد البيئة:
- أنشئ مشروعًا على Google Cloud.
- ضبط شاشة طلب الموافقة المتعلّقة ببروتوكول OAuth
- فعِّل واجهة Google Chat API وأعِدّها من خلال إضافة اسم ورمز ووصف لتطبيق Chat.
- ثبِّت Node.js Cloud Client Library.
- أنشئ بيانات اعتماد الوصول استنادًا إلى الطريقة التي تريد استخدامها للمصادقة في طلب Google Chat API:
- لإجراء المصادقة كمستخدم في Chat،
أنشئ بيانات اعتماد معرّف عميل OAuthواحفظها كملف JSON باسم
credentials.jsonفي الدليل المحلي. - لإجراء المصادقة بصفتك تطبيق Chat،
أنشئ بيانات اعتماد
لحساب الخدمة واحفظها كملف JSON باسم
credentials.json.
- لإجراء المصادقة كمستخدم في Chat،
أنشئ بيانات اعتماد معرّف عميل OAuthواحفظها كملف JSON باسم
- اختَر نطاق تفويض استنادًا إلى ما إذا كنت تريد المصادقة كمستخدم أو كتطبيق Chat.
- مساحة Chat في Google Chat يكون المستخدم الذي تم التحقّق من هويته أو تطبيق Chat عضوًا فيها لإثبات هويتك كتطبيق Chat، أضِف تطبيق Chat إلى المساحة.
Python
- حساب Google Workspace تابع للعمل أو لمؤسسة مع إمكانية الوصول إلى Google Chat
- إعداد البيئة:
- أنشئ مشروعًا على Google Cloud.
- ضبط شاشة طلب الموافقة المتعلّقة ببروتوكول OAuth
- فعِّل واجهة Google Chat API وأعِدّها من خلال إضافة اسم ورمز ووصف لتطبيق Chat.
- ثبِّت مكتبة برامج Cloud للغة Python.
- أنشئ بيانات اعتماد الوصول استنادًا إلى الطريقة التي تريد استخدامها للمصادقة في طلب Google Chat API:
- لإجراء المصادقة كمستخدم في Chat،
أنشئ بيانات اعتماد معرّف عميل OAuthواحفظها كملف JSON باسم
credentials.jsonفي الدليل المحلي. - لإجراء المصادقة بصفتك تطبيق Chat،
أنشئ بيانات اعتماد
لحساب الخدمة واحفظها كملف JSON باسم
credentials.json.
- لإجراء المصادقة كمستخدم في Chat،
أنشئ بيانات اعتماد معرّف عميل OAuthواحفظها كملف JSON باسم
- اختَر نطاق تفويض استنادًا إلى ما إذا كنت تريد المصادقة كمستخدم أو كتطبيق Chat.
- مساحة Chat في Google Chat يكون المستخدم الذي تم التحقّق من هويته أو تطبيق Chat عضوًا فيها لإثبات هويتك كتطبيق Chat، أضِف تطبيق Chat إلى المساحة.
جافا
- حساب Google Workspace تابع للعمل أو لمؤسسة مع إمكانية الوصول إلى Google Chat
- إعداد البيئة:
- أنشئ مشروعًا على Google Cloud.
- ضبط شاشة طلب الموافقة المتعلّقة ببروتوكول OAuth
- فعِّل واجهة Google Chat API وأعِدّها من خلال إضافة اسم ورمز ووصف لتطبيق Chat.
- ثبِّت Java Cloud Client Library.
- أنشئ بيانات اعتماد الوصول استنادًا إلى الطريقة التي تريد استخدامها للمصادقة في طلب Google Chat API:
- لإجراء المصادقة كمستخدم في Chat،
أنشئ بيانات اعتماد معرّف عميل OAuthواحفظها كملف JSON باسم
credentials.jsonفي الدليل المحلي. - لإجراء المصادقة بصفتك تطبيق Chat،
أنشئ بيانات اعتماد
لحساب الخدمة واحفظها كملف JSON باسم
credentials.json.
- لإجراء المصادقة كمستخدم في Chat،
أنشئ بيانات اعتماد معرّف عميل OAuthواحفظها كملف JSON باسم
- اختَر نطاق تفويض استنادًا إلى ما إذا كنت تريد المصادقة كمستخدم أو كتطبيق Chat.
- مساحة Chat في Google Chat يكون المستخدم الذي تم التحقّق من هويته أو تطبيق Chat عضوًا فيها لإثبات هويتك كتطبيق Chat، أضِف تطبيق Chat إلى المساحة.
برمجة التطبيقات
- حساب Google Workspace تابع للعمل أو لمؤسسة مع إمكانية الوصول إلى Google Chat
- إعداد البيئة:
- أنشئ مشروعًا على Google Cloud.
- ضبط شاشة طلب الموافقة المتعلّقة ببروتوكول OAuth
- فعِّل واجهة Google Chat API وأعِدّها من خلال إضافة اسم ورمز ووصف لتطبيق Chat.
- أنشئ مشروعًا مستقلاً في "برمجة تطبيقات Google"، وفعِّل خدمة Chat المتقدّمة.
- في هذا الدليل، يجب استخدام مصادقة المستخدم أو التطبيق. للمصادقة كتطبيق Chat، أنشئ بيانات اعتماد حساب خدمة. للاطّلاع على الخطوات، يُرجى قراءة مقالة المصادقة والتفويض كتطبيق Google Chat.
- اختَر نطاق تفويض استنادًا إلى ما إذا كنت تريد المصادقة كمستخدم أو كتطبيق Chat.
- مساحة Chat في Google Chat يكون المستخدم الذي تم التحقّق من هويته أو تطبيق Chat عضوًا فيها لإثبات هويتك كتطبيق Chat، أضِف تطبيق Chat إلى المساحة.
إرسال رسالة كتطبيق Chat
يوضّح هذا القسم كيفية إرسال رسائل تحتوي على نصوص وبطاقات وأدوات تفاعلية خاصة بالملحقات باستخدام مصادقة التطبيق.

لاستدعاء طريقة CreateMessage()
باستخدام مصادقة التطبيق، يجب تحديد الحقول التالية في الطلب:
chat.botنطاق التفويض- تمثّل هذه السمة
Spaceالمورد الذي تريد نشر الرسالة فيه. يجب أن يكون تطبيق Chat عضوًا في المساحة. - تمثّل هذه السمة مورد
Messageالذي سيتم إنشاؤه. لتحديد محتوى الرسالة، يمكنك تضمين نص منسّق (text) أو واجهة بطاقة واحدة أو أكثر (cardsV2) أو كليهما.
يمكنك اختياريًا تضمين ما يلي:
- الحقل
accessoryWidgetsلتضمين أزرار تفاعلية في أسفل الرسالة - الحقل
privateMessageViewerلإرسال الرسالة بشكل خاص إلى مستخدم محدّد - حقل
messageIdالذي يتيح لك تسمية الرسالة لاستخدامها في طلبات أخرى من واجهة برمجة التطبيقات - الحقلان
thread.threadKeyوmessageReplyOptionلبدء سلسلة محادثات أو الرد عليها إذا كانت المساحة لا تستخدم سلاسل المحادثات، سيتم تجاهل هذا الحقل.
يعرض الرمز التالي مثالاً على كيفية إرسال تطبيق Chat رسالة منشورة كتطبيق Chat تتضمّن نصًا وبطاقة وزرًا قابلاً للنقر في أسفل الرسالة:
Node.js
Python
جافا
برمجة التطبيقات
لتشغيل هذا النموذج، استبدِل SPACE_NAME برقم التعريف من حقل name في المساحة. يمكنك الحصول على المعرّف من خلال استدعاء الطريقة
ListSpaces()
أو من عنوان URL الخاص بالمساحة.
إضافة تطبيقات مصغّرة تفاعلية في أسفل الرسالة
في عينة التعليمات البرمجية الأولى من هذا الدليل، تعرض رسالة تطبيق Chat زرًا قابلاً للنقر في أسفل الرسالة، يُعرف باسم التطبيق المصغّر الملحق. تظهر أدوات التطبيقات المصغّرة الخاصة بالأجهزة الملحقة بعد أي نص أو بطاقات في الرسالة. يمكنك استخدام هذه الأدوات المصغّرة لتشجيع المستخدمين على التفاعل مع رسالتك بطرق عديدة، بما في ذلك ما يلي:
- تقييم دقة الرسالة أو مدى رضاك عنها
- الإبلاغ عن مشكلة في الرسالة أو تطبيق Chat
- فتح رابط يؤدي إلى محتوى ذي صلة، مثل المستندات
- يمكنك تجاهل الرسائل المشابهة من تطبيق Chat أو تأجيلها لفترة زمنية محددة.
لإضافة تطبيقات مصغّرة خاصة بالملحقات، أدرِج الحقل
accessoryWidgets[]
في نص الطلب وحدِّد تطبيقًا مصغّرًا واحدًا أو أكثر تريد تضمينه.
تعرض الصورة التالية تطبيق Chat يضيف رسالة نصيّة مع أدوات ملحقة حتى يتمكّن المستخدمون من تقييم تجربتهم مع تطبيق Chat.
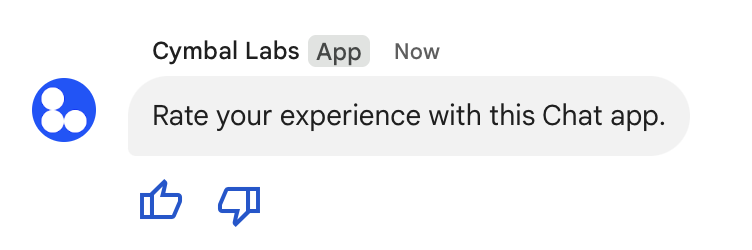
يوضّح ما يلي نص الطلب الذي ينشئ رسالة نصيّة تتضمّن زرَّين إضافيَّين. عندما ينقر المستخدم على زر، تعالج الدالة المقابلة (مثل doUpvote) التفاعل:
{
  text: "Rate your experience with this Chat app.",
  accessoryWidgets: [{ buttonList: { buttons: [{
    icon: { material_icon: {
      name: "thumb_up"
    }},
    color: { red: 0, blue: 255, green: 0 },
    onClick: { action: {
      function: "doUpvote"
    }}
  }, {
    icon: { material_icon: {
      name: "thumb_down"
    }},
    color: { red: 0, blue: 255, green: 0 },
    onClick: { action: {
      function: "doDownvote"
    }}
  }]}}]
}
إرسال رسالة بشكل خاص
يمكن لتطبيقات Chat إرسال رسائل بشكل خاص كي لا يراها سوى مستخدم محدّد في المساحة. عندما يرسل تطبيق Chat رسالة خاصة، تعرض الرسالة تصنيفًا يُعلم المستخدم بأنّ الرسالة لا يمكن لأحد غيره الاطّلاع عليها.
لإرسال رسالة بشكل خاص باستخدام Chat API، حدِّد الحقل
privateMessageViewer
في نص الطلب. لتحديد المستخدم، عليك ضبط القيمة على المورد User الذي يمثّل مستخدم Chat. يمكنك أيضًا استخدام حقل
name
في المرجع User، كما هو موضّح في المثال التالي:
{
  text: "Hello private world!",
  privateMessageViewer: {
    name: "users/USER_ID"
  }
}
لاستخدام هذا النموذج، استبدِل USER_ID بمعرّف فريد للمستخدم، مثل 12345678987654321 أو hao@cymbalgroup.com. لمزيد من المعلومات حول تحديد المستخدمين، يُرجى الاطّلاع على
تحديد مستخدمي Google Chat.
لإرسال رسالة بشكل خاص، يجب حذف ما يلي من طلبك:
إرسال إشعارات إجبارية أو رسائل صامتة
عندما يرسل تطبيق في Chat رسالة، يمكنه استخدام أحد الخيارَين التاليَين لإرسال إشعارات إلى المستخدمين:
- فرض إرسال إشعار: يرسل Chat دائمًا إشعارًا فوريًا إلى المستلمين، بغض النظر عن إعدادات الإشعارات أو حالة "عدم الإزعاج". داخل Chat، تؤدي الرسالة إلى تمييزها بخط عريض ووضعها في أعلى القائمة لدى المستلمين أو في قائمة "الصفحة الرئيسية"، كما تعرض شارة.
- إرسال رسالة صامتة: يوقف Chat الإشعارات الفورية للمستلمين. داخل Chat، لا تؤدي الرسالة إلى إظهار النص بخط غامق أو إبرازه في قائمة المستلمين أو قائمة "الصفحة الرئيسية"، ولا تعرض شارة. إذا كانت الرسالة الصامتة هي آخر رسالة في المحادثة، لن يظهر محتواها في مقتطف "الصفحة الرئيسية".
سواء كانت هذه الرسائل إجبارية أو صامتة، فإنّها تتضمّن مؤشرًا مرئيًا يُعلم المستلمين بسلوك الإشعارات الخاص.
لا تتوفّر الإشعارات الإجبارية والرسائل الصامتة إلا لتطبيقات Chat التي تستخدم مصادقة التطبيق.
تنطبق القيود التالية على الإشعارات الإجبارية والرسائل الصامتة:
- المستخدمون الخارجيون: لا تنطبق الإشعارات الإجبارية والرسائل الصامتة على المستخدمين الخارجيين (الضيوف) في المساحة. يتلقّى المستخدمون الخارجيون الإشعارات وفقًا لإعداداتهم.
- الإشارات: لا تتيح الرسائل الصامتة الإشارة إلى المستخدمين. إذا أشرت إلى شخص في رسالة صامتة، سيتم التعامل مع الإشارة كنص عادي.
- سلاسل المحادثات: لا يمكنك بدء سلسلة محادثات أو الرد عليها باستخدام رسالة صامتة.
- نوع المساحة: لا تتوفّر الإشعارات الإجبارية والرسائل الصامتة في الرسائل المباشرة أو المساحات التي يملكها مستخدمون ليس لديهم حساب على Google Workspace.
- الإشعارات عبر البريد الإلكتروني: لا تؤدي الرسائل الصامتة إلى إرسال إشعارات عبر البريد الإلكتروني. لا تؤدي الرسائل التي يتم إرسال إشعارات بشأنها إلى إرسال إشعارات عبر البريد الإلكتروني إلا إذا كانت تتضمّن أيضًا إشارة إلى مستخدم معيّن.
لفرض إشعار أو إرسال رسالة صامتة، أدرِج الحقل
createMessageNotificationOptions
في طلبك واضبط قيمة notificationType على إحدى القيم التالية:
| القيمة | السلوك |
|---|---|
NOTIFICATION_TYPE_FORCE_NOTIFY |
يفرض إشعارًا. |
NOTIFICATION_TYPE_SILENT |
يرسِل الرسالة بدون تنبيه صوتي. |
يعرض المثال التالي نص JSON لطلب إرسال رسالة تتضمّن إشعارًا إلزاميًا:
{
  "text": "Critical update: the server is down!",
  "createMessageNotificationOptions": {
    "notificationType": "NOTIFICATION_TYPE_FORCE_NOTIFY"
  }
}
إرسال رسالة نصية نيابةً عن مستخدم
يوضّح هذا القسم كيفية إرسال الرسائل نيابةً عن مستخدم باستخدام مصادقة المستخدم. عند استخدام ميزة مصادقة المستخدم، يمكن أن يتضمّن محتوى الرسالة نصًا فقط، ويجب حذف ميزات المراسلة المتوفّرة فقط لتطبيقات المحادثة، بما في ذلك واجهات البطاقات والأدوات التفاعلية. في برنامج معاينة المطوّرين، يمكنك إنشاء رسائل تتضمّن بطاقات نيابةً عن مستخدم. لمزيد من التفاصيل، يُرجى الاطّلاع على إنشاء البطاقات وتعديلها.

لاستدعاء طريقة CreateMessage() باستخدام مصادقة المستخدم، يجب تحديد الحقول التالية في الطلب:
- نطاق تفويض
يتيح مصادقة المستخدم لهذه الطريقة. يستخدم المثال التالي النطاق
chat.messages.create. - تمثّل هذه السمة
Spaceالمورد الذي تريد نشر الرسالة فيه. يجب أن يكون المستخدم الذي تمت المصادقة عليه عضوًا في المساحة. - تمثّل هذه السمة مورد
Messageالذي سيتم إنشاؤه. لتحديد محتوى الرسالة، عليك تضمين الحقلtext.
يمكنك اختياريًا تضمين ما يلي:
- الحقل
createMessageNotificationOptionsلتحديد ما إذا كان سيتم فرض إظهار إشعار أو إرسال الرسالة بدون إشعار - حقل
messageIdالذي يتيح لك تسمية الرسالة لاستخدامها في طلبات أخرى من واجهة برمجة التطبيقات - الحقلان
thread.threadKeyوmessageReplyOptionلبدء سلسلة محادثات أو الرد عليها إذا كانت المساحة لا تستخدم سلاسل المحادثات، سيتم تجاهل هذا الحقل.
يوضّح الرمز التالي مثالاً على كيفية إرسال تطبيق Chat رسالة نصية في مساحة معيّنة نيابةً عن مستخدم تم التحقّق من هويته:
Node.js
Python
جافا
برمجة التطبيقات
لتشغيل هذا النموذج، استبدِل SPACE_NAME برقم التعريف من حقل name في المساحة. يمكنك الحصول على المعرّف من خلال استدعاء الطريقة
ListSpaces()
أو من عنوان URL الخاص بالمساحة.
بدء سلسلة محادثات أو الردّ فيها
بالنسبة إلى المساحات التي تستخدم سلاسل المحادثات، يمكنك تحديد ما إذا كانت الرسالة الجديدة تبدأ سلسلة محادثات أو ترد على سلسلة محادثات حالية.
بشكل تلقائي، تؤدي الرسائل التي تنشئها باستخدام Chat API إلى بدء سلسلة محادثات جديدة. لمساعدتك في تحديد سلسلة المحادثات والردّ عليها لاحقًا، يمكنك تحديد مفتاح سلسلة المحادثات في طلبك:
- في نص الطلب، حدِّد الحقل
thread.threadKey. - حدِّد مَعلمة طلب البحث
messageReplyOptionلتحديد ما يحدث إذا كان المفتاح متوفّرًا.
لإنشاء رسالة تردّ على سلسلة محادثات حالية:
- في نص طلبك، أدرِج الحقل
thread. في حال ضبطها، يمكنك تحديدthreadKeyالذي أنشأته. بخلاف ذلك، يجب استخدامnameفي سلسلة المحادثات. - حدِّد مَعلمة طلب البحث
messageReplyOption.
يوضّح الرمز التالي مثالاً على كيفية إرسال تطبيق Chat رسالة نصية تبدأ سلسلة محادثات معيّنة أو تردّ عليها، ويتم تحديدها من خلال مفتاح لمساحة معيّنة نيابةً عن مستخدم تمّت المصادقة عليه:
Node.js
Python
جافا
برمجة التطبيقات
لتشغيل هذا النموذج، استبدِل ما يلي:
THREAD_KEY: مفتاح سلسلة محادثات حالية في المساحة، أو اسم فريد لسلسلة المحادثات لإنشاء سلسلة محادثات جديدةSPACE_NAME: رقم التعريف من حقلnameفي المساحة يمكنك الحصول على المعرّف من خلال استدعاء الطريقةListSpaces()أو من عنوان URL الخاص بالمساحة.
تسمية رسالة
لاسترداد رسالة أو تحديدها في طلبات مستقبلية من واجهة برمجة التطبيقات، يمكنك تسمية رسالة من خلال ضبط الحقل messageId في طلبك.
يتيح لك تسمية رسالتك تحديد الرسالة بدون الحاجة إلى تخزين المعرّف الذي يحدّده النظام من اسم المورد الخاص بالرسالة (الممثّل في الحقل name).
على سبيل المثال، لاسترداد رسالة باستخدام طريقة get()، عليك استخدام اسم المورد لتحديد الرسالة التي تريد استردادها. يتم تنسيق اسم المورد على النحو التالي: spaces/{space}/messages/{message}، حيث يمثّل {message} رقم التعريف الذي يحدّده النظام أو الاسم المخصّص الذي تحدّده عند إنشاء الرسالة.
لتسمية رسالة، حدِّد معرّفًا مخصّصًا في الحقل
messageId عند إنشاء الرسالة. يضبط الحقل messageId قيمة الحقل
clientAssignedMessageId
للمورد Message.
يمكنك تسمية رسالة فقط عند إنشائها. لا يمكنك تسمية أو تعديل معرّف مخصّص للرسائل الحالية. يجب أن يستوفي المعرّف المخصّص المتطلبات التالية:
- يبدأ بـ "
client-". على سبيل المثال،client-custom-nameهو معرّف مخصّص صالح، ولكنcustom-nameليس صالحًا. - يحتوي على ما يصل إلى 63 حرفًا وأحرف صغيرة وأرقام وواصلات فقط.
- أن يكون فريدًا ضمن مساحة لا يمكن لتطبيق Chat استخدام المعرّف المخصّص نفسه لرسائل مختلفة.
يوضّح الرمز التالي مثالاً على كيفية إرسال تطبيق Chat رسالة نصية تتضمّن رقم تعريف إلى مساحة معيّنة نيابةً عن مستخدم تم إثبات هويته:
Node.js
Python
جافا
برمجة التطبيقات
لتشغيل هذا النموذج، استبدِل ما يلي:
SPACE_NAME: رقم التعريف من حقلnameفي المساحة يمكنك الحصول على المعرّف من خلال استدعاء الطريقةListSpaces()أو من عنوان URL الخاص بالمساحة.-
MESSAGE-ID: اسم للرسالة يبدأ بـcustom-. يجب أن يكون الاسم فريدًا عن أي أسماء رسائل أخرى أنشأها تطبيق Chat في المساحة المحدّدة.
اقتباس رسالة
يمكنك اقتباس رسالة أخرى من خلال استدعاء
CreateMessage()
(rpc,
rest)
وتعيين quotedMessageMetadata
(rpc,
rest)
في الطلب.
يمكنك اقتباس الرسائل ضمن سلسلة محادثات أو في المحادثة الرئيسية، ولكن لا يمكنك اقتباس رسالة من سلسلة محادثات مختلفة.
يوضّح الرمز التالي كيفية إنشاء رسالة تتضمّن اقتباسًا من رسالة أخرى:
Node.js
import {createClientWithUserCredentials} from './authentication-utils.js';

const USER_AUTH_OAUTH_SCOPES = ['https://www.googleapis.com/auth/chat.messages.create'];

// This sample shows how to create a message that quotes another message.
async function main() {

  // Create a client
  const chatClient = await createClientWithUserCredentials(USER_AUTH_OAUTH_SCOPES);

  // Initialize request argument(s)
  const request = {

    // TODO(developer): Replace SPACE_NAME .
    parent: 'spaces/SPACE_NAME',

    message: {
      text: 'I am responding to a quoted message!',

      // quotedMessageMetadata lets Chat apps respond to a message by quoting it.
      quotedMessageMetadata: {

        // TODO(developer): Replace QUOTED_MESSAGE_NAME
        // and QUOTED_MESSAGE_LAST_UPDATE_TIME.
        name: 'QUOTED_MESSAGE_NAME',
        lastUpdateTime: 'QUOTED_MESSAGE_LAST_UPDATE_TIME'
      }
    }
  };

  // Make the request
  const response = await chatClient.createMessage(request);

  // Handle the response
  console.log(response);
}

main().catch(console.error);
Python
from authentication_utils import create_client_with_user_credentials
from google.apps import chat_v1 as google_chat
from google.protobuf.timestamp_pb2 import Timestamp

SCOPES = ['https://www.googleapis.com/auth/chat.messages.create']

# This sample shows how to create a message that quotes another message.
def create_message_quote_message():
    '''Creates a message that quotes another message.'''

    # Create a client
    client = create_client_with_user_credentials(SCOPES)

    # Create a timestamp from the RFC-3339 string.
    # TODO(developer): Replace QUOTED_MESSAGE_LAST_UPDATE_TIME.
    last_update_time = Timestamp()
    last_update_time.FromJsonString('QUOTED_MESSAGE_LAST_UPDATE_TIME')

    # Initialize request argument(s)
    request = google_chat.CreateMessageRequest(

        # TODO(developer): Replace SPACE_NAME.
        parent='spaces/SPACE_NAME',

        # Create the message.
        message = google_chat.Message(
            text='I am responding to a quoted message!',

            # quotedMessageMetadata lets Chat apps respond to a message by quoting it.
            quoted_message_metadata=google_chat.QuotedMessageMetadata(

                name='QUOTED_MESSAGE_NAME',
                last_update_time=last_update_time
            )
        )
    )

    # Make the request
    response = client.create_message(request)

    # Handle the response
    print(response)

create_message_quote_message()
جافا
import com.google.chat.v1.ChatServiceClient;
import com.google.chat.v1.CreateMessageRequest;
import com.google.chat.v1.Message;
import com.google.chat.v1.QuotedMessageMetadata;
import com.google.protobuf.util.Timestamps;
import com.google.workspace.api.chat.samples.utils.AuthenticationUtils;
import java.text.ParseException;

// This sample shows how to create a message that quotes another message.
public class CreateMessageQuoteMessage {
  public static void main(String[] args) throws Exception, ParseException {
    // Create a client.
    ChatServiceClient chatClient = AuthenticationUtils.createClientWithUserCredentials();

    // Initialize request argument(s).
    // TODO(developer): Replace SPACE_NAME, QUOTED_MESSAGE_NAME,
    // and QUOTED_MESSAGE_LAST_UPDATE_TIME here.
    String parent = "spaces/SPACE_NAME";
    String quotedMessageName = "QUOTED_MESSAGE_NAME";
    String lastUpdateTime = "QUOTED_MESSAGE_LAST_UPDATE_TIME";

    QuotedMessageMetadata quotedMessageMetadata =
        QuotedMessageMetadata.newBuilder()
            .setName(quotedMessageName)
            .setLastUpdateTime(Timestamps.parse(lastUpdateTime))
            .build();

    Message message = Message.newBuilder()
        .setText("I am responding to a quoted message!")
        .setQuotedMessageMetadata(quotedMessageMetadata)
        .build();

    CreateMessageRequest request =
        CreateMessageRequest.newBuilder()
            .setParent(parent)
            .setMessage(message)
            .build();

    // Make the request.
    Message response = chatClient.createMessage(request);

    // Handle the response.
    System.out.println(response);
  }
}
برمجة التطبيقات
/**
 * Creates a message that quotes another message.
 *
 * Relies on the OAuth2 scope 'https://www.googleapis.com/auth/chat.messages.create'
 * referenced in the manifest file (appsscript.json).
 */
function createMessageQuoteMessage() {

  // Initialize request argument(s)
  // TODO(developer): Replace SPACE_NAME here.
  const parent = 'spaces/SPACE_NAME';

  const message = {

    // The text content of the message.
    text: 'I am responding to a quoted message!',

    // quotedMessageMetadata lets Chat apps respond to a message by quoting it.
    //
    // TODO(developer): Replace QUOTED_MESSAGE_NAME
    // and QUOTED_MESSAGE_LAST_UPDATE_TIME .
    quotedMessageMetadata: {
      name: 'QUOTED_MESSAGE_NAME',
      lastUpdateTime: 'QUOTED_MESSAGE_LAST_UPDATE_TIME',
    }
  };

  // Make the request
  const response = Chat.Spaces.Messages.create(message, parent);

  // Handle the response
  console.log(response);
}
لتشغيل هذا النموذج، استبدِل ما يلي:
SPACE_NAME: رقم التعريف من حقلnameفي المساحة يمكنك الحصول على المعرّف من خلال استدعاء الطريقةListSpaces()(rpc,rest) أو من عنوان URL الخاص بالمساحة.QUOTED_MESSAGE_NAME: مورد الرسالةname(rpc،rest) التي سيتم اقتباسها بالتنسيقspaces/{space}/messages/{message}.-
QUOTED_MESSAGE_LAST_UPDATE_TIME: وقت آخر تعديل للرسالة التي تريد اقتباسها. إذا لم يتم تعديل الرسالة مطلقًا، يتطابق معcreateTime(rpc،rest). أما إذا تم تعديل الرسالة، فيتطابق معlastUpdateTime(rpc،rest).
تحديد المشاكل وحلّها
عندما يعرض تطبيق أو بطاقة في Google Chat خطأً، تعرض واجهة Chat رسالة تفيد بحدوث خطأ. أو "تعذّر علينا معالجة طلبك". في بعض الأحيان، لا تعرض واجهة مستخدم Chat أي رسالة خطأ، ولكن ينتج تطبيق Chat أو البطاقة نتيجة غير متوقّعة، مثلاً، قد لا تظهر رسالة البطاقة.
على الرغم من أنّه قد لا تظهر رسالة خطأ في واجهة مستخدم Chat، تتوفّر رسائل خطأ وصفية وبيانات سجلّات لمساعدتك في إصلاح الأخطاء عند تفعيل تسجيل الأخطاء لتطبيقات Chat. للحصول على مساعدة في عرض الأخطاء وتصحيحها وتحديد المشاكل فيها، يُرجى الاطّلاع على تحديد مشاكل Google Chat وحلّها.
مواضيع ذات صلة
- استخدِم أداة إنشاء البطاقات لتصميم رسائل البطاقات بتنسيق JSON ومعاينتها لتطبيقات Chat.
- تنسيق الرسائل
- الحصول على تفاصيل حول رسالة
- عرض قائمة بالرسائل في مساحة
- تعديل رسالة
- حذف رسالة
- تحديد المستخدمين في رسائل Google Chat
- إرسال رسائل إلى Google Chat باستخدام الويب هوك