

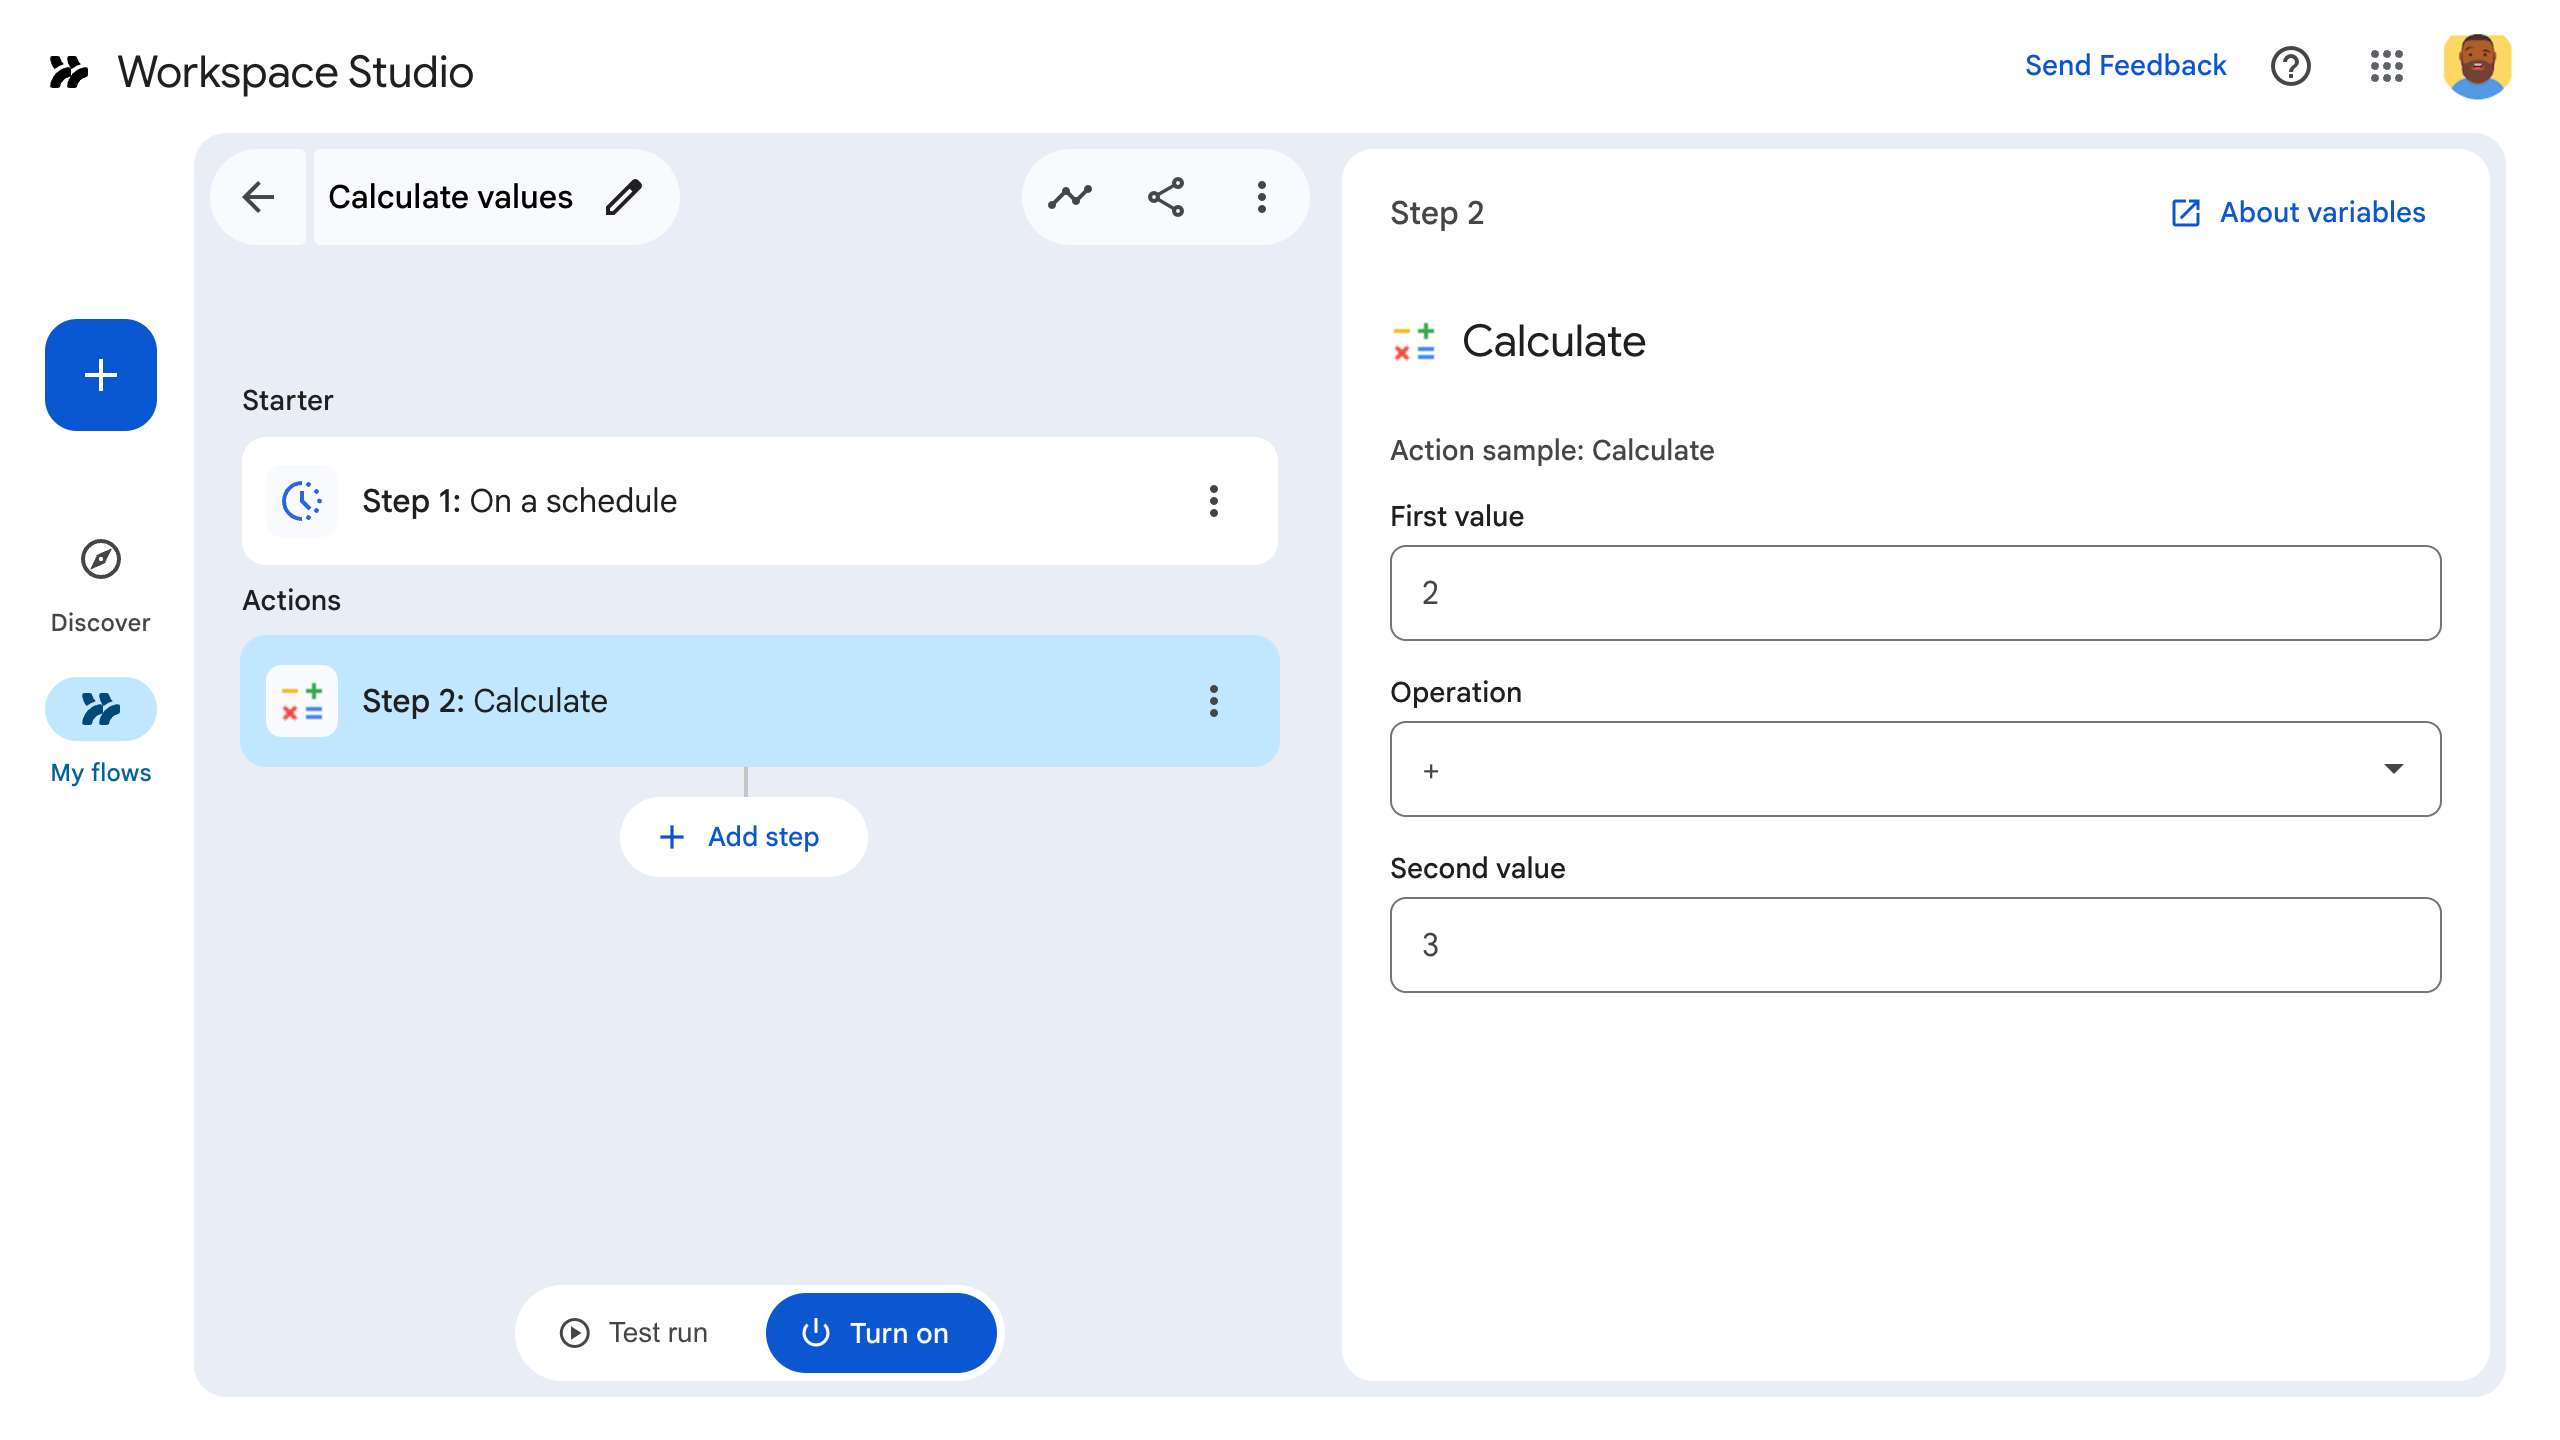
במדריך למתחילים הזה מוסבר איך ליצור שלב בהתאמה אישית ל-Workspace Studio באמצעות Google Apps Script. השלב המותאם אישית מקבל שני מספרים ופעולה חשבונית כקלט, מבצע את החישוב ומוציא את התוצאה.
מטרות
- יצירת שלב בהתאמה אישית ל-Workspace Studio באמצעות Google Apps Script.
- פורסים את השלב בהתאמה אישית בארגון שלכם ב-Google Workspace.
- בודקים את השלב בהתאמה אישית ב-Workspace Studio.
דרישות מוקדמות
- חשבון Google עם גישה ל-Workspace Studio.
הגדרת הסקריפט
כדי להגדיר את הסקריפט, יוצרים פרויקט חדש ב-Apps Script ומוסיפים את הקוד מהמדריך למתחילים:
לוחצים על הכפתור הבא כדי ליצור פרויקט חדש ב-Apps Script:
נותנים שם לפרויקט ב-Apps Script:
לוחצים על פרויקט ללא שם.
ב-Project title, מקלידים
Calculator quickstart.לוחצים על Rename.
ליד הקובץ
Code.gs, לוחצים על סמל האפשרויות הנוספות > שינוי שם. נותנים לקובץ את השםCalculator.מחליפים את התוכן של
Calculator.gsבקוד הבא. הקובץ הזה מגדיר שלב בהתאמה אישית ב-Google Workspace Studio בשם Calculate, שמקבל שני מספרים ופעולה כקלט ומחזיר את תוצאת החישוב.הצגת קוד אחד (
Calculator.gs)/** * This script defines a custom step for Google Workspace Studio. * The step, named "Calculate", takes two numbers and an operation as input * and returns the result of the calculation. * * The script includes functions to: * * 1. Define the configuration UI for the step using Card objects: * * - `onConfigCalculateFunction()`: Generates the main configuration card. * - Helper functions like `pushCard()`, `saveButton()` to build card components. * * 2. Handle the execution of the step. * * - `onExecuteCalculateFunction()`: Retrieves inputs, performs the calculation, * and returns outputs. * * To learn more, see the following quickstart guide: * https://developers.google.com/workspace/add-ons/studio/quickstart */ /** * Creates an action response to push a new card onto the card stack. * * This function generates an action object that, when returned, causes the * provided card to be pushed onto the card stack, making it the currently * displayed card in the configuration UI. * @param {Object} card The Card object to push. * @return {Object} The action response object. */ function pushCard(card) { return { "action": { "navigations": [{ "push_card": card } ] } }; } /** * Creates an action response to update the currently displayed card. * * This function generates an action object that, when returned, causes the * currently displayed card to be replaced with the provided card in the * configuration UI. * @param {Object} card The Card object to update. * @return {Object} The render actions object. */ function updateCard(card) { return { "render_actions": { "action": { "navigations": [{ "update_card": card } ] } } }; } /** * Creates a button configuration object for saving the step. * * This function generates a button definition that, when clicked, triggers * a save action for the current step configuration. * @return {Object} The button widget object. */ function saveButton() { return { "text": "Save", "onClick": { "hostAppAction" : { "workflowAction" : { "saveWorkflowAction" : {} } } }, }; } /** * Creates a button configuration object for a refresh action. * * This function generates a button definition that, when clicked, triggers * a function to refresh the current card. * @param {string} functionName The name of the Apps Script function to call on click. * @return {Object} The button widget object. */ function refreshButton(functionName) { return { "text": "Refresh", "onClick": { "action" : { "function" : functionName } }, }; } /** * Generates and displays a configuration card for the sample calculation action. * * This function creates a card with input fields for two values and a dropdown * for selecting an arithmetic operation. The card also includes a "Save" * button to save the action configuration for the step. * * The input fields are configured to let the user select outputs from previous * steps as input values using the `hostAppDataSource` property. * This function is called when the user adds or edits the "Calculate" step in the UI. * @return {Object} The action response object containing the card to display. */ function onConfigCalculateFunction() { var card = { "sections": [ { "header": "Action sample: Calculate", "widgets": [ { "textInput": { "name": "value1", "label": "First value", "hostAppDataSource" : { "workflowDataSource" : { "includeVariables" : true } } } }, { "selectionInput": { "name": "operation", "label": "Operation", "type": "DROPDOWN", "items": [ { "text": "+", "value": "+", }, { "text": "-", "value": "-", }, { "text": "x", "value": "x", }, { "text": "/", "value": "/", } ] } }, { "textInput": { "name": "value2", "label": "Second value", "hostAppDataSource" : { "workflowDataSource" : { "includeVariables" : true } } } } ] } ] }; return pushCard(card); } /** * Gets an integer value from variable data, handling both string and integer formats. * * This function attempts to extract an integer value from the provided variable data. * It checks if the data contains string values and, if so, parses the first string * as an integer. If integer values are present, it returns the first integer. * @param {Object} variableData The variable data object from the event. * @return {number} The extracted integer value. */ function getIntValue(variableData) { if (variableData.stringValues) { return parseInt(variableData.stringValues[0]); } return variableData.integerValues[0]; } /** * Returns output variables from a step. * * This function constructs an object that, when returned, sends the * provided variable values as output from the current step. * The variable values are logged to the console for debugging purposes. */ function outputVariables(variableDataMap) { const workflowAction = AddOnsResponseService.newReturnOutputVariablesAction() .setVariableDataMap(variableDataMap); const hostAppAction = AddOnsResponseService.newHostAppAction() .setWorkflowAction(workflowAction); const renderAction = AddOnsResponseService.newRenderActionBuilder() .setHostAppAction(hostAppAction) .build(); return renderAction; } /** * Executes the calculation action based on the inputs from an event. * * This function retrieves input values ("value1", "value2") and the "operation" * from the event, performs the calculation, and returns the "result" and * "log" as output variables. * This function is called when the flow reaches this custom step. * @param {Object} event The event object passed by the runtime. * @return {Object} The output variables object. */ function onExecuteCalculateFunction(event) { console.log("output: " + JSON.stringify(event)); var calculatedValue = 0; var value1 = event.workflow.actionInvocation.inputs["value1"].integerValues[0]; var value2 = event.workflow.actionInvocation.inputs["value2"].integerValues[0]; var operation = event.workflow.actionInvocation.inputs["operation"].stringValues[0]; if (operation == "+") { calculatedValue = value1 + value2; } else if (operation == "-") { calculatedValue = value1 - value2; } else if (operation == "x") { calculatedValue = value1 * value2; } else if (operation == "/") { calculatedValue = value1 / value2; } const variableDataMap = { "result": AddOnsResponseService.newVariableData().addIntegerValue(calculatedValue) }; return outputVariables(variableDataMap); }
לוחצים על הגדרות הפרויקט ומסמנים את התיבה Show "appsscript.json" קובץ מניפסט in editor.
לוחצים על Editor , פותחים את קובץ המניפסט
appsscript.jsonומחליפים את התוכן שלו בקוד הבא:הצגת קוד אחד (
appsscript.json){ "timeZone": "America/Los_Angeles", "exceptionLogging": "STACKDRIVER", "runtimeVersion": "V8", "addOns": { "common": { "name": "Calculator", "logoUrl": "https://www.gstatic.com/images/branding/productlogos/calculator_search/v1/web-24dp/logo_calculator_search_color_1x_web_24dp.png", "useLocaleFromApp": true }, "flows": { "workflowElements": [ { "id": "actionElement", "state": "ACTIVE", "name": "Calculate", "description": "Asks the user for two values and a math operation, then performs the math operation on the values and outputs the result.", "workflowAction": { "inputs": [ { "id": "value1", "description": "value1", "cardinality": "SINGLE", "dataType": { "basicType": "INTEGER" } }, { "id": "value2", "description": "value2", "cardinality": "SINGLE", "dataType": { "basicType": "INTEGER" } }, { "id": "operation", "description": "operation", "cardinality": "SINGLE", "dataType": { "basicType": "STRING" } } ], "outputs": [ { "id": "result", "description": "Calculated result", "cardinality": "SINGLE", "dataType": { "basicType": "INTEGER" } } ], "onConfigFunction": "onConfigCalculateFunction", "onExecuteFunction": "onExecuteCalculateFunction" } } ] } } }
לוחצים על סמל השמירה .
פריסה ובדיקה של השלב
כדי לבדוק את השלב, מגדירים פריסת בדיקה לתוסף, מוסיפים את השלב לתהליך עבודה ומריצים את התהליך.
מגדירים פריסת בדיקה לתוסף:
- פותחים את פרויקט הסקריפט בכלי העריכה של Apps Script.
- לוחצים על פריסה > פריסות לבדיקה.
- לוחצים על התקנה.
- בתחתית המסך, לוחצים על סיום.
אתם יכולים לאפשר למשתמשים אחרים לבדוק את התוסף על ידי שיתוף פרויקט Apps Script עם החשבון שלהם (נדרשת גישת עריכה). לאחר מכן, מבקשים מהמשתמשים לבצע את השלבים הקודמים.
אחרי ההתקנה, התוסף זמין מיד ב-Flows. יכול להיות שתצטרכו לרענן את Flows לפני שהתוסף יופיע. צריך גם לאשר את התוסף לפני שמשתמשים בו.
מידע נוסף על פריסות לבדיקה זמין במאמר התקנת תוסף שלא פורסם.
פותחים את Flows.
יוצרים תהליך שכולל את השלב:
- לוחצים על תהליך חדש.
- בוחרים איך התהליך יתחיל. אם השלב דורש משתנה קלט, מגדירים את משתנה הקלט כחלק מהפלט של הגורם להפעלה.
- לוחצים על הוספת שלב. בוחרים את השלב שיצרתם או עדכנתם, שנקרא Calculate.
- מגדירים את השלב. בשלב החישוב, בוחרים שני ערכים ופעולה מתמטית. השלב נשמר באופן אוטומטי.
- כדי לבדוק את הפלט של השלב, מוסיפים עוד שלב. לדוגמה, כדי להוסיף פלט להודעת צ'אט ב-Google Chat, מוסיפים את השלב שלח לי הודעה ב-Chat. בקטע Message, לוחצים על Variables ובוחרים את הפלט של השלב. בשלב החישוב, בוחרים באפשרות Variables (משתנים) > Step 2: Calculate (שלב 2: חישוב) > Calculated result (תוצאת החישוב). המשתנה מופיע כצ'יפ בשדה הודעה.
- לוחצים על הפעלה. התהליך מוכן להפעלה.
מפעילים את התהליך באמצעות הגדרת הגורם שמפעיל את התהליך. לדוגמה, אם התהליך מתחיל לפי לוח זמנים, הוא פועל בתאריך ובשעה שצוינו.
מוודאים שהתהליך פועל כמו שצריך. כדי לבדוק את היומנים, נכנסים לכרטיסייה Activity בכלי ליצירת תהליכים. במאמר יומני פעילות מוסבר איך יוצרים יומנים בהתאמה אישית בכרטיסייה Activity.
השלבים הבאים
יצרתם ובדקתם שלב בהתאמה אישית ב-Workspace Studio. מעכשיו אפשר:
ממשיכים להתאים אישית את השלב באמצעות הנחיה ל-Gemini כדי ליישם לוגיקה מורכבת יותר.
יצירת כרטיס הגדרות להתאמה אישית של הגדרות השלב.
לרשום פעילות ושגיאות כדי לתעד ולפתור בעיות בהפעלות של השלבים.
בדיקת אובייקטים של אירועים כדי לבדוק את המטען הייעודי (payload) של JSON שהתהליכים שולחים ומקבלים בזמן שהשלבים פועלים.
כדי ליצור טריגר ופעולה בהתאמה אישית באמצעות Apps Script, נסו את ה-Codelab יצירת טריגרים ופעולות בהתאמה אישית ב-Workspace Studio.