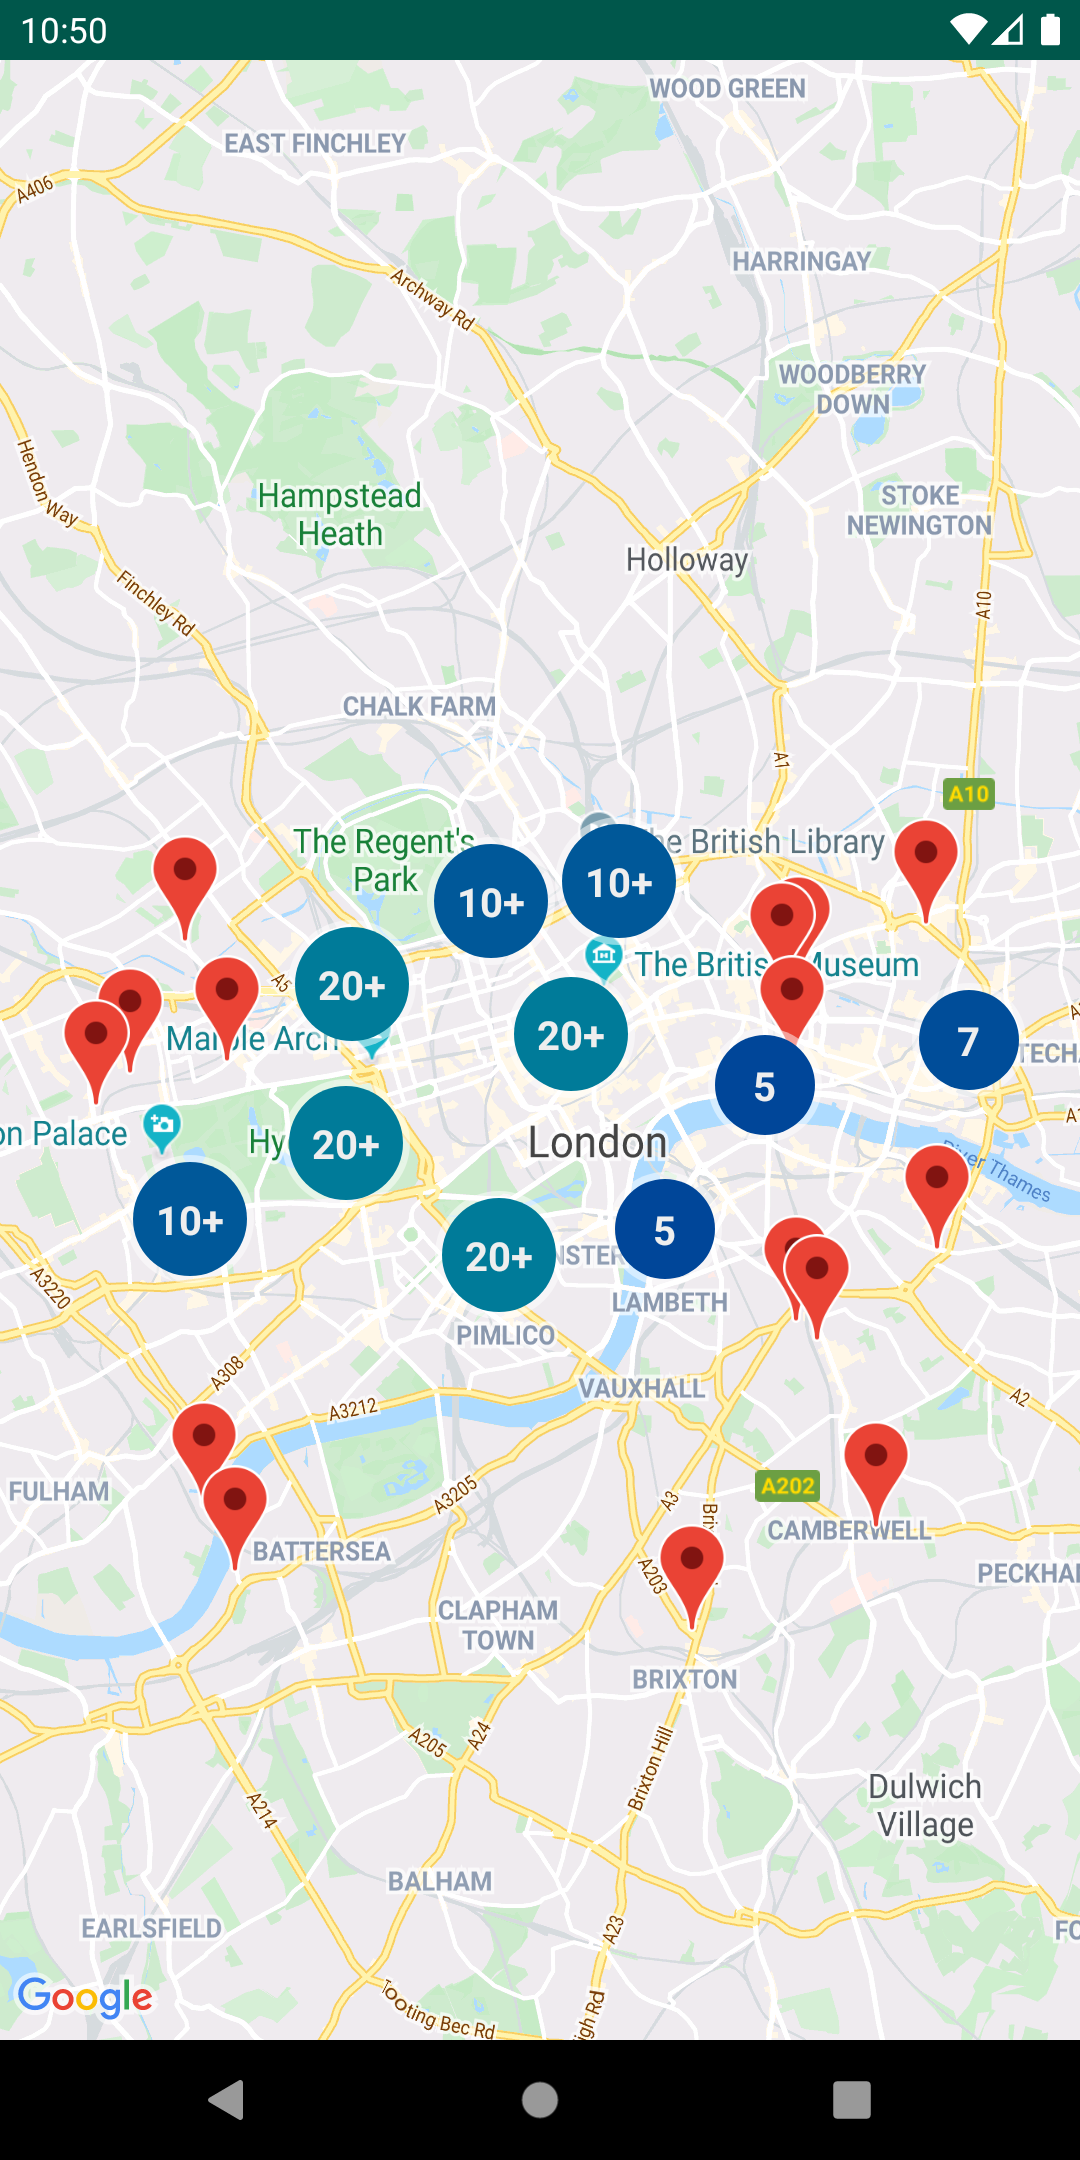
마커를 클러스터링하면 지도의 가독성을 해치지 않으면서도 지도에 많은 마커를 넣을 수 있습니다.
소개
이 동영상은 데이터가 지도에서 다수의 데이터 포인트가 필요한 경우, 마커 클러스터링을 사용하는 방법을 설명합니다.
마커 클러스터링 유틸리티를 사용하면 다양한 확대/축소 수준에서 여러 개의 마커를 관리할 수 있습니다. 엄밀히 말하면, 이 시점에서 '마커'는 실제로 '항목'이고 렌더링되었을 때만 '마커'가 됩니다. 그러나 혼동을 피하기 위해 이 문서에서는 이름을 모두 '마커'로 통일합니다.
사용자가 지도 화면을 확대하면 개별 마커가 지도에 나타납니다. 사용자가 지도 화면을 축소하면 마커가 클러스터로 모여서 지도를 보기 쉽게 해줍니다. 마커 클러스터링 유틸리티는 Android용 Maps SDK 유틸리티 라이브러리의 일부에 속합니다. 아직 라이브러리를 설정하지 않았다면 이 페이지의 나머지 부분을 읽기 전에 설정 가이드를 따르세요.
마커 클러스터링 유틸리티를 사용하려면 마커를
ClusterManager에 ClusterItem 객체로 추가해야 합니다. ClusterManager는
마커를 Algorithm으로 전달하여
이를 클러스터 집합으로 변환합니다. ClusterRenderer는
클러스터와 개별 마커를 추가 및 삭제하여 렌더링을
처리합니다. ClusterRenderer 및 Algorithm은
플러깅이 가능하며 맞춤설정할 수 있습니다.
유틸리티 라이브러리와 함께 마커 클러스터링 유틸리티의 샘플 구현이 포함된 데모 앱이 제공됩니다. 데모 앱 실행에 관한 도움말은 설정 가이드를 참고하세요. 데모 앱에는 다음과 같은 마커 클러스터링 샘플이 포함되어 있습니다.
ClusteringDemoActivity: 마커 클러스터링을 보여주는 간단한 활동BigClusteringDemoActivity: 2,000개 마커의 클러스터링CustomMarkerClusteringDemoActivity: 클러스터형 마커의 맞춤 디자인 생성
간단한 마커 클러스터러 추가
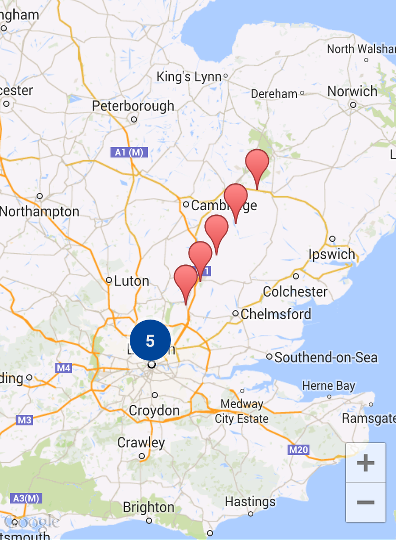
아래 단계에 따라 10개의 마커로 구성된 간단한 클러스터를 생성합니다. 그 결과는 다음과 같이 표시되며, 이때 표시되는/클러스터링되는 마커 수는 확대/축소 수준에 따라 달라집니다.
다음은 필요한 단계를 요약한 내용입니다.
ClusterItem을 구현하여 지도에 마커를 표시합니다. 클러스터 항목은 LatLng 객체로 마커의 위치를 반환하고 선택사항으로 제목 또는 스니펫을 반환합니다.- 새
ClusterManager를 추가하여 확대/축소 수준에 따라 클러스터 항목(마커)을 그룹화합니다. ClusterManager가 리스너를 구현하므로 지도의OnCameraIdleListener()를ClusterManager로 설정합니다.- 마커 클릭 이벤트에 응답하여 특정 기능을
추가하려면
ClusterManager가 리스너를 구현하므로 지도의OnMarkerClickListener()를ClusterManager로 설정하세요. - 마커를
ClusterManager에 공급합니다.
단계를 더 자세히 살펴보겠습니다. 10개의 마커로 구성된
간단한 클러스터를 만들려면 먼저 ClusterItem을 구현하는 MyItem 클래스를
만듭니다.
Kotlin
inner class MyItem(
    lat: Double,
    lng: Double,
    title: String,
    snippet: String
) : ClusterItem {

    private val position: LatLng
    private val title: String
    private val snippet: String

    override fun getPosition(): LatLng {
        return position
    }

    override fun getTitle(): String {
        return title
    }

    override fun getSnippet(): String {
        return snippet
    }

    override fun getZIndex(): Float {
        return 0f
    }

    init {
        position = LatLng(lat, lng)
        this.title = title
        this.snippet = snippet
    }
}
Java
public class MyItem implements ClusterItem {
    private final LatLng position;
    private final String title;
    private final String snippet;

    public MyItem(double lat, double lng, String title, String snippet) {
        position = new LatLng(lat, lng);
        this.title = title;
        this.snippet = snippet;
    }

    @Override
    public LatLng getPosition() {
        return position;
    }

    @Override
    public String getTitle() {
        return title;
    }

    @Override
    public String getSnippet() {
        return snippet;
    }

    @Nullable
    @Override
    public Float getZIndex() {
        return 0f;
    }
}
지도 활동에서 ClusterManager를 추가하고 여기에
클러스터 항목을 입력합니다. 유형 인수
<MyItem>을 확인합니다.
이 인수는 ClusterManager를 MyItem 유형으로
선언합니다.
Kotlin
// Declare a variable for the cluster manager.
private lateinit var clusterManager: ClusterManager<MyItem>

private fun setUpClusterer() {
    // Position the map.
    map.moveCamera(CameraUpdateFactory.newLatLngZoom(LatLng(51.503186, -0.126446), 10f))

    // Initialize the manager with the context and the map.
    // (Activity extends context, so we can pass 'this' in the constructor.)
    clusterManager = ClusterManager(context, map)

    // Point the map's listeners at the listeners implemented by the cluster
    // manager.
    map.setOnCameraIdleListener(clusterManager)
    map.setOnMarkerClickListener(clusterManager)

    // Add cluster items (markers) to the cluster manager.
    addItems()
}

private fun addItems() {

    // Set some lat/lng coordinates to start with.
    var lat = 51.5145160
    var lng = -0.1270060

    // Add ten cluster items in close proximity, for purposes of this example.
    for (i in 0..9) {
        val offset = i / 60.0
        lat += offset
        lng += offset
        val offsetItem =
            MyItem(lat, lng, "Title $i", "Snippet $i")
        clusterManager.addItem(offsetItem)
    }
}
Java
// Declare a variable for the cluster manager.
private ClusterManager<MyItem> clusterManager;

private void setUpClusterer() {
    // Position the map.
    map.moveCamera(CameraUpdateFactory.newLatLngZoom(new LatLng(51.503186, -0.126446), 10));

    // Initialize the manager with the context and the map.
    // (Activity extends context, so we can pass 'this' in the constructor.)
    clusterManager = new ClusterManager<MyItem>(context, map);

    // Point the map's listeners at the listeners implemented by the cluster
    // manager.
    map.setOnCameraIdleListener(clusterManager);
    map.setOnMarkerClickListener(clusterManager);

    // Add cluster items (markers) to the cluster manager.
    addItems();
}

private void addItems() {

    // Set some lat/lng coordinates to start with.
    double lat = 51.5145160;
    double lng = -0.1270060;

    // Add ten cluster items in close proximity, for purposes of this example.
    for (int i = 0; i < 10; i++) {
        double offset = i / 60d;
        lat = lat + offset;
        lng = lng + offset;
        MyItem offsetItem = new MyItem(lat, lng, "Title " + i, "Snippet " + i);
        clusterManager.addItem(offsetItem);
    }
}
확대 및 축소할 때 클러스터링 애니메이션을 사용 중지할 수도 있습니다.
애니메이션이 사용 중지되어 있으면 마커가 클러스터
안팎으로 움직이는 대신 제 위치에 고정됩니다.
애니메이션을 사용 중지하려면 아래와 같이 ClusterManager에서
setAnimation()을 사용합니다.
Kotlin
clusterManager.setAnimation(false)
Java
clusterManager.setAnimation(false);
개별적으로 클러스터링된 마커에 대한 정보 창 추가
특정 클러스터형 마커의 정보 창을 추가하려면 ClusterItem의 구현
생성자에 제목과 스니펫 문자열을 추가합니다.
다음 예시에서는 제목과 스니펫을 설정하여 addItems()
메서드에 정보 창이 있는 마커를 추가합니다.
Kotlin
// Set the lat/long coordinates for the marker.
val lat = 51.5009
val lng = -0.122

// Set the title and snippet strings.
val title = "This is the title"
val snippet = "and this is the snippet."

// Create a cluster item for the marker and set the title and snippet using the constructor.
val infoWindowItem = MyItem(lat, lng, title, snippet)

// Add the cluster item (marker) to the cluster manager.
clusterManager.addItem(infoWindowItem)
Java
// Set the lat/long coordinates for the marker.
double lat = 51.5009;
double lng = -0.122;

// Set the title and snippet strings.
String title = "This is the title";
String snippet = "and this is the snippet.";

// Create a cluster item for the marker and set the title and snippet using the constructor.
MyItem infoWindowItem = new MyItem(lat, lng, title, snippet);

// Add the cluster item (marker) to the cluster manager.
clusterManager.addItem(infoWindowItem);
마커 클러스터 맞춤설정
ClusterManager 생성자는 DefaultClusterRenderer
및 NonHierarchicalDistanceBasedAlgorithm을
생성합니다. ClusterManager의 setAlgorithm(Algorithm<T> algorithm)
및 setRenderer(ClusterRenderer<T> view) 메서드를
사용하여 ClusterRenderer
및 Algorithm을 변경할 수
있습니다.
ClusterRenderer를 구현하여 클러스터 렌더링을
맞춤설정할 수 있습니다. DefaultClusterRenderer는 좋은 시작 기반을
제공합니다. DefaultClusterRenderer의 서브클래스를 생성하여 기본값을
재정의할 수 있습니다.
맞춤설정의 자세한 예는 유틸리티 라이브러리와
함께 제공되는 데모 앱에서 CustomMarkerClusteringDemoActivity를
참고하세요.

CustomMarkerClusteringDemoActivity는 자체 클러스터
항목 Person을 정의하고
DefaultClusterRenderer를 PersonRenderer로 확장하여 렌더링합니다.
또한 데모는 ClusterManager.OnClusterClickListener<Person> 인터페이스를
구현하여 클러스터를 클릭했을 때
사람에 대한 자세한 정보를 표시하는 방법도 보여줍니다. 이와 비슷한
방식으로 ClusterManager.OnClusterItemClickListener<Person>을
구현할 수도
있습니다.
데모 앱 실행에 관한 도움말은 설정 가이드를 참고하세요.