Page Summary
-
To add Sign In With Google or One Tap, you must first get an OAuth 2.0 client ID and configure OAuth branding and settings.
-
Obtaining a Google API client ID is the initial step to enable Google Identity Services on your website and is required for configuring Sign In With Google and verifying ID tokens.
-
The OAuth consent screen, which is part of both Sign In With Google and One Tap, informs users about the application requesting access and the data being requested.
-
Loading the Google Identity Services client library is necessary on any page where a user might sign in.
-
While optional, implementing a Content Security Policy is recommended to secure your app and prevent cross-site scripting attacks, and the policy may require specific directives to allow Google Identity Services to function correctly.
-
The Cross-Origin-Opener-Policy may need to be adjusted to
same-originand includesame-origin-allow-popupsfor popups to work correctly when FedCM is disabled.
To add a Sign In With Google button or One Tap and Automatic sign-in prompts to your website you first need to:
- get an OAuth 2.0 client ID,
- configure OAuth branding and settings,
- load the Google Identity Services client library, and
- optionally setup Content Security Policy and
- update Cross-Origin Opener Policy
Get your Google API client ID
To enable Google Identity Services on your website, you first need to set up a Google API client ID. To do so, complete the following steps:
- Open the Clients page of the Google Cloud Console.
- Create or select a Cloud Console project. If you already have a project for the Sign In With Google button or Google One Tap, use the existing project and the web client ID. When creating production applications, multiple projects may be necessary, repeat the remaining steps of this section for each project you manage.
- Click Create client and for Application type select Web application to create a new client ID. To use an existing client ID select one of type Web application.
Add the URI of your website to Authorized JavaScript origins. The URI includes the scheme and fully qualified hostname only. For example,
https://www.example.com.Optionally, credentials may be returned using a redirect to an endpoint you host rather than through a JavaScript callback. If this is the case, add your redirect URIs to Authorized redirect URIs. Redirect URIs include the scheme, fully qualified hostname, and path and must comply with Redirect URI validation rules. For example,
https://www.example.com/auth-receiver.
Include the client ID in your web app using the data-client_id or client_id fields.
Configure your OAuth Consent Screen
Both Sign In With Google and One Tap authentication include a consent screen which tells users the application requesting access to their data, what kind of data they are asked for and the terms that apply.
- Open the Branding page of the Google Auth Platform section of the Cloud Console.
- If prompted, select the project you just created.
On the Branding page, fill out the form and click the "Save" button.
Application name: The name of the application asking for consent. The name should accurately reflect your application and be consistent with the application name users see elsewhere.
Application logo: This image is shown on the consent screen to help users to recognize your app. The logo is shown on Sign In With Google consent screen and on account settings, but is not shown on One Tap dialog.
Support email: Shown on the consent screen for user support and to Google Workspace administrators evaluating access to your application for their users. This email address is shown to users on the Sign In With Google consent screen when the user clicks the application name.
Authorized domains: To protect you and your users, Google only allows applications that authenticate using OAuth to use Authorized Domains. Your applications' links must be hosted on Authorized Domains. Learn more.
Application Homepage link: Shown on Sign In With Google consent screen and One-Tap GDPR compliant disclaimer information under the "Continue as" button. Must be hosted on an Authorized Domain.
Application Privacy Policy link: Shown on Sign In With Google consent screen and One-Tap GDPR compliant disclaimer information under the "Continue as" button. Must be hosted on an Authorized Domain.
Application Terms of Service link (Optional): Shown on Sign In With Google consent screen and One-Tap GDPR compliant disclaimer information under the "Continue as" button. Must be hosted on an Authorized Domain.
Navigate to the Data Access page to configure scopes for your app.
- Scopes for Google APIs: Scopes allow your application to access your user's private data. For the authentication, default scope (email, profile, openid) is sufficient, you don't need to add any sensitive scopes. It is generally a best practice to request scopes incrementally, at the time access is required, rather than upfront.
Check "Verification Status", if your application needs verification then click the "Submit For Verification" button to submit your application for verification. Refer to OAuth verification requirements for details.
Display of OAuth settings during sign-in
One Tap using FedCM
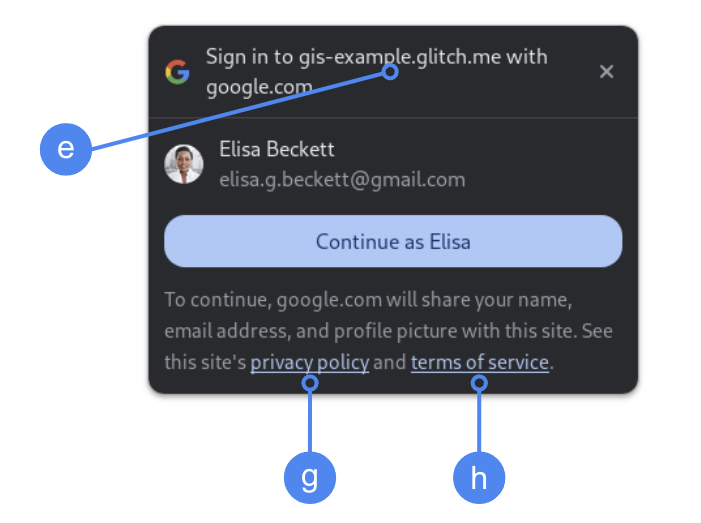
The top-level Authorized domain is displayed during user consent in Chrome. Only using One Tap in cross-origin but same-site iframes is a supported method.
One Tap without FedCM
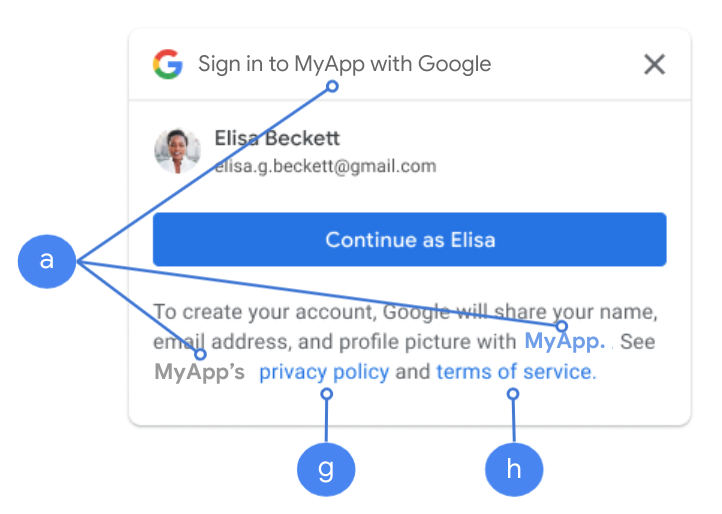
The Application name is displayed during user consent.
Figure 1. OAuth consent settings displayed by One Tap in Chrome.
Load the client library
Be sure to load the Google Identity Services client library on any page that a user might sign in on. Use the following code snippet:
<script src="https://accounts.google.com/gsi/client" async></script>
You can optimize your pages loading speed if you load the script with the
async attribute.
Refer to the HTML and JavaScript API references for the list of methods and properties the library supports.
Content Security Policy
While optional, a Content Security Policy is recommended to secure your app and prevent cross-site scripting (XSS) attacks. To learn more, see an Introduction to CSP and CSP and XSS.
Your Content Security Policy might include one or more directives, such as
connect-src, frame-src, script-src, style-src, or default-src.
If your CSP includes the:
connect-srcdirective, addhttps://accounts.google.com/gsi/to allow a page to load the parent URL for Google Identity Services server-side endpoints.frame-srcdirective, addhttps://accounts.google.com/gsi/to allow the parent URL of the One Tap and Sign In With Google button iframes.script-srcdirective, addhttps://accounts.google.com/gsi/clientto allow the URL of the Google Identity Services JavaScript library.style-srcdirective, addhttps://accounts.google.com/gsi/styleto allow the URL of the Google Identity Services Stylesheets.default-srcdirective, if used, is a fallback if any of the preceding directives (connect-src,frame-src,script-src, orstyle-src) is not specified, addhttps://accounts.google.com/gsi/to allow a page to load the parent URL for Google Identity Services server-side endpoints.
Avoid listing individual GIS URLs when using connect-src. This helps minimize
failures when GIS is updated. For example, instead of adding
https://accounts.google.com/gsi/status use the GIS parent URL
https://accounts.google.com/gsi/.
This example response header allows Google Identity Services to load and execute successfully:
Content-Security-Policy-Report-Only: script-src
https://accounts.google.com/gsi/client; frame-src
https://accounts.google.com/gsi/; connect-src https://accounts.google.com/gsi/;
Cross Origin Opener Policy
The Sign In With Google button and Google One Tap may require changes to your
Cross-Origin-Opener-Policy (COOP) in order
to successfully create popups.
When FedCM is enabled the browser directly renders popups and no changes are necessary.
However, when FedCM is disabled, set the COOP header:
- to
same-originand - include
same-origin-allow-popups.
Failing to set the proper header breaks communication between windows, leading to a blank pop-up window or similar bugs.