
多數卡片式外掛程式都是使用多張卡片建構而成,代表外掛程式介面的不同「頁面」。如要提供有效的使用者體驗,您應在外掛程式的資訊卡之間使用簡單自然的導覽方式。
在 Gmail 外掛程式中,UI 不同卡片之間的轉場效果原本是透過將卡片推入及彈出單一卡片堆疊來處理,而 Gmail 會顯示堆疊頂端的卡片。
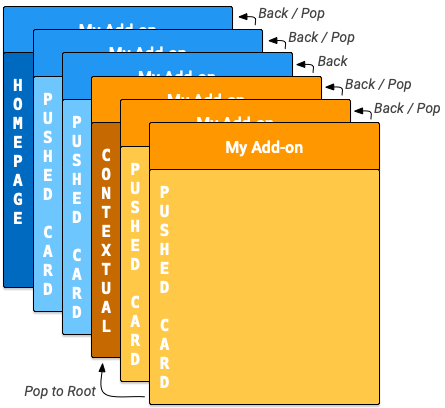
Google Workspace 外掛程式推出首頁和非情境式資訊卡。為因應情境式和非情境式資訊卡,Google Workspace 外掛程式會為每種資訊卡提供內部卡片堆疊。在主機中開啟外掛程式時,系統會觸發對應的 homepageTrigger,在堆疊上建立第一個首頁資訊卡 (下圖中的深藍色「首頁」資訊卡)。如果未定義 homepageTrigger,系統會建立預設資訊卡、顯示該資訊卡,並將其推送至非情境堆疊。第一張卡片是根卡片。
當使用者瀏覽外掛程式時,外掛程式可以建立其他非脈絡資訊卡,並將這些資訊卡推送到堆疊 (圖表中的藍色「已推送的資訊卡」)。外掛程式 UI 會顯示堆疊中的頂端資訊卡,因此將新資訊卡推送到堆疊會變更顯示畫面,而從堆疊中彈出資訊卡則會將顯示畫面返回先前的資訊卡。
如果外掛程式已定義情境觸發條件,當使用者進入該情境時,系統就會觸發條件。觸發函式會建構情境式資訊卡,但 UI 顯示畫面會根據新資訊卡的 DisplayStyle 更新:
- 如果
DisplayStyle為REPLACE(預設值),系統會以內容相關卡片 (圖表中的深橘色「內容相關」卡片) 取代目前顯示的卡片。這項操作會有效啟動新的情境式資訊卡堆疊,並置於非情境式資訊卡堆疊上方,而這張情境式資訊卡就是情境式堆疊的根資訊卡。 - 如果
DisplayStyle為PEEK,UI 會改為建立顯示於外掛程式側欄底部的窺視標題,並覆蓋目前的資訊卡。「快速查看」標題會顯示新資訊卡的標題,並提供使用者按鈕控制項,讓使用者決定是否要查看新資訊卡。如果他們點選「查看」按鈕,系統會以該資訊卡取代目前的資訊卡 (如上文所述,使用REPLACE)。
您可以建立其他情境資訊卡,並將這些資訊卡推送到堆疊 (圖表中的黃色「已推送的資訊卡」)。更新資訊卡堆疊會變更外掛程式 UI,顯示最頂端的資訊卡。如果使用者離開脈絡,堆疊中的脈絡資訊卡就會移除,顯示畫面也會更新為最上層的非脈絡資訊卡或首頁。
如果使用者輸入的內容,外掛程式未定義相應的內容觸發條件,系統就不會建立新資訊卡,而是繼續顯示目前的資訊卡。
下文所述的 Navigation 動作只會對來自相同環境的資訊卡生效;舉例來說,popToRoot() 從環境資訊卡內彈出時,只會彈出所有其他環境資訊卡,不會影響首頁資訊卡。
相較之下,使用者隨時可以按下 按鈕,從情境式資訊卡前往非情境式資訊卡。
導覽方式
您可以從資訊卡堆疊新增或移除資訊卡,藉此建立資訊卡之間的轉場效果。Navigation 類別提供從堆疊推送及彈出卡片的函式。如要建構有效的資訊卡導覽功能,請設定小工具,使用導覽動作。您可以同時推送或彈出多張資訊卡,但無法移除外掛程式啟動時,第一個推送至堆疊的初始首頁資訊卡。
如要回應使用者與小工具的互動,並前往新資訊卡,請按照下列步驟操作:
- 建立
Action物件,並將其與您定義的回呼函式建立關聯。 - 呼叫小工具的適當小工具處理常式函式,在該小工具上設定
Action。 - 實作執行導覽的回呼函式。這個函式會收到動作事件物件做為引數,且必須執行下列操作:
- 建立
Navigation物件來定義卡片變更。單一Navigation物件可包含多個導覽步驟,這些步驟會按照加入物件的順序執行。 - 使用
ActionResponseBuilder類別和Navigation物件,建構ActionResponse物件。 - 傳回建構的
ActionResponse。
- 建立
建構導覽控制項時,您會使用下列 Navigation 物件函式:
| 函式 | 說明 |
|---|---|
Navigation.pushCard(Card) |
將卡片推送到目前的堆疊。這需要先完整建構卡片。 |
Navigation.popCard() |
從堆疊頂端移除一張卡片。相當於點選外掛程式標題列中的返回箭頭。這項操作不會移除根卡。 |
Navigation.popToRoot() |
從堆疊中移除所有資訊卡,但根資訊卡除外。這項操作基本上會重設該卡片堆疊。 |
Navigation.popToNamedCard(String) |
從堆疊中彈出卡片,直到抵達具有指定名稱的卡片或堆疊的根卡片為止。您可以使用 CardBuilder.setName(String) 函式為卡片指派名稱。 |
Navigation.updateCard(Card) |
就地取代目前的資訊卡,並在 UI 中重新整理顯示畫面。 |
導覽最佳做法
如果使用者互動或事件應導致在相同環境中重新算繪資訊卡,請使用 Navigation.pushCard()、Navigation.popCard() 和 Navigation.updateCard() 方法取代現有資訊卡。如果使用者互動或事件應導致在不同情境中重新算繪資訊卡,請使用 ActionResponseBuilder.setStateChanged() 強制在這些情境中重新執行外掛程式。
以下是導覽範例:
- 如果互動或事件會變更目前卡片的狀態 (例如將工作新增至工作清單),請使用
updateCard()。 - 如果互動或事件提供更多詳細資料,或提示使用者採取進一步動作 (例如點選項目標題查看更多詳細資料,或按下按鈕建立新的日曆活動),請使用
pushCard()顯示新頁面,同時允許使用者使用返回按鈕離開新頁面。 - 如果互動或事件更新了先前卡片中的狀態 (例如從詳細資料檢視畫面更新項目的標題),請使用
popCard()、popCard()、pushCard(previous)和pushCard(current)等項目,更新先前的卡片和目前的卡片。
正在重新整理資訊卡
使用者可以透過 Google Workspace 外掛程式,重新執行資訊清單中註冊的 Apps Script 觸發函式,藉此重新整理資訊卡。使用者透過外掛程式選單項目觸發這項重新整理作業:
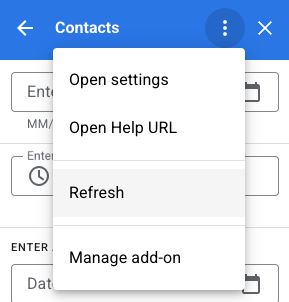
系統會自動將這項動作新增至 homepageTrigger 或 contextualTrigger 觸發函式產生的資訊卡,如外掛程式資訊清單檔案 (情境和非情境資訊卡堆疊的「根」) 中所指定。
退回多張卡片

首頁或內容相關觸發函式會用於建構及傳回單一 Card 物件,或是應用程式 UI 顯示的 Card 物件陣列。
如果只有一張卡片,系統會將其新增至非脈絡或脈絡堆疊,做為根卡片,並在主機應用程式 UI 中顯示。
如果傳回的陣列包含多個建構的 Card 物件,主機應用程式會改為顯示新資訊卡,其中包含每個資訊卡的標題清單。使用者點選任一標題時,使用者介面會顯示對應的資訊卡。
使用者從清單選取資訊卡時,該資訊卡會推送至目前的堆疊,並由主機應用程式顯示。 按鈕會將使用者帶回資訊卡標題清單。
如果外掛程式不需要在您建立的資訊卡之間進行任何轉場效果,這種「平面」卡片排列方式就很適合。不過在大多數情況下,建議您直接定義卡片轉場效果,並讓首頁和情境觸發函式傳回單一卡片物件。
範例
以下範例說明如何建構多張卡片,並在卡片之間加入跳轉的導覽按鈕。您可以透過在特定情境內或情境外推送 createNavigationCard() 傳回的卡片,將這些卡片新增至情境式或非情境式堆疊。
  /**
   *  Create the top-level card, with buttons leading to each of three
   *  'children' cards, as well as buttons to backtrack and return to the
   *  root card of the stack.
   *  @return {Card}
   */
  function createNavigationCard() {
    // Create a button set with actions to navigate to 3 different
    // 'children' cards.
    var buttonSet = CardService.newButtonSet();
    for(var i = 1; i <= 3; i++) {
      buttonSet.addButton(createToCardButton(i));
    }

    // Build the card with all the buttons (two rows)
    var card = CardService.newCardBuilder()
        .setHeader(CardService.newCardHeader().setTitle('Navigation'))
        .addSection(CardService.newCardSection()
            .addWidget(buttonSet)
            .addWidget(buildPreviousAndRootButtonSet()));
    return card.build();
  }

  /**
   *  Create a button that navigates to the specified child card.
   *  @return {TextButton}
   */
  function createToCardButton(id) {
    var action = CardService.newAction()
        .setFunctionName('gotoChildCard')
        .setParameters({'id': id.toString()});
    var button = CardService.newTextButton()
        .setText('Card ' + id)
        .setOnClickAction(action);
    return button;
  }

  /**
   *  Create a ButtonSet with two buttons: one that backtracks to the
   *  last card and another that returns to the original (root) card.
   *  @return {ButtonSet}
   */
  function buildPreviousAndRootButtonSet() {
    var previousButton = CardService.newTextButton()
        .setText('Back')
        .setOnClickAction(CardService.newAction()
            .setFunctionName('gotoPreviousCard'));
    var toRootButton = CardService.newTextButton()
        .setText('To Root')
        .setOnClickAction(CardService.newAction()
            .setFunctionName('gotoRootCard'));

    // Return a new ButtonSet containing these two buttons.
    return CardService.newButtonSet()
        .addButton(previousButton)
        .addButton(toRootButton);
  }

  /**
   *  Create a child card, with buttons leading to each of the other
   *  child cards, and then navigate to it.
   *  @param {Object} e object containing the id of the card to build.
   *  @return {ActionResponse}
   */
  function gotoChildCard(e) {
    var id = parseInt(e.parameters.id);  // Current card ID
    var id2 = (id==3) ? 1 : id + 1;      // 2nd card ID
    var id3 = (id==1) ? 3 : id - 1;      // 3rd card ID
    var title = 'CARD ' + id;

    // Create buttons that go to the other two child cards.
    var buttonSet = CardService.newButtonSet()
      .addButton(createToCardButton(id2))
      .addButton(createToCardButton(id3));

    // Build the child card.
    var card = CardService.newCardBuilder()
        .setHeader(CardService.newCardHeader().setTitle(title))
        .addSection(CardService.newCardSection()
            .addWidget(buttonSet)
            .addWidget(buildPreviousAndRootButtonSet()))
        .build();

    // Create a Navigation object to push the card onto the stack.
    // Return a built ActionResponse that uses the navigation object.
    var nav = CardService.newNavigation().pushCard(card);
    return CardService.newActionResponseBuilder()
        .setNavigation(nav)
        .build();
  }

  /**
   *  Pop a card from the stack.
   *  @return {ActionResponse}
   */
  function gotoPreviousCard() {
    var nav = CardService.newNavigation().popCard();
    return CardService.newActionResponseBuilder()
        .setNavigation(nav)
        .build();
  }

  /**
   *  Return to the initial add-on card.
   *  @return {ActionResponse}
   */
  function gotoRootCard() {
    var nav = CardService.newNavigation().popToRoot();
    return CardService.newActionResponseBuilder()
        .setNavigation(nav)
        .build();
  }