使用 Google Chat API 发送消息

本指南介绍了如何使用 Google Chat API 的 Message 资源中的 create() 方法执行以下任一操作:

  • 发送包含文字、卡片和互动式微件的消息。
  • 以私密方式向特定 Chat 用户发送消息。
  • 发起或回复消息串。
  • 为消息命名,以便您可以在其他 Chat API 请求中指定该消息。

消息大小上限(包括任何文本或卡片)为 32,000 字节。 如需发送超出此大小限制的消息,Chat 应用必须改为发送多条消息。

除了调用 Chat API 来创建消息之外,Chat 应用还可以创建和发送消息来回复用户互动,例如在用户将 Chat 应用添加到聊天室后发布欢迎辞。在响应互动时,Chat 应用可以使用其他类型的消息传递功能,包括互动对话框和链接预览界面。如需回复用户,Chat 应用会同步返回消息,而无需调用 Chat API。如需了解如何发送消息来响应互动,请参阅接收和响应与 Google Chat 应用的互动

Chat 如何显示和归因于使用 Chat API 创建的消息

您可以使用应用身份验证用户身份验证来调用 create() 方法。 Chat 会根据您使用的身份验证类型,以不同的方式显示消息发送者。

当您以 Chat 应用的身份进行身份验证时,Chat 应用会发送消息。

使用应用身份验证调用 create() 方法。
图 1:通过应用身份验证,Chat 应用会发送消息。为了表明发件人不是真人,Chat 会在其名称旁边显示 App

当您以用户身份进行身份验证时,Chat 应用会代表用户发送消息。Chat 还会通过显示聊天应用名称来将聊天应用归因于消息。

使用用户身份验证调用 create() 方法。
图 2:通过用户身份验证,用户发送消息,Chat 会在用户姓名旁边显示 Chat 应用名称。

身份验证类型还决定了您可以在消息中包含哪些消息传递功能和界面。借助应用身份验证,Chat 应用可以发送包含富文本、基于卡片的界面和互动式 widget 的消息。 通过用户身份验证,您可以发送短信。在开发者预览版中,您还可以发送卡片,如创建和更新卡片中所述。

如需详细了解 Chat API 提供的消息传递功能,请参阅 Google Chat 消息概览

本指南介绍如何使用任一身份验证类型通过 Chat API 发送消息。

前提条件

Node.js

Python

Java

Apps 脚本

以 Chat 应用的身份发送消息

本部分介绍了如何使用应用身份验证发送包含文本、卡片和互动辅助功能 widget 的消息。

通过应用身份验证发送的邮件
图 4. 聊天应用发送包含文本、卡片和辅助按钮的消息。

如需使用应用身份验证来调用 CreateMessage() 方法,您必须在请求中指定以下字段:

  • chat.bot 授权范围
  • 您要发布消息的 Space 资源。Chat 应用必须是聊天室的成员。
  • 要创建的 Message 资源。如需定义消息的内容,您可以添加富文本 (text)、一个或多个卡片界面 (cardsV2),也可以同时添加这两者。

您还可以选择性地添加以下内容:

以下代码展示了一个示例,说明了 Chat 应用如何发送以 Chat 应用身份发布的包含文本、卡片和消息底部可点击按钮的消息:

Node.js

chat/client-libraries/cloud/create-message-app-cred.js
import {createClientWithAppCredentials} from './authentication-utils.js';

// This sample shows how to create message with app credential
async function main() {
  // Create a client
  const chatClient = createClientWithAppCredentials();

  // Initialize request argument(s)
  const request = {
    // Replace SPACE_NAME here.
    parent: 'spaces/SPACE_NAME',
    message: {
      text:
        '👋🌎 Hello world! I created this message by calling ' +
        "the Chat API's `messages.create()` method.",
      cardsV2: [
        {
          card: {
            header: {
              title: 'About this message',
              imageUrl:
                'https://fonts.gstatic.com/s/i/short-term/release/googlesymbols/info/default/24px.svg',
            },
            sections: [
              {
                header: 'Contents',
                widgets: [
                  {
                    textParagraph: {
                      text:
                        '🔡 <b>Text</b> which can include ' +
                        'hyperlinks 🔗, emojis 😄🎉, and @mentions 🗣️.',
                    },
                  },
                  {
                    textParagraph: {
                      text:
                        '🖼️ A <b>card</b> to display visual elements' +
                        'and request information such as text 🔤, ' +
                        'dates and times 📅, and selections ☑️.',
                    },
                  },
                  {
                    textParagraph: {
                      text:
                        '👉🔘 An <b>accessory widget</b> which adds ' +
                        'a button to the bottom of a message.',
                    },
                  },
                ],
              },
              {
                header: "What's next",
                collapsible: true,
                widgets: [
                  {
                    textParagraph: {
                      text: "❤️ <a href='https://developers.google.com/workspace/chat/api/reference/rest/v1/spaces.messages.reactions/create'>Add a reaction</a>.",
                    },
                  },
                  {
                    textParagraph: {
                      text:
                        "🔄 <a href='https://developers.google.com/workspace/chat/api/reference/rest/v1/spaces.messages/patch'>Update</a> " +
                        "or ❌ <a href='https://developers.google.com/workspace/chat/api/reference/rest/v1/spaces.messages/delete'>delete</a> " +
                        'the message.',
                    },
                  },
                ],
              },
            ],
          },
        },
      ],
      accessoryWidgets: [
        {
          buttonList: {
            buttons: [
              {
                text: 'View documentation',
                icon: {materialIcon: {name: 'link'}},
                onClick: {
                  openLink: {
                    url: 'https://developers.google.com/workspace/chat/create-messages',
                  },
                },
              },
            ],
          },
        },
      ],
    },
  };

  // Make the request
  const response = await chatClient.createMessage(request);

  // Handle the response
  console.log(response);
}

await main();

Python

chat/client-libraries/cloud/create_message_app_cred.py
from authentication_utils import create_client_with_app_credentials
from google.apps import chat_v1 as google_chat

# This sample shows how to create message with app credential
def create_message_with_app_cred():
    # Create a client
    client = create_client_with_app_credentials()

    # Initialize request argument(s)
    request = google_chat.CreateMessageRequest(
        # Replace SPACE_NAME here.
        parent = "spaces/SPACE_NAME",
        message = {
            "text": '👋🌎 Hello world! I created this message by calling ' +
                    'the Chat API\'s `messages.create()` method.',
            "cards_v2" : [{ "card": {
                "header": {
                    "title": 'About this message',
                    "image_url": 'https://fonts.gstatic.com/s/i/short-term/release/googlesymbols/info/default/24px.svg'
                },
                "sections": [{
                    "header": "Contents",
                    "widgets": [{ "text_paragraph": {
                            "text": '🔡 <b>Text</b> which can include ' +
                                    'hyperlinks 🔗, emojis 😄🎉, and @mentions 🗣️.'
                        }}, { "text_paragraph": {
                            "text": '🖼️ A <b>card</b> to display visual elements' +
                                    'and request information such as text 🔤, ' +
                                    'dates and times 📅, and selections ☑️.'
                        }}, { "text_paragraph": {
                            "text": '👉🔘 An <b>accessory widget</b> which adds ' +
                                    'a button to the bottom of a message.'
                        }}
                    ]}, {
                        "header": "What's next",
                        "collapsible": True,
                        "widgets": [{ "text_paragraph": {
                                "text": "❤️ <a href='https://developers.google.com/workspace/chat/api/reference/rest/v1/spaces.messages.reactions/create'>Add a reaction</a>."
                            }}, { "text_paragraph": {
                                "text": "🔄 <a href='https://developers.google.com/workspace/chat/api/reference/rest/v1/spaces.messages/patch'>Update</a> " +
                                        "or ❌ <a href='https://developers.google.com/workspace/chat/api/reference/rest/v1/spaces.messages/delete'>delete</a> " +
                                        "the message."
                            }
                        }]
                    }
                ]
            }}],
            "accessory_widgets": [{ "button_list": { "buttons": [{
                "text": 'View documentation',
                "icon": { "material_icon": { "name": 'link' }},
                "on_click": { "open_link": {
                    "url": 'https://developers.google.com/workspace/chat/create-messages'
                }}
            }]}}]
        }
    )

    # Make the request
    response = client.create_message(request)

    # Handle the response
    print(response)

create_message_with_app_cred()

Java

chat/client-libraries/cloud/src/main/java/com/google/workspace/api/chat/samples/CreateMessageAppCred.java
import com.google.apps.card.v1.Button;
import com.google.apps.card.v1.ButtonList;
import com.google.apps.card.v1.Card;
import com.google.apps.card.v1.Icon;
import com.google.apps.card.v1.MaterialIcon;
import com.google.apps.card.v1.OnClick;
import com.google.apps.card.v1.OpenLink;
import com.google.apps.card.v1.TextParagraph;
import com.google.apps.card.v1.Widget;
import com.google.apps.card.v1.Card.CardHeader;
import com.google.apps.card.v1.Card.Section;
import com.google.chat.v1.AccessoryWidget;
import com.google.chat.v1.CardWithId;
import com.google.chat.v1.ChatServiceClient;
import com.google.chat.v1.CreateMessageRequest;
import com.google.chat.v1.Message;

// This sample shows how to create message with app credential.
public class CreateMessageAppCred {

  public static void main(String[] args) throws Exception {
    try (ChatServiceClient chatServiceClient =
        AuthenticationUtils.createClientWithAppCredentials()) {
      CreateMessageRequest.Builder request = CreateMessageRequest.newBuilder()
        // Replace SPACE_NAME here.
        .setParent("spaces/SPACE_NAME")
        .setMessage(Message.newBuilder()
          .setText( "👋🌎 Hello world! I created this message by calling " +
                    "the Chat API\'s `messages.create()` method.")
          .addCardsV2(CardWithId.newBuilder().setCard(Card.newBuilder()
            .setHeader(CardHeader.newBuilder()
              .setTitle("About this message")
              .setImageUrl("https://fonts.gstatic.com/s/i/short-term/release/googlesymbols/info/default/24px.svg"))
            .addSections(Section.newBuilder()
              .setHeader("Contents")
              .addWidgets(Widget.newBuilder().setTextParagraph(TextParagraph.newBuilder().setText(
                "🔡 <b>Text</b> which can include " +
                "hyperlinks 🔗, emojis 😄🎉, and @mentions 🗣️.")))
              .addWidgets(Widget.newBuilder().setTextParagraph(TextParagraph.newBuilder().setText(
                "🖼️ A <b>card</b> to display visual elements " +
                "and request information such as text 🔤, " +
                "dates and times 📅, and selections ☑️.")))
              .addWidgets(Widget.newBuilder().setTextParagraph(TextParagraph.newBuilder().setText(
                "👉🔘 An <b>accessory widget</b> which adds " +
                "a button to the bottom of a message."))))
            .addSections(Section.newBuilder()
              .setHeader("What's next")
              .setCollapsible(true)
              .addWidgets(Widget.newBuilder().setTextParagraph(TextParagraph.newBuilder().setText(
                "❤️ <a href='https://developers.google.com/workspace/chat/api/reference/rest/v1/spaces.messages.reactions/create'>Add a reaction</a>.")))
              .addWidgets(Widget.newBuilder().setTextParagraph(TextParagraph.newBuilder().setText(
                "🔄 <a href='https://developers.google.com/workspace/chat/api/reference/rest/v1/spaces.messages/patch'>Update</a> " +
                "or ❌ <a href='https://developers.google.com/workspace/chat/api/reference/rest/v1/spaces.messages/delete'>delete</a> " +
                "the message."))))))
          .addAccessoryWidgets(AccessoryWidget.newBuilder()
            .setButtonList(ButtonList.newBuilder()
              .addButtons(Button.newBuilder()
                .setText("View documentation")
                .setIcon(Icon.newBuilder()
                  .setMaterialIcon(MaterialIcon.newBuilder().setName("link")))
                .setOnClick(OnClick.newBuilder()
                  .setOpenLink(OpenLink.newBuilder()
                    .setUrl("https://developers.google.com/workspace/chat/create-messages")))))));
      Message response = chatServiceClient.createMessage(request.build());

      System.out.println(JsonFormat.printer().print(response));
    }
  }
}

Apps 脚本

chat/advanced-service/Main.gs
/**
 * This sample shows how to create message with app credential
 *
 * It relies on the OAuth2 scope 'https://www.googleapis.com/auth/chat.bot'
 * used by service accounts.
 */
function createMessageAppCred() {
  // Initialize request argument(s)
  // TODO(developer): Replace SPACE_NAME here.
  const parent = "spaces/SPACE_NAME";
  const message = {
    text:
      "👋🌎 Hello world! I created this message by calling " +
      "the Chat API's `messages.create()` method.",
    cardsV2: [
      {
        card: {
          header: {
            title: "About this message",
            imageUrl:
              "https://fonts.gstatic.com/s/i/short-term/release/googlesymbols/info/default/24px.svg",
          },
          sections: [
            {
              header: "Contents",
              widgets: [
                {
                  textParagraph: {
                    text:
                      "🔡 <b>Text</b> which can include " +
                      "hyperlinks 🔗, emojis 😄🎉, and @mentions 🗣️.",
                  },
                },
                {
                  textParagraph: {
                    text:
                      "🖼️ A <b>card</b> to display visual elements" +
                      "and request information such as text 🔤, " +
                      "dates and times 📅, and selections ☑️.",
                  },
                },
                {
                  textParagraph: {
                    text:
                      "👉🔘 An <b>accessory widget</b> which adds " +
                      "a button to the bottom of a message.",
                  },
                },
              ],
            },
            {
              header: "What's next",
              collapsible: true,
              widgets: [
                {
                  textParagraph: {
                    text: "❤️ <a href='https://developers.google.com/workspace/chat/api/reference/rest/v1/spaces.messages.reactions/create'>Add a reaction</a>.",
                  },
                },
                {
                  textParagraph: {
                    text:
                      "🔄 <a href='https://developers.google.com/workspace/chat/api/reference/rest/v1/spaces.messages/patch'>Update</a> " +
                      "or ❌ <a href='https://developers.google.com/workspace/chat/api/reference/rest/v1/spaces.messages/delete'>delete</a> " +
                      "the message.",
                  },
                },
              ],
            },
          ],
        },
      },
    ],
    accessoryWidgets: [
      {
        buttonList: {
          buttons: [
            {
              text: "View documentation",
              icon: { materialIcon: { name: "link" } },
              onClick: {
                openLink: {
                  url: "https://developers.google.com/workspace/chat/create-messages",
                },
              },
            },
          ],
        },
      },
    ],
  };
  const parameters = {};

  // Make the request
  const response = Chat.Spaces.Messages.create(
    message,
    parent,
    parameters,
    getHeaderWithAppCredentials(),
  );

  // Handle the response
  console.log(response);
}

如需运行此示例,请将 SPACE_NAME 替换为空间name字段中的 ID。您可以通过调用 ListSpaces() 方法或从空间的网址中获取 ID。

在消息底部添加互动式微件

在本指南的第一个代码示例中,Chat 应用消息会在消息底部显示一个可点击的按钮,称为辅助 widget。辅助微件会显示在消息中的任何文本或卡片之后。您可以使用这些 widget 以多种方式提示用户与您的消息互动,包括:

  • 对消息的准确性或满意度进行评分。
  • 报告“信息”应用或 Chat 应用存在的问题。
  • 打开指向相关内容(例如文档)的链接。
  • 在特定时间段内关闭或推迟来自 Chat 应用的类似消息。

如需添加配件 widget,请在请求正文中添加 accessoryWidgets[] 字段,并指定要添加的一个或多个 widget。

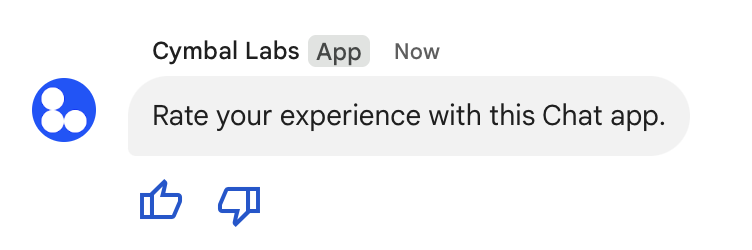
下图展示了一个 Chat 应用,该应用会在文本消息中附加辅助 widget,以便用户评价其使用 Chat 应用的体验。

配件 widget。
图 5:包含文字和附件微件的聊天应用消息。

以下示例展示了创建包含两个附件按钮的文本消息的请求正文。当用户点击按钮时,相应的函数(例如 doUpvote)会处理互动:

{
  text: "Rate your experience with this Chat app.",
  accessoryWidgets: [{ buttonList: { buttons: [{
    icon: { material_icon: {
      name: "thumb_up"
    }},
    color: { red: 0, blue: 255, green: 0 },
    onClick: { action: {
      function: "doUpvote"
    }}
  }, {
    icon: { material_icon: {
      name: "thumb_down"
    }},
    color: { red: 0, blue: 255, green: 0 },
    onClick: { action: {
      function: "doDownvote"
    }}
  }]}}]
}

私密地发送消息

聊天应用可以私下发送消息,以便消息仅对聊天室中的特定用户可见。当聊天应用发送私信时,该消息会显示一个标签,通知用户该消息只对他可见。

如需使用 Chat API 私下发送消息,请在请求正文中指定 privateMessageViewer 字段。如需指定用户,请将值设置为表示 Chat 用户的 User 资源。您还可以使用 User 资源的 name 字段,如以下示例所示:

{
  text: "Hello private world!",
  privateMessageViewer: {
    name: "users/USER_ID"
  }
}

如需使用此示例,请将 USER_ID 替换为用户的唯一 ID,例如 12345678987654321hao@cymbalgroup.com。如需详细了解如何指定用户,请参阅识别和指定 Google Chat 用户

如需私下发送消息,您必须在请求中省略以下内容:

发送强制通知或静默消息

当 Chat 应用发送消息时,可以使用以下选项之一来通知用户:

  • 强制通知:无论收件人的通知设置或“勿扰”(DND) 状态如何,Chat 都会始终向收件人发送推送通知。在 Chat 中,该消息会在收件人的名单或“首页”列表中触发加粗和置顶行为,并显示徽章。
  • 发送静默消息:聊天会抑制接收者的推送通知。在 Chat 中,该消息不会在收件人的名单或首页列表中触发加粗或置顶行为,也不会显示徽章。如果无声消息是对话中的最后一条消息,则其内容不会显示在首页摘要中。

无论是强制通知还是静默通知,这些消息都包含一个视觉指示器,用于通知收件人特殊的通知行为。

强制通知和静默消息仅适用于使用应用身份验证的 Chat 应用。

强制通知和无声消息具有以下限制:

  • 外部用户:强制通知和无声消息不适用于聊天室中的外部用户(访客)。外部用户会根据自己的设置接收通知。
  • 提及:静默消息不支持提及用户。如果您在静音消息中添加提及内容,系统会将其视为纯文本。
  • 消息串:您无法使用静音消息发起或回复消息串。
  • 聊天室类型:在私信 (DM) 或由没有 Google Workspace 账号的用户创建的聊天室中,不支持强制通知和静音消息。
  • 电子邮件通知:静音消息不会触发电子邮件通知。 强制通知的消息仅在还提及了特定用户时才会触发电子邮件通知。

如需强制显示通知或发送静默消息,请在请求中添加 createMessageNotificationOptions 字段,并将 notificationType 设置为以下值之一:

行为
NOTIFICATION_TYPE_FORCE_NOTIFY 强制显示通知。
NOTIFICATION_TYPE_SILENT 静默发送消息。

以下示例展示了发送强制通知消息的请求的 JSON 正文:

{
  "text": "Critical update: the server is down!",
  "createMessageNotificationOptions": {
    "notificationType": "NOTIFICATION_TYPE_FORCE_NOTIFY"
  }
}

代表用户发送短信

本部分介绍如何使用用户身份验证代表用户发送消息。 如果使用用户身份验证,消息内容只能包含文本,并且必须省略仅适用于 Chat 应用的消息传递功能,包括卡片界面和互动 widget。 在开发者预览版中,您可以代表用户创建带有卡片的即时通讯。如需了解详情,请参阅创建和更新卡片

通过用户身份验证发送的消息
图 3. Chat 应用代表用户发送短信。

如需使用用户身份验证来调用 CreateMessage() 方法,您必须在请求中指定以下字段:

  • 支持此方法的用户身份验证的授权范围。以下示例使用 chat.messages.create 范围。
  • 您要发布消息的 Space 资源。经过身份验证的用户必须是相应聊天室的成员。
  • 要创建的 Message 资源。如需定义消息的内容,您必须添加 text 字段。

您还可以选择性地添加以下内容:

以下代码展示了 Chat 应用如何代表已通过身份验证的用户在指定聊天室中发送文本消息的示例:

Node.js

chat/client-libraries/cloud/create-message-user-cred.js
import {createClientWithUserCredentials} from './authentication-utils.js';

const USER_AUTH_OAUTH_SCOPES = [
  'https://www.googleapis.com/auth/chat.messages.create',
];

// This sample shows how to create message with user credential
async function main() {
  // Create a client
  const chatClient = await createClientWithUserCredentials(
    USER_AUTH_OAUTH_SCOPES,
  );

  // Initialize request argument(s)
  const request = {
    // Replace SPACE_NAME here.
    parent: 'spaces/SPACE_NAME',
    message: {
      text:
        '👋🌎 Hello world!' +
        'Text messages can contain things like:\n\n' +
        '* Hyperlinks 🔗\n' +
        '* Emojis 😄🎉\n' +
        '* Mentions of other Chat users `@` \n\n' +
        'For details, see the ' +
        '<https://developers.google.com/workspace/chat/format-messages' +
        '|Chat API developer documentation>.',
    },
  };

  // Make the request
  const response = await chatClient.createMessage(request);

  // Handle the response
  console.log(response);
}

await main();

Python

chat/client-libraries/cloud/create_message_user_cred.py
from authentication_utils import create_client_with_user_credentials
from google.apps import chat_v1 as google_chat

SCOPES = ["https://www.googleapis.com/auth/chat.messages.create"]

def create_message_with_user_cred():
    # Create a client
    client = create_client_with_user_credentials(SCOPES)

    # Initialize request argument(s)
    request = google_chat.CreateMessageRequest(
        # Replace SPACE_NAME here.
        parent = "spaces/SPACE_NAME",
        message = {
            "text": '👋🌎 Hello world!' +
                    'Text messages can contain things like:\n\n' +
                    '* Hyperlinks 🔗\n' +
                    '* Emojis 😄🎉\n' +
                    '* Mentions of other Chat users `@` \n\n' +
                    'For details, see the ' +
                    '<https://developers.google.com/workspace/chat/format-messages' +
                    '|Chat API developer documentation>.'
        }
    )

    # Make the request
    response = client.create_message(request)

    # Handle the response
    print(response)

create_message_with_user_cred()

Java

chat/client-libraries/cloud/src/main/java/com/google/workspace/api/chat/samples/CreateMessageUserCred.java
import com.google.chat.v1.ChatServiceClient;
import com.google.chat.v1.CreateMessageRequest;
import com.google.chat.v1.Message;

// This sample shows how to create message with user credential.
public class CreateMessageUserCred {

  private static final String SCOPE =
    "https://www.googleapis.com/auth/chat.messages.create";

  public static void main(String[] args) throws Exception {
    try (ChatServiceClient chatServiceClient =
        AuthenticationUtils.createClientWithUserCredentials(
          ImmutableList.of(SCOPE))) {
      CreateMessageRequest.Builder request = CreateMessageRequest.newBuilder()
        // Replace SPACE_NAME here.
        .setParent("spaces/SPACE_NAME")
        .setMessage(Message.newBuilder()
          .setText( "👋🌎 Hello world!" +
                    "Text messages can contain things like:\n\n" +
                    "* Hyperlinks 🔗\n" +
                    "* Emojis 😄🎉\n" +
                    "* Mentions of other Chat users `@` \n\n" +
                    "For details, see the " +
                    "<https://developers.google.com/workspace/chat/format-messages" +
                    "|Chat API developer documentation>."));
      Message response = chatServiceClient.createMessage(request.build());

      System.out.println(JsonFormat.printer().print(response));
    }
  }
}

Apps 脚本

chat/advanced-service/Main.gs
/**
 * This sample shows how to create message with user credential
 *
 * It relies on the OAuth2 scope 'https://www.googleapis.com/auth/chat.messages.create'
 * referenced in the manifest file (appsscript.json).
 */
function createMessageUserCred() {
  // Initialize request argument(s)
  // TODO(developer): Replace SPACE_NAME here.
  const parent = "spaces/SPACE_NAME";
  const message = {
    text:
      "👋🌎 Hello world!" +
      "Text messages can contain things like:\n\n" +
      "* Hyperlinks 🔗\n" +
      "* Emojis 😄🎉\n" +
      "* Mentions of other Chat users `@` \n\n" +
      "For details, see the " +
      "<https://developers.google.com/workspace/chat/format-messages" +
      "|Chat API developer documentation>.",
  };

  // Make the request
  const response = Chat.Spaces.Messages.create(message, parent);

  // Handle the response
  console.log(response);
}

如需运行此示例,请将 SPACE_NAME 替换为空间name字段中的 ID。您可以通过调用 ListSpaces() 方法或从空间的网址中获取 ID。

发起消息串或在消息串中回复

对于使用话题的聊天室,您可以指定新消息是发起新话题,还是回复现有话题。

默认情况下,使用 Chat API 创建的消息会启动新线程。为了便于您日后识别相应消息串并回复,您可以在请求中指定消息串键:

如需创建回复现有对话串的消息,请执行以下操作:

  • 在请求正文中,添加 thread 字段。如果设置了此属性,您可以指定已创建的 threadKey。否则,您必须使用线程的 name
  • 指定查询参数 messageReplyOption

以下代码展示了 Chat 应用如何代表已通过身份验证的用户发送一条文本消息,该消息会启动或回复给定聊天室中由键标识的给定线程:

Node.js

chat/client-libraries/cloud/create-message-user-cred-thread-key.js
import {protos} from '@google-apps/chat';
import {createClientWithUserCredentials} from './authentication-utils.js';

const USER_AUTH_OAUTH_SCOPES = [
  'https://www.googleapis.com/auth/chat.messages.create',
];

// This sample shows how to create message with user credential with thread key
async function main() {
  // Create a client
  const chatClient = await createClientWithUserCredentials(
    USER_AUTH_OAUTH_SCOPES,
  );

  // Initialize request argument(s)
  const request = {
    // Replace SPACE_NAME here.
    parent: 'spaces/SPACE_NAME',
    // Creates the message as a reply to the thread specified by thread_key
    // If it fails, the message starts a new thread instead
    messageReplyOption:
      protos.google.chat.v1.CreateMessageRequest.MessageReplyOption
        .REPLY_MESSAGE_FALLBACK_TO_NEW_THREAD,
    message: {
      text: 'Hello with user credential!',
      thread: {
        // Thread key specifies a thread and is unique to the chat app
        // that sets it
        threadKey: 'THREAD_KEY',
      },
    },
  };

  // Make the request
  const response = await chatClient.createMessage(request);

  // Handle the response
  console.log(response);
}

await main();

Python

chat/client-libraries/cloud/create_message_user_cred_thread_key.py
from authentication_utils import create_client_with_user_credentials
from google.apps import chat_v1 as google_chat

import google.apps.chat_v1.CreateMessageRequest.MessageReplyOption

SCOPES = ["https://www.googleapis.com/auth/chat.messages.create"]

# This sample shows how to create message with user credential with thread key
def create_message_with_user_cred_thread_key():
    # Create a client
    client = create_client_with_user_credentials(SCOPES)

    # Initialize request argument(s)
    request = google_chat.CreateMessageRequest(
        # Replace SPACE_NAME here
        parent = "spaces/SPACE_NAME",
        # Creates the message as a reply to the thread specified by thread_key.
        # If it fails, the message starts a new thread instead.
        message_reply_option = MessageReplyOption.REPLY_MESSAGE_FALLBACK_TO_NEW_THREAD,
        message = {
            "text": "Hello with user credential!",
            "thread": {
                # Thread key specifies a thread and is unique to the chat app
                # that sets it.
                "thread_key": "THREAD_KEY"
            }
        }
    )

    # Make the request
    response = client.create_message(request)

    # Handle the response
    print(response)

create_message_with_user_cred_thread_key()

Java

chat/client-libraries/cloud/src/main/java/com/google/workspace/api/chat/samples/CreateMessageUserCredThreadKey.java
import com.google.chat.v1.ChatServiceClient;
import com.google.chat.v1.CreateMessageRequest;
import com.google.chat.v1.CreateMessageRequest.MessageReplyOption;
import com.google.chat.v1.Message;
import com.google.chat.v1.Thread;

// This sample shows how to create message with a thread key with user
// credential.
public class CreateMessageUserCredThreadKey {

  private static final String SCOPE =
    "https://www.googleapis.com/auth/chat.messages.create";

  public static void main(String[] args) throws Exception {
    try (ChatServiceClient chatServiceClient =
        AuthenticationUtils.createClientWithUserCredentials(
          ImmutableList.of(SCOPE))) {
      CreateMessageRequest.Builder request = CreateMessageRequest.newBuilder()
        // Replace SPACE_NAME here.
        .setParent("spaces/SPACE_NAME")
        // Creates the message as a reply to the thread specified by thread_key.
        // If it fails, the message starts a new thread instead.
        .setMessageReplyOption(
          MessageReplyOption.REPLY_MESSAGE_FALLBACK_TO_NEW_THREAD)
        .setMessage(Message.newBuilder()
          .setText("Hello with user credentials!")
          // Thread key specifies a thread and is unique to the chat app
          // that sets it.
          .setThread(Thread.newBuilder().setThreadKey("THREAD_KEY")));
      Message response = chatServiceClient.createMessage(request.build());

      System.out.println(JsonFormat.printer().print(response));
    }
  }
}

Apps 脚本

chat/advanced-service/Main.gs
/**
 * This sample shows how to create message with user credential with thread key
 *
 * It relies on the OAuth2 scope 'https://www.googleapis.com/auth/chat.messages.create'
 * referenced in the manifest file (appsscript.json).
 */
function createMessageUserCredThreadKey() {
  // Initialize request argument(s)
  // TODO(developer): Replace SPACE_NAME here.
  const parent = "spaces/SPACE_NAME";
  // Creates the message as a reply to the thread specified by thread_key
  // If it fails, the message starts a new thread instead
  const messageReplyOption = "REPLY_MESSAGE_FALLBACK_TO_NEW_THREAD";
  const message = {
    text: "Hello with user credential!",
    thread: {
      // Thread key specifies a thread and is unique to the chat app
      // that sets it
      threadKey: "THREAD_KEY",
    },
  };

  // Make the request
  const response = Chat.Spaces.Messages.create(message, parent, {
    messageReplyOption: messageReplyOption,
  });

  // Handle the response
  console.log(response);
}

如需运行此示例,请替换以下内容:

  • THREAD_KEY:空间中的现有线程密钥,或者要创建新线程,则为线程的唯一名称。
  • SPACE_NAME:来自空间的 name 字段的 ID。您可以通过调用 ListSpaces() 方法或从空间的网址中获取 ID。

为消息命名

如需在未来的 API 调用中检索或指定消息,您可以在请求中设置 messageId 字段来为消息命名。为消息命名后,您无需存储消息资源名称(以 name 字段表示)中系统分配的 ID 即可指定消息。

例如,如需使用 get() 方法检索消息,您可以使用资源名称来指定要检索的消息。资源名称的格式为 spaces/{space}/messages/{message},其中 {message} 表示系统分配的 ID 或您在创建消息时设置的自定义名称。

如需为消息命名,请在创建消息时在 messageId 字段中指定自定义 ID。messageId 字段用于设置 Message 资源的 clientAssignedMessageId 字段的值。

您只能在创建消息时为其命名。您无法为现有消息命名或修改自定义 ID。自定义 ID 必须满足以下要求:

  • client- 开头。例如,client-custom-name 是有效的自定义 ID,但 custom-name 不是。
  • 最多包含 63 个字符,并且只能包含小写字母、数字和连字符。
  • 在空间内是唯一的。一个 Chat 应用不能为不同的消息使用相同的自定义 ID。

以下代码展示了 Chat 应用如何代表已通过身份验证的用户向指定聊天室发送包含 ID 的文本消息:

Node.js

chat/client-libraries/cloud/create-message-user-cred-message-id.js
import {createClientWithUserCredentials} from './authentication-utils.js';

const USER_AUTH_OAUTH_SCOPES = [
  'https://www.googleapis.com/auth/chat.messages.create',
];

// This sample shows how to create a message with user credentials and a custom
// message id
async function main() {
  // Create a client
  const chatClient = await createClientWithUserCredentials(
    USER_AUTH_OAUTH_SCOPES,
  );

  // Initialize request argument(s)
  const request = {
    // Replace SPACE_NAME here.
    parent: 'spaces/SPACE_NAME',
    // Message id lets chat apps get, update or delete a message without needing
    // to store the system assigned ID in the message's resource name
    messageId: 'client-MESSAGE-ID',
    message: {text: 'Hello with user credential!'},
  };

  // Make the request
  const response = await chatClient.createMessage(request);

  // Handle the response
  console.log(response);
}

await main();

Python

chat/client-libraries/cloud/create_message_user_cred_message_id.py
from authentication_utils import create_client_with_user_credentials
from google.apps import chat_v1 as google_chat

SCOPES = ["https://www.googleapis.com/auth/chat.messages.create"]

# This sample shows how to create message with user credential with message id
def create_message_with_user_cred_message_id():
    # Create a client
    client = create_client_with_user_credentials(SCOPES)

    # Initialize request argument(s)
    request = google_chat.CreateMessageRequest(
        # Replace SPACE_NAME here
        parent = "spaces/SPACE_NAME",
        # Message id let chat apps get, update or delete a message without needing
        # to store the system assigned ID in the message's resource name.
        message_id = "client-MESSAGE-ID",
        message = {
            "text": "Hello with user credential!"
        }
    )

    # Make the request
    response = client.create_message(request)

    # Handle the response
    print(response)

create_message_with_user_cred_message_id()

Java

chat/client-libraries/cloud/src/main/java/com/google/workspace/api/chat/samples/CreateMessageUserCredMessageId.java
import com.google.chat.v1.ChatServiceClient;
import com.google.chat.v1.CreateMessageRequest;
import com.google.chat.v1.Message;

// This sample shows how to create message with message id specified with user
// credential.
public class CreateMessageUserCredMessageId {

  private static final String SCOPE =
    "https://www.googleapis.com/auth/chat.messages.create";

  public static void main(String[] args) throws Exception {
    try (ChatServiceClient chatServiceClient =
        AuthenticationUtils.createClientWithUserCredentials(
          ImmutableList.of(SCOPE))) {
      CreateMessageRequest.Builder request = CreateMessageRequest.newBuilder()
        // Replace SPACE_NAME here.
        .setParent("spaces/SPACE_NAME")
        .setMessage(Message.newBuilder()
          .setText("Hello with user credentials!"))
        // Message ID lets chat apps get, update or delete a message without
        // needing to store the system assigned ID in the message's resource
        // name.
        .setMessageId("client-MESSAGE-ID");
      Message response = chatServiceClient.createMessage(request.build());

      System.out.println(JsonFormat.printer().print(response));
    }
  }
}

Apps 脚本

chat/advanced-service/Main.gs
/**
 * This sample shows how to create message with user credential with message id
 *
 * It relies on the OAuth2 scope 'https://www.googleapis.com/auth/chat.messages.create'
 * referenced in the manifest file (appsscript.json).
 */
function createMessageUserCredMessageId() {
  // Initialize request argument(s)
  // TODO(developer): Replace SPACE_NAME here.
  const parent = "spaces/SPACE_NAME";
  // Message id lets chat apps get, update or delete a message without needing
  // to store the system assigned ID in the message's resource name
  const messageId = "client-MESSAGE-ID";
  const message = { text: "Hello with user credential!" };

  // Make the request
  const response = Chat.Spaces.Messages.create(message, parent, {
    messageId: messageId,
  });

  // Handle the response
  console.log(response);
}

如需运行此示例,请替换以下内容:

  • SPACE_NAME:来自空间的 name 字段的 ID。您可以通过调用 ListSpaces() 方法或从空间的网址中获取 ID。
  • MESSAGE-ID:以 custom- 开头的消息的名称。必须与 Chat 应用在指定空间中创建的任何其他消息名称不同。

引用消息

您可以通过调用 CreateMessage() (rpc, rest) 并设置请求中的 quotedMessageMetadata (rpc, rest) 来引用另一条消息。

您可以在消息串或主聊天中引用消息,但无法引用其他消息串中的消息。

以下代码展示了如何创建引用另一条消息的消息:

Node.js

import {createClientWithUserCredentials} from './authentication-utils.js';

const USER_AUTH_OAUTH_SCOPES = ['https://www.googleapis.com/auth/chat.messages.create'];

// This sample shows how to create a message that quotes another message.
async function main() {

  // Create a client
  const chatClient = await createClientWithUserCredentials(USER_AUTH_OAUTH_SCOPES);

  // Initialize request argument(s)
  const request = {

    // TODO(developer): Replace SPACE_NAME .
    parent: 'spaces/SPACE_NAME',

    message: {
      text: 'I am responding to a quoted message!',

      // quotedMessageMetadata lets Chat apps respond to a message by quoting it.
      quotedMessageMetadata: {

        // TODO(developer): Replace QUOTED_MESSAGE_NAME
        // and QUOTED_MESSAGE_LAST_UPDATE_TIME.
        name: 'QUOTED_MESSAGE_NAME',
        lastUpdateTime: 'QUOTED_MESSAGE_LAST_UPDATE_TIME'
      }
    }
  };

  // Make the request
  const response = await chatClient.createMessage(request);

  // Handle the response
  console.log(response);
}

main().catch(console.error);

Python

from authentication_utils import create_client_with_user_credentials
from google.apps import chat_v1 as google_chat
from google.protobuf.timestamp_pb2 import Timestamp

SCOPES = ['https://www.googleapis.com/auth/chat.messages.create']

# This sample shows how to create a message that quotes another message.
def create_message_quote_message():
    '''Creates a message that quotes another message.'''

    # Create a client
    client = create_client_with_user_credentials(SCOPES)

    # Create a timestamp from the RFC-3339 string.
    # TODO(developer): Replace QUOTED_MESSAGE_LAST_UPDATE_TIME.
    last_update_time = Timestamp()
    last_update_time.FromJsonString('QUOTED_MESSAGE_LAST_UPDATE_TIME')

    # Initialize request argument(s)
    request = google_chat.CreateMessageRequest(

        # TODO(developer): Replace SPACE_NAME.
        parent='spaces/SPACE_NAME',

        # Create the message.
        message = google_chat.Message(
            text='I am responding to a quoted message!',

            # quotedMessageMetadata lets Chat apps respond to a message by quoting it.
            quoted_message_metadata=google_chat.QuotedMessageMetadata(

                name='QUOTED_MESSAGE_NAME',
                last_update_time=last_update_time
            )
        )
    )

    # Make the request
    response = client.create_message(request)

    # Handle the response
    print(response)

create_message_quote_message()

Java

import com.google.chat.v1.ChatServiceClient;
import com.google.chat.v1.CreateMessageRequest;
import com.google.chat.v1.Message;
import com.google.chat.v1.QuotedMessageMetadata;
import com.google.protobuf.util.Timestamps;
import com.google.workspace.api.chat.samples.utils.AuthenticationUtils;
import java.text.ParseException;

// This sample shows how to create a message that quotes another message.
public class CreateMessageQuoteMessage {
  public static void main(String[] args) throws Exception, ParseException {
    // Create a client.
    ChatServiceClient chatClient = AuthenticationUtils.createClientWithUserCredentials();

    // Initialize request argument(s).
    // TODO(developer): Replace SPACE_NAME, QUOTED_MESSAGE_NAME,
    // and QUOTED_MESSAGE_LAST_UPDATE_TIME here.
    String parent = "spaces/SPACE_NAME";
    String quotedMessageName = "QUOTED_MESSAGE_NAME";
    String lastUpdateTime = "QUOTED_MESSAGE_LAST_UPDATE_TIME";

    QuotedMessageMetadata quotedMessageMetadata =
        QuotedMessageMetadata.newBuilder()
            .setName(quotedMessageName)
            .setLastUpdateTime(Timestamps.parse(lastUpdateTime))
            .build();

    Message message = Message.newBuilder()
        .setText("I am responding to a quoted message!")
        .setQuotedMessageMetadata(quotedMessageMetadata)
        .build();

    CreateMessageRequest request =
        CreateMessageRequest.newBuilder()
            .setParent(parent)
            .setMessage(message)
            .build();

    // Make the request.
    Message response = chatClient.createMessage(request);

    // Handle the response.
    System.out.println(response);
  }
}

Apps 脚本

/**
 * Creates a message that quotes another message.
 *
 * Relies on the OAuth2 scope 'https://www.googleapis.com/auth/chat.messages.create'
 * referenced in the manifest file (appsscript.json).
 */
function createMessageQuoteMessage() {

  // Initialize request argument(s)
  // TODO(developer): Replace SPACE_NAME here.
  const parent = 'spaces/SPACE_NAME';

  const message = {

    // The text content of the message.
    text: 'I am responding to a quoted message!',

    // quotedMessageMetadata lets Chat apps respond to a message by quoting it.
    //
    // TODO(developer): Replace QUOTED_MESSAGE_NAME
    // and QUOTED_MESSAGE_LAST_UPDATE_TIME .
    quotedMessageMetadata: {
      name: 'QUOTED_MESSAGE_NAME',
      lastUpdateTime: 'QUOTED_MESSAGE_LAST_UPDATE_TIME',
    }
  };

  // Make the request
  const response = Chat.Spaces.Messages.create(message, parent);

  // Handle the response
  console.log(response);
}

如需运行此示例,请替换以下内容:

  • SPACE_NAME:来自空间的 name 字段的 ID。您可以通过调用 ListSpaces()rpcrest)方法或从会议室的网址中获取 ID。
  • QUOTED_MESSAGE_NAME:要引用的消息的消息资源 namerpcrest),格式为 spaces/{space}/messages/{message}
  • QUOTED_MESSAGE_LAST_UPDATE_TIME:要引用消息的上次更新时间。如果消息从未经过修改,则对应于 createTimerpcrest)。如果消息经过修改,则对应于 lastUpdateTimerpcrest)。

问题排查

当 Google Chat 应用或卡片返回错误时,Chat 界面会显示一条消息,提示“出了点问题”。 或“无法处理您的请求”。有时,Chat 界面不会显示任何错误消息,但 Chat 应用或卡片会产生意外结果;例如,卡片消息可能不会显示。

虽然聊天界面中可能不会显示错误消息,但当您为聊天应用启用错误日志记录功能后,系统会提供描述性错误消息和日志数据,帮助您修复错误。如需查看、调试和修复错误方面的帮助,请参阅排查和修复 Google Chat 错误