Obsługa dialogów interaktywnych

Na tej stronie opisujemy, jak aplikacja Google Chat może otwierać okna dialogowe, aby wyświetlać interfejsy i reagować na działania użytkowników.

Okna dialogowe to interfejsy oparte na kartach, które otwierają się w pokoju czatu lub wiadomości. Okno i jego zawartość są widoczne tylko dla użytkownika, który je otworzył.

Aplikacje do czatu mogą używać okien dialogowych do wysyłania próśb o informacje od użytkowników Google Chat i ich zbierania, w tym formularzy wieloetapowych. Więcej informacji o tworzeniu danych wejściowych formularza znajdziesz w artykule Zbieranie i przetwarzanie informacji od użytkowników.

Wymagania wstępne

HTTP

Aplikacja Google Chat, która odbiera i odpowiada na interakcje użytkowników. Aby go utworzyć, wykonaj czynności opisane w krótkim wprowadzeniu do HTTP.

Google Apps Script

Aplikacja Google Chat, która odbiera i odpowiada na interakcje użytkowników. Aby utworzyć taki skrypt, wykonaj czynności opisane w krótkim wprowadzeniu do Apps Script.

Otwórz okno
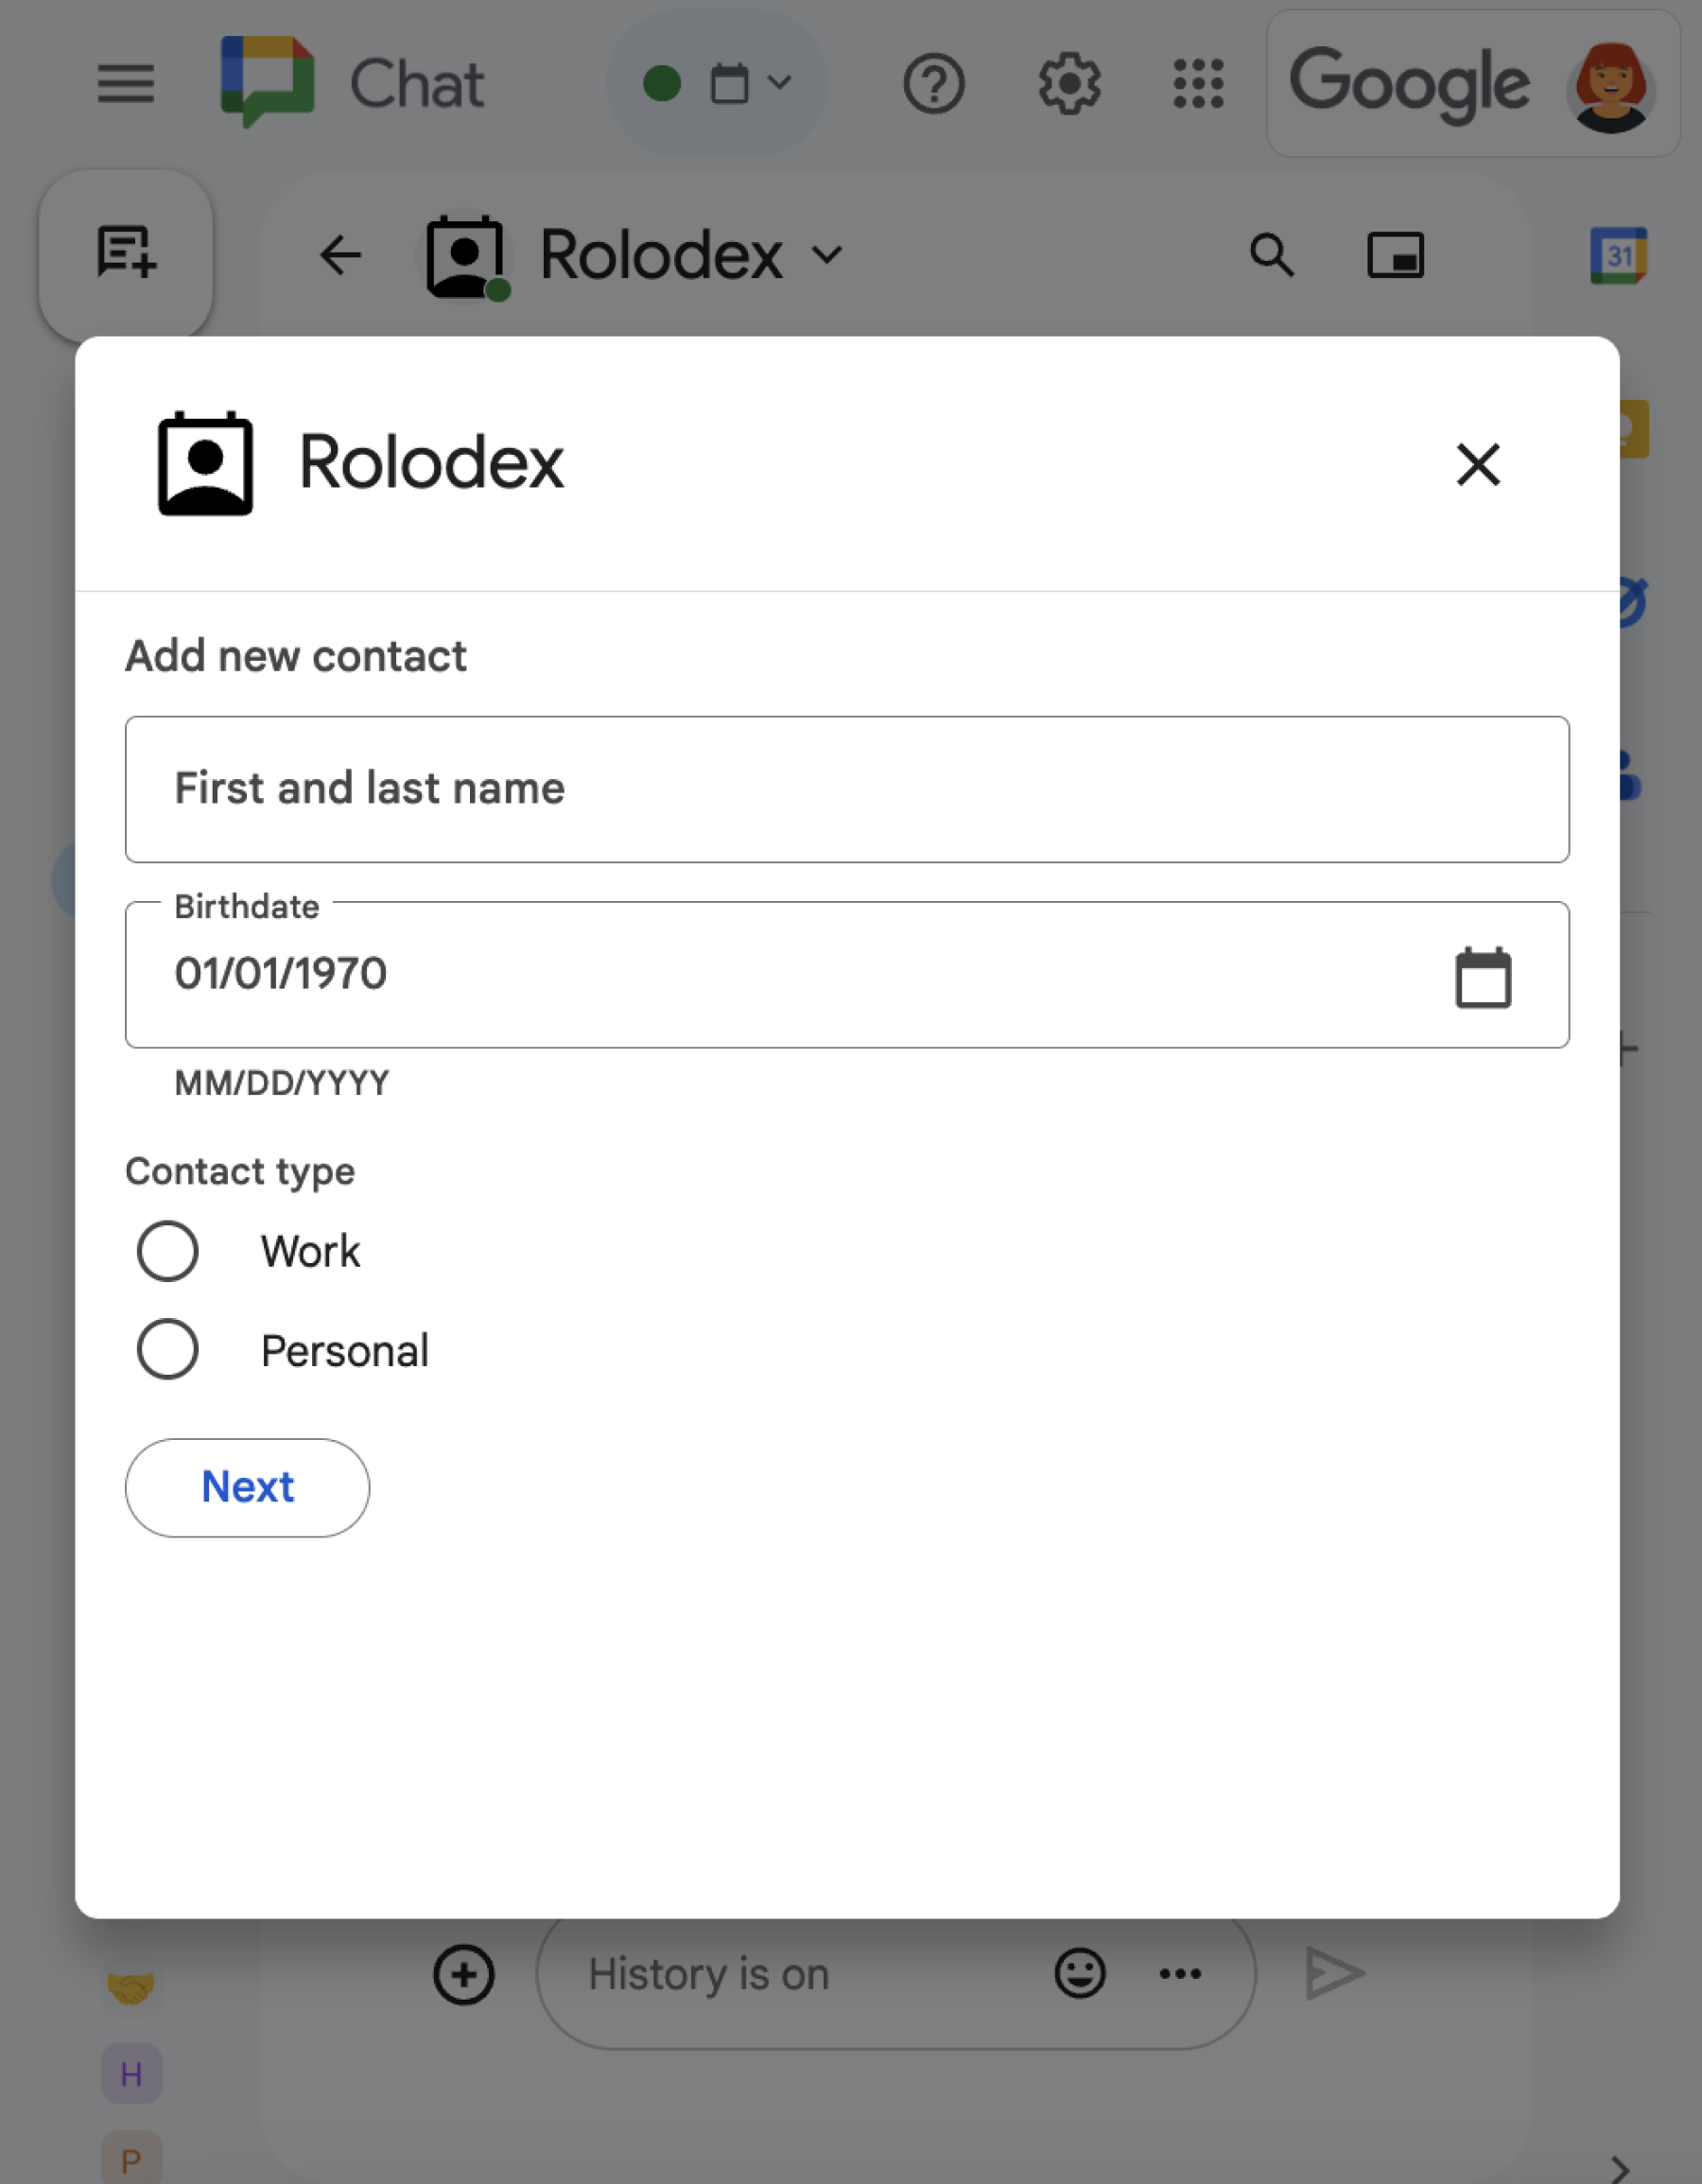
Okno z różnymi widżetami.
Ilustracja 1. Przykładowa aplikacja Google Chat, która otwiera okno dialogowe do zbierania informacji kontaktowych.

W tej sekcji dowiesz się, jak odpowiadać i konfigurować dialogi, wykonując te czynności:

  1. Wywołaj prośbę o okno z interakcji użytkownika.
  2. Obsłuż żądanie, zwracając i otwierając okno.
  3. Po przesłaniu przez użytkowników informacji przetwórz je, zamykając okno lub wyświetlając inne okno.

Wywoływanie prośby o okno

Aplikacja w Google Chat może otwierać okna tylko w odpowiedzi na interakcję użytkownika, np. polecenie lub kliknięcie przycisku w wiadomości na karcie.

Aby odpowiadać użytkownikom za pomocą okna, aplikacja do obsługi czatu musi utworzyć interakcję, która wywołuje żądanie okna, np.:

  • Odpowiadaj na polecenia. Aby wywołać prośbę za pomocą polecenia, podczas konfigurowania polecenia musisz zaznaczyć pole wyboru Otwiera okno.
  • Odpowiadanie na kliknięcie przycisku w wiadomości, w ramach karty lub u dołu wiadomości. Aby wywołać żądanie za pomocą przycisku w wiadomości, skonfiguruj działanie onClick przycisku, ustawiając jego parametr interaction na OPEN_DIALOG.
  • Odpowiadanie na kliknięcie przycisku na stronie głównej aplikacji do obsługi czatu Więcej informacji o otwieraniu okien z poziomu stron głównych znajdziesz w artykule Tworzenie strony głównej aplikacji Google Chat.
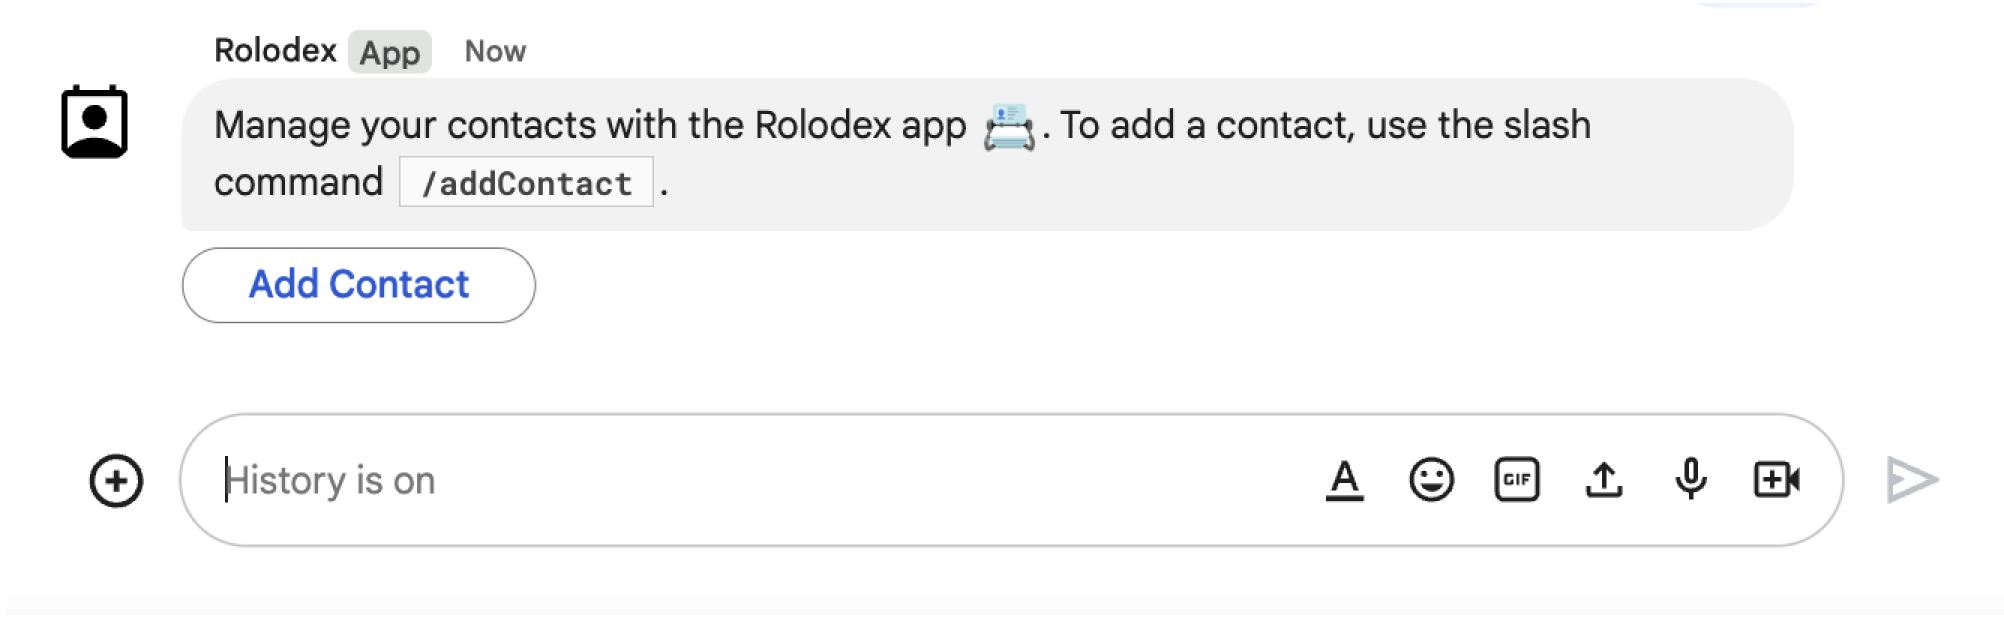
Przycisk, który otwiera okno
Ilustracja 2. Aplikacja do obsługi czatu wysyła wiadomość, która zachęca użytkowników do użycia /addContactpolecenia po ukośniku.
Wiadomość zawiera też przycisk, który użytkownicy mogą kliknąć, aby wywołać polecenie.

Poniższy przykładowy kod pokazuje, jak wywołać żądanie okna z przycisku w wiadomości z kartą. Aby otworzyć okno, ustaw pole onClick.action.interaction przycisku na OPEN_DIALOG:

Node.js

node/chat/contact-form-app/index.js
{ buttonList: { buttons: [{
  text: "ADD CONTACT",
  onClick: { action: {
    function: FUNCTION_URL,
    interaction: "OPEN_DIALOG",
    parameters: [
      { key: "actionName", value: "openInitialDialog" }
    ]
  }}
}]}}

Zastąp FUNCTION_URL punktem końcowym HTTP, który obsługuje kliknięcia przycisku.

Python

python/chat/contact-form-app/main.py
{ 'buttonList': { 'buttons': [{
  'text': "ADD CONTACT",
  'onClick': { 'action': {
    'function': FUNCTION_URL,
    'interaction': "OPEN_DIALOG",
    'parameters': [
      { 'key': "actionName", 'value': "openInitialDialog" }
    ]
  }}
}]}}

Zastąp FUNCTION_URL punktem końcowym HTTP, który obsługuje kliknięcia przycisku.

Java

java/chat/contact-form-app/src/main/java/com/google/chat/contact/App.java
.setButtonList(new GoogleAppsCardV1ButtonList().setButtons(List.of(new GoogleAppsCardV1Button()
  .setText("ADD CONTACT")
  .setOnClick(new GoogleAppsCardV1OnClick().setAction(new GoogleAppsCardV1Action()
    .setFunction(FUNCTION_URL)
    .setInteraction("OPEN_DIALOG")
    .setParameters(List.of(
      new GoogleAppsCardV1ActionParameter().setKey("actionName").setValue("openInitialDialog"))))))))));

Zastąp FUNCTION_URL punktem końcowym HTTP, który obsługuje kliknięcia przycisku.

Google Apps Script

W tym przykładzie wysyłana jest wiadomość z kartą przez zwrócenie kodu JSON karty. Możesz też użyć usługi kart Apps Script.

apps-script/chat/contact-form-app/Code.gs
{ buttonList: { buttons: [{
  text: "ADD CONTACT",
  onClick: { action: {
    function: "openInitialDialog",
    interaction: "OPEN_DIALOG"
  }}
}]}}

Otwórz okno początkowe

Gdy użytkownik wywoła żądanie okna, aplikacja do obsługi czatu otrzyma obiekt zdarzenia z ładunkiem, który określa obiekt dialogEventType jako REQUEST_DIALOG.

Aby otworzyć okno, aplikacja do obsługi czatu może odpowiedzieć na żądanie, zwracając obiekt RenderActions z nawigacją pushCard, aby wyświetlić kartę. Karta powinna zawierać elementy interfejsu, w tym co najmniej 1 sections[] widżet. Aby zbierać informacje od użytkowników, możesz określić widżety danych wejściowych formularza i widżet przycisku. Więcej informacji o projektowaniu danych wejściowych formularza znajdziesz w artykule Zbieranie i przetwarzanie informacji od użytkowników.

Poniższy przykładowy kod pokazuje, jak aplikacja w Google Chat zwraca odpowiedź, która otwiera okno:

Node.js

node/chat/contact-form-app/index.js
/**
 * Opens the initial step of the dialog that lets users add contact details.
 *
 * @return {Object} open the dialog.
 */
function openInitialDialog() {
  return { action: { navigations: [{ pushCard: { sections: [{ widgets: [
    { textInput: {
      name: "contactName",
      label: "First and last name",
      type: "SINGLE_LINE"
    }},
    { dateTimePicker: {
      name: "contactBirthdate",
      label: "Birthdate",
      type: "DATE_ONLY"
    }},
    { selectionInput: {
      name: "contactType",
      label: "Contact type",
      type: "RADIO_BUTTON",
      items: [
        { text: "Work", value: "Work", selected: false },
        { text: "Personal", value: "Personal", selected: false }
      ]
    }},
    { buttonList: { buttons: [{
      text: "NEXT",
      onClick: { action: {
        function: FUNCTION_URL,
        parameters: [
          { key: "actionName", value: "openConfirmationDialog" }
        ]
      }}
    }]}}
  ]}]}}]}};
}

Zastąp FUNCTION_URL punktem końcowym HTTP, który obsługuje kliknięcia przycisku.

Python

python/chat/contact-form-app/main.py
def open_initial_dialog() -> Mapping[str, Any]:
  """Opens the initial step of the dialog that lets users add contact details.

  Returns:
    Mapping[str, Any]: open the dialog.
  """
  return { 'action': { 'navigations': [{ 'pushCard': { 'sections': [{ 'widgets': [
    { 'textInput': {
      'name': "contactName",
      'label': "First and last name",
      'type': "SINGLE_LINE"
    }},
    { 'dateTimePicker': {
      'name': "contactBirthdate",
      'label': "Birthdate",
      'type': "DATE_ONLY"
    }},
    { 'selectionInput': {
      'name': "contactType",
      'label': "Contact type",
      'type': "RADIO_BUTTON",
      'items': [
        { 'text': "Work", 'value': "Work", 'selected': False },
        { 'text': "Personal", 'value': "Personal", 'selected': False }
      ]
    }},
    { 'buttonList': { 'buttons': [{
      'text': "NEXT",
      'onClick': { 'action': {
        'function': FUNCTION_URL,
        'parameters': [
          { 'key': "actionName", 'value': "openConfirmationDialog" }
        ]
      }}
    }]}}
  ]}]}}]}}

Zastąp FUNCTION_URL punktem końcowym HTTP, który obsługuje kliknięcia przycisku.

Java

java/chat/contact-form-app/src/main/java/com/google/chat/contact/App.java
/**
 * Opens the initial step of the dialog that lets users add contact details.
 *
 * @return {Object} open the dialog.
 */
GenericJson openInitialDialog() {
  GoogleAppsCardV1Card cardV2 = new GoogleAppsCardV1Card()
    .setSections(List.of(new GoogleAppsCardV1Section().setWidgets(List.of(
      new GoogleAppsCardV1Widget().setTextInput(new GoogleAppsCardV1TextInput()
        .setName("contactName")
        .setLabel("First and last name")
        .setType("SINGLE_LINE")),
      new GoogleAppsCardV1Widget().setDateTimePicker(new GoogleAppsCardV1DateTimePicker()
        .setName("contactBirthdate")
        .setLabel("Birthdate")
        .setType("DATE_ONLY")),
      new GoogleAppsCardV1Widget().setSelectionInput(new GoogleAppsCardV1SelectionInput()
        .setName("contactType")
        .setLabel("Contact type")
        .setType("RADIO_BUTTON")
        .setItems(List.of(
          new GoogleAppsCardV1SelectionItem()
            .setText("Work")
            .setValue("Work")
            .setSelected(false),
          new GoogleAppsCardV1SelectionItem()
            .setText("Personal")
            .setValue("Personal")
            .setSelected(false)))),
      new GoogleAppsCardV1Widget().setButtonList(new GoogleAppsCardV1ButtonList().setButtons(List.of(
        new GoogleAppsCardV1Button()
          .setText("NEXT")
          .setOnClick(new GoogleAppsCardV1OnClick().setAction(new GoogleAppsCardV1Action()
            .setFunction(FUNCTION_URL)
            .setParameters(List.of(
              new GoogleAppsCardV1ActionParameter().setKey("actionName").setValue("openConfirmationDialog"))))))))))));
  return new GenericJson() {{
    put("action", new GenericJson() {{
      put("navigations", List.of(new GenericJson() {{
        put("pushCard", cardV2);
      }}));
    }});
  }};
}

Zastąp FUNCTION_URL punktem końcowym HTTP, który obsługuje kliknięcia przycisku.

Google Apps Script

W tym przykładzie wysyłana jest wiadomość z kartą przez zwrócenie kodu JSON karty. Możesz też użyć usługi kart Apps Script.

apps-script/chat/contact-form-app/Code.gs
/**
 * Opens the initial step of the dialog that lets users add contact details.
 *
 * @param {Object} event The event object from the Google Workspace add-on.
 * @return {Object} open the dialog.
 */
function openInitialDialog(event) {
  return { action: { navigations: [{ pushCard: { sections: [{ widgets: [
    { textInput: {
      name: "contactName",
      label: "First and last name",
      type: "SINGLE_LINE"
    }},
    { dateTimePicker: {
      name: "contactBirthdate",
      label: "Birthdate",
      type: "DATE_ONLY"
    }},
    { selectionInput: {
      name: "contactType",
      label: "Contact type",
      type: "RADIO_BUTTON",
      items: [
        { text: "Work", value: "Work", selected: false },
        { text: "Personal", value: "Personal", selected: false }
      ]
    }},
    { buttonList: { buttons: [{
      text: "NEXT",
      onClick: { action: { function : "openConfirmationDialog" }}
    }]}}
  ]}]}}]}};
}

Obsługa przesłania okna

Gdy użytkownicy klikną przycisk, który przesyła okno dialogowe, aplikacja do obsługi czatu otrzyma obiekt zdarzenia z obiektem buttonClickedPayload. W ładunku wartość parametru dialogEventType jest ustawiona na SUBMIT_DIALOG. Aby dowiedzieć się, jak zbierać i przetwarzać informacje w oknie, przeczytaj artykuł Zbieranie i przetwarzanie informacji od użytkowników Google Chat.

Aplikacja do Google Chat musi odpowiedzieć na obiekt zdarzenia, wykonując jedną z tych czynności:

  • Zwróć kolejne okno, aby wypełnić kolejną kartę lub formularz.
  • Zamknij okno po sprawdzeniu danych przesłanych przez użytkownika i opcjonalnie wyślij wiadomość z potwierdzeniem.

Opcjonalnie: zwracanie innego okna

Po przesłaniu początkowego okna dialogowego aplikacje w Google Chat mogą zwracać jedno lub więcej dodatkowych okien dialogowych, aby pomóc użytkownikom sprawdzić informacje przed przesłaniem, wypełnić formularze wieloetapowe lub dynamicznie wypełnić zawartość formularza.

Aby przetwarzać dane wprowadzane przez użytkowników, aplikacja Chat obsługuje je w obiekcie commonEventObject.formInputs zdarzenia. Więcej informacji o pobieraniu wartości z widżetów wejściowych znajdziesz w artykule Zbieranie i przetwarzanie informacji od użytkowników.

Aby śledzić dane wprowadzane przez użytkowników w początkowym oknie, musisz dodać parametry do przycisku, który otwiera następne okno. Więcej informacji znajdziesz w artykule Przenoszenie danych na inną kartę.

W tym przykładzie aplikacja do obsługi czatu otwiera początkowe okno, które prowadzi do drugiego okna z prośbą o potwierdzenie przed przesłaniem:

Node.js

node/chat/contact-form-app/index.js
/**
 * Responds to a message in Google Chat.
 *
 * @return {Object} response that handles dialogs.
 */
function handleMessage() {
  return { hostAppDataAction: { chatDataAction: { createMessageAction: { message: {
    text: "To add a contact, use the `ADD CONTACT` button below.",
    accessoryWidgets: [
      { buttonList: { buttons: [{
        text: "ADD CONTACT",
        onClick: { action: {
          function: FUNCTION_URL,
          interaction: "OPEN_DIALOG",
          parameters: [
            { key: "actionName", value: "openInitialDialog" }
          ]
        }}
      }]}}
    ]
  }}}}};
}

/**
 * Responds to a button clicked in Google Chat.
 *
 * @param {Object} event The event object from the Google Workspace add-on.
 * @return {Object} response depending on the button clicked.
 */
function handleButtonClicked(event) {
  // Initial dialog form page
  if (event.commonEventObject.parameters.actionName === "openInitialDialog") {
    return openInitialDialog();
  // Confirmation dialog form page
  } else if (event.commonEventObject.parameters.actionName === "openConfirmationDialog") {
    return openConfirmationDialog(event);
  // Submission dialog form page
  } else if (event.commonEventObject.parameters.actionName === "submitDialog") {
    return submitDialog(event);
  }
}

/**
 * Opens the initial step of the dialog that lets users add contact details.
 *
 * @return {Object} open the dialog.
 */
function openInitialDialog() {
  return { action: { navigations: [{ pushCard: { sections: [{ widgets: [
    { textInput: {
      name: "contactName",
      label: "First and last name",
      type: "SINGLE_LINE"
    }},
    { dateTimePicker: {
      name: "contactBirthdate",
      label: "Birthdate",
      type: "DATE_ONLY"
    }},
    { selectionInput: {
      name: "contactType",
      label: "Contact type",
      type: "RADIO_BUTTON",
      items: [
        { text: "Work", value: "Work", selected: false },
        { text: "Personal", value: "Personal", selected: false }
      ]
    }},
    { buttonList: { buttons: [{
      text: "NEXT",
      onClick: { action: {
        function: FUNCTION_URL,
        parameters: [
          { key: "actionName", value: "openConfirmationDialog" }
        ]
      }}
    }]}}
  ]}]}}]}};
}

/**
 * Opens the second step of the dialog that lets users confirm details.
 *
 * @param {Object} event The event object from the Google Workspace add-on.
 * @return {Object} update the dialog.
 */
function openConfirmationDialog(event) {
  // Retrieve the form input values
  const name = event.commonEventObject.formInputs["contactName"].stringInputs.value[0];
  const birthdate = event.commonEventObject.formInputs["contactBirthdate"].dateInput.msSinceEpoch;
  const type = event.commonEventObject.formInputs["contactType"].stringInputs.value[0];
  // Display the input values for confirmation
  return { action: { navigations: [{ pushCard: { sections: [{ widgets: [
    { textParagraph: { text: "Confirm contact information and submit:" }},
    { textParagraph: { text: "<b>Name:</b> " + name }},
    { textParagraph: { text: "<b>Birthday:</b> " + new Date(birthdate) }},
    { textParagraph: { text: "<b>Type:</b> " + type }},
    { buttonList: { buttons: [{
      text: "SUBMIT",
      onClick: { action: {
        function: FUNCTION_URL,
        parameters: [
          { key: "actionName", value: "submitDialog" },
          // Pass input values as parameters for last dialog step (submission)
          { key: "contactName", value: name },
          { key: "contactBirthdate", value: birthdate },
          { key: "contactType", value: type }
        ]
      }}
    }]}}
  ]}]}}]}};
}

Zastąp FUNCTION_URL punktem końcowym HTTP, który obsługuje kliknięcia przycisku.

Python

python/chat/contact-form-app/main.py
def handle_message() -> Mapping[str, Any]:
  """Responds to a message in Google Chat.

  Returns:
    Mapping[str, Any]: the response that handles dialogs.
  """
  return { 'hostAppDataAction': { 'chatDataAction': { 'createMessageAction': { 'message': {
    'text': "To add a contact, use the `ADD CONTACT` button below.",
    'accessoryWidgets': [
      { 'buttonList': { 'buttons': [{
        'text': "ADD CONTACT",
        'onClick': { 'action': {
          'function': FUNCTION_URL,
          'interaction': "OPEN_DIALOG",
          'parameters': [
            { 'key': "actionName", 'value': "openInitialDialog" }
          ]
        }}
      }]}}
    ]
  }}}}}


def handle_button_clicked(event: Mapping[str, Any]) -> Mapping[str, Any]:
  """Responds to a button clicked in Google Chat.

  Args:
    Mapping[str, Any] event: the event object from the Google Workspace add-on

  Returns:
    Mapping[str, Any]: the response depending on the button clicked.
  """
  # Initial dialog form page
  if "openInitialDialog" == event['commonEventObject']['parameters']['actionName']:
    return open_initial_dialog()
  # Confirmation dialog form page
  elif "openConfirmationDialog" == event['commonEventObject']['parameters']['actionName'] :
    return open_confirmation_dialog(event)
  # Submission dialog form page
  elif "submitDialog" == event['commonEventObject']['parameters']['actionName']:
    return submit_dialog(event)


def open_initial_dialog() -> Mapping[str, Any]:
  """Opens the initial step of the dialog that lets users add contact details.

  Returns:
    Mapping[str, Any]: open the dialog.
  """
  return { 'action': { 'navigations': [{ 'pushCard': { 'sections': [{ 'widgets': [
    { 'textInput': {
      'name': "contactName",
      'label': "First and last name",
      'type': "SINGLE_LINE"
    }},
    { 'dateTimePicker': {
      'name': "contactBirthdate",
      'label': "Birthdate",
      'type': "DATE_ONLY"
    }},
    { 'selectionInput': {
      'name': "contactType",
      'label': "Contact type",
      'type': "RADIO_BUTTON",
      'items': [
        { 'text': "Work", 'value': "Work", 'selected': False },
        { 'text': "Personal", 'value': "Personal", 'selected': False }
      ]
    }},
    { 'buttonList': { 'buttons': [{
      'text': "NEXT",
      'onClick': { 'action': {
        'function': FUNCTION_URL,
        'parameters': [
          { 'key': "actionName", 'value': "openConfirmationDialog" }
        ]
      }}
    }]}}
  ]}]}}]}}


def open_confirmation_dialog(event: Mapping[str, Any]) -> Mapping[str, Any]:
  """Opens the second step of the dialog that lets users confirm details.

  Args:
    Mapping[str, Any] event: the event object from the Google Workspace add-on

  Returns:
    Mapping[str, Any]: update the dialog.
  """
  name = event.get('commonEventObject').get('formInputs')["contactName"].get('stringInputs').get('value')[0]
  birthdateEpoch = event.get('commonEventObject').get('formInputs')["contactBirthdate"].get('dateInput').get('msSinceEpoch')
  birthdate = datetime.fromtimestamp(int(birthdateEpoch) / 1000.0).strftime("%Y-%m-%d")
  type = event.get('commonEventObject').get('formInputs')["contactType"].get('stringInputs').get('value')[0]
  # Display the input values for confirmation
  return { 'action': { 'navigations': [{ 'pushCard': { 'sections': [{ 'widgets': [
    { 'textParagraph': { 'text': "Confirm contact information and submit:" }},
    { 'textParagraph': { 'text': "<b>Name:</b> " + name }},
    { 'textParagraph': { 'text': "<b>Birthday:</b> " + birthdate }},
    { 'textParagraph': { 'text': "<b>Type:</b> " + type }},
    { 'buttonList': { 'buttons': [{
      'text': "SUBMIT",
      'onClick': { 'action': {
        'function': FUNCTION_URL,
        'parameters': [
          { 'key': "actionName", 'value': "submitDialog" },
          # Pass input values as parameters for last dialog step (submission)
          { 'key': "contactName", 'value': name },
          { 'key': "contactBirthdate", 'value': birthdate },
          { 'key': "contactType", 'value': type }
        ]
      }}
    }]}}
  ]}]}}]}}

Zastąp FUNCTION_URL punktem końcowym HTTP, który obsługuje kliknięcia przycisku.

Java

java/chat/contact-form-app/src/main/java/com/google/chat/contact/App.java
/**
 * Responds to a message in Google Chat.
 *
 * @return response that handles dialogs.
 */
GenericJson handleMessage() {
  Message message = new Message()
    .setText("To add a contact, use the `ADD CONTACT` button below.")
    .setAccessoryWidgets(List.of(new AccessoryWidget()
      .setButtonList(new GoogleAppsCardV1ButtonList().setButtons(List.of(new GoogleAppsCardV1Button()
        .setText("ADD CONTACT")
        .setOnClick(new GoogleAppsCardV1OnClick().setAction(new GoogleAppsCardV1Action()
          .setFunction(FUNCTION_URL)
          .setInteraction("OPEN_DIALOG")
          .setParameters(List.of(
            new GoogleAppsCardV1ActionParameter().setKey("actionName").setValue("openInitialDialog"))))))))));
  return new GenericJson() {{
    put("hostAppDataAction", new GenericJson() {{
      put("chatDataAction", new GenericJson() {{
        put("createMessageAction", new GenericJson() {{
          put("message", message);
        }});
      }});
    }});
  }};
}

/**
 * Responds to a button clicked in Google Chat.
 *
 * @param event The event object from the Google Workspace add-on.
 * @return response depending on the button clicked.
 */
GenericJson handleButtonClicked(JsonNode event) {
  String actionName = event.at("/commonEventObject/parameters/actionName").asText();
  // Initial dialog form page
  if ("openInitialDialog".equals(actionName)) {
    return openInitialDialog();
  // Confirmation dialog form page
  } else if ("openConfirmationDialog".equals(actionName)) {
    return openConfirmationDialog(event);
  // Submission dialog form page
  } else if ("submitDialog".equals(actionName)) {
    return submitDialog(event);
  }
  return null; 
}

/**
 * Opens the initial step of the dialog that lets users add contact details.
 *
 * @return {Object} open the dialog.
 */
GenericJson openInitialDialog() {
  GoogleAppsCardV1Card cardV2 = new GoogleAppsCardV1Card()
    .setSections(List.of(new GoogleAppsCardV1Section().setWidgets(List.of(
      new GoogleAppsCardV1Widget().setTextInput(new GoogleAppsCardV1TextInput()
        .setName("contactName")
        .setLabel("First and last name")
        .setType("SINGLE_LINE")),
      new GoogleAppsCardV1Widget().setDateTimePicker(new GoogleAppsCardV1DateTimePicker()
        .setName("contactBirthdate")
        .setLabel("Birthdate")
        .setType("DATE_ONLY")),
      new GoogleAppsCardV1Widget().setSelectionInput(new GoogleAppsCardV1SelectionInput()
        .setName("contactType")
        .setLabel("Contact type")
        .setType("RADIO_BUTTON")
        .setItems(List.of(
          new GoogleAppsCardV1SelectionItem()
            .setText("Work")
            .setValue("Work")
            .setSelected(false),
          new GoogleAppsCardV1SelectionItem()
            .setText("Personal")
            .setValue("Personal")
            .setSelected(false)))),
      new GoogleAppsCardV1Widget().setButtonList(new GoogleAppsCardV1ButtonList().setButtons(List.of(
        new GoogleAppsCardV1Button()
          .setText("NEXT")
          .setOnClick(new GoogleAppsCardV1OnClick().setAction(new GoogleAppsCardV1Action()
            .setFunction(FUNCTION_URL)
            .setParameters(List.of(
              new GoogleAppsCardV1ActionParameter().setKey("actionName").setValue("openConfirmationDialog"))))))))))));
  return new GenericJson() {{
    put("action", new GenericJson() {{
      put("navigations", List.of(new GenericJson() {{
        put("pushCard", cardV2);
      }}));
    }});
  }};
}

/**
 * Opens the second step of the dialog that lets users confirm details.
 *
 * @param event The event object from the Google Workspace add-on.
 * @return update the dialog.
 */
GenericJson openConfirmationDialog(JsonNode event) {
  // Retrieve the form input values
  String name = event.at("/commonEventObject/formInputs/contactName/stringInputs/value").get(0).asText();
  String birthdateEpoch = event.at("/commonEventObject/formInputs/contactBirthdate/dateInput/msSinceEpoch").asText();
  String birthdate = new SimpleDateFormat("MM/dd/yyyy").format(new Date((long)Double.parseDouble(birthdateEpoch)));
  String type = event.at("/commonEventObject/formInputs/contactType/stringInputs/value").get(0).asText();
  // Display the input values for confirmation
  GoogleAppsCardV1Card cardV2 = new GoogleAppsCardV1Card()
    .setSections(List.of(new GoogleAppsCardV1Section().setWidgets(List.of(
      new GoogleAppsCardV1Widget().setTextParagraph(new GoogleAppsCardV1TextParagraph()
        .setText("Confirm contact information and submit:")),
      new GoogleAppsCardV1Widget().setTextParagraph(new GoogleAppsCardV1TextParagraph()
        .setText("<b>Name:</b> " + name)),
      new GoogleAppsCardV1Widget().setTextParagraph(new GoogleAppsCardV1TextParagraph()
        .setText("<b>Birthday:</b> " + birthdate)),
      new GoogleAppsCardV1Widget().setTextParagraph(new GoogleAppsCardV1TextParagraph()
        .setText("<b>Type:</b> " + type)),
      new GoogleAppsCardV1Widget().setButtonList(new GoogleAppsCardV1ButtonList().setButtons(List.of(
        new GoogleAppsCardV1Button()
          .setText("SUBMIT")
          .setOnClick(new GoogleAppsCardV1OnClick().setAction(new GoogleAppsCardV1Action()
            .setFunction(FUNCTION_URL)
            .setParameters(List.of(
              new GoogleAppsCardV1ActionParameter().setKey("actionName").setValue("submitDialog"),
              // Pass input values as parameters for last dialog step (submission)
              new GoogleAppsCardV1ActionParameter().setKey("contactName").setValue(name),
              new GoogleAppsCardV1ActionParameter().setKey("contactBirthdate").setValue(birthdate),
              new GoogleAppsCardV1ActionParameter().setKey("contactType").setValue(type))))))))))));
  return new GenericJson() {{
    put("action", new GenericJson() {{
      put("navigations", List.of(new GenericJson() {{
        put("pushCard", cardV2);
      }}));
    }});
  }};
}

Zastąp FUNCTION_URL punktem końcowym HTTP, który obsługuje kliknięcia przycisku.

Google Apps Script

W tym przykładzie wysyłana jest wiadomość z kartą przez zwrócenie kodu JSON karty. Możesz też użyć usługi kart Apps Script.

apps-script/chat/contact-form-app/Code.gs
/**
 * Responds to a message in Google Chat.
 *
 * @param {Object} event The event object from the Google Workspace add-on.
 * @return {Object} response that handles dialogs.
 */
function onMessage(event) {
  // Reply with a message that contains a button to open the initial dialog
  return { hostAppDataAction: { chatDataAction: { createMessageAction: { message: {
    text: "To add a contact, use the `ADD CONTACT` button below.",
    accessoryWidgets: [
      { buttonList: { buttons: [{
        text: "ADD CONTACT",
        onClick: { action: {
          function: "openInitialDialog",
          interaction: "OPEN_DIALOG"
        }}
      }]}}
    ]
  }}}}};
}

/**
 * Opens the initial step of the dialog that lets users add contact details.
 *
 * @param {Object} event The event object from the Google Workspace add-on.
 * @return {Object} open the dialog.
 */
function openInitialDialog(event) {
  return { action: { navigations: [{ pushCard: { sections: [{ widgets: [
    { textInput: {
      name: "contactName",
      label: "First and last name",
      type: "SINGLE_LINE"
    }},
    { dateTimePicker: {
      name: "contactBirthdate",
      label: "Birthdate",
      type: "DATE_ONLY"
    }},
    { selectionInput: {
      name: "contactType",
      label: "Contact type",
      type: "RADIO_BUTTON",
      items: [
        { text: "Work", value: "Work", selected: false },
        { text: "Personal", value: "Personal", selected: false }
      ]
    }},
    { buttonList: { buttons: [{
      text: "NEXT",
      onClick: { action: { function : "openConfirmationDialog" }}
    }]}}
  ]}]}}]}};
}

/**
 * Opens the second step of the dialog that lets users confirm details.
 *
 * @param {Object} event The event object from the Google Workspace add-on.
 * @return {Object} update the dialog.
 */
function openConfirmationDialog(event) {
  // Retrieve the form input values
  const name = event.commonEventObject.formInputs["contactName"].stringInputs.value[0];
  const birthdate = event.commonEventObject.formInputs["contactBirthdate"].dateInput.msSinceEpoch;
  const type = event.commonEventObject.formInputs["contactType"].stringInputs.value[0];
  // Display the input values for confirmation
  return { action: { navigations: [{ pushCard: { sections: [{ widgets: [
    { textParagraph: { text: "Confirm contact information and submit:" }},
    { textParagraph: { text: "<b>Name:</b> " + name }},
    { textParagraph: { text: "<b>Birthday:</b> " + new Date(birthdate) }},
    { textParagraph: { text: "<b>Type:</b> " + type }},
    { buttonList: { buttons: [{
      text: "SUBMIT",
      onClick: { action: {
        function: "submitDialog",
        // Pass input values as parameters for last dialog step (submission)
        parameters: [
          { key: "contactName", value: name },
          { key: "contactBirthdate", value: birthdate },
          { key: "contactType", value: type }
        ]
      }}
    }]}}
  ]}]}}]}};
}

Zamknij okno

Gdy użytkownicy klikną przycisk przesyłania w oknie dialogowym, aplikacja do obsługi czatu wykona powiązane z nim działanie i prześle obiekt zdarzenia z parametrem buttonClickedPayload ustawionym na:

  • isDialogEvent to true.
  • dialogEventType to SUBMIT_DIALOG.

Aplikacja Google Chat powinna zwrócić obiekt RenderActions z wartością endNavigation ustawioną na CLOSE_DIALOG (endNavigation: "CLOSE_DIALOG").

Opcjonalnie: wyświetlanie tymczasowego powiadomienia

Po zamknięciu okna możesz też wyświetlić użytkownikowi, który korzysta z aplikacji, tymczasowe powiadomienie tekstowe.

Aby wyświetlić powiadomienie, zwróć obiekt RenderActions z ustawionym polem notification.

Ten przykład zamyka okno z powiadomieniem tekstowym:

Node.js

node/chat/contact-form-app/index.js
// Validate the parameters.
if (!event.commonEventObject.parameters["contactName"]) {
  return { action: {
    navigations: [{ endNavigation: { action: "CLOSE_DIALOG"}}],
    notification: { text: "Failure, the contact name was missing!" }
  }};
}

Python

python/chat/contact-form-app/main.py
# Validate the parameters.
if event.get('commonEventObject').get('parameters')["contactName"] == "":
  return { 'action': {
    'navigations': [{ 'endNavigation': { 'action': "CLOSE_DIALOG"}}],
    'notification': { 'text': "Failure, the contact name was missing!" }
  }}

Java

java/chat/contact-form-app/src/main/java/com/google/chat/contact/App.java
    // Validate the parameters.
    if (event.at("/commonEventObject/parameters/contactName").asText().isEmpty()) {
      return new GenericJson() {{
        put("action", new GenericJson() {{
          put("navigations", List.of(new GenericJson() {{
            put("endNavigation", new GenericJson() {{
              put("action", "CLOSE_DIALOG");
            }});
          }}));
          put("notification", new GenericJson() {{
            put("text", "Failure, the contact name was missing!");
          }});
        }});
      }};
    }

    return new GenericJson() {{
      put("hostAppDataAction", new GenericJson() {{
        put("chatDataAction", new GenericJson() {{
          put("createMessageAction", new GenericJson() {{
            put("message", new Message()
              .setText( "✅ " + event.at("/commonEventObject/parameters/contactName").asText() +
                        " has been added to your contacts."));
          }});
        }});
      }});
    }};
  }
}

Google Apps Script

W tym przykładzie wysyłana jest wiadomość z kartą przez zwrócenie kodu JSON karty. Możesz też użyć usługi kart Apps Script.

apps-script/chat/contact-form-app/Code.gs
// Validate the parameters.
if (!event.commonEventObject.parameters["contactName"]) {
  return { action: {
    navigations: [{ endNavigation: { action: "CLOSE_DIALOG"}}],
    notification: { text: "Failure, the contact name was missing!" }
  }};
}

Szczegółowe informacje o przekazywaniu parametrów między oknami znajdziesz w artykule Przekazywanie danych na inną kartę.

Opcjonalnie: wysyłanie wiadomości na czacie z potwierdzeniem

Po zamknięciu okna możesz też wysłać nową wiadomość na czacie lub zaktualizować istniejącą.

Aby wysłać nową wiadomość, zwróć obiekt DataActions z polem CreateMessageAction ustawionym na nową wiadomość. W tym przykładzie okno zamyka się przez wysłanie nowej wiadomości:

Node.js

node/chat/contact-form-app/index.js
return { hostAppDataAction: { chatDataAction: { createMessageAction: { message: {
  text: "✅ " + event.commonEventObject.parameters["contactName"] + " has been added to your contacts."
}}}}};

Python

python/chat/contact-form-app/main.py
return { 'hostAppDataAction': { 'chatDataAction': { 'createMessageAction': { 'message': {
  'text': "✅ " + event.get('commonEventObject').get('parameters')["contactName"] + " has been added to your contacts."
}}}}}

Java

java/chat/contact-form-app/src/main/java/com/google/chat/contact/App.java
return new GenericJson() {{
  put("hostAppDataAction", new GenericJson() {{
    put("chatDataAction", new GenericJson() {{
      put("createMessageAction", new GenericJson() {{
        put("message", new Message()
          .setText( "✅ " + event.at("/commonEventObject/parameters/contactName").asText() +
                    " has been added to your contacts."));
      }});
    }});
  }});
}};

Google Apps Script

W tym przykładzie wysyłana jest wiadomość z kartą przez zwrócenie kodu JSON karty. Możesz też użyć usługi kart Apps Script.

apps-script/chat/contact-form-app/Code.gs
return { hostAppDataAction: { chatDataAction: { createMessageAction: { message: {
  text: "✅ " + event.commonEventObject.parameters["contactName"] + " has been added to your contacts."
}}}}};

Aby zaktualizować wiadomość po przesłaniu przez użytkownika okna, zwróć obiekt DataActions zawierający jedno z tych działań:

Rozwiązywanie problemów

Gdy aplikacja Google Chat lub karta zwróci błąd, w interfejsie Google Chat pojawi się komunikat „Coś poszło nie tak”. lub „Nie udało się przetworzyć żądania”. Czasami interfejs Google Chat nie wyświetla żadnego komunikatu o błędzie, ale aplikacja lub karta Google Chat zwraca nieoczekiwany wynik, np. może nie pojawić się wiadomość na karcie.

Chociaż w interfejsie czatu może nie wyświetlać się komunikat o błędzie, opisowe komunikaty o błędach i dane logowania są dostępne, aby pomóc w naprawieniu błędów, gdy rejestrowanie błędów w aplikacjach na czat jest włączone. Pomoc dotyczącą wyświetlania, debugowania i naprawiania błędów znajdziesz w artykule Rozwiązywanie problemów z Google Chat.

Aplikacje do obsługi czatu, które nie są dodatkami: otwieranie interaktywnych okien

Poniższa dokumentacja dotyczy aplikacji do Google Chat, które nie są dodatkami do Google Workspace. Aby przeprowadzić migrację aplikacji do czatu, która nie jest dodatkiem, przeczytaj artykuł Przekształcanie aplikacji do Google Chat w dodatek do Google Workspace.

Wywoływanie prośby o okno

Poniższy przykładowy kod pokazuje, jak aplikacja Google Chat, która nie jest dodatkiem, wywołuje żądanie okna z przycisku w wiadomości z kartą. Aby otworzyć okno, w polu button.interaction ustaw wartość OPEN_DIALOG:

Node.js

node/contact-form-app/index.js
buttonList: { buttons: [{
  text: "Add Contact",
  onClick: { action: {
    function: "openInitialDialog",
    interaction: "OPEN_DIALOG"
  }}
}]}

Python

python/contact-form-app/main.py
'buttonList': { 'buttons': [{
  'text': "Add Contact",
  'onClick': { 'action': {
    'function': "openInitialDialog",
    'interaction': "OPEN_DIALOG"
  }}
}]}

Java

java/contact-form-app/src/main/java/com/google/chat/contact/App.java
.setButtonList(new GoogleAppsCardV1ButtonList().setButtons(List.of(new GoogleAppsCardV1Button()
  .setText("Add Contact")
  .setOnClick(new GoogleAppsCardV1OnClick().setAction(new GoogleAppsCardV1Action()
    .setFunction("openInitialDialog")
    .setInteraction("OPEN_DIALOG"))))))));

Google Apps Script

W tym przykładzie wysyłana jest wiadomość z kartą przez zwrócenie kodu JSON karty. Możesz też użyć usługi kart Apps Script.

apps-script/contact-form-app/main.gs
buttonList: { buttons: [{
  text: "Add Contact",
  onClick: { action: {
    function: "openInitialDialog",
    interaction: "OPEN_DIALOG"
  }}
}]}

Otwórz okno początkowe

Gdy użytkownik wywoła żądanie okna, aplikacja do obsługi czatu, która nie jest dodatkiem, otrzyma zdarzenie interakcji reprezentowane jako typ event w interfejsie Chat API. Jeśli interakcja wywołuje prośbę o wyświetlenie okna dialogowego, pole dialogEventType zdarzenia ma wartość REQUEST_DIALOG.

Aby otworzyć okno, aplikacja do obsługi czatu, która nie jest dodatkiem, może odpowiedzieć na żądanie, zwracając obiekt actionResponse z obiektami type: "DIALOG" i Message. Aby określić zawartość okna, musisz uwzględnić te obiekty:

  • Obiekt actionResponse, którego właściwość type ma wartość DIALOG.
  • Obiekt dialogAction. Pole body zawiera elementy interfejsu, które mają być wyświetlane na karcie, w tym co najmniej 1 sections widżetów. Aby zbierać informacje od użytkowników, możesz określić widżety danych wejściowych formularza i widżet przycisku.

Poniższy przykładowy kod pokazuje, jak aplikacja do obsługi czatu, która nie jest dodatkiem, zwraca odpowiedź otwierającą okno:

Node.js

node/contact-form-app/index.js
/**
 * Opens the initial step of the dialog that lets users add contact details.
 *
 * @return {Object} a message with an action response to open a dialog.
 */
function openInitialDialog() {
  return { actionResponse: {
    type: "DIALOG",
    dialogAction: { dialog: { body: { sections: [{
      header: "Add new contact",
      widgets: CONTACT_FORM_WIDGETS.concat([{
        buttonList: { buttons: [{
          text: "Review and submit",
          onClick: { action: { function: "openConfirmation" }}
        }]}
      }])
    }]}}}
  }};
}

Python

python/contact-form-app/main.py
def open_initial_dialog() -> dict:
  """Opens the initial step of the dialog that lets users add contact details."""
  return { 'actionResponse': {
    'type': "DIALOG",
    'dialogAction': { 'dialog': { 'body': { 'sections': [{
      'header': "Add new contact",
      'widgets': CONTACT_FORM_WIDGETS + [{
        'buttonList': { 'buttons': [{
          'text': "Review and submit",
          'onClick': { 'action': { 'function': "openConfirmation" }}
        }]}
      }]
    }]}}}
  }}

Java

java/contact-form-app/src/main/java/com/google/chat/contact/App.java
// Opens the initial step of the dialog that lets users add contact details.
Message openInitialDialog() {
  return new Message().setActionResponse(new ActionResponse()
    .setType("DIALOG")
    .setDialogAction(new DialogAction().setDialog(new Dialog().setBody(new GoogleAppsCardV1Card()
      .setSections(List.of(new GoogleAppsCardV1Section()
        .setHeader("Add new contact")
        .setWidgets(Stream.concat(
          CONTACT_FORM_WIDGETS.stream(),
          List.of(new GoogleAppsCardV1Widget()
            .setButtonList(new GoogleAppsCardV1ButtonList().setButtons(List.of(new GoogleAppsCardV1Button()
            .setText("Review and submit")
            .setOnClick(new GoogleAppsCardV1OnClick().setAction(new GoogleAppsCardV1Action()
              .setFunction("openConfirmation"))))))).stream()).collect(Collectors.toList()))))))));
}

Google Apps Script

W tym przykładzie wysyłana jest wiadomość z kartą przez zwrócenie kodu JSON karty. Możesz też użyć usługi kart Apps Script.

apps-script/contact-form-app/main.gs
/**
 * Opens the initial step of the dialog that lets users add contact details.
 *
 * @return {Object} a message with an action response to open a dialog.
 */
function openInitialDialog() {
  return { actionResponse: {
    type: "DIALOG",
    dialogAction: { dialog: { body: { sections: [{
      header: "Add new contact",
      widgets: CONTACT_FORM_WIDGETS.concat([{
        buttonList: { buttons: [{
          text: "Review and submit",
          onClick: { action: { function: "openConfirmation" }}
        }]}
      }])
    }]}}}
  }};
}

Obsługa przesłania okna

Gdy użytkownik kliknie przycisk, który przesyła okno dialogowe, aplikacja do obsługi czatu, która nie jest dodatkiem, otrzyma zdarzenie interakcji CARD_CLICKED, w którym dialogEventType ma wartość SUBMIT_DIALOG.

Opcjonalnie: zwracanie innego okna

Aby przetwarzać dane wprowadzane przez użytkowników w aplikacji do obsługi czatu, która nie jest dodatkiem, aplikacja do obsługi czatu używa obiektu event.common.formInputs.

W tym przykładzie aplikacja do obsługi czatu, która nie jest dodatkiem, otwiera początkowe okno, które prowadzi do drugiego okna z prośbą o potwierdzenie przed przesłaniem:

Node.js

node/contact-form-app/index.js
/**
 * Responds to CARD_CLICKED interaction events in Google Chat.
 *
 * @param {Object} event the CARD_CLICKED interaction event from Google Chat.
 * @return {Object} message responses specific to the dialog handling.
 */
function onCardClick(event) {
  // Initial dialog form page
  if (event.common.invokedFunction === "openInitialDialog") {
    return openInitialDialog();
  // Confirmation dialog form page
  } else if (event.common.invokedFunction === "openConfirmation") {
    return openConfirmation(event);
  // Submission dialog form page
  } else if (event.common.invokedFunction === "submitForm") {
    return submitForm(event);
  }
}

/**
 * Opens the initial step of the dialog that lets users add contact details.
 *
 * @return {Object} a message with an action response to open a dialog.
 */
function openInitialDialog() {
  return { actionResponse: {
    type: "DIALOG",
    dialogAction: { dialog: { body: { sections: [{
      header: "Add new contact",
      widgets: CONTACT_FORM_WIDGETS.concat([{
        buttonList: { buttons: [{
          text: "Review and submit",
          onClick: { action: { function: "openConfirmation" }}
        }]}
      }])
    }]}}}
  }};
}

/**
 * Returns the second step as a dialog or card message that lets users confirm details.
 *
 * @param {Object} event the interactive event with form inputs.
 * @return {Object} returns a dialog or private card message.
 */
function openConfirmation(event) {
  const name = fetchFormValue(event, "contactName") ?? "";
  const birthdate = fetchFormValue(event, "contactBirthdate") ?? "";
  const type = fetchFormValue(event, "contactType") ?? "";
  const cardConfirmation = {
    header: "Your contact",
    widgets: [{
      textParagraph: { text: "Confirm contact information and submit:" }}, {
      textParagraph: { text: "<b>Name:</b> " + name }}, {
      textParagraph: {
        text: "<b>Birthday:</b> " + convertMillisToDateString(birthdate)
      }}, {
      textParagraph: { text: "<b>Type:</b> " + type }}, {
      buttonList: { buttons: [{
        text: "Submit",
        onClick: { action: {
          function: "submitForm",
          parameters: [{
            key: "contactName", value: name }, {
            key: "contactBirthdate", value: birthdate }, {
            key: "contactType", value: type
          }]
        }}
      }]}
    }]
  };

  // Returns a dialog with contact information that the user input.
  if (event.isDialogEvent) {
    return { action_response: {
      type: "DIALOG",
      dialogAction: { dialog: { body: { sections: [ cardConfirmation ]}}}
    }};
  }

  // Updates existing card message with contact information that the user input.
  return {
    actionResponse: { type: "UPDATE_MESSAGE" },
    privateMessageViewer: event.user,
    cardsV2: [{
      card: { sections: [cardConfirmation]}
    }]
  }
}

Python

python/contact-form-app/main.py
def on_card_click(event: dict) -> dict:
  """Responds to CARD_CLICKED interaction events in Google Chat."""
  # Initial dialog form page
  if "openInitialDialog" == event.get('common').get('invokedFunction'):
    return open_initial_dialog()
  # Confirmation dialog form page
  elif "openConfirmation" == event.get('common').get('invokedFunction'):
    return open_confirmation(event)
  # Submission dialog form page
  elif "submitForm" == event.get('common').get('invokedFunction'):
    return submit_form(event)


def open_initial_dialog() -> dict:
  """Opens the initial step of the dialog that lets users add contact details."""
  return { 'actionResponse': {
    'type': "DIALOG",
    'dialogAction': { 'dialog': { 'body': { 'sections': [{
      'header': "Add new contact",
      'widgets': CONTACT_FORM_WIDGETS + [{
        'buttonList': { 'buttons': [{
          'text': "Review and submit",
          'onClick': { 'action': { 'function': "openConfirmation" }}
        }]}
      }]
    }]}}}
  }}


def open_confirmation(event: dict) -> dict:
  """Returns the second step as a dialog or card message that lets users confirm details."""
  name = fetch_form_value(event, "contactName") or ""
  birthdate = fetch_form_value(event, "contactBirthdate") or ""
  type = fetch_form_value(event, "contactType") or ""
  card_confirmation = {
    'header': "Your contact",
    'widgets': [{
      'textParagraph': { 'text': "Confirm contact information and submit:" }}, {
      'textParagraph': { 'text': "<b>Name:</b> " + name }}, {
      'textParagraph': {
        'text': "<b>Birthday:</b> " + convert_millis_to_date_string(birthdate)
      }}, {
      'textParagraph': { 'text': "<b>Type:</b> " + type }}, {
      'buttonList': { 'buttons': [{
        'text': "Submit",
        'onClick': { 'action': {
          'function': "submitForm",
          'parameters': [{
            'key': "contactName", 'value': name }, {
            'key': "contactBirthdate", 'value': birthdate }, {
            'key': "contactType", 'value': type
          }]
        }}
      }]}
    }]
  }

  # Returns a dialog with contact information that the user input.
  if event.get('isDialogEvent'): 
    return { 'action_response': {
      'type': "DIALOG",
      'dialogAction': { 'dialog': { 'body': { 'sections': [card_confirmation] }}}
    }}

  # Updates existing card message with contact information that the user input.
  return {
    'actionResponse': { 'type': "UPDATE_MESSAGE" },
    'privateMessageViewer': event.get('user'),
    'cardsV2': [{
      'card': { 'sections': [card_confirmation] }
    }]
  }

Java

java/contact-form-app/src/main/java/com/google/chat/contact/App.java
// Responds to CARD_CLICKED interaction events in Google Chat.
Message onCardClick(JsonNode event) {
  String invokedFunction = event.at("/common/invokedFunction").asText();
  // Initial dialog form page
  if ("openInitialDialog".equals(invokedFunction)) {
    return openInitialDialog();
  // Confirmation dialog form page
  } else if ("openConfirmation".equals(invokedFunction)) {
    return openConfirmation(event);
  // Submission dialog form page
  } else if ("submitForm".equals(invokedFunction)) {
    return submitForm(event);
  }
  return null; 
}

// Opens the initial step of the dialog that lets users add contact details.
Message openInitialDialog() {
  return new Message().setActionResponse(new ActionResponse()
    .setType("DIALOG")
    .setDialogAction(new DialogAction().setDialog(new Dialog().setBody(new GoogleAppsCardV1Card()
      .setSections(List.of(new GoogleAppsCardV1Section()
        .setHeader("Add new contact")
        .setWidgets(Stream.concat(
          CONTACT_FORM_WIDGETS.stream(),
          List.of(new GoogleAppsCardV1Widget()
            .setButtonList(new GoogleAppsCardV1ButtonList().setButtons(List.of(new GoogleAppsCardV1Button()
            .setText("Review and submit")
            .setOnClick(new GoogleAppsCardV1OnClick().setAction(new GoogleAppsCardV1Action()
              .setFunction("openConfirmation"))))))).stream()).collect(Collectors.toList()))))))));
}

// Returns the second step as a dialog or card message that lets users confirm details.
Message openConfirmation(JsonNode event) {
  String name = fetchFormValue(event, "contactName") != null ?
    fetchFormValue(event, "contactName") : "";
  String birthdate = fetchFormValue(event, "contactBirthdate") != null ?
    fetchFormValue(event, "contactBirthdate") : "";
  String type = fetchFormValue(event, "contactType") != null ?
    fetchFormValue(event, "contactType") : "";
  GoogleAppsCardV1Section cardConfirmationSection = new GoogleAppsCardV1Section()
    .setHeader("Your contact")
    .setWidgets(List.of(
      new GoogleAppsCardV1Widget().setTextParagraph(new GoogleAppsCardV1TextParagraph()
        .setText("Confirm contact information and submit:")),
      new GoogleAppsCardV1Widget().setTextParagraph(new GoogleAppsCardV1TextParagraph()
        .setText("<b>Name:</b> " + name)),
      new GoogleAppsCardV1Widget().setTextParagraph(new GoogleAppsCardV1TextParagraph()
        .setText("<b>Birthday:</b> " + convertMillisToDateString(birthdate))),
      new GoogleAppsCardV1Widget().setTextParagraph(new GoogleAppsCardV1TextParagraph()
        .setText("<b>Type:</b> " + type)),
      new GoogleAppsCardV1Widget().setButtonList(new GoogleAppsCardV1ButtonList().setButtons(List.of(new GoogleAppsCardV1Button()
        .setText("Submit")
        .setOnClick(new GoogleAppsCardV1OnClick().setAction(new GoogleAppsCardV1Action()
          .setFunction("submitForm")
          .setParameters(List.of(
            new GoogleAppsCardV1ActionParameter().setKey("contactName").setValue(name),
            new GoogleAppsCardV1ActionParameter().setKey("contactBirthdate").setValue(birthdate),
            new GoogleAppsCardV1ActionParameter().setKey("contactType").setValue(type))))))))));

  // Returns a dialog with contact information that the user input.
  if (event.at("/isDialogEvent") != null && event.at("/isDialogEvent").asBoolean()) {
    return new Message().setActionResponse(new ActionResponse()
      .setType("DIALOG")
      .setDialogAction(new DialogAction().setDialog(new Dialog().setBody(new GoogleAppsCardV1Card()
        .setSections(List.of(cardConfirmationSection))))));
  }

  // Updates existing card message with contact information that the user input.
  return new Message()
    .setActionResponse(new ActionResponse()
      .setType("UPDATE_MESSAGE"))
    .setPrivateMessageViewer(new User().setName(event.at("/user/name").asText()))
    .setCardsV2(List.of(new CardWithId().setCard(new GoogleAppsCardV1Card()
      .setSections(List.of(cardConfirmationSection)))));
}

Google Apps Script

W tym przykładzie wysyłana jest wiadomość z kartą przez zwrócenie kodu JSON karty. Możesz też użyć usługi kart Apps Script.

apps-script/contact-form-app/main.gs
/**
 * Responds to CARD_CLICKED interaction events in Google Chat.
 *
 * @param {Object} event the CARD_CLICKED interaction event from Google Chat.
 * @return {Object} message responses specific to the dialog handling.
 */
function onCardClick(event) {
  // Initial dialog form page
  if (event.common.invokedFunction === "openInitialDialog") {
    return openInitialDialog();
  // Confirmation dialog form page
  } else if (event.common.invokedFunction === "openConfirmation") {
    return openConfirmation(event);
  // Submission dialog form page
  } else if (event.common.invokedFunction === "submitForm") {
    return submitForm(event);
  }
}

/**
 * Opens the initial step of the dialog that lets users add contact details.
 *
 * @return {Object} a message with an action response to open a dialog.
 */
function openInitialDialog() {
  return { actionResponse: {
    type: "DIALOG",
    dialogAction: { dialog: { body: { sections: [{
      header: "Add new contact",
      widgets: CONTACT_FORM_WIDGETS.concat([{
        buttonList: { buttons: [{
          text: "Review and submit",
          onClick: { action: { function: "openConfirmation" }}
        }]}
      }])
    }]}}}
  }};
}

/**
 * Returns the second step as a dialog or card message that lets users confirm details.
 *
 * @param {Object} event the interactive event with form inputs.
 * @return {Object} returns a dialog or private card message.
 */
function openConfirmation(event) {
  const name = fetchFormValue(event, "contactName") ?? "";
  const birthdate = fetchFormValue(event, "contactBirthdate") ?? "";
  const type = fetchFormValue(event, "contactType") ?? "";
  const cardConfirmation = {
    header: "Your contact",
    widgets: [{
      textParagraph: { text: "Confirm contact information and submit:" }}, {
      textParagraph: { text: "<b>Name:</b> " + name }}, {
      textParagraph: {
        text: "<b>Birthday:</b> " + convertMillisToDateString(birthdate)
      }}, {
      textParagraph: { text: "<b>Type:</b> " + type }}, {
      buttonList: { buttons: [{
        text: "Submit",
        onClick: { action: {
          function: "submitForm",
          parameters: [{
            key: "contactName", value: name }, {
            key: "contactBirthdate", value: birthdate }, {
            key: "contactType", value: type
          }]
        }}
      }]}
    }]
  };

  // Returns a dialog with contact information that the user input.
  if (event.isDialogEvent) {
    return { action_response: {
      type: "DIALOG",
      dialogAction: { dialog: { body: { sections: [ cardConfirmation ]}}}
    }};
  }

  // Updates existing card message with contact information that the user input.
  return {
    actionResponse: { type: "UPDATE_MESSAGE" },
    privateMessageViewer: event.user,
    cardsV2: [{
      card: { sections: [cardConfirmation]}
    }]
  }
}

Zamknij okno

Gdy użytkownik kliknie przycisk w oknie, aplikacja Google Chat, która nie jest dodatkiem, wykona powiązane z nim działanie i udostępni obiekt zdarzenia z tymi informacjami:

Aplikacja do obsługi czatu, która nie jest dodatkiem, powinna zwracać obiekt ActionResponse, w którym pole type ma wartość DIALOG, a pole dialogAction jest wypełnione. Jeśli działanie się powiodło, wartość dialogAction.actionStatus powinna być równa OK, jak w tym przykładzie:

Node.js

node/contact-form-app/index.js
// The Chat app indicates that it received form data from the dialog or card.
// Sends private text message that confirms submission.
const confirmationMessage = "✅ " + contactName + " has been added to your contacts.";
if (event.dialogEventType === "SUBMIT_DIALOG") {
  return {
    actionResponse: {
      type: "DIALOG",
      dialogAction: { actionStatus: {
        statusCode: "OK",
        userFacingMessage: "Success " + contactName
      }}
    }
  };
}

Python

python/contact-form-app/main.py
# The Chat app indicates that it received form data from the dialog or card.
# Sends private text message that confirms submission.
confirmation_message = "✅ " + contact_name + " has been added to your contacts.";
if "SUBMIT_DIALOG" == event.get('dialogEventType'):
  return {
    'actionResponse': {
      'type': "DIALOG",
      'dialogAction': { 'actionStatus': {
        'statusCode': "OK",
        'userFacingMessage': "Success " + contact_name
      }}
    }
  }

Java

java/contact-form-app/src/main/java/com/google/chat/contact/App.java
// The Chat app indicates that it received form data from the dialog or card.
// Sends private text message that confirms submission.
String confirmationMessage = "✅ " + contactName + " has been added to your contacts.";
if (event.at("/dialogEventType") != null && "SUBMIT_DIALOG".equals(event.at("/dialogEventType").asText())) {
  return new Message().setActionResponse(new ActionResponse()
    .setType("DIALOG")
    .setDialogAction(new DialogAction().setActionStatus(new ActionStatus()
      .setStatusCode("OK")
      .setUserFacingMessage("Success " + contactName))));
}

Google Apps Script

W tym przykładzie wysyłana jest wiadomość z kartą przez zwrócenie kodu JSON karty. Możesz też użyć usługi kart Apps Script.

apps-script/contact-form-app/main.gs
// The Chat app indicates that it received form data from the dialog or card.
// Sends private text message that confirms submission.
const confirmationMessage = "✅ " + contactName + " has been added to your contacts.";
if (event.dialogEventType === "SUBMIT_DIALOG") {
  return {
    actionResponse: {
      type: "DIALOG",
      dialogAction: { actionStatus: {
        statusCode: "OK",
        userFacingMessage: "Success " + contactName
      }}
    }
  };
}
Opcjonalnie: wyświetlanie tymczasowego powiadomienia

Aplikacja do obsługi czatu, która nie jest dodatkiem, może odpowiedzieć powiadomieniem o powodzeniu lub błędzie, zwracając ActionResponse z ustawionym parametrem actionStatus.

W tym przykładzie sprawdzamy, czy parametry są prawidłowe, a w przypadku nieprawidłowych parametrów zamykamy okno z powiadomieniem tekstowym:

Node.js

node/contact-form-app/index.js
const contactName = event.common.parameters["contactName"];
// Checks to make sure the user entered a contact name.
// If no name value detected, returns an error message.
const errorMessage = "Don't forget to name your new contact!";
if (!contactName && event.dialogEventType === "SUBMIT_DIALOG") {
  return { actionResponse: {
    type: "DIALOG",
    dialogAction: { actionStatus: {
      statusCode: "INVALID_ARGUMENT",
      userFacingMessage: errorMessage
    }}
  }};
}

Python

python/contact-form-app/main.py
contact_name = event.get('common').get('parameters')["contactName"]
# Checks to make sure the user entered a contact name.
# If no name value detected, returns an error message.
error_message = "Don't forget to name your new contact!"
if contact_name == "" and "SUBMIT_DIALOG" == event.get('dialogEventType'):
  return { 'actionResponse': {
    'type': "DIALOG",
    'dialogAction': { 'actionStatus': {
      'statusCode': "INVALID_ARGUMENT",
      'userFacingMessage': error_message
    }}
  }}

Java

java/contact-form-app/src/main/java/com/google/chat/contact/App.java
String contactName = event.at("/common/parameters/contactName").asText();
// Checks to make sure the user entered a contact name.
// If no name value detected, returns an error message.
String errorMessage = "Don't forget to name your new contact!";
if (contactName.isEmpty() && event.at("/dialogEventType") != null && "SUBMIT_DIALOG".equals(event.at("/dialogEventType").asText())) {
  return new Message().setActionResponse(new ActionResponse()
    .setType("DIALOG")
    .setDialogAction(new DialogAction().setActionStatus(new ActionStatus()
      .setStatusCode("INVALID_ARGUMENT")
      .setUserFacingMessage(errorMessage))));
}

Google Apps Script

W tym przykładzie wysyłana jest wiadomość z kartą przez zwrócenie kodu JSON karty. Możesz też użyć usługi kart Apps Script.

apps-script/contact-form-app/main.gs
const contactName = event.common.parameters["contactName"];
// Checks to make sure the user entered a contact name.
// If no name value detected, returns an error message.
const errorMessage = "Don't forget to name your new contact!";
if (!contactName && event.dialogEventType === "SUBMIT_DIALOG") {
  return { actionResponse: {
    type: "DIALOG",
    dialogAction: { actionStatus: {
      statusCode: "INVALID_ARGUMENT",
      userFacingMessage: errorMessage
    }}
  }};
}
Opcjonalnie: wysyłanie wiadomości na czacie z potwierdzeniem

Aby wysłać nową wiadomość po zamknięciu okna w aplikacji do Google Chat, która nie jest dodatkiem, zwróć obiekt ActionResponse z type: "NEW_MESSAGE". W tym przykładzie zamykamy okno dialogowe za pomocą SMS-a z tekstem potwierdzającym:

Node.js

node/contact-form-app/index.js
return {
  actionResponse: { type: "NEW_MESSAGE" },
  privateMessageViewer: event.user,
  text: confirmationMessage
};

Python

python/contact-form-app/main.py
return {
  'actionResponse': { 'type': "NEW_MESSAGE" },
  'privateMessageViewer': event.get('user'),
  'text': confirmation_message
}

Java

java/contact-form-app/src/main/java/com/google/chat/contact/App.java
return new Message()
  .setActionResponse(new ActionResponse().setType("NEW_MESSAGE"))
  .setPrivateMessageViewer(new User().setName(event.at("/user/name").asText()))
  .setText(confirmationMessage);

Google Apps Script

W tym przykładzie wysyłana jest wiadomość z kartą przez zwrócenie kodu JSON karty. Możesz też użyć usługi kart Apps Script.

apps-script/contact-form-app/main.gs
return {
  actionResponse: { type: "NEW_MESSAGE" },
  privateMessageViewer: event.user,
  text: confirmationMessage
};

Aby zaktualizować wiadomość, zwróć obiekt actionResponse, który zawiera zaktualizowaną wiadomość i ustawia pole type na jedną z tych wartości: