इंटरैक्टिव डायलॉग बॉक्स के साथ काम करना

इस पेज पर बताया गया है कि Google Chat ऐप्लिकेशन, यूज़र इंटरफ़ेस (यूआई) दिखाने और लोगों को जवाब देने के लिए, डायलॉग कैसे खोल सकता है.

डायलॉग, विंडो वाले कार्ड-आधारित इंटरफ़ेस होते हैं. ये Chat स्पेस या मैसेज से खुलते हैं. डायलॉग और उसका कॉन्टेंट सिर्फ़ उस उपयोगकर्ता को दिखता है जिसने उसे खोला है.

चैट ऐप्लिकेशन, डायलॉग का इस्तेमाल करके चैट उपयोगकर्ताओं से जानकारी का अनुरोध कर सकते हैं और उसे इकट्ठा कर सकते हैं. इसमें कई चरणों वाले फ़ॉर्म भी शामिल हैं. फ़ॉर्म इनपुट बनाने के बारे में ज़्यादा जानकारी के लिए, उपयोगकर्ताओं से जानकारी इकट्ठा करना और उसे प्रोसेस करना लेख पढ़ें.

ज़रूरी शर्तें

HTTP

Google Chat ऐप्लिकेशन, जो उपयोगकर्ता के इंटरैक्शन को स्वीकार करता है और उनका जवाब देता है. इसे बनाने के लिए, एचटीटीपी क्विकस्टार्ट पूरा करें.

Apps Script

Google Chat ऐप्लिकेशन, जो उपयोगकर्ता के इंटरैक्शन को स्वीकार करता है और उनका जवाब देता है. इसे बनाने के लिए, Apps Script क्विकस्टार्ट पूरा करें.

डायलॉग बॉक्स खोलें
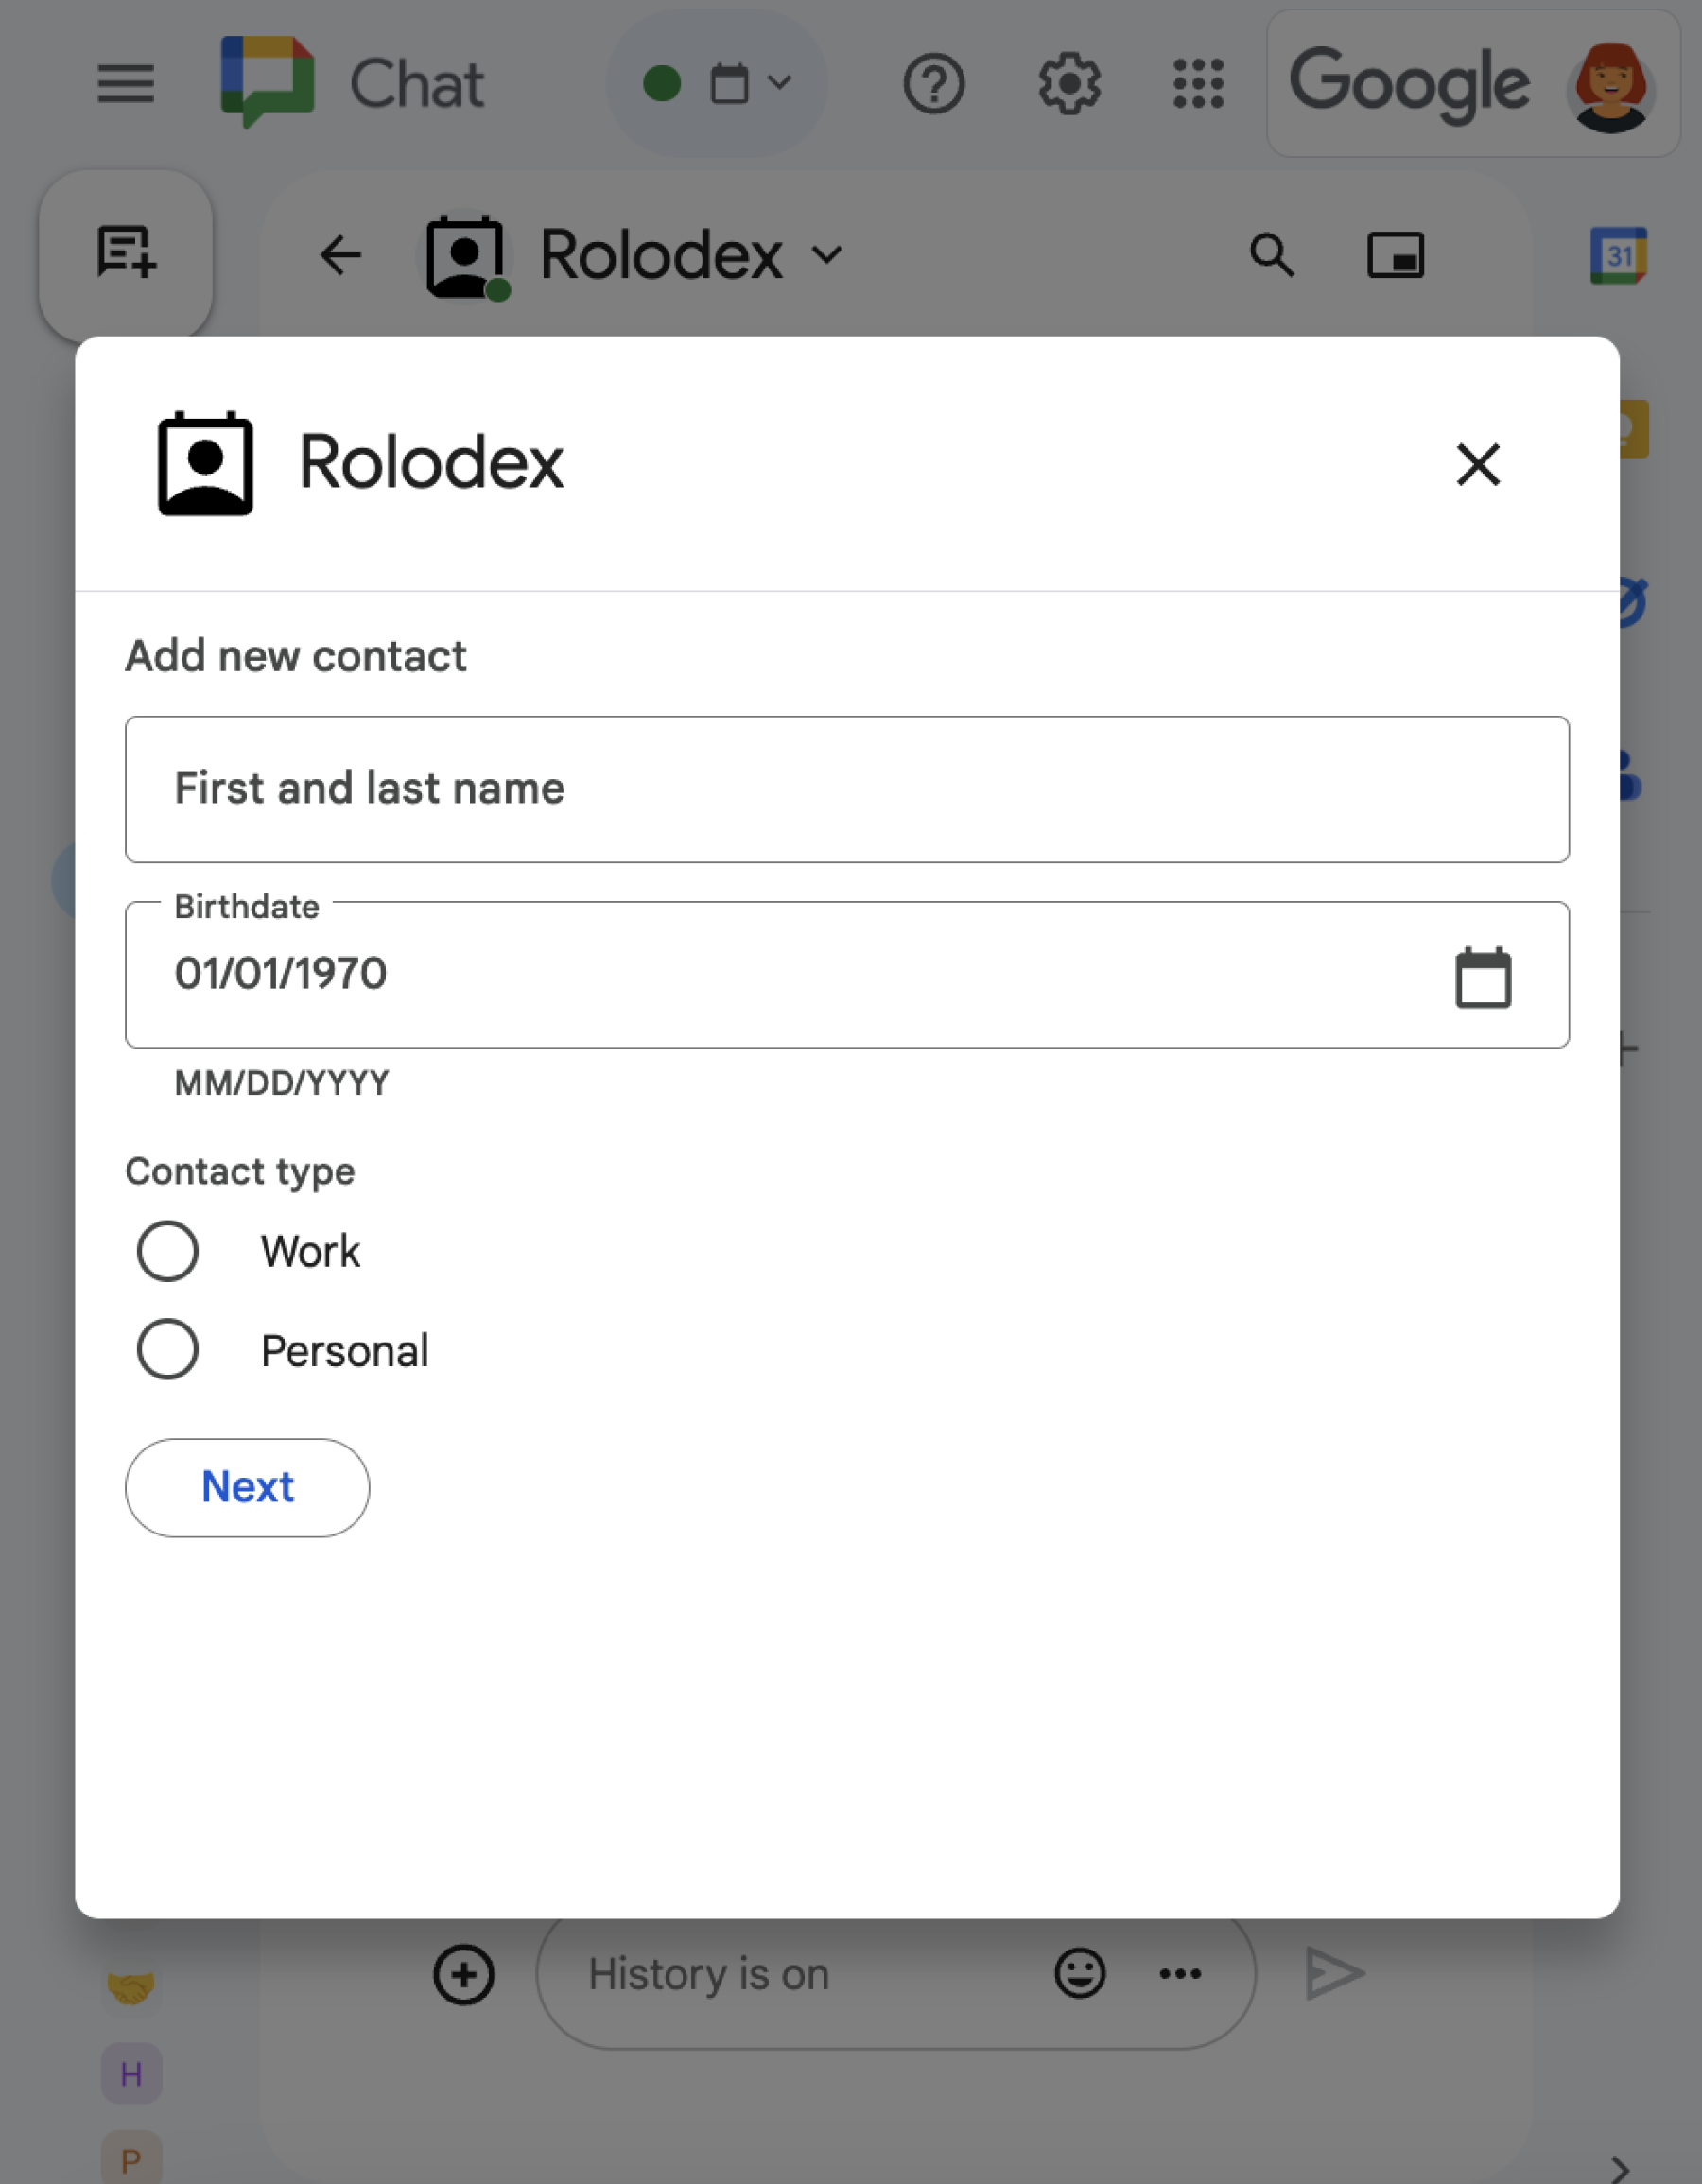
अलग-अलग तरह के कई विजेट दिखाने वाला डायलॉग.
पहली इमेज: Chat ऐप्लिकेशन का सैंपल, जो संपर्क जानकारी इकट्ठा करने के लिए एक डायलॉग खोलता है.

इस सेक्शन में, इन तरीकों से जवाब देने और डायलॉग सेट अप करने का तरीका बताया गया है:

  1. उपयोगकर्ता के इंटरैक्शन से, डायलॉग बॉक्स दिखाने का अनुरोध ट्रिगर करें.
  2. डायलॉग बॉक्स खोलकर और उसे वापस भेजकर, अनुरोध को मैनेज करें.
  3. उपयोगकर्ताओं की ओर से जानकारी सबमिट करने के बाद, सबमिट किए गए डेटा को प्रोसेस करें. इसके लिए, डायलॉग बॉक्स को बंद करें या दूसरा डायलॉग बॉक्स दिखाएं.

डायलॉग का अनुरोध ट्रिगर करना

Chat ऐप्लिकेशन, सिर्फ़ उपयोगकर्ता के इंटरैक्शन का जवाब देने के लिए डायलॉग खोल सकता है. जैसे, कार्ड में मौजूद मैसेज से कोई कमांड देना या बटन पर क्लिक करना.

डायलॉग की मदद से लोगों को जवाब देने के लिए, Chat ऐप्लिकेशन को ऐसा इंटरैक्शन बनाना होगा जो डायलॉग के अनुरोध को ट्रिगर करे. जैसे, यहां दिए गए इंटरैक्शन:

  • किसी निर्देश का जवाब देना. किसी कमांड से अनुरोध ट्रिगर करने के लिए, आपको कमांड कॉन्फ़िगर करते समय डायलॉग खोलता है चेकबॉक्स पर सही का निशान लगाना होगा.
  • मैसेज में बटन पर क्लिक करने पर जवाब देना. यह जवाब, कार्ड के हिस्से के तौर पर या मैसेज के सबसे नीचे दिया जा सकता है. मैसेज में मौजूद किसी बटन से अनुरोध ट्रिगर करने के लिए, बटन के onClick ऐक्शन को कॉन्फ़िगर करें. इसके लिए, interaction को OPEN_DIALOG पर सेट करें.
  • Chat ऐप्लिकेशन के होम पेज पर, बटन पर क्लिक करने पर जवाब देना. होम पेज से डायलॉग खोलने के बारे में जानने के लिए, अपने Google Chat ऐप्लिकेशन के लिए होम पेज बनाना लेख पढ़ें.
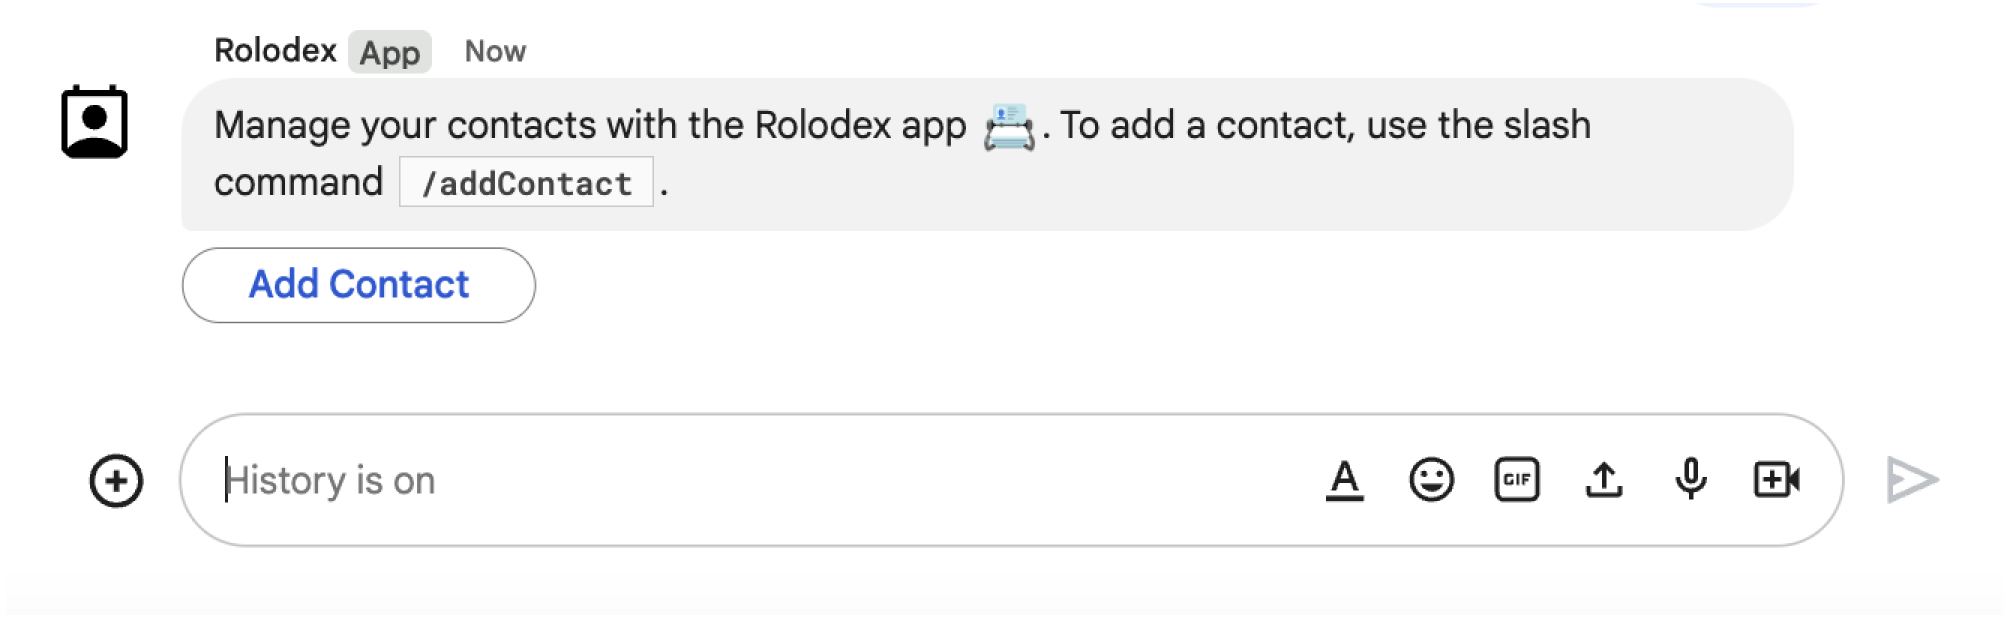
डायलॉग बॉक्स को ट्रिगर करने वाला बटन
दूसरी इमेज: Chat ऐप्लिकेशन एक मैसेज भेजता है, जिसमें लोगों को /addContact स्लैश कमांड का इस्तेमाल करने के लिए कहा जाता है.
मैसेज में एक बटन भी शामिल होता है. इस पर क्लिक करके उपयोगकर्ता, कमांड को ट्रिगर कर सकते हैं.

यहां दिए गए कोड सैंपल में, कार्ड मैसेज में मौजूद बटन से डायलॉग अनुरोध को ट्रिगर करने का तरीका बताया गया है. डायलॉग बॉक्स खोलने के लिए, बटन के फ़ील्ड onClick.action.interaction को OPEN_DIALOG पर सेट करें:

Node.js

node/chat/contact-form-app/index.js
{ buttonList: { buttons: [{
  text: "ADD CONTACT",
  onClick: { action: {
    function: FUNCTION_URL,
    interaction: "OPEN_DIALOG",
    parameters: [
      { key: "actionName", value: "openInitialDialog" }
    ]
  }}
}]}}

FUNCTION_URL को उस एचटीटीपी एंडपॉइंट से बदलें जो बटन क्लिक को हैंडल करता है.

Python

python/chat/contact-form-app/main.py
{ 'buttonList': { 'buttons': [{
  'text': "ADD CONTACT",
  'onClick': { 'action': {
    'function': FUNCTION_URL,
    'interaction': "OPEN_DIALOG",
    'parameters': [
      { 'key': "actionName", 'value': "openInitialDialog" }
    ]
  }}
}]}}

FUNCTION_URL को उस एचटीटीपी एंडपॉइंट से बदलें जो बटन क्लिक को हैंडल करता है.

Java

java/chat/contact-form-app/src/main/java/com/google/chat/contact/App.java
.setButtonList(new GoogleAppsCardV1ButtonList().setButtons(List.of(new GoogleAppsCardV1Button()
  .setText("ADD CONTACT")
  .setOnClick(new GoogleAppsCardV1OnClick().setAction(new GoogleAppsCardV1Action()
    .setFunction(FUNCTION_URL)
    .setInteraction("OPEN_DIALOG")
    .setParameters(List.of(
      new GoogleAppsCardV1ActionParameter().setKey("actionName").setValue("openInitialDialog"))))))))));

FUNCTION_URL को उस एचटीटीपी एंडपॉइंट से बदलें जो बटन क्लिक को हैंडल करता है.

Apps Script

इस उदाहरण में, कार्ड JSON को वापस भेजकर, कार्ड मैसेज भेजा जाता है. Apps Script की कार्ड सेवा का भी इस्तेमाल किया जा सकता है.

apps-script/chat/contact-form-app/Code.gs
{ buttonList: { buttons: [{
  text: "ADD CONTACT",
  onClick: { action: {
    function: "openInitialDialog",
    interaction: "OPEN_DIALOG"
  }}
}]}}

शुरुआती डायलॉग बॉक्स खोलें

जब कोई उपयोगकर्ता डायलॉग का अनुरोध ट्रिगर करता है, तो आपके Chat ऐप्लिकेशन को एक इवेंट ऑब्जेक्ट मिलता है. इसमें एक पेलोड होता है, जो dialogEventType ऑब्जेक्ट को REQUEST_DIALOG के तौर पर दिखाता है.

डायलॉग खोलने के लिए, आपका Chat ऐप्लिकेशन अनुरोध का जवाब दे सकता है. इसके लिए, उसे RenderActions ऑब्जेक्ट को नेविगेशन pushCard के साथ वापस भेजना होगा, ताकि कार्ड दिखाया जा सके. कार्ड में कोई भी यूज़र इंटरफ़ेस (यूआई) एलिमेंट होना चाहिए. इसमें एक या उससे ज़्यादा sections[] विजेट शामिल हैं. उपयोगकर्ताओं से जानकारी इकट्ठा करने के लिए, फ़ॉर्म इनपुट विजेट और बटन विजेट तय किए जा सकते हैं. फ़ॉर्म इनपुट डिज़ाइन करने के बारे में ज़्यादा जानने के लिए, उपयोगकर्ताओं से जानकारी इकट्ठा करना और उसे प्रोसेस करना लेख पढ़ें.

नीचे दिए गए कोड सैंपल में बताया गया है कि Chat ऐप्लिकेशन, डायलॉग खोलने वाला जवाब कैसे देता है:

Node.js

node/chat/contact-form-app/index.js
/**
 * Opens the initial step of the dialog that lets users add contact details.
 *
 * @return {Object} open the dialog.
 */
function openInitialDialog() {
  return { action: { navigations: [{ pushCard: { sections: [{ widgets: [
    { textInput: {
      name: "contactName",
      label: "First and last name",
      type: "SINGLE_LINE"
    }},
    { dateTimePicker: {
      name: "contactBirthdate",
      label: "Birthdate",
      type: "DATE_ONLY"
    }},
    { selectionInput: {
      name: "contactType",
      label: "Contact type",
      type: "RADIO_BUTTON",
      items: [
        { text: "Work", value: "Work", selected: false },
        { text: "Personal", value: "Personal", selected: false }
      ]
    }},
    { buttonList: { buttons: [{
      text: "NEXT",
      onClick: { action: {
        function: FUNCTION_URL,
        parameters: [
          { key: "actionName", value: "openConfirmationDialog" }
        ]
      }}
    }]}}
  ]}]}}]}};
}

FUNCTION_URL को उस एचटीटीपी एंडपॉइंट से बदलें जो बटन क्लिक को हैंडल करता है.

Python

python/chat/contact-form-app/main.py
def open_initial_dialog() -> Mapping[str, Any]:
  """Opens the initial step of the dialog that lets users add contact details.

  Returns:
    Mapping[str, Any]: open the dialog.
  """
  return { 'action': { 'navigations': [{ 'pushCard': { 'sections': [{ 'widgets': [
    { 'textInput': {
      'name': "contactName",
      'label': "First and last name",
      'type': "SINGLE_LINE"
    }},
    { 'dateTimePicker': {
      'name': "contactBirthdate",
      'label': "Birthdate",
      'type': "DATE_ONLY"
    }},
    { 'selectionInput': {
      'name': "contactType",
      'label': "Contact type",
      'type': "RADIO_BUTTON",
      'items': [
        { 'text': "Work", 'value': "Work", 'selected': False },
        { 'text': "Personal", 'value': "Personal", 'selected': False }
      ]
    }},
    { 'buttonList': { 'buttons': [{
      'text': "NEXT",
      'onClick': { 'action': {
        'function': FUNCTION_URL,
        'parameters': [
          { 'key': "actionName", 'value': "openConfirmationDialog" }
        ]
      }}
    }]}}
  ]}]}}]}}

FUNCTION_URL को उस एचटीटीपी एंडपॉइंट से बदलें जो बटन क्लिक को हैंडल करता है.

Java

java/chat/contact-form-app/src/main/java/com/google/chat/contact/App.java
/**
 * Opens the initial step of the dialog that lets users add contact details.
 *
 * @return {Object} open the dialog.
 */
GenericJson openInitialDialog() {
  GoogleAppsCardV1Card cardV2 = new GoogleAppsCardV1Card()
    .setSections(List.of(new GoogleAppsCardV1Section().setWidgets(List.of(
      new GoogleAppsCardV1Widget().setTextInput(new GoogleAppsCardV1TextInput()
        .setName("contactName")
        .setLabel("First and last name")
        .setType("SINGLE_LINE")),
      new GoogleAppsCardV1Widget().setDateTimePicker(new GoogleAppsCardV1DateTimePicker()
        .setName("contactBirthdate")
        .setLabel("Birthdate")
        .setType("DATE_ONLY")),
      new GoogleAppsCardV1Widget().setSelectionInput(new GoogleAppsCardV1SelectionInput()
        .setName("contactType")
        .setLabel("Contact type")
        .setType("RADIO_BUTTON")
        .setItems(List.of(
          new GoogleAppsCardV1SelectionItem()
            .setText("Work")
            .setValue("Work")
            .setSelected(false),
          new GoogleAppsCardV1SelectionItem()
            .setText("Personal")
            .setValue("Personal")
            .setSelected(false)))),
      new GoogleAppsCardV1Widget().setButtonList(new GoogleAppsCardV1ButtonList().setButtons(List.of(
        new GoogleAppsCardV1Button()
          .setText("NEXT")
          .setOnClick(new GoogleAppsCardV1OnClick().setAction(new GoogleAppsCardV1Action()
            .setFunction(FUNCTION_URL)
            .setParameters(List.of(
              new GoogleAppsCardV1ActionParameter().setKey("actionName").setValue("openConfirmationDialog"))))))))))));
  return new GenericJson() {{
    put("action", new GenericJson() {{
      put("navigations", List.of(new GenericJson() {{
        put("pushCard", cardV2);
      }}));
    }});
  }};
}

FUNCTION_URL को उस एचटीटीपी एंडपॉइंट से बदलें जो बटन क्लिक को हैंडल करता है.

Apps Script

इस उदाहरण में, कार्ड JSON को वापस भेजकर, कार्ड मैसेज भेजा जाता है. Apps Script की कार्ड सेवा का भी इस्तेमाल किया जा सकता है.

apps-script/chat/contact-form-app/Code.gs
/**
 * Opens the initial step of the dialog that lets users add contact details.
 *
 * @param {Object} event The event object from the Google Workspace add-on.
 * @return {Object} open the dialog.
 */
function openInitialDialog(event) {
  return { action: { navigations: [{ pushCard: { sections: [{ widgets: [
    { textInput: {
      name: "contactName",
      label: "First and last name",
      type: "SINGLE_LINE"
    }},
    { dateTimePicker: {
      name: "contactBirthdate",
      label: "Birthdate",
      type: "DATE_ONLY"
    }},
    { selectionInput: {
      name: "contactType",
      label: "Contact type",
      type: "RADIO_BUTTON",
      items: [
        { text: "Work", value: "Work", selected: false },
        { text: "Personal", value: "Personal", selected: false }
      ]
    }},
    { buttonList: { buttons: [{
      text: "NEXT",
      onClick: { action: { function : "openConfirmationDialog" }}
    }]}}
  ]}]}}]}};
}

डायलॉग सबमिट करने की प्रोसेस मैनेज करना

जब उपयोगकर्ता, डायलॉग सबमिट करने वाले बटन पर क्लिक करते हैं, तो आपके Chat ऐप्लिकेशन को buttonClickedPayload ऑब्जेक्ट के साथ एक इवेंट ऑब्जेक्ट मिलता है. इस पेलोड में, dialogEventType को SUBMIT_DIALOG पर सेट किया गया है. डायलॉग में मौजूद जानकारी को इकट्ठा और प्रोसेस करने का तरीका जानने के लिए, Google Chat के उपयोगकर्ताओं से जानकारी इकट्ठा करना और उसे प्रोसेस करना लेख पढ़ें.

आपके Chat ऐप्लिकेशन को इवेंट ऑब्जेक्ट का जवाब देना होगा. इसके लिए, इनमें से कोई एक तरीका अपनाएं:

ज़रूरी नहीं: कोई दूसरा डायलॉग बॉक्स दिखाएं

उपयोगकर्ताओं के शुरुआती डायलॉग सबमिट करने के बाद, चैट ऐप्लिकेशन एक या उससे ज़्यादा डायलॉग दिखा सकते हैं. इससे उपयोगकर्ताओं को जानकारी सबमिट करने से पहले उसकी समीक्षा करने में मदद मिलती है. साथ ही, वे कई चरणों वाले फ़ॉर्म भर पाते हैं या फ़ॉर्म के कॉन्टेंट को डाइनैमिक तरीके से भर पाते हैं.

उपयोगकर्ताओं के इनपुट किए गए डेटा को प्रोसेस करने के लिए, Chat ऐप्लिकेशन इवेंट के commonEventObject.formInputs ऑब्जेक्ट में मौजूद डेटा को मैनेज करता है. इनपुट विजेट से वैल्यू वापस पाने के बारे में ज़्यादा जानने के लिए, उपयोगकर्ताओं से जानकारी इकट्ठा करना और उसे प्रोसेस करना लेख पढ़ें.

अगर आपको उपयोगकर्ताओं के शुरुआती डायलॉग में डाले गए डेटा को ट्रैक करना है, तो आपको उस बटन में पैरामीटर जोड़ने होंगे जो अगला डायलॉग बॉक्स खोलता है. ज़्यादा जानकारी के लिए, डेटा को दूसरे कार्ड में ट्रांसफ़र करना लेख पढ़ें.

इस उदाहरण में, चैट ऐप्लिकेशन एक शुरुआती डायलॉग खोलता है. इससे पुष्टि करने के लिए दूसरा डायलॉग खुलता है. इसके बाद, सबमिट करने का विकल्प मिलता है:

Node.js

node/chat/contact-form-app/index.js
/**
 * Responds to a message in Google Chat.
 *
 * @return {Object} response that handles dialogs.
 */
function handleMessage() {
  return { hostAppDataAction: { chatDataAction: { createMessageAction: { message: {
    text: "To add a contact, use the `ADD CONTACT` button below.",
    accessoryWidgets: [
      { buttonList: { buttons: [{
        text: "ADD CONTACT",
        onClick: { action: {
          function: FUNCTION_URL,
          interaction: "OPEN_DIALOG",
          parameters: [
            { key: "actionName", value: "openInitialDialog" }
          ]
        }}
      }]}}
    ]
  }}}}};
}

/**
 * Responds to a button clicked in Google Chat.
 *
 * @param {Object} event The event object from the Google Workspace add-on.
 * @return {Object} response depending on the button clicked.
 */
function handleButtonClicked(event) {
  // Initial dialog form page
  if (event.commonEventObject.parameters.actionName === "openInitialDialog") {
    return openInitialDialog();
  // Confirmation dialog form page
  } else if (event.commonEventObject.parameters.actionName === "openConfirmationDialog") {
    return openConfirmationDialog(event);
  // Submission dialog form page
  } else if (event.commonEventObject.parameters.actionName === "submitDialog") {
    return submitDialog(event);
  }
}

/**
 * Opens the initial step of the dialog that lets users add contact details.
 *
 * @return {Object} open the dialog.
 */
function openInitialDialog() {
  return { action: { navigations: [{ pushCard: { sections: [{ widgets: [
    { textInput: {
      name: "contactName",
      label: "First and last name",
      type: "SINGLE_LINE"
    }},
    { dateTimePicker: {
      name: "contactBirthdate",
      label: "Birthdate",
      type: "DATE_ONLY"
    }},
    { selectionInput: {
      name: "contactType",
      label: "Contact type",
      type: "RADIO_BUTTON",
      items: [
        { text: "Work", value: "Work", selected: false },
        { text: "Personal", value: "Personal", selected: false }
      ]
    }},
    { buttonList: { buttons: [{
      text: "NEXT",
      onClick: { action: {
        function: FUNCTION_URL,
        parameters: [
          { key: "actionName", value: "openConfirmationDialog" }
        ]
      }}
    }]}}
  ]}]}}]}};
}

/**
 * Opens the second step of the dialog that lets users confirm details.
 *
 * @param {Object} event The event object from the Google Workspace add-on.
 * @return {Object} update the dialog.
 */
function openConfirmationDialog(event) {
  // Retrieve the form input values
  const name = event.commonEventObject.formInputs["contactName"].stringInputs.value[0];
  const birthdate = event.commonEventObject.formInputs["contactBirthdate"].dateInput.msSinceEpoch;
  const type = event.commonEventObject.formInputs["contactType"].stringInputs.value[0];
  // Display the input values for confirmation
  return { action: { navigations: [{ pushCard: { sections: [{ widgets: [
    { textParagraph: { text: "Confirm contact information and submit:" }},
    { textParagraph: { text: "<b>Name:</b> " + name }},
    { textParagraph: { text: "<b>Birthday:</b> " + new Date(birthdate) }},
    { textParagraph: { text: "<b>Type:</b> " + type }},
    { buttonList: { buttons: [{
      text: "SUBMIT",
      onClick: { action: {
        function: FUNCTION_URL,
        parameters: [
          { key: "actionName", value: "submitDialog" },
          // Pass input values as parameters for last dialog step (submission)
          { key: "contactName", value: name },
          { key: "contactBirthdate", value: birthdate },
          { key: "contactType", value: type }
        ]
      }}
    }]}}
  ]}]}}]}};
}

FUNCTION_URL को उस एचटीटीपी एंडपॉइंट से बदलें जो बटन क्लिक को हैंडल करता है.

Python

python/chat/contact-form-app/main.py
def handle_message() -> Mapping[str, Any]:
  """Responds to a message in Google Chat.

  Returns:
    Mapping[str, Any]: the response that handles dialogs.
  """
  return { 'hostAppDataAction': { 'chatDataAction': { 'createMessageAction': { 'message': {
    'text': "To add a contact, use the `ADD CONTACT` button below.",
    'accessoryWidgets': [
      { 'buttonList': { 'buttons': [{
        'text': "ADD CONTACT",
        'onClick': { 'action': {
          'function': FUNCTION_URL,
          'interaction': "OPEN_DIALOG",
          'parameters': [
            { 'key': "actionName", 'value': "openInitialDialog" }
          ]
        }}
      }]}}
    ]
  }}}}}


def handle_button_clicked(event: Mapping[str, Any]) -> Mapping[str, Any]:
  """Responds to a button clicked in Google Chat.

  Args:
    Mapping[str, Any] event: the event object from the Google Workspace add-on

  Returns:
    Mapping[str, Any]: the response depending on the button clicked.
  """
  # Initial dialog form page
  if "openInitialDialog" == event['commonEventObject']['parameters']['actionName']:
    return open_initial_dialog()
  # Confirmation dialog form page
  elif "openConfirmationDialog" == event['commonEventObject']['parameters']['actionName'] :
    return open_confirmation_dialog(event)
  # Submission dialog form page
  elif "submitDialog" == event['commonEventObject']['parameters']['actionName']:
    return submit_dialog(event)


def open_initial_dialog() -> Mapping[str, Any]:
  """Opens the initial step of the dialog that lets users add contact details.

  Returns:
    Mapping[str, Any]: open the dialog.
  """
  return { 'action': { 'navigations': [{ 'pushCard': { 'sections': [{ 'widgets': [
    { 'textInput': {
      'name': "contactName",
      'label': "First and last name",
      'type': "SINGLE_LINE"
    }},
    { 'dateTimePicker': {
      'name': "contactBirthdate",
      'label': "Birthdate",
      'type': "DATE_ONLY"
    }},
    { 'selectionInput': {
      'name': "contactType",
      'label': "Contact type",
      'type': "RADIO_BUTTON",
      'items': [
        { 'text': "Work", 'value': "Work", 'selected': False },
        { 'text': "Personal", 'value': "Personal", 'selected': False }
      ]
    }},
    { 'buttonList': { 'buttons': [{
      'text': "NEXT",
      'onClick': { 'action': {
        'function': FUNCTION_URL,
        'parameters': [
          { 'key': "actionName", 'value': "openConfirmationDialog" }
        ]
      }}
    }]}}
  ]}]}}]}}


def open_confirmation_dialog(event: Mapping[str, Any]) -> Mapping[str, Any]:
  """Opens the second step of the dialog that lets users confirm details.

  Args:
    Mapping[str, Any] event: the event object from the Google Workspace add-on

  Returns:
    Mapping[str, Any]: update the dialog.
  """
  name = event.get('commonEventObject').get('formInputs')["contactName"].get('stringInputs').get('value')[0]
  birthdateEpoch = event.get('commonEventObject').get('formInputs')["contactBirthdate"].get('dateInput').get('msSinceEpoch')
  birthdate = datetime.fromtimestamp(int(birthdateEpoch) / 1000.0).strftime("%Y-%m-%d")
  type = event.get('commonEventObject').get('formInputs')["contactType"].get('stringInputs').get('value')[0]
  # Display the input values for confirmation
  return { 'action': { 'navigations': [{ 'pushCard': { 'sections': [{ 'widgets': [
    { 'textParagraph': { 'text': "Confirm contact information and submit:" }},
    { 'textParagraph': { 'text': "<b>Name:</b> " + name }},
    { 'textParagraph': { 'text': "<b>Birthday:</b> " + birthdate }},
    { 'textParagraph': { 'text': "<b>Type:</b> " + type }},
    { 'buttonList': { 'buttons': [{
      'text': "SUBMIT",
      'onClick': { 'action': {
        'function': FUNCTION_URL,
        'parameters': [
          { 'key': "actionName", 'value': "submitDialog" },
          # Pass input values as parameters for last dialog step (submission)
          { 'key': "contactName", 'value': name },
          { 'key': "contactBirthdate", 'value': birthdate },
          { 'key': "contactType", 'value': type }
        ]
      }}
    }]}}
  ]}]}}]}}

FUNCTION_URL को उस एचटीटीपी एंडपॉइंट से बदलें जो बटन क्लिक को हैंडल करता है.

Java

java/chat/contact-form-app/src/main/java/com/google/chat/contact/App.java
/**
 * Responds to a message in Google Chat.
 *
 * @return response that handles dialogs.
 */
GenericJson handleMessage() {
  Message message = new Message()
    .setText("To add a contact, use the `ADD CONTACT` button below.")
    .setAccessoryWidgets(List.of(new AccessoryWidget()
      .setButtonList(new GoogleAppsCardV1ButtonList().setButtons(List.of(new GoogleAppsCardV1Button()
        .setText("ADD CONTACT")
        .setOnClick(new GoogleAppsCardV1OnClick().setAction(new GoogleAppsCardV1Action()
          .setFunction(FUNCTION_URL)
          .setInteraction("OPEN_DIALOG")
          .setParameters(List.of(
            new GoogleAppsCardV1ActionParameter().setKey("actionName").setValue("openInitialDialog"))))))))));
  return new GenericJson() {{
    put("hostAppDataAction", new GenericJson() {{
      put("chatDataAction", new GenericJson() {{
        put("createMessageAction", new GenericJson() {{
          put("message", message);
        }});
      }});
    }});
  }};
}

/**
 * Responds to a button clicked in Google Chat.
 *
 * @param event The event object from the Google Workspace add-on.
 * @return response depending on the button clicked.
 */
GenericJson handleButtonClicked(JsonNode event) {
  String actionName = event.at("/commonEventObject/parameters/actionName").asText();
  // Initial dialog form page
  if ("openInitialDialog".equals(actionName)) {
    return openInitialDialog();
  // Confirmation dialog form page
  } else if ("openConfirmationDialog".equals(actionName)) {
    return openConfirmationDialog(event);
  // Submission dialog form page
  } else if ("submitDialog".equals(actionName)) {
    return submitDialog(event);
  }
  return null; 
}

/**
 * Opens the initial step of the dialog that lets users add contact details.
 *
 * @return {Object} open the dialog.
 */
GenericJson openInitialDialog() {
  GoogleAppsCardV1Card cardV2 = new GoogleAppsCardV1Card()
    .setSections(List.of(new GoogleAppsCardV1Section().setWidgets(List.of(
      new GoogleAppsCardV1Widget().setTextInput(new GoogleAppsCardV1TextInput()
        .setName("contactName")
        .setLabel("First and last name")
        .setType("SINGLE_LINE")),
      new GoogleAppsCardV1Widget().setDateTimePicker(new GoogleAppsCardV1DateTimePicker()
        .setName("contactBirthdate")
        .setLabel("Birthdate")
        .setType("DATE_ONLY")),
      new GoogleAppsCardV1Widget().setSelectionInput(new GoogleAppsCardV1SelectionInput()
        .setName("contactType")
        .setLabel("Contact type")
        .setType("RADIO_BUTTON")
        .setItems(List.of(
          new GoogleAppsCardV1SelectionItem()
            .setText("Work")
            .setValue("Work")
            .setSelected(false),
          new GoogleAppsCardV1SelectionItem()
            .setText("Personal")
            .setValue("Personal")
            .setSelected(false)))),
      new GoogleAppsCardV1Widget().setButtonList(new GoogleAppsCardV1ButtonList().setButtons(List.of(
        new GoogleAppsCardV1Button()
          .setText("NEXT")
          .setOnClick(new GoogleAppsCardV1OnClick().setAction(new GoogleAppsCardV1Action()
            .setFunction(FUNCTION_URL)
            .setParameters(List.of(
              new GoogleAppsCardV1ActionParameter().setKey("actionName").setValue("openConfirmationDialog"))))))))))));
  return new GenericJson() {{
    put("action", new GenericJson() {{
      put("navigations", List.of(new GenericJson() {{
        put("pushCard", cardV2);
      }}));
    }});
  }};
}

/**
 * Opens the second step of the dialog that lets users confirm details.
 *
 * @param event The event object from the Google Workspace add-on.
 * @return update the dialog.
 */
GenericJson openConfirmationDialog(JsonNode event) {
  // Retrieve the form input values
  String name = event.at("/commonEventObject/formInputs/contactName/stringInputs/value").get(0).asText();
  String birthdateEpoch = event.at("/commonEventObject/formInputs/contactBirthdate/dateInput/msSinceEpoch").asText();
  String birthdate = new SimpleDateFormat("MM/dd/yyyy").format(new Date((long)Double.parseDouble(birthdateEpoch)));
  String type = event.at("/commonEventObject/formInputs/contactType/stringInputs/value").get(0).asText();
  // Display the input values for confirmation
  GoogleAppsCardV1Card cardV2 = new GoogleAppsCardV1Card()
    .setSections(List.of(new GoogleAppsCardV1Section().setWidgets(List.of(
      new GoogleAppsCardV1Widget().setTextParagraph(new GoogleAppsCardV1TextParagraph()
        .setText("Confirm contact information and submit:")),
      new GoogleAppsCardV1Widget().setTextParagraph(new GoogleAppsCardV1TextParagraph()
        .setText("<b>Name:</b> " + name)),
      new GoogleAppsCardV1Widget().setTextParagraph(new GoogleAppsCardV1TextParagraph()
        .setText("<b>Birthday:</b> " + birthdate)),
      new GoogleAppsCardV1Widget().setTextParagraph(new GoogleAppsCardV1TextParagraph()
        .setText("<b>Type:</b> " + type)),
      new GoogleAppsCardV1Widget().setButtonList(new GoogleAppsCardV1ButtonList().setButtons(List.of(
        new GoogleAppsCardV1Button()
          .setText("SUBMIT")
          .setOnClick(new GoogleAppsCardV1OnClick().setAction(new GoogleAppsCardV1Action()
            .setFunction(FUNCTION_URL)
            .setParameters(List.of(
              new GoogleAppsCardV1ActionParameter().setKey("actionName").setValue("submitDialog"),
              // Pass input values as parameters for last dialog step (submission)
              new GoogleAppsCardV1ActionParameter().setKey("contactName").setValue(name),
              new GoogleAppsCardV1ActionParameter().setKey("contactBirthdate").setValue(birthdate),
              new GoogleAppsCardV1ActionParameter().setKey("contactType").setValue(type))))))))))));
  return new GenericJson() {{
    put("action", new GenericJson() {{
      put("navigations", List.of(new GenericJson() {{
        put("pushCard", cardV2);
      }}));
    }});
  }};
}

FUNCTION_URL को उस एचटीटीपी एंडपॉइंट से बदलें जो बटन क्लिक को हैंडल करता है.

Apps Script

इस उदाहरण में, कार्ड JSON को वापस भेजकर, कार्ड मैसेज भेजा जाता है. Apps Script की कार्ड सेवा का भी इस्तेमाल किया जा सकता है.

apps-script/chat/contact-form-app/Code.gs
/**
 * Responds to a message in Google Chat.
 *
 * @param {Object} event The event object from the Google Workspace add-on.
 * @return {Object} response that handles dialogs.
 */
function onMessage(event) {
  // Reply with a message that contains a button to open the initial dialog
  return { hostAppDataAction: { chatDataAction: { createMessageAction: { message: {
    text: "To add a contact, use the `ADD CONTACT` button below.",
    accessoryWidgets: [
      { buttonList: { buttons: [{
        text: "ADD CONTACT",
        onClick: { action: {
          function: "openInitialDialog",
          interaction: "OPEN_DIALOG"
        }}
      }]}}
    ]
  }}}}};
}

/**
 * Opens the initial step of the dialog that lets users add contact details.
 *
 * @param {Object} event The event object from the Google Workspace add-on.
 * @return {Object} open the dialog.
 */
function openInitialDialog(event) {
  return { action: { navigations: [{ pushCard: { sections: [{ widgets: [
    { textInput: {
      name: "contactName",
      label: "First and last name",
      type: "SINGLE_LINE"
    }},
    { dateTimePicker: {
      name: "contactBirthdate",
      label: "Birthdate",
      type: "DATE_ONLY"
    }},
    { selectionInput: {
      name: "contactType",
      label: "Contact type",
      type: "RADIO_BUTTON",
      items: [
        { text: "Work", value: "Work", selected: false },
        { text: "Personal", value: "Personal", selected: false }
      ]
    }},
    { buttonList: { buttons: [{
      text: "NEXT",
      onClick: { action: { function : "openConfirmationDialog" }}
    }]}}
  ]}]}}]}};
}

/**
 * Opens the second step of the dialog that lets users confirm details.
 *
 * @param {Object} event The event object from the Google Workspace add-on.
 * @return {Object} update the dialog.
 */
function openConfirmationDialog(event) {
  // Retrieve the form input values
  const name = event.commonEventObject.formInputs["contactName"].stringInputs.value[0];
  const birthdate = event.commonEventObject.formInputs["contactBirthdate"].dateInput.msSinceEpoch;
  const type = event.commonEventObject.formInputs["contactType"].stringInputs.value[0];
  // Display the input values for confirmation
  return { action: { navigations: [{ pushCard: { sections: [{ widgets: [
    { textParagraph: { text: "Confirm contact information and submit:" }},
    { textParagraph: { text: "<b>Name:</b> " + name }},
    { textParagraph: { text: "<b>Birthday:</b> " + new Date(birthdate) }},
    { textParagraph: { text: "<b>Type:</b> " + type }},
    { buttonList: { buttons: [{
      text: "SUBMIT",
      onClick: { action: {
        function: "submitDialog",
        // Pass input values as parameters for last dialog step (submission)
        parameters: [
          { key: "contactName", value: name },
          { key: "contactBirthdate", value: birthdate },
          { key: "contactType", value: type }
        ]
      }}
    }]}}
  ]}]}}]}};
}

डायलॉग बंद करें

जब उपयोगकर्ता किसी डायलॉग पर मौजूद 'सबमिट करें' बटन पर क्लिक करते हैं, तो आपका चैट ऐप्लिकेशन उससे जुड़ी कार्रवाई करता है. साथ ही, इवेंट ऑब्जेक्ट उपलब्ध कराता है. इसमें buttonClickedPayload को इस तरह सेट किया जाता है:

  • isDialogEvent true है.
  • dialogEventType SUBMIT_DIALOG है.

Chat ऐप्लिकेशन को RenderActions ऑब्जेक्ट दिखाना चाहिए. इसमें endNavigation को CLOSE_DIALOG (endNavigation: "CLOSE_DIALOG") पर सेट किया गया हो.

ज़रूरी नहीं: कुछ समय के लिए सूचना दिखाना

डायलॉग बंद करने पर, ऐप्लिकेशन का इस्तेमाल कर रहे व्यक्ति को कुछ समय के लिए टेक्स्ट सूचना भी दिखाई जा सकती है.

सूचना दिखाने के लिए, RenderActions ऑब्जेक्ट को notification फ़ील्ड के साथ सेट करके वापस भेजें.

यहां दिए गए उदाहरण में, टेक्स्ट सूचना के साथ डायलॉग बॉक्स बंद किया गया है:

Node.js

node/chat/contact-form-app/index.js
// Validate the parameters.
if (!event.commonEventObject.parameters["contactName"]) {
  return { action: {
    navigations: [{ endNavigation: { action: "CLOSE_DIALOG"}}],
    notification: { text: "Failure, the contact name was missing!" }
  }};
}

Python

python/chat/contact-form-app/main.py
# Validate the parameters.
if event.get('commonEventObject').get('parameters')["contactName"] == "":
  return { 'action': {
    'navigations': [{ 'endNavigation': { 'action': "CLOSE_DIALOG"}}],
    'notification': { 'text': "Failure, the contact name was missing!" }
  }}

Java

java/chat/contact-form-app/src/main/java/com/google/chat/contact/App.java
    // Validate the parameters.
    if (event.at("/commonEventObject/parameters/contactName").asText().isEmpty()) {
      return new GenericJson() {{
        put("action", new GenericJson() {{
          put("navigations", List.of(new GenericJson() {{
            put("endNavigation", new GenericJson() {{
              put("action", "CLOSE_DIALOG");
            }});
          }}));
          put("notification", new GenericJson() {{
            put("text", "Failure, the contact name was missing!");
          }});
        }});
      }};
    }

    return new GenericJson() {{
      put("hostAppDataAction", new GenericJson() {{
        put("chatDataAction", new GenericJson() {{
          put("createMessageAction", new GenericJson() {{
            put("message", new Message()
              .setText( "✅ " + event.at("/commonEventObject/parameters/contactName").asText() +
                        " has been added to your contacts."));
          }});
        }});
      }});
    }};
  }
}

Apps Script

इस उदाहरण में, कार्ड JSON को वापस भेजकर, कार्ड मैसेज भेजा जाता है. Apps Script की कार्ड सेवा का भी इस्तेमाल किया जा सकता है.

apps-script/chat/contact-form-app/Code.gs
// Validate the parameters.
if (!event.commonEventObject.parameters["contactName"]) {
  return { action: {
    navigations: [{ endNavigation: { action: "CLOSE_DIALOG"}}],
    notification: { text: "Failure, the contact name was missing!" }
  }};
}

डायलॉग के बीच पैरामीटर पास करने के बारे में जानकारी के लिए, डेटा को किसी दूसरे कार्ड में ट्रांसफ़र करना लेख पढ़ें.

ज़रूरी नहीं: पुष्टि करने वाला चैट मैसेज भेजें

डायलॉग बॉक्स बंद करने के बाद, नया चैट मैसेज भेजा जा सकता है या मौजूदा मैसेज को अपडेट किया जा सकता है.

नया मैसेज भेजने के लिए, DataActions ऑब्जेक्ट वापस भेजें. इसमें CreateMessageAction फ़ील्ड को नए मैसेज के साथ सेट किया गया हो. यहां दिए गए उदाहरण में, नया मैसेज भेजकर डायलॉग बॉक्स को बंद किया गया है:

Node.js

node/chat/contact-form-app/index.js
return { hostAppDataAction: { chatDataAction: { createMessageAction: { message: {
  text: "✅ " + event.commonEventObject.parameters["contactName"] + " has been added to your contacts."
}}}}};

Python

python/chat/contact-form-app/main.py
return { 'hostAppDataAction': { 'chatDataAction': { 'createMessageAction': { 'message': {
  'text': "✅ " + event.get('commonEventObject').get('parameters')["contactName"] + " has been added to your contacts."
}}}}}

Java

java/chat/contact-form-app/src/main/java/com/google/chat/contact/App.java
return new GenericJson() {{
  put("hostAppDataAction", new GenericJson() {{
    put("chatDataAction", new GenericJson() {{
      put("createMessageAction", new GenericJson() {{
        put("message", new Message()
          .setText( "✅ " + event.at("/commonEventObject/parameters/contactName").asText() +
                    " has been added to your contacts."));
      }});
    }});
  }});
}};

Apps Script

इस उदाहरण में, कार्ड JSON को वापस भेजकर, कार्ड मैसेज भेजा जाता है. Apps Script की कार्ड सेवा का भी इस्तेमाल किया जा सकता है.

apps-script/chat/contact-form-app/Code.gs
return { hostAppDataAction: { chatDataAction: { createMessageAction: { message: {
  text: "✅ " + event.commonEventObject.parameters["contactName"] + " has been added to your contacts."
}}}}};

उपयोगकर्ता के डायलॉग सबमिट करने के बाद, मैसेज को अपडेट करने के लिए, DataActions ऑब्जेक्ट दिखाएं. इसमें इनमें से कोई एक कार्रवाई शामिल होनी चाहिए:

समस्या हल करें

जब कोई Google Chat ऐप्लिकेशन या कार्ड गड़बड़ी दिखाता है, तो Chat इंटरफ़ेस पर एक मैसेज दिखता है. इसमें लिखा होता है कि "कोई गड़बड़ी हुई." या "आपके अनुरोध को प्रोसेस नहीं किया जा सका." कभी-कभी Chat के यूज़र इंटरफ़ेस (यूआई) पर कोई गड़बड़ी का मैसेज नहीं दिखता, लेकिन Chat ऐप्लिकेशन या कार्ड से कोई अनचाहा नतीजा मिलता है. उदाहरण के लिए, हो सकता है कि कार्ड मैसेज न दिखे.

ऐसा हो सकता है कि Chat के यूज़र इंटरफ़ेस (यूआई) में गड़बड़ी का मैसेज न दिखे. हालांकि, Chat ऐप्लिकेशन के लिए गड़बड़ी लॉग करने की सुविधा चालू होने पर, गड़बड़ियों को ठीक करने में आपकी मदद करने के लिए, गड़बड़ी के बारे में जानकारी देने वाले मैसेज और लॉग डेटा उपलब्ध होता है. गड़बड़ियां देखने, डीबग करने, और उन्हें ठीक करने के लिए, Google Chat से जुड़ी गड़बड़ियों को ठीक करना लेख पढ़ें.

ऐड-ऑन के तौर पर उपलब्ध नहीं कराए गए चैट ऐप्लिकेशन: इंटरैक्टिव डायलॉग बॉक्स खोलना

यहां दिया गया दस्तावेज़, Google Workspace ऐड-ऑन के अलावा अन्य Chat ऐप्लिकेशन पर लागू होता है. अगर आपको किसी ऐसे Chat ऐप्लिकेशन को माइग्रेट करना है जो ऐड-ऑन नहीं है, तो Google Chat ऐप्लिकेशन को Google Workspace ऐड-ऑन में बदलना लेख पढ़ें.

डायलॉग का अनुरोध ट्रिगर करना

यहां दिए गए कोड सैंपल में दिखाया गया है कि ऐड-ऑन के तौर पर काम न करने वाला Chat ऐप्लिकेशन, कार्ड मैसेज में मौजूद बटन से डायलॉग का अनुरोध कैसे ट्रिगर करता है. डायलॉग बॉक्स खोलने के लिए, button.interaction फ़ील्ड को OPEN_DIALOG पर सेट करें:

Node.js

node/contact-form-app/index.js
buttonList: { buttons: [{
  text: "Add Contact",
  onClick: { action: {
    function: "openInitialDialog",
    interaction: "OPEN_DIALOG"
  }}
}]}

Python

python/contact-form-app/main.py
'buttonList': { 'buttons': [{
  'text': "Add Contact",
  'onClick': { 'action': {
    'function': "openInitialDialog",
    'interaction': "OPEN_DIALOG"
  }}
}]}

Java

java/contact-form-app/src/main/java/com/google/chat/contact/App.java
.setButtonList(new GoogleAppsCardV1ButtonList().setButtons(List.of(new GoogleAppsCardV1Button()
  .setText("Add Contact")
  .setOnClick(new GoogleAppsCardV1OnClick().setAction(new GoogleAppsCardV1Action()
    .setFunction("openInitialDialog")
    .setInteraction("OPEN_DIALOG"))))))));

Apps Script

इस उदाहरण में, कार्ड JSON को वापस भेजकर, कार्ड मैसेज भेजा जाता है. Apps Script की कार्ड सेवा का भी इस्तेमाल किया जा सकता है.

apps-script/contact-form-app/main.gs
buttonList: { buttons: [{
  text: "Add Contact",
  onClick: { action: {
    function: "openInitialDialog",
    interaction: "OPEN_DIALOG"
  }}
}]}

शुरुआती डायलॉग बॉक्स खोलें

जब कोई उपयोगकर्ता डायलॉग का अनुरोध ट्रिगर करता है, तो ऐड-ऑन नहीं होने वाला Chat ऐप्लिकेशन, इंटरैक्शन इवेंट पाता है. इसे Chat API में event टाइप के तौर पर दिखाया जाता है. अगर इंटरैक्शन से डायलॉग का अनुरोध ट्रिगर होता है, तो इवेंट के dialogEventType फ़ील्ड को REQUEST_DIALOG पर सेट किया जाता है.

डायलॉग खोलने के लिए, ऐड-ऑन के तौर पर काम न करने वाला Chat ऐप्लिकेशन, अनुरोध का जवाब दे सकता है. इसके लिए, उसे type: "DIALOG" और Message ऑब्जेक्ट के साथ actionResponse ऑब्जेक्ट दिखाना होगा. डायलॉग बॉक्स का कॉन्टेंट तय करने के लिए, आपको यहां दिए गए ऑब्जेक्ट शामिल करने होंगे:

  • actionResponse ऑब्जेक्ट, जिसकी type प्रॉपर्टी को DIALOG पर सेट किया गया है.
  • एक dialogAction ऑब्जेक्ट. body फ़ील्ड में, कार्ड में दिखाने के लिए यूज़र इंटरफ़ेस (यूआई) एलिमेंट शामिल होते हैं. इनमें एक या उससे ज़्यादा sections विजेट शामिल होते हैं. उपयोगकर्ताओं से जानकारी इकट्ठा करने के लिए, फ़ॉर्म इनपुट विजेट और बटन विजेट तय किए जा सकते हैं.

नीचे दिए गए कोड सैंपल में, ऐसे Chat ऐप्लिकेशन का उदाहरण दिखाया गया है जो ऐड-ऑन नहीं है. इसमें बताया गया है कि डायलॉग खोलने वाला जवाब कैसे मिलता है:

Node.js

node/contact-form-app/index.js
/**
 * Opens the initial step of the dialog that lets users add contact details.
 *
 * @return {Object} a message with an action response to open a dialog.
 */
function openInitialDialog() {
  return { actionResponse: {
    type: "DIALOG",
    dialogAction: { dialog: { body: { sections: [{
      header: "Add new contact",
      widgets: CONTACT_FORM_WIDGETS.concat([{
        buttonList: { buttons: [{
          text: "Review and submit",
          onClick: { action: { function: "openConfirmation" }}
        }]}
      }])
    }]}}}
  }};
}

Python

python/contact-form-app/main.py
def open_initial_dialog() -> dict:
  """Opens the initial step of the dialog that lets users add contact details."""
  return { 'actionResponse': {
    'type': "DIALOG",
    'dialogAction': { 'dialog': { 'body': { 'sections': [{
      'header': "Add new contact",
      'widgets': CONTACT_FORM_WIDGETS + [{
        'buttonList': { 'buttons': [{
          'text': "Review and submit",
          'onClick': { 'action': { 'function': "openConfirmation" }}
        }]}
      }]
    }]}}}
  }}

Java

java/contact-form-app/src/main/java/com/google/chat/contact/App.java
// Opens the initial step of the dialog that lets users add contact details.
Message openInitialDialog() {
  return new Message().setActionResponse(new ActionResponse()
    .setType("DIALOG")
    .setDialogAction(new DialogAction().setDialog(new Dialog().setBody(new GoogleAppsCardV1Card()
      .setSections(List.of(new GoogleAppsCardV1Section()
        .setHeader("Add new contact")
        .setWidgets(Stream.concat(
          CONTACT_FORM_WIDGETS.stream(),
          List.of(new GoogleAppsCardV1Widget()
            .setButtonList(new GoogleAppsCardV1ButtonList().setButtons(List.of(new GoogleAppsCardV1Button()
            .setText("Review and submit")
            .setOnClick(new GoogleAppsCardV1OnClick().setAction(new GoogleAppsCardV1Action()
              .setFunction("openConfirmation"))))))).stream()).collect(Collectors.toList()))))))));
}

Apps Script

इस उदाहरण में, कार्ड JSON को वापस भेजकर, कार्ड मैसेज भेजा जाता है. Apps Script की कार्ड सेवा का भी इस्तेमाल किया जा सकता है.

apps-script/contact-form-app/main.gs
/**
 * Opens the initial step of the dialog that lets users add contact details.
 *
 * @return {Object} a message with an action response to open a dialog.
 */
function openInitialDialog() {
  return { actionResponse: {
    type: "DIALOG",
    dialogAction: { dialog: { body: { sections: [{
      header: "Add new contact",
      widgets: CONTACT_FORM_WIDGETS.concat([{
        buttonList: { buttons: [{
          text: "Review and submit",
          onClick: { action: { function: "openConfirmation" }}
        }]}
      }])
    }]}}}
  }};
}

डायलॉग सबमिट करने की प्रोसेस मैनेज करना

जब उपयोगकर्ता, डायलॉग सबमिट करने वाले बटन पर क्लिक करते हैं, तो ऐड-ऑन नहीं होने वाला Chat ऐप्लिकेशन, CARD_CLICKED इंटरैक्शन इवेंट पाता है. इसमें dialogEventType, SUBMIT_DIALOG होता है.

ज़रूरी नहीं: कोई दूसरा डायलॉग बॉक्स दिखाएं

ऐड-ऑन के तौर पर उपलब्ध न होने वाले Chat ऐप्लिकेशन में उपयोगकर्ताओं के डाले गए डेटा को प्रोसेस करने के लिए, Chat ऐप्लिकेशन event.common.formInputs ऑब्जेक्ट का इस्तेमाल करता है.

इस उदाहरण में, ऐड-ऑन नहीं है. यह एक चैट ऐप्लिकेशन है. इसमें सबमिट करने से पहले, पुष्टि करने के लिए दो डायलॉग बॉक्स खुलते हैं:

Node.js

node/contact-form-app/index.js
/**
 * Responds to CARD_CLICKED interaction events in Google Chat.
 *
 * @param {Object} event the CARD_CLICKED interaction event from Google Chat.
 * @return {Object} message responses specific to the dialog handling.
 */
function onCardClick(event) {
  // Initial dialog form page
  if (event.common.invokedFunction === "openInitialDialog") {
    return openInitialDialog();
  // Confirmation dialog form page
  } else if (event.common.invokedFunction === "openConfirmation") {
    return openConfirmation(event);
  // Submission dialog form page
  } else if (event.common.invokedFunction === "submitForm") {
    return submitForm(event);
  }
}

/**
 * Opens the initial step of the dialog that lets users add contact details.
 *
 * @return {Object} a message with an action response to open a dialog.
 */
function openInitialDialog() {
  return { actionResponse: {
    type: "DIALOG",
    dialogAction: { dialog: { body: { sections: [{
      header: "Add new contact",
      widgets: CONTACT_FORM_WIDGETS.concat([{
        buttonList: { buttons: [{
          text: "Review and submit",
          onClick: { action: { function: "openConfirmation" }}
        }]}
      }])
    }]}}}
  }};
}

/**
 * Returns the second step as a dialog or card message that lets users confirm details.
 *
 * @param {Object} event the interactive event with form inputs.
 * @return {Object} returns a dialog or private card message.
 */
function openConfirmation(event) {
  const name = fetchFormValue(event, "contactName") ?? "";
  const birthdate = fetchFormValue(event, "contactBirthdate") ?? "";
  const type = fetchFormValue(event, "contactType") ?? "";
  const cardConfirmation = {
    header: "Your contact",
    widgets: [{
      textParagraph: { text: "Confirm contact information and submit:" }}, {
      textParagraph: { text: "<b>Name:</b> " + name }}, {
      textParagraph: {
        text: "<b>Birthday:</b> " + convertMillisToDateString(birthdate)
      }}, {
      textParagraph: { text: "<b>Type:</b> " + type }}, {
      buttonList: { buttons: [{
        text: "Submit",
        onClick: { action: {
          function: "submitForm",
          parameters: [{
            key: "contactName", value: name }, {
            key: "contactBirthdate", value: birthdate }, {
            key: "contactType", value: type
          }]
        }}
      }]}
    }]
  };

  // Returns a dialog with contact information that the user input.
  if (event.isDialogEvent) {
    return { action_response: {
      type: "DIALOG",
      dialogAction: { dialog: { body: { sections: [ cardConfirmation ]}}}
    }};
  }

  // Updates existing card message with contact information that the user input.
  return {
    actionResponse: { type: "UPDATE_MESSAGE" },
    privateMessageViewer: event.user,
    cardsV2: [{
      card: { sections: [cardConfirmation]}
    }]
  }
}

Python

python/contact-form-app/main.py
def on_card_click(event: dict) -> dict:
  """Responds to CARD_CLICKED interaction events in Google Chat."""
  # Initial dialog form page
  if "openInitialDialog" == event.get('common').get('invokedFunction'):
    return open_initial_dialog()
  # Confirmation dialog form page
  elif "openConfirmation" == event.get('common').get('invokedFunction'):
    return open_confirmation(event)
  # Submission dialog form page
  elif "submitForm" == event.get('common').get('invokedFunction'):
    return submit_form(event)


def open_initial_dialog() -> dict:
  """Opens the initial step of the dialog that lets users add contact details."""
  return { 'actionResponse': {
    'type': "DIALOG",
    'dialogAction': { 'dialog': { 'body': { 'sections': [{
      'header': "Add new contact",
      'widgets': CONTACT_FORM_WIDGETS + [{
        'buttonList': { 'buttons': [{
          'text': "Review and submit",
          'onClick': { 'action': { 'function': "openConfirmation" }}
        }]}
      }]
    }]}}}
  }}


def open_confirmation(event: dict) -> dict:
  """Returns the second step as a dialog or card message that lets users confirm details."""
  name = fetch_form_value(event, "contactName") or ""
  birthdate = fetch_form_value(event, "contactBirthdate") or ""
  type = fetch_form_value(event, "contactType") or ""
  card_confirmation = {
    'header': "Your contact",
    'widgets': [{
      'textParagraph': { 'text': "Confirm contact information and submit:" }}, {
      'textParagraph': { 'text': "<b>Name:</b> " + name }}, {
      'textParagraph': {
        'text': "<b>Birthday:</b> " + convert_millis_to_date_string(birthdate)
      }}, {
      'textParagraph': { 'text': "<b>Type:</b> " + type }}, {
      'buttonList': { 'buttons': [{
        'text': "Submit",
        'onClick': { 'action': {
          'function': "submitForm",
          'parameters': [{
            'key': "contactName", 'value': name }, {
            'key': "contactBirthdate", 'value': birthdate }, {
            'key': "contactType", 'value': type
          }]
        }}
      }]}
    }]
  }

  # Returns a dialog with contact information that the user input.
  if event.get('isDialogEvent'): 
    return { 'action_response': {
      'type': "DIALOG",
      'dialogAction': { 'dialog': { 'body': { 'sections': [card_confirmation] }}}
    }}

  # Updates existing card message with contact information that the user input.
  return {
    'actionResponse': { 'type': "UPDATE_MESSAGE" },
    'privateMessageViewer': event.get('user'),
    'cardsV2': [{
      'card': { 'sections': [card_confirmation] }
    }]
  }

Java

java/contact-form-app/src/main/java/com/google/chat/contact/App.java
// Responds to CARD_CLICKED interaction events in Google Chat.
Message onCardClick(JsonNode event) {
  String invokedFunction = event.at("/common/invokedFunction").asText();
  // Initial dialog form page
  if ("openInitialDialog".equals(invokedFunction)) {
    return openInitialDialog();
  // Confirmation dialog form page
  } else if ("openConfirmation".equals(invokedFunction)) {
    return openConfirmation(event);
  // Submission dialog form page
  } else if ("submitForm".equals(invokedFunction)) {
    return submitForm(event);
  }
  return null; 
}

// Opens the initial step of the dialog that lets users add contact details.
Message openInitialDialog() {
  return new Message().setActionResponse(new ActionResponse()
    .setType("DIALOG")
    .setDialogAction(new DialogAction().setDialog(new Dialog().setBody(new GoogleAppsCardV1Card()
      .setSections(List.of(new GoogleAppsCardV1Section()
        .setHeader("Add new contact")
        .setWidgets(Stream.concat(
          CONTACT_FORM_WIDGETS.stream(),
          List.of(new GoogleAppsCardV1Widget()
            .setButtonList(new GoogleAppsCardV1ButtonList().setButtons(List.of(new GoogleAppsCardV1Button()
            .setText("Review and submit")
            .setOnClick(new GoogleAppsCardV1OnClick().setAction(new GoogleAppsCardV1Action()
              .setFunction("openConfirmation"))))))).stream()).collect(Collectors.toList()))))))));
}

// Returns the second step as a dialog or card message that lets users confirm details.
Message openConfirmation(JsonNode event) {
  String name = fetchFormValue(event, "contactName") != null ?
    fetchFormValue(event, "contactName") : "";
  String birthdate = fetchFormValue(event, "contactBirthdate") != null ?
    fetchFormValue(event, "contactBirthdate") : "";
  String type = fetchFormValue(event, "contactType") != null ?
    fetchFormValue(event, "contactType") : "";
  GoogleAppsCardV1Section cardConfirmationSection = new GoogleAppsCardV1Section()
    .setHeader("Your contact")
    .setWidgets(List.of(
      new GoogleAppsCardV1Widget().setTextParagraph(new GoogleAppsCardV1TextParagraph()
        .setText("Confirm contact information and submit:")),
      new GoogleAppsCardV1Widget().setTextParagraph(new GoogleAppsCardV1TextParagraph()
        .setText("<b>Name:</b> " + name)),
      new GoogleAppsCardV1Widget().setTextParagraph(new GoogleAppsCardV1TextParagraph()
        .setText("<b>Birthday:</b> " + convertMillisToDateString(birthdate))),
      new GoogleAppsCardV1Widget().setTextParagraph(new GoogleAppsCardV1TextParagraph()
        .setText("<b>Type:</b> " + type)),
      new GoogleAppsCardV1Widget().setButtonList(new GoogleAppsCardV1ButtonList().setButtons(List.of(new GoogleAppsCardV1Button()
        .setText("Submit")
        .setOnClick(new GoogleAppsCardV1OnClick().setAction(new GoogleAppsCardV1Action()
          .setFunction("submitForm")
          .setParameters(List.of(
            new GoogleAppsCardV1ActionParameter().setKey("contactName").setValue(name),
            new GoogleAppsCardV1ActionParameter().setKey("contactBirthdate").setValue(birthdate),
            new GoogleAppsCardV1ActionParameter().setKey("contactType").setValue(type))))))))));

  // Returns a dialog with contact information that the user input.
  if (event.at("/isDialogEvent") != null && event.at("/isDialogEvent").asBoolean()) {
    return new Message().setActionResponse(new ActionResponse()
      .setType("DIALOG")
      .setDialogAction(new DialogAction().setDialog(new Dialog().setBody(new GoogleAppsCardV1Card()
        .setSections(List.of(cardConfirmationSection))))));
  }

  // Updates existing card message with contact information that the user input.
  return new Message()
    .setActionResponse(new ActionResponse()
      .setType("UPDATE_MESSAGE"))
    .setPrivateMessageViewer(new User().setName(event.at("/user/name").asText()))
    .setCardsV2(List.of(new CardWithId().setCard(new GoogleAppsCardV1Card()
      .setSections(List.of(cardConfirmationSection)))));
}

Apps Script

इस उदाहरण में, कार्ड JSON को वापस भेजकर, कार्ड मैसेज भेजा जाता है. Apps Script की कार्ड सेवा का भी इस्तेमाल किया जा सकता है.

apps-script/contact-form-app/main.gs
/**
 * Responds to CARD_CLICKED interaction events in Google Chat.
 *
 * @param {Object} event the CARD_CLICKED interaction event from Google Chat.
 * @return {Object} message responses specific to the dialog handling.
 */
function onCardClick(event) {
  // Initial dialog form page
  if (event.common.invokedFunction === "openInitialDialog") {
    return openInitialDialog();
  // Confirmation dialog form page
  } else if (event.common.invokedFunction === "openConfirmation") {
    return openConfirmation(event);
  // Submission dialog form page
  } else if (event.common.invokedFunction === "submitForm") {
    return submitForm(event);
  }
}

/**
 * Opens the initial step of the dialog that lets users add contact details.
 *
 * @return {Object} a message with an action response to open a dialog.
 */
function openInitialDialog() {
  return { actionResponse: {
    type: "DIALOG",
    dialogAction: { dialog: { body: { sections: [{
      header: "Add new contact",
      widgets: CONTACT_FORM_WIDGETS.concat([{
        buttonList: { buttons: [{
          text: "Review and submit",
          onClick: { action: { function: "openConfirmation" }}
        }]}
      }])
    }]}}}
  }};
}

/**
 * Returns the second step as a dialog or card message that lets users confirm details.
 *
 * @param {Object} event the interactive event with form inputs.
 * @return {Object} returns a dialog or private card message.
 */
function openConfirmation(event) {
  const name = fetchFormValue(event, "contactName") ?? "";
  const birthdate = fetchFormValue(event, "contactBirthdate") ?? "";
  const type = fetchFormValue(event, "contactType") ?? "";
  const cardConfirmation = {
    header: "Your contact",
    widgets: [{
      textParagraph: { text: "Confirm contact information and submit:" }}, {
      textParagraph: { text: "<b>Name:</b> " + name }}, {
      textParagraph: {
        text: "<b>Birthday:</b> " + convertMillisToDateString(birthdate)
      }}, {
      textParagraph: { text: "<b>Type:</b> " + type }}, {
      buttonList: { buttons: [{
        text: "Submit",
        onClick: { action: {
          function: "submitForm",
          parameters: [{
            key: "contactName", value: name }, {
            key: "contactBirthdate", value: birthdate }, {
            key: "contactType", value: type
          }]
        }}
      }]}
    }]
  };

  // Returns a dialog with contact information that the user input.
  if (event.isDialogEvent) {
    return { action_response: {
      type: "DIALOG",
      dialogAction: { dialog: { body: { sections: [ cardConfirmation ]}}}
    }};
  }

  // Updates existing card message with contact information that the user input.
  return {
    actionResponse: { type: "UPDATE_MESSAGE" },
    privateMessageViewer: event.user,
    cardsV2: [{
      card: { sections: [cardConfirmation]}
    }]
  }
}

डायलॉग बंद करें

जब उपयोगकर्ता किसी डायलॉग बॉक्स में मौजूद बटन पर क्लिक करते हैं, तो ऐड-ऑन नहीं होने वाला Chat ऐप्लिकेशन, उससे जुड़ी कार्रवाई करता है. साथ ही, इवेंट ऑब्जेक्ट में यह जानकारी देता है:

ऐड-ऑन के तौर पर उपलब्ध नहीं होने वाले Chat ऐप्लिकेशन को ActionResponse ऑब्जेक्ट दिखाना चाहिए. इसमें type को DIALOG पर सेट किया गया हो और dialogAction की वैल्यू मौजूद हो. अगर कार्रवाई पूरी हो गई है, तो dialogAction.actionStatus को OK के तौर पर मार्क किया जाना चाहिए. उदाहरण के लिए:

Node.js

node/contact-form-app/index.js
// The Chat app indicates that it received form data from the dialog or card.
// Sends private text message that confirms submission.
const confirmationMessage = "✅ " + contactName + " has been added to your contacts.";
if (event.dialogEventType === "SUBMIT_DIALOG") {
  return {
    actionResponse: {
      type: "DIALOG",
      dialogAction: { actionStatus: {
        statusCode: "OK",
        userFacingMessage: "Success " + contactName
      }}
    }
  };
}

Python

python/contact-form-app/main.py
# The Chat app indicates that it received form data from the dialog or card.
# Sends private text message that confirms submission.
confirmation_message = "✅ " + contact_name + " has been added to your contacts.";
if "SUBMIT_DIALOG" == event.get('dialogEventType'):
  return {
    'actionResponse': {
      'type': "DIALOG",
      'dialogAction': { 'actionStatus': {
        'statusCode': "OK",
        'userFacingMessage': "Success " + contact_name
      }}
    }
  }

Java

java/contact-form-app/src/main/java/com/google/chat/contact/App.java
// The Chat app indicates that it received form data from the dialog or card.
// Sends private text message that confirms submission.
String confirmationMessage = "✅ " + contactName + " has been added to your contacts.";
if (event.at("/dialogEventType") != null && "SUBMIT_DIALOG".equals(event.at("/dialogEventType").asText())) {
  return new Message().setActionResponse(new ActionResponse()
    .setType("DIALOG")
    .setDialogAction(new DialogAction().setActionStatus(new ActionStatus()
      .setStatusCode("OK")
      .setUserFacingMessage("Success " + contactName))));
}

Apps Script

इस उदाहरण में, कार्ड JSON को वापस भेजकर, कार्ड मैसेज भेजा जाता है. Apps Script की कार्ड सेवा का भी इस्तेमाल किया जा सकता है.

apps-script/contact-form-app/main.gs
// The Chat app indicates that it received form data from the dialog or card.
// Sends private text message that confirms submission.
const confirmationMessage = "✅ " + contactName + " has been added to your contacts.";
if (event.dialogEventType === "SUBMIT_DIALOG") {
  return {
    actionResponse: {
      type: "DIALOG",
      dialogAction: { actionStatus: {
        statusCode: "OK",
        userFacingMessage: "Success " + contactName
      }}
    }
  };
}
ज़रूरी नहीं: कुछ समय के लिए सूचना दिखाना

Chat ऐप्लिकेशन, ऐड-ऑन नहीं है. यह ActionResponse को actionStatus के साथ सेट करके, सूचना के तौर पर सफलता या गड़बड़ी का जवाब दे सकता है.

यहां दिए गए उदाहरण में, यह जांच की जाती है कि पैरामीटर मान्य हैं या नहीं. अगर पैरामीटर अमान्य हैं, तो टेक्स्ट सूचना के साथ डायलॉग बंद कर दिया जाता है:

Node.js

node/contact-form-app/index.js
const contactName = event.common.parameters["contactName"];
// Checks to make sure the user entered a contact name.
// If no name value detected, returns an error message.
const errorMessage = "Don't forget to name your new contact!";
if (!contactName && event.dialogEventType === "SUBMIT_DIALOG") {
  return { actionResponse: {
    type: "DIALOG",
    dialogAction: { actionStatus: {
      statusCode: "INVALID_ARGUMENT",
      userFacingMessage: errorMessage
    }}
  }};
}

Python

python/contact-form-app/main.py
contact_name = event.get('common').get('parameters')["contactName"]
# Checks to make sure the user entered a contact name.
# If no name value detected, returns an error message.
error_message = "Don't forget to name your new contact!"
if contact_name == "" and "SUBMIT_DIALOG" == event.get('dialogEventType'):
  return { 'actionResponse': {
    'type': "DIALOG",
    'dialogAction': { 'actionStatus': {
      'statusCode': "INVALID_ARGUMENT",
      'userFacingMessage': error_message
    }}
  }}

Java

java/contact-form-app/src/main/java/com/google/chat/contact/App.java
String contactName = event.at("/common/parameters/contactName").asText();
// Checks to make sure the user entered a contact name.
// If no name value detected, returns an error message.
String errorMessage = "Don't forget to name your new contact!";
if (contactName.isEmpty() && event.at("/dialogEventType") != null && "SUBMIT_DIALOG".equals(event.at("/dialogEventType").asText())) {
  return new Message().setActionResponse(new ActionResponse()
    .setType("DIALOG")
    .setDialogAction(new DialogAction().setActionStatus(new ActionStatus()
      .setStatusCode("INVALID_ARGUMENT")
      .setUserFacingMessage(errorMessage))));
}

Apps Script

इस उदाहरण में, कार्ड JSON को वापस भेजकर, कार्ड मैसेज भेजा जाता है. Apps Script की कार्ड सेवा का भी इस्तेमाल किया जा सकता है.

apps-script/contact-form-app/main.gs
const contactName = event.common.parameters["contactName"];
// Checks to make sure the user entered a contact name.
// If no name value detected, returns an error message.
const errorMessage = "Don't forget to name your new contact!";
if (!contactName && event.dialogEventType === "SUBMIT_DIALOG") {
  return { actionResponse: {
    type: "DIALOG",
    dialogAction: { actionStatus: {
      statusCode: "INVALID_ARGUMENT",
      userFacingMessage: errorMessage
    }}
  }};
}
ज़रूरी नहीं: पुष्टि करने वाला चैट मैसेज भेजें

ऐड-ऑन के तौर पर उपलब्ध नहीं होने वाले चैट ऐप्लिकेशन में डायलॉग बंद करते समय नया मैसेज भेजने के लिए, type: "NEW_MESSAGE" के साथ ActionResponse ऑब्जेक्ट दिखाएं. यहां दिए गए उदाहरण में, पुष्टि करने वाले टेक्स्ट मैसेज के साथ डायलॉग बंद करने का तरीका बताया गया है:

Node.js

node/contact-form-app/index.js
return {
  actionResponse: { type: "NEW_MESSAGE" },
  privateMessageViewer: event.user,
  text: confirmationMessage
};

Python

python/contact-form-app/main.py
return {
  'actionResponse': { 'type': "NEW_MESSAGE" },
  'privateMessageViewer': event.get('user'),
  'text': confirmation_message
}

Java

java/contact-form-app/src/main/java/com/google/chat/contact/App.java
return new Message()
  .setActionResponse(new ActionResponse().setType("NEW_MESSAGE"))
  .setPrivateMessageViewer(new User().setName(event.at("/user/name").asText()))
  .setText(confirmationMessage);

Apps Script

इस उदाहरण में, कार्ड JSON को वापस भेजकर, कार्ड मैसेज भेजा जाता है. Apps Script की कार्ड सेवा का भी इस्तेमाल किया जा सकता है.

apps-script/contact-form-app/main.gs
return {
  actionResponse: { type: "NEW_MESSAGE" },
  privateMessageViewer: event.user,
  text: confirmationMessage
};

मैसेज को अपडेट करने के लिए, ऐसा actionResponse ऑब्जेक्ट दिखाएं जिसमें अपडेट किया गया मैसेज शामिल हो. साथ ही, type को इनमें से किसी एक पर सेट करें: