Mit Sammlungen den Überblick behalten
Sie können Inhalte basierend auf Ihren Einstellungen speichern und kategorisieren.
Für jede Google Chat-App, die Sie erstellen, ist ein eigenes Google Cloud-Projekt mit aktivierter und konfigurierter Chat API erforderlich. Auf dieser Seite erfahren Sie, wie Sie die Chat API konfigurieren.
Anzeigenamen, Avatar und Beschreibung für Ihre Chat-App auswählen
Wenn Sie die Chat API aktivieren, konfigurieren Sie die Details zu Ihrer Chat-App, die Nutzern in Chat angezeigt werden, einschließlich Anzeigename, Avatar und Beschreibung. Diese Informationen werden nur in Chat angezeigt. Wenn Sie Ihre Chat-App im Marketplace veröffentlichen möchten, müssen Sie auch die Details angeben, die im Marketplace-Eintrag Ihrer Chat-App angezeigt werden.
Wenn Sie die Chat API aufrufen möchten, müssen Sie eine Google Chat-App mit den folgenden Informationen einrichten:
Feld
Beschreibung
Format
App-Name
Der Anzeigename für die Chat-App.
Bis zu 25 alphanumerische Zeichen
Avatar-URL
Das Bild, das als Avatar Ihrer Chat-App angezeigt wird.
Eine HTTPS-URL, die auf ein quadratisches Bild (PNG oder JPEG) verweist.
Die empfohlene Größe beträgt mindestens 256 × 256 Pixel.
Beschreibung
Eine kurze Beschreibung des Zwecks der Chat-App.
Bis zu 40 alphanumerische Zeichen
Der Name, der Avatar und die Beschreibung der Chat-App werden den Nutzern in der Chat-Benutzeroberfläche angezeigt. Bei einigen Schreibanfragen an die Chat API verwendet Chat diese Informationen, um die Aktionen zuzuordnen, die eine Chat-App in Chat ausführt.
Wenn Sie beispielsweise die Methode spaces.create() aufrufen, enthält Chat den Namen der Chat-App in der Beschreibung, wer den Gruppenbereich erstellt hat, wie im folgenden Bild dargestellt:
Abbildung 1: Die Attributionsnachricht, die in Chat angezeigt wird, wenn die Methode 
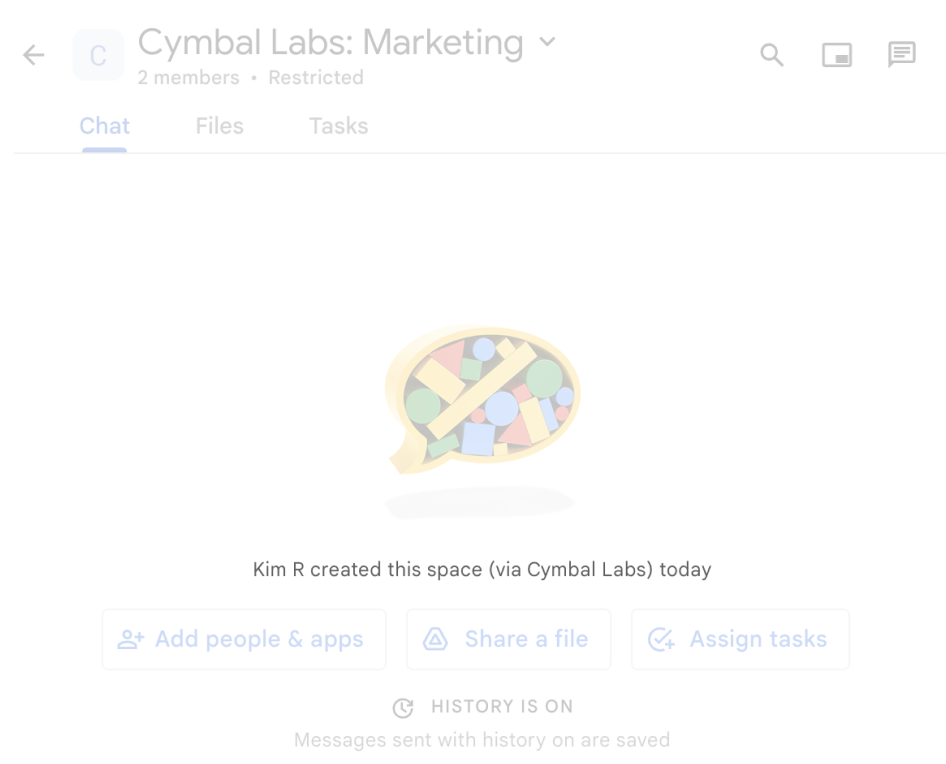
spaces.create() verwendet wird, um einen Gruppenbereich im Namen eines Nutzers zu erstellen.
Nutzer können auch auf folgende Weise mit Chat-Apps interagieren oder diese Informationen sehen oder verwenden:
Rufen Sie die Chat App auf, indem Sie ihren Namen mit @erwähnen.
Suchen Sie die Chat App und starten Sie eine Direktnachricht.
Im Menü Apps werden in Direktnachrichten der Name und der Avatar der Chat App angezeigt.
Über die Leiste zum Verfassen von Nachrichten können Nutzer Chat-Apps aufrufen und sich ihren Namen, Avatar und ihre Beschreibung ansehen.
Chat-App in der Google Cloud Console konfigurieren
Wenn Sie die Details zu Ihrer Chat-App haben, öffnen Sie Ihr Cloud-Projekt und konfigurieren Sie die Chat API:
Rufen Sie in der Google Cloud Console die Seite „Chat API“ auf und klicken Sie auf die Seite Konfiguration:
Füllen Sie unter Anwendungsinformationen die Felder Name der App, Avatar-URL und Beschreibung aus.
Klicken Sie unter „Interaktive Funktionen“ auf den Schalter Interaktive Funktionen aktivieren, um interaktive Funktionen für die Chat-App zu deaktivieren. Sie können dies später einrichten. Informationen zum Konfigurieren und Erstellen interaktiver Funktionen finden Sie unter Nutzerinteraktionen empfangen und darauf reagieren.
Optional: Wählen Sie unter Logs das Kästchen Fehler in Logging protokollieren aus, um Google Cloud Logging zu verwenden. Weitere Informationen finden Sie unter Fehlerlogs für Chat-Apps abfragen.
Klicken Sie auf Speichern.
Anderen Personen die Berechtigung zum Konfigurieren der Chat API erteilen
Sie können bestimmten Nutzern Zugriff auf die Konfigurationsseite der Chat-App gewähren, indem Sie ihnen die Google Cloud IAM-RolleChat apps Owner oder Chat apps Viewer zuweisen.
Nutzer mit diesen Rollen können nicht über das Dashboard APIs & Services zur Konfigurationsseite für Chat-Apps navigieren. Sie können jedoch auf die Konfigurationsseite zugreifen, indem sie in der Google Cloud Console zum Cloud-Projekt des Hosts der Chat-App navigieren:
[[["Leicht verständlich","easyToUnderstand","thumb-up"],["Mein Problem wurde gelöst","solvedMyProblem","thumb-up"],["Sonstiges","otherUp","thumb-up"]],[["Benötigte Informationen nicht gefunden","missingTheInformationINeed","thumb-down"],["Zu umständlich/zu viele Schritte","tooComplicatedTooManySteps","thumb-down"],["Nicht mehr aktuell","outOfDate","thumb-down"],["Problem mit der Übersetzung","translationIssue","thumb-down"],["Problem mit Beispielen/Code","samplesCodeIssue","thumb-down"],["Sonstiges","otherDown","thumb-down"]],["Zuletzt aktualisiert: 2025-08-29 (UTC)."],[[["\u003cp\u003eEvery Google Chat app needs its own Google Cloud project with the Chat API enabled and configured, following specific prerequisites.\u003c/p\u003e\n"],["\u003cp\u003eChat apps require a display name, avatar URL, and description, which are visible to users and used by Chat for attributions.\u003c/p\u003e\n"],["\u003cp\u003eThe Chat API is configured in the Google Cloud console, where you can set the app's details, enable/disable interactive features, and optionally enable error logging.\u003c/p\u003e\n"],["\u003cp\u003eAccess to the Chat app configuration page can be granted to other users via specific Google Cloud IAM roles.\u003c/p\u003e\n"]]],["Each Google Chat app requires a dedicated Google Cloud project with the Chat API enabled. Configuration involves setting up the app's display name (up to 25 characters), avatar URL (square image, 256x256 pixels or more), and description (up to 40 characters). In the Google Cloud console, you must fill out these application details, and optionally, enable or disable interactive features and log errors. Additionally, you can grant specific users access to configure the Chat API by assigning them the \"Chat apps Owner\" or \"Chat apps Viewer\" IAM roles.\n"],null,["# Configure the Google Chat API\n\nEach Google Chat app that you create requires its own\nGoogle Cloud project with the Chat API enabled and configured. This page\nshows you how to configure the Chat API.\n\nPrerequisites\n-------------\n\n- A Business or Enterprise [Google Workspace](https://support.google.com/a/answer/6043576) account with access to [Google Chat](https://workspace.google.com/products/chat/).\n- [Create a Google Cloud project](/workspace/guides/create-project).\n- [Configure the OAuth consent screen](/workspace/guides/configure-oauth-consent).\n- [Enable the Google Chat API](/workspace/guides/enable-apis).\n\nChoose a display name, avatar, and description for your Chat app\n----------------------------------------------------------------\n\nWhen you enable the Chat API, you configure the details about your\nChat app that appear to users in Chat,\nincluding a display name, avatar, and description. These details only appear\nin Chat. To publish your Chat app to the\nMarketplace, you must also specify the details that\nappear in your Chat app's\n[Marketplace listing](/workspace/marketplace/create-listing).\n\nTo call the Chat API, you must set up a\nGoogle Chat app with the following information:\n\n| Field | Description | Format |\n|-------------|-----------------------------------------------------|----------------------------------------------------------------------------------------------------------------|\n| App name | The display name for the Chat app. | Up to 25 alphanumeric characters |\n| Avatar URL | The image that displays as your Chat app's avatar. | An HTTPS URL pointing to a square graphics image (PNG or JPEG). Recommended size is 256 by 256 pixels or more. |\n| Description | A brief description of the purpose of the Chat app. | Up to 40 alphanumeric characters |\n\nThe Chat app's name, avatar, and description are\ndisplayed to users in the Chat UI. For some Chat API\nwrite requests, Chat uses this information to attribute the\nactions that a Chat app takes in Chat.\n\nFor example, if you call the `spaces.create()` method, Chat\nincludes the name of the Chat app in the\ndescription of who created the space, as shown in the following image:\n**Figure 1** . The attribution message that Chat displays when the `spaces.create()` method is used to create a space on behalf of a user.\n\nTo interact with Chat apps, users can also see or use this\ninformation in the following ways:\n\n- Invoke the Chat app by @mentioning its name.\n- Find and start a direct message with the Chat app. In the **Apps** menu, direct messages display the Chat app's name and avatar.\n- From the compose bar, users can browse Chat apps and see their name, avatar, and description.\n\nConfigure your Chat app in the Google Cloud console\n---------------------------------------------------\n\nWhen you have your Chat app details, open your\nCloud project and configure the Chat API:\n\n1. In the Google Cloud console, go to the Chat API page and click the\n **Configuration** page:\n\n [Go to Chat API Configuration page](https://console.cloud.google.com/apis/api/chat.googleapis.com/hangouts-chat)\n2. Under **Application info** , fill out the **App name** , **Avatar URL** ,\n and **Description** fields.\n\n3. Under Interactive features, click the **Enable interactive features** toggle\n to the off position to disable interactive features for the\n Chat app. You can set this up later. To learn about\n configuring and building interactive features, see\n [Receive and respond to user interactions](/workspace/chat/receive-respond-interactions).\n\n4. Optional: Under **Logs** , select the **Log errors to Logging** checkbox to\n use Google Cloud Logging. For more information, see\n [Query error logs for Chat apps](/workspace/chat/query-logs).\n\n5. Click **Save**.\n\nGrant other people permission to configure the Chat API\n-------------------------------------------------------\n\nYou can\n[give specific users access](https://cloud.google.com/iam/docs/granting-changing-revoking-access#single-role)\nto the Chat app configuration page by granting them\nthe **Chat apps Owner** or **Chat apps Viewer**\n[Google Cloud Identity Access Management (IAM) role](https://cloud.google.com/iam/docs/understanding-roles#chat-roles).\nUsers with these roles can't navigate to the Chat apps\nconfiguration page by using the **APIs \\& Services** dashboard, but can\naccess the configuration page by navigating to the Google Cloud console for the\nChat app's host Cloud project as follows: \n\n```\nhttps://console.developers.google.com/apis/api/chat.googleapis.com/hangouts-chat?project=PROJECT_ID\n```\n\nWhere \u003cvar translate=\"no\"\u003ePROJECT_ID\u003c/var\u003e is the project ID of the\nGoogle Cloud project hosting the Chat app.\n| Users with **Project** roles can also access the app configuration page.\n|\n|\n| Users with custom roles containing the\n| `resourcemanager.projects.(get|update)` permissions cannot access\n| the Chat app configuration. For custom roles, use\n| the `chat.bots.(get|update)` permissions instead.\n\nRelated topics\n--------------\n\n- [Choose a Chat app architecture](/workspace/chat/structure)\n- To configure your Chat app for interactive features, see [Receive and respond to user interactions](/workspace/chat/receive-respond-interactions)"]]