
如果 Google Workspace 加载项连接到需要授权的第三方服务或 API,则该加载项可以提示用户登录并授权访问。
本页介绍了如何使用授权流程(例如 OAuth)对用户进行身份验证,其中包括以下步骤:
- 检测何时需要授权。
- 返回一个卡片界面,提示用户登录相应服务。
- 刷新插件,以便用户可以访问服务或受保护的资源。
如果您的插件仅需要用户身份,则可以使用用户的 Google Workspace ID 或电子邮件地址直接对用户进行身份验证。如需使用电子邮件地址进行身份验证,请参阅验证 JSON 请求。 如果您是使用 Google Apps 脚本构建插件的,则可以使用适用于 Google Apps 脚本的 OAuth2 库(另有 OAuth1 版本)来简化此流程。
检测到需要授权
使用插件时,用户可能因各种原因而未获授权访问受保护的资源,例如:
- 用于连接到第三方服务的访问令牌尚未生成或已过期。
- 访问令牌不涵盖所请求的资源。
- 访问令牌不包含请求所需的作用域。
您的插件应检测到这些情况,以便用户登录并访问您的服务。
如果您在 Apps 脚本中进行构建,OAuth 库的 hasAccess 函数可以告知您是否有权访问某项服务。或者,在使用 UrlFetchApp.fetch 请求时,您可以将 muteHttpExceptions 参数设置为 true。这样可以防止请求在失败时抛出异常,并让您检查返回的 HttpResponse 对象中的请求响应代码和内容。
提示用户登录您的服务
当插件检测到需要授权时,必须返回一个卡片界面,提示用户登录相应服务。登录卡必须将用户重定向到您的基础架构,以完成第三方身份验证和授权流程。
使用 HTTP 端点构建插件时,建议您使用 Google 登录保护目标应用,并通过登录期间签发的身份令牌获取用户 ID。sub 声明包含用户的唯一 ID,可与插件中的 ID 相关联。
构建并返回登录卡片
对于服务的登录卡片,您可以使用 Google 的基本授权卡片,也可以自定义卡片以显示其他信息,例如贵组织的徽标。如果您要公开发布插件,则必须使用自定义卡片。
基本授权卡
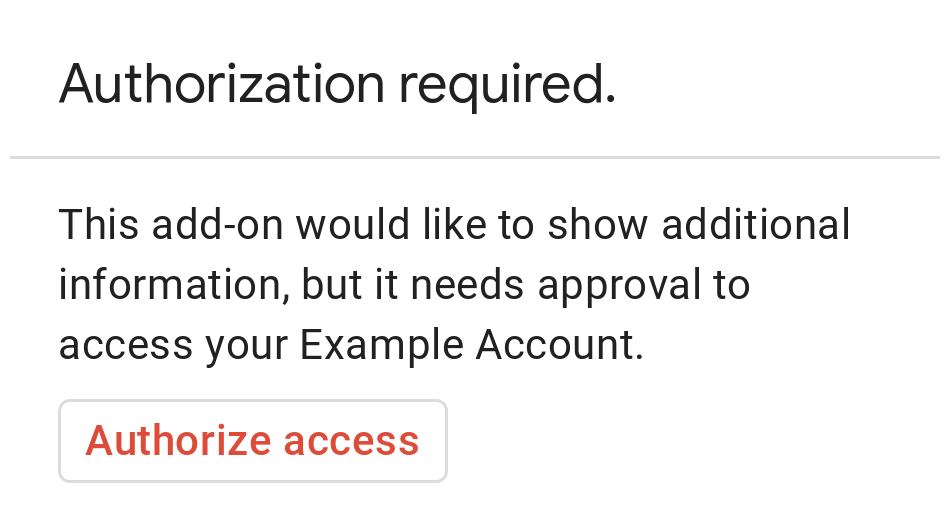
下图展示了 Google 的基本授权卡的示例:
如需向用户显示基本授权卡,您必须返回对象 AuthorizationError。以下代码展示了一个 AuthorizationError 对象的示例:
Apps 脚本
CardService.newAuthorizationException()
    .setAuthorizationUrl('AUTHORIZATION_URL')
    .setResourceDisplayName('RESOURCE_DISPLAY_NAME')
    .throwException();
JSON
返回以下 JSON 响应:
{
  "basic_authorization_prompt": {
    "authorization_url": "AUTHORIZATION_URL",
    "resource": "RESOURCE_DISPLAY_NAME"
  }
}
替换以下内容:
AUTHORIZATION_URL:用于处理授权的 Web 应用的网址。RESOURCE_DISPLAY_NAME:受保护资源或服务的显示名称。此名称会显示在授权提示中。例如,如果您的RESOURCE_DISPLAY_NAME是Example Account,则系统会显示提示:“此插件可显示额外信息,但需要您授权其访问您的‘示例账号’。”
完成授权后,系统会提示用户刷新该插件,以便访问受保护的资源。
Google Chat 中的退货授权卡片
如果您的插件扩展了 Google Chat,并且用户在 Google Chat 中执行该插件,则用户无需手动刷新即可完成授权流程。如果触发器是消息、添加到聊天室或应用命令,Google Chat 支持自动重试之前的执行。对于这些触发器,您的插件会在事件载荷中收到 completeRedirectUri。
您必须在配置网址中对 completeRedirectUri 进行编码,才能触发自动重试。重定向到此网址会向 Google Chat 表明配置请求已完成,并允许 Google Chat 重试之前的执行。
当用户成功重定向到原始消息中提供的 configCompleteRedirectUrl 时,Google Chat 会执行以下步骤:
- 清除向发起用户显示的提示。
- 第二次将原始事件对象发送到同一插件。
如果您未在配置网址中对 completeRedirectUri 进行编码,用户仍然可以完成授权流程。不过,Google Chat 不会重试之前的执行,用户必须手动再次调用您的插件。
以下代码示例展示了 Chat 应用如何请求离线 OAuth2 凭据、将其存储在数据库中,并使用它们通过用户身份验证进行 API 调用。
Apps 脚本
Node.js
Python
Java
自定义授权卡片
如需修改授权提示,您可以为服务的登录体验创建自定义卡片。
如果您要公开发布插件,则必须为所有 Google Workspace 宿主应用(Chat 除外)使用自定义授权卡片。如需详细了解 Google Workspace Marketplace 的发布要求,请参阅应用审核简介。
返回的卡片必须满足以下条件:
- 明确告知用户,相应插件正在请求代表用户访问非 Google 服务的权限。
- 明确说明获得授权后,该插件能够执行哪些操作。
- 包含一个按钮或类似 widget,用户点击该按钮或 widget 即可前往服务的授权网址。确保用户能够清楚了解此 widget 的功能。
- 前面的 widget 必须在其
OpenLink对象中使用OnClose.RELOAD设置,以确保在收到授权后重新加载插件。 - 从授权提示中打开的所有链接都必须使用 HTTPS。
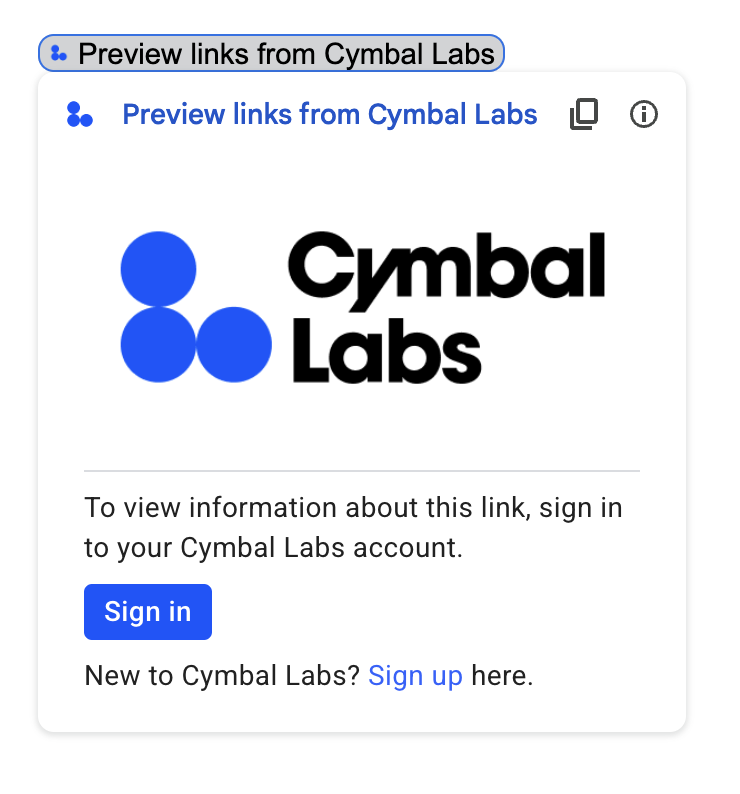
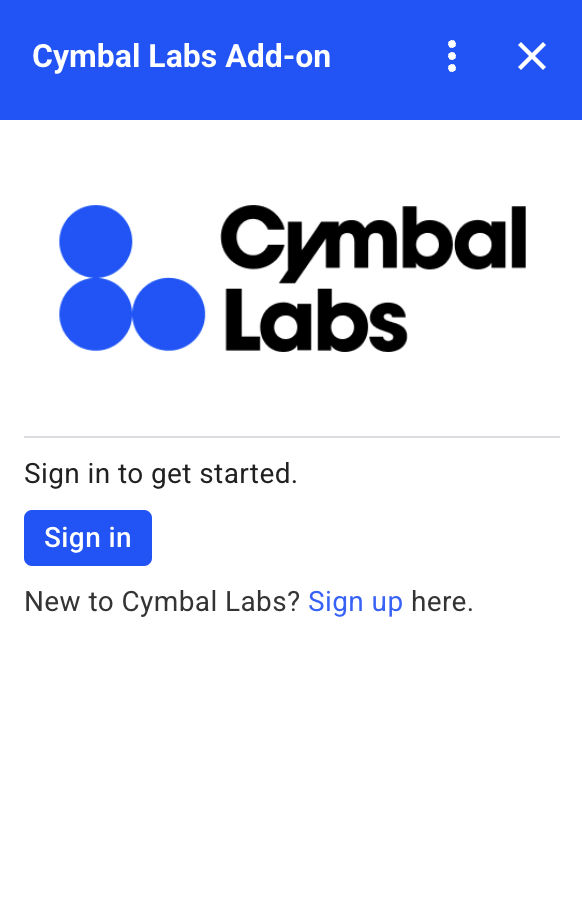
下图展示了一个插件首页的自定义授权卡片示例。 该卡片包含徽标、说明和登录按钮:
以下代码展示了如何使用此自定义卡片示例:
Apps 脚本
function customAuthorizationCard() {
    let cardSection1Image1 = CardService.newImage()
        .setImageUrl('LOGO_URL')
        .setAltText('LOGO_ALT_TEXT');

    let cardSection1Divider1 = CardService.newDivider();

    let cardSection1TextParagraph1 = CardService.newTextParagraph()
        .setText('DESCRIPTION');

    let cardSection1ButtonList1Button1 = CardService.newTextButton()
        .setText('Sign in')
        .setBackgroundColor('#0055ff')
        .setTextButtonStyle(CardService.TextButtonStyle.FILLED)
        .setAuthorizationAction(CardService.newAuthorizationAction()
            .setAuthorizationUrl('AUTHORIZATION_URL'));

    let cardSection1ButtonList1 = CardService.newButtonSet()
        .addButton(cardSection1ButtonList1Button1);

    let cardSection1TextParagraph2 = CardService.newTextParagraph()
        .setText('TEXT_SIGN_UP');

    let cardSection1 = CardService.newCardSection()
        .addWidget(cardSection1Image1)
        .addWidget(cardSection1Divider1)
        .addWidget(cardSection1TextParagraph1)
        .addWidget(cardSection1ButtonList1)
        .addWidget(cardSection1TextParagraph2);

    let card = CardService.newCardBuilder()
        .addSection(cardSection1)
        .build();
    return [card];
}

function startNonGoogleAuth() {
    CardService.newAuthorizationException()
        .setAuthorizationUrl('AUTHORIZATION_URL')
        .setResourceDisplayName('RESOURCE_DISPLAY_NAME')
        .setCustomUiCallback('customAuthorizationCard')
        .throwException();
  }
JSON
返回以下 JSON 响应:
{
  "custom_authorization_prompt": {
    "action": {
      "navigations": [
        {
          "pushCard": {
            "sections": [
              {
                "widgets": [
                  {
                    "image": {
                      "imageUrl": "LOGO_URL",
                      "altText": "LOGO_ALT_TEXT"
                    }
                  },
                  {
                    "divider": {}
                  },
                  {
                    "textParagraph": {
                      "text": "DESCRIPTION"
                    }
                  },
                  {
                    "buttonList": {
                      "buttons": [
                        {
                          "text": "Sign in",
                          "onClick": {
                            "openLink": {
                              "url": "AUTHORIZATION_URL",
                              "onClose": "RELOAD",
                              "openAs": "OVERLAY"
                            }
                          },
                          "color": {
                            "red": 0,
                            "green": 0,
                            "blue": 1,
                            "alpha": 1,
                          }
                        }
                      ]
                    }
                  },
                  {
                    "textParagraph": {
                      "text": "TEXT_SIGN_UP"
                    }
                  }
                ]
              }
            ]
          }
        }
      ]
    }
  }
}
替换以下内容:
LOGO_URL:徽标或图片的网址。必须是公开网址。LOGO_ALT_TEXT:徽标或图片的替代文本,例如Cymbal Labs Logo。DESCRIPTION:供用户登录的行动号召,例如Sign in to get started。- 如需更新登录按钮,请执行以下操作:
AUTHORIZATION_URL:用于处理授权的 Web 应用的网址。- 可选:如需更改按钮颜色,请更新
color字段的 RGBA 浮点值。对于 Apps 脚本,请使用十六进制值更新setBackgroundColor方法。
TEXT_SIGN_UP:提示用户创建账号的文字(如果用户没有账号)。例如New to Cymbal Labs? <a href=\"https://www.example.com/signup\">Sign up</a> here。
管理 Google Workspace 应用中的第三方登录
Google Workspace 插件的一个常见应用是提供一个界面,用于从 Google Workspace 宿主应用内与第三方系统进行交互。
第三方系统通常要求用户使用用户 ID、密码或其他凭据登录。当用户在使用某个 Google Workspace 宿主时登录您的第三方服务时,您必须确保他们在切换到另一个 Google Workspace 宿主时无需再次登录。
如果您在 Apps 脚本中进行构建,可以使用用户属性或 ID 令牌来防止重复的登录请求。以下部分将对此进行说明。
用户属性
您可以将用户的登录数据存储在 Apps 脚本的用户属性中。例如,您可以从其登录服务创建自己的 JSON Web 令牌 (JWT),并将其记录在用户属性中,或者记录其服务的用户名和密码。
用户属性的作用域限定为仅供相应用户在插件的脚本中访问。其他用户和其他脚本无法访问这些属性。如需了解详情,请参阅 PropertiesService。
ID 令牌
您可以使用 Google ID 令牌作为服务的登录凭据。这是一种实现单点登录的方式。由于用户位于 Google 主机应用中,因此已登录 Google。
非 Google OAuth 配置示例
以下 Apps 脚本代码示例展示了如何配置加载项以使用需要 OAuth 的非 Google API。此示例使用 OAuth2 for Apps 脚本库来构建用于访问 API 的服务。
Apps 脚本
/**
* Attempts to access a non-Google API using a constructed service
* object.
*
* If your add-on needs access to non-Google APIs that require OAuth,
* you need to implement this method. You can use the OAuth1 and
* OAuth2 Apps Script libraries to help implement it.
*
* @param {String} url         The URL to access.
* @param {String} method_opt  The HTTP method. Defaults to GET.
* @param {Object} headers_opt The HTTP headers. Defaults to an empty
*                             object. The Authorization field is added
*                             to the headers in this method.
* @return {HttpResponse} the result from the UrlFetchApp.fetch() call.
*/
function accessProtectedResource(url, method_opt, headers_opt) {
  var service = getOAuthService();
  var maybeAuthorized = service.hasAccess();
  if (maybeAuthorized) {
    // A token is present, but it may be expired or invalid. Make a
    // request and check the response code to be sure.

    // Make the UrlFetch request and return the result.
    var accessToken = service.getAccessToken();
    var method = method_opt || 'get';
    var headers = headers_opt || {};
    headers['Authorization'] =
        Utilities.formatString('Bearer %s', accessToken);
    var resp = UrlFetchApp.fetch(url, {
      'headers': headers,
      'method' : method,
      'muteHttpExceptions': true, // Prevents thrown HTTP exceptions.
    });

    var code = resp.getResponseCode();
    if (code >= 200 && code < 300) {
      return resp.getContentText("utf-8"); // Success
    } else if (code == 401 || code == 403) {
      // Not fully authorized for this action.
      maybeAuthorized = false;
    } else {
      // Handle other response codes by logging them and throwing an
      // exception.
      console.error("Backend server error (%s): %s", code.toString(),
                    resp.getContentText("utf-8"));
      throw ("Backend server error: " + code);
    }
  }

  if (!maybeAuthorized) {
    // Invoke the authorization flow using the default authorization
    // prompt card.
    CardService.newAuthorizationException()
        .setAuthorizationUrl(service.getAuthorizationUrl())
        .setResourceDisplayName("Display name to show to the user")
        .throwException();
  }
}

/**
* Create a new OAuth service to facilitate accessing an API.
* This example assumes there is a single service that the add-on needs to
* access. Its name is used when persisting the authorized token, so ensure
* it is unique within the scope of the property store. You must set the
* client secret and client ID, which are obtained when registering your
* add-on with the API.
*
* See the Apps Script OAuth2 Library documentation for more
* information:
*   https://github.com/googlesamples/apps-script-oauth2#1-create-the-oauth2-service
*
*  @return A configured OAuth2 service object.
*/
function getOAuthService() {
  return OAuth2.createService('SERVICE_NAME')
      .setAuthorizationBaseUrl('SERVICE_AUTH_URL')
      .setTokenUrl('SERVICE_AUTH_TOKEN_URL')
      .setClientId('CLIENT_ID')
      .setClientSecret('CLIENT_SECRET')
      .setScope('SERVICE_SCOPE_REQUESTS')
      .setCallbackFunction('authCallback')
      .setCache(CacheService.getUserCache())
      .setPropertyStore(PropertiesService.getUserProperties());
}

/**
* Boilerplate code to determine if a request is authorized and returns
* a corresponding HTML message. When the user completes the OAuth2 flow
* on the service provider's website, this function is invoked from the
* service. In order for authorization to succeed you must make sure that
* the service knows how to call this function by setting the correct
* redirect URL.
*
* The redirect URL to enter is:
* https://script.google.com/macros/d/<Apps Script ID>/usercallback
*
* See the Apps Script OAuth2 Library documentation for more
* information:
*   https://github.com/googlesamples/apps-script-oauth2#1-create-the-oauth2-service
*
*  @param {Object} callbackRequest The request data received from the
*                  callback function. Pass it to the service's
*                  handleCallback() method to complete the
*                  authorization process.
*  @return {HtmlOutput} a success or denied HTML message to display to
*          the user.
*/
function authCallback(callbackRequest) {
  var authorized = getOAuthService().handleCallback(callbackRequest);
  if (authorized) {
    return HtmlService.createHtmlOutput(
      'Success!');
  } else {
    return HtmlService.createHtmlOutput('Denied');
  }
}

/**
* Unauthorizes the non-Google service. This is useful for OAuth
* development/testing.  Run this method (Run > resetOAuth in the script
* editor) to reset OAuth to re-prompt the user for OAuth.
*/
function resetOAuth() {
  getOAuthService().reset();
}