Cómo compilar diálogos interactivos

En esta página, se describe cómo una app de Google Chat puede abrir diálogos para mostrar interfaces de usuario (IU) y responder a los usuarios.

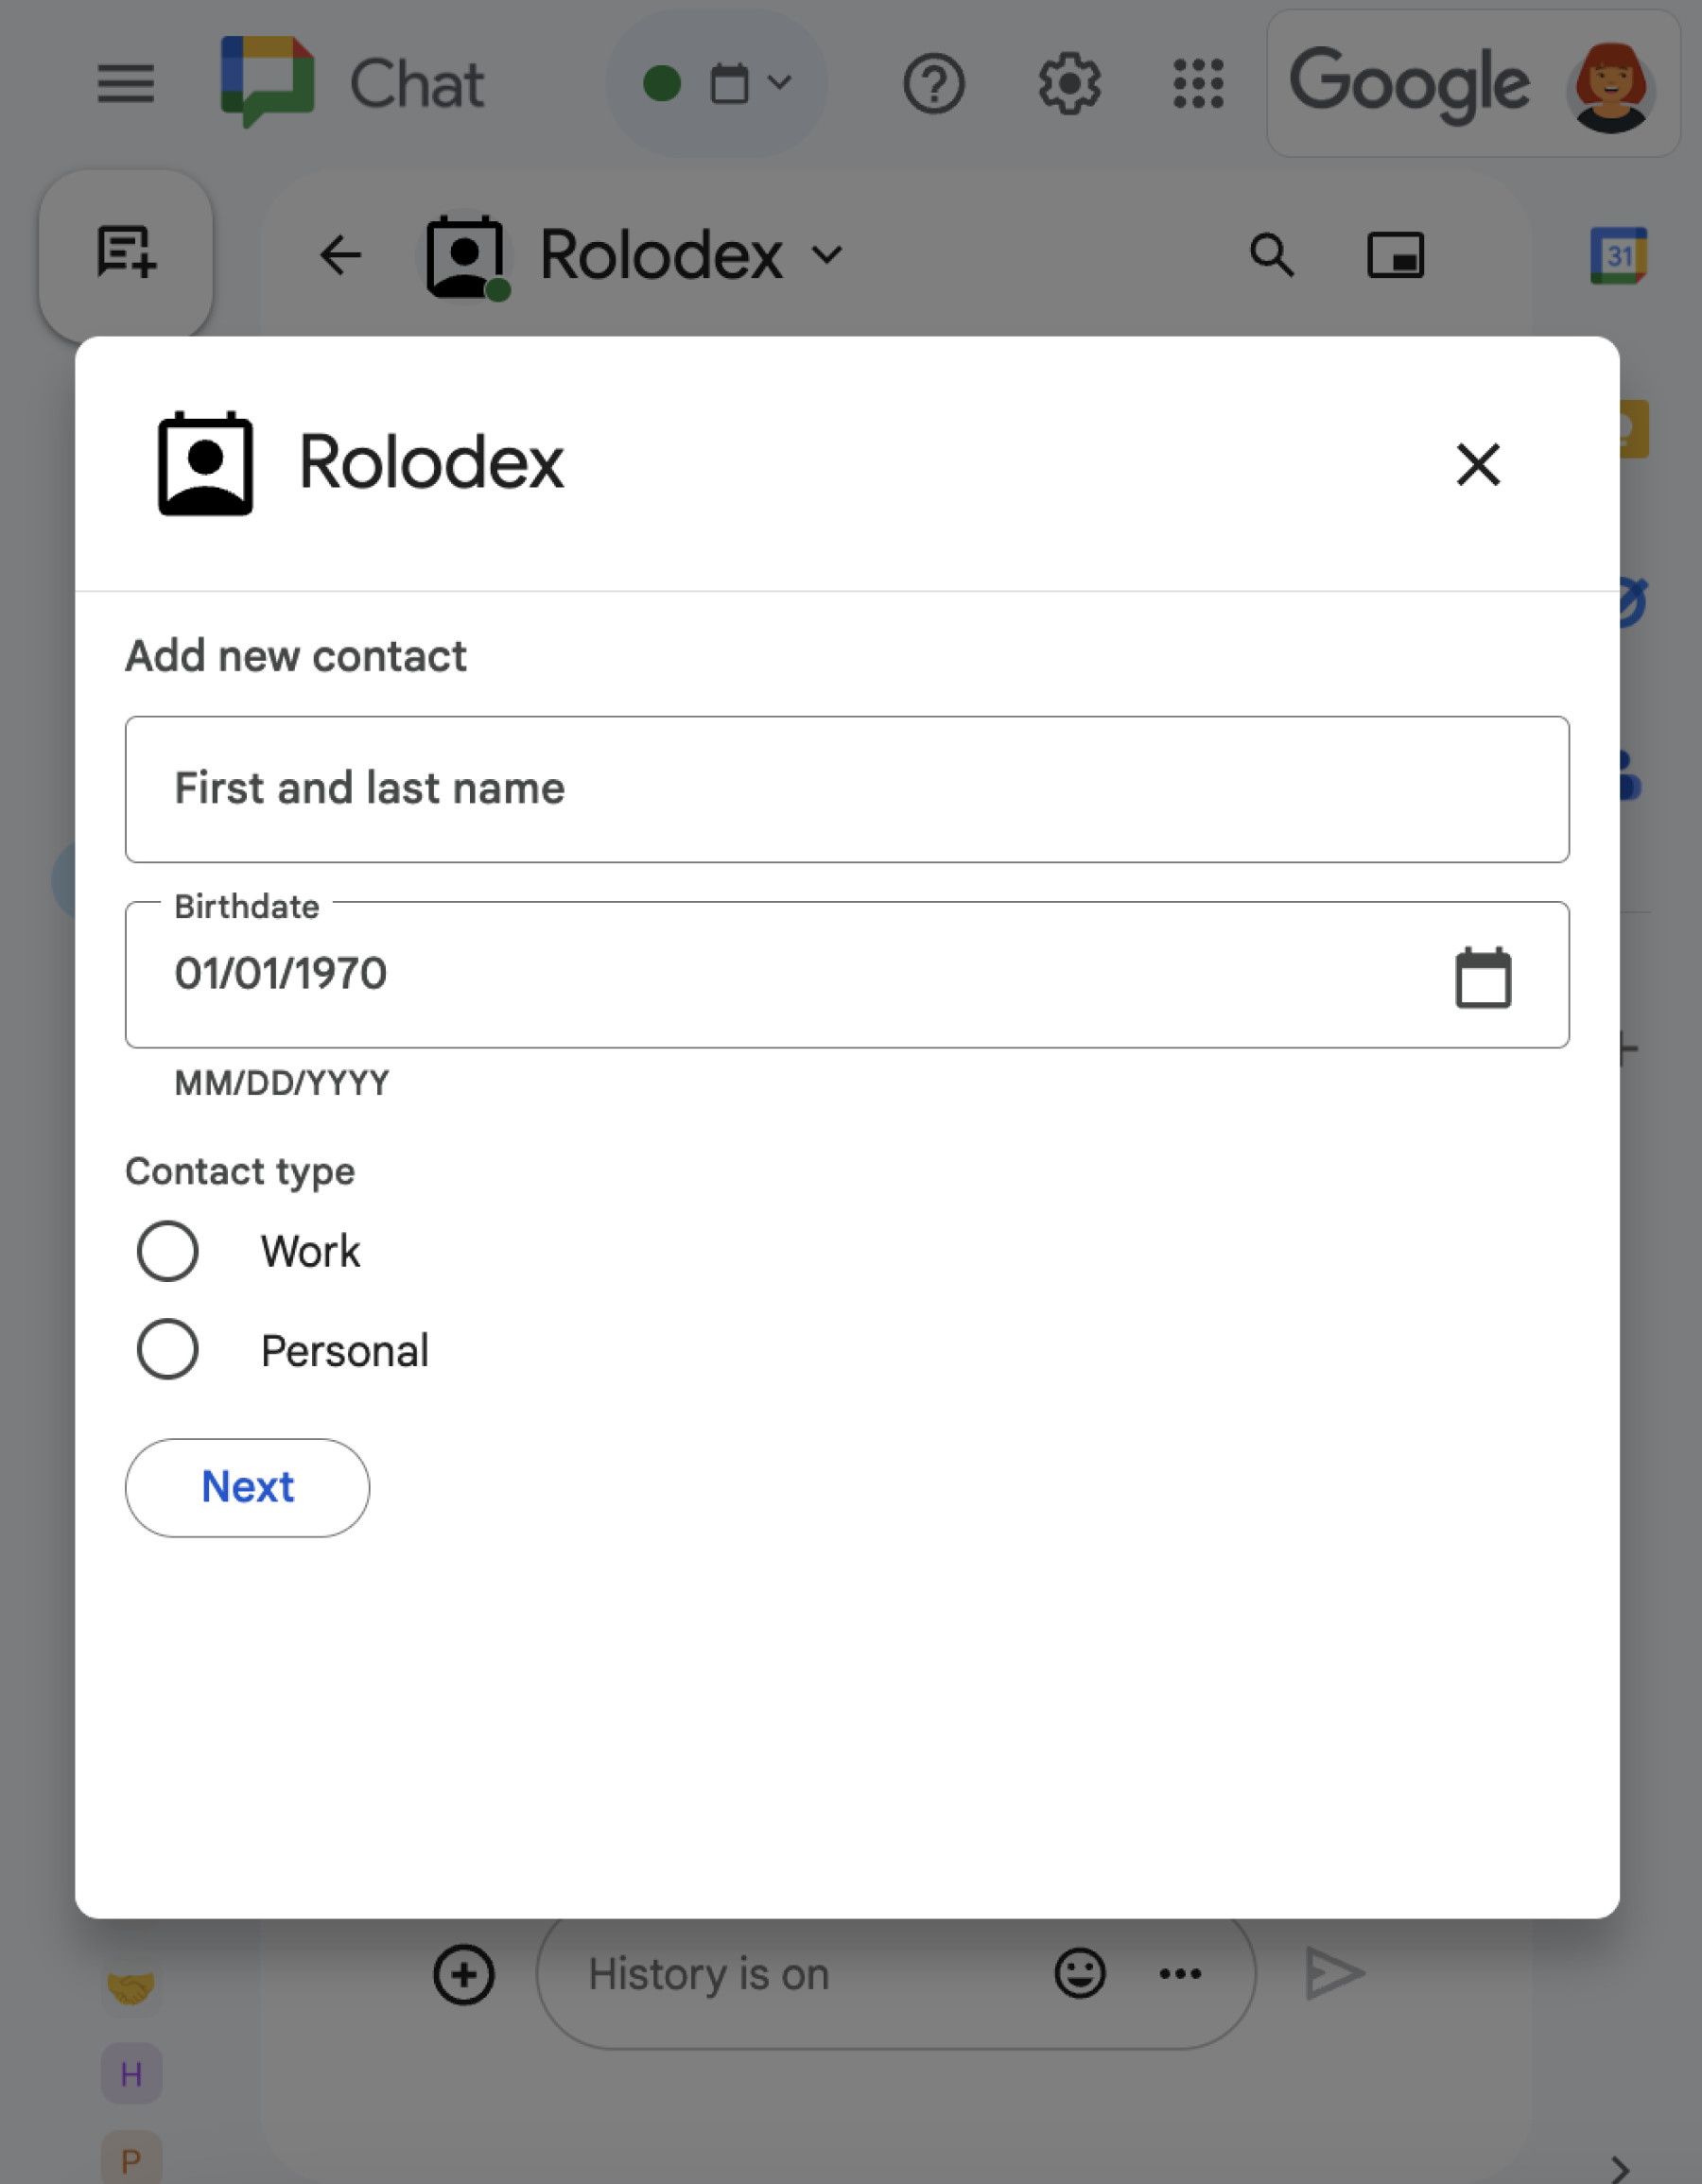
Los diálogos son interfaces basadas en tarjetas y ventanas que se abren desde un espacio de Chat o mensaje. El diálogo y su contenido solo son visibles para el usuario que lo abrió.

Las apps de Chat pueden usar diálogos para solicitar y recopilar información de los usuarios de Chat, incluidos formularios de varios pasos. Para obtener más detalles sobre la compilación de entradas de formularios, consulta Recopila y procesa información de los usuarios.

Requisitos previos

HTTP

Un complemento de Google Workspace que extiende Google Chat. Para compilar uno, completa la guía de inicio rápido de HTTP.

Apps Script

Un complemento de Google Workspace que extiende Google Chat. Para compilar uno, completa la guía de inicio rápido de Apps Script.

Abre un diálogo

Un diálogo con una variedad de widgets diferentes.
Figura 1: Una app de Chat que abre un diálogo para recopilar información de contacto.

En esta sección, se explica cómo responder y configurar un diálogo de la siguiente manera:

  1. Activa la solicitud de diálogo desde una interacción del usuario.
  2. Maneja la solicitud mostrando y abriendo un diálogo.
  3. Después de que los usuarios envíen información, procesa el envío cerrando el diálogo o mostrando otro.

Activa una solicitud de diálogo

Una app de Chat solo puede abrir diálogos para responder a una interacción del usuario, como un comando o un clic en un botón de un mensaje en una tarjeta.

Para responder a los usuarios con un diálogo, una app de Chat debe compilar una interacción que active la solicitud de diálogo, como la siguiente:

  • Responder a un comando. Para activar la solicitud desde un comando, debes marcar la casilla de verificación Abre un diálogo cuando configures el comando.
  • Responder a un clic en un botón en un mensaje, ya sea como parte de una tarjeta o en la parte inferior del mensaje. Para activar la solicitud desde un botón en un mensaje, configura la acción onClick del botón estableciendo su interaction en OPEN_DIALOG.
Botón que activa un diálogo
Figura 2: Una app de Chat envía un mensaje que les solicita a los usuarios que usen el comando de barra diagonal 
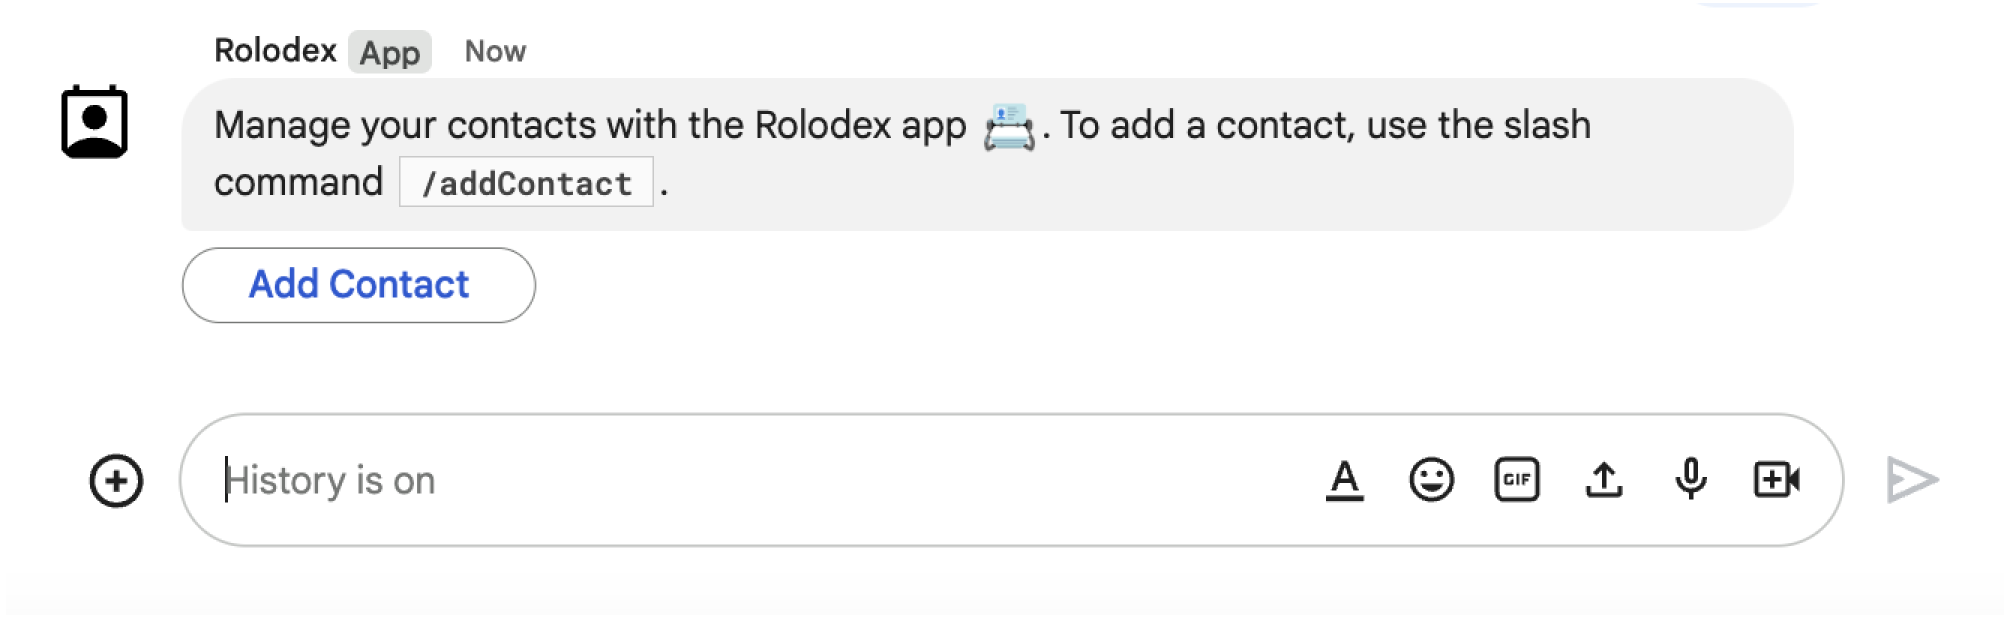
/addContact.
El mensaje también incluye un botón en el que los usuarios pueden hacer clic para activar el comando.

En la siguiente muestra de código, se muestra cómo activar una solicitud de diálogo desde un botón en un mensaje de tarjeta. Para abrir el diálogo, establece el campo onClick.action.interaction del botón en OPEN_DIALOG:

Node.js

node/chat/contact-form-app/index.js
{ buttonList: { buttons: [{
  text: "ADD CONTACT",
  onClick: { action: {
    function: FUNCTION_URL,
    interaction: "OPEN_DIALOG",
    parameters: [
      { key: "actionName", value: "openInitialDialog" }
    ]
  }}
}]}}

Reemplaza FUNCTION_URL por el extremo HTTP que controla los clics en los botones.

Python

python/chat/contact-form-app/main.py
{ 'buttonList': { 'buttons': [{
  'text': "ADD CONTACT",
  'onClick': { 'action': {
    'function': FUNCTION_URL,
    'interaction': "OPEN_DIALOG",
    'parameters': [
      { 'key': "actionName", 'value': "openInitialDialog" }
    ]
  }}
}]}}

Reemplaza FUNCTION_URL por el extremo HTTP que controla los clics en los botones.

Java

java/chat/contact-form-app/src/main/java/com/google/chat/contact/App.java
.setButtonList(new GoogleAppsCardV1ButtonList().setButtons(List.of(new GoogleAppsCardV1Button()
  .setText("ADD CONTACT")
  .setOnClick(new GoogleAppsCardV1OnClick().setAction(new GoogleAppsCardV1Action()
    .setFunction(FUNCTION_URL)
    .setInteraction("OPEN_DIALOG")
    .setParameters(List.of(
      new GoogleAppsCardV1ActionParameter().setKey("actionName").setValue("openInitialDialog"))))))))));

Reemplaza FUNCTION_URL por el extremo HTTP que controla los clics en los botones.

Apps Script

En este ejemplo, se envía un mensaje de tarjeta mostrando el JSON de la tarjeta. También puedes usar el servicio de tarjetas de Apps Script.

apps-script/chat/contact-form-app/Code.gs
{ buttonList: { buttons: [{
  text: "ADD CONTACT",
  onClick: { action: {
    function: "openInitialDialog",
    interaction: "OPEN_DIALOG"
  }}
}]}}

Abre el diálogo inicial

Cuando un usuario activa una solicitud de diálogo, tu app de Chat recibe un objeto de evento con una carga útil que especifica un dialogEventType objeto como REQUEST_DIALOG.

Para abrir un diálogo, tu app de Chat puede responder a la solicitud mostrando un RenderActions objeto con la navegación pushCard para mostrar una tarjeta. La tarjeta debe contener cualquier elemento de la interfaz de usuario (IU), incluidas una o más sections[] de widgets. Para recopilar información de los usuarios, puedes especificar widgets de entrada de formulario y un widget de botón. Para obtener más información sobre el diseño de entradas de formularios, consulta Recopila y procesa información de los usuarios.

En la siguiente muestra de código, se muestra cómo una app de Chat muestra una respuesta que abre un diálogo:

Node.js

node/chat/contact-form-app/index.js
/**
 * Opens the initial step of the dialog that lets users add contact details.
 *
 * @return {Object} open the dialog.
 */
function openInitialDialog() {
  return { action: { navigations: [{ pushCard: { sections: [{ widgets: [
    { textInput: {
      name: "contactName",
      label: "First and last name",
      type: "SINGLE_LINE"
    }},
    { dateTimePicker: {
      name: "contactBirthdate",
      label: "Birthdate",
      type: "DATE_ONLY"
    }},
    { selectionInput: {
      name: "contactType",
      label: "Contact type",
      type: "RADIO_BUTTON",
      items: [
        { text: "Work", value: "Work", selected: false },
        { text: "Personal", value: "Personal", selected: false }
      ]
    }},
    { buttonList: { buttons: [{
      text: "NEXT",
      onClick: { action: {
        function: FUNCTION_URL,
        parameters: [
          { key: "actionName", value: "openConfirmationDialog" }
        ]
      }}
    }]}}
  ]}]}}]}};
}

Reemplaza FUNCTION_URL por el extremo HTTP que controla los clics en los botones.

Python

python/chat/contact-form-app/main.py
def open_initial_dialog() -> Mapping[str, Any]:
  """Opens the initial step of the dialog that lets users add contact details.

  Returns:
    Mapping[str, Any]: open the dialog.
  """
  return { 'action': { 'navigations': [{ 'pushCard': { 'sections': [{ 'widgets': [
    { 'textInput': {
      'name': "contactName",
      'label': "First and last name",
      'type': "SINGLE_LINE"
    }},
    { 'dateTimePicker': {
      'name': "contactBirthdate",
      'label': "Birthdate",
      'type': "DATE_ONLY"
    }},
    { 'selectionInput': {
      'name': "contactType",
      'label': "Contact type",
      'type': "RADIO_BUTTON",
      'items': [
        { 'text': "Work", 'value': "Work", 'selected': False },
        { 'text': "Personal", 'value': "Personal", 'selected': False }
      ]
    }},
    { 'buttonList': { 'buttons': [{
      'text': "NEXT",
      'onClick': { 'action': {
        'function': FUNCTION_URL,
        'parameters': [
          { 'key': "actionName", 'value': "openConfirmationDialog" }
        ]
      }}
    }]}}
  ]}]}}]}}

Reemplaza FUNCTION_URL por el extremo HTTP que controla los clics en los botones.

Java

java/chat/contact-form-app/src/main/java/com/google/chat/contact/App.java
/**
 * Opens the initial step of the dialog that lets users add contact details.
 *
 * @return {Object} open the dialog.
 */
GenericJson openInitialDialog() {
  GoogleAppsCardV1Card cardV2 = new GoogleAppsCardV1Card()
    .setSections(List.of(new GoogleAppsCardV1Section().setWidgets(List.of(
      new GoogleAppsCardV1Widget().setTextInput(new GoogleAppsCardV1TextInput()
        .setName("contactName")
        .setLabel("First and last name")
        .setType("SINGLE_LINE")),
      new GoogleAppsCardV1Widget().setDateTimePicker(new GoogleAppsCardV1DateTimePicker()
        .setName("contactBirthdate")
        .setLabel("Birthdate")
        .setType("DATE_ONLY")),
      new GoogleAppsCardV1Widget().setSelectionInput(new GoogleAppsCardV1SelectionInput()
        .setName("contactType")
        .setLabel("Contact type")
        .setType("RADIO_BUTTON")
        .setItems(List.of(
          new GoogleAppsCardV1SelectionItem()
            .setText("Work")
            .setValue("Work")
            .setSelected(false),
          new GoogleAppsCardV1SelectionItem()
            .setText("Personal")
            .setValue("Personal")
            .setSelected(false)))),
      new GoogleAppsCardV1Widget().setButtonList(new GoogleAppsCardV1ButtonList().setButtons(List.of(
        new GoogleAppsCardV1Button()
          .setText("NEXT")
          .setOnClick(new GoogleAppsCardV1OnClick().setAction(new GoogleAppsCardV1Action()
            .setFunction(FUNCTION_URL)
            .setParameters(List.of(
              new GoogleAppsCardV1ActionParameter().setKey("actionName").setValue("openConfirmationDialog"))))))))))));
  return new GenericJson() {{
    put("action", new GenericJson() {{
      put("navigations", List.of(new GenericJson() {{
        put("pushCard", cardV2);
      }}));
    }});
  }};
}

Reemplaza FUNCTION_URL por el extremo HTTP que controla los clics en los botones.

Apps Script

En este ejemplo, se envía un mensaje de tarjeta mostrando el JSON de la tarjeta. También puedes usar el servicio de tarjetas de Apps Script.

apps-script/chat/contact-form-app/Code.gs
/**
 * Opens the initial step of the dialog that lets users add contact details.
 *
 * @param {Object} event The event object from the Google Workspace add-on.
 * @return {Object} open the dialog.
 */
function openInitialDialog(event) {
  return { action: { navigations: [{ pushCard: { sections: [{ widgets: [
    { textInput: {
      name: "contactName",
      label: "First and last name",
      type: "SINGLE_LINE"
    }},
    { dateTimePicker: {
      name: "contactBirthdate",
      label: "Birthdate",
      type: "DATE_ONLY"
    }},
    { selectionInput: {
      name: "contactType",
      label: "Contact type",
      type: "RADIO_BUTTON",
      items: [
        { text: "Work", value: "Work", selected: false },
        { text: "Personal", value: "Personal", selected: false }
      ]
    }},
    { buttonList: { buttons: [{
      text: "NEXT",
      onClick: { action: { function : "openConfirmationDialog" }}
    }]}}
  ]}]}}]}};
}

Maneja el envío del diálogo

Cuando los usuarios hacen clic en un botón que envía un diálogo, tu app de Chat recibe un objeto de evento con un ButtonClickedPayload objeto. En la carga útil, dialogEventType se establece en SUBMIT_DIALOG. Para comprender cómo recopilar y procesar la información en el diálogo, consulta Recopila y procesa información de los usuarios de Google Chat.

Tu app de Chat debe responder al objeto de evento de una de las siguientes maneras:

  • Muestra otro diálogo para completar otra tarjeta o formulario.
  • Cierra el diálogo después de validar los datos que envió el usuario y, de manera opcional, envía un mensaje de confirmación.

Opcional: Muestra otro diálogo

Después de que los usuarios envían el diálogo inicial, las apps de Chat pueden mostrar uno o más diálogos adicionales para ayudar a los usuarios a revisar la información antes de enviarla, completar formularios de varios pasos o propagar el contenido del formulario de forma dinámica.

Para procesar los datos que ingresan los usuarios, la app de Chat controla los datos en el commonEventObject.formInputs objeto del evento. Para obtener más información sobre cómo recuperar valores de widgets de entrada, consulta Recopila y procesa información de los usuarios.

Para hacer un seguimiento de los datos que ingresan los usuarios desde el diálogo inicial, debes agregar parámetros al botón que abre el siguiente diálogo. Para obtener más información, consulta Transfiere datos a otra tarjeta.

En este ejemplo, una app de Chat abre un diálogo inicial que lleva a un segundo diálogo para confirmar antes de enviar:

Node.js

node/chat/contact-form-app/index.js
/**
 * Responds to a message in Google Chat.
 *
 * @return {Object} response that handles dialogs.
 */
function handleMessage() {
  return { hostAppDataAction: { chatDataAction: { createMessageAction: { message: {
    text: "To add a contact, use the `ADD CONTACT` button below.",
    accessoryWidgets: [
      { buttonList: { buttons: [{
        text: "ADD CONTACT",
        onClick: { action: {
          function: FUNCTION_URL,
          interaction: "OPEN_DIALOG",
          parameters: [
            { key: "actionName", value: "openInitialDialog" }
          ]
        }}
      }]}}
    ]
  }}}}};
}

/**
 * Responds to a button clicked in Google Chat.
 *
 * @param {Object} event The event object from the Google Workspace add-on.
 * @return {Object} response depending on the button clicked.
 */
function handleButtonClicked(event) {
  // Initial dialog form page
  if (event.commonEventObject.parameters.actionName === "openInitialDialog") {
    return openInitialDialog();
  // Confirmation dialog form page
  } else if (event.commonEventObject.parameters.actionName === "openConfirmationDialog") {
    return openConfirmationDialog(event);
  // Submission dialog form page
  } else if (event.commonEventObject.parameters.actionName === "submitDialog") {
    return submitDialog(event);
  }
}

/**
 * Opens the initial step of the dialog that lets users add contact details.
 *
 * @return {Object} open the dialog.
 */
function openInitialDialog() {
  return { action: { navigations: [{ pushCard: { sections: [{ widgets: [
    { textInput: {
      name: "contactName",
      label: "First and last name",
      type: "SINGLE_LINE"
    }},
    { dateTimePicker: {
      name: "contactBirthdate",
      label: "Birthdate",
      type: "DATE_ONLY"
    }},
    { selectionInput: {
      name: "contactType",
      label: "Contact type",
      type: "RADIO_BUTTON",
      items: [
        { text: "Work", value: "Work", selected: false },
        { text: "Personal", value: "Personal", selected: false }
      ]
    }},
    { buttonList: { buttons: [{
      text: "NEXT",
      onClick: { action: {
        function: FUNCTION_URL,
        parameters: [
          { key: "actionName", value: "openConfirmationDialog" }
        ]
      }}
    }]}}
  ]}]}}]}};
}

/**
 * Opens the second step of the dialog that lets users confirm details.
 *
 * @param {Object} event The event object from the Google Workspace add-on.
 * @return {Object} update the dialog.
 */
function openConfirmationDialog(event) {
  // Retrieve the form input values
  const name = event.commonEventObject.formInputs["contactName"].stringInputs.value[0];
  const birthdate = event.commonEventObject.formInputs["contactBirthdate"].dateInput.msSinceEpoch;
  const type = event.commonEventObject.formInputs["contactType"].stringInputs.value[0];
  // Display the input values for confirmation
  return { action: { navigations: [{ pushCard: { sections: [{ widgets: [
    { textParagraph: { text: "Confirm contact information and submit:" }},
    { textParagraph: { text: "<b>Name:</b> " + name }},
    { textParagraph: { text: "<b>Birthday:</b> " + new Date(birthdate) }},
    { textParagraph: { text: "<b>Type:</b> " + type }},
    { buttonList: { buttons: [{
      text: "SUBMIT",
      onClick: { action: {
        function: FUNCTION_URL,
        parameters: [
          { key: "actionName", value: "submitDialog" },
          // Pass input values as parameters for last dialog step (submission)
          { key: "contactName", value: name },
          { key: "contactBirthdate", value: birthdate },
          { key: "contactType", value: type }
        ]
      }}
    }]}}
  ]}]}}]}};
}

Reemplaza FUNCTION_URL por el extremo HTTP que controla los clics en los botones.

Python

python/chat/contact-form-app/main.py
def handle_message() -> Mapping[str, Any]:
  """Responds to a message in Google Chat.

  Returns:
    Mapping[str, Any]: the response that handles dialogs.
  """
  return { 'hostAppDataAction': { 'chatDataAction': { 'createMessageAction': { 'message': {
    'text': "To add a contact, use the `ADD CONTACT` button below.",
    'accessoryWidgets': [
      { 'buttonList': { 'buttons': [{
        'text': "ADD CONTACT",
        'onClick': { 'action': {
          'function': FUNCTION_URL,
          'interaction': "OPEN_DIALOG",
          'parameters': [
            { 'key': "actionName", 'value': "openInitialDialog" }
          ]
        }}
      }]}}
    ]
  }}}}}


def handle_button_clicked(event: Mapping[str, Any]) -> Mapping[str, Any]:
  """Responds to a button clicked in Google Chat.

  Args:
    Mapping[str, Any] event: the event object from the Google Workspace add-on

  Returns:
    Mapping[str, Any]: the response depending on the button clicked.
  """
  # Initial dialog form page
  if "openInitialDialog" == event['commonEventObject']['parameters']['actionName']:
    return open_initial_dialog()
  # Confirmation dialog form page
  elif "openConfirmationDialog" == event['commonEventObject']['parameters']['actionName'] :
    return open_confirmation_dialog(event)
  # Submission dialog form page
  elif "submitDialog" == event['commonEventObject']['parameters']['actionName']:
    return submit_dialog(event)


def open_initial_dialog() -> Mapping[str, Any]:
  """Opens the initial step of the dialog that lets users add contact details.

  Returns:
    Mapping[str, Any]: open the dialog.
  """
  return { 'action': { 'navigations': [{ 'pushCard': { 'sections': [{ 'widgets': [
    { 'textInput': {
      'name': "contactName",
      'label': "First and last name",
      'type': "SINGLE_LINE"
    }},
    { 'dateTimePicker': {
      'name': "contactBirthdate",
      'label': "Birthdate",
      'type': "DATE_ONLY"
    }},
    { 'selectionInput': {
      'name': "contactType",
      'label': "Contact type",
      'type': "RADIO_BUTTON",
      'items': [
        { 'text': "Work", 'value': "Work", 'selected': False },
        { 'text': "Personal", 'value': "Personal", 'selected': False }
      ]
    }},
    { 'buttonList': { 'buttons': [{
      'text': "NEXT",
      'onClick': { 'action': {
        'function': FUNCTION_URL,
        'parameters': [
          { 'key': "actionName", 'value': "openConfirmationDialog" }
        ]
      }}
    }]}}
  ]}]}}]}}


def open_confirmation_dialog(event: Mapping[str, Any]) -> Mapping[str, Any]:
  """Opens the second step of the dialog that lets users confirm details.

  Args:
    Mapping[str, Any] event: the event object from the Google Workspace add-on

  Returns:
    Mapping[str, Any]: update the dialog.
  """
  name = event.get('commonEventObject').get('formInputs')["contactName"].get('stringInputs').get('value')[0]
  birthdateEpoch = event.get('commonEventObject').get('formInputs')["contactBirthdate"].get('dateInput').get('msSinceEpoch')
  birthdate = datetime.fromtimestamp(int(birthdateEpoch) / 1000.0).strftime("%Y-%m-%d")
  type = event.get('commonEventObject').get('formInputs')["contactType"].get('stringInputs').get('value')[0]
  # Display the input values for confirmation
  return { 'action': { 'navigations': [{ 'pushCard': { 'sections': [{ 'widgets': [
    { 'textParagraph': { 'text': "Confirm contact information and submit:" }},
    { 'textParagraph': { 'text': "<b>Name:</b> " + name }},
    { 'textParagraph': { 'text': "<b>Birthday:</b> " + birthdate }},
    { 'textParagraph': { 'text': "<b>Type:</b> " + type }},
    { 'buttonList': { 'buttons': [{
      'text': "SUBMIT",
      'onClick': { 'action': {
        'function': FUNCTION_URL,
        'parameters': [
          { 'key': "actionName", 'value': "submitDialog" },
          # Pass input values as parameters for last dialog step (submission)
          { 'key': "contactName", 'value': name },
          { 'key': "contactBirthdate", 'value': birthdate },
          { 'key': "contactType", 'value': type }
        ]
      }}
    }]}}
  ]}]}}]}}

Reemplaza FUNCTION_URL por el extremo HTTP que controla los clics en los botones.

Java

java/chat/contact-form-app/src/main/java/com/google/chat/contact/App.java
/**
 * Responds to a message in Google Chat.
 *
 * @return response that handles dialogs.
 */
GenericJson handleMessage() {
  Message message = new Message()
    .setText("To add a contact, use the `ADD CONTACT` button below.")
    .setAccessoryWidgets(List.of(new AccessoryWidget()
      .setButtonList(new GoogleAppsCardV1ButtonList().setButtons(List.of(new GoogleAppsCardV1Button()
        .setText("ADD CONTACT")
        .setOnClick(new GoogleAppsCardV1OnClick().setAction(new GoogleAppsCardV1Action()
          .setFunction(FUNCTION_URL)
          .setInteraction("OPEN_DIALOG")
          .setParameters(List.of(
            new GoogleAppsCardV1ActionParameter().setKey("actionName").setValue("openInitialDialog"))))))))));
  return new GenericJson() {{
    put("hostAppDataAction", new GenericJson() {{
      put("chatDataAction", new GenericJson() {{
        put("createMessageAction", new GenericJson() {{
          put("message", message);
        }});
      }});
    }});
  }};
}

/**
 * Responds to a button clicked in Google Chat.
 *
 * @param event The event object from the Google Workspace add-on.
 * @return response depending on the button clicked.
 */
GenericJson handleButtonClicked(JsonNode event) {
  String actionName = event.at("/commonEventObject/parameters/actionName").asText();
  // Initial dialog form page
  if ("openInitialDialog".equals(actionName)) {
    return openInitialDialog();
  // Confirmation dialog form page
  } else if ("openConfirmationDialog".equals(actionName)) {
    return openConfirmationDialog(event);
  // Submission dialog form page
  } else if ("submitDialog".equals(actionName)) {
    return submitDialog(event);
  }
  return null; 
}

/**
 * Opens the initial step of the dialog that lets users add contact details.
 *
 * @return {Object} open the dialog.
 */
GenericJson openInitialDialog() {
  GoogleAppsCardV1Card cardV2 = new GoogleAppsCardV1Card()
    .setSections(List.of(new GoogleAppsCardV1Section().setWidgets(List.of(
      new GoogleAppsCardV1Widget().setTextInput(new GoogleAppsCardV1TextInput()
        .setName("contactName")
        .setLabel("First and last name")
        .setType("SINGLE_LINE")),
      new GoogleAppsCardV1Widget().setDateTimePicker(new GoogleAppsCardV1DateTimePicker()
        .setName("contactBirthdate")
        .setLabel("Birthdate")
        .setType("DATE_ONLY")),
      new GoogleAppsCardV1Widget().setSelectionInput(new GoogleAppsCardV1SelectionInput()
        .setName("contactType")
        .setLabel("Contact type")
        .setType("RADIO_BUTTON")
        .setItems(List.of(
          new GoogleAppsCardV1SelectionItem()
            .setText("Work")
            .setValue("Work")
            .setSelected(false),
          new GoogleAppsCardV1SelectionItem()
            .setText("Personal")
            .setValue("Personal")
            .setSelected(false)))),
      new GoogleAppsCardV1Widget().setButtonList(new GoogleAppsCardV1ButtonList().setButtons(List.of(
        new GoogleAppsCardV1Button()
          .setText("NEXT")
          .setOnClick(new GoogleAppsCardV1OnClick().setAction(new GoogleAppsCardV1Action()
            .setFunction(FUNCTION_URL)
            .setParameters(List.of(
              new GoogleAppsCardV1ActionParameter().setKey("actionName").setValue("openConfirmationDialog"))))))))))));
  return new GenericJson() {{
    put("action", new GenericJson() {{
      put("navigations", List.of(new GenericJson() {{
        put("pushCard", cardV2);
      }}));
    }});
  }};
}

/**
 * Opens the second step of the dialog that lets users confirm details.
 *
 * @param event The event object from the Google Workspace add-on.
 * @return update the dialog.
 */
GenericJson openConfirmationDialog(JsonNode event) {
  // Retrieve the form input values
  String name = event.at("/commonEventObject/formInputs/contactName/stringInputs/value").get(0).asText();
  String birthdateEpoch = event.at("/commonEventObject/formInputs/contactBirthdate/dateInput/msSinceEpoch").asText();
  String birthdate = new SimpleDateFormat("MM/dd/yyyy").format(new Date((long)Double.parseDouble(birthdateEpoch)));
  String type = event.at("/commonEventObject/formInputs/contactType/stringInputs/value").get(0).asText();
  // Display the input values for confirmation
  GoogleAppsCardV1Card cardV2 = new GoogleAppsCardV1Card()
    .setSections(List.of(new GoogleAppsCardV1Section().setWidgets(List.of(
      new GoogleAppsCardV1Widget().setTextParagraph(new GoogleAppsCardV1TextParagraph()
        .setText("Confirm contact information and submit:")),
      new GoogleAppsCardV1Widget().setTextParagraph(new GoogleAppsCardV1TextParagraph()
        .setText("<b>Name:</b> " + name)),
      new GoogleAppsCardV1Widget().setTextParagraph(new GoogleAppsCardV1TextParagraph()
        .setText("<b>Birthday:</b> " + birthdate)),
      new GoogleAppsCardV1Widget().setTextParagraph(new GoogleAppsCardV1TextParagraph()
        .setText("<b>Type:</b> " + type)),
      new GoogleAppsCardV1Widget().setButtonList(new GoogleAppsCardV1ButtonList().setButtons(List.of(
        new GoogleAppsCardV1Button()
          .setText("SUBMIT")
          .setOnClick(new GoogleAppsCardV1OnClick().setAction(new GoogleAppsCardV1Action()
            .setFunction(FUNCTION_URL)
            .setParameters(List.of(
              new GoogleAppsCardV1ActionParameter().setKey("actionName").setValue("submitDialog"),
              // Pass input values as parameters for last dialog step (submission)
              new GoogleAppsCardV1ActionParameter().setKey("contactName").setValue(name),
              new GoogleAppsCardV1ActionParameter().setKey("contactBirthdate").setValue(birthdate),
              new GoogleAppsCardV1ActionParameter().setKey("contactType").setValue(type))))))))))));
  return new GenericJson() {{
    put("action", new GenericJson() {{
      put("navigations", List.of(new GenericJson() {{
        put("pushCard", cardV2);
      }}));
    }});
  }};
}

Reemplaza FUNCTION_URL por el extremo HTTP que controla los clics en los botones.

Apps Script

En este ejemplo, se envía un mensaje de tarjeta mostrando el JSON de la tarjeta. También puedes usar el servicio de tarjetas de Apps Script.

apps-script/chat/contact-form-app/Code.gs
/**
 * Responds to a message in Google Chat.
 *
 * @param {Object} event The event object from the Google Workspace add-on.
 * @return {Object} response that handles dialogs.
 */
function onMessage(event) {
  // Reply with a message that contains a button to open the initial dialog
  return { hostAppDataAction: { chatDataAction: { createMessageAction: { message: {
    text: "To add a contact, use the `ADD CONTACT` button below.",
    accessoryWidgets: [
      { buttonList: { buttons: [{
        text: "ADD CONTACT",
        onClick: { action: {
          function: "openInitialDialog",
          interaction: "OPEN_DIALOG"
        }}
      }]}}
    ]
  }}}}};
}

/**
 * Opens the initial step of the dialog that lets users add contact details.
 *
 * @param {Object} event The event object from the Google Workspace add-on.
 * @return {Object} open the dialog.
 */
function openInitialDialog(event) {
  return { action: { navigations: [{ pushCard: { sections: [{ widgets: [
    { textInput: {
      name: "contactName",
      label: "First and last name",
      type: "SINGLE_LINE"
    }},
    { dateTimePicker: {
      name: "contactBirthdate",
      label: "Birthdate",
      type: "DATE_ONLY"
    }},
    { selectionInput: {
      name: "contactType",
      label: "Contact type",
      type: "RADIO_BUTTON",
      items: [
        { text: "Work", value: "Work", selected: false },
        { text: "Personal", value: "Personal", selected: false }
      ]
    }},
    { buttonList: { buttons: [{
      text: "NEXT",
      onClick: { action: { function : "openConfirmationDialog" }}
    }]}}
  ]}]}}]}};
}

/**
 * Opens the second step of the dialog that lets users confirm details.
 *
 * @param {Object} event The event object from the Google Workspace add-on.
 * @return {Object} update the dialog.
 */
function openConfirmationDialog(event) {
  // Retrieve the form input values
  const name = event.commonEventObject.formInputs["contactName"].stringInputs.value[0];
  const birthdate = event.commonEventObject.formInputs["contactBirthdate"].dateInput.msSinceEpoch;
  const type = event.commonEventObject.formInputs["contactType"].stringInputs.value[0];
  // Display the input values for confirmation
  return { action: { navigations: [{ pushCard: { sections: [{ widgets: [
    { textParagraph: { text: "Confirm contact information and submit:" }},
    { textParagraph: { text: "<b>Name:</b> " + name }},
    { textParagraph: { text: "<b>Birthday:</b> " + new Date(birthdate) }},
    { textParagraph: { text: "<b>Type:</b> " + type }},
    { buttonList: { buttons: [{
      text: "SUBMIT",
      onClick: { action: {
        function: "submitDialog",
        // Pass input values as parameters for last dialog step (submission)
        parameters: [
          { key: "contactName", value: name },
          { key: "contactBirthdate", value: birthdate },
          { key: "contactType", value: type }
        ]
      }}
    }]}}
  ]}]}}]}};
}

Cierra el diálogo

Cuando los usuarios hacen clic en un botón de envío en un diálogo, tu app de Chat ejecuta su acción asociada y proporciona el objeto de evento con buttonClickedPayload establecido de la siguiente manera:

  • isDialogEvent es true.
  • dialogEventType es SUBMIT_DIALOG.

La app de Chat debe mostrar un RenderActions objeto con EndNavigation establecido en CLOSE_DIALOG.

Opcional: Muestra una notificación temporal

Cuando cierras el diálogo, también puedes mostrar una notificación de texto temporal al usuario que interactúa con la app.

Para mostrar una notificación, muestra el RenderActions objeto con el campo notification establecido.

En el siguiente ejemplo, se cierra el diálogo con una notificación de texto:

Node.js

node/chat/contact-form-app/index.js
// Validate the parameters.
if (!event.commonEventObject.parameters["contactName"]) {
  return { action: {
    navigations: [{ endNavigation: { action: "CLOSE_DIALOG"}}],
    notification: { text: "Failure, the contact name was missing!" }
  }};
}

Python

python/chat/contact-form-app/main.py
# Validate the parameters.
if event.get('commonEventObject').get('parameters')["contactName"] == "":
  return { 'action': {
    'navigations': [{ 'endNavigation': { 'action': "CLOSE_DIALOG"}}],
    'notification': { 'text': "Failure, the contact name was missing!" }
  }}

Java

java/chat/contact-form-app/src/main/java/com/google/chat/contact/App.java
    // Validate the parameters.
    if (event.at("/commonEventObject/parameters/contactName").asText().isEmpty()) {
      return new GenericJson() {{
        put("action", new GenericJson() {{
          put("navigations", List.of(new GenericJson() {{
            put("endNavigation", new GenericJson() {{
              put("action", "CLOSE_DIALOG");
            }});
          }}));
          put("notification", new GenericJson() {{
            put("text", "Failure, the contact name was missing!");
          }});
        }});
      }};
    }

    return new GenericJson() {{
      put("hostAppDataAction", new GenericJson() {{
        put("chatDataAction", new GenericJson() {{
          put("createMessageAction", new GenericJson() {{
            put("message", new Message()
              .setText( "✅ " + event.at("/commonEventObject/parameters/contactName").asText() +
                        " has been added to your contacts."));
          }});
        }});
      }});
    }};
  }
}

Apps Script

En este ejemplo, se envía un mensaje de tarjeta mostrando el JSON de la tarjeta. También puedes usar el servicio de tarjetas de Apps Script.

apps-script/chat/contact-form-app/Code.gs
// Validate the parameters.
if (!event.commonEventObject.parameters["contactName"]) {
  return { action: {
    navigations: [{ endNavigation: { action: "CLOSE_DIALOG"}}],
    notification: { text: "Failure, the contact name was missing!" }
  }};
}

Para obtener detalles sobre el paso de parámetros entre diálogos, consulta Transfiere datos a otra tarjeta.

Opcional: Envía un mensaje de confirmación de Chat

Cuando cierras el diálogo, también puedes enviar un mensaje nuevo de Chat o actualizar uno existente.

Para enviar un mensaje nuevo, muestra un DataActions objeto con el campo CreateMessageAction establecido con el mensaje nuevo. Por ejemplo, para cerrar el diálogo y enviar un mensaje de texto, muestra lo siguiente:

En el siguiente ejemplo, se cierra el diálogo enviando un mensaje nuevo:

Node.js

node/chat/contact-form-app/index.js
return { hostAppDataAction: { chatDataAction: { createMessageAction: { message: {
  text: "✅ " + event.commonEventObject.parameters["contactName"] + " has been added to your contacts."
}}}}};

Python

python/chat/contact-form-app/main.py
return { 'hostAppDataAction': { 'chatDataAction': { 'createMessageAction': { 'message': {
  'text': "✅ " + event.get('commonEventObject').get('parameters')["contactName"] + " has been added to your contacts."
}}}}}

Java

java/chat/contact-form-app/src/main/java/com/google/chat/contact/App.java
return new GenericJson() {{
  put("hostAppDataAction", new GenericJson() {{
    put("chatDataAction", new GenericJson() {{
      put("createMessageAction", new GenericJson() {{
        put("message", new Message()
          .setText( "✅ " + event.at("/commonEventObject/parameters/contactName").asText() +
                    " has been added to your contacts."));
      }});
    }});
  }});
}};

Apps Script

En este ejemplo, se envía un mensaje de tarjeta mostrando el JSON de la tarjeta. También puedes usar el servicio de tarjetas de Apps Script.

apps-script/chat/contact-form-app/Code.gs
return { hostAppDataAction: { chatDataAction: { createMessageAction: { message: {
  text: "✅ " + event.commonEventObject.parameters["contactName"] + " has been added to your contacts."
}}}}};

Para actualizar un mensaje después de que el usuario envía un diálogo, muestra un objeto DataActions que contenga una de las siguientes acciones:

Solucionar problemas

Cuando una app o tarjeta de Google Chat muestra un error, la interfaz de Chat muestra un mensaje que dice "Se produjo un error" o "No se pudo procesar la solicitud". A veces, la IU de Chat no muestra ningún mensaje de error, pero la app o tarjeta de Chat produce un resultado inesperado; por ejemplo, es posible que no aparezca un mensaje de tarjeta.

Aunque es posible que no se muestre un mensaje de error en la IU de Chat, hay mensajes de error descriptivos y datos de registro disponibles para ayudarte a corregir errores cuando se activa el registro de errores para las apps de Chat. Si necesitas ayuda para ver, depurar y corregir errores, consulta Soluciona problemas y corrige errores de Google Chat.