Page Summary
-
The Google Code Scanner API enables code scanning without requiring camera permission, preserving user privacy by delegating the task to Google Play services.
-
It supports various code formats, returns a
Barcodeobject, and is ideal for apps needing seamless code scanning without a custom UI. -
Auto-zoom, available from version 16.1.0, automatically zooms in on barcodes, eliminating the need for manual adjustments and making scanning faster and more accurate.
-
The API uses an unbundled library downloaded before use and requires Android API level 21 or higher.
-
For complex use cases requiring a custom UI, the ML Kit Barcode Scanning API is recommended.
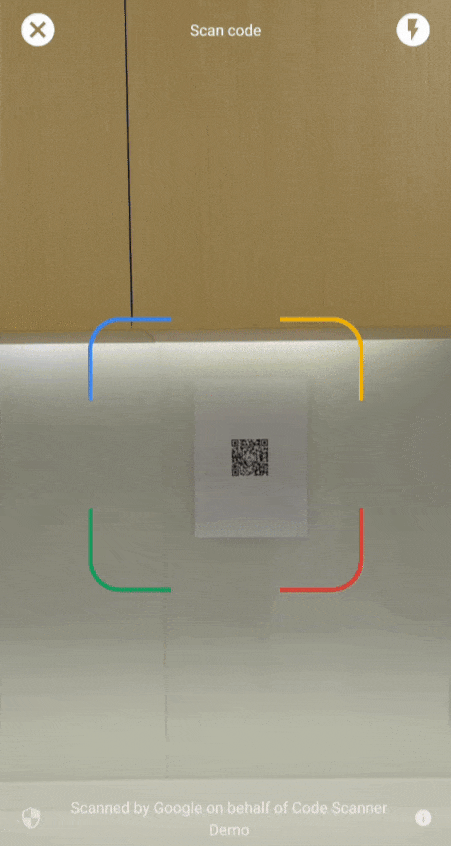
The Google code scanner API provides a complete solution for scanning code
without requiring your app to request camera permission, while preserving user
privacy. This is accomplished by delegating the task of scanning the code to
Google Play services and returning only the scan results to your app (Video 1).
All image processing occurs on the device and Google doesn't store the results
or image data. The API supports the same code formats as the
ML Kit Barcode Scanning API and returns the
same Barcode
object.
This API is ideal for apps that require seamless code scanning without the need for a custom UI or camera experience. The implementation resides entirely within Google Play services, ensuring minimal impact on the size of your app.
Starting with version 16.1.0, you can enable auto-zoom to allow the Google code scanner to automatically scan barcodes that are far away from the camera. When users point their devices at a barcode, the scanner will intelligently detect and zoom in on the barcode. This eliminates the need for manual zoom adjustments, making barcode scanning faster, more accurate and more accessible (see Video 2).
 |
 |
| Video 1. Google code scanner integration | Video 2. Auto-zoom effect |
For more complex use cases that require a custom UI, we recommend using the ML Kit Barcode Scanning API directly.
If you have questions, want to submit a bug, or need assistance, check the ML Kit community page.
Before you begin
To prepare your app, complete the steps in the following sections.
Configure your app
In your top-level
settings.gradlefile, include Google's Maven repository and Maven central repository in under thedependencyResolutionManagementblock:dependencyResolutionManagement { repositories { google() mavenCentral() } }Add the Google Play services dependency for the
play-services-code-scannerSDK to your module's Gradle build file, which is commonlyapp/build.gradle:dependencies { implementation 'com.google.android.gms:play-services-code-scanner:16.1.0' }You can configure your app to have Google Play services automatically download the scanner module to the device while your app is installed from the Play Store.
<application ...>
  ...
  <meta-data
      android:name="com.google.mlkit.vision.DEPENDENCIES"
      android:value="barcode_ui"/>
  ...
</application>
You can also explicitly check the scanner module availability and request download through Google Play services ModuleInstallClient API.
If you don't enable install-time module downloads or request explicit downloads—and the scanner module isn't already installed for another use case—Google Play services downloads the scanner module the first time it's used.
Scan a code
Implement the following steps to scan a barcode.
Optional: Configure the code scanner.
If you know which barcode formats you expect to read, you can improve the speed of the barcode detector by configuring it to only detect those formats. For example, to detect only Aztec code and QR codes, build a
GmsBarcodeScannerOptionsobject as in the following example:Kotlin
val options = GmsBarcodeScannerOptions.Builder()
   .setBarcodeFormats(
       Barcode.FORMAT_QR_CODE,
       Barcode.FORMAT_AZTEC)
   .build()
Java
GmsBarcodeScannerOptions options = new GmsBarcodeScannerOptions.Builder()
   .setBarcodeFormats(
       Barcode.FORMAT_QR_CODE,
       Barcode.FORMAT_AZTEC)
   .build();
By default, auto-zoom is turned off. To enable auto-zoom functionality starting in version 16.1.0, call
enableAutoZoom()as shown in the following code example.Kotlin
val options = GmsBarcodeScannerOptions.Builder()
   .setBarcodeFormats(...)
   .enableAutoZoom() // available on 16.1.0 and higher
   .build()
Java
GmsBarcodeScannerOptions options = new GmsBarcodeScannerOptions.Builder()
   .setBarcodeFormats(...)
   .enableAutoZoom() // available on 16.1.0 and higher
   .build();
Get an instance of
GmsBarcodeScanner, as shown in the code example:Kotlin
val scanner = GmsBarcodeScanning.getClient(this)
// Or with a configured options
// val scanner = GmsBarcodeScanning.getClient(this, options)
Java
GmsBarcodeScanner scanner = GmsBarcodeScanning.getClient(this);
// Or with a configured options
// GmsBarcodeScanner scanner = GmsBarcodeScanning.getClient(context, options);
Request a code scanning by calling
startScan().Kotlin
scanner.startScan()
   .addOnSuccessListener { barcode ->
       // Task completed successfully
   }
   .addOnCanceledListener {
       // Task canceled
   }
   .addOnFailureListener { e ->
       // Task failed with an exception
   }
Java
scanner
   .startScan()
   .addOnSuccessListener(
       barcode -> {
         // Task completed successfully
       })
   .addOnCanceledListener(
       () -> {
         // Task canceled
       })
   .addOnFailureListener(
       e -> {
         // Task failed with an exception
       });
Handle the resulting
Barcode.Kotlin
val rawValue: String? = barcode.rawValue
Java
String rawValue = barcode.getRawValue();