สร้างแอป HTTP สำหรับ Google Chat ที่มี Cloud Functions

หน้านี้จะอธิบายวิธีสร้างแอปใน Chat แบบ HTTP คุณใช้สถาปัตยกรรมนี้ได้หลายวิธี ใน Google Cloud คุณ สามารถใช้ Cloud Functions, Cloud Run และ App Engine ได้ ในการเริ่มต้นอย่างรวดเร็วนี้ คุณจะ เขียนและทำให้ Cloud Function ที่แอป Chat ใช้ตอบข้อความของผู้ใช้

เมื่อใช้สถาปัตยกรรมนี้ คุณจะกำหนดค่า Chat เพื่อผสานรวมกับ Google Cloud หรือเซิร์ฟเวอร์ภายในองค์กรโดยใช้ HTTP ดังที่แสดงใน แผนภาพต่อไปนี้

สถาปัตยกรรมของแอป Chat ที่ใช้บริการบนเว็บในเซิร์ฟเวอร์ภายในองค์กร

ในแผนภาพก่อนหน้านี้ ผู้ใช้ที่โต้ตอบกับ HTTP แอป Chat มีขั้นตอนข้อมูลต่อไปนี้

  1. ผู้ใช้ส่งข้อความใน Chat ไปยัง แอปแชท ทั้งในข้อความส่วนตัวหรือใน พื้นที่ใน Chat
  2. คำขอ HTTP ถูกส่งไปยังเว็บเซิร์ฟเวอร์ที่เป็นระบบคลาวด์หรือ ระบบภายในองค์กรที่มีแอป Chat
  3. (ไม่บังคับ) ตรรกะของแอป Chat จะผสานรวมกับ บริการของ Google Workspace (เช่น ปฏิทินและ ชีต) บริการอื่นๆ ของ Google (เช่น Maps, YouTube และ Vertex AI) หรือบริการบนเว็บอื่นๆ (เช่น โปรเจ็กต์) ) หรือเครื่องมือจำหน่ายตั๋ว)
  4. เว็บเซิร์ฟเวอร์จะส่งการตอบกลับ HTTP กลับไปยัง บริการแอปใน Chat ใน Chat
  5. ระบบจะส่งคำตอบให้กับผู้ใช้
  6. (ไม่บังคับ) แอป Chat สามารถเรียกใช้ Chat API เพื่อโพสต์ข้อความแบบไม่พร้อมกันหรือดำเนินการอื่นๆ operations.

สถาปัตยกรรมนี้ให้ความยืดหยุ่นในการใช้ไลบรารีที่มีอยู่และ ที่มีอยู่ในระบบของคุณอยู่แล้วเนื่องจาก คุณออกแบบแอปแชทโดยใช้ภาษาโปรแกรมที่แตกต่างกันได้

วัตถุประสงค์

  • ตั้งค่าสภาพแวดล้อมของคุณ
  • สร้างและทำให้ Cloud Function ใช้งานได้
  • เผยแพร่แอปไปยัง Chat
  • ทดสอบแอป

ข้อกำหนดเบื้องต้น

ตั้งค่าสภาพแวดล้อม

ก่อนใช้ Google APIs คุณต้องเปิดใช้ API เหล่านี้ในโปรเจ็กต์ Google Cloud คุณสามารถเปิด API ได้ตั้งแต่ 1 รายการขึ้นไปในโปรเจ็กต์ Google Cloud เดียว
  • ในคอนโซล Google Cloud ให้เปิดใช้ Google Chat API, Cloud Build API, Cloud Functions API Cloud Pub/Sub API, Cloud Logging API, Artifact Registry API และ Cloud Run API

    เปิดใช้ API

สร้างและทำให้ Cloud Function ใช้งานได้

สร้างและติดตั้งใช้งาน Cloud Function ที่สร้างการ์ด Chat ด้วยชื่อที่แสดงและรูปโปรไฟล์ของผู้ส่ง เมื่อ แอปแชทจะได้รับข้อความ ซึ่งจะเรียกใช้ฟังก์ชันนั้น และ ตอบกลับด้วยการ์ด

หากต้องการสร้างและทำให้ฟังก์ชันใช้งานได้สำหรับแอป Chat ทำตามขั้นตอนต่อไปนี้

Node.js

  1. ในคอนโซล Google Cloud ให้ไปที่หน้า Cloud Functions แล้วทำดังนี้

    ไปที่ Cloud Functions

    ตรวจสอบว่าโปรเจ็กต์สำหรับแอป Chat ของคุณ ที่เลือกไว้

  2. คลิก สร้างฟังก์ชัน

  3. ในหน้าสร้างฟังก์ชัน ให้ตั้งค่าฟังก์ชันต่อไปนี้

    1. ในสภาพแวดล้อม ให้เลือกรุ่นที่ 2
    2. ป้อน QuickStartChatApp ในชื่อฟังก์ชัน
    3. ในภูมิภาค ให้เลือกภูมิภาค
    4. เลือกต้องมีการตรวจสอบสิทธิ์ในส่วนการตรวจสอบสิทธิ์
    5. คลิกถัดไป
  4. ใน Runtime ให้เลือก Node.js เวอร์ชันล่าสุด

  5. ในซอร์สโค้ด ให้เลือกตัวแก้ไขในบรรทัด

  6. ใน Entry Point ให้ลบข้อความเริ่มต้นและป้อน helloChat

  7. แทนที่เนื้อหาของ index.js ด้วยรหัสต่อไปนี้

    node/avatar-app/index.js
    /**
     * Google Cloud Function that responds to messages sent from a
     * Google Chat room.
     *
     * @param {Object} req Request sent from Google Chat room
     * @param {Object} res Response to send back
     */
    exports.helloChat = function helloChat(req, res) {
      if (req.method === 'GET' || !req.body.message) {
        res.send('Hello! This function is meant to be used in a Google Chat ' +
          'Room.');
      }
    
      const sender = req.body.message.sender.displayName;
      const image = req.body.message.sender.avatarUrl;
    
      const data = createMessage(sender, image);
    
      res.send(data);
    };
    
    /**
     * Creates a card with two widgets.
     * @param {string} displayName the sender's display name
     * @param {string} imageUrl the URL for the sender's avatar
     * @return {Object} a card with the user's avatar.
     */
    function createMessage(displayName, imageUrl) {
      const cardHeader = {
        title: `Hello ${displayName}!`,
      };
    
      const avatarWidget = {
        textParagraph: {text: 'Your avatar picture: '},
      };
    
      const avatarImageWidget = {
        image: {imageUrl},
      };
    
      const avatarSection = {
        widgets: [
          avatarWidget,
          avatarImageWidget,
        ],
      };
    
      return {
        text: 'Here\'s your avatar',
        cardsV2: [{
          cardId: 'avatarCard',
          card: {
            name: 'Avatar Card',
            header: cardHeader,
            sections: [avatarSection],
          }
        }],
      };
    }

  8. คลิกทำให้ใช้งานได้

Python

  1. ในคอนโซล Google Cloud ให้ไปที่หน้า Cloud Functions แล้วทำดังนี้

    ไปที่ Cloud Functions

    ตรวจสอบว่าโปรเจ็กต์สำหรับแอป Chat ของคุณ ที่เลือกไว้

  2. คลิก สร้างฟังก์ชัน

  3. ในหน้าสร้างฟังก์ชัน ให้ตั้งค่าฟังก์ชันต่อไปนี้

    1. ในสภาพแวดล้อม ให้เลือกรุ่นที่ 2
    2. ป้อน QuickStartChatApp ในชื่อฟังก์ชัน
    3. ในภูมิภาค ให้เลือกภูมิภาค
    4. เลือกต้องมีการตรวจสอบสิทธิ์ในส่วนการตรวจสอบสิทธิ์
    5. คลิกถัดไป
  4. ในรันไทม์ ให้เลือก Python เวอร์ชันล่าสุด

  5. ในซอร์สโค้ด ให้เลือกตัวแก้ไขในบรรทัด

  6. ใน Entry Point ให้ลบข้อความเริ่มต้นและป้อน hello_chat

  7. แทนที่เนื้อหาของ main.py ด้วยรหัสต่อไปนี้

    python/avatar-app/main.py
    from typing import Any, Mapping
    
    import flask
    import functions_framework
    
    
    # Google Cloud Function that responds to messages sent in
    # Google Chat.
    #
    # @param {Object} req Request sent from Google Chat.
    # @param {Object} res Response to send back.
    @functions_framework.http
    def hello_chat(req: flask.Request) -> Mapping[str, Any]:
      if req.method == "GET":
        return "Hello! This function must be called from Google Chat."
    
      request_json = req.get_json(silent=True)
    
      display_name = request_json["message"]["sender"]["displayName"]
      avatar = request_json["message"]["sender"]["avatarUrl"]
    
      response = create_message(name=display_name, image_url=avatar)
    
      return response
    
    
    # Creates a card with two widgets.
    # @param {string} name the sender's display name.
    # @param {string} image_url the URL for the sender's avatar.
    # @return {Object} a card with the user's avatar.
    def create_message(name: str, image_url: str) -> Mapping[str, Any]:
      avatar_image_widget = {"image": {"imageUrl": image_url}}
      avatar_text_widget = {"textParagraph": {"text": "Your avatar picture:"}}
      avatar_section = {"widgets": [avatar_text_widget, avatar_image_widget]}
    
      header = {"title": f"Hello {name}!"}
    
      cards = {
          "text": "Here's your avatar",
          "cardsV2": [
              {
                  "cardId": "avatarCard",
                  "card": {
                      "name": "Avatar Card",
                      "header": header,
                      "sections": [avatar_section],
                  },
              }
          ]
      }
    
      return cards

  8. คลิกทำให้ใช้งานได้

Java

  1. ในคอนโซล Google Cloud ให้ไปที่หน้า Cloud Functions แล้วทำดังนี้

    ไปที่ Cloud Functions

    ตรวจสอบว่าโปรเจ็กต์สำหรับแอป Chat ของคุณ ไว้

  2. คลิก สร้างฟังก์ชัน

  3. ในหน้าสร้างฟังก์ชัน ให้ตั้งค่าฟังก์ชันต่อไปนี้

    1. ในสภาพแวดล้อม ให้เลือกรุ่นที่ 2
    2. ป้อน QuickStartChatApp ในชื่อฟังก์ชัน
    3. ในภูมิภาค ให้เลือกภูมิภาค
    4. เลือกต้องมีการตรวจสอบสิทธิ์ในส่วนการตรวจสอบสิทธิ์
    5. คลิกถัดไป
  4. ใน Runtime ให้เลือก Java เวอร์ชันล่าสุด

  5. ในซอร์สโค้ด ให้เลือกตัวแก้ไขในบรรทัด

  6. ใน Entry Point ให้ลบข้อความเริ่มต้นและป้อน HelloChat

  7. เปลี่ยนชื่อ src/main/java/com/example/Example.java เป็น src/main/java/HelloChat.java.

  8. แทนที่เนื้อหาของ HelloChat.java ด้วยรหัสต่อไปนี้

    java/avatar-app/src/main/java/HelloChat.java
    import com.google.api.services.chat.v1.model.CardWithId;
    import com.google.api.services.chat.v1.model.GoogleAppsCardV1Card;
    import com.google.api.services.chat.v1.model.GoogleAppsCardV1CardHeader;
    import com.google.api.services.chat.v1.model.GoogleAppsCardV1Image;
    import com.google.api.services.chat.v1.model.GoogleAppsCardV1Section;
    import com.google.api.services.chat.v1.model.GoogleAppsCardV1TextParagraph;
    import com.google.api.services.chat.v1.model.GoogleAppsCardV1Widget;
    import com.google.api.services.chat.v1.model.Message;
    import com.google.cloud.functions.HttpFunction;
    import com.google.cloud.functions.HttpRequest;
    import com.google.cloud.functions.HttpResponse;
    import com.google.gson.Gson;
    import com.google.gson.JsonObject;
    import java.util.List;
    
    public class HelloChat implements HttpFunction {
      private static final Gson gson = new Gson();
    
      @Override
      public void service(HttpRequest request, HttpResponse response) throws Exception {
        JsonObject body = gson.fromJson(request.getReader(), JsonObject.class);
    
        if (request.getMethod().equals("GET") || !body.has("message")) {
          response.getWriter().write("Hello! This function must be called from Google Chat.");
          return;
        }
    
        JsonObject sender = body.getAsJsonObject("message").getAsJsonObject("sender");
        String displayName = sender.has("displayName") ? sender.get("displayName").getAsString() : "";
        String avatarUrl = sender.has("avatarUrl") ? sender.get("avatarUrl").getAsString() : "";
        Message message = createMessage(displayName, avatarUrl);
    
        response.getWriter().write(gson.toJson(message));
      }
    
      Message createMessage(String displayName, String avatarUrl) {
        GoogleAppsCardV1CardHeader cardHeader = new GoogleAppsCardV1CardHeader();
        cardHeader.setTitle(String.format("Hello %s!", displayName));
    
        GoogleAppsCardV1TextParagraph textParagraph = new GoogleAppsCardV1TextParagraph();
        textParagraph.setText("Your avatar picture: ");
    
        GoogleAppsCardV1Widget avatarWidget = new GoogleAppsCardV1Widget();
        avatarWidget.setTextParagraph(textParagraph);
    
        GoogleAppsCardV1Image image = new GoogleAppsCardV1Image();
        image.setImageUrl(avatarUrl);
    
        GoogleAppsCardV1Widget avatarImageWidget = new GoogleAppsCardV1Widget();
        avatarImageWidget.setImage(image);
    
        GoogleAppsCardV1Section section = new GoogleAppsCardV1Section();
        section.setWidgets(List.of(avatarWidget, avatarImageWidget));
    
        GoogleAppsCardV1Card card = new GoogleAppsCardV1Card();
        card.setName("Avatar Card");
        card.setHeader(cardHeader);
        card.setSections(List.of(section));
    
        CardWithId cardWithId = new CardWithId();
        cardWithId.setCardId("previewLink");
        cardWithId.setCard(card);
    
        Message message = new Message();
        message.setText("Here's your avatar");
        message.setCardsV2(List.of(cardWithId));
    
        return message;
      }
    }

  9. แทนที่เนื้อหาของ pom.xml ด้วยรหัสต่อไปนี้

    java/avatar-app/pom.xml
    <project xmlns="http://maven.apache.org/POM/4.0.0"
             xmlns:xsi="http://www.w3.org/2001/XMLSchema-instance"
             xsi:schemaLocation="http://maven.apache.org/POM/4.0.0 http://maven.apache.org/xsd/maven-4.0.0.xsd">
      <modelVersion>4.0.0</modelVersion>
    
      <groupId>cloudfunctions</groupId>
      <artifactId>http-function</artifactId>
      <version>1.0-SNAPSHOT</version>
    
      <properties>
        <maven.compiler.target>11</maven.compiler.target>
        <maven.compiler.source>11</maven.compiler.source>
      </properties>
    
      <dependencies>
        <dependency>
          <groupId>com.google.cloud.functions</groupId>
          <artifactId>functions-framework-api</artifactId>
          <version>1.0.1</version>
        </dependency>
    
        <!-- https://mvnrepository.com/artifact/com.google.code.gson/gson -->
        <dependency>
            <groupId>com.google.code.gson</groupId>
            <artifactId>gson</artifactId>
            <version>2.9.1</version>
        </dependency>
    
        <!-- https://mvnrepository.com/artifact/com.google.apis/google-api-services-chat -->
        <dependency>
          <groupId>com.google.apis</groupId>
          <artifactId>google-api-services-chat</artifactId>
          <version>v1-rev20230115-2.0.0</version>
        </dependency>
      </dependencies>
    
      <!-- Required for Java 11 functions in the inline editor -->
      <build>
        <plugins>
          <plugin>
            <groupId>org.apache.maven.plugins</groupId>
            <artifactId>maven-compiler-plugin</artifactId>
            <version>3.8.1</version>
            <configuration>
              <excludes>
                <exclude>.google/</exclude>
              </excludes>
            </configuration>
          </plugin>
        </plugins>
      </build>
    </project>

  10. คลิกทำให้ใช้งานได้

หน้ารายละเอียดฟังก์ชันระบบคลาวด์จะเปิดขึ้น และฟังก์ชันจะปรากฏขึ้นโดยมี สัญญาณบอกสถานะความคืบหน้า: สัญญาณหนึ่งสําหรับบิลด์และอีกอันสําหรับบริการ เมื่อทั้ง 2 กรณี สัญญาณบอกสถานะความคืบหน้าจะหายไปและแทนที่ด้วยเครื่องหมายถูก ซึ่งเป็นฟังก์ชัน และพร้อมใช้งาน

ให้สิทธิ์ Google Chat เพื่อเรียกใช้ฟังก์ชัน

หากต้องการให้สิทธิ์ Google Chat เรียกใช้ฟังก์ชัน ให้เพิ่ม Google Chat บัญชีบริการที่มีบทบาทผู้เรียกใช้ Cloud Run

  1. ในคอนโซล Google Cloud ให้ไปที่หน้า Cloud Run แล้วดำเนินการดังนี้

    ไปที่ Cloud Run

  2. ในรายการบริการ Cloud Run ให้เลือกช่องทำเครื่องหมายข้างกล่องรับ (อย่าคลิกที่ฟังก์ชัน)

  3. คลิกสิทธิ์ แผงสิทธิ์จะเปิดขึ้น

  4. คลิกเพิ่มผู้ใช้หลัก

  5. ในผู้ใช้หลักใหม่ ให้ป้อน chat@system.gserviceaccount.com

  6. ในส่วนเลือกบทบาท ให้เลือก Cloud Run > ผู้เรียกใช้ Cloud Run

  7. คลิกบันทึก

เผยแพร่แอปไปยัง Google Chat

หลังจากทำให้ Cloud Function ใช้งานได้แล้ว ให้ทำตามขั้นตอนต่อไปนี้เพื่อเปลี่ยนให้เป็น แอป Google Chat:

  1. ในคอนโซล Google Cloud ให้คลิกเมนู &gt; Cloud Functions

    ไปที่ Cloud Functions

    ตรวจสอบว่าโปรเจ็กต์ที่คุณเปิดใช้ Cloud Functions ไว้ ไว้

  2. คลิก QuickStartChatApp ในรายการฟังก์ชัน

  3. คลิกแท็บทริกเกอร์

  4. คัดลอก URL ในส่วน HTTPS

  5. ค้นหา "Google Chat API" แล้วคลิก Google Chat API จากนั้นคลิกจัดการ

    ไปที่ Chat API

  6. คลิกการกำหนดค่าและตั้งค่าแอป Google Chat ดังนี้

    1. ป้อน Quickstart App ในชื่อแอป
    2. ใน URL รูปโปรไฟล์ ให้ป้อน https://developers.google.com/chat/images/quickstart-app-avatar.png
    3. ในคำอธิบาย ให้ป้อน Quickstart app
    4. ในส่วนฟังก์ชัน ให้เลือกรับข้อความแบบ 1:1 และ เข้าร่วมพื้นที่ทำงานและการสนทนากลุ่ม
    5. ในส่วนการตั้งค่าการเชื่อมต่อ ให้เลือก URL ของแอป แล้ววาง URL สำหรับ ทริกเกอร์ Cloud Function ในช่อง
    6. เลือก URL ของแอปในกลุ่มเป้าหมายการตรวจสอบสิทธิ์
    7. ในส่วนระดับการเข้าถึง ให้เลือก ทำให้แอป Google Chat นี้ใช้งานได้เฉพาะบางคนและ กลุ่มในโดเมนและป้อนอีเมล
    8. เลือกบันทึกข้อผิดพลาดในการบันทึกในส่วนบันทึก
  7. คลิกบันทึก

แอป Chat พร้อมที่จะรับและตอบกลับ ข้อความใน Chat

ทดสอบแอปใน Chat

หากต้องการทดสอบแอป Chat ให้เปิดพื้นที่ข้อความส่วนตัวด้วย แล้วส่งข้อความในแอป Chat

  1. เปิด Google Chat โดยใช้บัญชี Google Workspace ที่คุณ ที่ให้ไว้เมื่อคุณเพิ่มตัวเองเป็นผู้ทดสอบที่เชื่อถือได้

    ไปที่ Google Chat

  2. คลิก แชทใหม่
  3. ในช่องเพิ่มผู้คนอย่างน้อย 1 คน ให้พิมพ์ชื่อ แอป Chat
  4. เลือกแอปใน Chat จากผลการค้นหา โดยตรง ข้อความจะเปิดขึ้น

  5. ในข้อความส่วนตัวใหม่ที่มีแอป ให้พิมพ์ Hello แล้วกด enter.

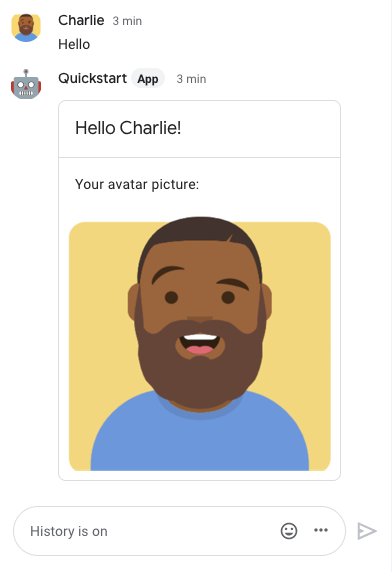
การตอบกลับของแอป Chat จะมี ข้อความของการ์ดที่แสดง ชื่อและรูปโปรไฟล์ของผู้ส่งดังที่แสดงในรูปภาพต่อไปนี้

แอป Chat ตอบกลับด้วยการ์ดที่มีชื่อที่แสดงและรูปโปรไฟล์ของผู้ส่ง
ภาพ

หากต้องการเพิ่มผู้ทดสอบที่เชื่อถือได้และดูข้อมูลเพิ่มเติมเกี่ยวกับการทดสอบฟีเจอร์แบบอินเทอร์แอกทีฟ โปรดดู ทดสอบฟีเจอร์แบบอินเทอร์แอกทีฟสำหรับ แอป Google Chat

แก้ปัญหา

เมื่อแอป Google Chat หรือ card จะแสดงผลข้อผิดพลาด อินเทอร์เฟซ Chat แสดงข้อความว่า "เกิดข้อผิดพลาด" หรือ "ไม่สามารถดำเนินการตามคำขอของคุณ" บางครั้ง UI ของ Chat ไม่แสดงข้อความแสดงข้อผิดพลาดใดๆ แต่แอป Chat หรือ ทำให้เกิดผลลัพธ์ที่ไม่คาดคิด เช่น ข้อความในการ์ดอาจ ปรากฏขึ้น

แม้ว่าข้อความแสดงข้อผิดพลาดอาจไม่แสดงใน UI ของแชท มีข้อความแสดงข้อผิดพลาดและข้อมูลบันทึกที่สื่อความหมายเพื่อช่วยคุณแก้ไขข้อผิดพลาด เมื่อมีการเปิดข้อผิดพลาดในการบันทึกสำหรับแอป Chat หากต้องการความช่วยเหลือในการดู การแก้ไขข้อบกพร่องและการแก้ไขข้อผิดพลาด โปรดดู แก้ปัญหาข้อผิดพลาดของ Google Chat

ล้างข้อมูล

เพื่อเลี่ยงไม่ให้เกิดการเรียกเก็บเงินกับบัญชี Google Cloud ของคุณตาม ซึ่งใช้ในบทแนะนำนี้ เราขอแนะนำให้คุณลบ โปรเจ็กต์ที่อยู่ในระบบคลาวด์

  1. ในคอนโซล Google Cloud ให้ไปที่หน้าจัดการทรัพยากร คลิก เมนู &gt; IAM และ ผู้ดูแลระบบ &gt; จัดการทรัพยากร

    ไปที่เครื่องมือจัดการทรัพยากร

  2. ในรายการโปรเจ็กต์ ให้เลือกโปรเจ็กต์ที่ต้องการลบ แล้วคลิก ลบ
  3. ในกล่องโต้ตอบ ให้พิมพ์รหัสโปรเจ็กต์แล้วคลิกปิดเครื่องเพื่อลบ ให้กับโครงการ