Google Chat、Vertex AI、Apps Script を使用してインシデントに対応する

このチュートリアルでは、Google Chat で リアルタイムでインシデントに対応しますインシデントに対応する際、アプリケーション Chat スペースを作成して入力し、インシデントが メッセージ、スラッシュ コマンド、ダイアログで解決し、AI を使用して要約を ドキュメントを Google ドキュメントに保存します

インシデントとは、チームの即時対応を必要とするイベントである 人によって異なります。インシデントの例:

  • 時間的制約のあるケースが顧客管理(CRM)で作成される サービスチームは問題解決に向けて協力する必要があります
  • システムがオフラインになり、サイト信頼性エンジニア(SRE)のグループにアラートが発生 オンラインに復帰できるようにします
  • マグニチュードの強い地震が起き、緊急作業員に 対応を調整する必要があります

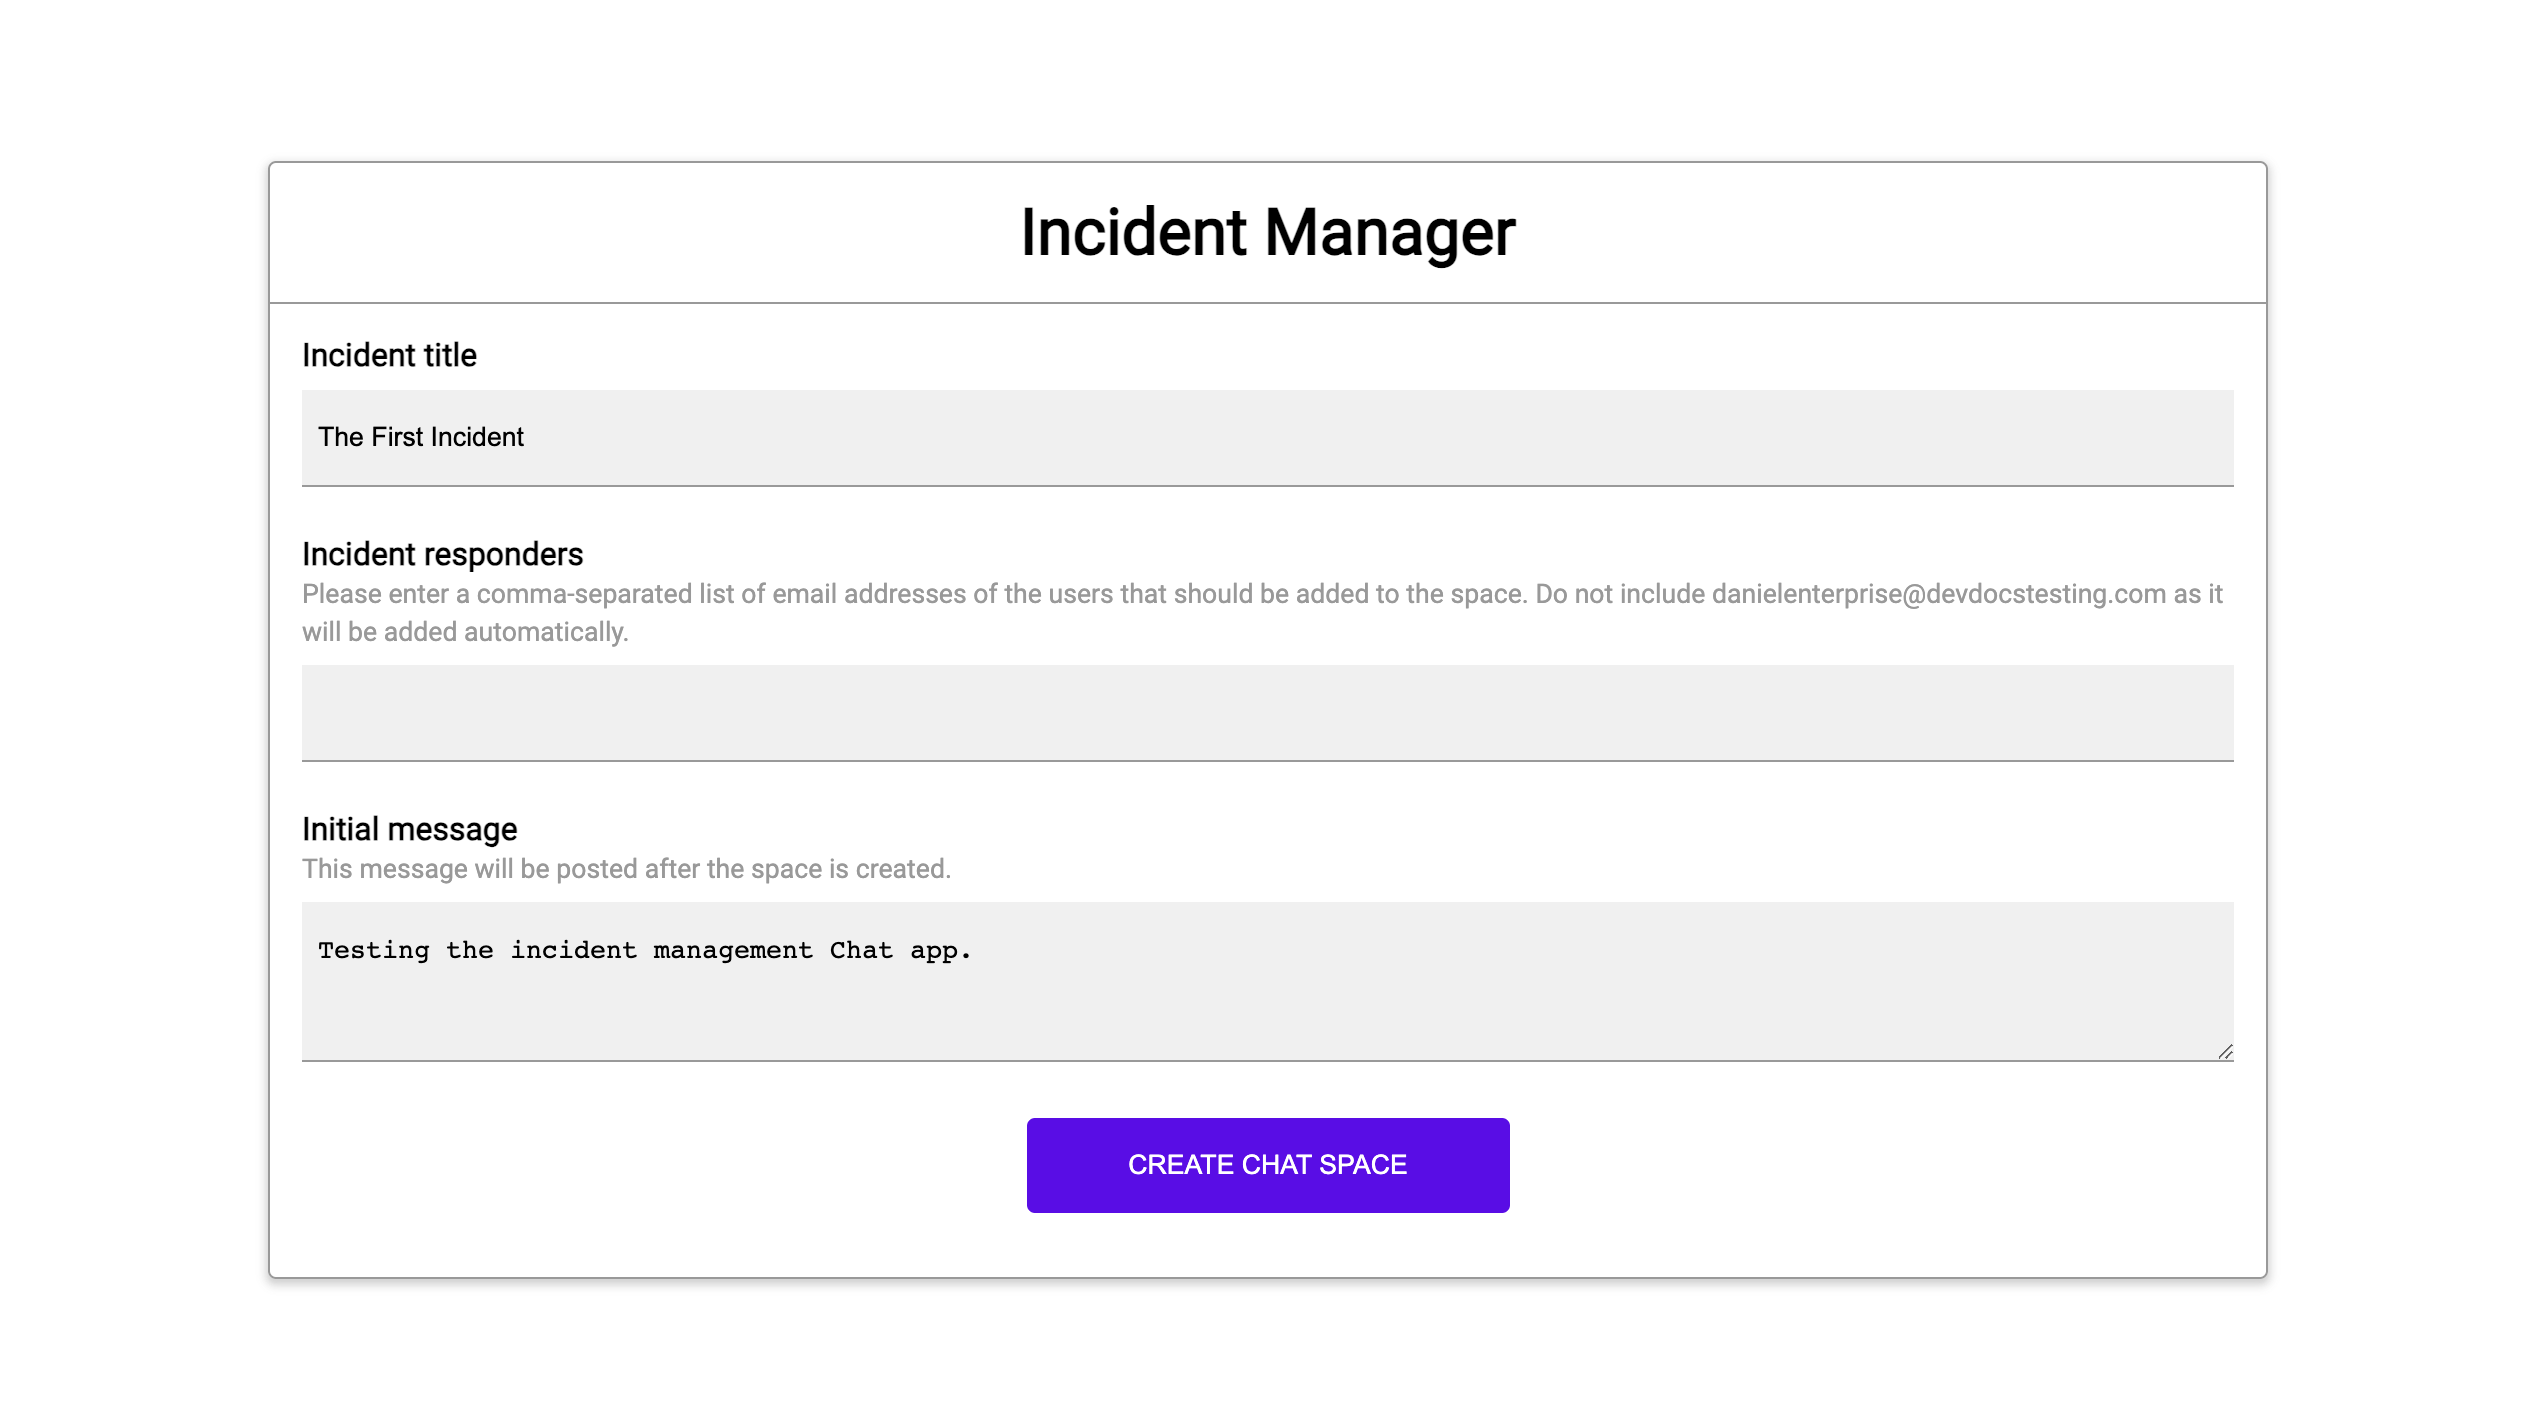
このチュートリアルでは、インシデント アラートは、誰かが ウェブページでボタンをクリックするだけでインシデントを報告できます。ウェブページは ユーザーに基本的なインシデント情報(タイトル、 回答者のメールアドレスもわかります

Chat アプリのインシデント管理の動作を確認します。

  • インシデントを開始するウェブサイト。
    図 1: インシデントを報告できるウェブサイトです。
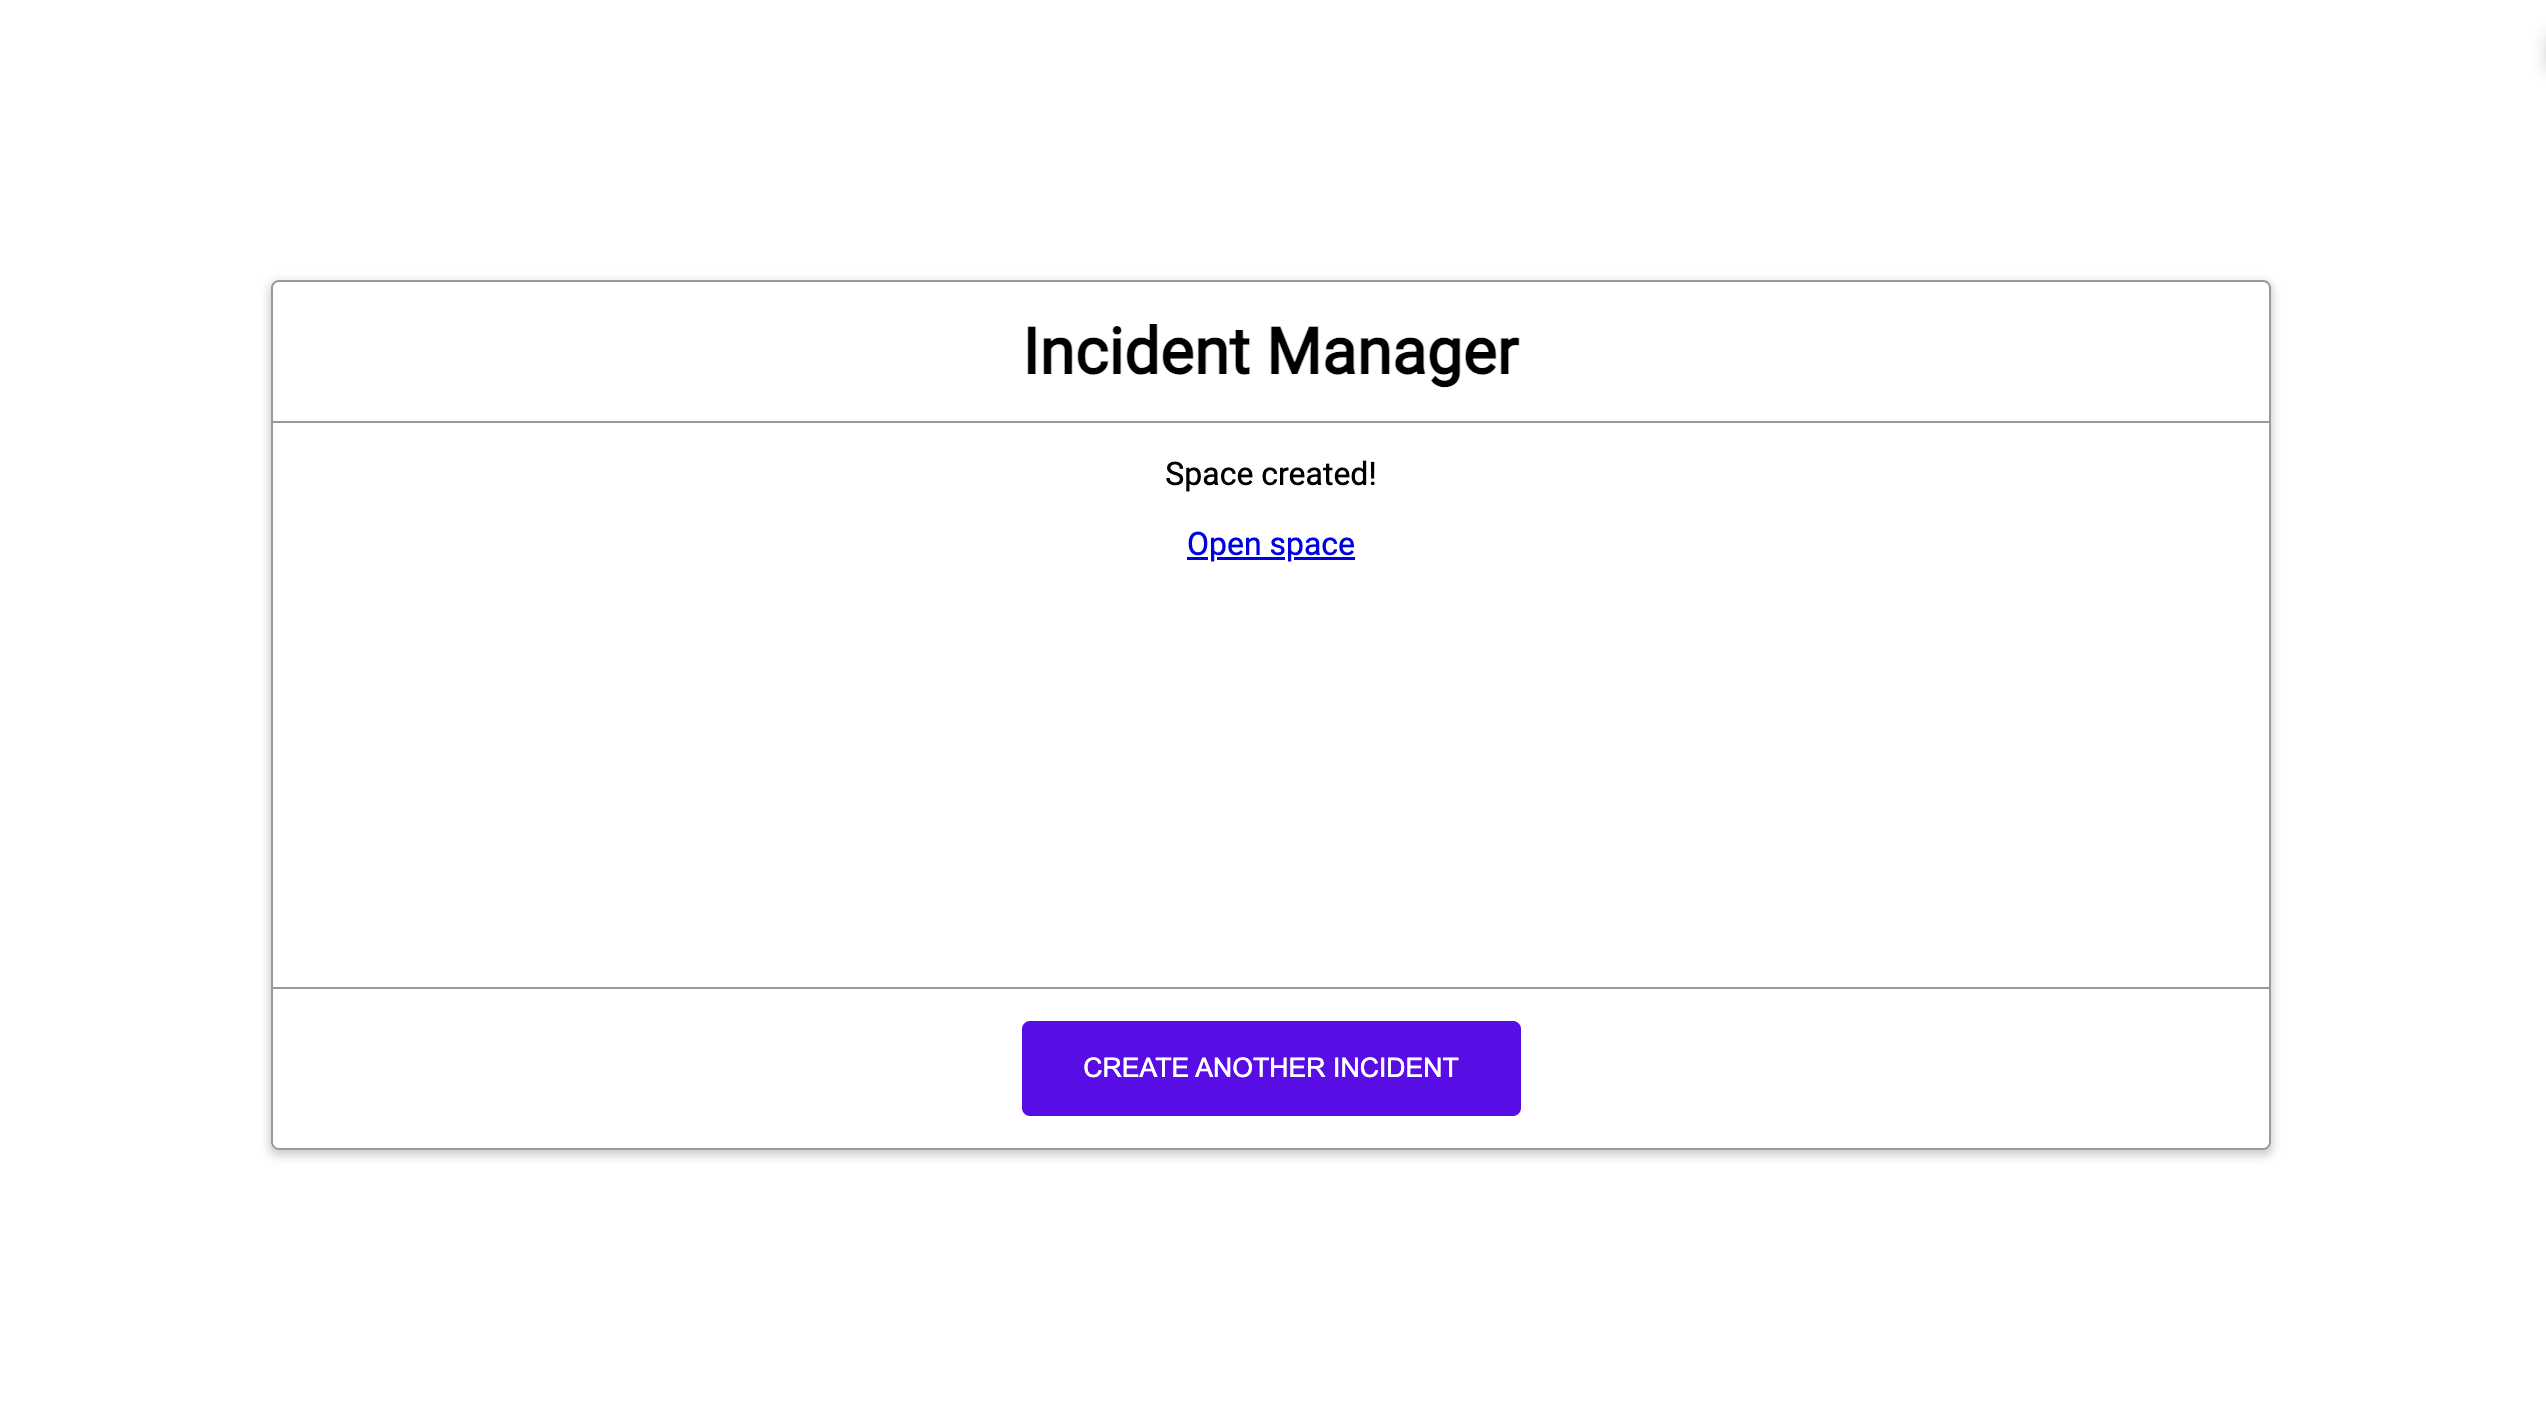
  • インシデントの Chat スペースが作成されたという通知。
    図 2.インシデントの Chat スペースが作成されたという通知。
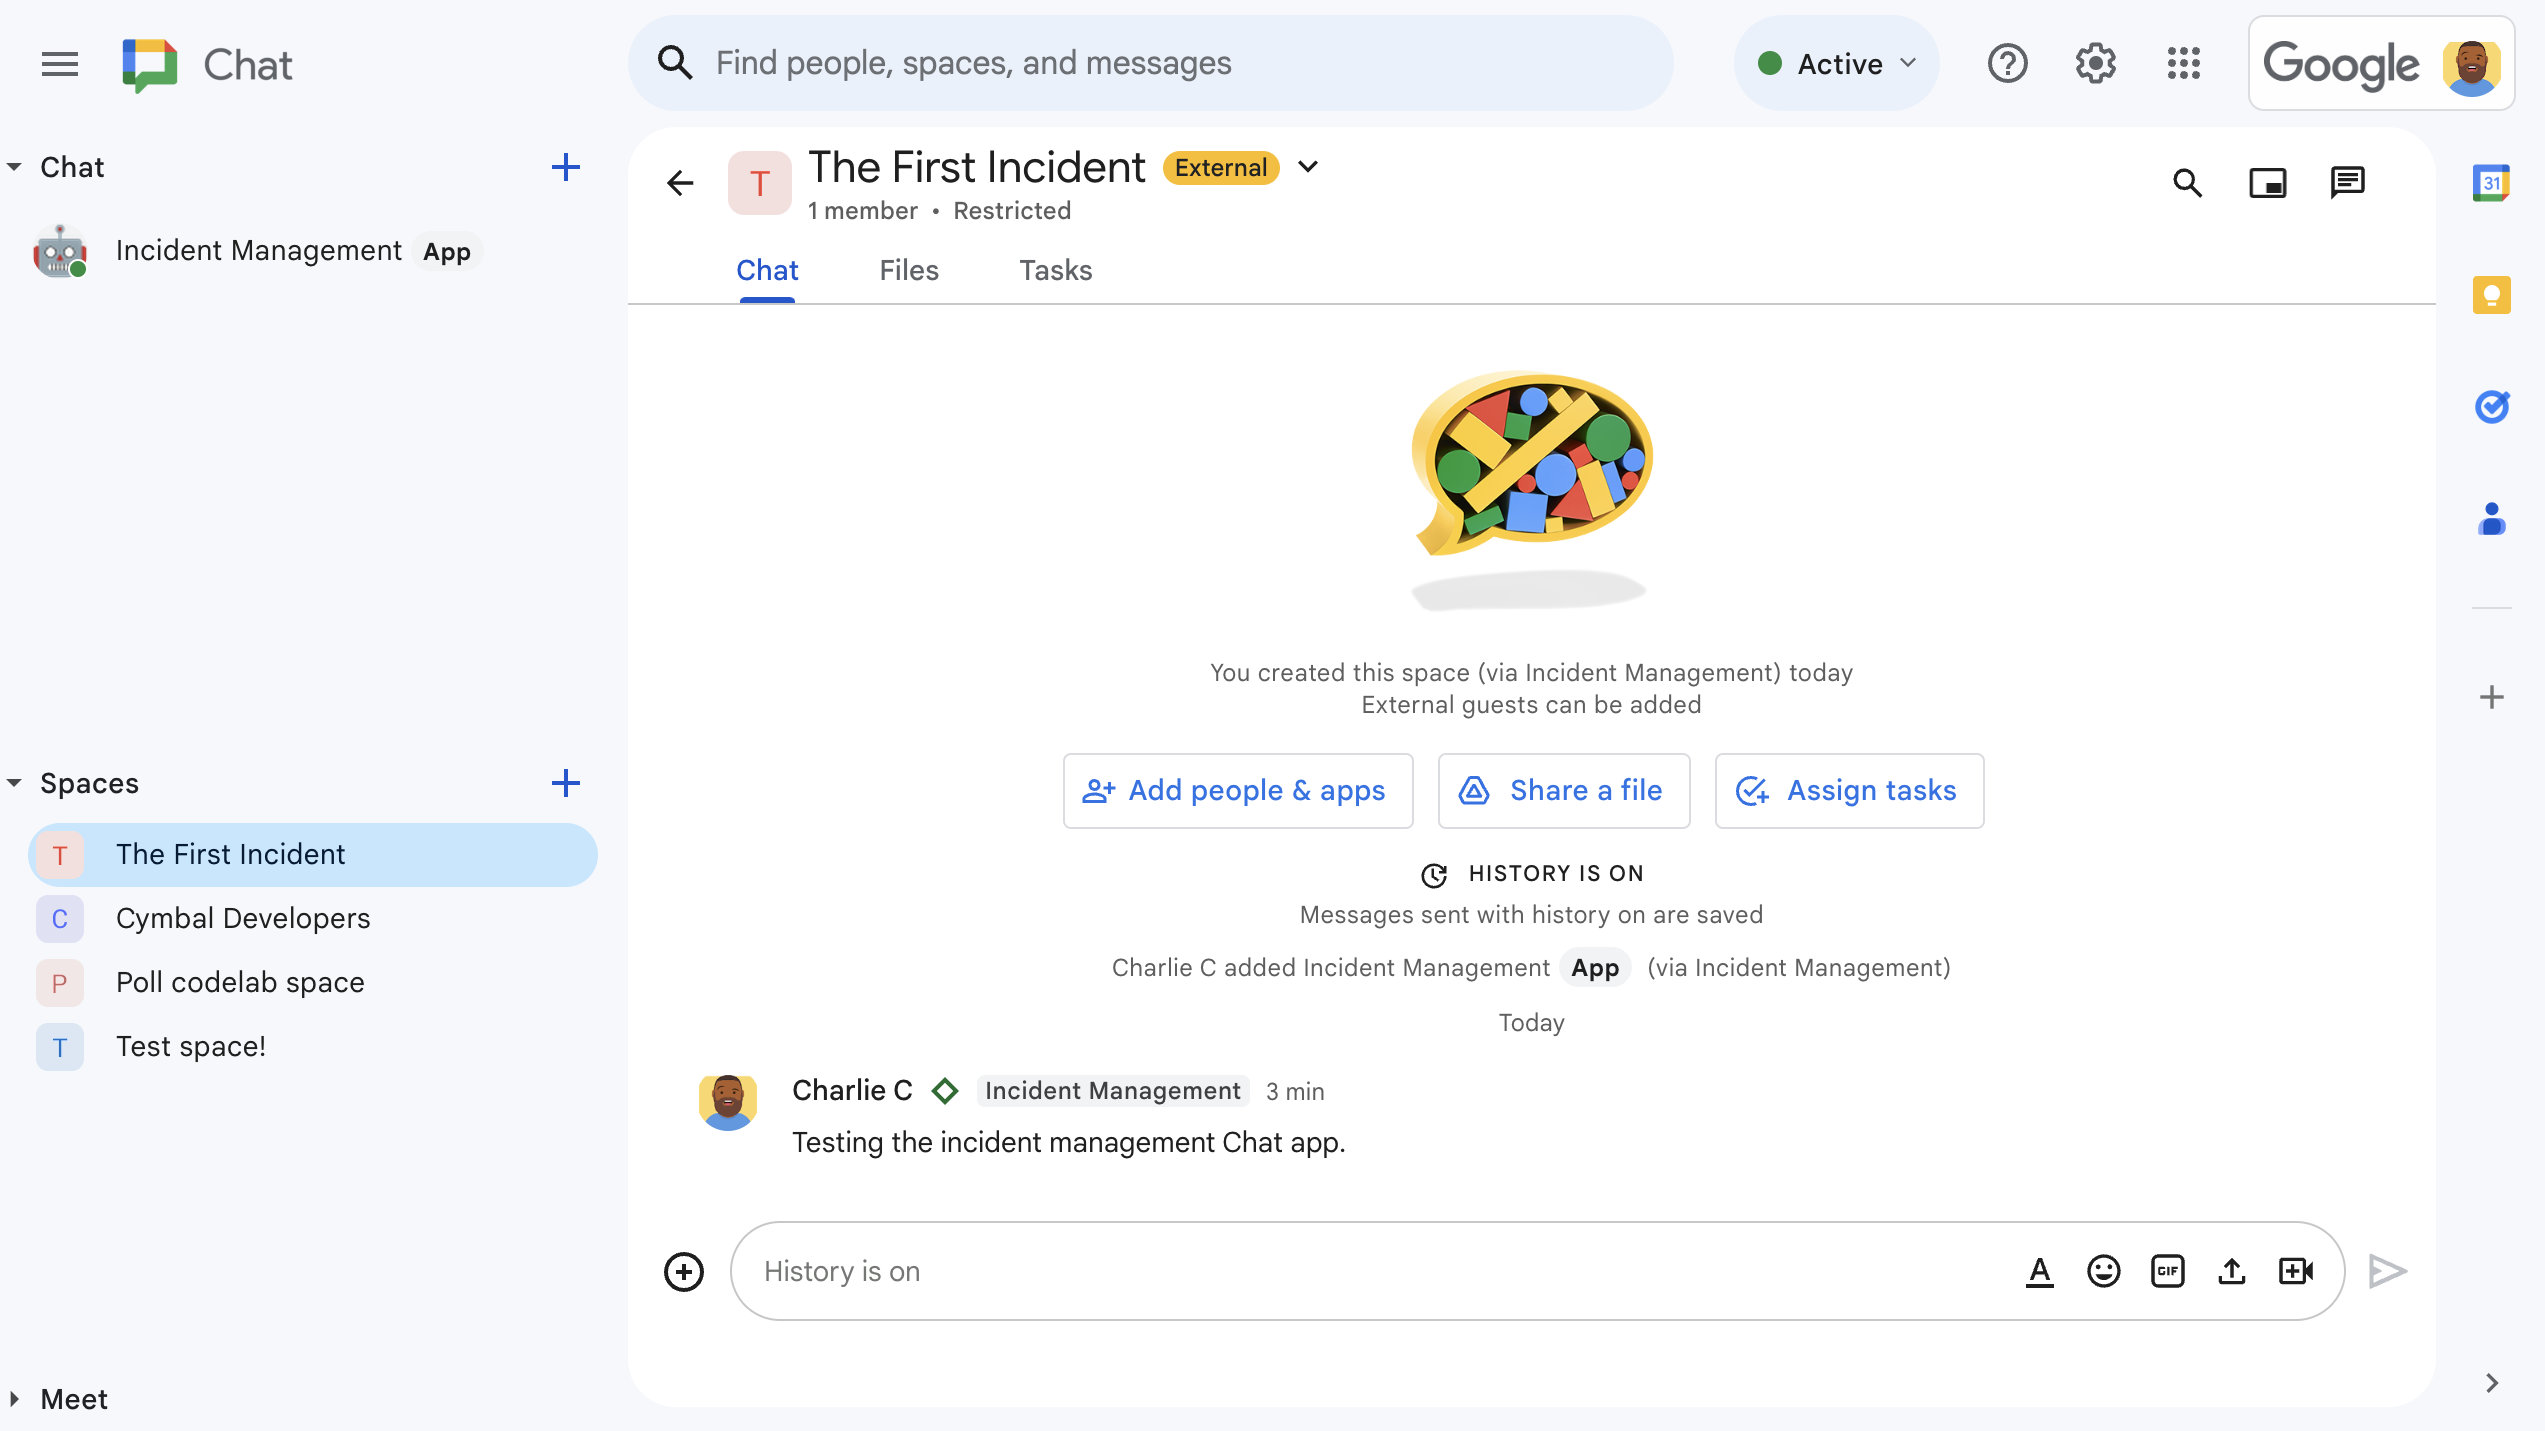
  • インシデント対応の Chat スペース。
    図 3.インシデント対応の Chat スペース。
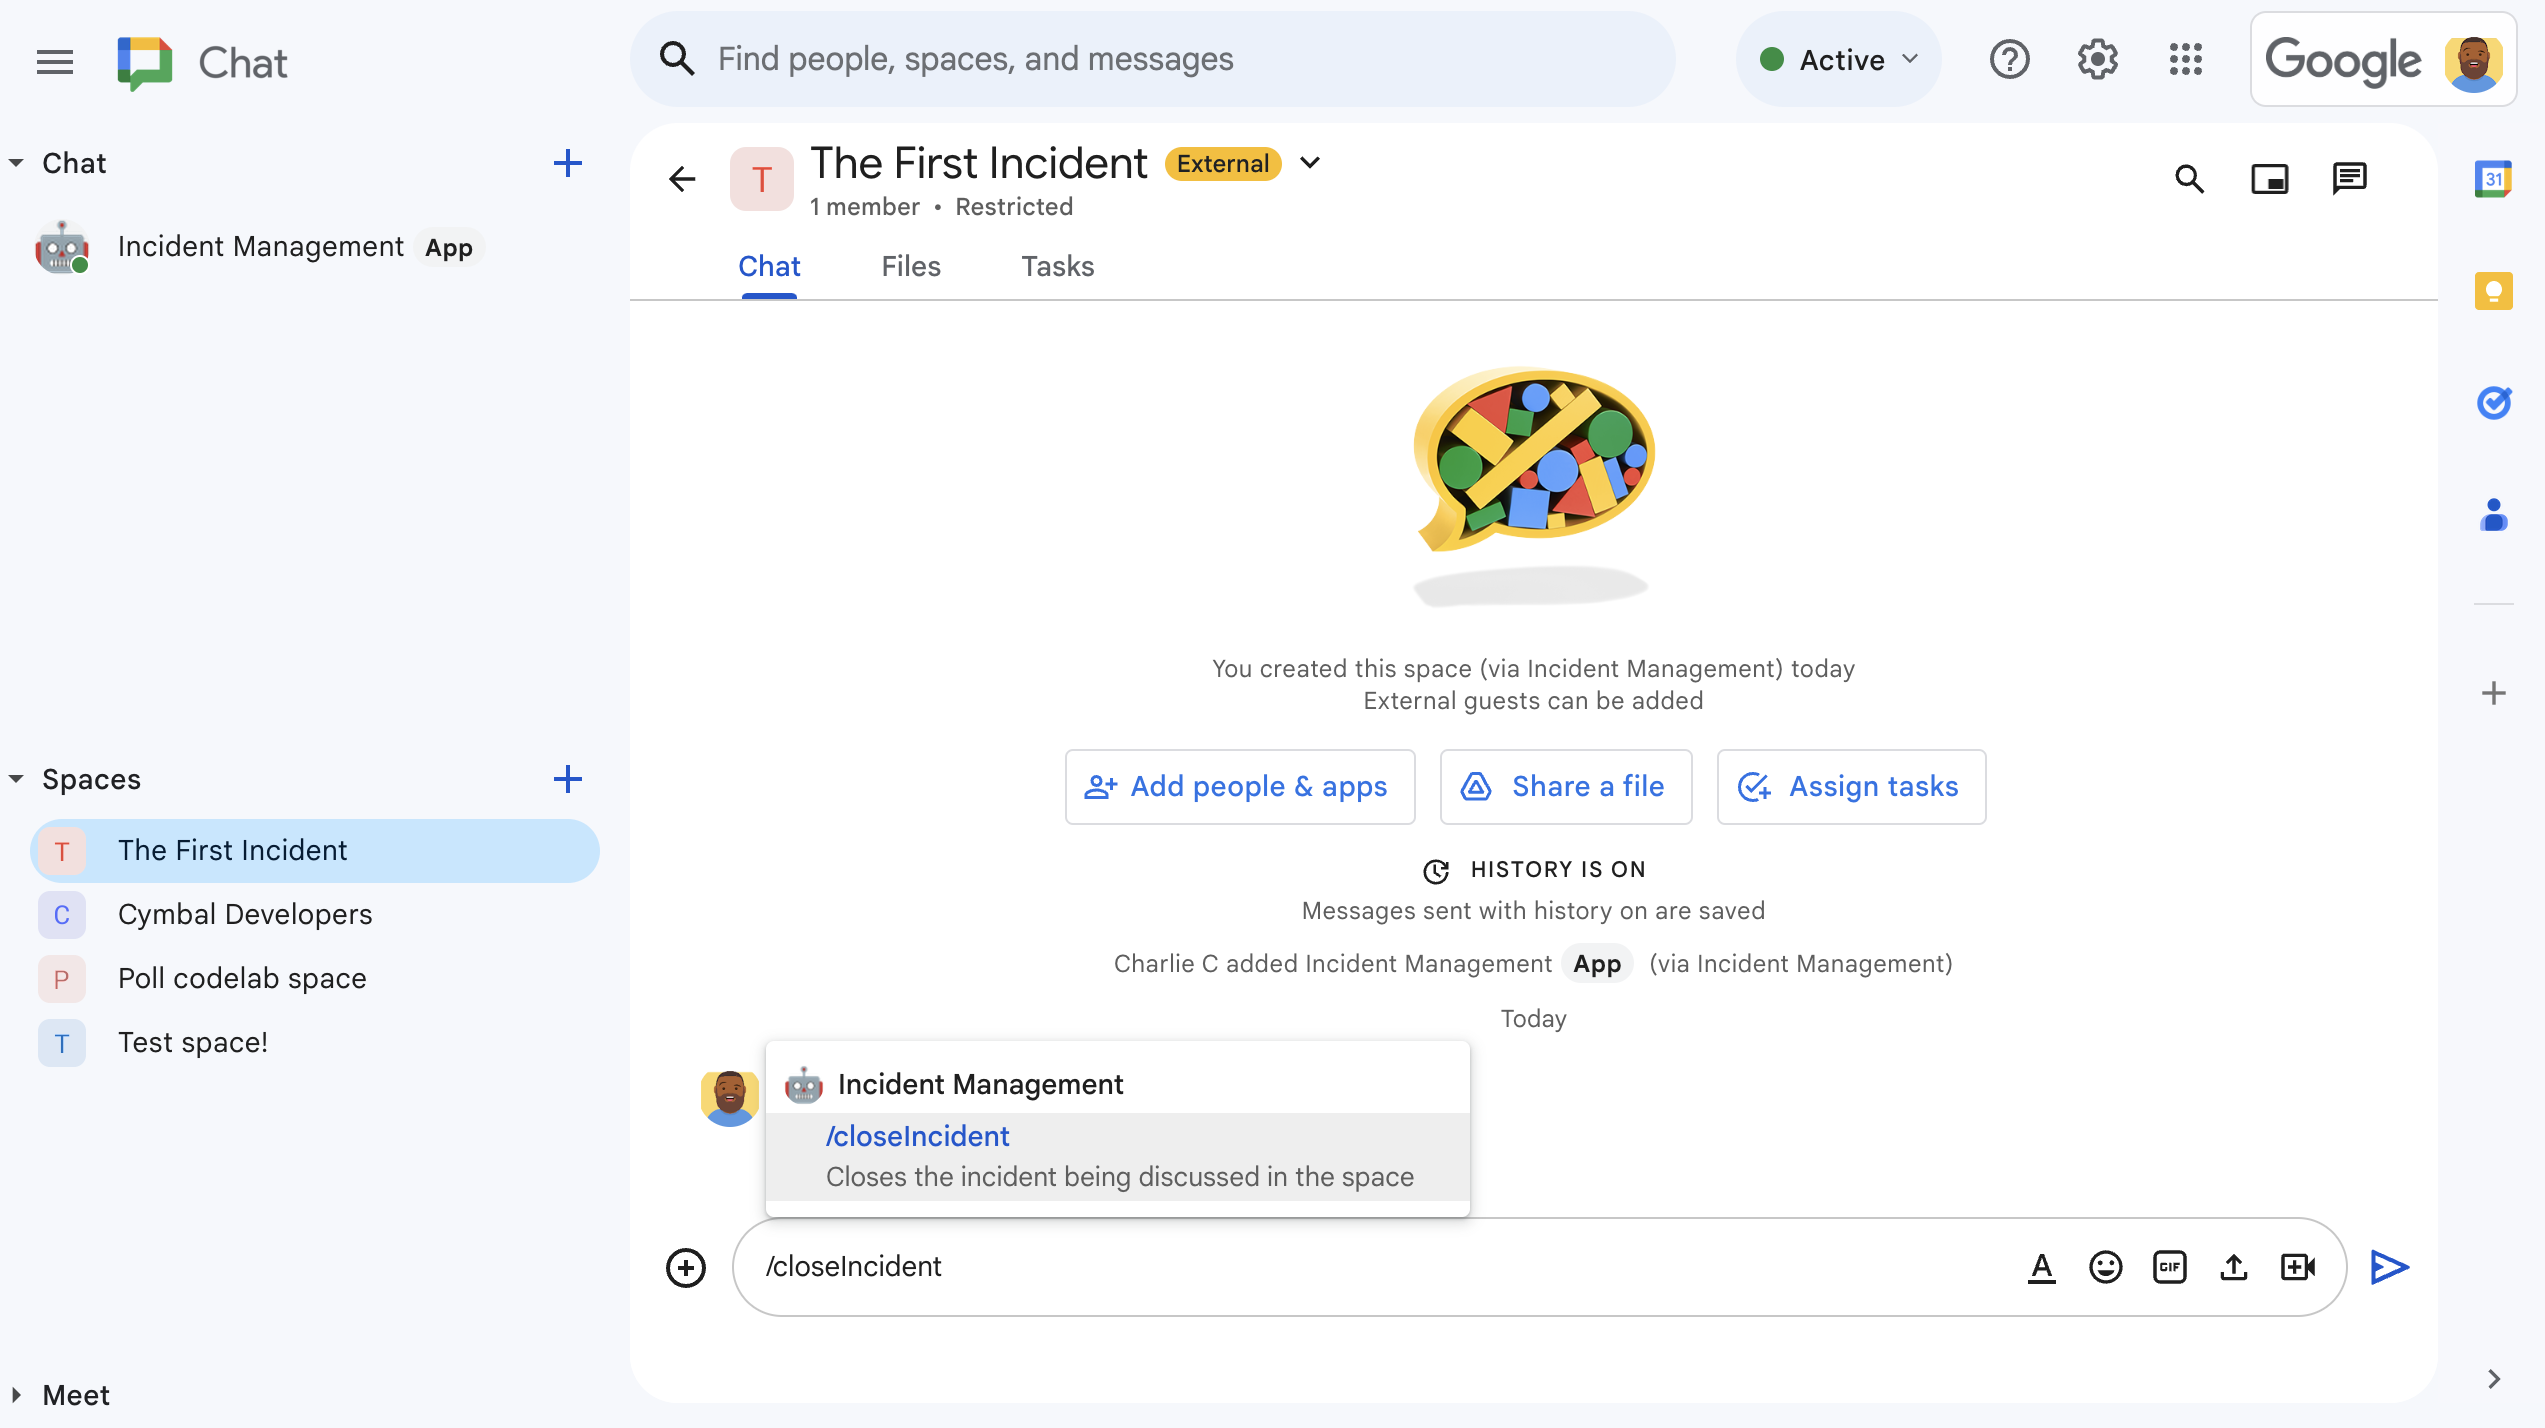
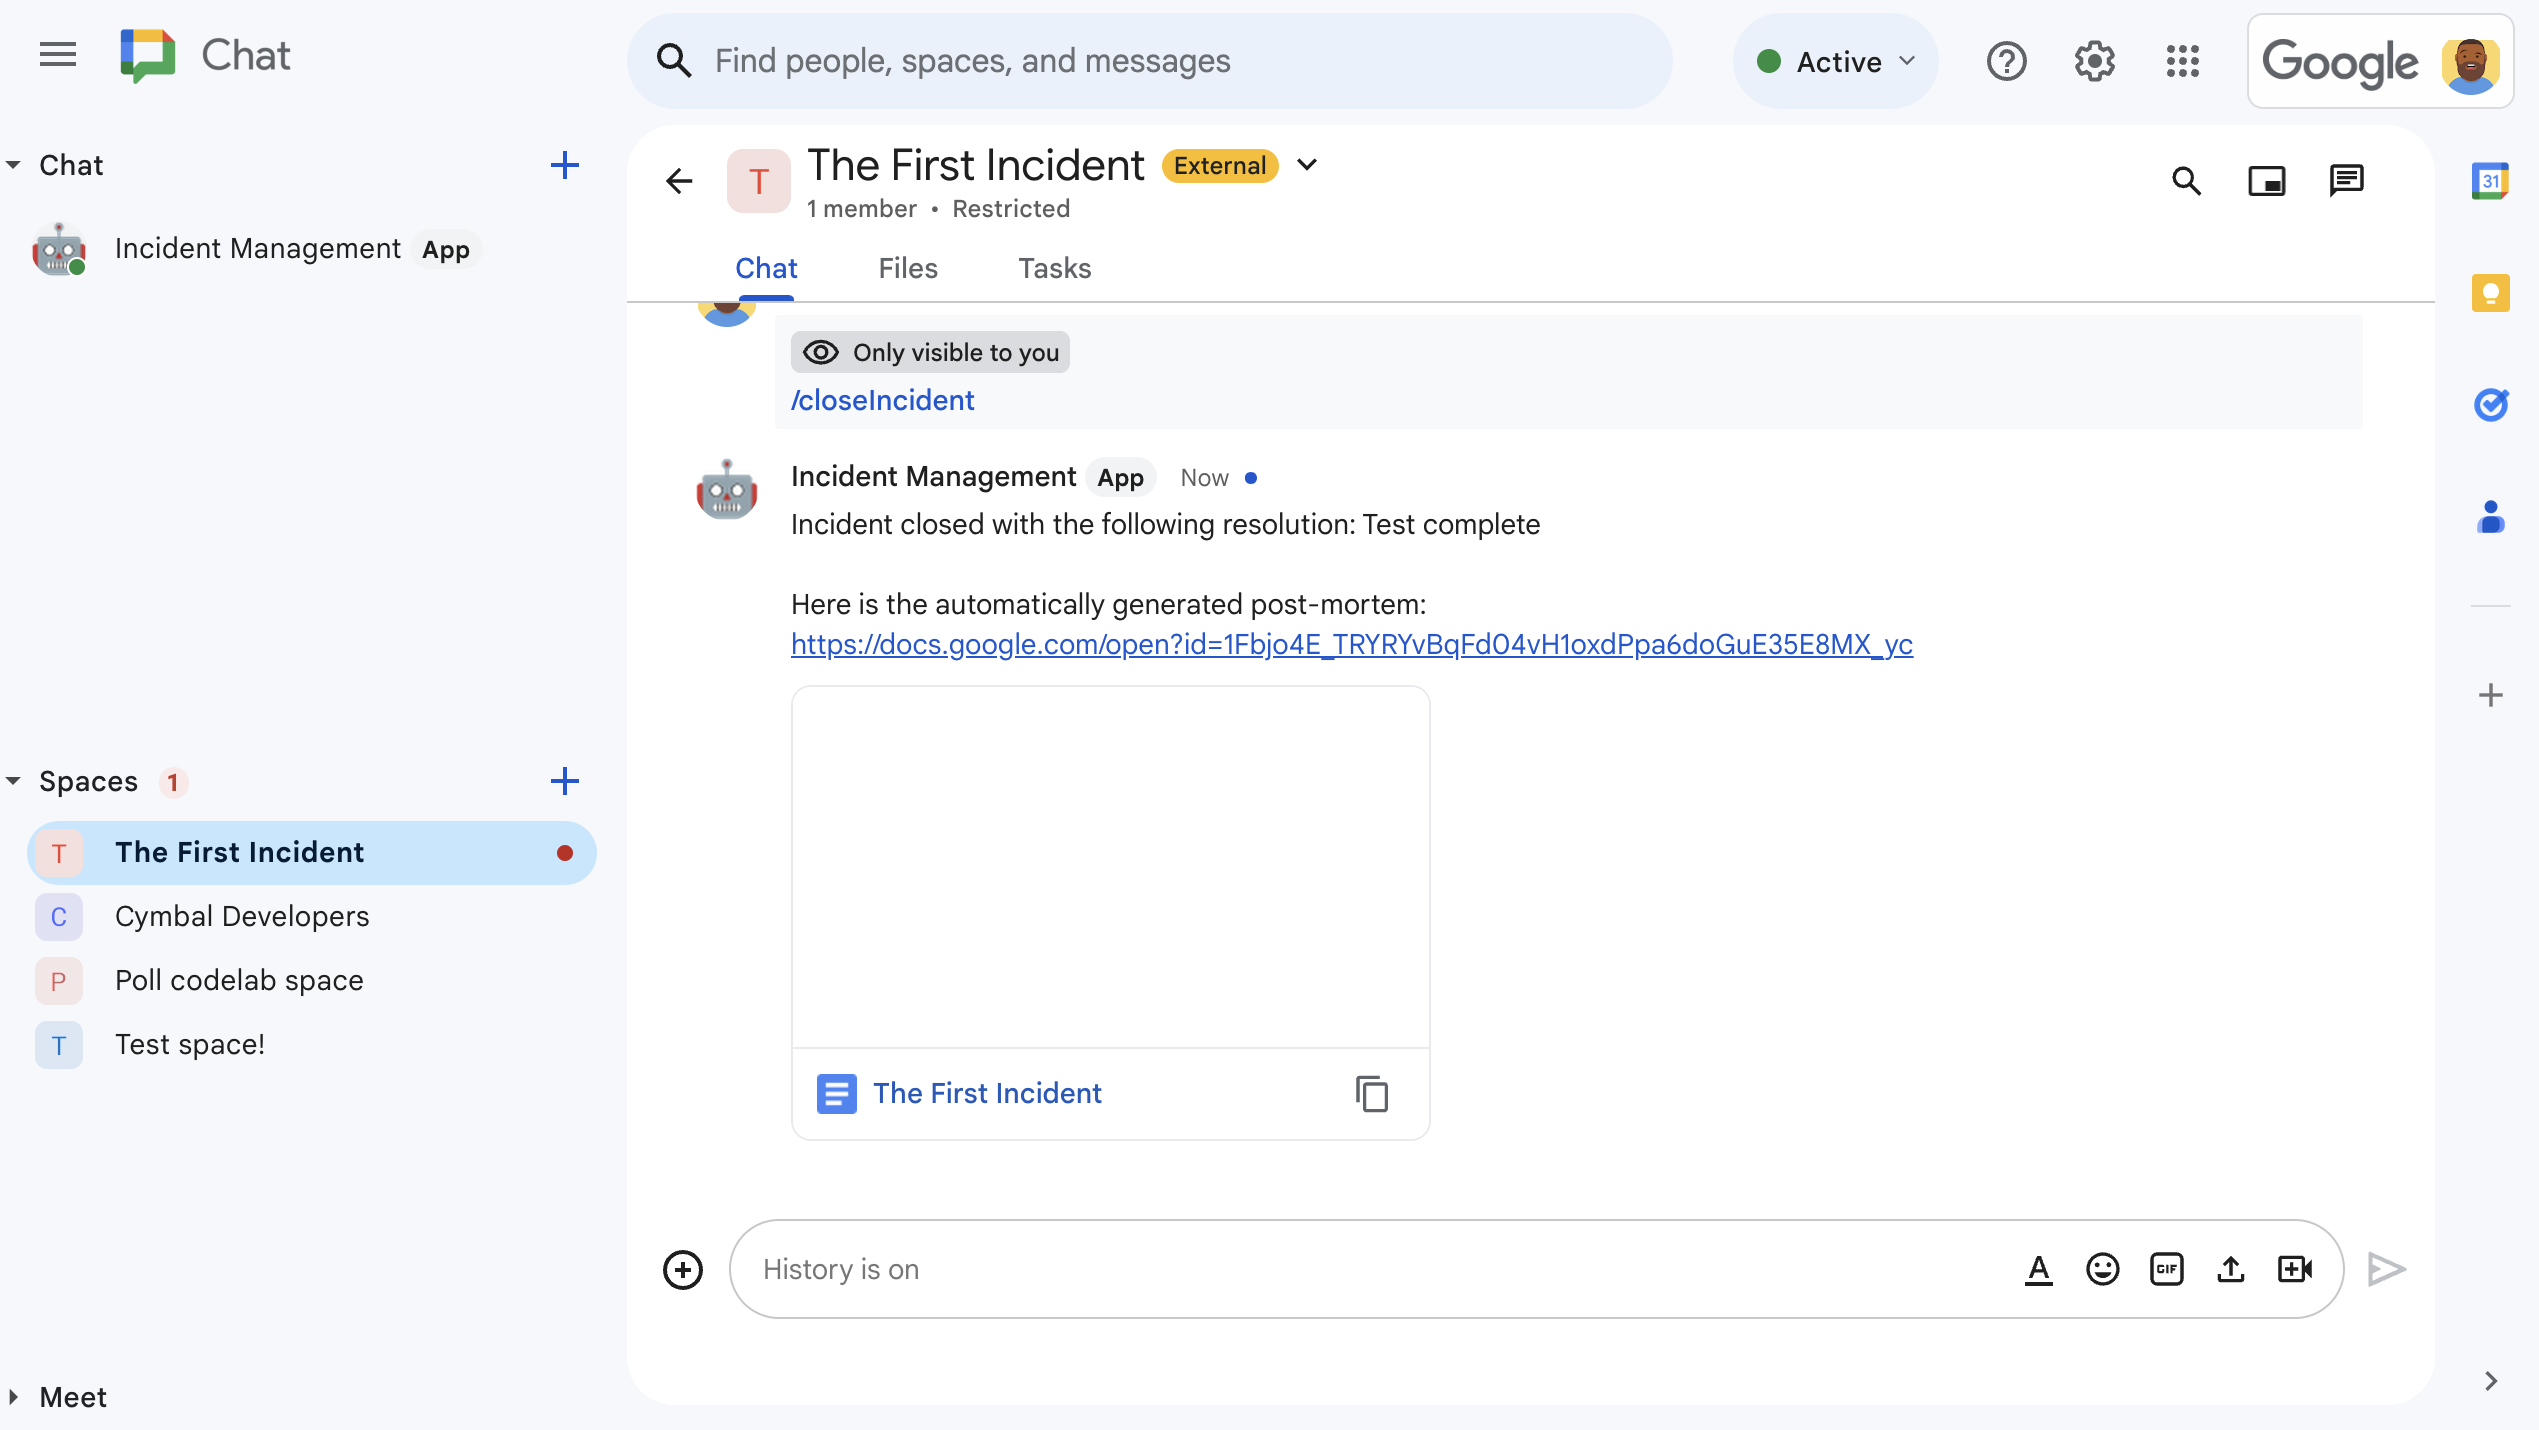
  • スラッシュ コマンドを使用してインシデントを解決する。
    図 4.スラッシュ コマンドを使用してインシデントを解決する。
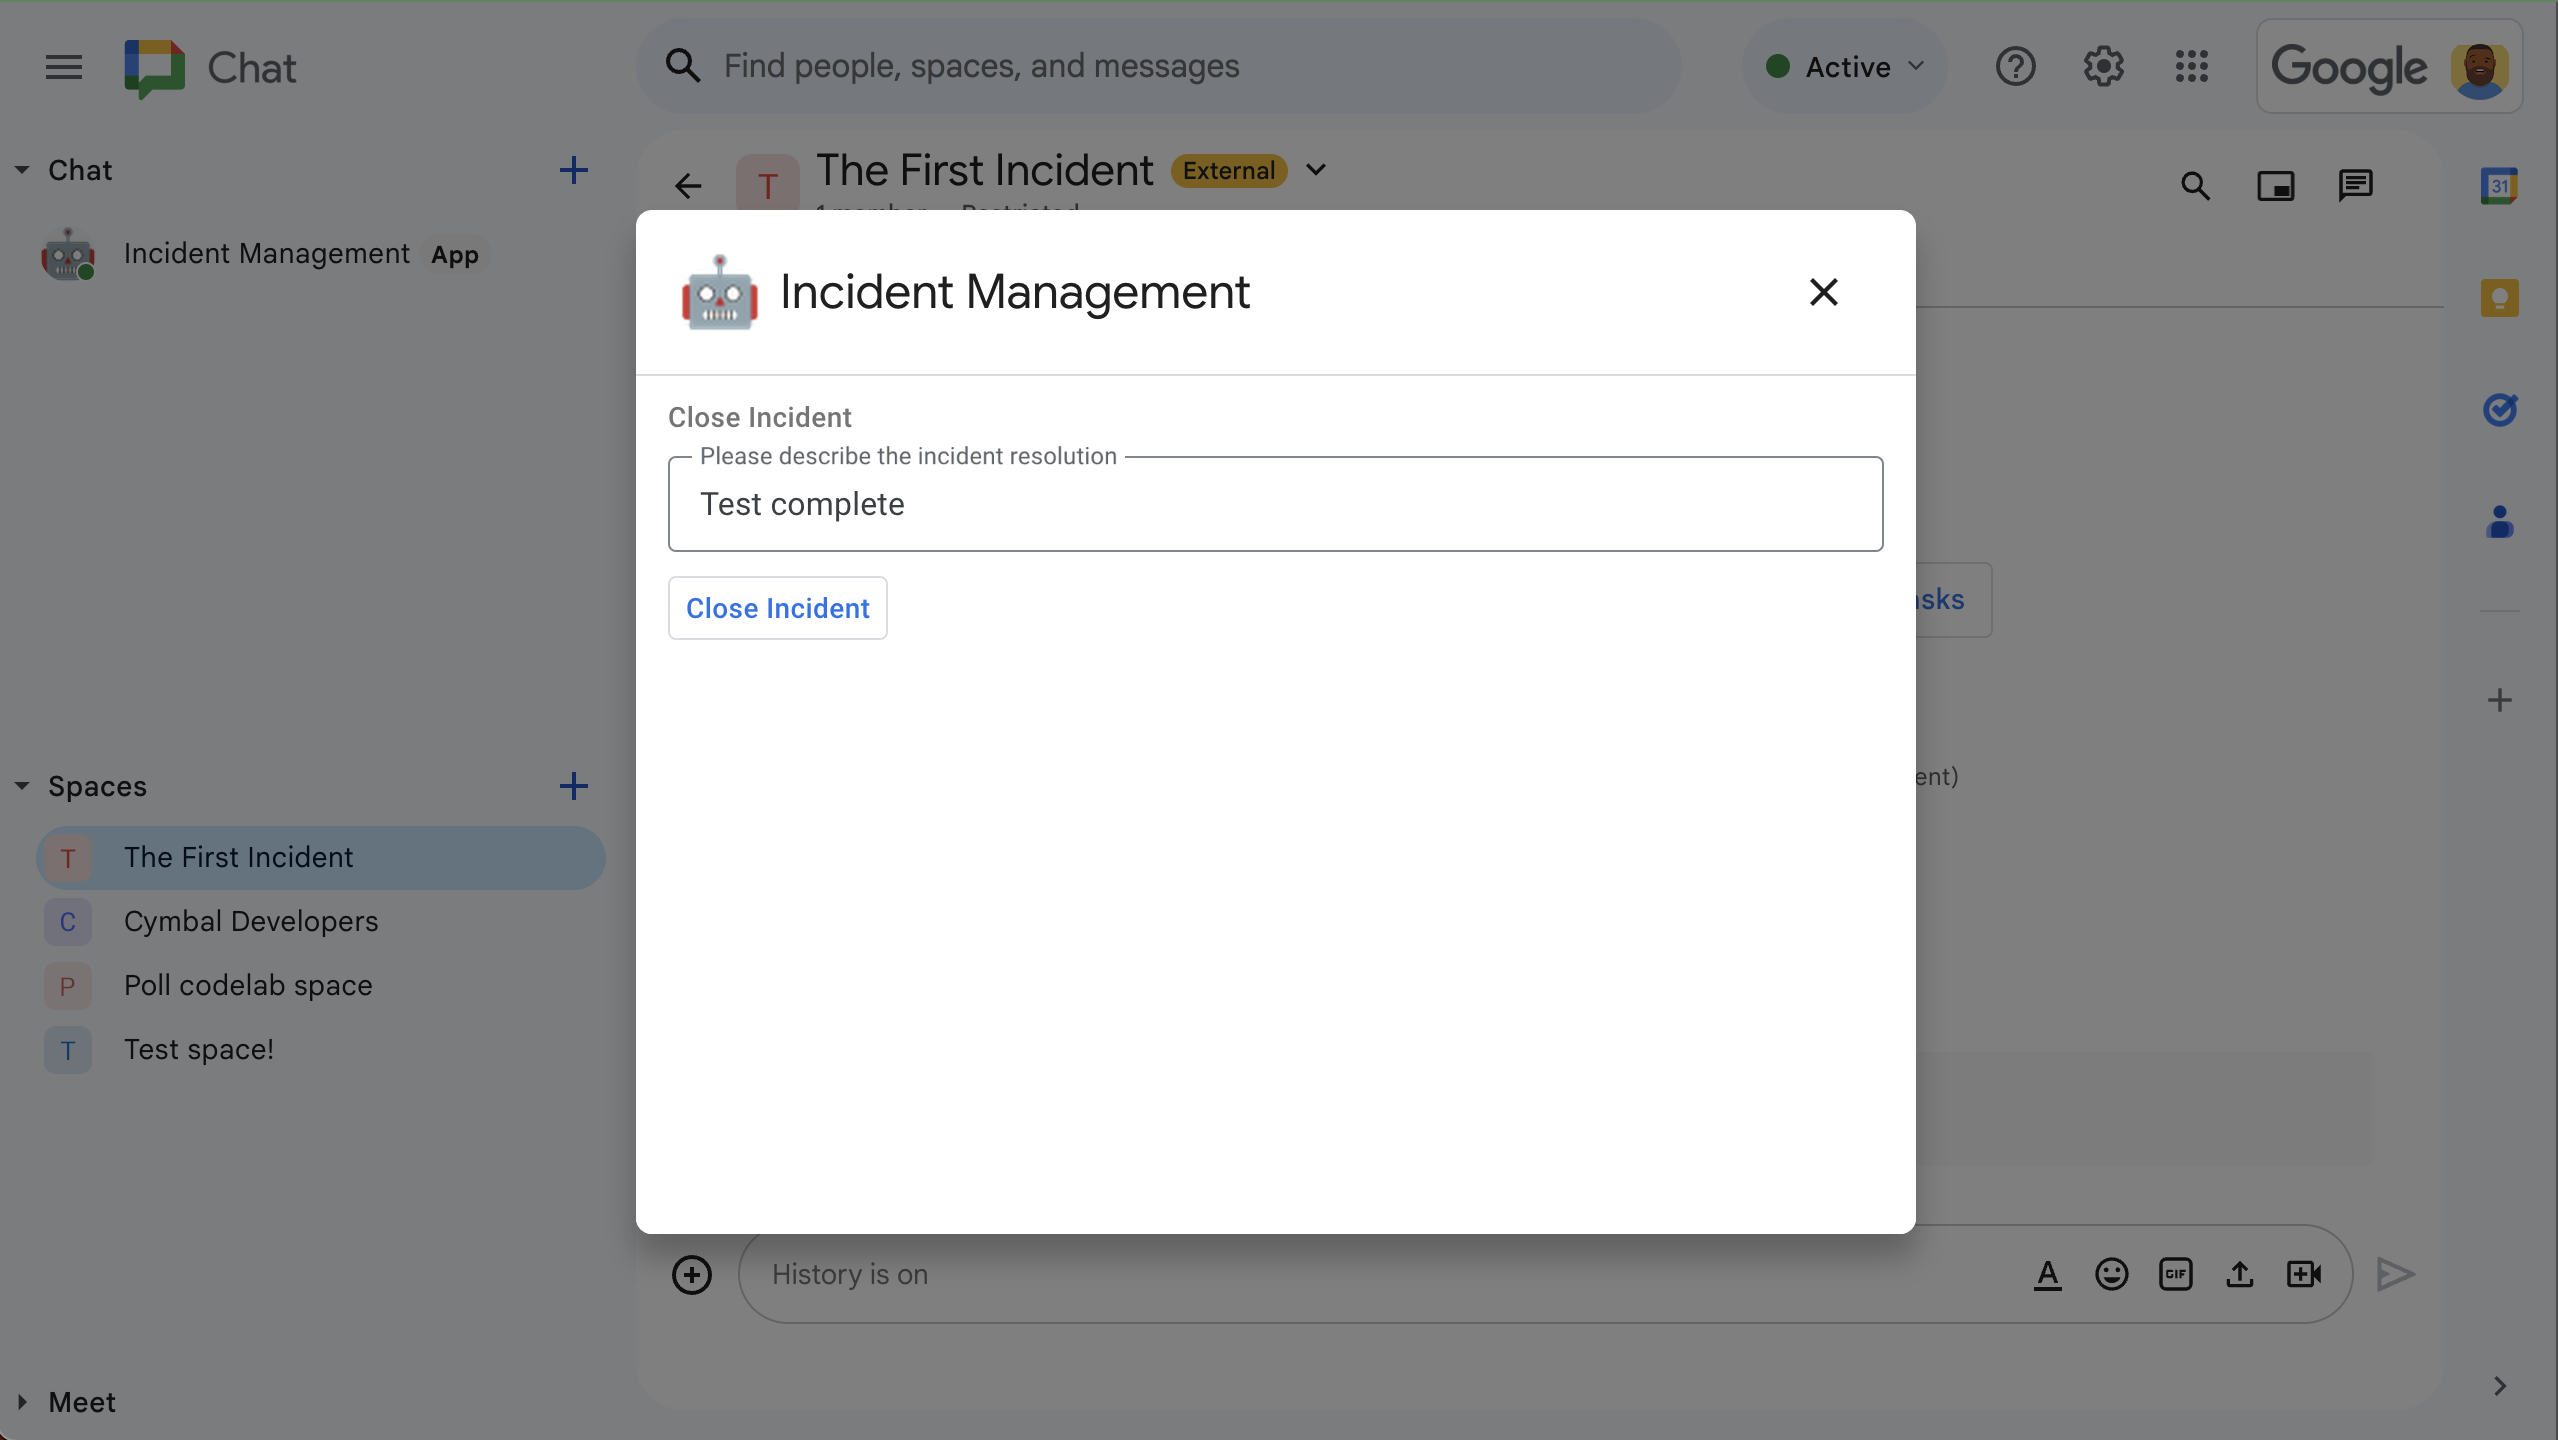
  • インシデント解決ダイアログ。
    図 5.インシデント解決ダイアログ
  • スペースで共有されたインシデント解決の Google ドキュメント ドキュメント。
    図 6.スペースで共有された、インシデント解決のための Google ドキュメント ドキュメント。
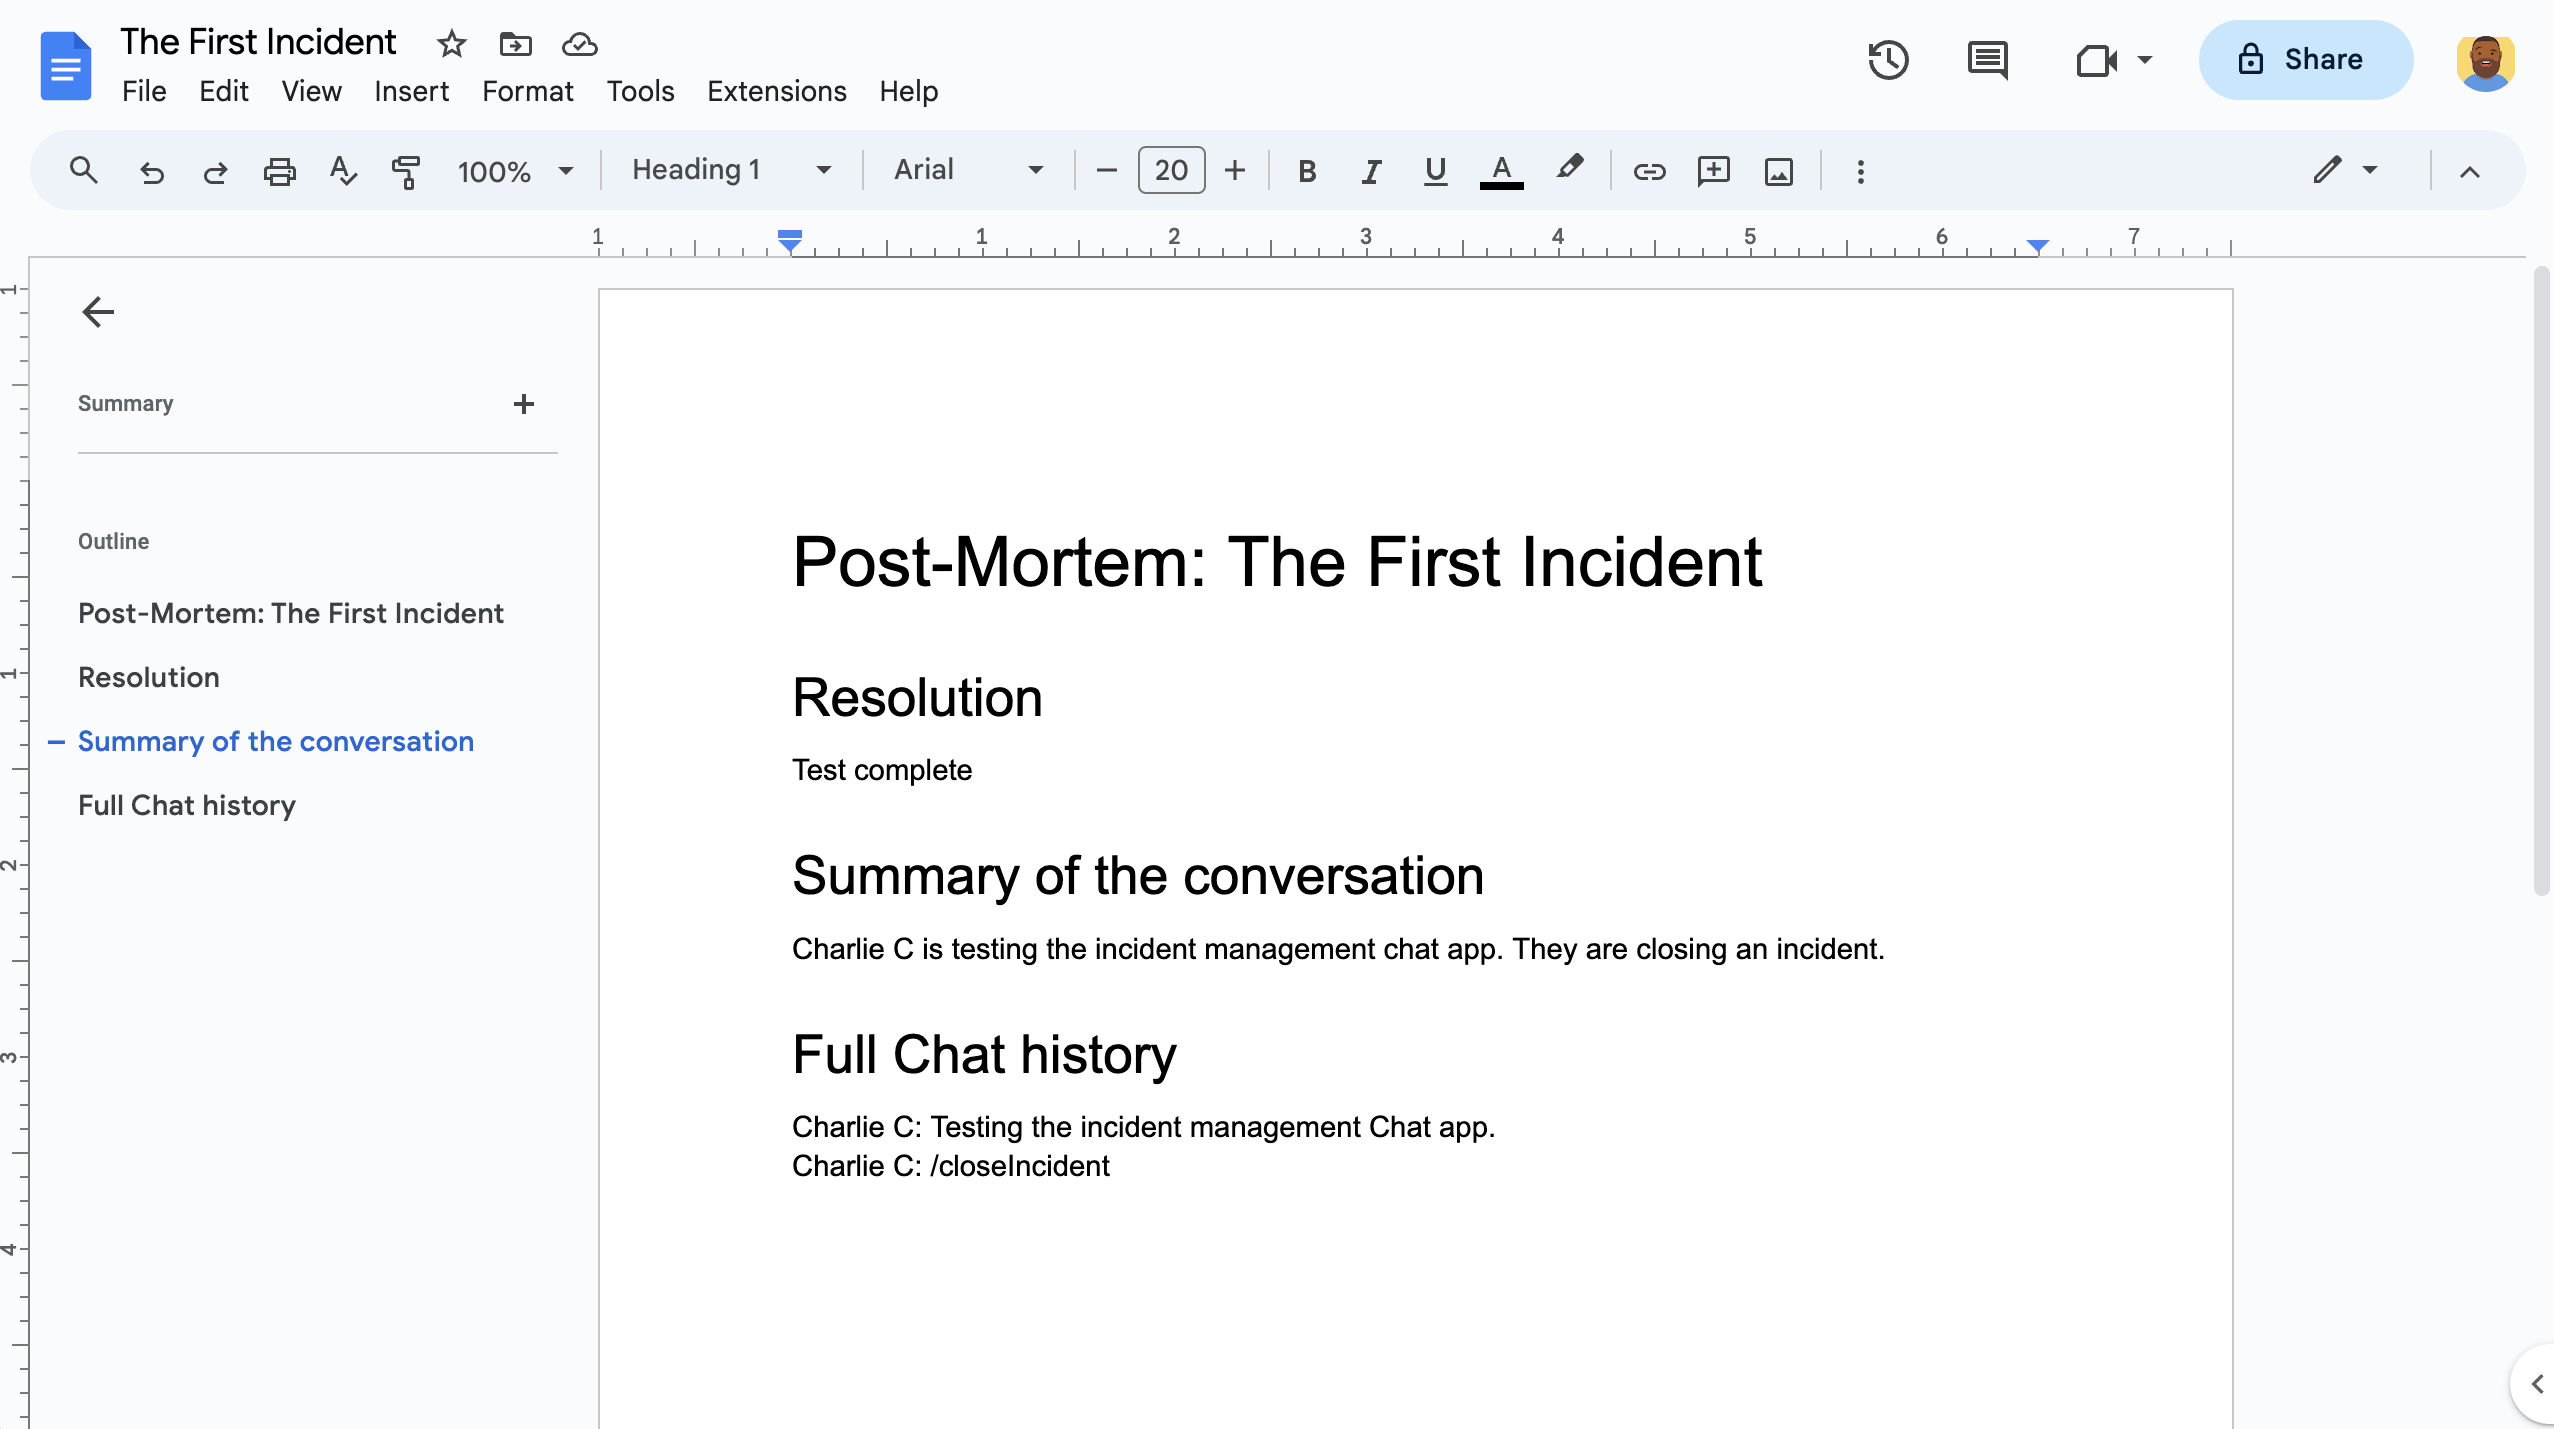
  • インシデント解決の AI サマリーに関する Google ドキュメント。
    図 7.インシデント解決の AI サマリーに関する Google ドキュメント ドキュメント。

前提条件

組織でこれらの前提条件のいずれかを有効にする必要がある場合は、 Google Workspace 管理者に依頼して有効にしてください。

  • 企業または大企業 以下にアクセスできる Google Workspace アカウント Google Chat
  • 目的 ディレクトリ (連絡先の共有)がオンになっていることを確認します。インシデントアプリでは インシデント対応担当者のログを連絡先情報(名前など) 入力します。インシデント対応担当者は、Google Chat と Google Workspace 組織の ユーザーアカウントにもアクセスできます

目標

  • インシデントに対応する Chat アプリを構築する。
  • ユーザーがインシデントに対応できるようサポートするには、次の操作を行います。 <ph type="x-smartling-placeholder">
      </ph>
    • インシデント対応のためのスペースを作成する。
    • インシデントと対応をまとめたメッセージを投稿する。
    • インタラクティブな要素によるコラボレーションのサポート Chat アプリの機能。
  • Vertex AI で会話と解決策を要約します。

アーキテクチャ

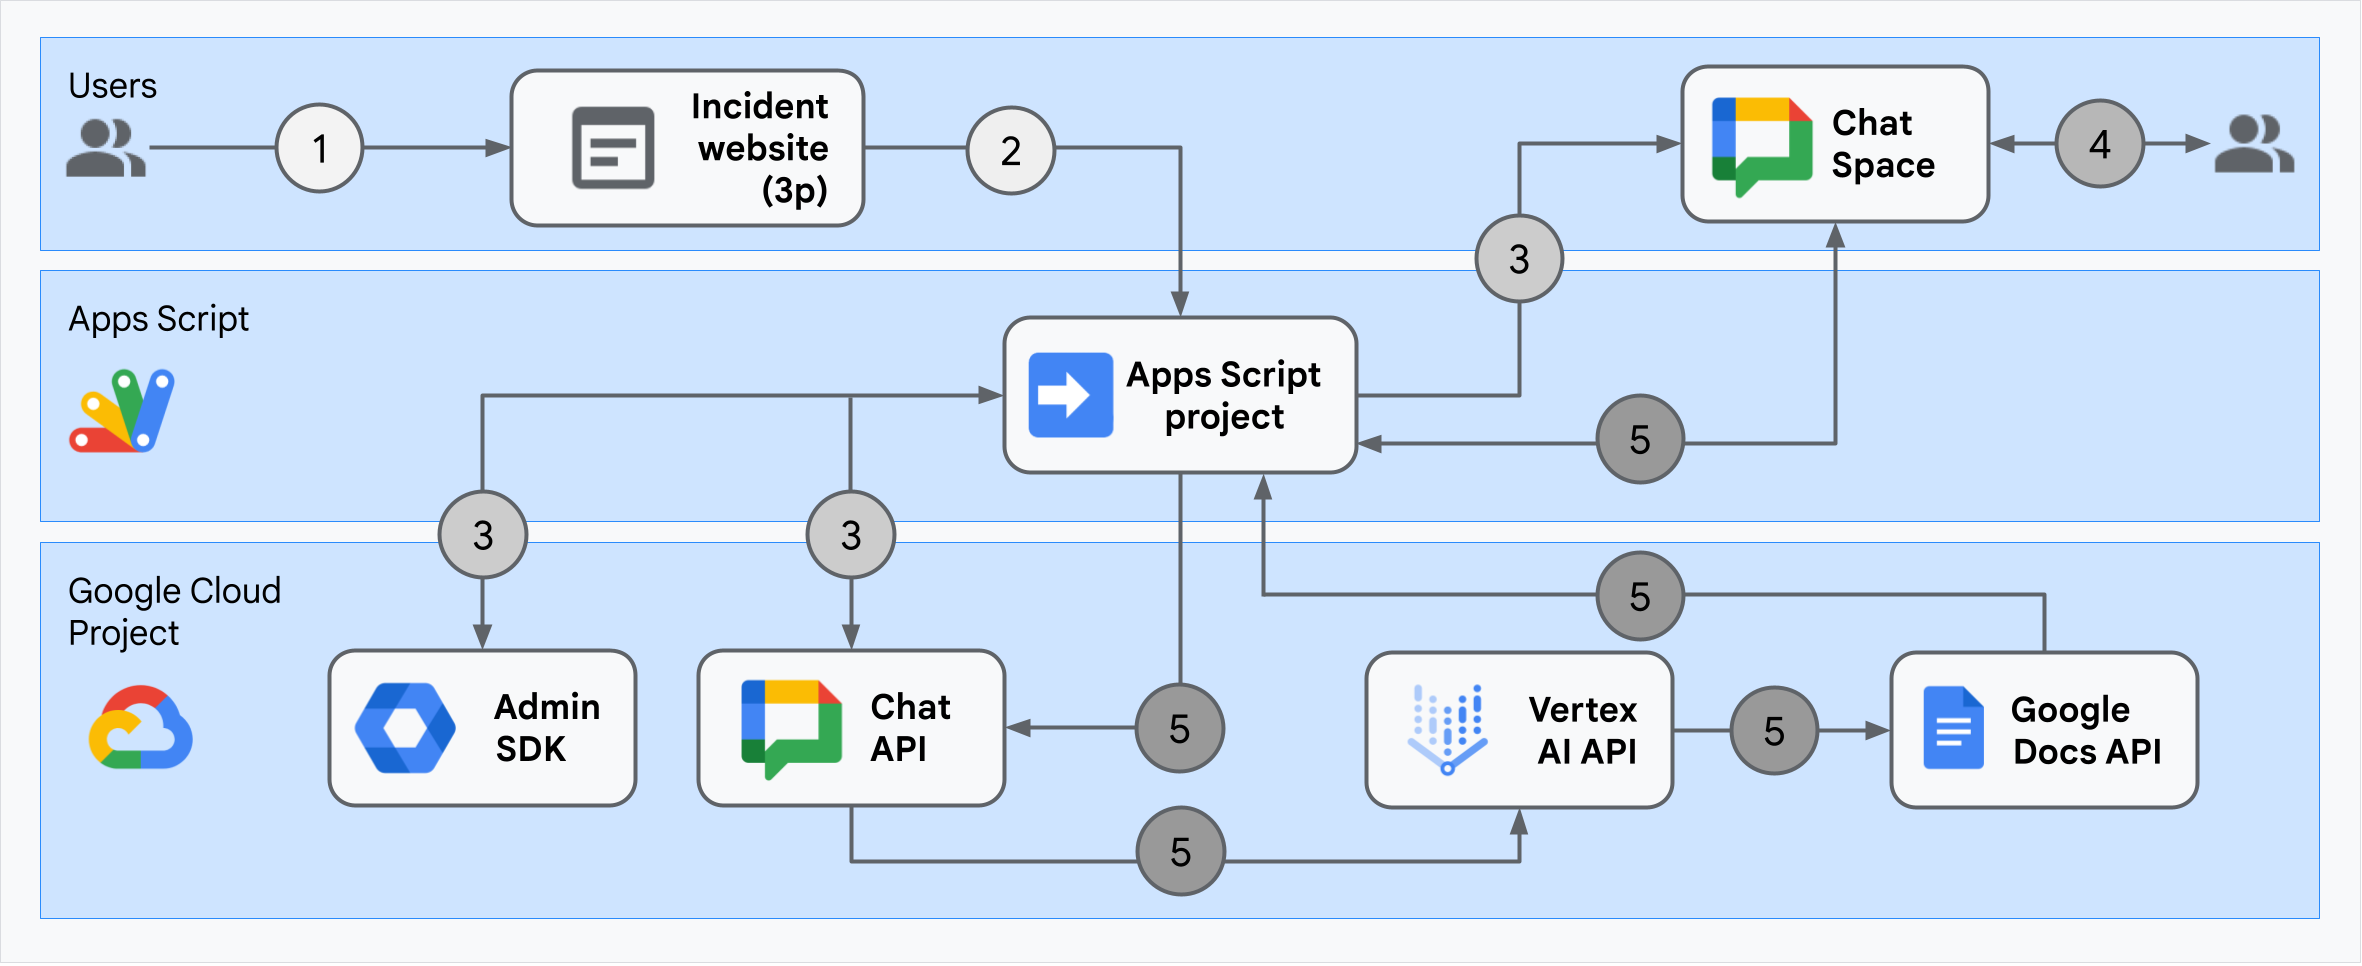
次の図は、Google Workspace と Compute Engine の インシデント対応で使用される Google Cloud リソース Google Chat アプリ。

インシデント対応 Google Chat アプリのアーキテクチャ

このアーキテクチャは、インシデント対応が Google Chat アプリはインシデントと解決を処理します。

  1. あるユーザーが、Google Cloud でホストされている外部ウェブサイトから Apps Script。

  2. ウェブサイトが非同期の HTTP リクエストを Google Chat アプリ。Apps Script でもホストされています。

  3. インシデント対応の Google Chat アプリは次のリクエストを処理します。

    1. Apps Script Admin SDK サービスがチームメンバーを取得する ユーザー ID やメールアドレスなどの情報も含まれます。

    2. Chat API への一連の HTTP リクエストを使用すると、 高度なチャット サービスである インシデント対応を Google Chat アプリがインシデントの Chat を作成する スペースにメンバーを追加して、スペースにメッセージを送信します。

  4. チームメンバーが Chat スペースでインシデントについて話し合っています。

  5. チームメンバーがスラッシュ コマンドを呼び出して、 できます。

    1. Apps Script を使用した Chat API への HTTP 呼び出し 高度なチャット サービスを使用すると、 メッセージが表示されます。

    2. Vertex AI は、リストされたメッセージを受信して要約を生成します。

    3. Apps Script DocumentApp サービスは、 ドキュメント ドキュメントに追加され、Vertex AI の要約が ドキュメントをご覧ください。

    4. Google Chat アプリからの Chat API を使用して、要約へのリンクを共有するメッセージを送信します ドキュメント。

環境を準備する

このセクションでは、Google Cloud プロジェクトを作成して構成する方法について説明します。 Chat アプリ。

Google Cloud プロジェクトを作成する

Google Cloud コンソール

  1. Google Cloud コンソールで、メニュー に移動します。 &gt; IAM と管理 &gt; [プロジェクトを作成] をクリックします。

    [プロジェクトの作成] に移動

  2. [プロジェクト名] フィールドに、プロジェクト用のわかりやすい名前を入力します。

    省略可: プロジェクト ID を編集するには、[編集] をクリックします。プロジェクト ID は変更できません そのため、有効期間中にニーズを満たす ID を選択してください。 できます。

  3. [場所] フィールドで [参照] をクリックして、 できます。[選択] をクリックします。 <ph type="x-smartling-placeholder">
  4. [作成] をクリックします。Google Cloud コンソールで [ダッシュボード] ページに移動し、プロジェクトが作成される 示されます

gcloud CLI

次のいずれかの開発環境で、Google Cloud コンソールに CLI(gcloud):

  • Cloud Shell: gcloud CLI でオンライン ターミナルを使用する Cloud Shell をアクティブにします。
    Cloud Shell をアクティブにする
  • ローカルシェル: ローカル開発環境を使用するには、 インストール初期化 使用できます。
    Cloud プロジェクトを作成するには、gcloud projects create コマンドを使用します。
    gcloud projects create PROJECT_ID
    PROJECT_ID は、作成するプロジェクトの ID を設定して置き換えます。

Cloud プロジェクトの課金を有効にする

<ph type="x-smartling-placeholder">

Google Cloud コンソール

  1. Google Cloud コンソールで [お支払い] に移動します。[ メニュー &gt; [お支払い] &gt; [マイ プロジェクト] を選択します。

    [マイ プロジェクトの課金] に移動

  2. [組織を選択] で、関連付けられている組織を選択します。 Google Cloud プロジェクトです
  3. プロジェクトの行で、[アクション] メニューを開く (), [お支払い情報を変更] をクリックし、 Cloud 請求先アカウント。
  4. [アカウントを設定] をクリックします。

gcloud CLI

  1. 使用可能な請求先アカウントを一覧表示するには、次のコマンドを実行します。
    gcloud billing accounts list
  2. 請求先アカウントを Google Cloud プロジェクトにリンクします。
    gcloud billing projects link PROJECT_ID --billing-account=BILLING_ACCOUNT_ID

    次のように置き換えます。

    • PROJECT_ID は、プロジェクトのプロジェクト ID です。 課金を有効にする Cloud プロジェクト。
    • BILLING_ACCOUNT_ID は、リンクする請求先アカウント ID です。 Google Cloud プロジェクトです

API を有効にする

Google Cloud コンソール

  1. Google Cloud コンソールで、Google Chat API、Google Docs API を有効にする Admin SDK API、Vertex AI API です。

    API を有効にする

  2. 正しい [次へ] をクリックします。

  3. 正しい API を有効にしていることを確認し、[有効にする] をクリックします。

gcloud CLI

  1. 必要に応じて、作成した Cloud プロジェクトを現在の Cloud プロジェクトに設定します。 gcloud config set project コマンドを使用します。

    gcloud config set project PROJECT_ID
    

    PROJECT_ID は、プロジェクトのプロジェクト ID に置き換えます。 作成しました。

  2. Google Chat API、Google Docs API、Admin SDK API、Vertex AI API を有効にする gcloud services enable コマンドを使用します。

    gcloud services enable chat.googleapis.com docs.googleapis.com admin.googleapis.com aiplatform.googleapis.com
    

認証と権限付与の設定

認証と認可によって、 Google Workspace と Google Workspace の Chat 用アプリ アクセス リソース Google Cloud でインシデント対応を処理する。

このチュートリアルではアプリを内部で公開するため、プレースホルダを使用しても問題はありません 情報です。アプリを外部に公開する前に、プレースホルダを置き換えます 実際の情報とともに同意画面の情報を表示します。

  1. Google Cloud コンソールで メニュー &gt; API とサービス &gt; OAuth 同意画面

    OAuth 同意画面に移動

  2. [ユーザーの種類] で [内部] を選択し、[作成] をクリックします。

  3. [アプリ名] に「Incident Management」と入力します。

  4. [User support email] で、自分のメールアドレスまたは適切な できます。

  5. [デベロッパーの連絡先情報] にメールアドレスを入力します。

  6. [保存して次へ] をクリックします。

  7. [スコープを追加または削除] をクリックします。パネルが表示され、スコープのリストが表示されます。 Cloud プロジェクトで有効にした各 API の Cloud Identity ドメインです。

  8. [スコープを手動で追加] に、次のスコープを貼り付けます。

    • https://www.googleapis.com/auth/chat.spaces.create
    • https://www.googleapis.com/auth/chat.memberships
    • https://www.googleapis.com/auth/chat.memberships.app
    • https://www.googleapis.com/auth/chat.messages
    • https://www.googleapis.com/auth/documents
    • https://www.googleapis.com/auth/admin.directory.user.readonly
    • https://www.googleapis.com/auth/script.external_request
    • https://www.googleapis.com/auth/userinfo.email
    • https://www.googleapis.com/auth/cloud-platform
  9. [Add to Table] をクリックします。

  10. [更新] をクリックします。

  11. [保存して次へ] をクリックします。

  12. アプリ登録の概要を確認し、[ダッシュボードに戻る] をクリックします。

Chat アプリを作成してデプロイする

次のセクションでは、Terraform Registry の 必要なアプリケーションをすべて含む Apps Script プロジェクト 作成されるため、コードをコピーして使用する必要はありません。 各ファイルを貼り付けます。

関数によっては、名前の末尾にアンダースコアが含まれていることがあります。例: ChatApp.gs から processSlashCommand_()。アンダースコアは関数を インシデントの初期化のウェブページをブラウザで開いてから、詳細情報 詳しくは、 非公開関数

Apps Script では、.gs スクリプトと .html の 2 つのファイル形式がサポートされています。 できます。このサポートを遵守するため、アプリのクライアントサイドの JavaScript がインクルードされています。 <script /> タグ内に指定し、その CSS を <style /> タグ内に指定 作成します

必要に応じて、GitHub でプロジェクト全体を表示できます。

GitHub で表示

各ファイルの概要は次のとおりです。

Consts.gs

他のコードファイルによって参照される定数を定義します。 (Cloud プロジェクト ID、Vertex AI ロケーション ID、 スラッシュ コマンド ID を使用します。

Consts.gs コードを表示

apps-script/incident-response/Consts.gs
const PROJECT_ID = 'replace-with-your-project-id';
const VERTEX_AI_LOCATION_ID = 'us-central1';
const CLOSE_INCIDENT_COMMAND_ID = 1;
ChatApp.gs

チャット インタラクション イベントを処理します。 メッセージ、カードのクリック、スラッシュ コマンド、ダイアログなどです。次に対応します: インシデントを収集するダイアログを開いて、/closeIncident スラッシュ コマンド 表示されます。次の呼び出しによって、スペース内のメッセージを Chat API の spaces.messages.list メソッド。 Admin SDK Directory サービスを使用してユーザー ID を取得します。 Apps Script。

ChatApp.gs コードを表示

apps-script/incident-response/ChatApp.gs
/**
 * Responds to a MESSAGE event in Google Chat.
 *
 * This app only responds to a slash command with the ID 1 ("/closeIncident").
 * It will respond to any other message with a simple "Hello" text message.
 *
 * @param {Object} event the event object from Google Chat
 */
function onMessage(event) {
  if (event.message.slashCommand) {
    return processSlashCommand_(event);
  }
  return { "text": "Hello from Incident Response app!" };
}

/**
 * Responds to a CARD_CLICKED event in Google Chat.
 *
 * This app only responds to one kind of dialog (Close Incident).
 *
 * @param {Object} event the event object from Google Chat
 */
function onCardClick(event) {
  if (event.isDialogEvent) {
    if (event.dialogEventType == 'SUBMIT_DIALOG') {
      return processSubmitDialog_(event);
    }
    return {
      actionResponse: {
        type: "DIALOG",
        dialogAction: {
          actionStatus: "OK"
        }
      }
    };
  }
}

/**
 * Responds to a MESSAGE event with a Slash command in Google Chat.
 *
 * This app only responds to a slash command with the ID 1 ("/closeIncident")
 * by returning a Dialog.
 *
 * @param {Object} event the event object from Google Chat
 */
function processSlashCommand_(event) {
  if (event.message.slashCommand.commandId != CLOSE_INCIDENT_COMMAND_ID) {
    return {
      "text": "Command not recognized. Use the command `/closeIncident` to close the incident managed by this space."
    };
  }
  const sections = [
    {
      header: "Close Incident",
      widgets: [
        {
          textInput: {
            label: "Please describe the incident resolution",
            type: "MULTIPLE_LINE",
            name: "description"
          }
        },
        {
          buttonList: {
            buttons: [
              {
                text: "Close Incident",
                onClick: {
                  action: {
                    function: "closeIncident"
                  }
                }
              }
            ]
          }
        }
      ]
    }
  ];
  return {
    actionResponse: {
      type: "DIALOG",
      dialogAction: {
        dialog: {
          body: {
            sections,
          }
        }
      }
    }
  };
}

/**
 * Responds to a CARD_CLICKED event with a Dialog submission in Google Chat.
 *
 * This app only responds to one kind of dialog (Close Incident).
 * It creates a Doc with a summary of the incident information and posts a message
 * to the space with a link to the Doc.
 *
 * @param {Object} event the event object from Google Chat
 */
function processSubmitDialog_(event) {
  const resolution = event.common.formInputs.description[""].stringInputs.value[0];
  const chatHistory = concatenateAllSpaceMessages_(event.space.name);
  const chatSummary = summarizeChatHistory_(chatHistory);
  const docUrl = createDoc_(event.space.displayName, resolution, chatHistory, chatSummary);
  return {
    actionResponse: {
      type: "NEW_MESSAGE",
    },
    text: `Incident closed with the following resolution: ${resolution}\n\nHere is the automatically generated post-mortem:\n${docUrl}`
  };
}

/**
 * Lists all the messages in the Chat space, then concatenate all of them into
 * a single text containing the full Chat history.
 *
 * For simplicity for this demo, it only fetches the first 100 messages.
 *
 * Messages with slash commands are filtered out, so the returned history will
 * contain only the conversations between users and not app command invocations.
 *
 * @return {string} a text containing all the messages in the space in the format:
 *          Sender's name: Message
 */
function concatenateAllSpaceMessages_(spaceName) {
  // Call Chat API method spaces.messages.list
  const response = Chat.Spaces.Messages.list(spaceName, { 'pageSize': 100 });
  const messages = response.messages;
  // Fetch the display names of the message senders and returns a text
  // concatenating all the messages.
  let userMap = new Map();
  return messages
    .filter(message => message.slashCommand === undefined)
    .map(message => `${getUserDisplayName_(userMap, message.sender.name)}: ${message.text}`)
    .join('\n');
}

/**
 * Obtains the display name of a user by using the Admin Directory API.
 *
 * The fetched display name is cached in the provided map, so we only call the API
 * once per user.
 *
 * If the user does not have a display name, then the full name is used.
 *
 * @param {Map} userMap a map containing the display names previously fetched
 * @param {string} userName the resource name of the user
 * @return {string} the user's display name
 */
function getUserDisplayName_(userMap, userName) {
  if (userMap.has(userName)) {
    return userMap.get(userName);
  }
  let displayName = 'Unknown User';
  try {
    const user = AdminDirectory.Users.get(
      userName.replace("users/", ""),
      { projection: 'BASIC', viewType: 'domain_public' });
    displayName = user.name.displayName ? user.name.displayName : user.name.fullName;
  } catch (e) {
    // Ignore error if the API call fails (for example, because it's an
    // out-of-domain user or Chat app)) and just use 'Unknown User'.
  }
  userMap.set(userName, displayName);
  return displayName;
}
ChatSpaceCreator.gs

ユーザーがインシデントで入力したフォームデータを受け取る 確認しました。このウェブページを使用して、Chat の スペースを作成して入力し、スペースに関するメッセージを できます。

ChatSpaceCreator.gs コードを表示

apps-script/incident-response/ChatSpaceCreator.gs
/**
 * Creates a space in Google Chat with the provided title and members, and posts an
 * initial message to it.
 *
 * @param {Object} formData the data submitted by the user. It should contain the fields
 *                          title, description, and users.
 * @return {string} the resource name of the new space.
 */
function createChatSpace(formData) {
  const users = formData.users.trim().length > 0 ? formData.users.split(',') : [];
  const spaceName = setUpSpace_(formData.title, users);
  addAppToSpace_(spaceName);
  createMessage_(spaceName, formData.description);
  return spaceName;
}

/**
 * Creates a space in Google Chat with the provided display name and members.
 *
 * @return {string} the resource name of the new space.
 */
function setUpSpace_(displayName, users) {
  const memberships = users.map(email => ({
    member: {
      name: `users/${email}`,
      type: "HUMAN"
    }
  }));
  const request = {
    space: {
      displayName: displayName,
      spaceType: "SPACE",
      externalUserAllowed: true
    },
    memberships: memberships
  };
  // Call Chat API method spaces.setup
  const space = Chat.Spaces.setup(request);
  return space.name;
}

/**
 * Adds this Chat app to the space.
 *
 * @return {string} the resource name of the new membership.
 */
function addAppToSpace_(spaceName) {
  const request = {
    member: {
      name: "users/app",
      type: "BOT"
    }
  };
  // Call Chat API method spaces.members.create
  const membership = Chat.Spaces.Members.create(request, spaceName);
  return membership.name;
}

/**
 * Posts a text message to the space on behalf of the user.
 *
 * @return {string} the resource name of the new message.
 */
function createMessage_(spaceName, text) {
  const request = {
    text: text
  };
  // Call Chat API method spaces.messages.create
  const message = Chat.Spaces.Messages.create(request, spaceName);
  return message.name;
}
DocsApi.gs

Google Docs API を呼び出して、Google ドキュメント ドキュメントを ユーザーの Google ドライブに書き込まれ、インシデント情報の概要が書き込まれます。 VertexAiApi.gs で作成されたドキュメントへの移動。

DocsApi.gs コードを表示

apps-script/incident-response/DocsApi.gs
/**
 * Creates a Doc in the user's Google Drive and writes a summary of the incident information to it.
 *
 * @param {string} title The title of the incident
 * @param {string} resolution Incident resolution described by the user
 * @param {string} chatHistory The whole Chat history be included in the document
 * @param {string} chatSummary A summary of the Chat conversation to be included in the document
 * @return {string} the URL of the created Doc
 */
function createDoc_(title, resolution, chatHistory, chatSummary) {
  let doc = DocumentApp.create(title);
  let body = doc.getBody();
  body.appendParagraph(`Post-Mortem: ${title}`).setHeading(DocumentApp.ParagraphHeading.TITLE);
  body.appendParagraph("Resolution").setHeading(DocumentApp.ParagraphHeading.HEADING1);
  body.appendParagraph(resolution);
  body.appendParagraph("Summary of the conversation").setHeading(DocumentApp.ParagraphHeading.HEADING1);
  body.appendParagraph(chatSummary);
  body.appendParagraph("Full Chat history").setHeading(DocumentApp.ParagraphHeading.HEADING1);
  body.appendParagraph(chatHistory);
  return doc.getUrl();
}
VertexAiApi.gs

Chat 内の会話を要約します 構築しました。この要約は特別に作成された DocsAPI.gs 内のドキュメント。

VertexAiApi.gs コードを表示

apps-script/incident-response/VertexAiApi.gs
/**
 * Summarizes a Chat conversation using the Vertex AI text prediction API.
 *
 * @param {string} chatHistory The Chat history that will be summarized.
 * @return {string} The content from the text prediction response.
 */
function summarizeChatHistory_(chatHistory) {
  const prompt =
    "Summarize the following conversation between Engineers resolving an incident"
      + " in a few sentences. Use only the information from the conversation.\n\n"
      + chatHistory;
  const request = {
    instances: [
      { prompt: prompt }
    ],
    parameters: {
      temperature: 0.2,
      maxOutputTokens: 256,
      topK: 40,
      topP: 0.95
    }
  }
  const fetchOptions = {
    method: 'POST',
    headers: { Authorization: 'Bearer ' + ScriptApp.getOAuthToken() },
    contentType: 'application/json',
    payload: JSON.stringify(request)
  }
  const response = UrlFetchApp.fetch(
    `https://${VERTEX_AI_LOCATION_ID}-aiplatform.googleapis.com/v1`
      + `/projects/${PROJECT_ID}/locations/${VERTEX_AI_LOCATION_ID}`
      + "/publishers/google/models/text-bison:predict",
    fetchOptions);
  const payload = JSON.parse(response.getContentText());
  return payload.predictions[0].content;
}
WebController.gs

インシデント初期化ウェブサイトを提供します。

WebController.gs コードを表示

apps-script/incident-response/WebController.gs
/**
 * Serves the web page from Index.html.
 */
function doGet() {
  return HtmlService
    .createTemplateFromFile('Index')
    .evaluate();
}

/**
 * Serves the web content from the specified filename.
 */
function include(filename) {
  return HtmlService
    .createHtmlOutputFromFile(filename)
    .getContent();
}

/**
 * Returns the email address of the user running the script.
 */
function getUserEmail() {
  return Session.getActiveUser().getEmail();
}
Index.html

インシデント初期化ウェブサイトを構成する HTML。

Index.html コードを表示

apps-script/incident-response/Index.html
<!DOCTYPE html>
<html>
  <head>
    <base target="_top">
    <link href='https://fonts.googleapis.com/css?family=Roboto' rel='stylesheet'>
    <?!= include('Stylesheet'); ?>
  </head>
  <body>
    <div class="container">
      <div class="content">
        <h1>Incident Manager</h1>
        <form id="incident-form" onsubmit="handleFormSubmit(this)">
          <div id="form">
            <p>
              <label for="title">Incident title</label><br/>
              <input type="text" name="title" id="title" />
            </p>
            <p>
              <label for="users">Incident responders</label><br/>
              <small>
                Please enter a comma-separated list of email addresses of the users
                that should be added to the space.
                Do not include <?= getUserEmail() ?> as it will be added automatically.
              </small><br/>
              <input type="text" name="users" id="users" />
            </p>
            <p>
              <label for="description">Initial message</label></br>
              <small>This message will be posted after the space is created.</small><br/>
              <textarea name="description" id="description"></textarea>
            </p>
            <p class="text-center">
              <input type="submit" value="CREATE CHAT SPACE" />
            </p>
          </div>
          <div id="output" class="hidden"></div>
          <div id="clear" class="hidden">
            <input type="reset" value="CREATE ANOTHER INCIDENT" onclick="onReset()" />
          </div>
        </form>
      </div>
    </div>
    <?!= include('JavaScript'); ?>
  </body>
</html>
JavaScript.html

フォームの送信、送信、 インシデント初期化ウェブサイトのエラーを表示し、クリアします。含まれる WebController.gs のカスタム include 関数によって Index.html に格納します。

JavaScript.html コードを表示

apps-script/incident-response/JavaScript.html
<script>
  var formDiv = document.getElementById('form');
  var outputDiv = document.getElementById('output');
  var clearDiv = document.getElementById('clear');

  function handleFormSubmit(formObject) {
    event.preventDefault();
    outputDiv.innerHTML = 'Please wait while we create the space...';
    hide(formDiv);
    show(outputDiv);
    google.script.run
      .withSuccessHandler(updateOutput)
      .withFailureHandler(onFailure)
      .createChatSpace(formObject);
  }

  function updateOutput(response) {
    var spaceId = response.replace('spaces/', '');
    outputDiv.innerHTML =
      '<p>Space created!</p><p><a href="https://mail.google.com/chat/#chat/space/'
        + spaceId
        + '" target="_blank">Open space</a></p>';
    show(outputDiv);
    show(clearDiv);
  }

  function onFailure(error) {
    outputDiv.innerHTML = 'ERROR: ' + error.message;
    outputDiv.classList.add('error');
    show(outputDiv);
    show(clearDiv);
  }

  function onReset() {
    outputDiv.innerHTML = '';
    outputDiv.classList.remove('error');
    show(formDiv);
    hide(outputDiv);
    hide(clearDiv);
  }

  function hide(element) {
    element.classList.add('hidden');
  }

  function show(element) {
    element.classList.remove('hidden');
  }
</script>
Stylesheet.html

インシデント初期化ウェブサイトの CSS。です。 カスタム include 関数によって Index.html に含まれている WebController.gs

Stylesheet.html コードを表示

apps-script/incident-response/Stylesheet.html
<style>
  * {
    box-sizing: border-box;
  }
  body {
    font-family: Roboto, Arial, Helvetica, sans-serif;
  }
  div.container {
    display: flex;
    justify-content: center;
    align-items: center;
    position: absolute;
    top: 0; bottom: 0; left: 0; right: 0;
  }
  div.content {
    width: 80%;
    max-width: 1000px;
    padding: 1rem;
    border: 1px solid #999;
    border-radius: 0.25rem;
    box-shadow: 0 2px 2px 0 rgba(66, 66, 66, 0.08), 0 2px 4px 2px rgba(66, 66, 66, 0.16);
  }
  h1 {
    text-align: center;
    padding-bottom: 1rem;
    margin: 0 -1rem 1rem -1rem;
    border-bottom: 1px solid #999;
  }
 #output {
    text-align: center;
    min-height: 250px;
  }
  div#clear {
    text-align: center;
    padding-top: 1rem;
    margin: 1rem -1rem 0 -1rem;
    border-top: 1px solid #999;
  }
  input[type=text], textarea {
    width: 100%;
    padding: 1rem 0.5rem;
    margin: 0.5rem 0;
    border: 0;
    border-bottom: 1px solid #999;
    background-color: #f0f0f0;
  }
  textarea {
    height: 5rem;
  }
  small {
    color: #999;
  }
  input[type=submit], input[type=reset] {
    padding: 1rem;
    border: none;
    background-color: #6200ee;
    color: #fff;
    border-radius: 0.25rem;
    width: 25%;
  }
  .hidden {
    display: none;
  }
  .text-center {
    text-align: center;
  }
  .error {
    color: red;
  }
</style>

Cloud プロジェクト番号と ID を確認する

  1. Google Cloud コンソールで、Cloud プロジェクトに移動します。

    Google Cloud コンソールに移動

  2. [設定とユーティリティ] をクリックします。 &gt; [プロジェクト設定]。

  3. [プロジェクト番号] フィールドと [プロジェクト ID] フィールドの値をメモします。マイページ 以降のセクションで使用します。

Apps Script プロジェクトを作成する

Apps Script プロジェクトを作成して、 Cloud プロジェクト:

  1. 次のボタンをクリックして、Apps Script プロジェクト「Respond to incidents with Google Chat」を開きます。
    プロジェクトを開く
  2. [概要] をクリックします。
  3. 概要ページで コピー作成のアイコン [コピーを作成] をクリックします。
  4. Apps Script プロジェクトのコピーに名前を付けます。

    1. [Respond toIncident to Google Chat] をクリックします。

    2. [プロジェクト タイトル] に「Incident Management Chat app」と入力します。

    3. [名前を変更] をクリックします。

  5. Apps Script プロジェクトのコピーで、Consts.gs に移動します。 YOUR_PROJECT_ID を実際の ID に置き換えます。 できます。

Apps Script プロジェクトの Cloud プロジェクトを設定する

  1. Apps Script プロジェクトで、 [プロジェクト設定のアイコン プロジェクトの設定] をクリックします。
  2. [Google Cloud Platform(GCP)プロジェクト] で、[プロジェクトを変更] をクリックします。
  3. [GCP プロジェクト番号] に、Cloud プロジェクトのプロジェクト番号を貼り付けます。
  4. [プロジェクトを設定] をクリックします。Cloud プロジェクトと Apps Script プロジェクトが接続されました。

Apps Script デプロイメントを作成する

すべてのコードが配置されたので、Apps Script をデプロイします。 できます。デプロイ ID は、サービスを構成するときに Google Cloud の Chat アプリ。

  1. Apps Script で、インシデント対応アプリのプロジェクトを開きます。

    [Apps Script] に移動

  2. [デプロイ] >新しいデプロイ

  3. [アドオン] と [ウェブアプリ] がまだ選択されていない場合は、 [タイプを選択] でデプロイタイプ プロジェクト設定のアイコン をクリックし、[アドオン] と [ウェブアプリ] を選択します。

  4. [説明] に、このバージョンの説明を入力します(例: Complete version of incident management app

  5. [Execute as] で [User access the web app] を選択します。

  6. [アクセスできるユーザー] で [Workspace 組織内のすべてのユーザー] を選択します。 「Workspace 組織」はは名前です。 Google Workspace の組織。

  7. [デプロイ] をクリックします。Apps Script レポートが正常に作成されました そのインシデントのデプロイ ID と URL が示されます。 のウェブページをご覧ください。

  8. 後でインシデントを開始したときに参照できるように、ウェブアプリの URL をメモしておきます。 [Deployment ID] をコピーします。この ID は、サービス アカウント Google Cloud コンソールの Chat アプリ。

  9. [完了] をクリックします。

Google Cloud コンソールで Chat 用アプリを構成する

このセクションでは、Google Cloud コンソールで Google Chat API を構成する方法について説明します。 Chat 用アプリに関する情報が表示されます。 Apps Script から作成したデプロイの ID できます。

  1. Google Cloud コンソールで [メニュー] をクリックします。 &gt; その他のプロダクト &gt; Google Workspace &gt; プロダクト ライブラリ &gt; Google Chat API &gt; [管理] &gt; [構成]。

    Chat API の構成に移動

  2. [アプリ名] に「Incident Management」と入力します。

  3. [アバターの URL] に「https://developers.google.com/chat/images/quickstart-app-avatar.png」と入力します。

  4. [説明] に「Responds to incidents.」と入力します。

  5. [インタラクティブ機能を有効にする] をクリックしてオンにします。

  6. [機能] で、[1:1 のメッセージを受信する]、[スペースとグループの会話に参加する] を選択します。

  7. [Connection settings] で、[Apps Script project] を選択します。

  8. [デプロイ ID] に、Apps Script のデプロイ ID を貼り付けます。 先ほど Apps Script プロジェクトからコピーした 説明します。

  9. スラッシュ コマンドを登録し、 完全実装された Chat 用アプリでは以下を使用します。

    1. [スラッシュ コマンド] で [スラッシュ コマンドを追加] をクリックします。

    2. [名前] に「/closeIncident」と入力します。

    3. [コマンド ID] に「1」と入力します。

    4. [説明] に次のように入力します。 Closes the incident being discussed in the space.

    5. [ダイアログを開く] を選択します。

    6. [完了] をクリックします。スラッシュ コマンドが登録され、一覧表示されます。

  10. [公開設定] で [ この Chat 用アプリを、 [Workspace Domain] に移動してメールアドレスを入力します。

  11. [ログ] で、[エラーを Logging にロギング] を選択します。

  12. [保存] をクリックします。構成が保存されているというメッセージが表示され、アプリが テストの準備が整いました

Chat アプリをテストする

インシデント管理の Chat 用アプリをテストするには、 Chat 用アプリが 次のように機能します。

  1. Apps Script デプロイ ウェブアプリの URL に移動します。

  2. Apps Script からデータへのアクセス許可を求められた場合は、 [権限を確認] をクリックし、適切な Google アカウントでログインします。 [許可] をクリックします。

  3. インシデントの初期化に関するウェブページが開きます。テスト情報を入力します。

    1. [Incident title] に「The First Incident」と入力します。
    2. 必要に応じて、[インシデント対応者] に、 他のインシデント対応担当者に提供できます対象となるのは、次のいずれかの属性を持つ Google Workspace 組織の Google Chat アカウント、または 失敗します。ご自身のメールアドレスは入力しないでください。 自動的に含まれます。
    3. [最初のメッセージ] に「Testing the incident management Chat app.」と入力します。
  4. [Create Chat Space] をクリックします。creating space というメッセージが表示されます。

  5. スペースが作成されると、Space created! メッセージが表示されます。[ スペースを開く: Chat のスペースが新しいタブで開きます。

  6. 必要に応じて、お客様と他のインシデント対応担当者は、 選択します。このアプリは Vertex AI を使用してこれらのメッセージを要約し、 作成しました。

  7. インシデント対応を終了して解決プロセスを開始するには、 Chat スペースの場合は、「/closeIncident」と入力します。インシデント管理 ダイアログが開きます。

  8. [インシデントを閉じる] に、インシデントの解決の説明を入力します。 (例: Test complete)。

  9. [Close Incident](インシデントを閉じる)をクリックします。

Incident Management アプリでは、スペース内のメッセージが一覧表示され、要約されます。 要約を Google ドキュメント ドキュメントに貼り付けて、 スペースでドキュメントを作成できます。

クリーンアップ

サービス アカウントに対する Google Cloud アカウントへの課金を回避するために、 リソースがある場合は、その Terraform 構成ファイルを できます。

  1. Google Cloud コンソールで、[リソースの管理] ページに移動します。[ メニュー &gt; IAM と管理者 &gt; [リソースの管理] をクリックします。

    <ph type="x-smartling-placeholder"></ph> Resource Manager に移動

  2. プロジェクト リストで、削除するプロジェクトを選択し、[ 削除します。
  3. ダイアログでプロジェクト ID を入力し、[シャットダウン] をクリックして削除します。 できます。