支持互动式对话框

本页介绍了 Google Chat 应用如何打开对话框以显示界面 (UI) 并响应用户。

对话框是基于卡片的窗口界面,可从 Chat 聊天室或消息中打开。对话框及其内容仅对打开该对话框的用户可见。

聊天应用可以使用对话框来请求和收集 Chat 用户的信息,包括多步表单。如需详细了解如何构建表单输入,请参阅收集和处理用户提供的信息。

前提条件

HTTP

一种 Google Chat 应用,可接收并响应用户互动。 如需构建一个,请完成 HTTP 快速入门。

Apps 脚本

一种 Google Chat 应用,可接收并响应用户互动。 如需构建一个,请完成 Apps 脚本快速入门。

打开对话框
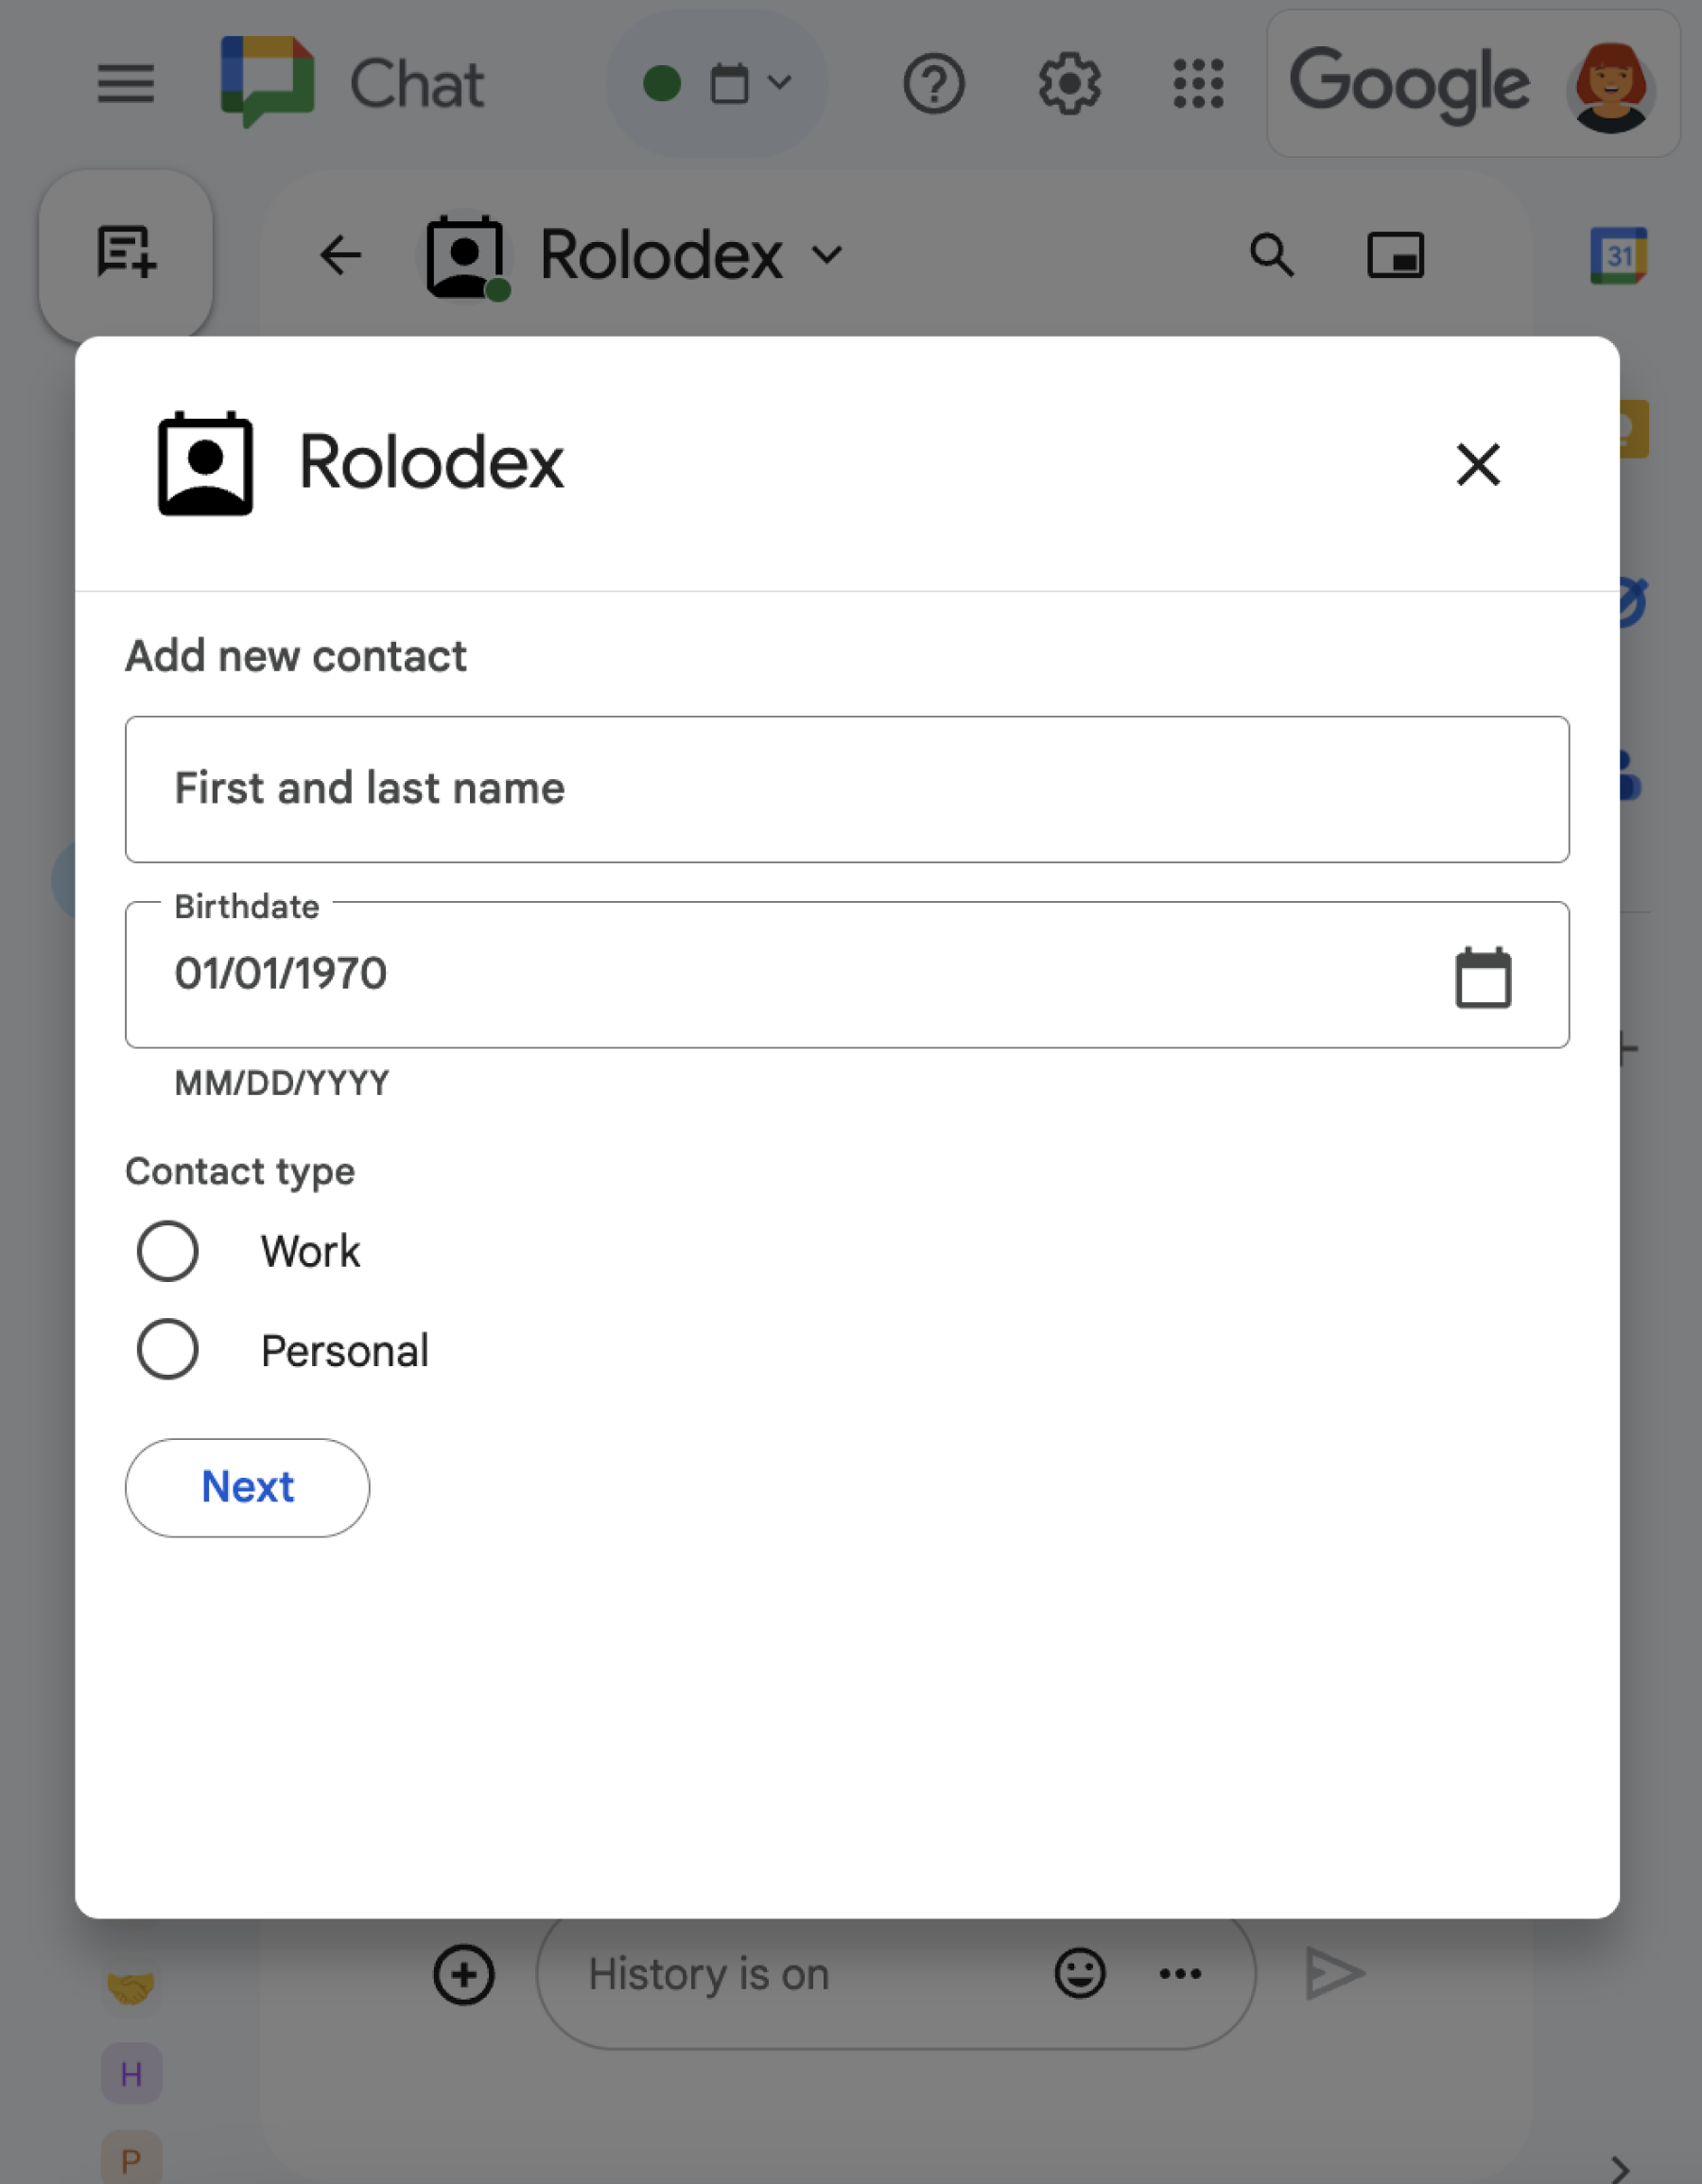
一个包含各种不同 widget 的对话框。
图 1:一个示例 Chat 应用,可打开对话框来收集联系信息。

本部分介绍如何通过执行以下操作来响应和设置对话:

  1. 通过用户互动触发对话框请求。
  2. 通过返回并打开对话框来处理请求。
  3. 用户提交信息后,通过关闭对话框或返回另一个对话框来处理提交内容。

触发对话框请求

Chat 应用只能通过打开对话框来响应用户互动,例如用户在卡片中点击消息中的命令或按钮。

如需通过对话框回复用户,聊天应用必须构建触发对话框请求的互动,例如:

  • 响应命令。如需通过命令触发请求,您必须在配置命令时选中打开对话框复选框。
  • 响应消息中的按钮点击,消息可以是卡片的一部分,也可以位于消息底部。如需通过消息中的按钮触发请求,请将按钮的 onClick 操作的 interaction 设置为 OPEN_DIALOG。
  • 在 Chat 应用首页中响应按钮点击。 如需了解如何从首页打开对话框,请参阅为 Google Chat 应用构建首页。
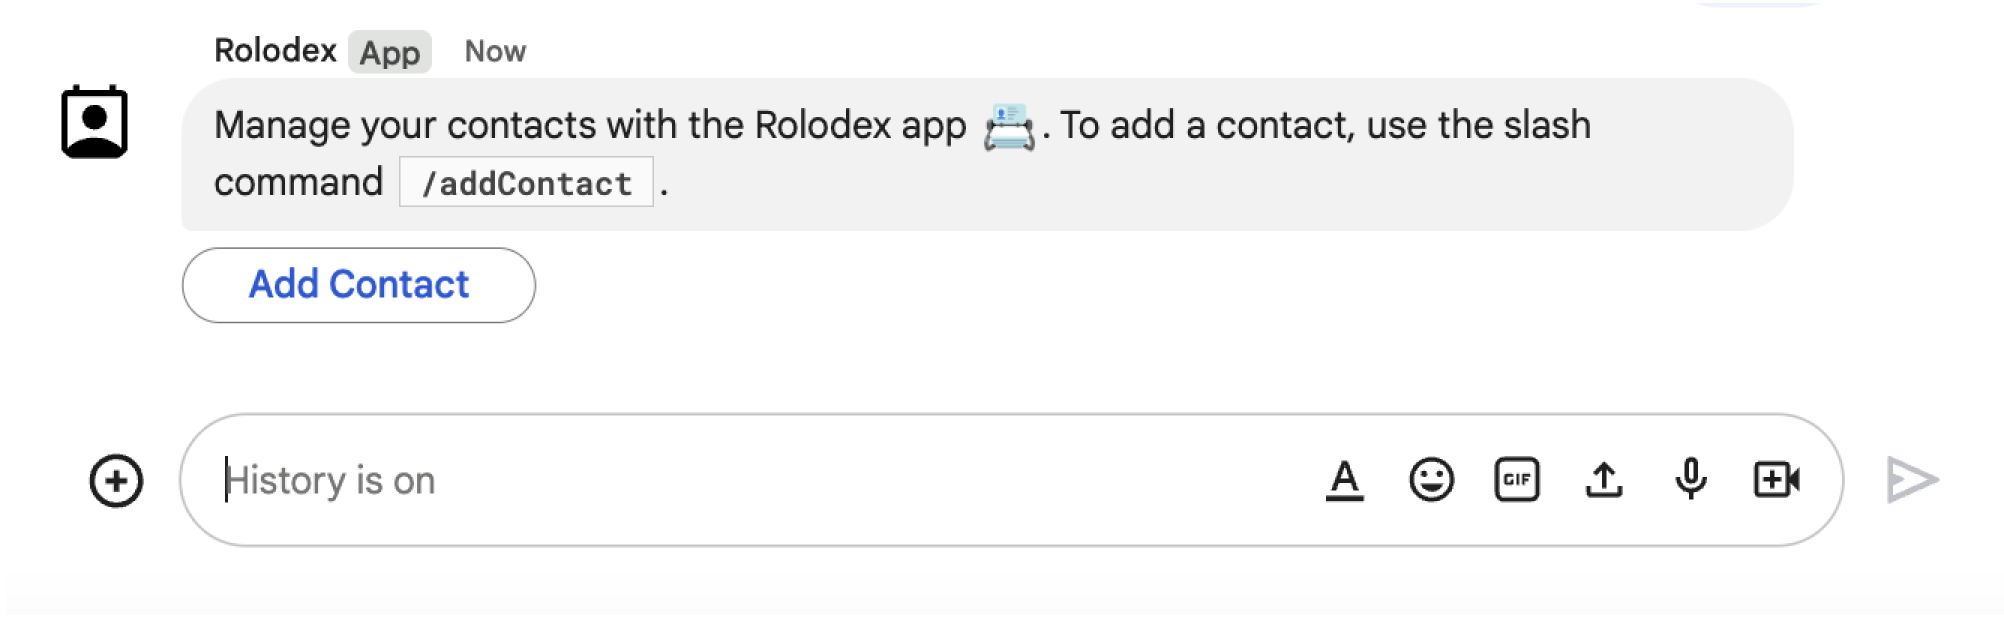
触发对话框的按钮
图 2:Chat 应用发送一条消息,提示用户使用 /addContact 斜杠命令。
该消息还包含一个按钮,用户可以点击该按钮来触发命令。

以下代码示例展示了如何从卡片消息中的按钮触发对话框请求。如需打开对话框,请将按钮的字段 onClick.action.interaction 设置为 OPEN_DIALOG:

Node.js

node/chat/contact-form-app/index.js
{ buttonList: { buttons: [{
  text: "ADD CONTACT",
  onClick: { action: {
    function: FUNCTION_URL,
    interaction: "OPEN_DIALOG",
    parameters: [
      { key: "actionName", value: "openInitialDialog" }
    ]
  }}
}]}}

将 FUNCTION_URL 替换为处理按钮点击的 HTTP 端点。

Python

python/chat/contact-form-app/main.py
{ 'buttonList': { 'buttons': [{
  'text': "ADD CONTACT",
  'onClick': { 'action': {
    'function': FUNCTION_URL,
    'interaction': "OPEN_DIALOG",
    'parameters': [
      { 'key': "actionName", 'value': "openInitialDialog" }
    ]
  }}
}]}}

将 FUNCTION_URL 替换为处理按钮点击的 HTTP 端点。

Java

java/chat/contact-form-app/src/main/java/com/google/chat/contact/App.java
.setButtonList(new GoogleAppsCardV1ButtonList().setButtons(List.of(new GoogleAppsCardV1Button()
  .setText("ADD CONTACT")
  .setOnClick(new GoogleAppsCardV1OnClick().setAction(new GoogleAppsCardV1Action()
    .setFunction(FUNCTION_URL)
    .setInteraction("OPEN_DIALOG")
    .setParameters(List.of(
      new GoogleAppsCardV1ActionParameter().setKey("actionName").setValue("openInitialDialog"))))))))));

将 FUNCTION_URL 替换为处理按钮点击的 HTTP 端点。

Apps 脚本

此示例通过返回 card JSON 来发送卡片消息。您还可以使用 Apps 脚本卡片服务。

apps-script/chat/contact-form-app/Code.gs
{ buttonList: { buttons: [{
  text: "ADD CONTACT",
  onClick: { action: {
    function: "openInitialDialog",
    interaction: "OPEN_DIALOG"
  }}
}]}}

打开初始对话框

当用户触发对话请求时,您的 Chat 应用会收到一个事件对象,其载荷将 dialogEventType 对象指定为 REQUEST_DIALOG。

如需打开对话框,您的 Chat 应用可以返回一个包含导航 pushCard 的 RenderActions 对象来响应请求,以显示卡片。卡片应包含任何界面 (UI) 元素,包括一个或多个 sections[] widget。如需收集用户的信息,您可以指定表单输入 widget 和按钮 widget。如需详细了解如何设计表单输入,请参阅收集和处理用户提供的信息。

以下代码示例展示了聊天应用如何返回用于打开对话框的响应:

Node.js

node/chat/contact-form-app/index.js
/**
 * Opens the initial step of the dialog that lets users add contact details.
 *
 * @return {Object} open the dialog.
 */
function openInitialDialog() {
  return { action: { navigations: [{ pushCard: { sections: [{ widgets: [
    { textInput: {
      name: "contactName",
      label: "First and last name",
      type: "SINGLE_LINE"
    }},
    { dateTimePicker: {
      name: "contactBirthdate",
      label: "Birthdate",
      type: "DATE_ONLY"
    }},
    { selectionInput: {
      name: "contactType",
      label: "Contact type",
      type: "RADIO_BUTTON",
      items: [
        { text: "Work", value: "Work", selected: false },
        { text: "Personal", value: "Personal", selected: false }
      ]
    }},
    { buttonList: { buttons: [{
      text: "NEXT",
      onClick: { action: {
        function: FUNCTION_URL,
        parameters: [
          { key: "actionName", value: "openConfirmationDialog" }
        ]
      }}
    }]}}
  ]}]}}]}};
}

将 FUNCTION_URL 替换为处理按钮点击的 HTTP 端点。

Python

python/chat/contact-form-app/main.py
def open_initial_dialog() -> Mapping[str, Any]:
  """Opens the initial step of the dialog that lets users add contact details.

  Returns:
    Mapping[str, Any]: open the dialog.
  """
  return { 'action': { 'navigations': [{ 'pushCard': { 'sections': [{ 'widgets': [
    { 'textInput': {
      'name': "contactName",
      'label': "First and last name",
      'type': "SINGLE_LINE"
    }},
    { 'dateTimePicker': {
      'name': "contactBirthdate",
      'label': "Birthdate",
      'type': "DATE_ONLY"
    }},
    { 'selectionInput': {
      'name': "contactType",
      'label': "Contact type",
      'type': "RADIO_BUTTON",
      'items': [
        { 'text': "Work", 'value': "Work", 'selected': False },
        { 'text': "Personal", 'value': "Personal", 'selected': False }
      ]
    }},
    { 'buttonList': { 'buttons': [{
      'text': "NEXT",
      'onClick': { 'action': {
        'function': FUNCTION_URL,
        'parameters': [
          { 'key': "actionName", 'value': "openConfirmationDialog" }
        ]
      }}
    }]}}
  ]}]}}]}}

将 FUNCTION_URL 替换为处理按钮点击的 HTTP 端点。

Java

java/chat/contact-form-app/src/main/java/com/google/chat/contact/App.java
/**
 * Opens the initial step of the dialog that lets users add contact details.
 *
 * @return {Object} open the dialog.
 */
GenericJson openInitialDialog() {
  GoogleAppsCardV1Card cardV2 = new GoogleAppsCardV1Card()
    .setSections(List.of(new GoogleAppsCardV1Section().setWidgets(List.of(
      new GoogleAppsCardV1Widget().setTextInput(new GoogleAppsCardV1TextInput()
        .setName("contactName")
        .setLabel("First and last name")
        .setType("SINGLE_LINE")),
      new GoogleAppsCardV1Widget().setDateTimePicker(new GoogleAppsCardV1DateTimePicker()
        .setName("contactBirthdate")
        .setLabel("Birthdate")
        .setType("DATE_ONLY")),
      new GoogleAppsCardV1Widget().setSelectionInput(new GoogleAppsCardV1SelectionInput()
        .setName("contactType")
        .setLabel("Contact type")
        .setType("RADIO_BUTTON")
        .setItems(List.of(
          new GoogleAppsCardV1SelectionItem()
            .setText("Work")
            .setValue("Work")
            .setSelected(false),
          new GoogleAppsCardV1SelectionItem()
            .setText("Personal")
            .setValue("Personal")
            .setSelected(false)))),
      new GoogleAppsCardV1Widget().setButtonList(new GoogleAppsCardV1ButtonList().setButtons(List.of(
        new GoogleAppsCardV1Button()
          .setText("NEXT")
          .setOnClick(new GoogleAppsCardV1OnClick().setAction(new GoogleAppsCardV1Action()
            .setFunction(FUNCTION_URL)
            .setParameters(List.of(
              new GoogleAppsCardV1ActionParameter().setKey("actionName").setValue("openConfirmationDialog"))))))))))));
  return new GenericJson() {{
    put("action", new GenericJson() {{
      put("navigations", List.of(new GenericJson() {{
        put("pushCard", cardV2);
      }}));
    }});
  }};
}

将 FUNCTION_URL 替换为处理按钮点击的 HTTP 端点。

Apps 脚本

此示例通过返回 card JSON 来发送卡片消息。您还可以使用 Apps 脚本卡片服务。

apps-script/chat/contact-form-app/Code.gs
/**
 * Opens the initial step of the dialog that lets users add contact details.
 *
 * @param {Object} event The event object from the Google Workspace add-on.
 * @return {Object} open the dialog.
 */
function openInitialDialog(event) {
  return { action: { navigations: [{ pushCard: { sections: [{ widgets: [
    { textInput: {
      name: "contactName",
      label: "First and last name",
      type: "SINGLE_LINE"
    }},
    { dateTimePicker: {
      name: "contactBirthdate",
      label: "Birthdate",
      type: "DATE_ONLY"
    }},
    { selectionInput: {
      name: "contactType",
      label: "Contact type",
      type: "RADIO_BUTTON",
      items: [
        { text: "Work", value: "Work", selected: false },
        { text: "Personal", value: "Personal", selected: false }
      ]
    }},
    { buttonList: { buttons: [{
      text: "NEXT",
      onClick: { action: { function : "openConfirmationDialog" }}
    }]}}
  ]}]}}]}};
}

处理对话框提交

当用户点击提交对话框的按钮时,您的聊天应用会收到一个包含 buttonClickedPayload 对象的事件对象。在载荷中,dialogEventType 设置为 SUBMIT_DIALOG。如需了解如何收集和处理对话框中的信息,请参阅收集和处理 Google Chat 用户的信息。

您的 Chat 应用必须通过执行以下操作之一来响应事件对象:

可选:返回另一个对话框

用户提交初始对话框后,聊天应用可以返回一个或多个额外的对话框,以帮助用户在提交之前查看信息、完成多步表单或动态填充表单内容。

为了处理用户输入的数据,Chat 应用会在事件的 commonEventObject.formInputs 对象中处理数据。如需详细了解如何从输入 widget 中检索值,请参阅收集和处理用户的信息。

如需跟踪用户在初始对话框中输入的任何数据,您必须向打开下一个对话框的按钮添加参数。如需了解详情,请参阅将数据转移到其他卡。

在此示例中,Chat 应用会打开一个初始对话框,该对话框会引导用户进入第二个对话框以进行确认,然后再提交:

Node.js

node/chat/contact-form-app/index.js
/**
 * Responds to a message in Google Chat.
 *
 * @return {Object} response that handles dialogs.
 */
function handleMessage() {
  return { hostAppDataAction: { chatDataAction: { createMessageAction: { message: {
    text: "To add a contact, use the `ADD CONTACT` button below.",
    accessoryWidgets: [
      { buttonList: { buttons: [{
        text: "ADD CONTACT",
        onClick: { action: {
          function: FUNCTION_URL,
          interaction: "OPEN_DIALOG",
          parameters: [
            { key: "actionName", value: "openInitialDialog" }
          ]
        }}
      }]}}
    ]
  }}}}};
}

/**
 * Responds to a button clicked in Google Chat.
 *
 * @param {Object} event The event object from the Google Workspace add-on.
 * @return {Object} response depending on the button clicked.
 */
function handleButtonClicked(event) {
  // Initial dialog form page
  if (event.commonEventObject.parameters.actionName === "openInitialDialog") {
    return openInitialDialog();
  // Confirmation dialog form page
  } else if (event.commonEventObject.parameters.actionName === "openConfirmationDialog") {
    return openConfirmationDialog(event);
  // Submission dialog form page
  } else if (event.commonEventObject.parameters.actionName === "submitDialog") {
    return submitDialog(event);
  }
}

/**
 * Opens the initial step of the dialog that lets users add contact details.
 *
 * @return {Object} open the dialog.
 */
function openInitialDialog() {
  return { action: { navigations: [{ pushCard: { sections: [{ widgets: [
    { textInput: {
      name: "contactName",
      label: "First and last name",
      type: "SINGLE_LINE"
    }},
    { dateTimePicker: {
      name: "contactBirthdate",
      label: "Birthdate",
      type: "DATE_ONLY"
    }},
    { selectionInput: {
      name: "contactType",
      label: "Contact type",
      type: "RADIO_BUTTON",
      items: [
        { text: "Work", value: "Work", selected: false },
        { text: "Personal", value: "Personal", selected: false }
      ]
    }},
    { buttonList: { buttons: [{
      text: "NEXT",
      onClick: { action: {
        function: FUNCTION_URL,
        parameters: [
          { key: "actionName", value: "openConfirmationDialog" }
        ]
      }}
    }]}}
  ]}]}}]}};
}

/**
 * Opens the second step of the dialog that lets users confirm details.
 *
 * @param {Object} event The event object from the Google Workspace add-on.
 * @return {Object} update the dialog.
 */
function openConfirmationDialog(event) {
  // Retrieve the form input values
  const name = event.commonEventObject.formInputs["contactName"].stringInputs.value[0];
  const birthdate = event.commonEventObject.formInputs["contactBirthdate"].dateInput.msSinceEpoch;
  const type = event.commonEventObject.formInputs["contactType"].stringInputs.value[0];
  // Display the input values for confirmation
  return { action: { navigations: [{ pushCard: { sections: [{ widgets: [
    { textParagraph: { text: "Confirm contact information and submit:" }},
    { textParagraph: { text: "<b>Name:</b> " + name }},
    { textParagraph: { text: "<b>Birthday:</b> " + new Date(birthdate) }},
    { textParagraph: { text: "<b>Type:</b> " + type }},
    { buttonList: { buttons: [{
      text: "SUBMIT",
      onClick: { action: {
        function: FUNCTION_URL,
        parameters: [
          { key: "actionName", value: "submitDialog" },
          // Pass input values as parameters for last dialog step (submission)
          { key: "contactName", value: name },
          { key: "contactBirthdate", value: birthdate },
          { key: "contactType", value: type }
        ]
      }}
    }]}}
  ]}]}}]}};
}

将 FUNCTION_URL 替换为处理按钮点击的 HTTP 端点。

Python

python/chat/contact-form-app/main.py
def handle_message() -> Mapping[str, Any]:
  """Responds to a message in Google Chat.

  Returns:
    Mapping[str, Any]: the response that handles dialogs.
  """
  return { 'hostAppDataAction': { 'chatDataAction': { 'createMessageAction': { 'message': {
    'text': "To add a contact, use the `ADD CONTACT` button below.",
    'accessoryWidgets': [
      { 'buttonList': { 'buttons': [{
        'text': "ADD CONTACT",
        'onClick': { 'action': {
          'function': FUNCTION_URL,
          'interaction': "OPEN_DIALOG",
          'parameters': [
            { 'key': "actionName", 'value': "openInitialDialog" }
          ]
        }}
      }]}}
    ]
  }}}}}


def handle_button_clicked(event: Mapping[str, Any]) -> Mapping[str, Any]:
  """Responds to a button clicked in Google Chat.

  Args:
    Mapping[str, Any] event: the event object from the Google Workspace add-on

  Returns:
    Mapping[str, Any]: the response depending on the button clicked.
  """
  # Initial dialog form page
  if "openInitialDialog" == event['commonEventObject']['parameters']['actionName']:
    return open_initial_dialog()
  # Confirmation dialog form page
  elif "openConfirmationDialog" == event['commonEventObject']['parameters']['actionName'] :
    return open_confirmation_dialog(event)
  # Submission dialog form page
  elif "submitDialog" == event['commonEventObject']['parameters']['actionName']:
    return submit_dialog(event)


def open_initial_dialog() -> Mapping[str, Any]:
  """Opens the initial step of the dialog that lets users add contact details.

  Returns:
    Mapping[str, Any]: open the dialog.
  """
  return { 'action': { 'navigations': [{ 'pushCard': { 'sections': [{ 'widgets': [
    { 'textInput': {
      'name': "contactName",
      'label': "First and last name",
      'type': "SINGLE_LINE"
    }},
    { 'dateTimePicker': {
      'name': "contactBirthdate",
      'label': "Birthdate",
      'type': "DATE_ONLY"
    }},
    { 'selectionInput': {
      'name': "contactType",
      'label': "Contact type",
      'type': "RADIO_BUTTON",
      'items': [
        { 'text': "Work", 'value': "Work", 'selected': False },
        { 'text': "Personal", 'value': "Personal", 'selected': False }
      ]
    }},
    { 'buttonList': { 'buttons': [{
      'text': "NEXT",
      'onClick': { 'action': {
        'function': FUNCTION_URL,
        'parameters': [
          { 'key': "actionName", 'value': "openConfirmationDialog" }
        ]
      }}
    }]}}
  ]}]}}]}}


def open_confirmation_dialog(event: Mapping[str, Any]) -> Mapping[str, Any]:
  """Opens the second step of the dialog that lets users confirm details.

  Args:
    Mapping[str, Any] event: the event object from the Google Workspace add-on

  Returns:
    Mapping[str, Any]: update the dialog.
  """
  name = event.get('commonEventObject').get('formInputs')["contactName"].get('stringInputs').get('value')[0]
  birthdateEpoch = event.get('commonEventObject').get('formInputs')["contactBirthdate"].get('dateInput').get('msSinceEpoch')
  birthdate = datetime.fromtimestamp(int(birthdateEpoch) / 1000.0).strftime("%Y-%m-%d")
  type = event.get('commonEventObject').get('formInputs')["contactType"].get('stringInputs').get('value')[0]
  # Display the input values for confirmation
  return { 'action': { 'navigations': [{ 'pushCard': { 'sections': [{ 'widgets': [
    { 'textParagraph': { 'text': "Confirm contact information and submit:" }},
    { 'textParagraph': { 'text': "<b>Name:</b> " + name }},
    { 'textParagraph': { 'text': "<b>Birthday:</b> " + birthdate }},
    { 'textParagraph': { 'text': "<b>Type:</b> " + type }},
    { 'buttonList': { 'buttons': [{
      'text': "SUBMIT",
      'onClick': { 'action': {
        'function': FUNCTION_URL,
        'parameters': [
          { 'key': "actionName", 'value': "submitDialog" },
          # Pass input values as parameters for last dialog step (submission)
          { 'key': "contactName", 'value': name },
          { 'key': "contactBirthdate", 'value': birthdate },
          { 'key': "contactType", 'value': type }
        ]
      }}
    }]}}
  ]}]}}]}}

将 FUNCTION_URL 替换为处理按钮点击的 HTTP 端点。

Java

java/chat/contact-form-app/src/main/java/com/google/chat/contact/App.java
/**
 * Responds to a message in Google Chat.
 *
 * @return response that handles dialogs.
 */
GenericJson handleMessage() {
  Message message = new Message()
    .setText("To add a contact, use the `ADD CONTACT` button below.")
    .setAccessoryWidgets(List.of(new AccessoryWidget()
      .setButtonList(new GoogleAppsCardV1ButtonList().setButtons(List.of(new GoogleAppsCardV1Button()
        .setText("ADD CONTACT")
        .setOnClick(new GoogleAppsCardV1OnClick().setAction(new GoogleAppsCardV1Action()
          .setFunction(FUNCTION_URL)
          .setInteraction("OPEN_DIALOG")
          .setParameters(List.of(
            new GoogleAppsCardV1ActionParameter().setKey("actionName").setValue("openInitialDialog"))))))))));
  return new GenericJson() {{
    put("hostAppDataAction", new GenericJson() {{
      put("chatDataAction", new GenericJson() {{
        put("createMessageAction", new GenericJson() {{
          put("message", message);
        }});
      }});
    }});
  }};
}

/**
 * Responds to a button clicked in Google Chat.
 *
 * @param event The event object from the Google Workspace add-on.
 * @return response depending on the button clicked.
 */
GenericJson handleButtonClicked(JsonNode event) {
  String actionName = event.at("/commonEventObject/parameters/actionName").asText();
  // Initial dialog form page
  if ("openInitialDialog".equals(actionName)) {
    return openInitialDialog();
  // Confirmation dialog form page
  } else if ("openConfirmationDialog".equals(actionName)) {
    return openConfirmationDialog(event);
  // Submission dialog form page
  } else if ("submitDialog".equals(actionName)) {
    return submitDialog(event);
  }
  return null; 
}

/**
 * Opens the initial step of the dialog that lets users add contact details.
 *
 * @return {Object} open the dialog.
 */
GenericJson openInitialDialog() {
  GoogleAppsCardV1Card cardV2 = new GoogleAppsCardV1Card()
    .setSections(List.of(new GoogleAppsCardV1Section().setWidgets(List.of(
      new GoogleAppsCardV1Widget().setTextInput(new GoogleAppsCardV1TextInput()
        .setName("contactName")
        .setLabel("First and last name")
        .setType("SINGLE_LINE")),
      new GoogleAppsCardV1Widget().setDateTimePicker(new GoogleAppsCardV1DateTimePicker()
        .setName("contactBirthdate")
        .setLabel("Birthdate")
        .setType("DATE_ONLY")),
      new GoogleAppsCardV1Widget().setSelectionInput(new GoogleAppsCardV1SelectionInput()
        .setName("contactType")
        .setLabel("Contact type")
        .setType("RADIO_BUTTON")
        .setItems(List.of(
          new GoogleAppsCardV1SelectionItem()
            .setText("Work")
            .setValue("Work")
            .setSelected(false),
          new GoogleAppsCardV1SelectionItem()
            .setText("Personal")
            .setValue("Personal")
            .setSelected(false)))),
      new GoogleAppsCardV1Widget().setButtonList(new GoogleAppsCardV1ButtonList().setButtons(List.of(
        new GoogleAppsCardV1Button()
          .setText("NEXT")
          .setOnClick(new GoogleAppsCardV1OnClick().setAction(new GoogleAppsCardV1Action()
            .setFunction(FUNCTION_URL)
            .setParameters(List.of(
              new GoogleAppsCardV1ActionParameter().setKey("actionName").setValue("openConfirmationDialog"))))))))))));
  return new GenericJson() {{
    put("action", new GenericJson() {{
      put("navigations", List.of(new GenericJson() {{
        put("pushCard", cardV2);
      }}));
    }});
  }};
}

/**
 * Opens the second step of the dialog that lets users confirm details.
 *
 * @param event The event object from the Google Workspace add-on.
 * @return update the dialog.
 */
GenericJson openConfirmationDialog(JsonNode event) {
  // Retrieve the form input values
  String name = event.at("/commonEventObject/formInputs/contactName/stringInputs/value").get(0).asText();
  String birthdateEpoch = event.at("/commonEventObject/formInputs/contactBirthdate/dateInput/msSinceEpoch").asText();
  String birthdate = new SimpleDateFormat("MM/dd/yyyy").format(new Date((long)Double.parseDouble(birthdateEpoch)));
  String type = event.at("/commonEventObject/formInputs/contactType/stringInputs/value").get(0).asText();
  // Display the input values for confirmation
  GoogleAppsCardV1Card cardV2 = new GoogleAppsCardV1Card()
    .setSections(List.of(new GoogleAppsCardV1Section().setWidgets(List.of(
      new GoogleAppsCardV1Widget().setTextParagraph(new GoogleAppsCardV1TextParagraph()
        .setText("Confirm contact information and submit:")),
      new GoogleAppsCardV1Widget().setTextParagraph(new GoogleAppsCardV1TextParagraph()
        .setText("<b>Name:</b> " + name)),
      new GoogleAppsCardV1Widget().setTextParagraph(new GoogleAppsCardV1TextParagraph()
        .setText("<b>Birthday:</b> " + birthdate)),
      new GoogleAppsCardV1Widget().setTextParagraph(new GoogleAppsCardV1TextParagraph()
        .setText("<b>Type:</b> " + type)),
      new GoogleAppsCardV1Widget().setButtonList(new GoogleAppsCardV1ButtonList().setButtons(List.of(
        new GoogleAppsCardV1Button()
          .setText("SUBMIT")
          .setOnClick(new GoogleAppsCardV1OnClick().setAction(new GoogleAppsCardV1Action()
            .setFunction(FUNCTION_URL)
            .setParameters(List.of(
              new GoogleAppsCardV1ActionParameter().setKey("actionName").setValue("submitDialog"),
              // Pass input values as parameters for last dialog step (submission)
              new GoogleAppsCardV1ActionParameter().setKey("contactName").setValue(name),
              new GoogleAppsCardV1ActionParameter().setKey("contactBirthdate").setValue(birthdate),
              new GoogleAppsCardV1ActionParameter().setKey("contactType").setValue(type))))))))))));
  return new GenericJson() {{
    put("action", new GenericJson() {{
      put("navigations", List.of(new GenericJson() {{
        put("pushCard", cardV2);
      }}));
    }});
  }};
}

将 FUNCTION_URL 替换为处理按钮点击的 HTTP 端点。

Apps 脚本

此示例通过返回 card JSON 来发送卡片消息。您还可以使用 Apps 脚本卡片服务。

apps-script/chat/contact-form-app/Code.gs
/**
 * Responds to a message in Google Chat.
 *
 * @param {Object} event The event object from the Google Workspace add-on.
 * @return {Object} response that handles dialogs.
 */
function onMessage(event) {
  // Reply with a message that contains a button to open the initial dialog
  return { hostAppDataAction: { chatDataAction: { createMessageAction: { message: {
    text: "To add a contact, use the `ADD CONTACT` button below.",
    accessoryWidgets: [
      { buttonList: { buttons: [{
        text: "ADD CONTACT",
        onClick: { action: {
          function: "openInitialDialog",
          interaction: "OPEN_DIALOG"
        }}
      }]}}
    ]
  }}}}};
}

/**
 * Opens the initial step of the dialog that lets users add contact details.
 *
 * @param {Object} event The event object from the Google Workspace add-on.
 * @return {Object} open the dialog.
 */
function openInitialDialog(event) {
  return { action: { navigations: [{ pushCard: { sections: [{ widgets: [
    { textInput: {
      name: "contactName",
      label: "First and last name",
      type: "SINGLE_LINE"
    }},
    { dateTimePicker: {
      name: "contactBirthdate",
      label: "Birthdate",
      type: "DATE_ONLY"
    }},
    { selectionInput: {
      name: "contactType",
      label: "Contact type",
      type: "RADIO_BUTTON",
      items: [
        { text: "Work", value: "Work", selected: false },
        { text: "Personal", value: "Personal", selected: false }
      ]
    }},
    { buttonList: { buttons: [{
      text: "NEXT",
      onClick: { action: { function : "openConfirmationDialog" }}
    }]}}
  ]}]}}]}};
}

/**
 * Opens the second step of the dialog that lets users confirm details.
 *
 * @param {Object} event The event object from the Google Workspace add-on.
 * @return {Object} update the dialog.
 */
function openConfirmationDialog(event) {
  // Retrieve the form input values
  const name = event.commonEventObject.formInputs["contactName"].stringInputs.value[0];
  const birthdate = event.commonEventObject.formInputs["contactBirthdate"].dateInput.msSinceEpoch;
  const type = event.commonEventObject.formInputs["contactType"].stringInputs.value[0];
  // Display the input values for confirmation
  return { action: { navigations: [{ pushCard: { sections: [{ widgets: [
    { textParagraph: { text: "Confirm contact information and submit:" }},
    { textParagraph: { text: "<b>Name:</b> " + name }},
    { textParagraph: { text: "<b>Birthday:</b> " + new Date(birthdate) }},
    { textParagraph: { text: "<b>Type:</b> " + type }},
    { buttonList: { buttons: [{
      text: "SUBMIT",
      onClick: { action: {
        function: "submitDialog",
        // Pass input values as parameters for last dialog step (submission)
        parameters: [
          { key: "contactName", value: name },
          { key: "contactBirthdate", value: birthdate },
          { key: "contactType", value: type }
        ]
      }}
    }]}}
  ]}]}}]}};
}

关闭对话框

当用户点击对话框中的提交按钮时,Chat 应用会执行其关联的操作,并提供将 buttonClickedPayload 设置为以下值的事件对象:

  • isDialogEvent 为 true。
  • dialogEventType 为 SUBMIT_DIALOG。

Chat 应用应返回一个 RenderActions 对象,并将 endNavigation 设置为 CLOSE_DIALOG (endNavigation: "CLOSE_DIALOG")。

可选:显示临时通知

关闭对话框时,您还可以向与应用互动的用户显示临时文本通知。

如需显示通知,请返回设置了 notification 字段的 RenderActions 对象。

以下示例会关闭对话框并显示文本通知:

Node.js

node/chat/contact-form-app/index.js
// Validate the parameters.
if (!event.commonEventObject.parameters["contactName"]) {
  return { action: {
    navigations: [{ endNavigation: { action: "CLOSE_DIALOG"}}],
    notification: { text: "Failure, the contact name was missing!" }
  }};
}

Python

python/chat/contact-form-app/main.py
# Validate the parameters.
if event.get('commonEventObject').get('parameters')["contactName"] == "":
  return { 'action': {
    'navigations': [{ 'endNavigation': { 'action': "CLOSE_DIALOG"}}],
    'notification': { 'text': "Failure, the contact name was missing!" }
  }}

Java

java/chat/contact-form-app/src/main/java/com/google/chat/contact/App.java
    // Validate the parameters.
    if (event.at("/commonEventObject/parameters/contactName").asText().isEmpty()) {
      return new GenericJson() {{
        put("action", new GenericJson() {{
          put("navigations", List.of(new GenericJson() {{
            put("endNavigation", new GenericJson() {{
              put("action", "CLOSE_DIALOG");
            }});
          }}));
          put("notification", new GenericJson() {{
            put("text", "Failure, the contact name was missing!");
          }});
        }});
      }};
    }

    return new GenericJson() {{
      put("hostAppDataAction", new GenericJson() {{
        put("chatDataAction", new GenericJson() {{
          put("createMessageAction", new GenericJson() {{
            put("message", new Message()
              .setText( "✅ " + event.at("/commonEventObject/parameters/contactName").asText() +
                        " has been added to your contacts."));
          }});
        }});
      }});
    }};
  }
}

Apps 脚本

此示例通过返回 card JSON 来发送卡片消息。您还可以使用 Apps 脚本卡片服务。

apps-script/chat/contact-form-app/Code.gs
// Validate the parameters.
if (!event.commonEventObject.parameters["contactName"]) {
  return { action: {
    navigations: [{ endNavigation: { action: "CLOSE_DIALOG"}}],
    notification: { text: "Failure, the contact name was missing!" }
  }};
}

如需详细了解如何在对话框之间传递参数,请参阅将数据转移到另一张卡片。

可选:发送确认聊天消息

关闭对话框后,您还可以发送新的聊天消息或更新现有消息。

如需发送新消息,请返回一个 DataActions 对象,并将字段 CreateMessageAction 设置为新消息。以下示例通过发送新消息来关闭对话框:

Node.js

node/chat/contact-form-app/index.js
return { hostAppDataAction: { chatDataAction: { createMessageAction: { message: {
  text: "✅ " + event.commonEventObject.parameters["contactName"] + " has been added to your contacts."
}}}}};

Python

python/chat/contact-form-app/main.py
return { 'hostAppDataAction': { 'chatDataAction': { 'createMessageAction': { 'message': {
  'text': "✅ " + event.get('commonEventObject').get('parameters')["contactName"] + " has been added to your contacts."
}}}}}

Java

java/chat/contact-form-app/src/main/java/com/google/chat/contact/App.java
return new GenericJson() {{
  put("hostAppDataAction", new GenericJson() {{
    put("chatDataAction", new GenericJson() {{
      put("createMessageAction", new GenericJson() {{
        put("message", new Message()
          .setText( "✅ " + event.at("/commonEventObject/parameters/contactName").asText() +
                    " has been added to your contacts."));
      }});
    }});
  }});
}};

Apps 脚本

此示例通过返回 card JSON 来发送卡片消息。您还可以使用 Apps 脚本卡片服务。

apps-script/chat/contact-form-app/Code.gs
return { hostAppDataAction: { chatDataAction: { createMessageAction: { message: {
  text: "✅ " + event.commonEventObject.parameters["contactName"] + " has been added to your contacts."
}}}}};

如需在用户提交对话框后更新消息,请返回包含以下某项操作的 DataActions 对象:

问题排查

当 Google Chat 应用或卡片返回错误时,Chat 界面会显示一条消息,提示“出了点问题”。 或“无法处理您的请求”。有时,聊天界面不会显示任何错误消息,但聊天应用或卡片会产生意外结果;例如,卡片消息可能不会显示。

虽然聊天界面中可能不会显示错误消息,但当您为聊天应用启用错误日志记录功能后,系统会提供描述性错误消息和日志数据,帮助您修复错误。如需有关查看、调试和修正错误的帮助,请参阅排查和修正 Google Chat 错误。

非插件的聊天应用:打开交互式对话框

以下文档适用于非 Google Workspace 加载项的 Chat 应用。如需迁移非插件的 Chat 应用,请参阅将 Google Chat 应用转换为 Google Workspace 加载项。

触发对话框请求

以下代码示例展示了非插件的 Chat 应用如何通过卡片消息中的按钮触发对话框请求。如需打开该对话框,请将 button.interaction 字段设置为 OPEN_DIALOG:

Node.js

node/contact-form-app/index.js
buttonList: { buttons: [{
  text: "Add Contact",
  onClick: { action: {
    function: "openInitialDialog",
    interaction: "OPEN_DIALOG"
  }}
}]}

Python

python/contact-form-app/main.py
'buttonList': { 'buttons': [{
  'text': "Add Contact",
  'onClick': { 'action': {
    'function': "openInitialDialog",
    'interaction': "OPEN_DIALOG"
  }}
}]}

Java

java/contact-form-app/src/main/java/com/google/chat/contact/App.java
.setButtonList(new GoogleAppsCardV1ButtonList().setButtons(List.of(new GoogleAppsCardV1Button()
  .setText("Add Contact")
  .setOnClick(new GoogleAppsCardV1OnClick().setAction(new GoogleAppsCardV1Action()
    .setFunction("openInitialDialog")
    .setInteraction("OPEN_DIALOG"))))))));

Apps 脚本

此示例通过返回 card JSON 来发送卡片消息。您还可以使用 Apps 脚本卡片服务。

apps-script/contact-form-app/main.gs
buttonList: { buttons: [{
  text: "Add Contact",
  onClick: { action: {
    function: "openInitialDialog",
    interaction: "OPEN_DIALOG"
  }}
}]}

打开初始对话框

当用户触发对话框请求时,非插件的 Chat 应用会收到交互事件,该事件在 Chat API 中表示为 event 类型。如果互动触发了对话框请求,则该事件的 dialogEventType 字段会设置为 REQUEST_DIALOG。

如需打开对话框,非插件的 Chat 应用可以通过返回包含 type: "DIALOG" 和 Message 对象的 actionResponse 对象来响应请求。如需指定对话框的内容,请添加以下对象:

  • 一个 actionResponse 对象,其 type 设置为 DIALOG。
  • dialogAction 对象。body 字段包含要在卡片中显示的用户界面 (UI) 元素,包括一个或多个 sections widget。 如需收集用户的信息,您可以指定表单输入 widget 和按钮 widget。

以下代码示例展示了非插件的 Chat 应用如何返回用于打开对话框的响应:

Node.js

node/contact-form-app/index.js
/**
 * Opens the initial step of the dialog that lets users add contact details.
 *
 * @return {Object} a message with an action response to open a dialog.
 */
function openInitialDialog() {
  return { actionResponse: {
    type: "DIALOG",
    dialogAction: { dialog: { body: { sections: [{
      header: "Add new contact",
      widgets: CONTACT_FORM_WIDGETS.concat([{
        buttonList: { buttons: [{
          text: "Review and submit",
          onClick: { action: { function: "openConfirmation" }}
        }]}
      }])
    }]}}}
  }};
}

Python

python/contact-form-app/main.py
def open_initial_dialog() -> dict:
  """Opens the initial step of the dialog that lets users add contact details."""
  return { 'actionResponse': {
    'type': "DIALOG",
    'dialogAction': { 'dialog': { 'body': { 'sections': [{
      'header': "Add new contact",
      'widgets': CONTACT_FORM_WIDGETS + [{
        'buttonList': { 'buttons': [{
          'text': "Review and submit",
          'onClick': { 'action': { 'function': "openConfirmation" }}
        }]}
      }]
    }]}}}
  }}

Java

java/contact-form-app/src/main/java/com/google/chat/contact/App.java
// Opens the initial step of the dialog that lets users add contact details.
Message openInitialDialog() {
  return new Message().setActionResponse(new ActionResponse()
    .setType("DIALOG")
    .setDialogAction(new DialogAction().setDialog(new Dialog().setBody(new GoogleAppsCardV1Card()
      .setSections(List.of(new GoogleAppsCardV1Section()
        .setHeader("Add new contact")
        .setWidgets(Stream.concat(
          CONTACT_FORM_WIDGETS.stream(),
          List.of(new GoogleAppsCardV1Widget()
            .setButtonList(new GoogleAppsCardV1ButtonList().setButtons(List.of(new GoogleAppsCardV1Button()
            .setText("Review and submit")
            .setOnClick(new GoogleAppsCardV1OnClick().setAction(new GoogleAppsCardV1Action()
              .setFunction("openConfirmation"))))))).stream()).collect(Collectors.toList()))))))));
}

Apps 脚本

此示例通过返回 card JSON 来发送卡片消息。您还可以使用 Apps 脚本卡片服务。

apps-script/contact-form-app/main.gs
/**
 * Opens the initial step of the dialog that lets users add contact details.
 *
 * @return {Object} a message with an action response to open a dialog.
 */
function openInitialDialog() {
  return { actionResponse: {
    type: "DIALOG",
    dialogAction: { dialog: { body: { sections: [{
      header: "Add new contact",
      widgets: CONTACT_FORM_WIDGETS.concat([{
        buttonList: { buttons: [{
          text: "Review and submit",
          onClick: { action: { function: "openConfirmation" }}
        }]}
      }])
    }]}}}
  }};
}

处理对话框提交

当用户点击提交对话框的按钮时,非插件聊天应用会收到 CARD_CLICKED 互动事件,其中 dialogEventType 为 SUBMIT_DIALOG。

可选:返回另一个对话框

若要处理用户在非插件 Chat 应用中输入的数据,Chat 应用会使用 event.common.formInputs 对象。

在此示例中,非插件的 Chat 应用会打开一个初始对话框,该对话框会引导用户进入第二个对话框以进行确认,然后再提交:

Node.js

node/contact-form-app/index.js
/**
 * Responds to CARD_CLICKED interaction events in Google Chat.
 *
 * @param {Object} event the CARD_CLICKED interaction event from Google Chat.
 * @return {Object} message responses specific to the dialog handling.
 */
function onCardClick(event) {
  // Initial dialog form page
  if (event.common.invokedFunction === "openInitialDialog") {
    return openInitialDialog();
  // Confirmation dialog form page
  } else if (event.common.invokedFunction === "openConfirmation") {
    return openConfirmation(event);
  // Submission dialog form page
  } else if (event.common.invokedFunction === "submitForm") {
    return submitForm(event);
  }
}

/**
 * Opens the initial step of the dialog that lets users add contact details.
 *
 * @return {Object} a message with an action response to open a dialog.
 */
function openInitialDialog() {
  return { actionResponse: {
    type: "DIALOG",
    dialogAction: { dialog: { body: { sections: [{
      header: "Add new contact",
      widgets: CONTACT_FORM_WIDGETS.concat([{
        buttonList: { buttons: [{
          text: "Review and submit",
          onClick: { action: { function: "openConfirmation" }}
        }]}
      }])
    }]}}}
  }};
}

/**
 * Returns the second step as a dialog or card message that lets users confirm details.
 *
 * @param {Object} event the interactive event with form inputs.
 * @return {Object} returns a dialog or private card message.
 */
function openConfirmation(event) {
  const name = fetchFormValue(event, "contactName") ?? "";
  const birthdate = fetchFormValue(event, "contactBirthdate") ?? "";
  const type = fetchFormValue(event, "contactType") ?? "";
  const cardConfirmation = {
    header: "Your contact",
    widgets: [{
      textParagraph: { text: "Confirm contact information and submit:" }}, {
      textParagraph: { text: "<b>Name:</b> " + name }}, {
      textParagraph: {
        text: "<b>Birthday:</b> " + convertMillisToDateString(birthdate)
      }}, {
      textParagraph: { text: "<b>Type:</b> " + type }}, {
      buttonList: { buttons: [{
        text: "Submit",
        onClick: { action: {
          function: "submitForm",
          parameters: [{
            key: "contactName", value: name }, {
            key: "contactBirthdate", value: birthdate }, {
            key: "contactType", value: type
          }]
        }}
      }]}
    }]
  };

  // Returns a dialog with contact information that the user input.
  if (event.isDialogEvent) {
    return { action_response: {
      type: "DIALOG",
      dialogAction: { dialog: { body: { sections: [ cardConfirmation ]}}}
    }};
  }

  // Updates existing card message with contact information that the user input.
  return {
    actionResponse: { type: "UPDATE_MESSAGE" },
    privateMessageViewer: event.user,
    cardsV2: [{
      card: { sections: [cardConfirmation]}
    }]
  }
}

Python

python/contact-form-app/main.py
def on_card_click(event: dict) -> dict:
  """Responds to CARD_CLICKED interaction events in Google Chat."""
  # Initial dialog form page
  if "openInitialDialog" == event.get('common').get('invokedFunction'):
    return open_initial_dialog()
  # Confirmation dialog form page
  elif "openConfirmation" == event.get('common').get('invokedFunction'):
    return open_confirmation(event)
  # Submission dialog form page
  elif "submitForm" == event.get('common').get('invokedFunction'):
    return submit_form(event)


def open_initial_dialog() -> dict:
  """Opens the initial step of the dialog that lets users add contact details."""
  return { 'actionResponse': {
    'type': "DIALOG",
    'dialogAction': { 'dialog': { 'body': { 'sections': [{
      'header': "Add new contact",
      'widgets': CONTACT_FORM_WIDGETS + [{
        'buttonList': { 'buttons': [{
          'text': "Review and submit",
          'onClick': { 'action': { 'function': "openConfirmation" }}
        }]}
      }]
    }]}}}
  }}


def open_confirmation(event: dict) -> dict:
  """Returns the second step as a dialog or card message that lets users confirm details."""
  name = fetch_form_value(event, "contactName") or ""
  birthdate = fetch_form_value(event, "contactBirthdate") or ""
  type = fetch_form_value(event, "contactType") or ""
  card_confirmation = {
    'header': "Your contact",
    'widgets': [{
      'textParagraph': { 'text': "Confirm contact information and submit:" }}, {
      'textParagraph': { 'text': "<b>Name:</b> " + name }}, {
      'textParagraph': {
        'text': "<b>Birthday:</b> " + convert_millis_to_date_string(birthdate)
      }}, {
      'textParagraph': { 'text': "<b>Type:</b> " + type }}, {
      'buttonList': { 'buttons': [{
        'text': "Submit",
        'onClick': { 'action': {
          'function': "submitForm",
          'parameters': [{
            'key': "contactName", 'value': name }, {
            'key': "contactBirthdate", 'value': birthdate }, {
            'key': "contactType", 'value': type
          }]
        }}
      }]}
    }]
  }

  # Returns a dialog with contact information that the user input.
  if event.get('isDialogEvent'): 
    return { 'action_response': {
      'type': "DIALOG",
      'dialogAction': { 'dialog': { 'body': { 'sections': [card_confirmation] }}}
    }}

  # Updates existing card message with contact information that the user input.
  return {
    'actionResponse': { 'type': "UPDATE_MESSAGE" },
    'privateMessageViewer': event.get('user'),
    'cardsV2': [{
      'card': { 'sections': [card_confirmation] }
    }]
  }

Java

java/contact-form-app/src/main/java/com/google/chat/contact/App.java
// Responds to CARD_CLICKED interaction events in Google Chat.
Message onCardClick(JsonNode event) {
  String invokedFunction = event.at("/common/invokedFunction").asText();
  // Initial dialog form page
  if ("openInitialDialog".equals(invokedFunction)) {
    return openInitialDialog();
  // Confirmation dialog form page
  } else if ("openConfirmation".equals(invokedFunction)) {
    return openConfirmation(event);
  // Submission dialog form page
  } else if ("submitForm".equals(invokedFunction)) {
    return submitForm(event);
  }
  return null; 
}

// Opens the initial step of the dialog that lets users add contact details.
Message openInitialDialog() {
  return new Message().setActionResponse(new ActionResponse()
    .setType("DIALOG")
    .setDialogAction(new DialogAction().setDialog(new Dialog().setBody(new GoogleAppsCardV1Card()
      .setSections(List.of(new GoogleAppsCardV1Section()
        .setHeader("Add new contact")
        .setWidgets(Stream.concat(
          CONTACT_FORM_WIDGETS.stream(),
          List.of(new GoogleAppsCardV1Widget()
            .setButtonList(new GoogleAppsCardV1ButtonList().setButtons(List.of(new GoogleAppsCardV1Button()
            .setText("Review and submit")
            .setOnClick(new GoogleAppsCardV1OnClick().setAction(new GoogleAppsCardV1Action()
              .setFunction("openConfirmation"))))))).stream()).collect(Collectors.toList()))))))));
}

// Returns the second step as a dialog or card message that lets users confirm details.
Message openConfirmation(JsonNode event) {
  String name = fetchFormValue(event, "contactName") != null ?
    fetchFormValue(event, "contactName") : "";
  String birthdate = fetchFormValue(event, "contactBirthdate") != null ?
    fetchFormValue(event, "contactBirthdate") : "";
  String type = fetchFormValue(event, "contactType") != null ?
    fetchFormValue(event, "contactType") : "";
  GoogleAppsCardV1Section cardConfirmationSection = new GoogleAppsCardV1Section()
    .setHeader("Your contact")
    .setWidgets(List.of(
      new GoogleAppsCardV1Widget().setTextParagraph(new GoogleAppsCardV1TextParagraph()
        .setText("Confirm contact information and submit:")),
      new GoogleAppsCardV1Widget().setTextParagraph(new GoogleAppsCardV1TextParagraph()
        .setText("<b>Name:</b> " + name)),
      new GoogleAppsCardV1Widget().setTextParagraph(new GoogleAppsCardV1TextParagraph()
        .setText("<b>Birthday:</b> " + convertMillisToDateString(birthdate))),
      new GoogleAppsCardV1Widget().setTextParagraph(new GoogleAppsCardV1TextParagraph()
        .setText("<b>Type:</b> " + type)),
      new GoogleAppsCardV1Widget().setButtonList(new GoogleAppsCardV1ButtonList().setButtons(List.of(new GoogleAppsCardV1Button()
        .setText("Submit")
        .setOnClick(new GoogleAppsCardV1OnClick().setAction(new GoogleAppsCardV1Action()
          .setFunction("submitForm")
          .setParameters(List.of(
            new GoogleAppsCardV1ActionParameter().setKey("contactName").setValue(name),
            new GoogleAppsCardV1ActionParameter().setKey("contactBirthdate").setValue(birthdate),
            new GoogleAppsCardV1ActionParameter().setKey("contactType").setValue(type))))))))));

  // Returns a dialog with contact information that the user input.
  if (event.at("/isDialogEvent") != null && event.at("/isDialogEvent").asBoolean()) {
    return new Message().setActionResponse(new ActionResponse()
      .setType("DIALOG")
      .setDialogAction(new DialogAction().setDialog(new Dialog().setBody(new GoogleAppsCardV1Card()
        .setSections(List.of(cardConfirmationSection))))));
  }

  // Updates existing card message with contact information that the user input.
  return new Message()
    .setActionResponse(new ActionResponse()
      .setType("UPDATE_MESSAGE"))
    .setPrivateMessageViewer(new User().setName(event.at("/user/name").asText()))
    .setCardsV2(List.of(new CardWithId().setCard(new GoogleAppsCardV1Card()
      .setSections(List.of(cardConfirmationSection)))));
}

Apps 脚本

此示例通过返回 card JSON 来发送卡片消息。您还可以使用 Apps 脚本卡片服务。

apps-script/contact-form-app/main.gs
/**
 * Responds to CARD_CLICKED interaction events in Google Chat.
 *
 * @param {Object} event the CARD_CLICKED interaction event from Google Chat.
 * @return {Object} message responses specific to the dialog handling.
 */
function onCardClick(event) {
  // Initial dialog form page
  if (event.common.invokedFunction === "openInitialDialog") {
    return openInitialDialog();
  // Confirmation dialog form page
  } else if (event.common.invokedFunction === "openConfirmation") {
    return openConfirmation(event);
  // Submission dialog form page
  } else if (event.common.invokedFunction === "submitForm") {
    return submitForm(event);
  }
}

/**
 * Opens the initial step of the dialog that lets users add contact details.
 *
 * @return {Object} a message with an action response to open a dialog.
 */
function openInitialDialog() {
  return { actionResponse: {
    type: "DIALOG",
    dialogAction: { dialog: { body: { sections: [{
      header: "Add new contact",
      widgets: CONTACT_FORM_WIDGETS.concat([{
        buttonList: { buttons: [{
          text: "Review and submit",
          onClick: { action: { function: "openConfirmation" }}
        }]}
      }])
    }]}}}
  }};
}

/**
 * Returns the second step as a dialog or card message that lets users confirm details.
 *
 * @param {Object} event the interactive event with form inputs.
 * @return {Object} returns a dialog or private card message.
 */
function openConfirmation(event) {
  const name = fetchFormValue(event, "contactName") ?? "";
  const birthdate = fetchFormValue(event, "contactBirthdate") ?? "";
  const type = fetchFormValue(event, "contactType") ?? "";
  const cardConfirmation = {
    header: "Your contact",
    widgets: [{
      textParagraph: { text: "Confirm contact information and submit:" }}, {
      textParagraph: { text: "<b>Name:</b> " + name }}, {
      textParagraph: {
        text: "<b>Birthday:</b> " + convertMillisToDateString(birthdate)
      }}, {
      textParagraph: { text: "<b>Type:</b> " + type }}, {
      buttonList: { buttons: [{
        text: "Submit",
        onClick: { action: {
          function: "submitForm",
          parameters: [{
            key: "contactName", value: name }, {
            key: "contactBirthdate", value: birthdate }, {
            key: "contactType", value: type
          }]
        }}
      }]}
    }]
  };

  // Returns a dialog with contact information that the user input.
  if (event.isDialogEvent) {
    return { action_response: {
      type: "DIALOG",
      dialogAction: { dialog: { body: { sections: [ cardConfirmation ]}}}
    }};
  }

  // Updates existing card message with contact information that the user input.
  return {
    actionResponse: { type: "UPDATE_MESSAGE" },
    privateMessageViewer: event.user,
    cardsV2: [{
      card: { sections: [cardConfirmation]}
    }]
  }
}

关闭对话框

当用户点击对话框中的按钮时,非插件的 Chat 应用会执行其关联的操作,并提供包含以下信息的事件对象:

非插件的 Chat 应用应返回一个 ActionResponse 对象,其 type 设置为 DIALOG,并且 dialogAction 已填充。如果操作未失败,则 dialogAction.actionStatus 应为 OK,如以下示例所示:

Node.js

node/contact-form-app/index.js
// The Chat app indicates that it received form data from the dialog or card.
// Sends private text message that confirms submission.
const confirmationMessage = "✅ " + contactName + " has been added to your contacts.";
if (event.dialogEventType === "SUBMIT_DIALOG") {
  return {
    actionResponse: {
      type: "DIALOG",
      dialogAction: { actionStatus: {
        statusCode: "OK",
        userFacingMessage: "Success " + contactName
      }}
    }
  };
}

Python

python/contact-form-app/main.py
# The Chat app indicates that it received form data from the dialog or card.
# Sends private text message that confirms submission.
confirmation_message = "✅ " + contact_name + " has been added to your contacts.";
if "SUBMIT_DIALOG" == event.get('dialogEventType'):
  return {
    'actionResponse': {
      'type': "DIALOG",
      'dialogAction': { 'actionStatus': {
        'statusCode': "OK",
        'userFacingMessage': "Success " + contact_name
      }}
    }
  }

Java

java/contact-form-app/src/main/java/com/google/chat/contact/App.java
// The Chat app indicates that it received form data from the dialog or card.
// Sends private text message that confirms submission.
String confirmationMessage = "✅ " + contactName + " has been added to your contacts.";
if (event.at("/dialogEventType") != null && "SUBMIT_DIALOG".equals(event.at("/dialogEventType").asText())) {
  return new Message().setActionResponse(new ActionResponse()
    .setType("DIALOG")
    .setDialogAction(new DialogAction().setActionStatus(new ActionStatus()
      .setStatusCode("OK")
      .setUserFacingMessage("Success " + contactName))));
}

Apps 脚本

此示例通过返回 card JSON 来发送卡片消息。您还可以使用 Apps 脚本卡片服务。

apps-script/contact-form-app/main.gs
// The Chat app indicates that it received form data from the dialog or card.
// Sends private text message that confirms submission.
const confirmationMessage = "✅ " + contactName + " has been added to your contacts.";
if (event.dialogEventType === "SUBMIT_DIALOG") {
  return {
    actionResponse: {
      type: "DIALOG",
      dialogAction: { actionStatus: {
        statusCode: "OK",
        userFacingMessage: "Success " + contactName
      }}
    }
  };
}
可选:显示临时通知

非插件的聊天应用可以通过返回设置了 actionStatus 的 ActionResponse 来响应成功或错误通知。

以下示例检查参数是否有效,并在无效时关闭对话框并显示文本通知:

Node.js

node/contact-form-app/index.js
const contactName = event.common.parameters["contactName"];
// Checks to make sure the user entered a contact name.
// If no name value detected, returns an error message.
const errorMessage = "Don't forget to name your new contact!";
if (!contactName && event.dialogEventType === "SUBMIT_DIALOG") {
  return { actionResponse: {
    type: "DIALOG",
    dialogAction: { actionStatus: {
      statusCode: "INVALID_ARGUMENT",
      userFacingMessage: errorMessage
    }}
  }};
}

Python

python/contact-form-app/main.py
contact_name = event.get('common').get('parameters')["contactName"]
# Checks to make sure the user entered a contact name.
# If no name value detected, returns an error message.
error_message = "Don't forget to name your new contact!"
if contact_name == "" and "SUBMIT_DIALOG" == event.get('dialogEventType'):
  return { 'actionResponse': {
    'type': "DIALOG",
    'dialogAction': { 'actionStatus': {
      'statusCode': "INVALID_ARGUMENT",
      'userFacingMessage': error_message
    }}
  }}

Java

java/contact-form-app/src/main/java/com/google/chat/contact/App.java
String contactName = event.at("/common/parameters/contactName").asText();
// Checks to make sure the user entered a contact name.
// If no name value detected, returns an error message.
String errorMessage = "Don't forget to name your new contact!";
if (contactName.isEmpty() && event.at("/dialogEventType") != null && "SUBMIT_DIALOG".equals(event.at("/dialogEventType").asText())) {
  return new Message().setActionResponse(new ActionResponse()
    .setType("DIALOG")
    .setDialogAction(new DialogAction().setActionStatus(new ActionStatus()
      .setStatusCode("INVALID_ARGUMENT")
      .setUserFacingMessage(errorMessage))));
}

Apps 脚本

此示例通过返回 card JSON 来发送卡片消息。您还可以使用 Apps 脚本卡片服务。

apps-script/contact-form-app/main.gs
const contactName = event.common.parameters["contactName"];
// Checks to make sure the user entered a contact name.
// If no name value detected, returns an error message.
const errorMessage = "Don't forget to name your new contact!";
if (!contactName && event.dialogEventType === "SUBMIT_DIALOG") {
  return { actionResponse: {
    type: "DIALOG",
    dialogAction: { actionStatus: {
      statusCode: "INVALID_ARGUMENT",
      userFacingMessage: errorMessage
    }}
  }};
}
可选:发送确认聊天消息

如需在关闭非插件的 Chat 应用中的对话框时发送新消息,请返回包含 type: "NEW_MESSAGE" 的 ActionResponse 对象。以下示例通过确认短信关闭对话框:

Node.js

node/contact-form-app/index.js
return {
  actionResponse: { type: "NEW_MESSAGE" },
  privateMessageViewer: event.user,
  text: confirmationMessage
};

Python

python/contact-form-app/main.py
return {
  'actionResponse': { 'type': "NEW_MESSAGE" },
  'privateMessageViewer': event.get('user'),
  'text': confirmation_message
}

Java

java/contact-form-app/src/main/java/com/google/chat/contact/App.java
return new Message()
  .setActionResponse(new ActionResponse().setType("NEW_MESSAGE"))
  .setPrivateMessageViewer(new User().setName(event.at("/user/name").asText()))
  .setText(confirmationMessage);

Apps 脚本

此示例通过返回 card JSON 来发送卡片消息。您还可以使用 Apps 脚本卡片服务。

apps-script/contact-form-app/main.gs
return {
  actionResponse: { type: "NEW_MESSAGE" },
  privateMessageViewer: event.user,
  text: confirmationMessage
};

如需更新消息,请返回一个包含更新后消息的 actionResponse 对象,并将 type 设置为以下值之一: