在 Google Chat 中回應斜線指令

本頁面說明如何設定 Google Chat 應用程式,以便回應斜線指令。

在 Google Chat 中,使用者會看到附加元件,就像是 Google Chat 應用程式一樣。詳情請參閱「擴充 Google Chat 總覽」。

斜線指令是使用者叫用及與 Chat 應用程式互動的常見方式。斜線指令也有助於使用者探索及使用 Chat 應用程式的重點功能。如要決定是否應設定斜線指令,以及瞭解如何設計使用者互動,請參閱 Chat API 說明文件中的「定義所有使用者歷程」。

使用者如何使用斜線指令

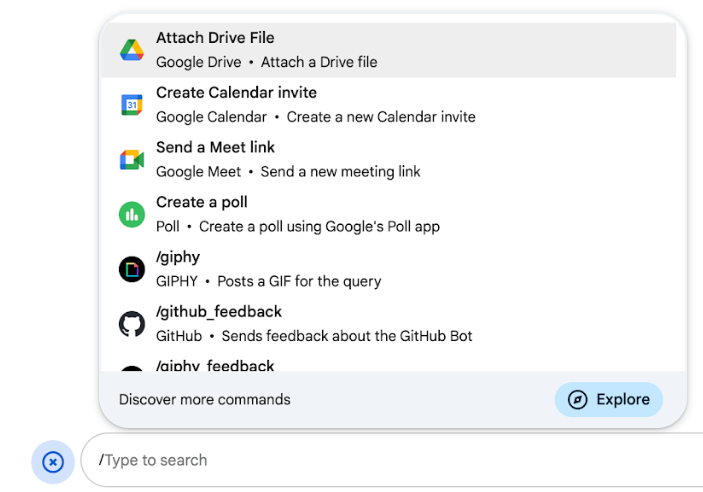
如要使用斜線指令,使用者請輸入斜線 (/),然後輸入簡短文字指令,例如 /about,即可取得 Chat 應用程式相關資訊。使用者只要在 Google Chat 中輸入斜線,系統就會顯示一個視窗,列出 Chat 應用程式可用的指令:

斜線指令視窗
圖 1:使用者在 Google Chat 中輸入斜線時顯示的視窗。

當使用者傳送含有斜線指令的訊息時,只有使用者和 Chat 應用程式可看到該訊息。如果您已將 Chat 應用程式新增至有多人參與的聊天室,建議您私下回應斜線指令,以便保留使用者與 Chat 應用程式之間的私人互動。

舉例來說,如果想瞭解在聊天室中發現的 Chat 應用程式,使用者可以使用 /about/help 等指令。為避免通知聊天室中的其他人,Chat 應用程式可私下回覆,提供如何使用 Chat 應用程式和取得支援的相關資訊。

必要條件

Node.js

可擴充 Google Chat 功能的 Google Workspace 外掛程式。如要建構一個,請完成HTTP 快速入門

Apps Script

可擴充 Google Chat 功能的 Google Workspace 外掛程式。如要建構一個應用程式,請完成 Apps Script 快速入門

設定斜線指令

本節說明如何完成下列步驟,設定斜線指令:

  1. 為斜線指令命名
  2. 在 Google Chat API 中設定斜線指令

為斜線指令命名

斜線指令的名稱是使用者在 Chat 訊息中輸入的內容,用於叫用 Chat 應用程式。名稱下方也會顯示簡短說明,進一步提示使用者如何使用指令:
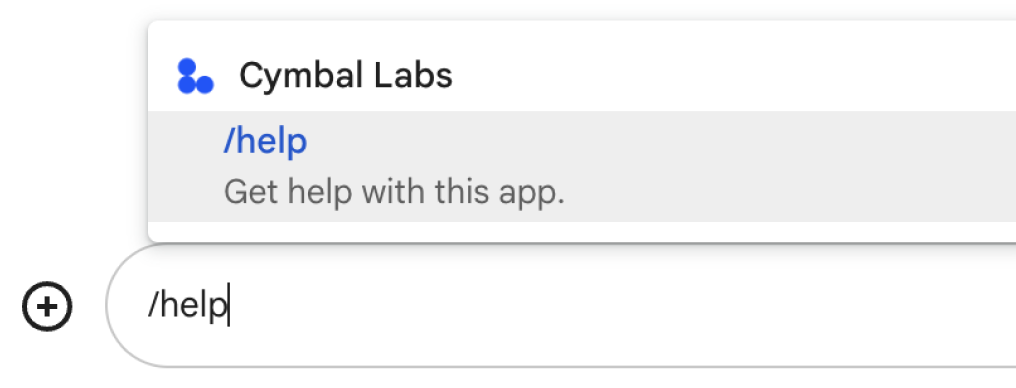
斜線指令名稱和說明
圖 2:斜線指令的名稱和說明。

選擇斜線指令的名稱和說明時,請考慮下列建議:

  • 如要為斜線指令命名:

    • 使用簡短、具描述性且可採取行動的字詞或詞組,讓使用者清楚簡單地瞭解指令。例如,使用 /remindMe,而不使用 /createAReminder
    • 如果指令包含多個字詞,請使用小寫字母輸入第一個字詞,然後將其他字詞的首字母改為大寫,方便使用者閱讀指令。例如,使用 /updateContact,而不使用 /updatecontact
    • 請考慮要為指令使用不重複或常見的名稱。如果指令描述的是一般互動或功能,您可以使用使用者熟悉且預期的常用名稱,例如 /settings/feedback。否則,請盡量使用不重複的指令名稱,因為如果您的指令名稱與其他 Chat 應用程式相同,使用者就必須篩選類似的指令,才能找到並使用您的指令。
  • 如要說明斜線指令:

    • 請簡短明確地說明,讓使用者知道執行指令時會發生什麼事。
    • 請告知使用者指令是否有任何格式規定。舉例來說,如果您建立需要引數文字的 /remindMe 指令,請將說明設為 Remind me to do [something] at [time] 之類的內容。
    • 請讓使用者知道 Chat 應用程式會回覆聊天室中的所有人,還是只回覆叫用指令的使用者。例如,如果是斜線指令 /about,您可以將其描述為 Learn about this app (Only visible to you)

在 Google Chat API 中設定斜線指令

如要建立斜線指令,您必須在 Chat 應用程式的 Google Chat API 設定中指定指令相關資訊。

如要在 Google Chat API 中設定斜線指令,請完成下列步驟:

  1. 在 Google Cloud 控制台中,依序點選「Menu」圖示 >「API 和服務」 >「已啟用的 API 和服務」 >「Google Chat API」

    前往 Google Chat API 頁面

  2. 按一下「設定」

  3. 在「進階設定」下方,前往「觸發條件」,確認「MESSAGE」欄位包含觸發條件,例如 HTTP 端點或 Apps Script 函式。您必須在下一個章節中使用這個觸發條件,才能回應斜線指令。

  4. 在「斜線指令」下方,按一下「新增斜線指令」

  5. 輸入指令的名稱、指令 ID 和說明:

    1. 名稱:指令的顯示名稱,以及使用者要輸入的喚出應用程式名稱。開頭必須為斜線,且只能包含文字,長度上限為 50 個字元。
    2. 說明:說明如何使用及設定指令格式的文字。說明長度上限為 50 個半形字元。
    3. 指令 ID:Chat 應用程式用來辨識斜線指令並傳回回應的 1 到 1000 之間的數字。
  6. 選用:如要讓 Chat 應用程式透過對話方塊回應指令,請選取「Open a dialog」核取方塊。

  7. 按一下 [儲存]

斜線指令現已為 Chat 應用程式設定完成。

回應斜線指令

使用者建立 Chat 訊息時,Chat 應用程式會收到包含訊息相關資訊的事件物件。事件物件包含酬載,其中包含訊息中所用指令的詳細資料 (包括指令 ID),方便您傳回適當的回應。

如要回應斜線指令,您必須實作 Message 觸發事件,讓 Chat 應用程式能夠處理任何包含斜線指令中繼資料的事件物件

Cymbal Labs Chat 應用程式的私人訊息。訊息指出 Chat 應用程式是由 Cymbal Labs 建立,並分享說明文件連結和支援團隊聯絡連結。
Chat 應用程式會私下回應斜線指令 /help,說明如何取得支援。

以下程式碼示範 Chat 應用程式如何使用文字訊息回覆 /about 斜線指令。為了回應斜線指令,Chat 應用程式會處理來自 Message 觸發事件的事件物件。當事件物件的酬載包含斜線指令 ID 時,Chat 應用程式會傳回使用 createMessageAction 物件的動作 DataActions

Node.js

// The ID of the slash command "/about".
// It's not enabled by default, set to the actual ID to enable it. You must
// use the same ID as set in the Google Chat API configuration.
const ABOUT_COMMAND_ID = 0;

/**
 * Google Cloud Function that responds to messages sent from a
 * Google Chat space.
 *
 * @param {Object} req Request sent from Google Chat space
 * @param {Object} res Response to send back
 */
exports.avatarApp = function avatarApp(req, res) {
    if (req.method === 'GET' || !req.body.chat) {
        return res.send('Hello! This function is meant to be used ' +
            'in a Google Chat Space.');
    }

    // Stores the Google Chat event as a variable.
    const chatMessage = req.body.chat.messagePayload.message;

    if (chatMessage.slashCommand) {
        // Executes the slash command logic based on its ID.
        // Slash command IDs are set in the Google Chat API configuration.
        switch (chatMessage.slashCommand.commandId) {
            case ABOUT_COMMAND_ID:
                return res.send({ hostAppDataAction: { chatDataAction: { createMessageAction: { message: {
                    text: 'The Avatar app replies to Google Chat messages.'
                }}}}});
        }
    }

    // Replies with the sender's avatar in a card otherwise.
    const displayName = chatMessage.sender.displayName;
    const avatarUrl = chatMessage.sender.avatarUrl;
    res.send({ hostAppDataAction: { chatDataAction: { createMessageAction: { message: {
        text: 'Here\'s your avatar',
        cardsV2: [{
            cardId: 'avatarCard',
            card: {
                name: 'Avatar Card',
                header: {
                    title: `Hello ${displayName}!`,
                },
                sections: [{
                    widgets: [{
                        textParagraph: { text: 'Your avatar picture: ' }
                    }, {
                        image: { imageUrl: avatarUrl }
                    }]
                }]
            }
        }]
    }}}}});
};

Apps Script

// The ID of the slash command "/about".
// It's not enabled by default, set to the actual ID to enable it. You must
// use the same ID as set in the Google Chat API configuration.
const ABOUT_COMMAND_ID = 0;

/**
 * Responds to a MESSAGE event in Google Chat.
 *
 * @param {Object} event the event object from Google Chat
 */
function onMessage(event) {
    // Stores the Google Chat event as a variable.
    const chatMessage = event.chat.messagePayload.message;

    if (chatMessage.slashCommand) {
        // Executes the slash command logic based on its ID.
        // Slash command IDs are set in the Google Chat API configuration.
        switch (chatMessage.slashCommand.commandId) {
            case ABOUT_COMMAND_ID:
                return { hostAppDataAction: { chatDataAction: { createMessageAction: { message: {
                    text: 'The Avatar app replies to Google Chat messages.'
                }}}}};
        }
    }

    // Replies with the sender's avatar in a card otherwise.
    const displayName = chatMessage.sender.displayName;
    const avatarUrl = chatMessage.sender.avatarUrl;
    return { hostAppDataAction: { chatDataAction: { createMessageAction: { message: {
        text: 'Here\'s your avatar',
        cardsV2: [{
            cardId: 'avatarCard',
            card: {
                name: 'Avatar Card',
                header: {
                    title: `Hello ${displayName}!`,
                },
                sections: [{
                    widgets: [{
                        textParagraph: { text: 'Your avatar picture: ' }
                    }, {
                        image: { imageUrl: avatarUrl }
                    }]
                }]
            }
        }]
    }}}}};
}

如要使用這個程式碼範例,請將 ABOUT_COMMAND_ID 替換為您在在 Chat API 中設定斜線指令時指定的指令 ID。