Ein Kartenstil umfasst eine Reihe von visuellen Anpassungen an Kartenelementen und kann mit einer Karten-ID verknüpft werden. Im Anwendungscode wird dann zur Darstellung der benutzerdefinierten Karte auf diese ID verwiesen.
Ein Kartenstil lässt sich auch ohne Karten-ID erstellen. Bevor Sie ihn verwenden können, müssen Sie ihn jedoch mit einer Karten-ID verknüpfen. Um einen Kartenstil zu verwenden, sind folgende Schritte erforderlich:
Rufen Sie in der Google Cloud Console Kartenstile auf und wählen Sie bei Bedarf ein Projekt aus.
Klicken Sie unter Kartenstile auf Stil erstellen.
Wählen Sie im Dialogfeld auf dem Tab Google-Stile eine der folgenden Optionen aus:
Hell, um einen hellen Kartenstil zu erstellen, bei dem der Kartentyp „Roadmap“ ist.
scienceDunkel, um einen dunklen Kartenstil zu erstellen, bei dem der Kartentyp „Roadmap dunkel“ ist.
Optional: Wenn Sie die monochrome Variante auf Ihren Kartenstil anwenden möchten, wählen Sie Monochrom aus.
Wählen Sie Anpassen aus, um einen neuen Stil ohne Titel zu erstellen.
Wählen Sie Kartenelemente aus und ändern Sie ihren Stil, um den gewünschten Kartenstil zu erstellen.
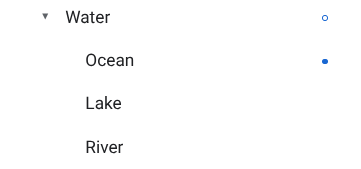
Neben Kartenelementen mit benutzerdefinierten Stilen wird ein ausgefüllter blauer Punkt angezeigt. Wenn Sie ein untergeordnetes Design anpassen, wird im übergeordneten Design ein blauer Kreis angezeigt. Weitere Informationen zur Hierarchie von Kartenstilen finden Sie unter Hierarchie und Übernahme von Kartenstilen.
Klicken Sie auf Speichern.
Geben Sie im Feld Kartenstil speichern und veröffentlichen einen Namen und optional eine Beschreibung für den Stil ein und klicken Sie auf Speichern.
Der Stil wird automatisch veröffentlicht und seine Hauptseite geöffnet.
Stil duplizieren
Rufen Sie Kartenstile auf und wählen Sie bei Bedarf ein Projekt aus.
Wählen Sie einen vorhandenen Stil aus.
Klicken Sie auf der Seite des Stils auf Duplizieren.
Geben Sie im Feld Kartenstil duplizieren einen neuen Namen und optional eine Beschreibung ein.
Klicken Sie auf Speichern.
Der Stil wird automatisch veröffentlicht und seine Hauptseite geöffnet. Verknüpfen Sie ihn mit einer Karten-ID, damit Sie ihn für Ihre Karten verwenden können. Weitere Informationen finden Sie unter Karten-ID mit einem Kartenstil verknüpfen.
Wenn Sie den Stil ändern möchten, klicken Sie auf Anpassen, nehmen Sie die gewünschten Änderungen vor und klicken Sie auf Speichern.
Stil veröffentlichen
Wenn Sie einen Kartenstil neu erstellen, wird diese erste Instanz des neuen Stils automatisch veröffentlicht. Danach können Sie Änderungen als Entwurf speichern und den Stil veröffentlichen, wenn Sie mit dem Ergebnis zufrieden sind.
Nehmen Sie die Änderungen an dem Kartenstil oder duplizierten Kartenstil vor. Weitere Informationen finden Sie unter Stil ändern.
Klicken Sie auf Speichern, um die Änderungen als Entwurf zu speichern.
Wenn Sie den Stil veröffentlichen möchten und Ihre Änderungen für alle Karten-IDs, für die dieser Kartenstil verwendet wird, übernommen werden sollen, klicken Sie auf Veröffentlichen.
Veröffentlichte Kartenstile im Vergleich zu Entwürfen
Veröffentlicht: Ein veröffentlichter Kartenstil ist live. Alle Karten, für die der Stil verwendet wird, nutzen seine veröffentlichte Version.
Entwurf: Entwurfsversionen eines Kartenstils sind noch in Arbeit und werden erst dann für Karten verwendet, wenn sie veröffentlicht wurden.
Stil ändern
Änderungen am Kartenstil können Sie direkt im Stileditor vornehmen. Es gibt je nach Ihren Anforderungen mehrere Möglichkeiten, einen Stil zu aktualisieren:
Änderungen sollen sofort nach Abschluss wirksam werden: Klicken Sie auf Anpassen und nehmen Sie die gewünschten Änderungen vor. Klicken Sie auf Speichern, um die Änderungen als Entwurf zu speichern, und dann auf Veröffentlichen, wenn Sie fertig sind.
Sie möchten Ihre Änderungen erst in einer Testumgebung testen: Anstatt Änderungen direkt im Kartenstil vorzunehmen, können Sie ihn erst duplizieren. Weitere Informationen finden Sie unter Stil duplizieren und Kartenstiländerungen testen.
Nachdem Sie einen Kartenstil erstellt haben, haben Sie folgende Möglichkeiten, ihn auf seiner Hauptseite zu ändern:
Bearbeiten: Klicken Sie auf Anpassen.
Duplizieren: Weitere Informationen finden Sie unter Stil duplizieren.
Umbenennen: Benennen Sie den Stil um.
Löschen: Löschen Sie den Kartenstil.
Stil mit einer Karten-ID verknüpfen
:
Verknüpfen Sie Ihren Stil mit einer Karten-ID, um ihn auf Ihrer Website und in Ihrer App anzuzeigen. Mit einer Karten-ID kann nur ein heller Stil (Typ „roadmap“) und ein science dunkler Stil (Typ „roadmap_dark“) verknüpft sein.
So ändern Sie den verknüpften Stil für eine Karten-ID in der Google Cloud Console:
Rufen Sie die Kartenverwaltung auf und wählen Sie eine Karten-ID aus.
Klicken Sie im Bereich „Kartenstile“ für einen hellen oder dunklen Kartenstil auf Stil ändern.
Im Bereich werden für helle Stile nur Stile mit dem Kartentyp „Roadmap“ und für dunkle Stile nur Stile mit dem Kartentyp „science-Roadmap“ angezeigt.
Wählen Sie im Bereich einen der Stile aus, die mit dieser Karten-ID verknüpft werden sollen.
Klicken Sie auf Fertig.
Klicken Sie auf Speichern, um alle Änderungen zu übernehmen.
Die Vorschaukarte funktioniert genauso wie jede andere Google Maps-Karte:
Geben Sie im Feld Adresse suchen eine Adresse oder einen Ort ein.
Klicken Sie auf den Kompass, um die Karte auf Ihren Standort zu zentrieren. Unter Umständen müssen Sie die Berechtigung zur Standortermittlung gewähren.
Die Karte lässt sich durch Ziehen verschieben.
Mit Plus (+) und Minus (-) können Sie heran- bzw. herauszoomen.
Kartenelemente suchen
Sie können den Filter oder den Karteninspektor verwenden, um nach einem Kartenelement zu suchen, das Sie gestalten möchten.
Alternativ lassen sich die Kategorien für Kartenelemente zu diesem Zweck auch maximieren und minimieren. Sehen Sie sich die Liste der Kartenelemente unter Mögliche Stile auf der Karte an.
Kartenelemente filtern
Wenn Sie Kartenelemente mithilfe des Filters suchen möchten, geben Sie unter Kartenelemente einen Begriff in das Feld Filter ein.
Falls Sie ein Kartenelement nicht finden können:
Geben Sie keine Pluralformen in die Suche ein. In allen Kategorien wird nur der Singular verwendet.
Verwenden Sie eine allgemeinere Bezeichnung für das Element. Suchen Sie z. B. statt nach „Pizzeria“ oder „Imbiss“ nach „Restaurant“.
Verwenden Sie eine weiter gefasste Kategorie als Startpunkt und suchen Sie darin nach dem Kartenelement, das dem gesuchten am ähnlichsten ist. Geben Sie also beispielsweise „Unterhaltung“ statt „Theater“ ein.
Kartenelemente prüfen
So suchen Sie mit dem Karteninspektor nach Kartenelementen:
Klicken Sie mit der linken Maustaste auf eine beliebige Stelle auf der Karte, um den Karteninspektor an der Stelle zu öffnen, an der Sie geklickt haben.
Wählen Sie im Karteninspektor ein Kartenelement aus, um es im Bereich Kartenelemente zu öffnen.
[[["Leicht verständlich","easyToUnderstand","thumb-up"],["Mein Problem wurde gelöst","solvedMyProblem","thumb-up"],["Sonstiges","otherUp","thumb-up"]],[["Benötigte Informationen nicht gefunden","missingTheInformationINeed","thumb-down"],["Zu umständlich/zu viele Schritte","tooComplicatedTooManySteps","thumb-down"],["Nicht mehr aktuell","outOfDate","thumb-down"],["Problem mit der Übersetzung","translationIssue","thumb-down"],["Problem mit Beispielen/Code","samplesCodeIssue","thumb-down"],["Sonstiges","otherDown","thumb-down"]],["Zuletzt aktualisiert: 2025-09-05 (UTC)."],[[["\u003cp\u003eA Map Style is a customizable set of visual elements applied to a map using a Map ID, which is referenced in your application code.\u003c/p\u003e\n"],["\u003cp\u003eMap Styles can be created by starting fresh, duplicating existing styles or versions, or importing JSON styling code.\u003c/p\u003e\n"],["\u003cp\u003eStyles exist as either published, live versions or drafts that can be edited and later published for use in your maps.\u003c/p\u003e\n"],["\u003cp\u003eYou can manage Map Styles by renaming, duplicating, deleting, associating with Map IDs, and restoring previous versions.\u003c/p\u003e\n"],["\u003cp\u003eTo utilize a Cloud-based Map Style in your application, associate the style with a Map ID and then add the Map ID to your app code.\u003c/p\u003e\n"]]],[],null,["Select platform: [Android](/maps/documentation/android-sdk/cloud-customization/map-styles \"View this page for the Android platform docs.\") [iOS](/maps/documentation/ios-sdk/cloud-customization/map-styles \"View this page for the iOS platform docs.\") [JavaScript](/maps/documentation/javascript/cloud-customization/map-styles \"View this page for the JavaScript platform docs.\") [Web Service](/maps/documentation/maps-static/cloud-customization/map-styles \"View this page for the Web Service platform docs.\")\n\n\u003cbr /\u003e\n\nA map style is a set of visual customizations to map features\nthat you associate with a map ID. You then reference the\nmap ID in your application code to display the customized map.\n\nYou can create a map style before you have a map ID; however, to use\nthe style, you must associate the style with a map ID. To use a map style,\nyou must take all of these steps:\n\n1. **Create and publish a map Style** . For details, see\n [Create a style](#create-style) and [Publish a style](#publish-style).\n\n2. **Create a map ID** . For details, see\n [Create a map ID](../map-ids/get-map-id).\n\n3. **Associate the map style with a map ID** . For details, see\n [Associate a map ID to a map style](#associate-style-with-map-id).\n\n4. **Add the map ID to your app** to display your style. For details, see\n [Add the map ID to your map](../map-ids/get-map-id#add-a-map-id-to-your-app).\n\n| **Tip**: Once the map ID is in your application code, you can change the map style without any changes in your application code, and your end users don't have to upgrade to see updated map styles. Instead, you edit the map style associated with the map ID, and changes show up in your application maps.\n\nThis document describes how to create, edit, and publish map styles and how to\nassociate them to a map ID.\n\nCreate a map style\n\nCreate a map style using one of these methods:\n\n- [Create](#create-new-style) a new style using the default Google map style.\n\n- [Duplicate](#duplicate-style) and modify an existing standard or customized style.\n\n- [Import a JSON map style](/maps/documentation/maps-static/cloud-customization/json#json-import) to use as a customized style.\n\nCreate a new style [Experimental](/maps/launch-stages#experimental) feature.\n\n1. In the Google Cloud console,\n go to [**Map Styles**](https://console.cloud.google.com/google/maps-apis/studio/styles), and select a project, if needed.\n\n2. In **Map styles** , click **Create style**.\n\n3. In the dialog, under the **Google styles** tab, select one of the following:\n\n - **Light** to create a light map style, where the map type is roadmap.\n - science **Dark** to create a dark map style, where the map type is roadmap dark.\n4. (Optional) To apply the monochrome variation to your map style, select **Monochrome**.\n\n5. Select **Customize** to create a new untitled style.\n\n6. Select map features and change their style to create the map style you want.\n\n Map features with custom styles have a solid blue dot next to them. If you\n customize a child style, the parent style displays a blue circle. For more\n information on map style hierarchy, see\n [Understand map style inheritance and hierarchy](/maps/documentation/maps-static/cloud-customization/map-hier).\n | **Note:** Not all styles appear at all zoom levels. For more information, see [Style zoom levels](/maps/documentation/maps-static/cloud-customization/zoom-levels).\n7. Click **Save**.\n\n8. In the **Save and publish map style** box, enter a name for your style and\n optionally a description, and click **Save**.\n\nThe style is automatically published, and you see your new style's\nmain page.\n| **Caution:** Making style changes but not explicitly saving them creates **Unsaved Changes** in your map style's version history. These versions are lost when you close the browser tab or when your Cloud console session ends.\n\nDuplicate a style\n\n1. Go to [**Map Styles**](https://console.cloud.google.com/google/maps-apis/studio/styles), and select a project, if needed.\n\n2. Select one of your existing styles.\n\n3. On the style page, click **Duplicate**.\n\n4. In the **Duplicate Map Style** box, enter a new map name and optionally\n a description.\n\n5. Click **Save**.\n\n The style is automatically published, and you can see your new style's\n main page. Associate it with a map ID to use it for your maps. For details,\n see [Associate a map ID to a map style](#associate-style-with-map-id).\n6. If you want to modify the style, click **Customize** , make changes,\n and click **Save**.\n\nPublish a style\n\nWhen you first create a new map style, that first instance of\nthe new map style is automatically published. After that, you save changes\nas a draft and when you're happy with the changes, you must publish.\n\n1. Make the changes to the map style or duplicated map style. For details, see\n [Change a style](#update-style).\n\n2. Click **Save** to save changes as a draft.\n\n3. When you're ready to publish and have your changes go live for any map IDs\n using that map style, click **Publish**.\n\nPublished versus Draft map styles\n\n**Published**: A published map style is live. Any maps that use the map style\ndisplay the published version of it.\n| **Note:** Style changes can take a few hours to propagate to your apps websites, and apps can take longer if the devices aren't connected to the internet. If you're still not seeing your style changes after a few hours, see [My style changes aren't updating](/maps/documentation/maps-static/cloud-customization/troubleshoot#style-delay).\n\n**Draft**: Draft versions of a map style are works in progress\nand aren't displayed in maps until you publish them.\n\nChange a style\n\nIf you want to make changes to your map style, you can make the changes right\nin the style editor. You have a couple of choices when you update a style:\n\n- **If you want changes to go live as soon as you're ready** : Click\n **Customize** and make your changes. Click **Save** to save your\n changes as a draft, and then click **Publish** when you are ready.\n\n- **If you want to test your changes in a test environment first** : Instead of\n making changes directly in the map style, duplicate the style first. For\n details, see [Duplicate a style](#duplicate-style) and\n [Test map style updates](/maps/documentation/maps-static/cloud-customization/test-style-updates).\n\nOnce you've created a map style, you can make changes to it on the style's\nmain page in any of the following ways:\n\n- **Edit** : Click **Customize**.\n\n- **Duplicate** : For details, see\n [Duplicate a style](/maps/documentation/maps-static/cloud-customization/map-styles#duplicate-style).\n\n- **Rename**: Rename the map style.\n\n- **Delete**: Delete the map style.\n\nAssociate your style to a map ID [Experimental](/maps/launch-stages#experimental) feature.\n\nAssociate your style to a map ID to display your custom style on your website\nand in your app. A map ID can have only one light style (roadmap type) and one\nscience dark style (roadmap dark type) associated with it.\n\nTo change the associated style for a map ID, do the following in the\nGoogle Cloud console:\n\n1. Go to **Map Management** and select a map ID.\n\n2. In the Map styles section, click **Change style** for a light or dark map style.\n\n The panel displays only styles with a roadmap map type for light styles, and\n only styles with a science roadmap dark map type for dark styles.\n3. In the panel, select one of the styles to associate to this map ID.\n\n4. Click **Done**.\n\n5. Click **Save** to apply all changes.\n\nTo use your cloud-based map style,\n[add the map ID to your app](../map-ids/get-map-id#add-a-map-id-to-your-app).\n\nNavigate on the preview map\n\nYou navigate on the preview map in the same way you navigate on any Google map:\n\n- Enter an address or location in the **Search Address** box.\n\n- Click the compass to center on your location. You may also have to grant\n location permissions.\n\n- Drag to move the map.\n\n- Zoom in or out using the plus (+) and minus (-).\n\nFind map features\n\nTo find a map feature that you want to style, you can use the filter or the map\ninspector.\n\nYou can also expand and collapse map feature categories to find the map\nfeature you want. Browse the list of map features at [What you can style on a map](/maps/documentation/maps-static/cloud-customization/taxonomy).\n\nFilter map features\n\nTo find map features using the filter, under **Map Features** , enter a\nterm in the **Filter** box.\n\nIf you can't find a map feature:\n\n- Don't use plurals. All of the categories are singular.\n\n- Try using a more generic term for the feature. For example, instead of\n \"pizza parlor\" or \"fast food,\" search for \"restaurant.\"\n\n- Try using a broader category, and then explore that category for the closest\n map feature. For example, instead of \"theater,\" search for \"entertainment.\"\n\nInspect map features\n\nTo find map features using the map inspector, perform the following steps:\n\n1. Left-click anywhere on the map to open the map inspector at your click point.\n\n2. Select a map feature in the map inspector to open it in the **Map Features** pane."]]